import lombok. SneakyThrows ;
import org. springframework. scheduling. annotation. Async ;
import org. springframework. stereotype. Service ;
@Service
public class BeforeCall {
@SneakyThrows
@Async
public void asyncBefore ( ) {
Thread . sleep ( 3000 ) ;
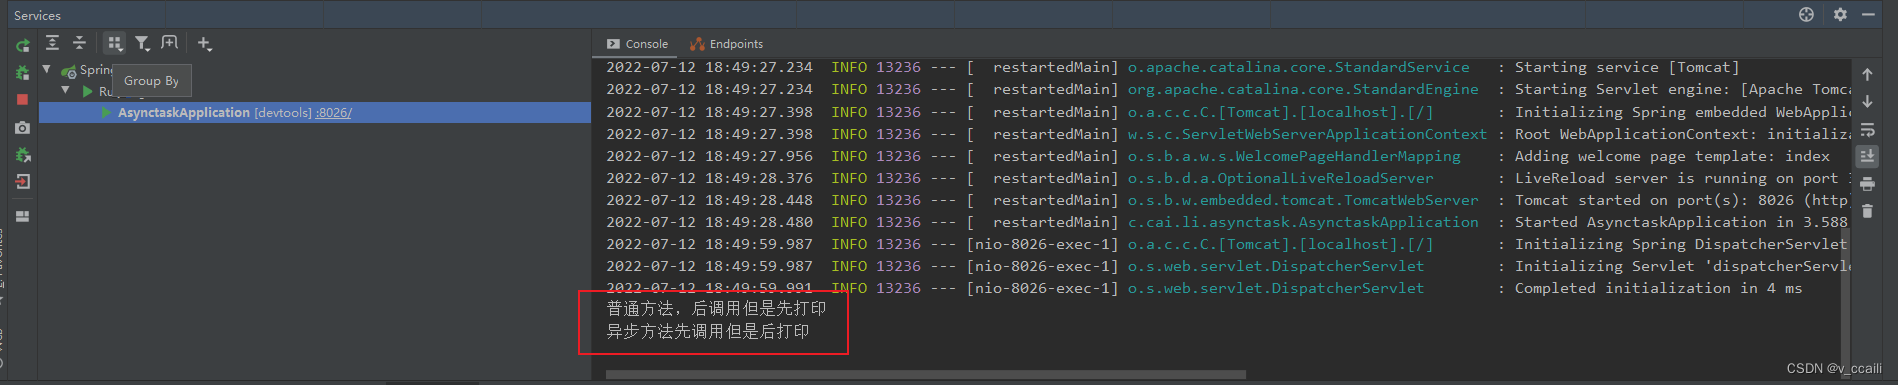
System . out. println ( "异步方法先调用但是后打印" ) ;
}
}
import org. springframework. stereotype. Service ;
@Service
public class AfterCall {
public void afcall ( ) {
System . out. println ( "普通方法,后调用但是先打印" ) ;
}
}
import com. cai. li. asynctask. service. AfterCall ;
import com. cai. li. asynctask. service. BeforeCall ;
import org. springframework. beans. factory. annotation. Autowired ;
import org. springframework. stereotype. Controller ;
import org. springframework. web. bind. annotation. RequestMapping ;
import org. springframework. web. bind. annotation. ResponseBody ;
@Controller
@ResponseBody
@RequestMapping ( "/test" )
public class DataController {
@Autowired
BeforeCall beforeCall;
@Autowired
AfterCall afterCall;
@RequestMapping ( "/asynctask" )
public void test ( ) {
beforeCall. asyncBefore ( ) ;
afterCall. afcall ( ) ;
}
}
import org. springframework. boot. SpringApplication ;
import org. springframework. boot. autoconfigure. SpringBootApplication ;
import org. springframework. boot. autoconfigure. jdbc. DataSourceAutoConfiguration ;
import org. springframework. scheduling. annotation. EnableAsync ;
@SpringBootApplication ( exclude = DataSourceAutoConfiguration . class )
@EnableAsync
public class AsynctaskApplication {
public static void main ( String [ ] args) {
SpringApplication . run ( AsynctaskApplication . class , args) ;
}
}
import lombok. SneakyThrows ;
public class First implements Runnable {
@SneakyThrows
@Override
public void run ( ) {
Thread . sleep ( 5000 ) ;
Second first = new Second ( ) ;
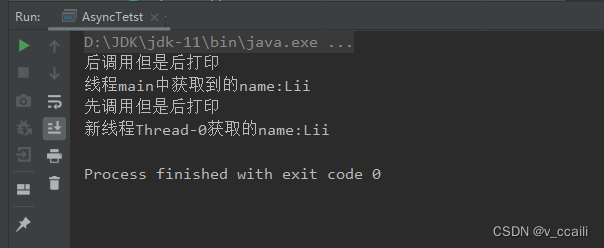
System . out. println ( "先调用但是后打印" ) ;
System . out. println ( "新线程" + Thread . currentThread ( ) . getName ( ) + "获取的name:" + first. name) ;
}
}
public class Second {
static String name;
public void Data ( String data) {
this . name = data;
System . out. println ( "后调用但是后打印" ) ;
System . out. println ( "线程" + Thread . currentThread ( ) . getName ( ) + "中获取到的name:" + name) ;
}
}
public class AsyncTetst {
public static void main ( String [ ] args) {
First first = new First ( ) ;
Second second = new Second ( ) ;
new Thread ( first) . start ( ) ;
second. Data( "Lii" ) ;
}
}


 3524
3524


 被折叠的 条评论
为什么被折叠?
被折叠的 条评论
为什么被折叠?
 到【灌水乐园】发言


