


1. IOC
Spring最成功的是其提出的理念,而不是技术本身。它所依赖的两个核心理念,
- 一个是控制反转(Inversion of Control,IoC),
- 另一个是面向切面编程(Aspect Oriented Programming,AOP)。
1.1 简介
IoC是一种通过描述来生成或者获取对象的技术,而这个技术不是Spring甚至不是Java独有的。对于Java初学者更多的时候所熟悉的是使用new关键字来创建对象,而在Spring中则不是,它是通过描述来创建对象。只是Spring Boot并不建议使用XML,而是通过注解的描述生成对象。
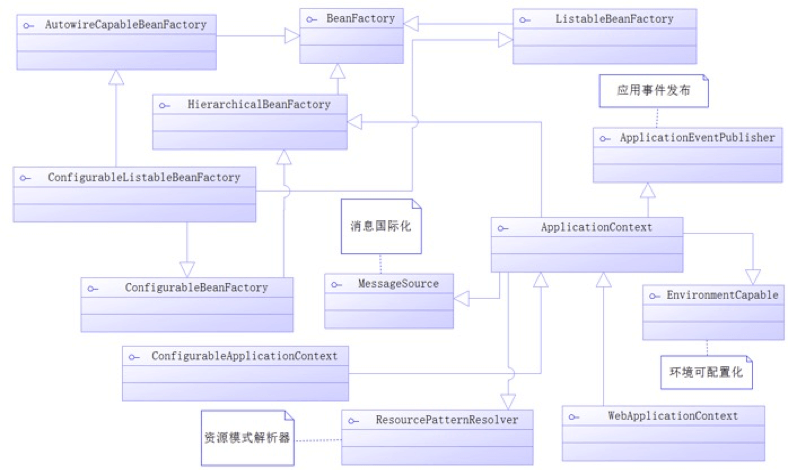
1.2 容器的功能
Spring还提供了依赖注入的功能,使得我们能够通过描述来管理各个对象之间的关系。
为了描述上述的班级、同学和老师这3个对象关系,我们需要一个容器。在Spring中把每一个需要管理的对象称为Spring Bean(简称Bean),而Spring管理这些Bean的容器,被我们称为Spring IoC容器(或者简称IoC容器)。IoC容器需要具备两个基本的功能:
- 通过描述管理Bean,包括发布和获取Bean;
- 通过描述完成Bean之间的依赖关系。
2. 装配Bean
2.1 扫描装配
对于扫描装配而言使用的注解是@Component和@ComponentScan。
# @Component('')
- 是标明哪个类被扫描进入Spring IoC容器,
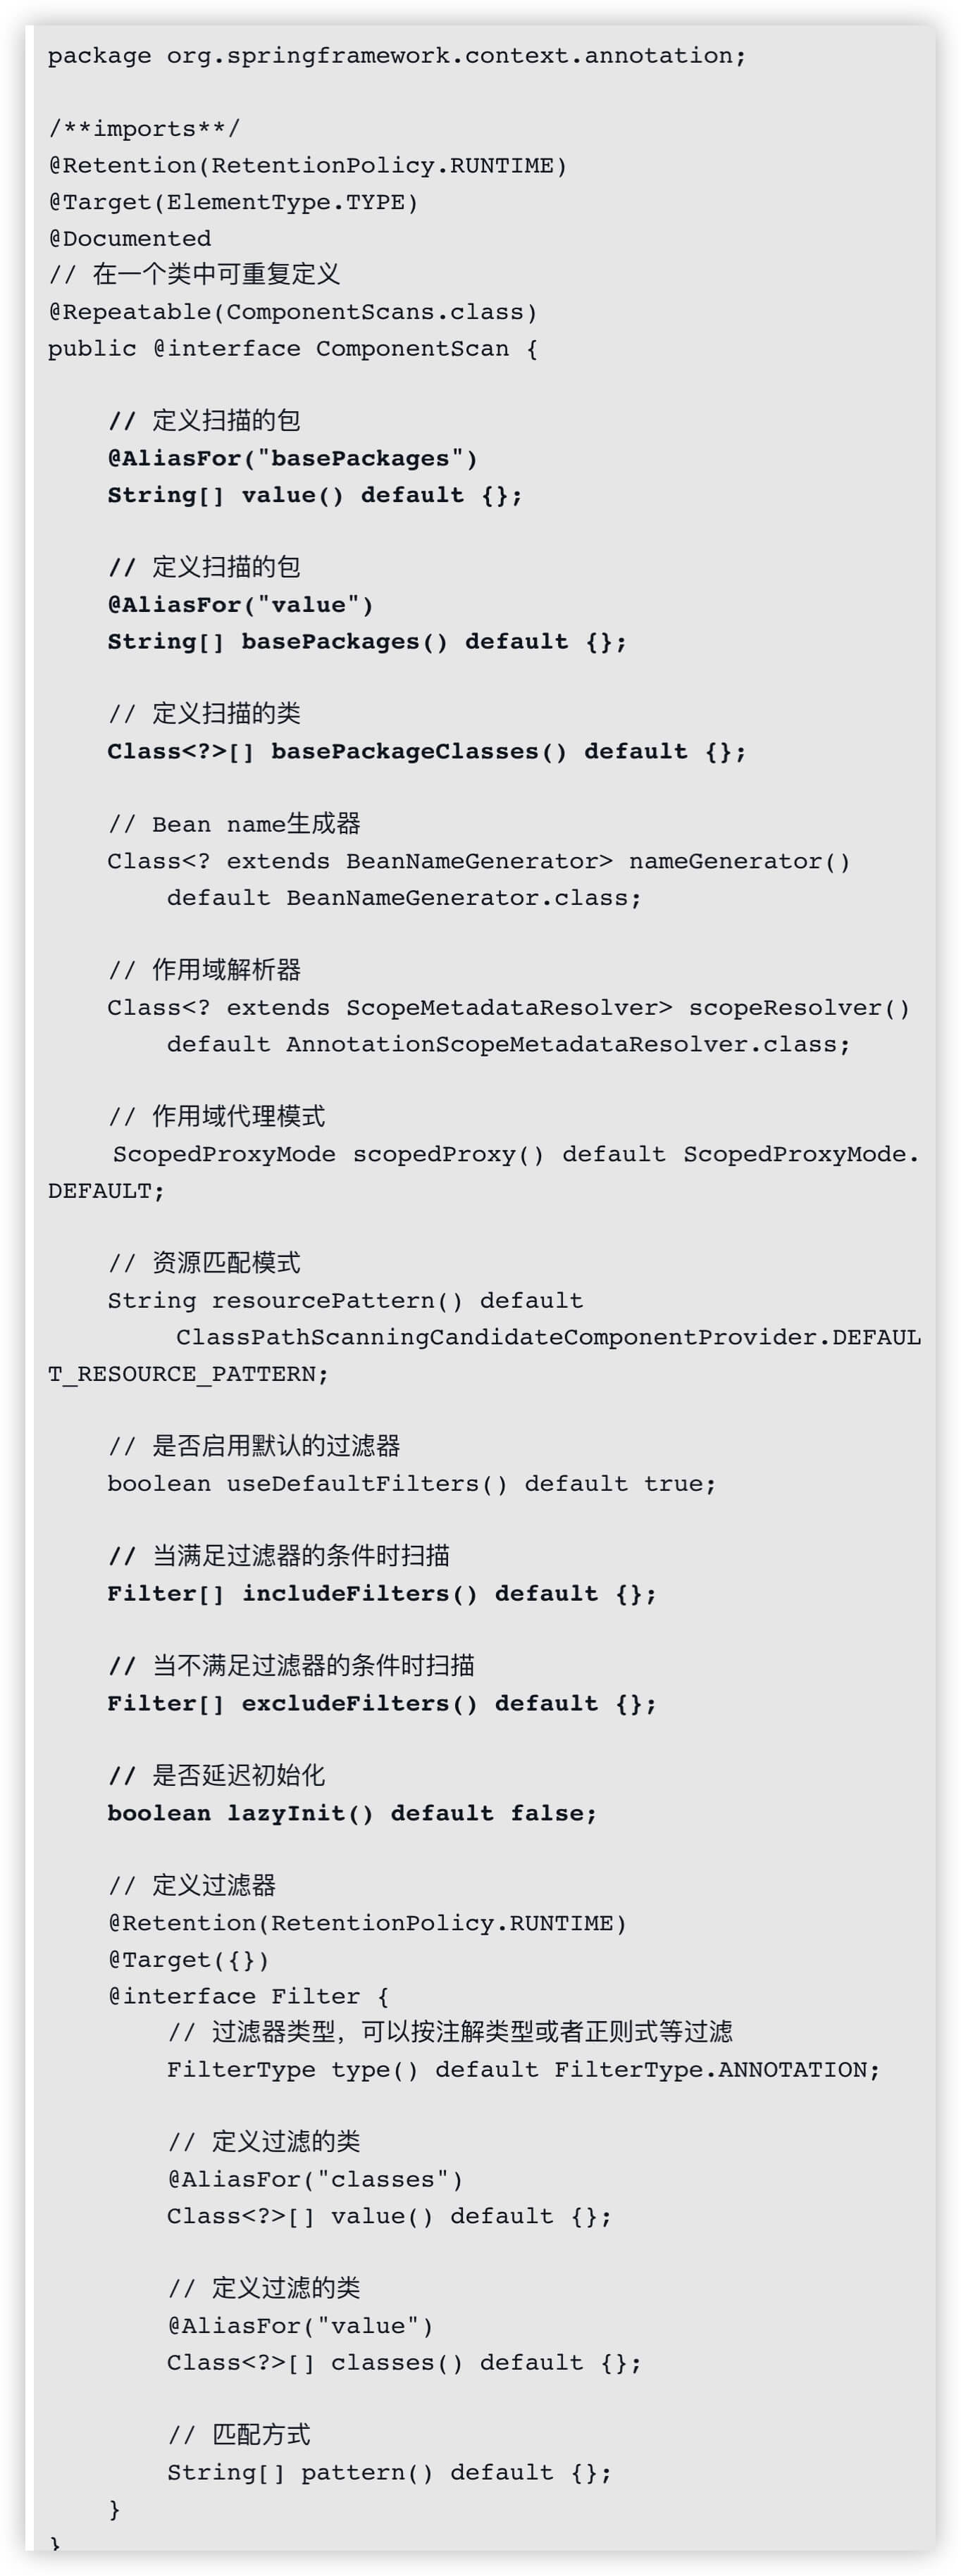
# @ComponentScan
- 则是标明采用何种策略去扫描装配Bean。
2.1.1 @Component
装配Bean 的名字
- 默认类名首字母小写作为名字
@Component('user')
2.1.2 @ComponentScan
扫描Bean
- 默认当前包和子包
自定义扫描包
2.2 自定义第三方Bean
作用:
现实的Java的应用往往需要引入许多来自第三方的包,并且很有可能希望把第三方包的类对象也放入到Spring IoC容器中,这时@Bean注解就可以发挥作用了。
2.2.1 @Bean
- 默认使用方法名称或者@Bean(name = “dataSource”)
- 配合@Configuration注解使用
@Configuration
public class AppConfig {

    @Bean(name = "dataSource")
    public DataSource getTestDataSource() {
    	return  null;
    }

}
2.3 依赖注入
IOC对于如何进行获取,还有一个作用没有谈及,那就是Bean之间的依赖,在Spring IoC的概念中,我们称为依赖注入(Dependency Injection,DI)。
2.3.1 @Autowired
- 根据属性的类型(by type)找到对应的Bean进行注入。
- 用在属性,方法上面。
- 必须是唯一的。
消除唯一性:
如果对应类型的Bean不是唯一的,那么它会根据其属性名称和Bean的名称进行匹配。如果匹配得上,就会使用该Bean;如果还无法匹配,就会抛出异常。
2.3.2 消除歧义性——@Primary和@Quelifier
@Primary:
- 在类上设置为主要的,优先注入。
@Quelifier:
- @Quelifier可以满足你的这个愿望。它的配置项value需要一个字符串去定义,它将与@Autowired组合在一起,通过类型和名称一起找到Bean。
@Autowired
@Qualifier(value = "dog")
3. 引入XML配置Bean
3.1 配置xml文件
- 定义POJO
package com.springboot.other.pojo;

import com.springboot.chapter3.pojo.definition.Animal;

public class Squirrel implements Animal {

	@Override
	public void use() {
		System.out.println("松鼠可以采集松果");
	}
}
- 写xml文件
<beans xmlns="http://www.springframework.org/schema/beans"
    xmlns:xsi="http://www.w3.org/2001/XMLSchema-instance"
    xsi:schemaLocation="http://www.springframework.org/schema/beans
       http://www.springframework.org/schema/beans/spring-beans.xsd">
       <bean id="squirrel" class="com.springboot.other.pojo.Squirrel"/>
</beans>
3.2 装配Bean-@ImportResource
@ImportResource(value = {"classpath:spring-other.xml"})
4. 使用属性文件
在Spring Boot中使用属性文件,可以采用其默认为我们准备的application.properties,也可以使用自定义的配置文件。
4.1 文件依赖
<dependency>
    <groupId>org.springframework.boot</groupId>
    <artifactId>spring-boot-configuration-processor</artifactId>
    <optional>true</optional>
</dependency>
配置文件写入
database.driverName=com.mysql.jdbc.Driver
database.url=jdbc:mysql://localhost:3306/chapter3
database.username=root
database.password=123456
4.2 读取
4.2.1 @Value
@Value("${database.driverName}")
private String driverName = null;
4.2.2 @ConfigurationProperties( “database”)
注解@ConfigurationProperties中配置的字符串database,将与POJO的属性名称组成属性的全限定名去配置文件里查找,这样就能将对应的属性读入到POJO当中。
@ConfigurationProperties( "database")
public class DataBaseProperties {

  private String driverName = null;

}
4.3 使用其他配置文件
@PropertySource(value = {"classpath:jdbc.properties"},ignoreResourceNotFound = true)
5. 条件装配Bean
一个注解,一个接口
- 接口返回Boolean值,为正加载Bean。
// 注解
@Conditional(DatabaseConditional.class)
//接口 Condition

public class DatabaseConditional implements Condition {

	public boolean matches(ConditionContext context, AnnotatedTypeMetadata metadata) {
		Environment env = context.getEnvironment();
		return env.containsProperty("database.driverName") && env.containsProperty("database.url")
				&& env.containsProperty("database.username") && env.containsProperty("database.password");
	}

}
6. Bean的作用域
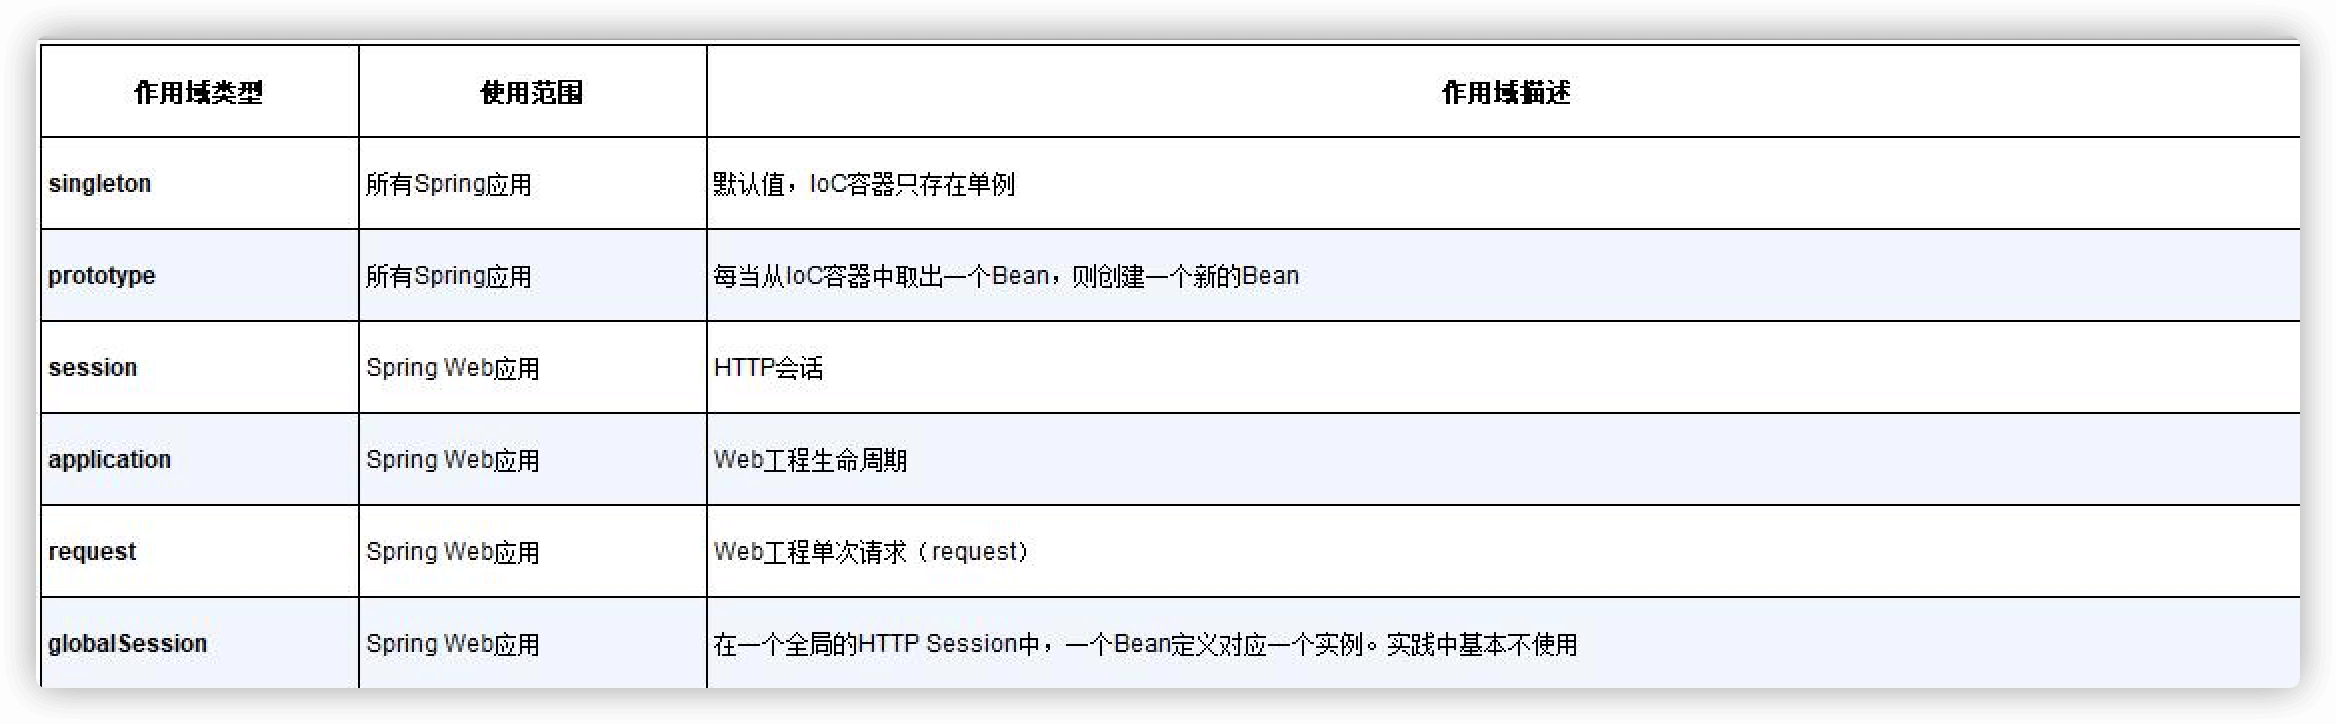
6.1 @Scope
@Scope(ConfigurableBeanFactory.SCOPE_SINGLETON)
public class DatabaseConditional implements Condition {

}
7. 使用@Profile切换开发环境
7.1 设置运行环境
JAVA_OPTS="-Dspring.profiles.active=dev"
7.2 @Profile 配置如何生效
在Spring中存在两个参数可以提供给我们配置,以修改启动Profile机制,
- 一个是spring.profiles.active,
- 另一个是spring.profiles.default。
在这两个属性都没有配置的情况下,Spring将不会启动Profile机制,这就意味着被@Profile标注的Bean将不会被Spring装配到IoC容器中。
7.2.1 优先级
Spring是先判定是否存在spring.profiles.active配置后,再去查找spring.profiles.default配置的,所以spring.profiles.active的优先级要大于spring.profiles.default。
7.3 使用@Profile添加Bean
@Bean(name = "dataSource", destroyMethod = "close") @Profile("test") public DataSource getTestDataSource() { Properties props = new Properties(); props.setProperty("driver", "com.mysql.jdbc.Driver"); props.setProperty("url", "jdbc:mysql://localhost:3306/test_spring_boot"); props.setProperty("username", "root"); props.setProperty("password", "123456"); DataSource dataSource = null; try { dataSource = BasicDataSourceFactory.createDataSource(props); } catch (Exception e) { e.printStackTrace(); } return dataSource; }
7.4 属性配置(properties)文件
在Spring Boot中还存在一个约定,假设把选项-Dspring.profiles.active配置的值记为{profile},则它会用application-{profile}.properties文件去代替原来默认的application.properties文件,
8. 使用Spring EL
@Value("#{T(System).currentTimeMillis()}")private Long initTime = null;
注意,这里采用#{…}代表启用Spring表达式,它将具有运算的功能;
T(…)代表的是引入类;System是java.lang.*包的类,


 947
947


 被折叠的 条评论
为什么被折叠?
被折叠的 条评论
为什么被折叠?
 到【灌水乐园】发言


