


今天将学习三大框架的Spring!
Spring
spring是一个开源框架,为了解决企业应用开发的复杂性而创建,但是现在已经不仅应用于企业应用。是一个轻量级的控制反转(Ioc)和面向切面(Aop)的容器框架。
- 从大小与开销两方面是轻量级。
- 通过控制反转(Ioc)来达到松耦合的目的。
- 提供了面向切面编程的支持,允许通过分离应用的业务逻辑与系统级服务进行内聚性开发。
- 包含并管理应用对象的配置和生命周期,这个意义上是个容器。
- 将简单的组件,配置成复杂的应用,这就是框架。
面向接口编程
- 结构设计中,分清层次及调用关系,每层只向外(上层)提供一组功能接口,各层间仅依赖接口而非实现类。
- 接口实现的变动,不影响各层的调动。
- 面向接口编程, “接口”是隐藏具体实现和实现多态性的组件。
面向接口编程小例子
public interface TestInterface {
	void show(String word);

}
public class TestInterfaceImpl implements TestInterface{
@Override
public void show(String word) {
// TODO Auto-generated method stub
System.out.println(word);
}
}
public static void main(String[] args) {
			TestInterface ti = new TestInterfaceImpl();
			ti.show("66666666666");
		}
Ioc
控制反转,控制权转移,应用程序不依赖对象的创建和维护,而是由外部容器负责创建和维护。DI(依赖注入)是实现方式的一种,目的是创建对象和组建对象的关系。
Sping注入
spring注入是指在启动Spring容器加载bean配置的时候,完成对变量的赋值行为。
常用注入方式
- 设值注入(Ioc容器使用属性的setter方法来注入被依赖的实例)
- 构造注入(Ioc容器使用构造器来注入被依赖的实例)
设置注入代码如下:
public interface Axe {
   public String shop();
}
public interface Person {
	public void useAxe();

}
public class StoneAxe implements Axe{
@Override
public String shop() {
// TODO Auto-generated method stub
return "用石头斧子";
}
}public class Cinese implements Person {
private String name;
private Axe axe;
@Override
public void useAxe() {
// TODO Auto-generated method stub
System.out.println("我是"+name+"用"+axe.shop());
}
public String getName() {
return name;
}
public void setName(String name) {
this.name = name;
}
public Axe getAxe() {
return axe;
}
public void setAxe(Axe axe) {
this.axe = axe;
}
}
下面看配置:
<bean id="Cinese" class="com.example.test.Cinese">
<property name="axe" ref="StoneAxe"/>
<property name="name" value="liu"/>
</bean>
<bean id="StoneAxe" class="com.example.test.StoneAxe"></bean>
注意:配置下标签,如果属性的值是某个实现类的实例,要ref;如果是某个具体值需要的是value。class:指定该类的实现类,此处不可以用接口,必须是实现类,Spring容器会使用xml解析器读取该属性值,并利用反射来创建该实现类的实例。
public class Cinese implements Person {
	private String name;
	private Axe axe;
	public Cinese(String name, Axe axe) {
		super();
		this.name = name;
		this.axe = axe;
	}

	@Override
	public void useAxe() {
		// TODO Auto-generated method stub
		System.out.println("我是"+name+"用"+axe.shop());

	}
}
需要构造注入的属性一定要覆盖该属性的构造方法。
配置代码如下:
<bean id="Cinese" class="com.example.test.Cinese">
<constructor-arg ref="StoneAxe"/>
<constructor-arg value="liu"/>
</bean>
<bean id="StoneAxe" class="com.example.test.StoneAxe"></bean>
Bean配置项
- id:在整个ioc容器,唯一标识。
- class:具体实例化的类。
- scope:作用域。
- constructor arguments:构造器参数。
- properties:属性。
- autowiring mode:自动装配模式。
- lazy-initialization mode:懒加载。
- initialization/destruction method:初始化,销毁。
Bean作用域
- singleton:单例,指一个Bean容器中只存在一份。(默认作用域)
- propotype:每次请求(每次使用)创建新的实例,destory方式不生效。
- request:每次http请求创建一个实例且仅在当前request内有效。
- session:同上,每次http请求创建,当前session有效。
- global session:基于portlet的web中有效(portlet定义了global session),如果是在web中,同session。
Bean生命周期
- 定义
- 初始化
- 使用
- 销毁
bean初始化两种方法:
- 提供初始化、销毁方法,在配置文件中配置。
public class BeanLife {

	public void init(){
		System.out.println("spring 开始初始化!!");
	}

	public void destory(){
		System.out.println("spring 开始销毁!!!");
	}

}
配置信息:
<bean id="BeanLife" class="com.example.test.BeanLife" init-method="init" destroy-method="destory"></bean>- 实现接口。
public class BeanLife implements InitializingBean,DisposableBean {

	@Override
	public void destroy() throws Exception {
		// TODO Auto-generated method stub

	}

	@Override
	public void afterPropertiesSet() throws Exception {
		// TODO Auto-generated method stub

	}
}
全局默认初始化:
还是在一个bean中提供初始化和销毁的方法。
配置信息 :
<beans
	xmlns="http://www.springframework.org/schema/beans"
	xmlns:xsi="http://www.w3.org/2001/XMLSchema-instance"
	xmlns:p="http://www.springframework.org/schema/p"
	xsi:schemaLocation="http://www.springframework.org/schema/beans http://www.springframework.org/schema/beans/spring-beans-3.1.xsd"
	default-init-method="init" default-destroy-method="destory">
在上述几个初始化,实现接口的方式优先级最高。
Bean的Aware接口
- ApplicationContextAware 获取Bean容器上下文
- BeanNameAware 获取Bean的id
Bean自动装配
- No:不做任何操作。(默认转载模式)
- byName:就是通过Bean的属性名字进行自动装配,在Spring的配置文档XML中,找到一个要装配同样名字的Bean。
该装载模式,主要用于设值注入,在实现类中提供相应的set方法,主要和设值注入不同,就是配置。配置如下:
<beans
	xmlns="http://www.springframework.org/schema/beans"
	xmlns:xsi="http://www.w3.org/2001/XMLSchema-instance"
	xmlns:p="http://www.springframework.org/schema/p"
	xsi:schemaLocation="http://www.springframework.org/schema/beans http://www.springframework.org/schema/beans/spring-beans-3.1.xsd"
    default-autowire="byName"
	>
<bean id="Cinese" class="com.example.test.Cinese">
<property name="name" value="liu"/>
</bean>
<bean id="stoneAxe" class="com.example.test.StoneAxe"></bean>
</beans>- byType:就是如果XML中正好有一个与属性类型一样的Bean,就自动装配这个属性。如果有多这样的Bean,就报错。如果找不到Bean,则什么事都不发生。
<beans
	xmlns="http://www.springframework.org/schema/beans"
	xmlns:xsi="http://www.w3.org/2001/XMLSchema-instance"
	xmlns:p="http://www.springframework.org/schema/p"
	xsi:schemaLocation="http://www.springframework.org/schema/beans http://www.springframework.org/schema/beans/spring-beans-3.1.xsd"
    default-autowire="byType"
	>
<bean id="Cinese" class="com.example.test.Cinese">
<property name="name" value="liu"/>


</bean>
<bean class="com.example.test.StoneAxe"></bean>
<bean id="BeanLife" class="com.example.test.BeanLife"></bean>
</beans>
- Constructor:就是根据构造函数的参数自动装配。
<?xml version="1.0" encoding="UTF-8"?>
<beans
	xmlns="http://www.springframework.org/schema/beans"
	xmlns:xsi="http://www.w3.org/2001/XMLSchema-instance"
	xmlns:p="http://www.springframework.org/schema/p"
	xsi:schemaLocation="http://www.springframework.org/schema/beans http://www.springframework.org/schema/beans/spring-beans-3.1.xsd"
    default-autowire="constructor"
	>
<bean id="Cinese" class="com.example.test.Cinese"></bean>
<bean class="com.example.test.StoneAxe"></bean>
<bean id="BeanLife" class="com.example.test.BeanLife"></bean>
</beans>
public class Cinese implements Person {
private StoneAxe stoneAxe;
public Cinese(StoneAxe stoneAxe) {
super();
this.stoneAxe = stoneAxe;
}
@Override
public void useAxe() {
// TODO Auto-generated method stubhy
System.out.println("用"+stoneAxe.shop());
}
}
Ioc容器首先会进行构造器的寻找,然后根据构造器的参数类型,去找相应的Bean,即完成装配。
总结:
在bean配置文件里设置autowire属性进行自动装配将会装配bean的所有属性,然而,若只希望装配个别属性时,autowire就不够灵活了。
autowire属性要么根据类型自动装配,要么根据名称自动装配,不能两者兼而有之
一般情况下,在实际的项目中很少使用自动装配功能,因为和自动装配功能所带来的好处比起来,明确清晰的配置文档更有说服力。
一般情况下,在实际的项目中很少使用自动装配功能,因为和自动装配功能所带来的好处比起来,明确清晰的配置文档更有说服力。
Resourse
是针对资源文件的统一接口,Spring通过它来调用资源文件。
Resourse分类
- UrlResource:url对应的资源,根据一个url地址即可构建。
- ClassPathResource:获取类路径下的资源文件。
- FileSystemResource:获取文件系统里面对的资源。
- ServletContextResource:ServletContext封装的资源,用来访问ServletContext环境下的资源。
- InputStreamResource:针对于输入流封装的资源。
- ByteArrayResource:针对于字节数组封装的资源。
ResourceLoader:资源加载类。
下面是具体的代码:
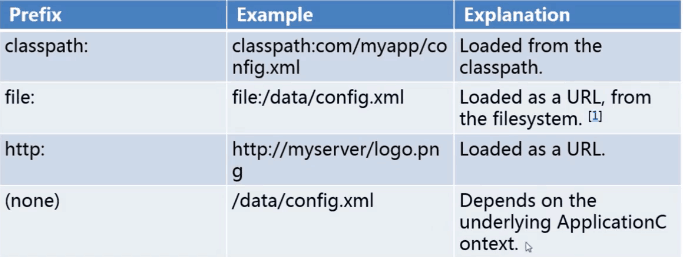
Resource s = context.getResource("classpath:com/example/test/config1.txt");
		System.out.println(s.getFilename());
		try {
			System.out.println(s.contentLength());
		} catch (IOException e) {
			// TODO Auto-generated catch block
			e.printStackTrace();
		}
注意:如果你在项目下添加资源文件,采用的前缀是classpath。如果在默认不加的情况,是按照classpath查找。前缀file是外部文件;http是网络资源。
类的自动检测与注册bean
从spring3.0开始,提供java而不是xml定义bean,通过用注解来提供,比如:@configuration,@bean,@import,@dependson。@component是一个通用的注解,可用于任何bean,@respository,@service,@contrSoller是更有针对性的注解,这三个注解基于@component 。
@repository通常用注解dao类,即持久层,
@Service通常用于注解Service类,即服务层 ,
@controller通常用于controller类,即控制层(mvc)。
@controller通常用于controller类,即控制层(mvc)。
扫描过程中组件被自动检测,那么bean名称是由BeanNameGenerator生成的(@component,@repository,@service,@controller都会有个name属性用来显示设置Bean Name),如果没有name属性,默认的bean name 就是Bean类,将首单词小写作为name,如果要实现自定义bean命名策略,实现BeanNameGenerator接口,并一定要包含一个无参构造函数。
通过注解来实现bean的作用域,其中注解默认作用域的值是prototype,也可以自定义scope策略,实现scopemetadataResolver接口并提供一个无参构造器
通过注解来实现bean的作用域,其中注解默认作用域的值是prototype,也可以自定义scope策略,实现scopemetadataResolver接口并提供一个无参构造器
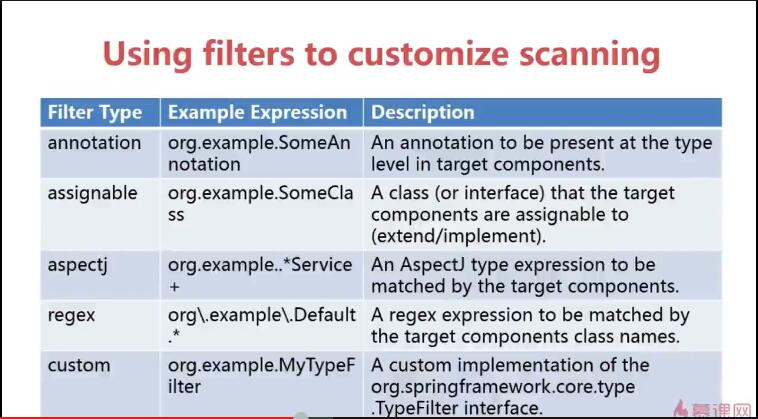
使用过滤器进行扫描:
下面具体代码实现:
package com.example.test;

import org.springframework.context.annotation.Scope;
import org.springframework.stereotype.Component;
@Scope()
@Component
public class TestAnnocation {
       public void test(){
    	   System.out.println("我不是xml注册的bean");
       }
       public void myHashcode(){
    	   System.out.println(this.hashCode());
       }
}
applicationxml配置文件:
<?xml version="1.0" encoding="UTF-8"?>
<beans
	xmlns="http://www.springframework.org/schema/beans"
	xmlns:xsi="http://www.w3.org/2001/XMLSchema-instance"
	xmlns:p="http://www.springframework.org/schema/p"
	xmlns:context="http://www.springframework.org/schema/context"
	xsi:schemaLocation="http://www.springframework.org/schema/beans
	 http://www.springframework.org/schema/beans/spring-beans-3.1.xsd
	 http://www.springframework.org/schema/context
	 http://www.springframework.org/schema/context/spring-context.xsd"
          default-autowire="constructor"
	>
	<context:component-scan base-package="com.example.test"/>
</beans>@required @autowired 自动装配
@required注解适用bean属性的setter方法,这个注解仅仅表示,受影响的bean属性必须在配置时被填充,通过在bean定义或通过自动转配一个明确属性值。在现在的开发中,用的多的是@Autowired注解可以用于构造器、setter、成员变量。
在默认情况下,如果因找不到合适的bean将会导致自动装载失败抛出异常,可以通过下面的方式避免
	 @Autowired(required =false)
	public Cinese(StoneAxe stoneAxe) {
		super();
		this.stoneAxe = stoneAxe;
	}
每个类只能有一个构造器被标记required=true。
下面具体代码实现:
package com.example.test;

import org.springframework.beans.factory.annotation.Autowired;
import org.springframework.stereotype.Component;
@Component
public class Cinese implements Person {
	 @Autowired
	private StoneAxe stoneAxe;
	 @Autowired
	public Cinese(StoneAxe stoneAxe) {
		super();
		this.stoneAxe = stoneAxe;
	}


	@Override
	public void useAxe() {
		// TODO Auto-generated method stubhy
		System.out.println("用"+stoneAxe.shop());

	}

	public StoneAxe getStoneAxe() {
		return stoneAxe;
	}
	 @Autowired
	public void setStoneAxe(StoneAxe stoneAxe) {
		this.stoneAxe = stoneAxe;
	}
}
可以使用@autowired注解那些众所周知的接口,就可以使用它的实例。比如BeanFactory、ApplicationContext、Environment、ResourceLoader。
可以通过添加注解给需要该类型的数组的字段或方法,以提供ApplicationContext中的所有特定类型的bean,也可以用于装配key为String的Map,如果希望数组有序,可以让bean实现ordered接口或者@order注解。仅限于数组,map不行。
下面是具体代码:
public interface BeanInterface {

}
@Component
@Order(1)
public class BeanInterfaceImplone implements BeanInterface {

}
@Component
@Order(2)
public class BeanInterfaceImpltwo implements BeanInterface {

}
@Component
public class BeanInvoker {
	@Autowired
	private List<BeanInterface> list ;

	private Map<String, BeanInterface>  map ;
	public void say(){
	/*	for(int i =0;i<list.size();i++){
			System.out.println(list.get(i).getClass().getName());
		}*/
		for(BeanInterface bean :list){
			System.out.println(bean.getClass().getName());
		}

	}
	public void say1() {
		// TODO Auto-generated method stub
       for(Map.Entry<String,BeanInterface> entry: map.entrySet()){
    	   System.out.println(entry.getKey()+"   "+entry.getValue().getClass().getName());
       }
	}

}
@autowired自动装载List泛型对象,如果是接口,就自动装载接口实现类的对象,所以在接口实现类要添加@componment。
@qualifter和@resource
按类型自动装配可能有多个bean实例的情况,可以使用spring的@qualifiter注解缩小范围(或者指定唯一),也可以用于指定单独对的构造器参数或者方法参数。
@autowired通常用于按类型进行自动装配。
@autowired和@qualifter一起使用是按照name进行自动装配。@qualifter的value是引用的bean的name,如果是自动扫描的就是bean类名的第一个字母小写。
@Resource注解,JSR-250标准注解,推荐使用它来代替Spring专有的@Autowired注解。@Resource的作用相当于@Autowired,只不过@Autowired按byType自动注入,而@Resource默认按byName自动注入罢了。@Resource有两个属性是比较重要的,分别是name和type,Spring将 @Resource注解的name属性解析为bean的名字,而type属性则解析为bean的类型。所以如果使用name属性,则使用byName的自动注入策略,而使用type属性时则使用byType自动注入策略。如果既不指定name也不指定type属性,这时将通过反射机制使用byName自动注入策略。@resourse没有显示name时,如果定义在set方法上,就是set方法的方法名,如果定义在变量上,就是该变量的名称。
@autowired适用于fields,constructors,multi-argument methods这些允许在参数级别使用@qualifiter注解缩小范围的情况。
@resources适用于成员变量,只有一个参数的setter方法,所以在目标是构造器或者一个多参数方法时,最好的方式是使用qualifiter。
	@Autowired
	@Qualifier("beanInterfaceImplone")
	private BeanInterface bean;
@bean
SpringIoc容器管理的新对象的方法,类似xml配置文件呢的<bean>
可以在spring的@configuration注解的类中使用@bean注解任何方法。
可以在spring的@configuration注解的类中使用@bean注解任何方法。
例子代码如下:
public interface Store {

}
public class StringStore implements Store {
	private void init() {
		// TODO Auto-generated method stub
    System.out.println("this is init");
	}
	private void destory() {
		// TODO Auto-generated method stub
	    System.out.println("this is destory");

	}

}
@Configuration
public class StoreConfig {
	@Bean(name="stringstore",initMethod="init",destroyMethod="destory")
	public StringStore getStringStore(){
		return new StringStore();
	}

}@ImportResource与@value
我们该如何在spring用注解引进资源属性文件,properties文件中存放的属性是按key、value,例如数据库连接信息。代码如下:
在当前包下添加一个属性文件

在spring文件中引入资源属性文件
<beans
	xmlns="http://www.springframework.org/schema/beans"
	xmlns:xsi="http://www.w3.org/2001/XMLSchema-instance"
	xmlns:p="http://www.springframework.org/schema/p"
	xmlns:context="http://www.springframework.org/schema/context"
	xsi:schemaLocation="http://www.springframework.org/schema/beans
	 http://www.springframework.org/schema/beans/spring-beans-3.1.xsd
	 http://www.springframework.org/schema/context
	 http://www.springframework.org/schema/context/spring-context.xsd"

	>
	<context:component-scan base-package="com.example.test"/>
	<context:property-placeholder location="classpath:com/example/test/config.properties"/>
</beans>
public class MyJdbcInfo {
private String url;
private String username;
private String userpass;
public MyJdbcInfo(String url, String username, String userpass) {
super();
this.url = url;
this.username = username;
this.userpass = userpass;
System.out.println(this.url+this.username+this.userpass);
}
}@Configuration
@ImportResource("classpath:applicationContext.xml")
public class JdbcConfig {
@Value("${url}")
private String url;
@Value("${jdbc.username}")
private String username;
@Value("${userpass}")
private String userpass;
@Bean(name="jdbc")
public MyJdbcInfo getMyJdbcInfo(){
return new MyJdbcInfo(url, username, userpass);
}
}通过@value将属性文件值赋给对应属性值。
@scope
这个注解主要用于bean的作用域和代理模式。
@Scope(value="prototype",proxyMode=ScopedProxyMode.DEFAULT)基于注解的泛型自动装配
public interface Store<T> {

}
public class StringStore implements Store<String> {
	private void init() {
		// TODO Auto-generated method stub
    System.out.println("this is init");
	}
	private void destory() {
		// TODO Auto-generated method stub
	    System.out.println("this is destory");

	}

}
public class IntegerStore implements Store<Integer>{
}
@Configuration
public class StoreConfig {
	/*@Bean(name="stringstore",initMethod="init",destroyMethod="destory")
	public StringStore getStringStore(){
		return new StringStore();
	}*/
	@Resource(name="string")
	private Store<String> ss;
	@Resource(name="integer")
	private Store<Integer>is;
	@Bean(name="string")
	public StringStore getStringStore(){
		return new StringStore();
	}
	@Bean(name="integer")
	public IntegerStore getiIntegerStore(){
		return new IntegerStore();
	}
	@Bean(name="teststore")
	public StringStore testStore(){
		System.out.println(ss.getClass().getName()+"        "+is.getClass().getName());
		return new StringStore();
	}


}
需要注意这里泛型自动装配的时候为啥不用@autowired,原因下面的bean有两个返回类型一致,会导致自动装配失败。
jsr中@resourse以及初始化回调和销毁回调
@Repository
public class JslDao {
	public void save(){
		System.out.println("this is  a method");
	}

}
@Service
public class JslService {
@Resource
private JslDao dao;
public void save(){
dao.save();
}
@PostConstruct
public void init(){
System.out.println("init");
}
@PreDestroy
public void destory(){
System.out.println("destory");
}
}
使用jsr330标准注解
@inject等效于@autowired,可以使用于类、属性、方法、构造器。
如果想使用特定名称进行依赖注入,使用@name。
@name与@componment在类注解上是等效的,可以定义一个bean。
如果想使用特定名称进行依赖注入,使用@name。
@name与@componment在类注解上是等效的,可以定义一个bean。
@Named
public class JslService {
@Inject
   private JslDao dao;

   public void save(){
	   dao.save();
   }
   @PostConstruct
   public void init(){
	   System.out.println("init");
   }
   @PreDestroy
   public void destory(){
	   System.out.println("destory");
   }
}
@Named
public class JslService {
@Inject
private JslDao dao;
public void save(){
dao.save();
}
@PostConstruct
public void init(){
System.out.println("init");
}
@PreDestroy
public void destory(){
System.out.println("destory");
}
}


 5万+
5万+

 被折叠的 条评论
为什么被折叠?
被折叠的 条评论
为什么被折叠?
 到【灌水乐园】发言


