


今天我们将学习项目管理利器-maven,更好的管理项目。
Maven 是基于项目对象模型(POM),可以通过一小段描述信息来管理项目的构件、报告和文档的软件项目管理工具。
Maven环境配置(基于window)
- 首先到maven官网下载压缩文件,解压到自己目录下。
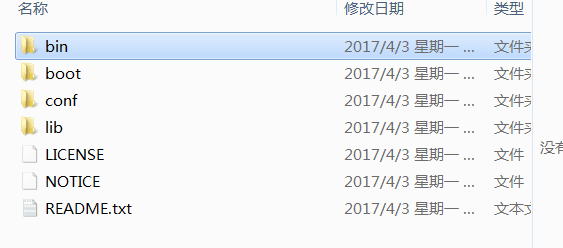
bin目录包含mav的运行脚本,cmd中命令行可以调用
boot目录包含一个类加载器的框架,maven使用它来加载自己的类库
conf是配置文件目录,比如以后要经常用到的 settings.xmls
lib中包含了所有maven运行时所需要的类库,除了自身的还有第三方的。
boot目录包含一个类加载器的框架,maven使用它来加载自己的类库
conf是配置文件目录,比如以后要经常用到的 settings.xmls
lib中包含了所有maven运行时所需要的类库,除了自身的还有第三方的。
- 进入环境变量配置,在系统变量中,添加M2_HOME 对应就是下载文件解压路径。然后在系统变量中path,在原有的末尾添加;%M2_HOME%\bin。
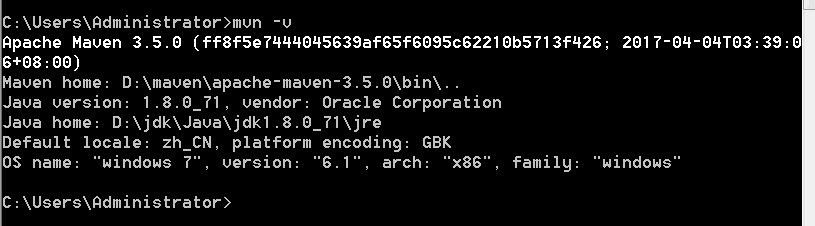
- 在cmd输入 mvn -v,出现以下,即为配置成功。
maven文件目录结构

第一个mevan案例
按照上面的文件格式建工程,然后在项目工程的根目录下放pom.xml文件。
pom.xml
<project xmlns="http://maven.apache.org/POM/4.0.0"
        xmlns:xsi="http://www.w3.org/2001/XMLSchema-instance"
        xsi:schemaLocation="http://maven.apache.org/POM/4.0.0
         http://maven.apache.org/xsd/maven-4.0.0.xsd">
	<modelVersion>4.0.0</modelVersion>
	<groupId>com.example.test</groupId>
	<artifactId>maven01-test</artifactId>
	<version>0.0.1SNAPSHOT</version>
    <dependencies>
	<dependency>
	<groupId>junit</groupId>
        <artifactId>junit</artifactId>
	<version>4.10</version>
	</dependency>
    </dependencies>
</project>
groupId 定义了项目属于哪个组,就是你整个工程的总包。
artifactId 定义了当前Maven项目在组织中唯一的ID, 可以理解为项目中的模块, 模块为Maven中最小单位构件
version 项目的版本
dependency是该工程中所依赖jar
在window下,打开cmd进入到该工程目录,
构建maven ,输入mvn compile,进行编译,第一次安装maven,进行编译,会下载很多依赖、工具等。编译成功如下:
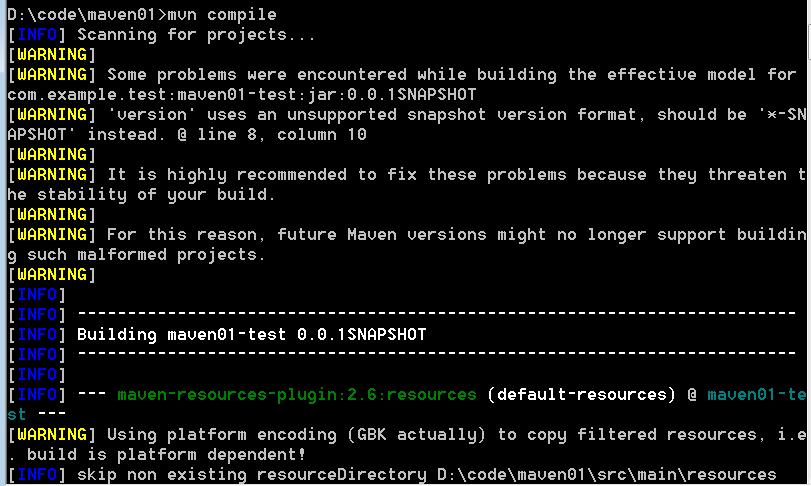
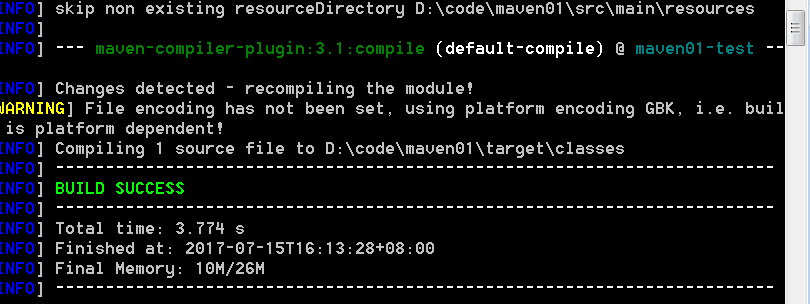
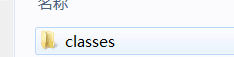
在编译成功时,该工程下会出现编译类的class文件。
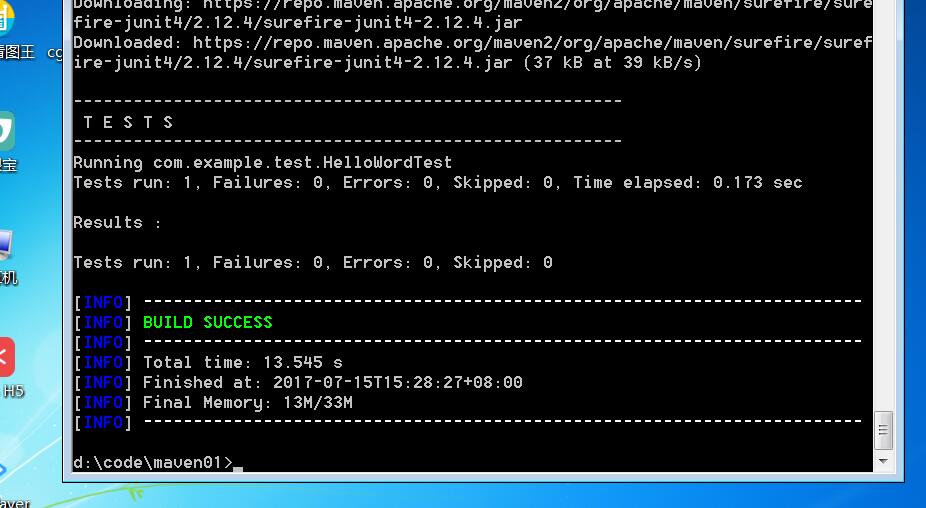
构建成功之后,就是测试运行程序(测试运行借助单元测试,必须将测试类放在test包下),输入 mvn test。
利用maven,打包工程,输入 mvn package。在该工程下面的target文件出现打包好的jar。

maven命令-clean
在该工程下输入mvn clean,就是将该工程在maven编译下生成的target删除。
maven命令-install
我们在上面一个工程上,在新建一个简单的工程,主要是在该工程下,引用上面工程的方法。通过maven构建发现报错如下:
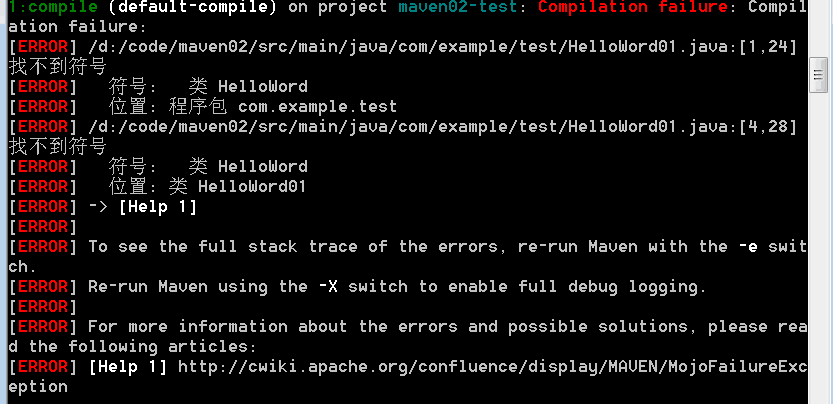
问题出现的问题就是找不到上个工程,平常我们会导入相应的jar,但是maven提供简单方法,就是install。通过这个命令可以将需要的jar文件,发布到本地仓库中。
具体做法如下:
先执行mvn install,这个命令要在被引用工程下执行。(就是2引用1,在1下执行)。
然后在新工程下的pom.xml修改坐标,如图所示:
<project xmlns="http://maven.apache.org/POM/4.0.0"
        xmlns:xsi="http://www.w3.org/2001/XMLSchema-instance"
        xsi:schemaLocation="http://maven.apache.org/POM/4.0.0
                        http://maven.apache.org/xsd/maven-4.0.0.xsd">
	<modelVersion>4.0.0</modelVersion>
	<groupId>com.example.test</groupId>
	<artifactId>maven02-test</artifactId>
	<version>0.0.1SNAPSHOT</version>
	<dependencies>
	<dependency>
	<groupId>junit</groupId>
       <artifactId>junit</artifactId>
	<version>4.10</version>
	</dependency>
	<dependency>
	<groupId>com.example.test</groupId>
	<artifactId>maven01-test</artifactId>
	<version>0.0.1SNAPSHOT</version>
	</dependency>
	</dependencies>
</project> archetype插件自动建立目录骨架
archetype插件,用于创建符合maven规定的目录骨架。
下面是cmd执行过程:
先在cmd进入到项目文件位置,在cmd输入mvn archetype generate:
需要注意的,第一次使用archetype需要耐心等待一下,需要下载一些依赖。
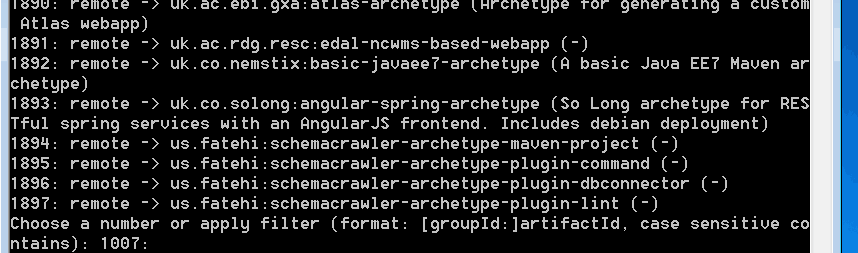
出现上述,单击回车键,出现下面选择maven版本:
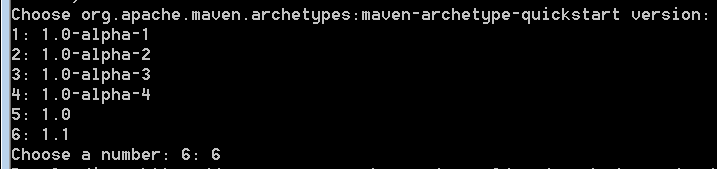
单击回车键,进行maven的pom.xml配置设置:

- DgroupId=组织名,公司网址的反写+项目名
- DartifactId=项目名
- Dversion=版本号
- Dpackage=代码所存在的包名
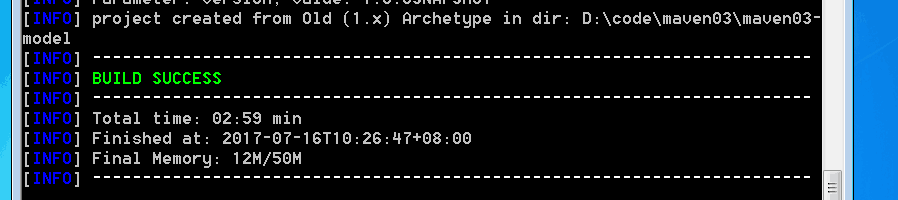
在确定上面设置,输入y,maven进行自动创建,出现下面如图,即成功。
需要注意的事,基于这种自动构件,自动依赖junit是3.8.0,现在已经到4.10,以免错误。
坐标、构件
坐标:在maven任意的依赖、插件、项目构件输出都可以成为构件,所以的构件都是通过坐标作为唯一标识。 项目的pom.xml中groupId、artifactId、version都可以是构件的坐标。
仓库
用来管理项目依赖的。
- 本地仓库
- 远程仓库
- 镜像仓库(因为maven的远程仓库都是国外提供的,有时不稳定,所以国内有镜像,可以提供一样的功能)
怎么修改镜像仓库,打开maven压缩包下的conf,找到setting.xml

id是镜像的id,mirrorof为哪个仓库配置镜像,url是镜像地址。
本地仓库查找不到依赖,就会到远程仓库下载到本地仓库,如果远程仓库找不到,就报错。
修改本地仓库
在maven默认的conf文件下的setting.xml,默认的本地仓库在用户的m2文件下可以找到。通过setting.xml可以修改。
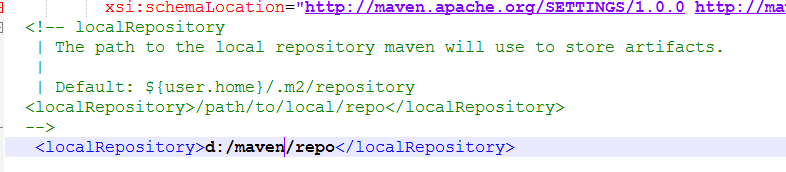
添加自己默认的本地仓库,通过将setting也复制一份到d:/maven下。
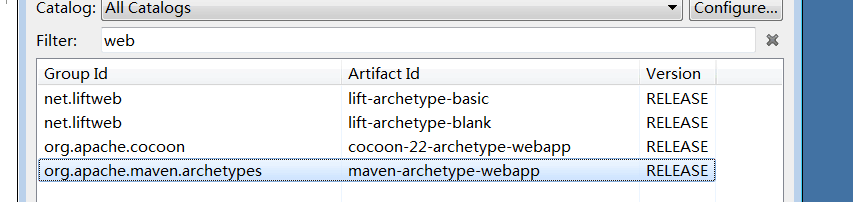
如何利用myeclipse建一个maven工程
- 打开myeclipse,新建一个maven project,选择下面如图:
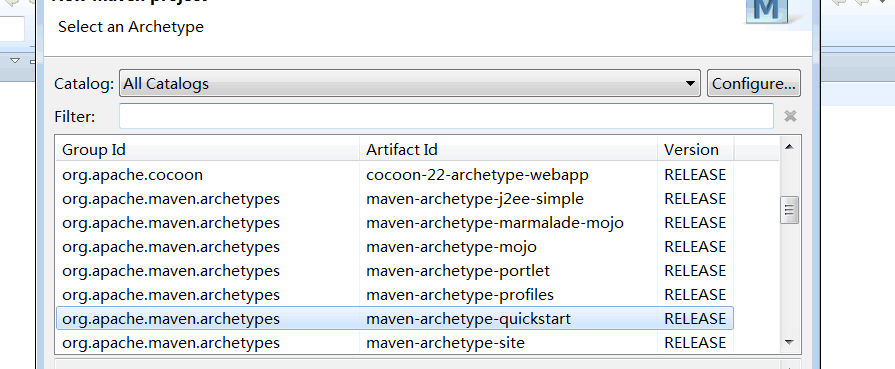
- 点击next,输入以下内容:
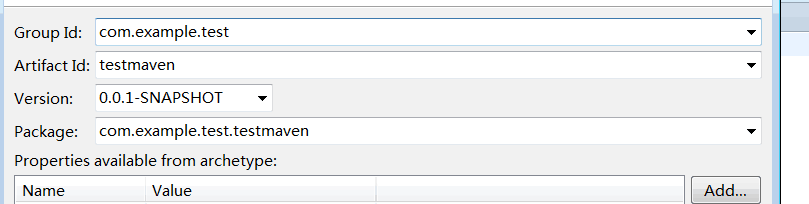
注意其中Artifactid就作为项目工程名。
如何在myeclipse运行maven
右击工程,点击run as ,选择各种命令执行。
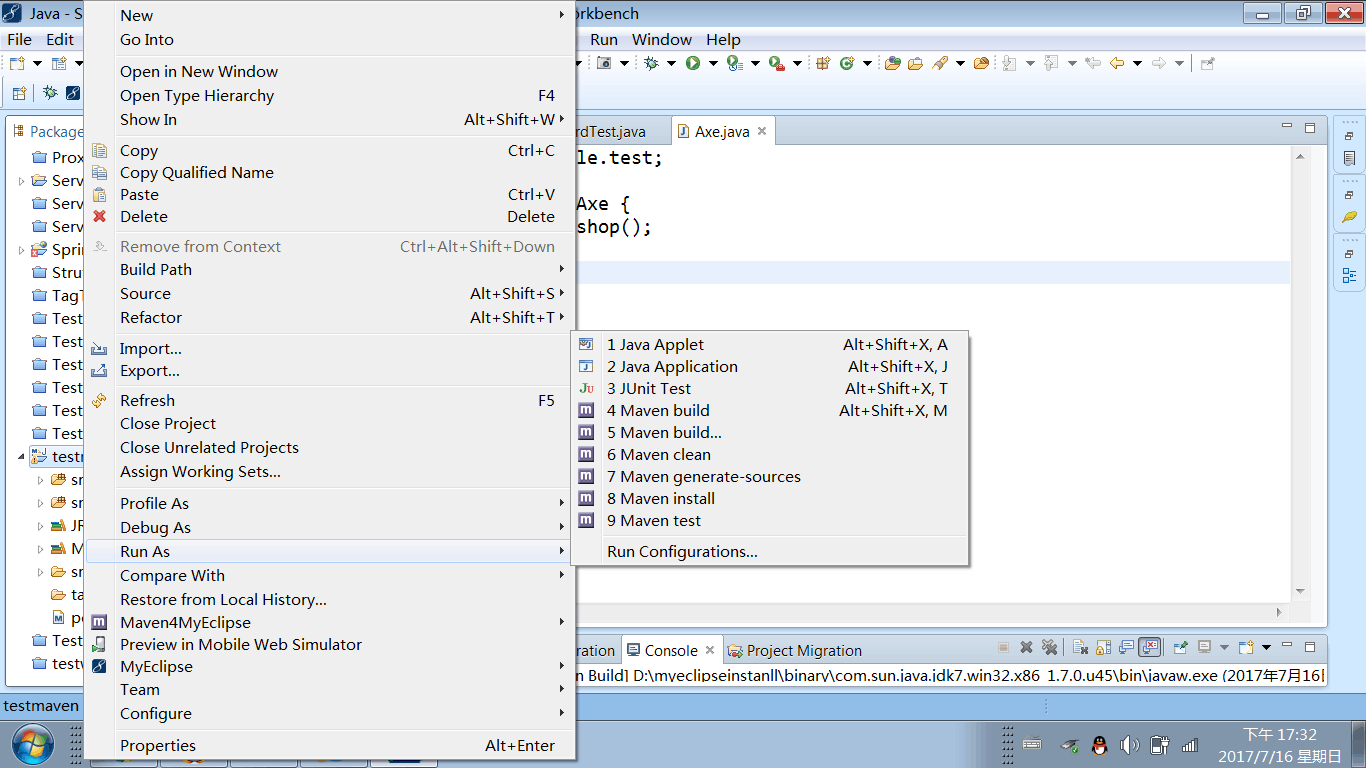
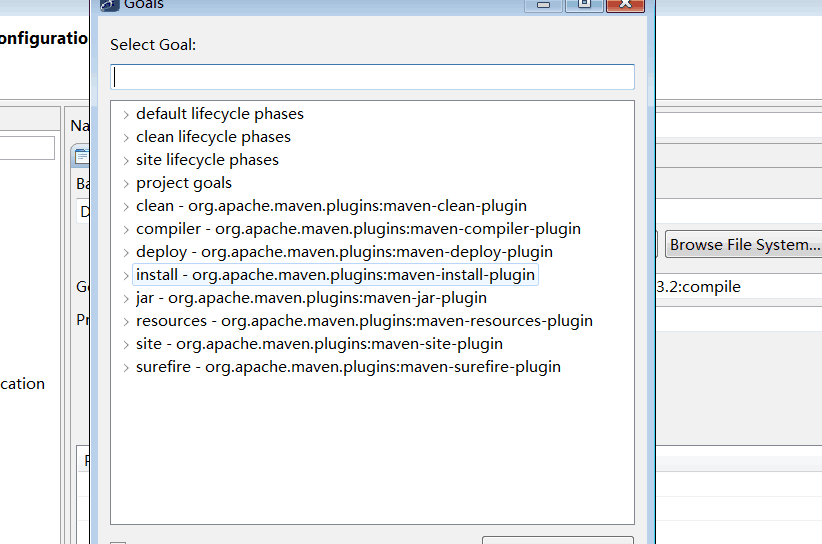
如果上述命令没有,可以点击run configurations,出现以下,选择命令,例如package,一样执行。
maven生命周期
项目构建完整过程:清理、编译、测试、打包、集成测试、验证、部署。
maven 生命周期:
- clean 清理项目
- default构件项目
- site 生成项目站点
相互独立,每个生命周期都有相应阶段,且都有顺序。后面的阶段依赖前面阶段,后面阶段执行,前面的阶段依次执行。
clean 清理项目
- pre-clean 执行清理前的工作
- clean 清理上一次构建生成的所有文件
- post-clean 执行清理后的文件
default 构建项目(生命周期的核心)
compile test package install 都在default中。
site生成项目站点
- pre-site 在生成项目站点前要完成的工作
- site 生成项目的站点文档
- post-site 在生成项目站点后要完成的工作
- site-deploy 发布生成的站点到服务器
pom.xml常用标签
<project xmlns="http://maven.apache.org/POM/4.0.0" xmlns:xsi="http://www.w3.org/2001/XMLSchema-instance"
  xsi:schemaLocation="http://maven.apache.org/POM/4.0.0 http://maven.apache.org/xsd/maven-4.0.0.xsd">
  <modelVersion>4.0.0</modelVersion>

  <groupId>com.example.test</groupId>反写的公司网址+项目名
  <artifactId>testmaven</artifactId>项目名+模块名
  <version>0.0.1-SNAPSHOT</version>第一个0是大版本号,第二个0表示分支版本号,第3个0是小版本号,snapshot快照版本,alpha内部测试,beta公测,Release稳定,GA正式发布
  <packaging>jar</packaging>打包 ,默认是jar也可以打包成zip,war等

  <name>testmaven</name>项目描述名
  <url>http://maven.apache.org</url>项目地址


  <properties>
    <project.build.sourceEncoding>UTF-8</project.build.sourceEncoding>
  </properties>

  <dependencies>//依赖列表
    <dependency>//依赖项
      <groupId>junit</groupId>
      <artifactId>junit</artifactId>
      <version>3.8.1</version>
      <scope>test</scope>//依赖范围
      <exclusions>
      <exclusion></exclusion>
      </exclusions>//排除依赖列表
    </dependency>
  </dependencies>
</project>
maven依赖范围
项目中要使用其他的jar,就必须将其依赖添加到class path中。
maven 3中classpath
maven 3中classpath
- 编译
- 测试
- 运行
依赖的范围就是控制3中class path的对应
作用域:
compile 运行度有效。默认的范围,编译测试运行度有效。
provided:在编译测试有效。
runtime:在测试运行有效。system:
test:测试有效。
system:编译测试有效,与本机系统相连,可移植差。
import:导入的范围,它只使用在dependencyManagement中,表示从其他的pom中倒入的dependency的配置。
作用域:
compile 运行度有效。默认的范围,编译测试运行度有效。
provided:在编译测试有效。
runtime:在测试运行有效。system:
test:测试有效。
system:编译测试有效,与本机系统相连,可移植差。
import:导入的范围,它只使用在dependencyManagement中,表示从其他的pom中倒入的dependency的配置。
依赖传递
a依赖b,而b又依赖于c,那么a和c关系就是依赖的传递。
项目a
 <dependencies>
    <dependency>
      <groupId>junit</groupId>
      <artifactId>junit</artifactId>
      <version>3.8.1</version>
      <scope>test</scope>
    </dependency>
    <dependency>
     <groupId>com.example.test</groupId>
  <artifactId>testb</artifactId>
  <version>0.0.1-SNAPSHOT</version>
    </dependency>
</dependencies><dependencies>
<dependency>
<groupId>junit</groupId>
<artifactId>junit</artifactId>
<version>3.8.1</version>
<scope>test</scope>
</dependency>
<dependency>
<groupId>com.example.test</groupId>
<artifactId>testc</artifactId>
<version>0.0.1-SNAPSHOT</version>
</dependency>
</dependencies>
项目a会自动依赖项目b和项目c。
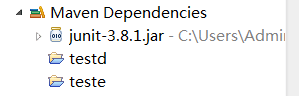
如果项目a只想依赖项目b,而不自动依赖项目c,则需要如下,依赖排除。
 <dependencies>
    <dependency>
      <groupId>junit</groupId>
      <artifactId>junit</artifactId>
      <version>3.8.1</version>
      <scope>test</scope>
    </dependency>
    <dependency>
     <groupId>com.example.test</groupId>
  <artifactId>testd</artifactId>
  <version>0.0.1-SNAPSHOT</version>
  <exclusions>
  <exclusion>
   <groupId>com.example.test</groupId>
  <artifactId>teste</artifactId>
  <version>0.0.1-SNAPSHOT</version>
  </exclusion>
  </exclusions>
maven聚合和继承
当我们同时要安装多个maven项目时,我们是不是必须要一个一个安装,还是有其他方法,看下面两种:
聚合:
<project xmlns="http://maven.apache.org/POM/4.0.0" xmlns:xsi="http://www.w3.org/2001/XMLSchema-instance"
  xsi:schemaLocation="http://maven.apache.org/POM/4.0.0 http://maven.apache.org/xsd/maven-4.0.0.xsd">
  <modelVersion>4.0.0</modelVersion>

  <groupId>com.example.test</groupId>
  <artifactId>testall</artifactId>
  <version>0.0.1-SNAPSHOT</version>
  <packaging>pom</packaging>

  <name>testall</name>
  <url>http://maven.apache.org</url>

  <properties>
    <project.build.sourceEncoding>UTF-8</project.build.sourceEncoding>
  </properties>
  <modules>
  <module>../testa</module>
  <module>../testd</module>
  <module>../teste</module>
  </modules>

  <dependencies>
    <dependency>
      <groupId>junit</groupId>
      <artifactId>junit</artifactId>
      <version>3.8.1</version>
      <scope>test</scope>
    </dependency>
  </dependencies>
</project>
继承:抽取一个父类
<project xmlns="http://maven.apache.org/POM/4.0.0" xmlns:xsi="http://www.w3.org/2001/XMLSchema-instance"
  xsi:schemaLocation="http://maven.apache.org/POM/4.0.0 http://maven.apache.org/xsd/maven-4.0.0.xsd">
  <modelVersion>4.0.0</modelVersion>

  <groupId>com.example.test</groupId>
  <artifactId>testparent</artifactId>
  <version>0.0.1-SNAPSHOT</version>
  <packaging>pom</packaging>

  <name>testparent</name>
  <url>http://maven.apache.org</url>

  <properties>
    <project.build.sourceEncoding>UTF-8</project.build.sourceEncoding>
    <junit.version>3.8.1</junit.version>
  </properties>
<dependencyManagement>
  <dependencies>
    <dependency>
      <groupId>junit</groupId>
      <artifactId>junit</artifactId>
       <version>${junit.version}</version>
      <scope>test</scope>
    </dependency>
  </dependencies>
  </dependencyManagement>
</project>
 <properties>
    <project.build.sourceEncoding>UTF-8</project.build.sourceEncoding>
  </properties>
  <parent>
   <groupId>com.example.test</groupId>
  <artifactId>testparent</artifactId>
  <version>0.0.1-SNAPSHOT</version>

  </parent>

  <dependencies>
    <dependency>
      <groupId>junit</groupId>
      <artifactId>junit</artifactId>

    </dependency>

  </dependencies>
<dependency>
<groupId>javax.servlet</groupId>
<artifactId>javax.servlet-api</artifactId>
<version>3.0.1</version>
<scope>provided</scope>
</dependency>如何在myeclipse搭建maven工程
- 创建一个maven project ,需要注意的是:
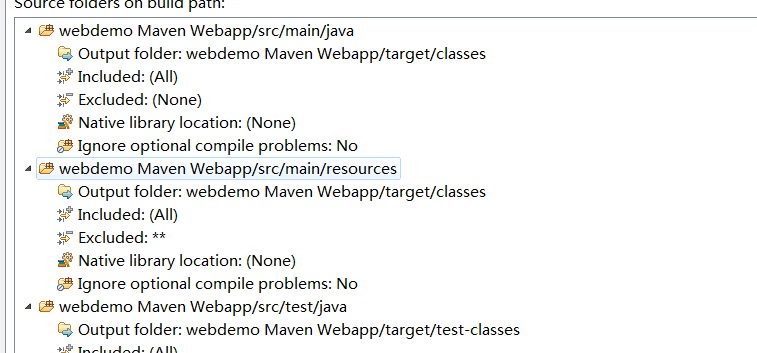
- 完善项目结构
创建初始的目录
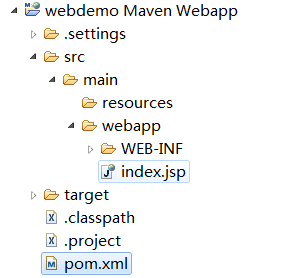
打开项目导航navigator,修改后的目录,自己对照修改
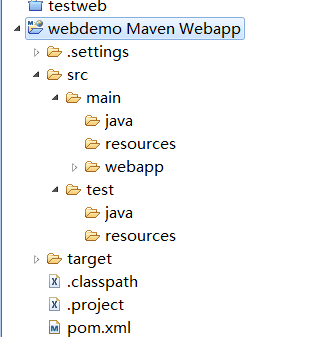
- 查看项目输出路径,必须是target目录下。
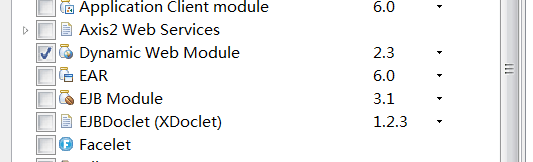
- 把maven工程转成web
右击项目,点击属性,myeclipse-deployment assembly
- 部署web应用到服务器
在maven中用jetty插件,或者tomcat插件
 <build>
    <finalName>webdemo</finalName>
    <plugins>
    <plugin>
  <!--  <groupId>org.mortbay.jetty</groupId>
    <artifactId>jetty-maven-plugin</artifactId>
    <version>8.1.16.v20140903</version> -->
     <groupId>org.apache.tomcat.maven</groupId>
  <artifactId>tomcat7-maven-plugin</artifactId>
  <version>2.2</version>
    <!-- 在打包成功后,运行jrtty:run/tomcat:run服务 -->
    <executions>
    <execution>
    <phase>package</phase>
    <goals>
    <goal>run</goal>
    </goals>
    </execution>
    </executions>
    </plugin>
    </plugins>
  </build>

在tomcat中运行的地址也给出来啦就是http://localhost:8080/webdemo。


 2793
2793

 被折叠的 条评论
为什么被折叠?
被折叠的 条评论
为什么被折叠?
 到【灌水乐园】发言


