目录
一、编译工具
1.1 编译工具
win10,vs2017\vs2019社区版
1.2 加密工具(OpenSSL)
1、Openssl为加密库,编译32位库使用32为OpenSSL,编译64位库使用64位OpenSSL;
2、本教程中使用的版本为Win32OpenSSL-1_1_1q(32位)、Win64OpenSSL-1_1_1d(64位)
3、下载地址:
(1)Win32/Win64 OpenSSL Installer for Windows - Shining Light ProductionsWin32/Win64 OpenSSL Installer for Windows - Shining Light Productions![]() https://slproweb.com/products/Win32OpenSSL.htmlWin32/Win64 OpenSSL Installer for Windows - Shining Light Productions
https://slproweb.com/products/Win32OpenSSL.htmlWin32/Win64 OpenSSL Installer for Windows - Shining Light Productions
1.3 VS工程生成工具(Cmake)
1、Cmake用于将MQTT源码转换为vs对应版本的工程,以便使用vs将源码编译成库。
2、编译成不同位数的库要使用对应位数的cmake,即编译成64位库要使用64位cmake,32位使用32位的cmake。否则编译过程中出现32位与64位冲突问题
3、本例中使用的cmake版本为:cmake-3.16.2-win32-x86(32位)、cmake-3.16.2-win64-x64(64位)
4、下载地址
Index of /files![]() https://cmake.org/files/
https://cmake.org/files/
1.4 获取MQTT源码
2、C++源码:GitHub - eclipse/paho.mqtt.cpp
3、由于编译MQTTC++时需要依赖MQTT C的库,需要先编译C库再编译C++库
本人亲测,分别使用VS2019和VS2017编译了32位版本和64位版本,下面仅以VS2019编译32位版本为例。如果想直接下载使用,请看本文第6节,有各版本下载地址
二、编译C库
2.1 编译步骤
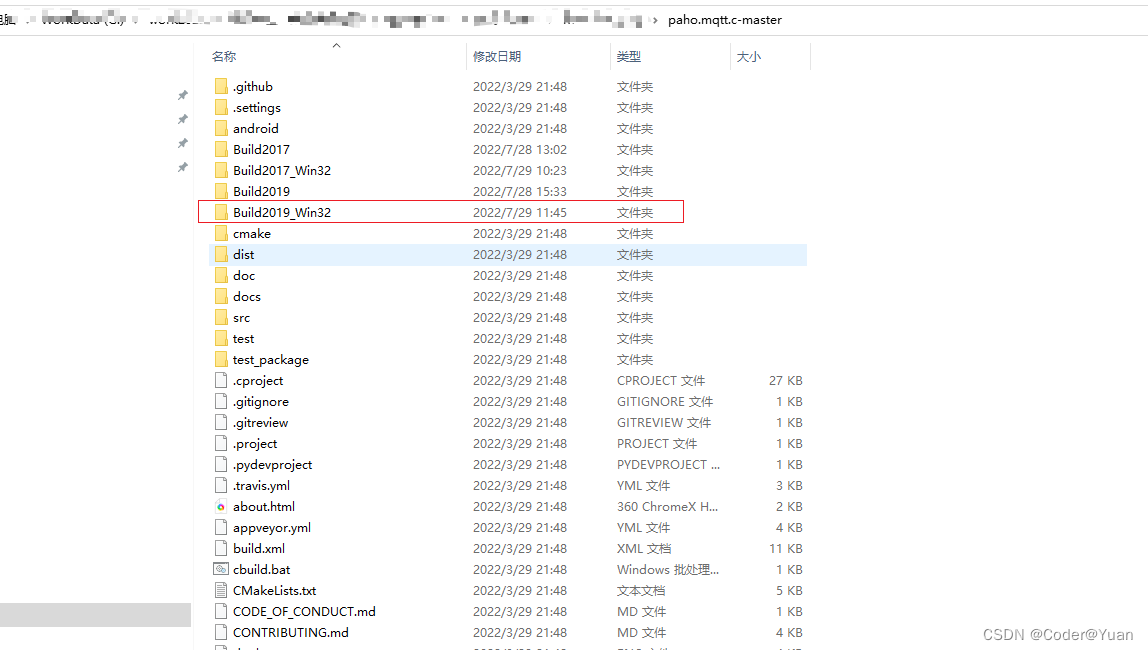
1、个人习惯,先在C库目录中创建文件夹Build2019_Win32用于保存Cmake生成的VS工程文件
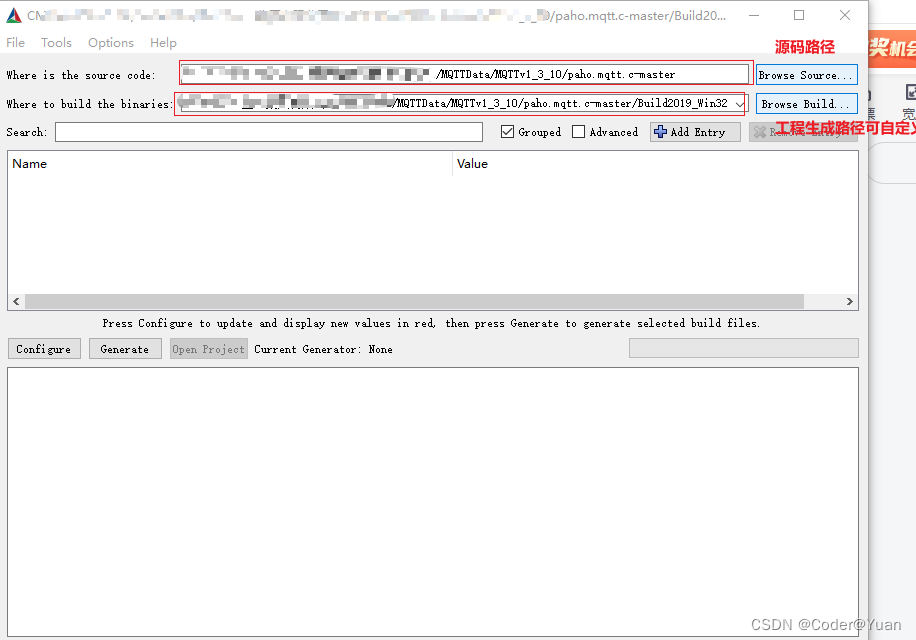
2、打开32位Cmake工具,配置路径
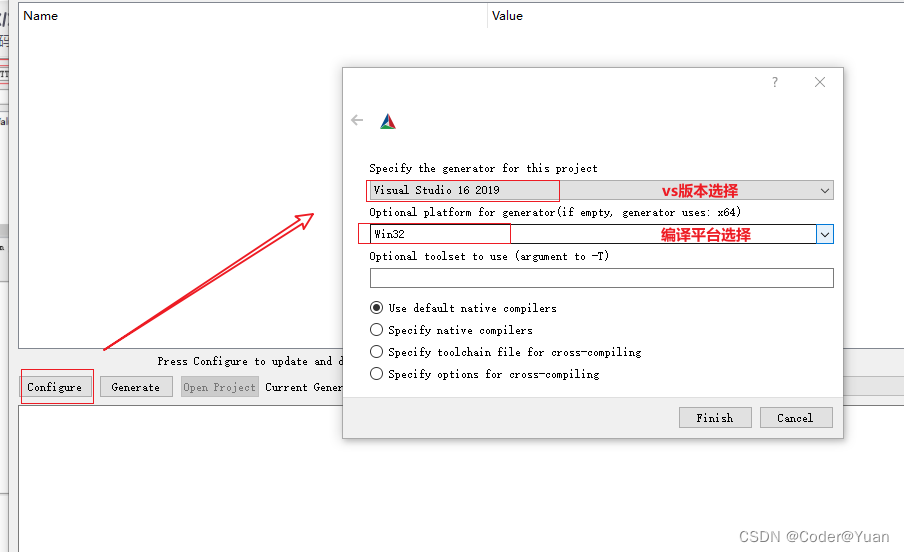
3、点击configure,弹出配置对话框,本例使用VS2019编译成32位库,因此按照如下图配置。如果使用VS其他版本编译,则选用对应的vs版本。默认编译平台为32位,如果要把库编译成64位,则选在x64平台
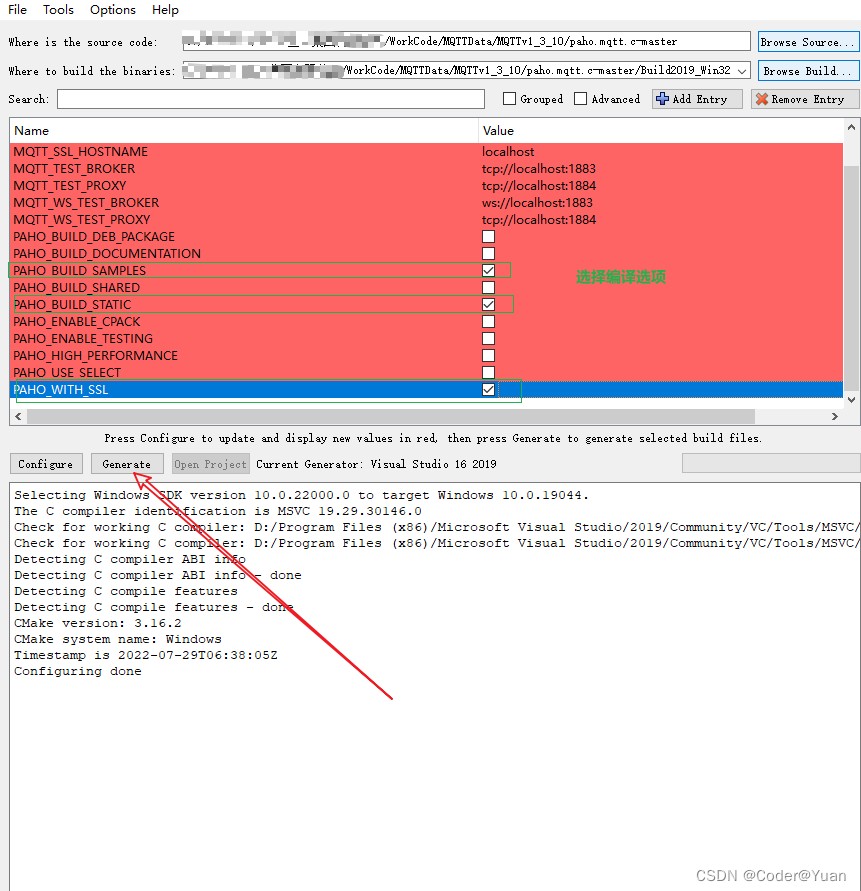
4、按照下图选在编译选项后,点击"Generate"按钮生成工程
5、工程生成过程中报错,是因为选中了ssl,但没有配置openssl
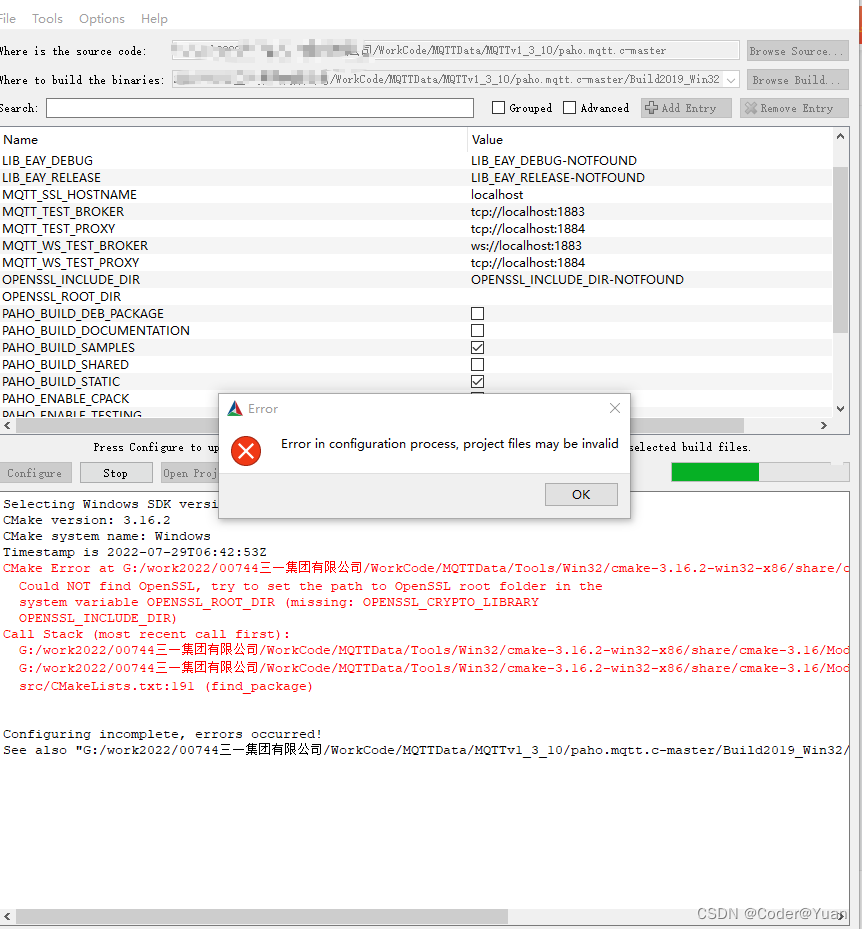
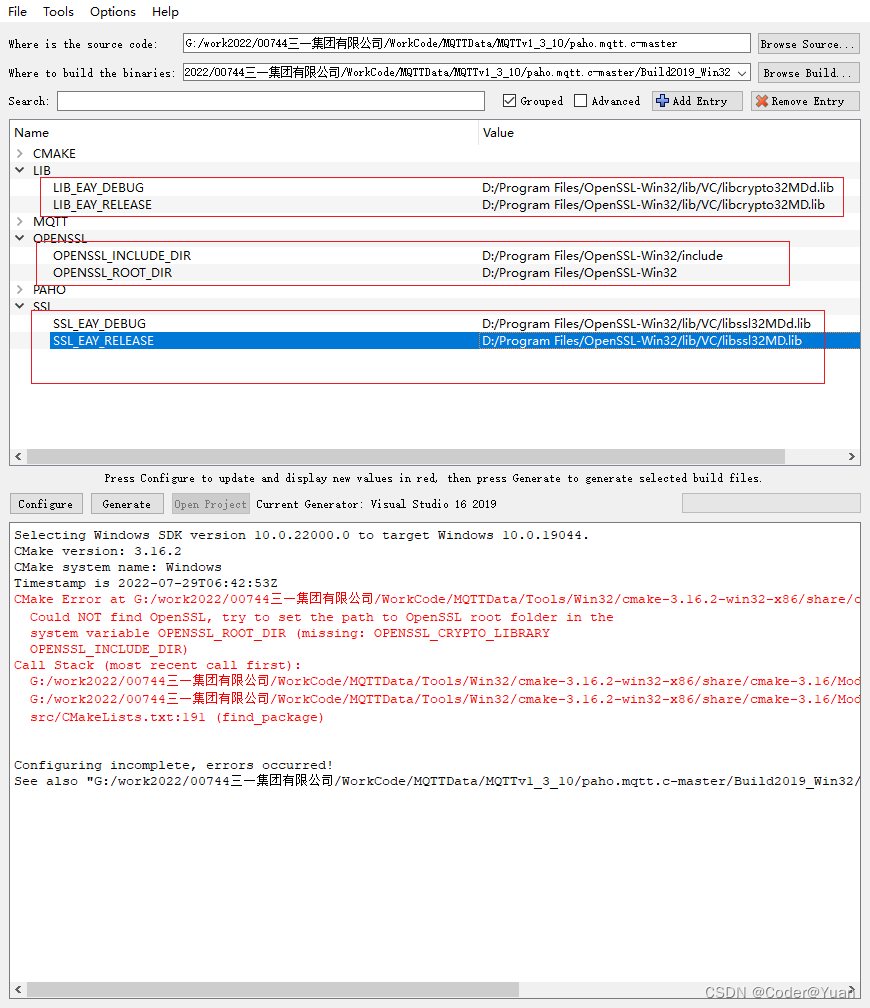
6、按照下图配置32位版本的Openssl
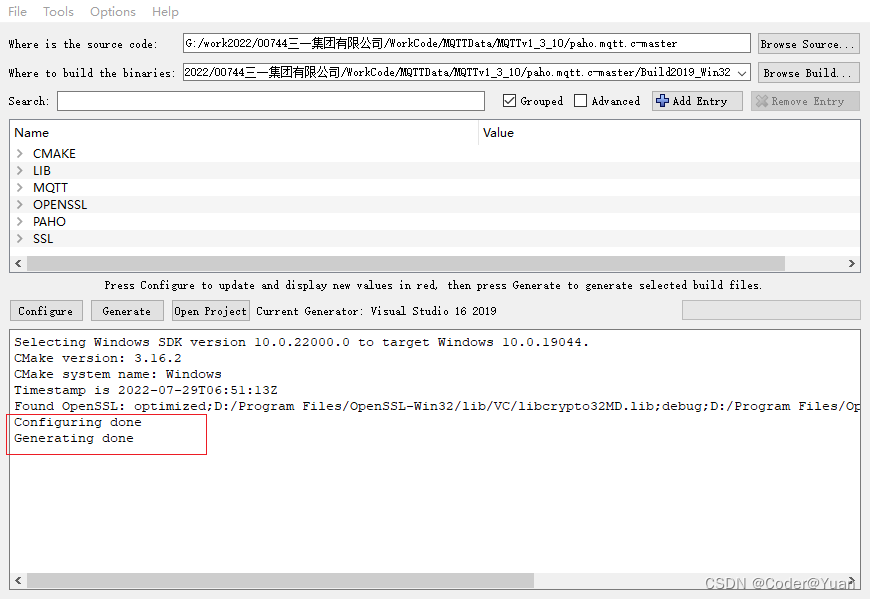
7、再次点击生成按钮,如下图所示,代表成功
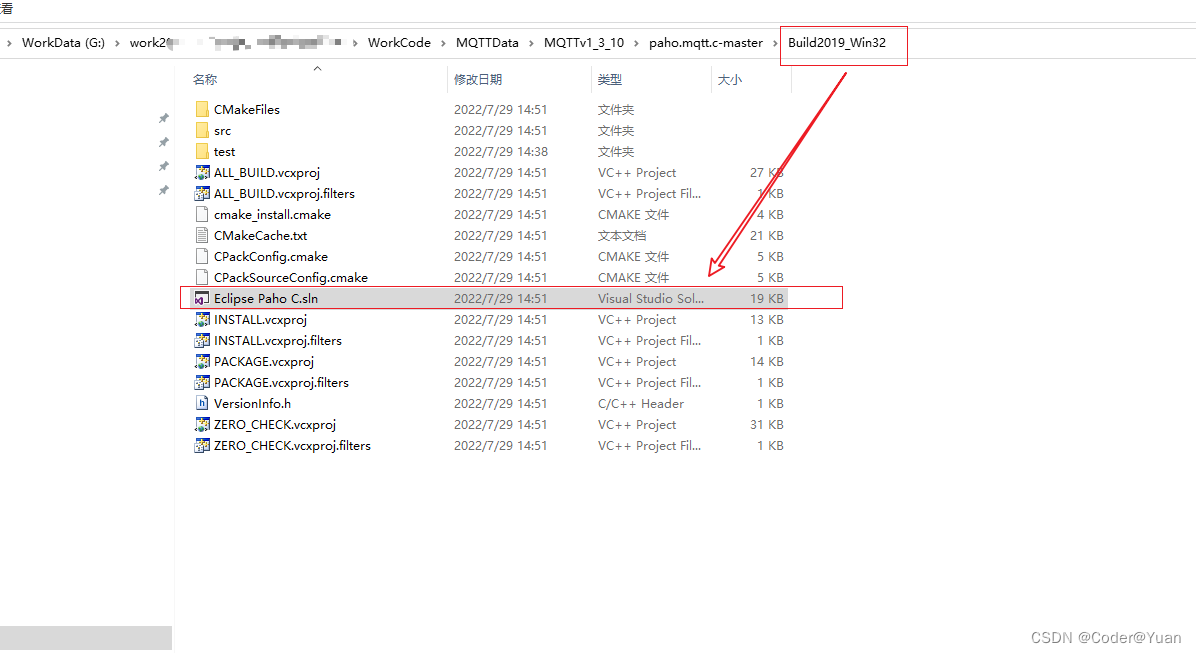
8、在第一步创建的路径下会生成如下图所示的vs工程
9、使用vs2019打开上述工程,平台一定要配置为win32(前面Cmake的时候配置的是win32),根据需要编译成Debug或者Release版本

10、编译后会报下面错误,因为咱们的目的是为了编译出C++所需的模块,因此对下面错误无需理会。网上也有对下面错的解决方法,如有需要自行百度

11、编译后,会在最初创建的文件夹Build2019_Win32/src/Release路径下生成4个静态库,这4个静态库就是 编译C++库所需要的
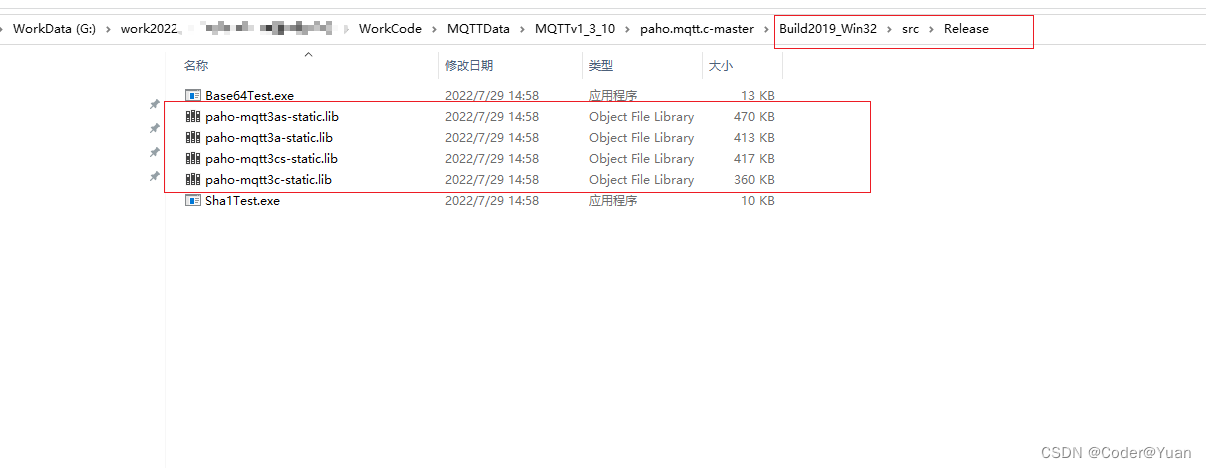
13、根据Github介绍四个库有如下意义

paho-mqtt3a : a表示的是异步消息推送(asynchronous)
paho-mqtt3as : as表示的是 异步+加密(asynchronous+OpenSSL)
paho-mqtt3c : 同步(Synchronize),一般性能较差,是发送+等待模式
paho-mqtt3cs : 同上,增加了一个OpenSSL而已
14、正确生成ssl加密版本的lib前提是,安装了对应版本OPenssl,且在步骤4到6步中要配置OPenSSL。本例中基于高性能且安全性考虑使用的是paho-mqtt3as
三、编译C++库
3.1 编译步骤
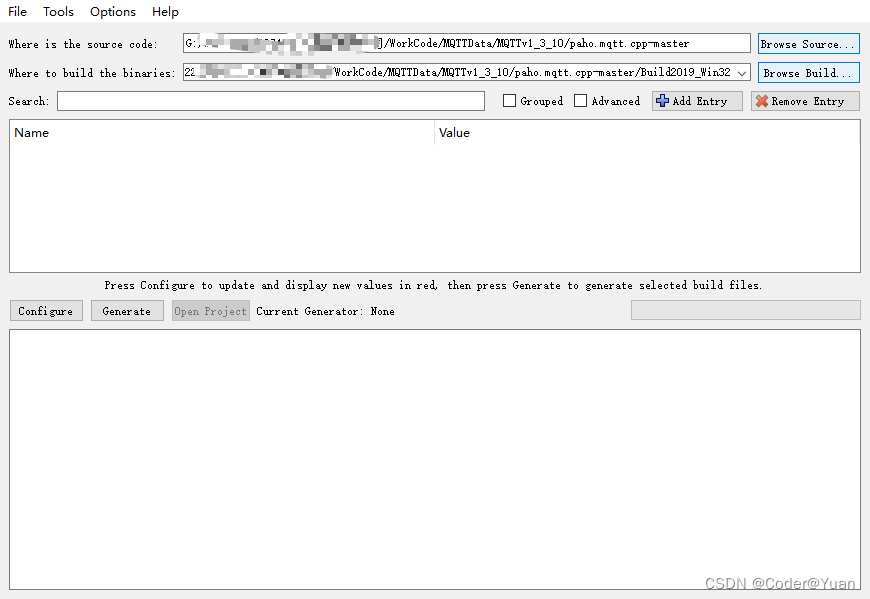
1、同C库编译过程,在C++源码目录下创建个文件夹
2、打开Cmake配置路径
2、平台配置
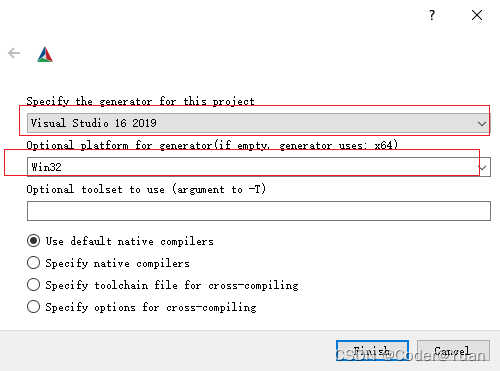
3、Finieshed报错

4、除了像生成C库一样,配置源码路径、OPenSSL还要加上C的源码路径和所需要的C编译后的lib文件路径
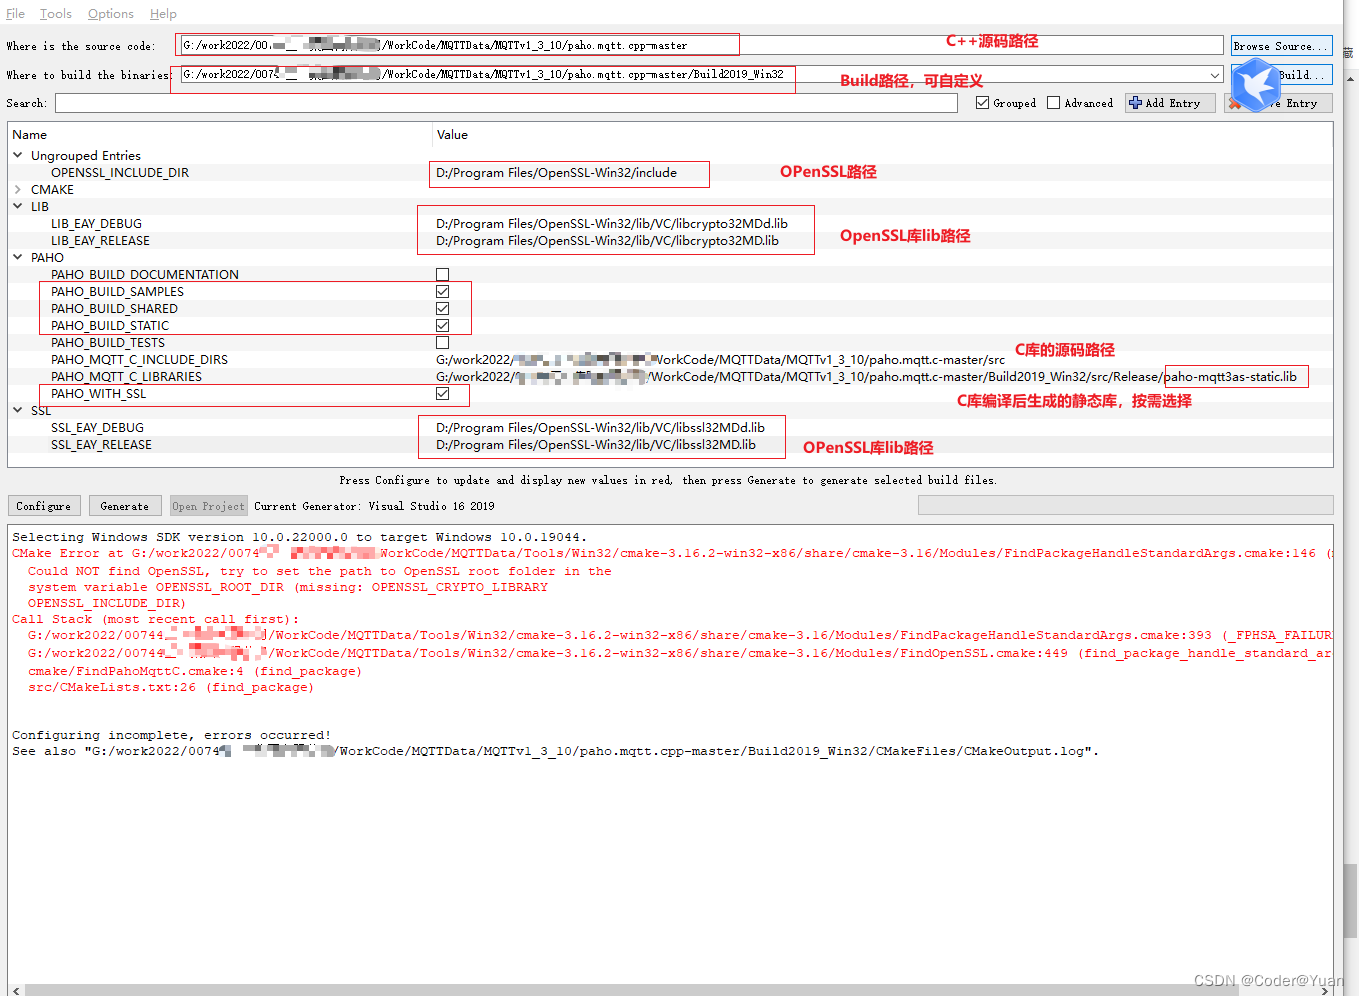
5、正确配置后,再次"Generate",如下图所示表示正确生成VS工程
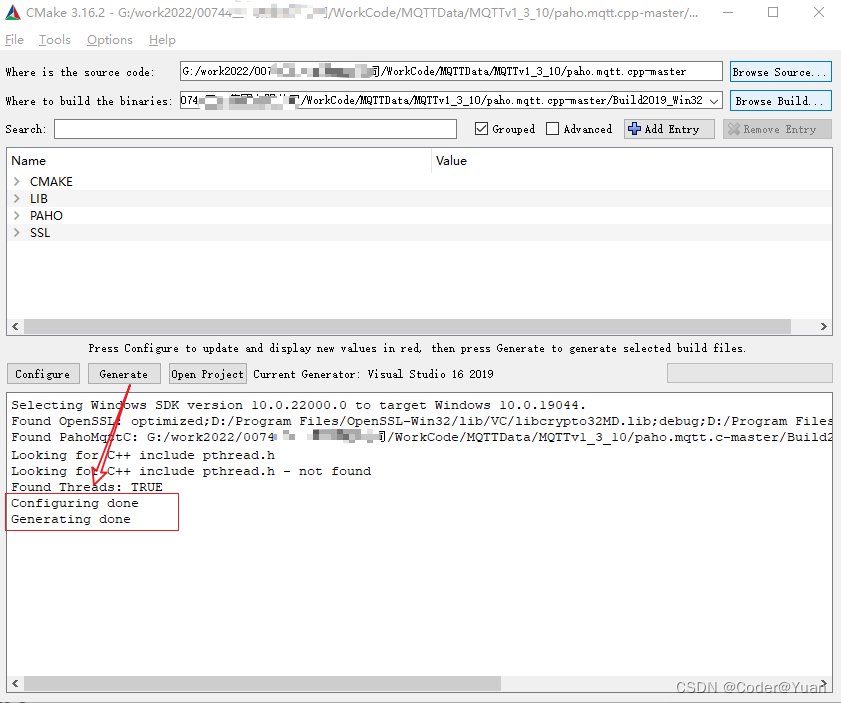
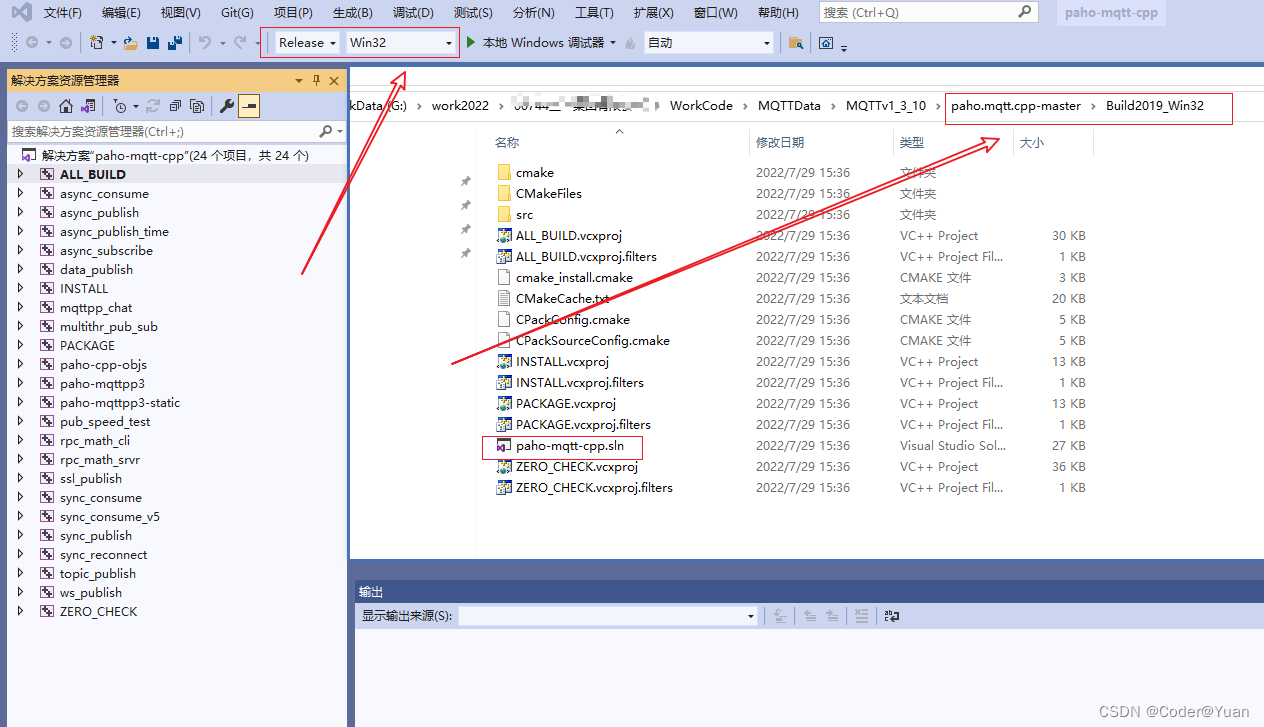
6、Cmake Build后在第1步创建路径下生成了VS工程,使用VS2019打开工程,并配置为win32平台编译
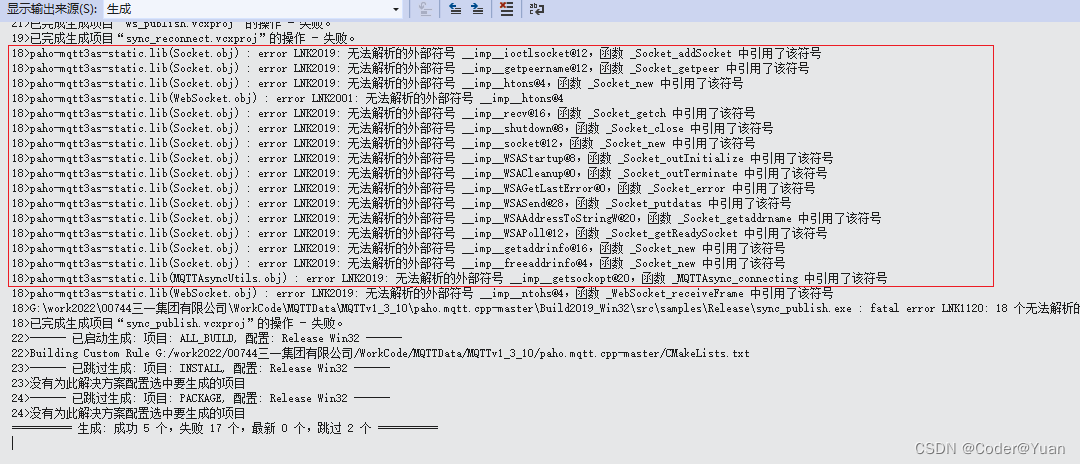
7、编译过程中会报如下无法解析的外部符号错误,是因为对应模块依赖的ws2_32.lib没加上
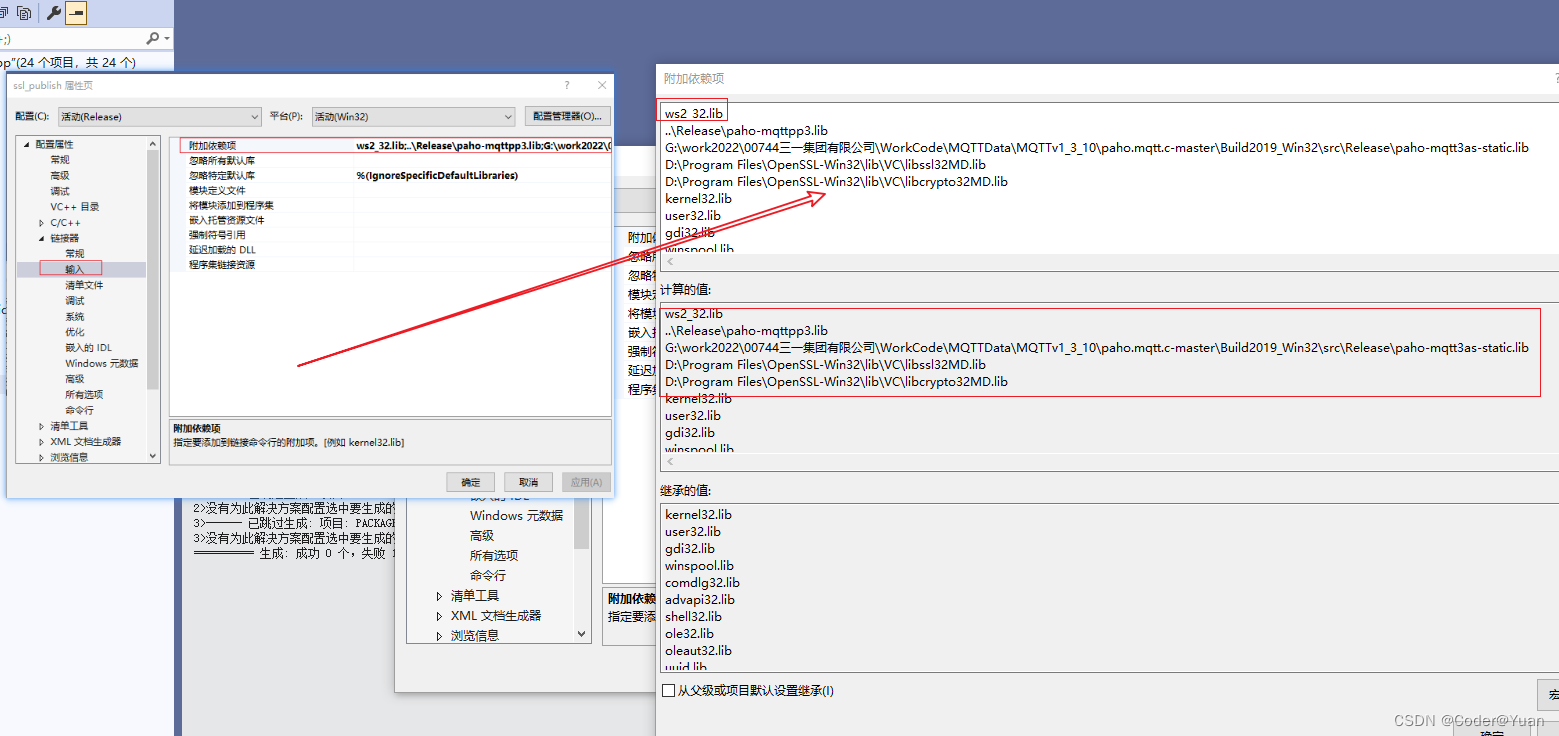
8、ws2_32.lib依赖到对应模块中
9、再次编译,还剩一个错误,由于报错模块与调用mqtt库无关,故不做处理。

10、使用VS2019编译后,在前面创建的目录下生成静态库,开发程序的时候只要依赖上对应库即可

四、调用举例
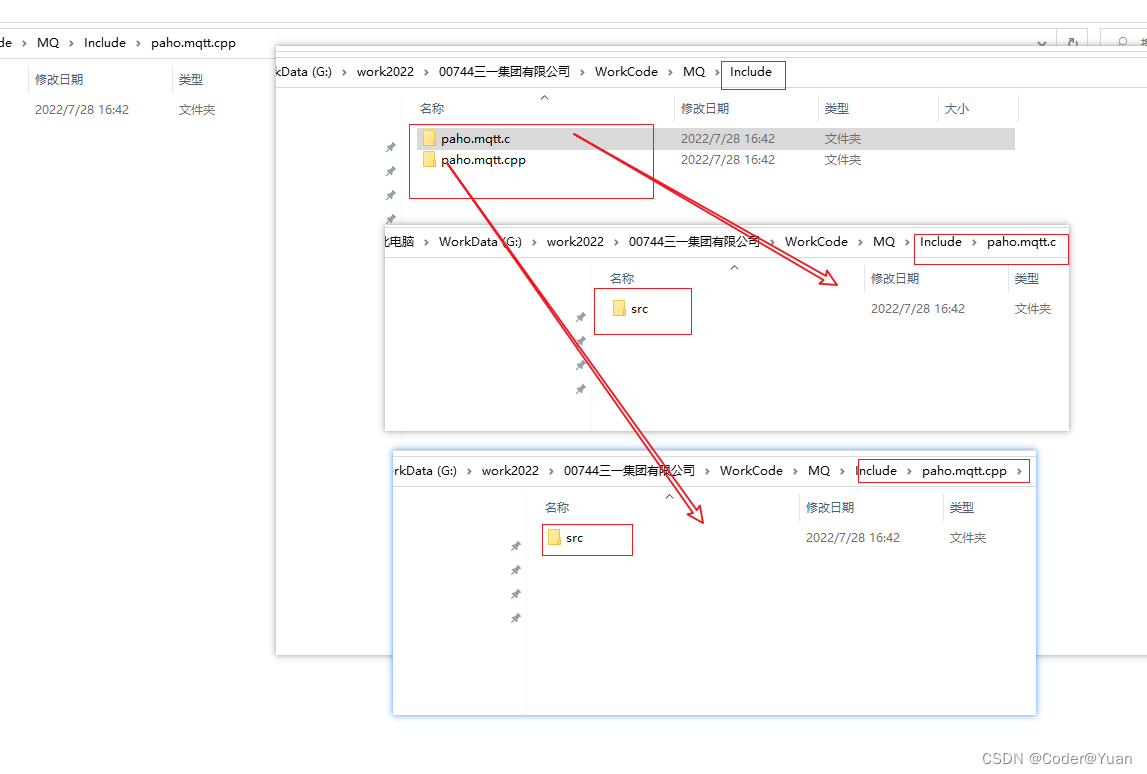
1、创建vs工程,在工程路径下创建Include文件夹,并创建两个文件夹把c和C++源码库中的src文件夹拷贝到对应路径下
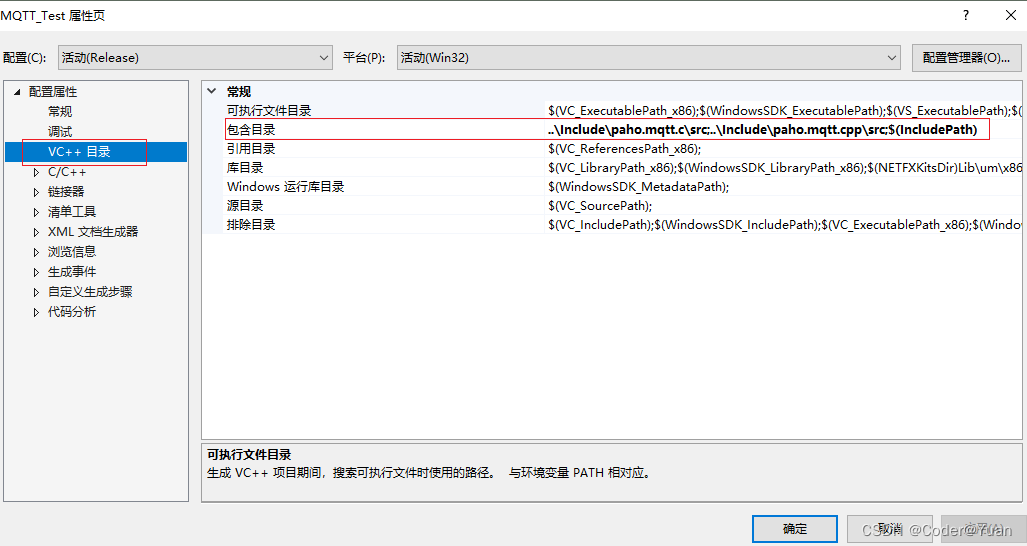
2、配置vs工程,源码路径
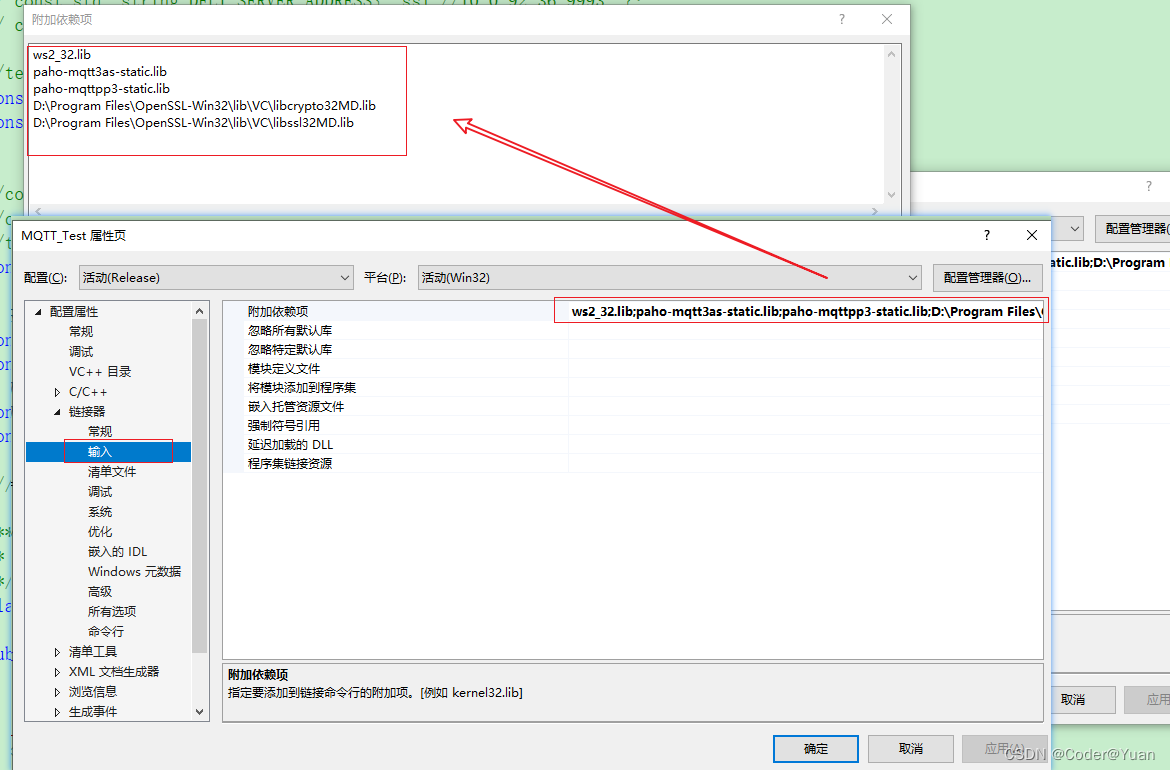
3、添加依赖项
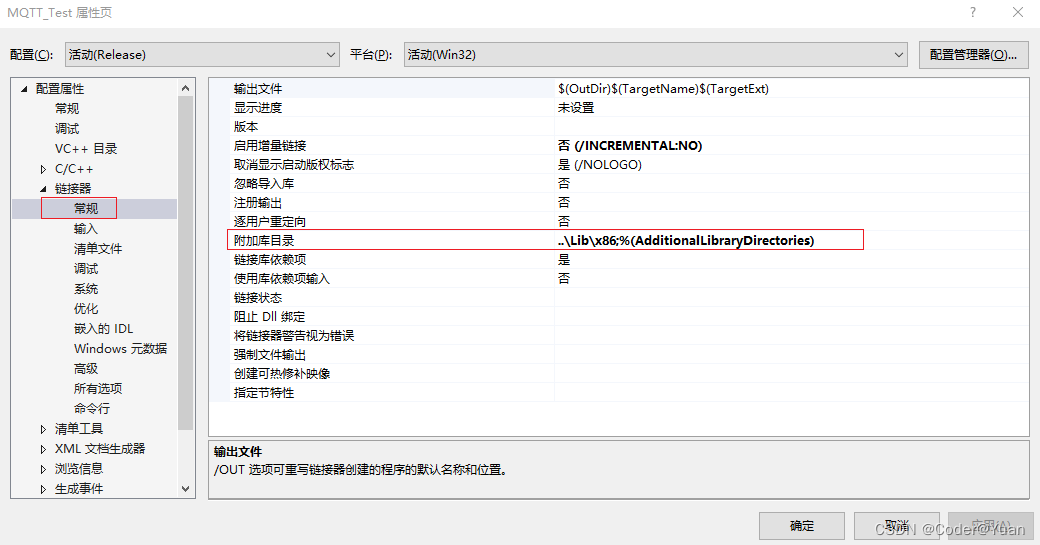
4、添加lib目录
5、由于库为32位,因此编译平台选用x86平台
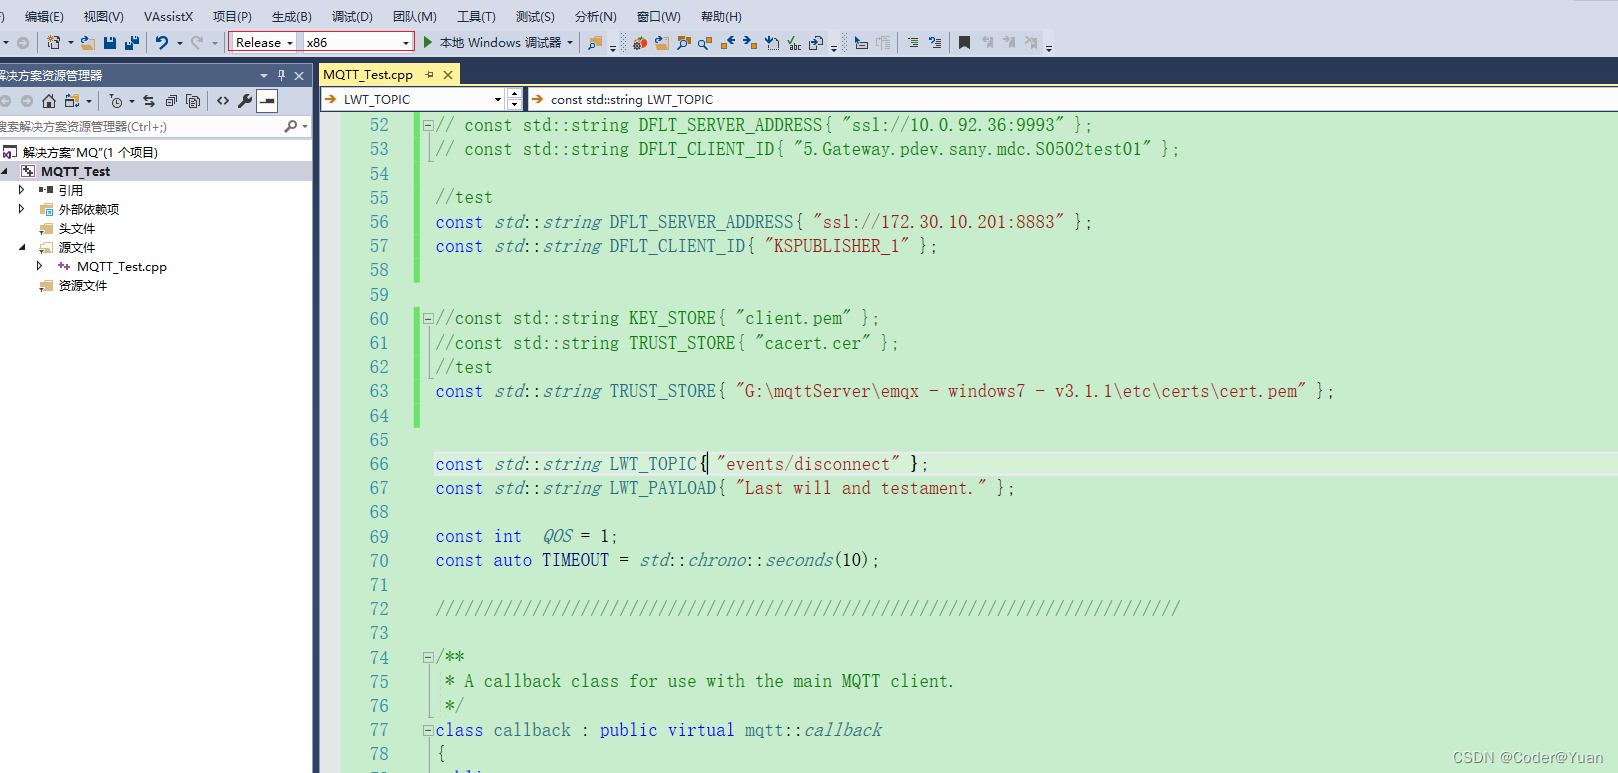
6、代码举例
// ssl_publish.cpp
//
// This is a Paho MQTT C++ client, sample application.
//
// It's an example of how to connect to an MQTT broker securely, and then
// send messages as an MQTT publisher using the C++ asynchronous client
// interface.
//
// The sample demonstrates:
//  - Connecting to an MQTT server/broker securely
//  - Setting SSL/TLS options
//  - Last will and testament
//  - Publishing messages
//  - Using asynchronous tokens
//  - Implementing callbacks and action listeners
//
// We can test this using mosquitto configured with certificates in the
// Paho C library. The C library has an SSL/TSL test suite, and we can use
// that to test:
//     $ cd paho.mqtt.c
//     $ mosquitto -c test/tls-testing/mosquitto.conf
//
// Then use the files "test-root-ca.crt" and "client.pem" from the
// test/ssl directory (paho.mqtt.c/test/ssl) for the trust store and
// key_store, respectively, for this program.
//

/*******************************************************************************
 * Copyright (c) 2013-2017 Frank Pagliughi <fpagliughi@mindspring.com>
 *
 * All rights reserved. This program and the accompanying materials
 * are made available under the terms of the Eclipse Public License v1.0
 * and Eclipse Distribution License v1.0 which accompany this distribution.
 *
 * The Eclipse Public License is available at
 *    http://www.eclipse.org/legal/epl-v10.html
 * and the Eclipse Distribution License is available at
 *   http://www.eclipse.org/org/documents/edl-v10.php.
 *
 * Contributors:
 *    Frank Pagliughi - initial implementation and documentation
 *******************************************************************************/

#include <iostream>
#include <fstream>
#include <cstdlib>
#include <string>
#include <chrono>
#include <cstring>
#include "mqtt/async_client.h"
using namespace std;
// const std::string DFLT_SERVER_ADDRESS{ "ssl://10.0.92.36:9993" };
// const std::string DFLT_CLIENT_ID{ "5.Gateway.pdev.sany.mdc.S0502test01" };

//test
const std::string DFLT_SERVER_ADDRESS{ "ssl://172.30.10.201:8883" };
const std::string DFLT_CLIENT_ID{ "KSPUBLISHER_1" };


//const std::string KEY_STORE{ "client.pem" };
//const std::string TRUST_STORE{ "cacert.cer" };
//test
const std::string TRUST_STORE{ "G:\mqttServer\emqx - windows7 - v3.1.1\etc\certs\cert.pem" };


const std::string LWT_TOPIC{ "events/disconnect" };
const std::string LWT_PAYLOAD{ "Last will and testament." };

const int  QOS = 1;
const auto TIMEOUT = std::chrono::seconds(10);

/

/**
 * A callback class for use with the main MQTT client.
 */
class callback : public virtual mqtt::callback
{
public:
	void connection_lost(const std::string& cause) override {
		std::cout << "\nConnection lost" << std::endl;
		if (!cause.empty())
			std::cout << "\tcause: " << cause << std::endl;
	}

	void delivery_complete(mqtt::delivery_token_ptr tok) override {
		std::cout << "\tDelivery complete for token: "
			<< (tok ? tok->get_message_id() : -1) << std::endl;
	}
};

/


int main(int argc, char* argv[])
{
	string	address = (argc > 1) ? string(argv[1]) : DFLT_SERVER_ADDRESS,
		clientID = (argc > 2) ? string(argv[2]) : DFLT_CLIENT_ID;

	// Note that we don't actually need to open the trust or key stores.
	// We just need a quick, portable way to check that they exist.
	{
		ifstream tstore(TRUST_STORE);
		if (!tstore) {
			cerr << "The trust store file does not exist: " << TRUST_STORE << endl;
			cerr << "  Get a copy from \"paho.mqtt.c/test/ssl/test-root-ca.crt\"" << endl;;
			//return 1;
		}
		/*
		ifstream kstore(KEY_STORE);
		if (!kstore) {
			cerr << "The key store file does not exist: " << KEY_STORE << endl;
			cerr << "  Get a copy from \"paho.mqtt.c/test/ssl/client.pem\"" << endl;
			return 1;
		}
		*/
	}

	cout << "Initializing for server '" << address << "'..." << endl;
	mqtt::async_client client(DFLT_SERVER_ADDRESS, DFLT_CLIENT_ID);
	callback cb;
	client.set_callback(cb);

	// Build the connect options, including SSL and a LWT message.
	///方法1
#if 1


	//设置ssl
	mqtt::ssl_options sslopts;
	//sslopts.set_trust_store(TRUST_STORE);
	//sslopts.set_key_store(KEY_STORE);
	sslopts.set_ca_path(TRUST_STORE);
	sslopts.set_enable_server_cert_auth(false);
	sslopts.set_verify(false);
	sslopts.set_ssl_version(1);

	//遗嘱信息
	mqtt::message willmsg(LWT_TOPIC, LWT_PAYLOAD, QOS, true);
	mqtt::will_options will(willmsg);

	//连接配置
	mqtt::connect_options connopts("S0502test01", "097a8d28b6bf428daec40df3a5bd1dad");
	connopts.set_will(will);
	connopts.set_ssl(sslopts);
	connopts.set_clean_session(true);
#endif

///方法2

#if 0

	auto sslopts = mqtt::ssl_options_builder()
		//.trust_store(TRUST_STORE)
		//.key_store(KEY_STORE)
		.ca_path(TRUST_STORE)
		.verify(false)
		.enable_server_cert_auth(false)
		.ssl_version(1)
		.error_handler([](const std::string& msg) {
		std::cerr << "SSL Error: " << msg << std::endl;
	})
		.finalize();

	auto willmsg = mqtt::message(LWT_TOPIC, LWT_PAYLOAD, QOS, true);
	//admin public
	auto connopts = mqtt::connect_options_builder()
		//.user_name("admin")
		//.password("public")
		.user_name("S0502test01")
		.password("097a8d28b6bf428daec40df3a5bd1dad")
		.will(std::move(willmsg))
		.ssl(std::move(sslopts))
		.clean_session(true)
		.finalize();

	cout << "  ...OK" << endl;
#endif


	try {
		// Connect using SSL/TLS

		cout << "\nConnecting..." << endl;
		mqtt::token_ptr conntok = client.connect(connopts);
		cout << "Waiting for the connection..." << endl;
		conntok->wait();
		cout << "  ...OK" << endl;

		// Send a message

		cout << "\nSending message..." << endl;
		auto msg = mqtt::make_message("hello", "Hello secure C++ world!", QOS, false);
		client.publish(msg)->wait_for(TIMEOUT);
		cout << "  ...OK" << endl;

		// Disconnect

		cout << "\nDisconnecting..." << endl;
		client.disconnect()->wait();
		cout << "  ...OK" << endl;
	}
	catch (const mqtt::exception& exc) {
		cerr << exc.what() << endl;
		//return 1;
	}

	system("pause");
	return 0;
}
五、注意事项
1、工具的版本(OPenSSL、Cmake)安装的时候必须要和期望编译成的库的版本一致,即:需要32位的MQTT库就安装32位的OPenssl和Cmake 否则编译过程中会有各种错误
2、使用编译好的MQTT开发程序时,编译平台要与库的位数一致,同时不要忘记依赖对应版本的MQTT库、OPenSSL库
3、一定不要忘记依赖ws2_32.lib
六、下载路径
如果觉的自己编译麻烦,可以从下面路径中直接下载编译好的MQTT库
1、VS2017/vs2019编译的32位MQTT路径
VS2017&&VS2019编译生成的32位MQTT库-C++文档类资源-CSDN下载
2、VS2017/VS2019编译的64位MQTT路径
VS2017&&vs2019编译生成的64位版本MQTT库-C++文档类资源-CSDN下载
3、教程中使用的MQTT源码
4、编译过程用到的工具(OPenSSL\Cmake)
编译MQTT库所需要的工具包(OPenSSL、Cmake)-C++文档类资源-CSDN下载
七、参考地址
1、VS2019编译MQTT库 C/C++(超详细,含示例工程)_攻城狮白玉的博客-CSDN博客_c++ mqtt库


 665
665


 被折叠的 条评论
为什么被折叠?


