


本期将为大家讲解如何在Hexo Butterfly主题中使用自定义页脚。
0. 前期回顾
最新Hexo+GitHubPages搭建个人博客【二】-使用Vercel加速和自定义域名
最新Hexo+GitHubPages搭建个人博客【三】-使用GitHub自带的自定义域名]
最新Hexo+GitHubPages搭建个人博客【四】-Hexo基础使用
最新Hexo+GitHubPages搭建个人博客【五】-主题Icarus使用
Hexo搭建个人博客系列【七】- Butterfly主题使用及美化
Hexo搭建个人博客系列【八】- Butterfly侧边栏公众号
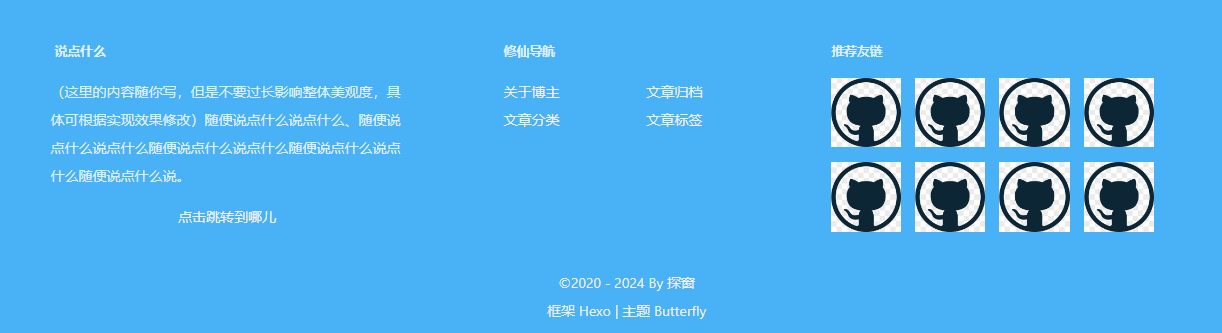
1. 效果预览
2. 实现步骤
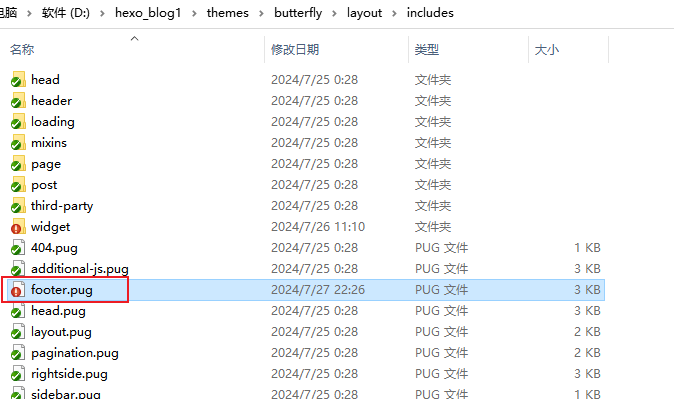
2.1 编辑footer文件
编辑博客根目录下的themes/butterfly/layout/includes/footer.pugg文件。
文件位置如图:
复制以下代码到文件中。
#footer-wrap
  #ft
    .ft-item-1
      .t-top
        .t-t-l
          p.ft-t.t-l-t 说点什么
          .bg-ad
            div
              | (这里的内容随你写,但是不要过长影响整体美观度,具体可根据实现效果修改)随便说点什么说点什么、随便说点什么说点什么随便说点什么说点什么随便说点什么说点什么随便说点什么说。
            .btn-xz-box
              a.btn-xz(href='https://7we.cn/') 点击跳转到哪儿
        .t-t-r
          p.ft-t.t-l-t 修仙导航
          ul.ft-links

            li
              a(href='https://7we.cn/about/') 关于博主
              a(href='https://7we.cn/archives/') 文章归档
            li
              a(href='https://7we.cn/categories/') 文章分类
              a(href='https://7we.cn/tags/') 文章标签

    .ft-item-2
      p.ft-t 推荐友链
      .ft-img-group
        .img-group-item
          a(href='https://7we.cn/')
            img(src='https://7we.cn/images/github.png' alt='')
        .img-group-item
          a(href='https://7we.cn/')
            img(src='https://7we.cn/images/github.png' alt='')
        .img-group-item
          a(href='https://7we.cn/')
            img(src='https://7we.cn/images/github.png' alt='')
        .img-group-item
          a(href='https://7we.cn/')
            img(src='https://7we.cn/images/github.png' alt='')
        .img-group-item
          a(href='https://7we.cn/')
            img(src='https://7we.cn/images/github.png' alt='')
        .img-group-item
          a(href='https://7we.cn/')
            img(src='https://7we.cn/images/github.png' alt='')
        .img-group-item
          a(href='https://7we.cn/')
            img(src='https://7we.cn/images/github.png' alt='')
        .img-group-item
          a(href='https://7we.cn/')
            img(src='https://7we.cn/images/github.png' alt='')
  if theme.footer.owner.enable
    - var now = new Date()
    - var nowYear = now.getFullYear()
    if theme.footer.owner.since && theme.footer.owner.since != nowYear
      .copyright!= `©${theme.footer.owner.since} - ${nowYear} By ${config.author}`
    else
      .copyright!= `©${nowYear} By ${config.author}`
  if theme.footer.copyright
    .framework-info
      span= _p('footer.framework') + ' '
      a(href='https://hexo.io')= 'Hexo'
      span.footer-separator |
      span= _p('footer.theme') + ' '
      a(href='https://github.com/jerryc127/hexo-theme-butterfly')= 'Butterfly'
  if theme.footer.custom_text
    .footer_custom_text!=`${theme.footer.custom_text}`
你需要添加的代码为#ft整个 div,注意在缩进上与主题的几个if对齐。这里你可以根据自己的需求修改以上内容等,例如【说点什么】、自定义底部导航链接等,【推荐友链】的图片尺寸建议 1:1。
2.2 修改自定义样式
编辑themes/butterfly/source/css/custom.css`文件,将代码复制进去。
文件位置如下图
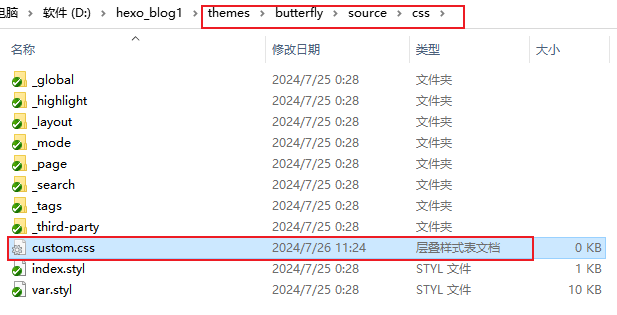
编辑自定义样式文件
编辑themes/butterfly/source/css/custom.css文件,复制以下代码到文件中:
/* 自定义底部  start */
#ft {
    max-width: 1200px;
    margin: 0 auto 12px;
    display: flex;
    color: rgb(255 255 255 / 80%) !important;
    text-align: left;
    flex-wrap: wrap;
}

.ft-item-1,
.ft-item-2 {
    display: flex;
    height: 100%;
    padding: 10px 14px;
}

.ft-item-1 {
    flex-direction: column;
    flex: 2;
}

.ft-item-2 {
    flex: 1;
    flex-direction: column;
}

.t-top {
    display: flex;
}

.t-top .t-t-l {
    display: flex;
    flex-direction: column;
    flex: 1.4;
    margin-right: 10px;
}

.t-top .t-t-l .bg-ad {
    width: 85%;
    border-radius: 10px;
    padding: 0 10px;
}

.btn-xz-box {
    margin-top: 10px;
}

.btn-xz {
    display: block;
    background-color: var(--btn-bg);
    color: var(--btn-color);
    text-align: center;
    line-height: 2.4;
    margin: 8px 0;
    cursor: pointer !important;
}

.btn-xz:hover {
    text-decoration: none !important;

}

.btn-xz-box:hover .btn-xz {
    background-color: #6f42c1;
}

.t-top .t-t-r {
    display: flex;
    flex-direction: column;
    flex: 1;
}

.ft-links {
    padding: 0 14px;
    list-style: none;
    margin-top: 0 !important;
}

.ft-links li a {
    display: inline-block !important;
    width: 50%;
    cursor: pointer !important;
}

.ft-links li a:hover {
    text-decoration: none !important;
    color: #6f42c1 !important;
}

.ft-item-2 .ft-img-group {
    width: 100%;
}

.ft-t {
    font-size: 0.8rem;
    margin-bottom: 20px;
    line-height: 1;
    font-weight: 600;
}

.t-l-t {
    padding-left: 14px;
}

.ft-item-2 .ft-img-group .img-group-item {
    display: inline-block;
    width: 18.4%;
    margin-right: 14px;
    margin-bottom: 6px;
}

.ft-item-2 .ft-img-group .img-group-item a {
    display: inline-block;
    width: 100%;
    height: 100%;
    cursor: pointer !important;
}

.ft-item-2 .ft-img-group .img-group-item a img {
    width: 100%;
    max-height: 80px;
}

@media screen and (max-width: 768px) {

    .ft-item-1 {
        flex-basis: 100% !important;
    }

    .ft-item-2 {
        flex-basis: 100% !important;
    }

    .t-top .t-t-l .bg-ad {
        width: 100%;
    }
}

@media screen and (max-width: 576px) {
    .t-top {
        flex-wrap: wrap;
    }

    .t-top .t-t-l {
        flex-basis: 100% !important;

    }

    .t-top .t-t-r {
        margin-top: 16px;
        flex-basis: 100% !important;
    }
}
/* 自定义底部  End */
css 中的#6f42c1是我的主题色,这里记得换成你的主题色。
2.3 验证效果
启动服务并访问http://localhost:4000查看效果.
hexo clean && hexo s
如果没有生效,请确保以上的步骤是否完全正确,文件是否在正确的位置。
3. 其他
另外,对以下内容感兴趣的同学请移步对应教程:


 2881
2881

 被折叠的 条评论
为什么被折叠?
被折叠的 条评论
为什么被折叠?
 到【灌水乐园】发言


