


转载请标明出处:
http://blog.csdn.net/lmj623565791/article/details/49990941;
本文出自:【张鸿洋的博客】
一、概述
相信Android的开发者对于设配问题都比较苦恼,Google官方虽然给出了一系列的建议,但是想要单纯使用这些建议将设备很轻松的做好,还是相当困难的。个人也比较关注适配的问题,之前也发了几篇关于适配的文章,大致有:
ok,我大致说一下,没看过的先看完这篇,再考虑看不看以上几篇,本篇的灵感是来自以上几篇,但是适配的方便程度、以及效果远比上面几篇效果要好。
既然灵感来源于上述几篇,就大体介绍下:
-
第一篇:主要是根据设计图的尺寸,然后将设计图上标识的px尺寸,转化为百分比,为所有的主流屏幕去生成对应百分比的值,每个尺寸都会有一个values文件夹。存在一些问题:产生大量的文件夹,适配不了特殊的尺寸(必须建立默认的文件夹)
-
第二篇和第三篇:这两篇属于一样的了,主要是基于Google推出的百分比布局,已经很大程度解决了适配的问题。存在一些问题:使用起来比较反人类,因为设计图上标识的都是px,所以需要去计算百分比,然后这个百分比还是依赖父容器的,设计图可能并不会将每个父容器的尺寸都标识出来,所有很难使用(当然,有人已经采用自动化的工具去计算了)。还有个问题就是,因为依赖于父容器,导致ScrollView,ListView等容器内高度无法使用百分比。
可以看到都存在一些问题,或多或少都需要进行一些额外的工作,然而我希望适配是这样的:
- 拿到设计图,meta信息中填入设计图的尺寸,然后不需要额外计算,布局直接抄设计图上的尺寸,不产生任何多余的资源文件,完成各种分辨率的适配!
二、直观的体验
假设我们拿到一张设计图:
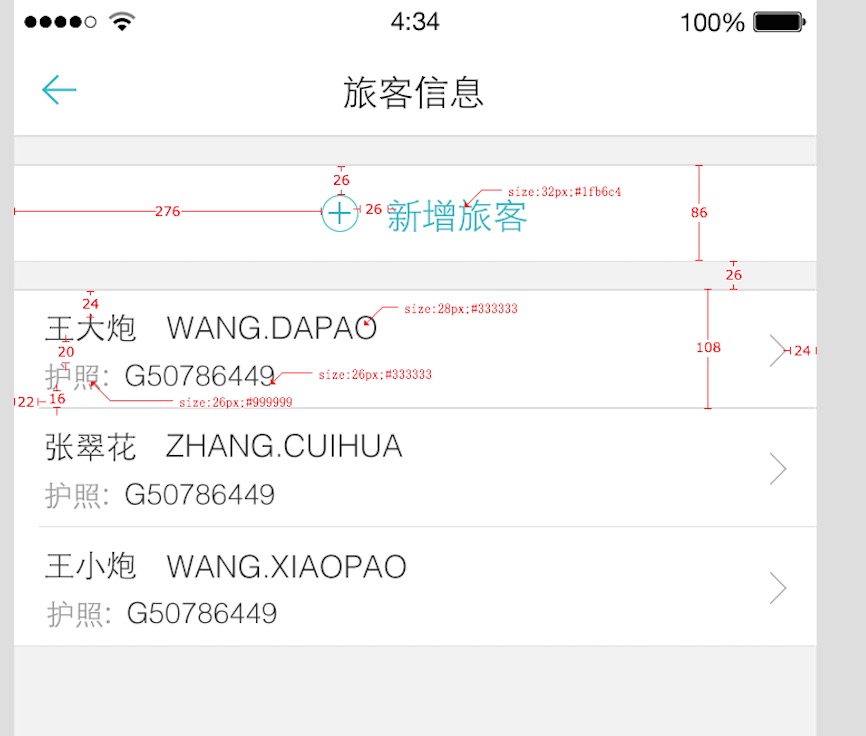
这样的设计图开发中很常见吧,有些公司可能需要自己去测量。
按照我们的思想:
布局直接抄设计图上的尺寸
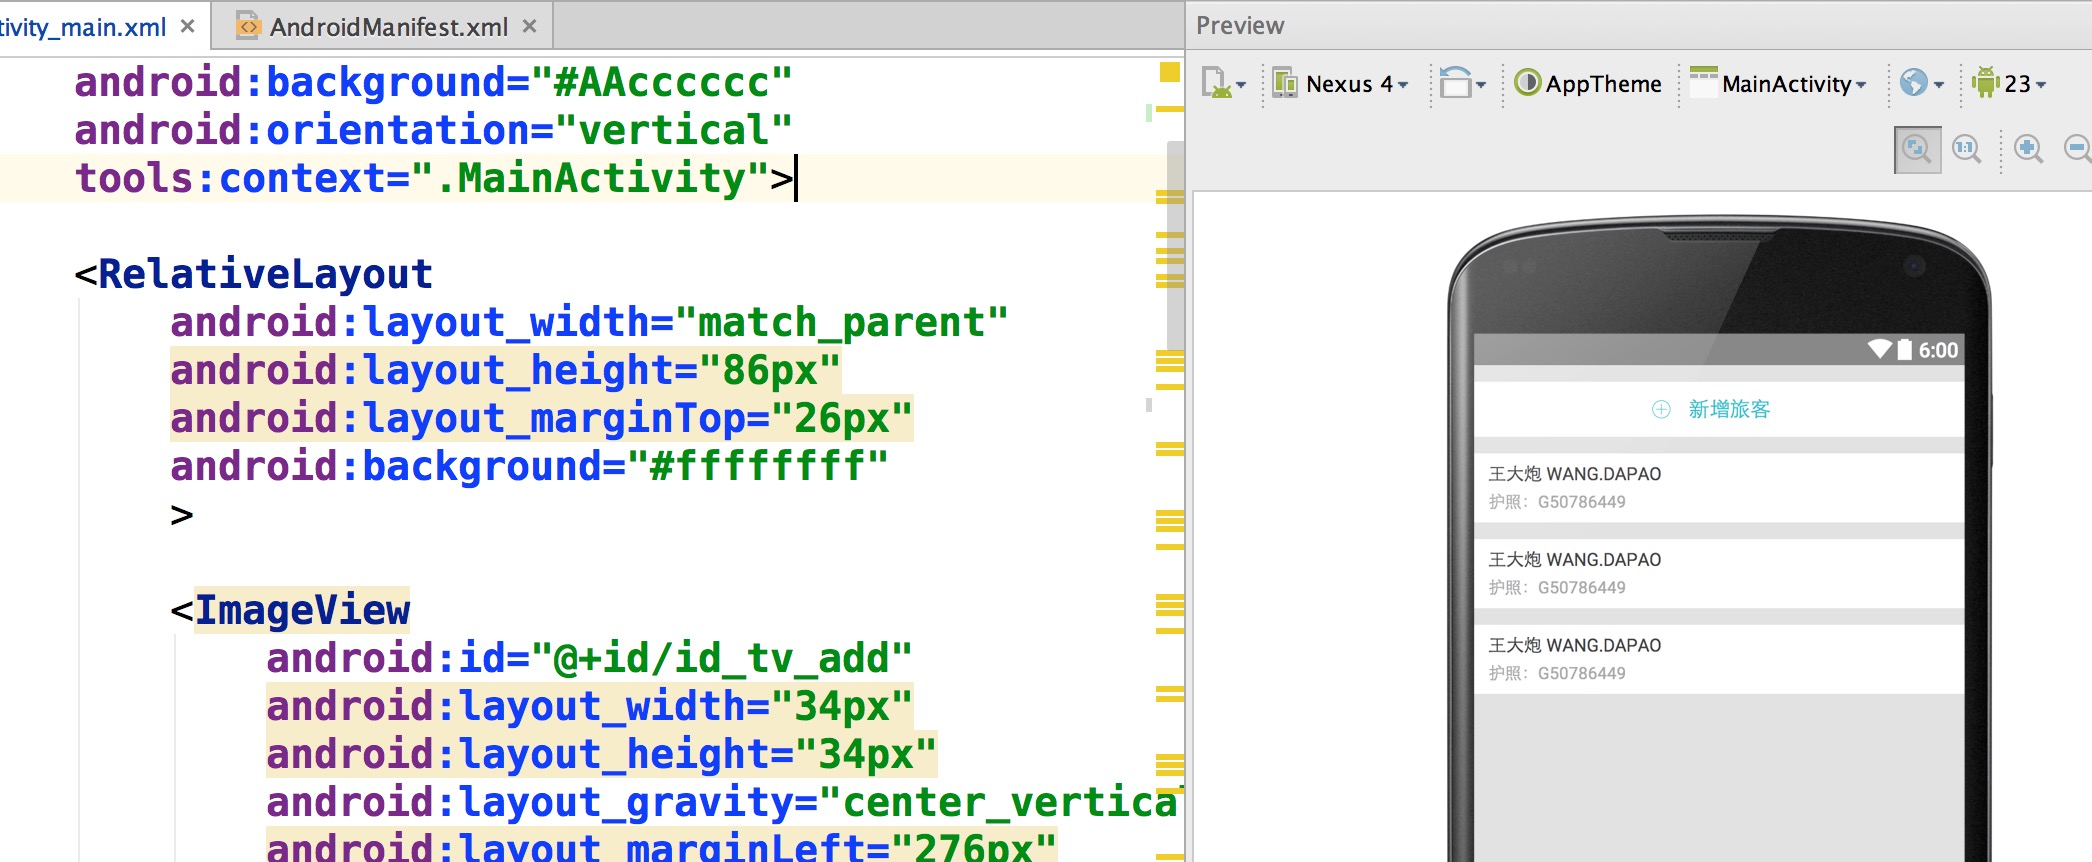
对于,新增旅客我们的布局文库应该这么写:
<RelativeLayout
android:layout_width="match_parent"
android:layout_height="86px"
android:layout_marginTop="26px"
android:background="#ffffffff">

<ImageView
    android:id="@+id/id_tv_add"
    android:layout_width="34px"
    android:layout_height="34px"
    android:layout_gravity="center_vertical"
    android:layout_marginLeft="276px"
    android:layout_marginTop="26px"
    android:src="@mipmap/add"
    />

<TextView
    android:layout_width="wrap_content"
    android:layout_height="wrap_content"
    android:layout_centerVertical="true"
    android:layout_marginLeft="26px"
    android:layout_toRightOf="@id/id_tv_add"
    android:text="新增旅客"
    android:textColor="#1fb6c4"
    android:textSize="32px"
    />
</RelativeLayout>
来张组合图,感受一下:
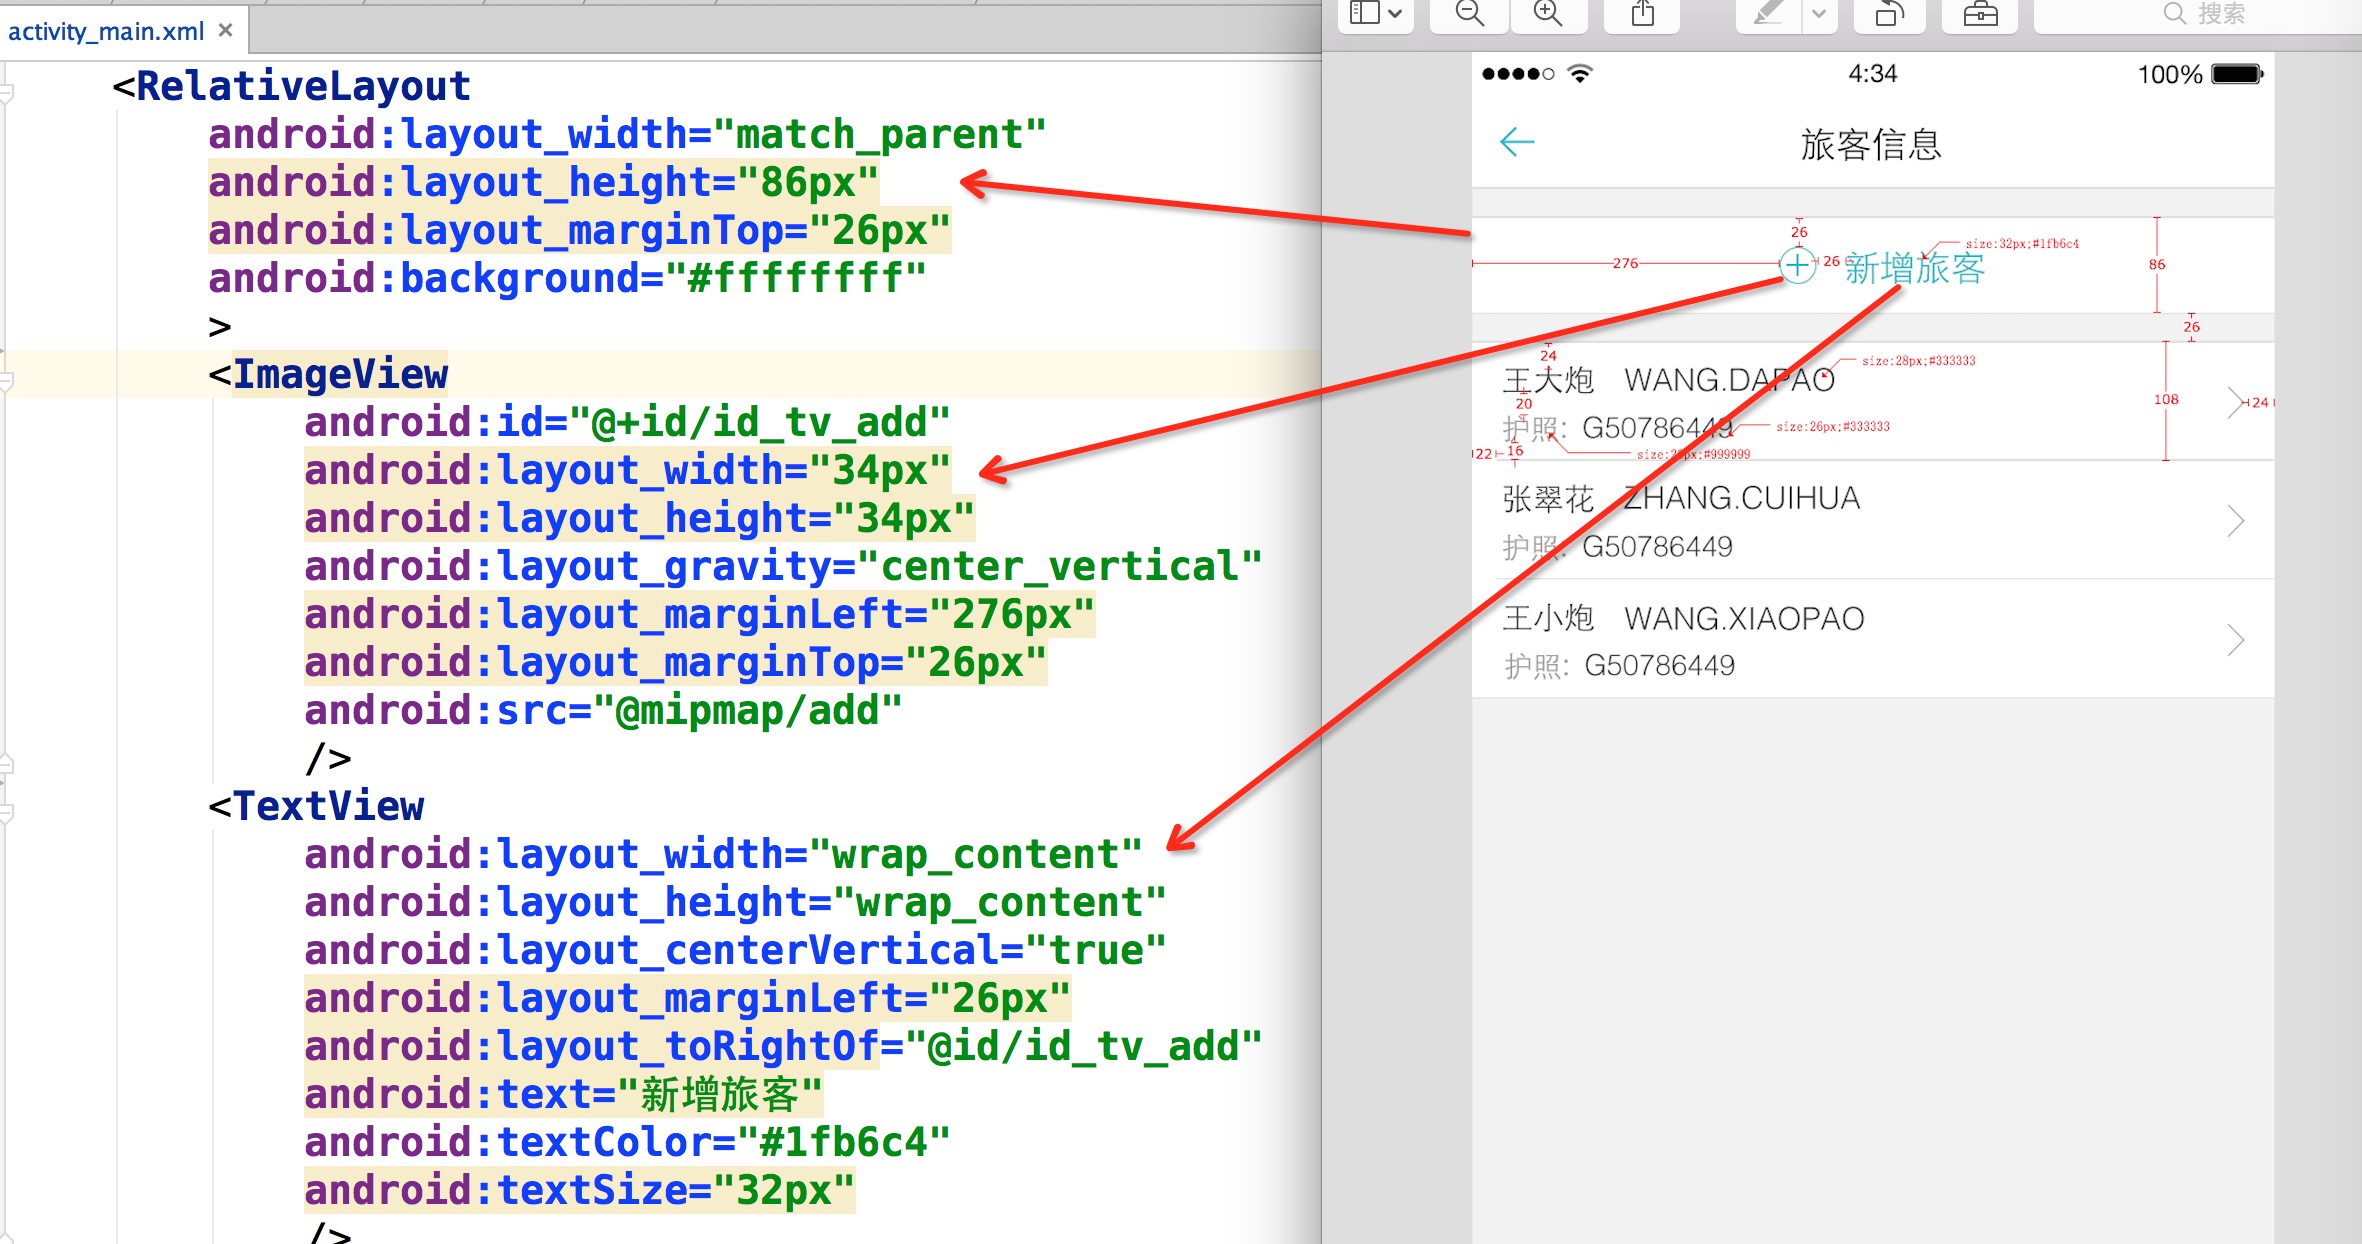
感受完了,想一想,按照这种方式去写布局你说爽不爽。
ok,那么对于Item的布局文件,就是这么写:
<RelativeLayout
    android:layout_width="match_parent"
    android:layout_height="108px"
    android:layout_marginTop="26px"
    android:background="#ffffffff"
    >

    <TextView
        android:layout_width="wrap_content"
        android:layout_height="wrap_content"
        android:layout_marginLeft="22px"
        android:layout_marginTop="16px"
        android:text="王大炮 WANG.DAPAO"
        android:textColor="#333"
        android:textSize="28px"
        />
    <TextView
        android:layout_width="wrap_content"
        android:layout_height="wrap_content"
        android:layout_alignParentBottom="true"
        android:layout_marginBottom="16px"
        android:layout_marginLeft="22px"
        android:text="护照:G50786449"
        android:textColor="#999"
        android:textSize="26px"
        />

</RelativeLayout>
看到这,我相信,你现在最大的疑问就是:你用的px,px能完成适配?搞笑吧?
那么首先说一下:这个px并不代表1像素,我在内部会进行百分比化处理,也就是说:720px高度的屏幕,你这里填写72px,占据10%;当这个布局文件运行在任何分辨率的手机上,这个72px都代表10%的高度,这就是本库适配的原理。
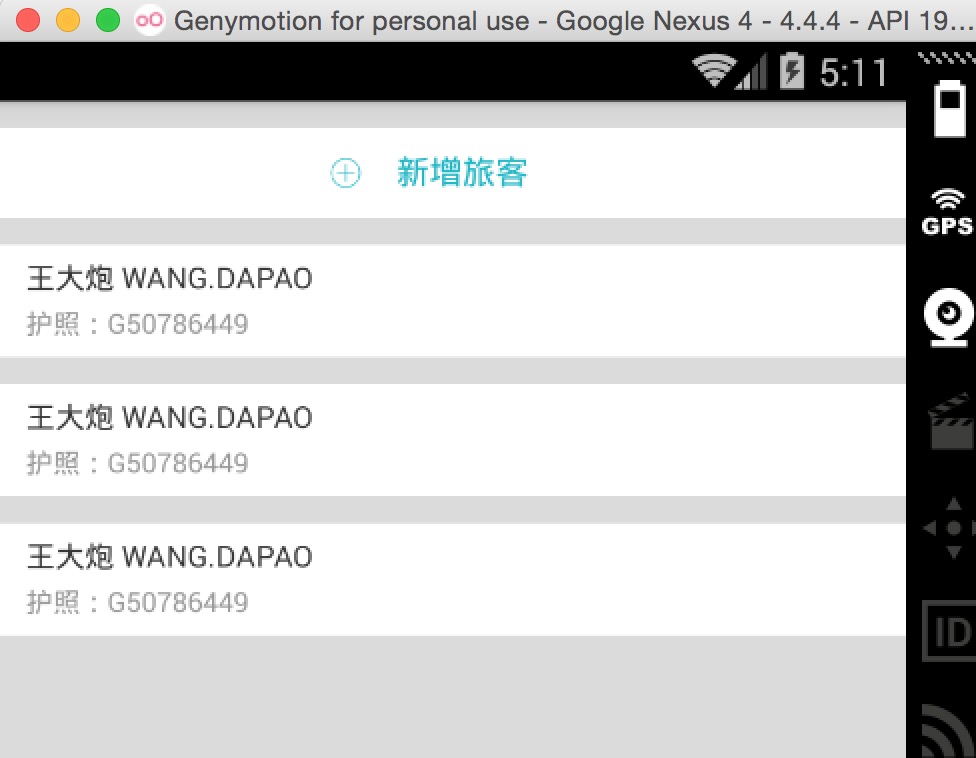
接下来:看下不同分辨率下的效果:
768*1280,Andriod 4.4.4
480*800,Android 2.3.7
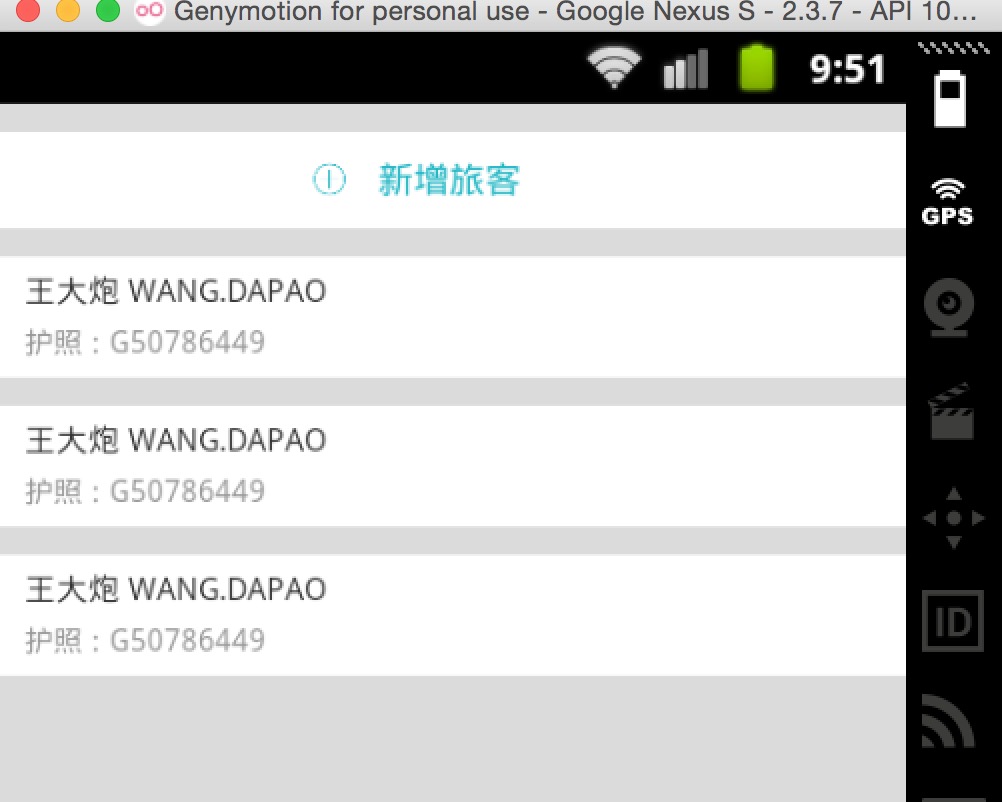
上述两个机器的分辨率差距相当大了,按照百分比的规则,完美实现了适配,最为重要的是:
- 再也不用拿着设计稿去想这控件的宽高到底取多少dp
- 再也不用去为多个屏幕去写多个dimens
- 再也不用去计算百分比了(如果使用百分比控件完成适配)
- 再也不用去跟UI MM去解释什么是dp了
接下来说下用法。
本库的地址:https://github.com/hongyangAndroid/AndroidAutoLayout
三、用法
用法
(1)注册设计图尺寸
将autolayout引入
dependencies {
    compile project(':autolayout')
}
对于eclipse的伙伴,只有去copy源码了~~
在你的项目的AndroidManifest中注明你的设计稿的尺寸。
<meta-data android:name="design_width" android:value="768"></meta-data>
<meta-data android:name="design_height" android:value="1280"></meta-data>
(2)Activity中开启设配
- 让你的Activity去继承
AutoLayoutActivity
ok,非常简单的两部即可引入项目,然后,然后干嘛?
然后就按照上个章节的编写方式开始玩耍吧~
ok,上面是最简单的用法,当然你也可以不去继承AutoLayoutActivity来使用。
AutoLayoutActivity的用法实际上是完成了一件事:
- LinearLayout -> AutoLinearLayout
- RelativeLayout -> AutoRelativeLayout
- FrameLayout -> AutoFrameLayout
如果你不想继承AutoLayoutActivity,那么你就得像Google的百分比库一样,去用AutoXXXLayout代替系统原有的XXXLayout。当然,你可以放心的是,所有的系统属性原有的属性都会支持,不过根布局上就不支持px的自动百分比化了,但是一般根布局都是MATCH_PARENT,而上述的方式,根布局也是可以直接px的百分比化的。
四、注意事项
(1)如何开启PreView
大家都知道,写布局文件的时候,不能实时的去预览效果,那么体验真的是非常的不好,也在很大程度上降低开发效率,所以下面教大家如何用好,用对PreView(针对该库)。
首先,你要记得你设计稿的尺寸,比如 768 * 1280
然后在你的PreView面板,选择分辨率一致的设备:
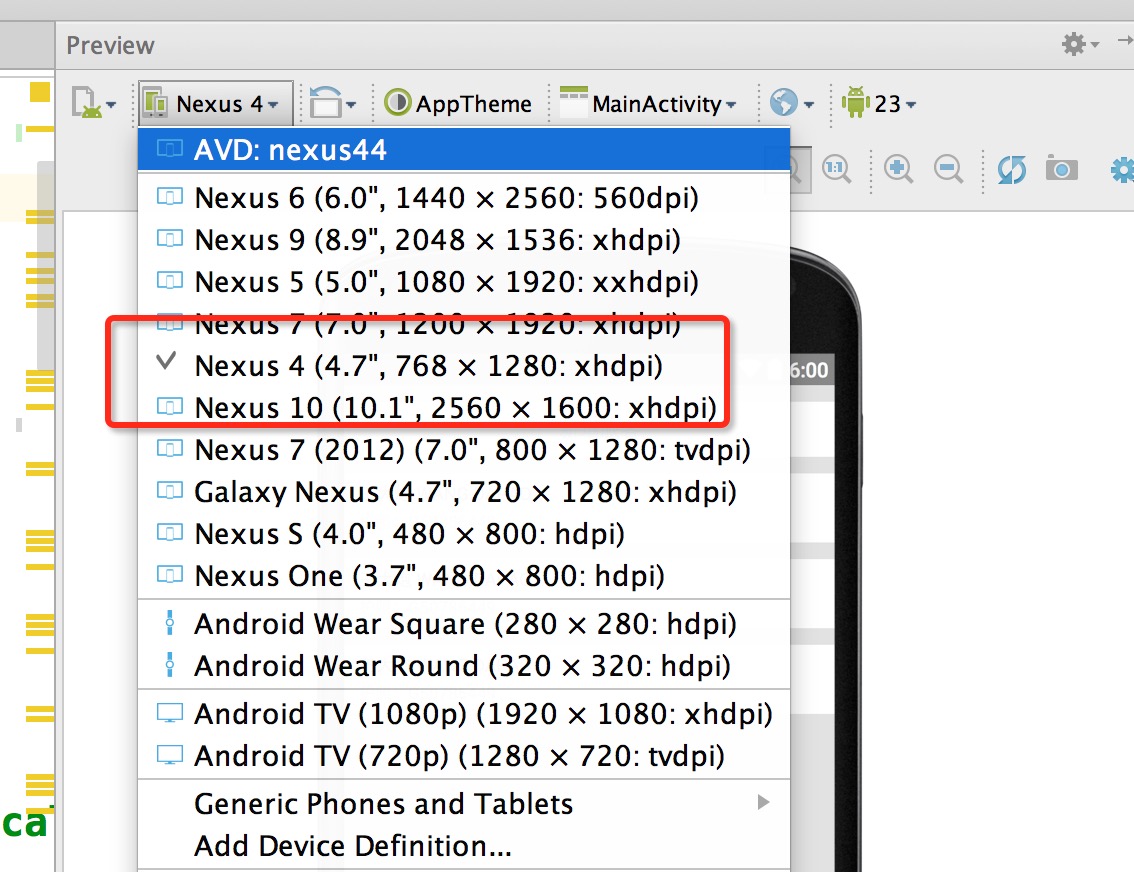
然后你就可以看到最为精确的预览了:
两个注意事项:
- 你们UI给的设计图的尺寸并非是主流的设计图,该尺寸没找到,你可以
拿显示器砸他自己去新建一个设备。 - 不要在PreView中去查看所有分辨率下的显示,是看不出来适配效果的,因为有些计算是动态的。
(2)关于TextView
TextView这个控件呢,可能和设计稿上会有一些出入,并非是此库的原因,而是与生俱来的特性。
比如:
<TextView
 textSize="32px"
 layout_height="wrap_contnt"
 />
你去运行肯定不是32px的高度,文字的上下方都会有一定的空隙。如何你将高度写死,也会发现文字显示不全。
恩,所以呢,灵活应对这个问题,对于存在字体标识很精确的值,你可以选择:对于TextView与其他控件的上下边距呢,尽可能的稍微写小一点。
其实我上面的例子,几乎都是TextView,所有我在编写Item里面的时候,也有意缩小了一下marginTop值等。不过,对于其他控件是不存在这样的问题的。
ps:因为TextView的上述问题:所以对于居中,虽然可以使用本库通过编写margin_left,margin_top等很轻松的完成居中。但是为了精确起见,还是建议使用gravity,centerInXXX等属性完成。
(3) 指定设置的值参考宽度或者高度
由于该库的特点,布局文件中宽高上的1px是不相等的,于是如果需要宽高保持一致的情况,布局中使用属性:
app:layout_auto_basewidth="height",代表height上编写的像素值参考宽度。
app:layout_auto_baseheight="width",代表width上编写的像素值参考高度。
如果需要指定多个值参考宽度即:
app:layout_auto_basewidth="height|padding"
用|隔开,类似gravity的用法,取值为:
- width,height
- margin,marginLeft,marginTop,marginRight,marginBottom
- padding,paddingLeft,paddingTop,paddingRight,paddingBottom
- textSize.
(4)将状态栏区域作为内容区域
如果某个Activity需要将状态栏区域作为实际的内容区域时,那么可用高度会变大,你所要做的只有一件事:让这个Activity实现UseStatusBar接口(仅仅作为标识左右,不需要实现任何方法),当然你肯定要自己开启windowTranslucentStatus或者设置FLAG_TRANSLUCENT_STATUS。
注意:仅仅是改变状态栏颜色,并不需要实现此接口,因为并没有实际上增加可用高度。
五、其他
目前支持属性
- layout_width
- layout_height
- layout_margin(left,top,right,bottom)
- pading(left,top,right,bottom)
- textSize
- 不会影响系统所有的其他属性,以及不会影响dp,sp的使用
性能的提升
通过本库的方式去编写代码,可以在很大程序上使用margin,也就是说,对于View的位置非常好控制,从而能够减少非常多的嵌套,甚至任何一个复杂的界面做到无嵌套。
以及,几乎不需要去使用RelativeLayout的规则了,比如rightOf,完全可以由marginLeft完成,其他的rule同理。
对于LinearLayout的weight,几乎也不需要使用了,比如屏幕宽度720px,想要四个控件横向均分,完全可以写layout_width="180px"
我相信通过上述的介绍,你已经了解的本库适配的做法,而且可以说是我见过的最方便的适配方案,最大化的减轻了适配的负担,甚至比你不适配时编写UI都方便。目前本库,已经尝试用于项目中,尽可能去发现一些潜在的问题。
本库的地址:https://github.com/hongyangAndroid/AndroidAutoLayout,欢迎各位一起完善,让适配问题消失在我们的痛苦中。
ok,最后,只有去体验了,才能发现优点和缺点~~
欢迎关注我的微博:
http://weibo.com/u/3165018720
群号:514447580,欢迎入群
微信公众号:hongyangAndroid
(欢迎关注,第一时间推送博文信息)

转载请标明出处:
http://blog.csdn.net/lmj623565791/article/details/49883661;
本文出自:【张鸿洋的博客】
一、概述
最新github上开源了很多热补丁动态修复框架,大致有:
- https://github.com/dodola/HotFix
- https://github.com/jasonross/Nuwa
- https://github.com/bunnyblue/DroidFix
上述三个框架呢,根据其描述,原理都来自:安卓App热补丁动态修复技术介绍,以及Android dex分包方案,所以这俩篇务必要看。这里就不对三个框架做过多对比了,因为原理都一致,实现的代码可能差异并不是特别大。
有兴趣的直接看这篇原理文章,加上上面框架的源码基本就可以看懂了。当然了,本篇博文也会做个上述框架源码的解析,以及在整个实现过程中用到的技术的解析。
二、热修复原理
对于热修复的原理,如果你看了上面的两篇文章,相信你已经大概明白了。重点需要知道的就是,Android的ClassLoader体系,android中加载类一般使用的是PathClassLoader和DexClassLoader,首先看下这两个类的区别:
-
对于
PathClassLoader,从文档上的注释来看:Provides a simple {@link ClassLoader} implementation that operates
on a list of files and directories in the local file system, but
does not attempt to load classes from the network. Android uses
this class for its system class loader and for its application
class loader(s).可以看出,Android是使用这个类作为其系统类和应用类的加载器。并且对于这个类呢,只能去加载已经安装到Android系统中的apk文件。
-
对于
DexClassLoader,依然看下注释:A class loader that loads classes from {@code .jar} and
{@code .apk} files containing a {@code classes.dex} entry.
This can be used to execute code not installed as part of an application.可以看出,该类呢,可以用来从.jar和.apk类型的文件内部加载classes.dex文件。可以用来执行非安装的程序代码。
ok,如果大家对于插件化有所了解,肯定对这个类不陌生,插件化一般就是提供一个apk(插件)文件,然后在程序中load该apk,那么如何加载apk中的类呢?其实就是通过这个DexClassLoader,具体的代码我们后面有描述。
ok,到这里,大家只需要明白,Android使用PathClassLoader作为其类加载器,DexClassLoader可以从.jar和.apk类型的文件内部加载classes.dex文件就好了。
上面我们已经说了,Android使用PathClassLoader作为其类加载器,那么热修复的原理具体是?
ok,对于加载类,无非是给个classname,然后去findClass,我们看下源码就明白了。
PathClassLoader和DexClassLoader都继承自BaseDexClassLoader。在BaseDexClassLoader中有如下源码:
#BaseDexClassLoader
@Override
protected Class<?> findClass(String name) throws ClassNotFoundException {
    Class clazz = pathList.findClass(name);

    if (clazz == null) {
        throw new ClassNotFoundException(name);
    }

    return clazz;
}

#DexPathList
public Class findClass(String name) {
    for (Element element : dexElements) {
        DexFile dex = element.dexFile;

        if (dex != null) {
            Class clazz = dex.loadClassBinaryName(name, definingContext);
            if (clazz != null) {
                return clazz;
            }
        }
    }

    return null;
}

#DexFile
public Class loadClassBinaryName(String name, ClassLoader loader) {
    return defineClass(name, loader, mCookie);
}
private native static Class defineClass(String name, ClassLoader loader, int cookie);
可以看出呢,BaseDexClassLoader中有个pathList对象,pathList中包含一个DexFile的集合dexElements,而对于类加载呢,就是遍历这个集合,通过DexFile去寻找。
ok,通俗点说:
一个ClassLoader可以包含多个dex文件,每个dex文件是一个Element,多个dex文件排列成一个有序的数组dexElements,当找类的时候,会按顺序遍历dex文件,然后从当前遍历的dex文件中找类,如果找类则返回,如果找不到从下一个dex文件继续查找。(来自:安卓App热补丁动态修复技术介绍)
那么这样的话,我们可以在这个dexElements中去做一些事情,比如,在这个数组的第一个元素放置我们的patch.jar,里面包含修复过的类,这样的话,当遍历findClass的时候,我们修复的类就会被查找到,从而替代有bug的类。
说到这,你可能已经露出笑容了,原来热修复原理这么简单。不过,还存在一个CLASS_ISPREVERIFIED的问题,对于这个问题呢,详见:安卓App热补丁动态修复技术介绍该文有图文详解。
ok,对于CLASS_ISPREVERIFIED,还是带大家理一下:
根据上面的文章,在虚拟机启动的时候,当verify选项被打开的时候,如果static方法、private方法、构造函数等,其中的直接引用(第一层关系)到的类都在同一个dex文件中,那么该类就会被打上CLASS_ISPREVERIFIED标志。
那么,我们要做的就是,阻止该类打上CLASS_ISPREVERIFIED的标志。
注意下,是阻止引用者的类,也就是说,假设你的app里面有个类叫做LoadBugClass,再其内部引用了BugClass。发布过程中发现BugClass有编写错误,那么想要发布一个新的BugClass类,那么你就要阻止LoadBugClass这个类打上CLASS_ISPREVERIFIED的标志。
也就是说,你在生成apk之前,就需要阻止相关类打上CLASS_ISPREVERIFIED的标志了。对于如何阻止,上面的文章说的很清楚,让LoadBugClass在构造方法中,去引用别的dex文件,比如:hack.dex中的某个类即可。
ok,总结下:
其实就是两件事:1、动态改变BaseDexClassLoader对象间接引用的dexElements;2、在app打包的时候,阻止相关类去打上CLASS_ISPREVERIFIED标志。
如果你没有看明白,没事,多看几遍,下面也会通过代码来说明。
三、阻止相关类打上CLASS_ISPREVERIFIED标志
ok,接下来的代码基本上会通过https://github.com/dodola/HotFix所提供的代码来讲解。
那么,这里拿具体的类来说:
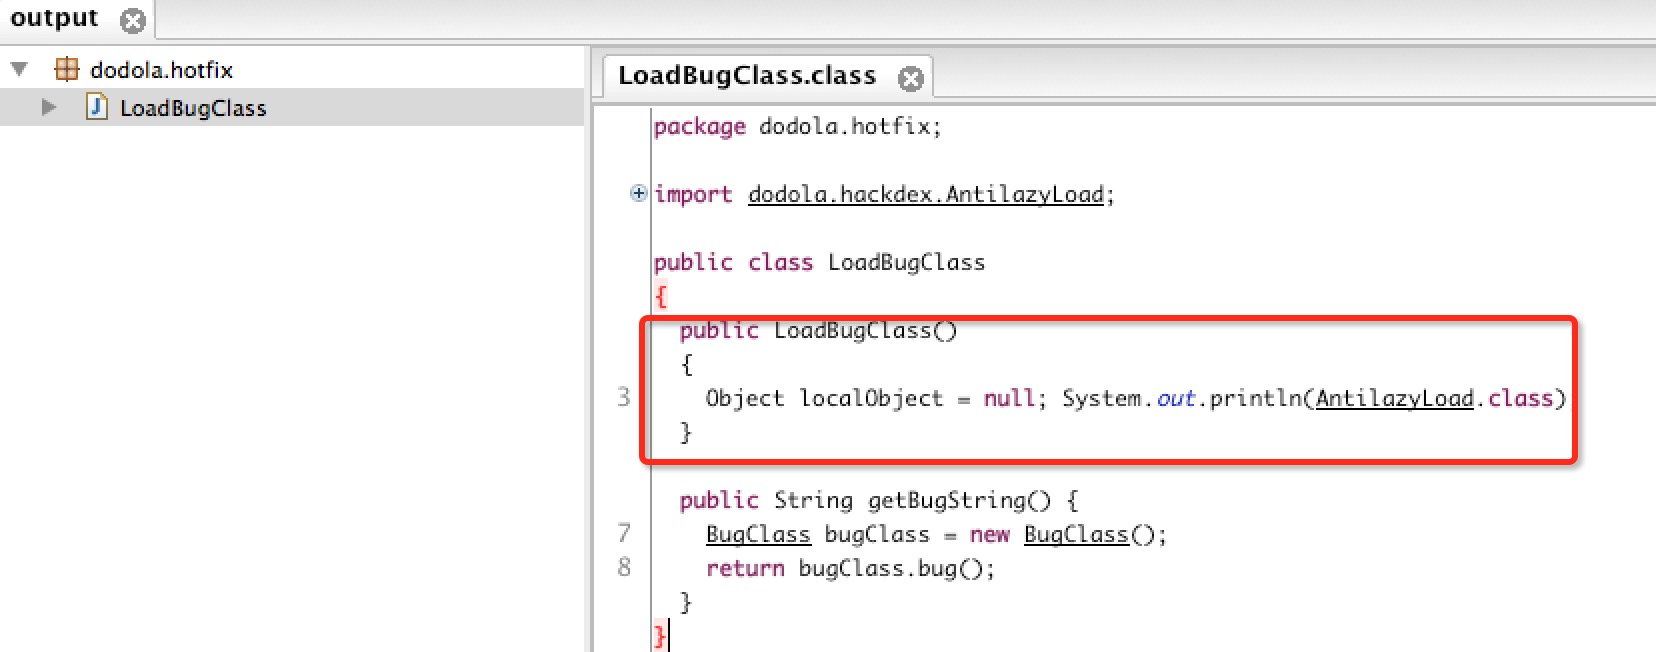
大致的流程是:在dx工具执行之前,将LoadBugClass.class文件呢,进行修改,再其构造中添加System.out.println(dodola.hackdex.AntilazyLoad.class),然后继续打包的流程。注意:AntilazyLoad.class这个类是独立在hack.dex中。
ok,这里大家可能会有2个疑问:
- 如何去修改一个类的class文件
- 如何在dx之前去进行疑问1的操作
(1)如何去修改一个类的class文件
这里我们使用javassist来操作,很简单:
ok,首先我们新建几个类:
package dodola.hackdex;
public class AntilazyLoad
{

}

package dodola.hotfix;
public class BugClass
{
    public String bug()
    {
        return "bug class";
    }
}

package dodola.hotfix;
public class LoadBugClass
{
    public String getBugString()
    {
        BugClass bugClass = new BugClass();
        return bugClass.bug();
    }
}
注意下,这里的package,我们要做的是,上述类正常编译以后产生class文件。比如:LoadBugClass.class,我们在LoadBugClass.class的构造中去添加一行:
System.out.println(dodola.hackdex.AntilazyLoad.class)下面看下操作类:
package test;

import javassist.ClassPool;
import javassist.CtClass;
import javassist.CtConstructor;

public class InjectHack
{
    public static void main(String[] args)
    {
        try
        {
            String path = "/Users/zhy/develop_work/eclipse_android/imooc/JavassistTest/";
            ClassPool classes = ClassPool.getDefault();
            classes.appendClassPath(path + "bin");//项目的bin目录即可
            CtClass c = classes.get("dodola.hotfix.LoadBugClass");
            CtConstructor ctConstructor = c.getConstructors()[0];
            ctConstructor
                    .insertAfter("System.out.println(dodola.hackdex.AntilazyLoad.class);");
            c.writeFile(path + "/output");
        } catch (Exception e)
        {
            e.printStackTrace();
        }

    }
}
ok,点击run即可了,注意项目中导入javassist-*.jar的包。
首先拿到ClassPool对象,然后添加classpath,如果你有多个classpath可以多次调用。然后从classpath中找到LoadBugClass,拿到其构造方法,在其最后插入一行代码。ok,代码很好懂。
ok,我们反编译看下我们生成的class文件:
ok,关于javassist,如果有兴趣的话,大家可以参考几篇文章学习下:
(2)如何在dx之前去进行(1)的操作
ok,这个就结合https://github.com/dodola/HotFix的源码来说了。
将其源码导入之后,打开app/build.gradle
apply plugin: 'com.android.application'

task('processWithJavassist') << {
    String classPath = file('build/intermediates/classes/debug')//项目编译class所在目录
    dodola.patch.PatchClass.process(classPath, project(':hackdex').buildDir
            .absolutePath + '/intermediates/classes/debug')//第二个参数是hackdex的class所在目录

}
android {
    applicationVariants.all { variant ->
        variant.dex.dependsOn << processWithJavassist //在执行dx命令之前将代码打入到class中
    }
}
你会发现,在执行dx之前,会先执行processWithJavassist这个任务。这个任务的作用呢,就和我们上面的代码一致了。而且源码也给出了,大家自己看下。
ok,到这呢,你就可以点击run了。ok,有兴趣的话,你可以反编译去看看dodola.hotfix.LoadBugClass这个类的构造方法中是否已经添加了改行代码。
关于反编译的用法,工具等,参考:http://blog.csdn.net/lmj623565791/article/details/23564065
ok,到此我们已经能够正常的安装apk并且运行了。但是目前还未涉及到打补丁的相关代码。
四、动态改变BaseDexClassLoader对象间接引用的dexElements
ok,这里就比较简单了,动态改变一个对象的某个引用我们反射就可以完成了。
不过这里需要注意的是,还记得我们之前说的,寻找class是遍历dexElements;然后我们的AntilazyLoad.class实际上并不包含在apk的classes.dex中,并且根据上面描述的需要,我们需要将AntilazyLoad.class这个类打成独立的hack_dex.jar,注意不是普通的jar,必须经过dx工具进行转化。
具体做法:
jar cvf hack.jar dodola/hackdex/*
dx  --dex --output hack_dex.jar hack.jar
如果,你没有办法把那一个class文件搞成jar,去百度一下…
ok,现在有了hack_dex.jar,这个是干嘛的呢?
应该还记得,我们的app中部门类引用了AntilazyLoad.class,那么我们必须在应用启动的时候,降这个hack_dex.jar插入到dexElements,否则肯定会出事故的。
那么,Application的onCreate方法里面就很适合做这件事情,我们把hack_dex.jar放到assets目录。
下面看hotfix的源码:
/*
 * Copyright (C) 2015 Baidu, Inc. All Rights Reserved.
 */
package dodola.hotfix;

import android.app.Application;
import android.content.Context;

import java.io.File;

import dodola.hotfixlib.HotFix;

/**
 * Created by sunpengfei on 15/11/4.
 */
public class HotfixApplication extends Application
{

    @Override
    public void onCreate()
    {
        super.onCreate();
        File dexPath = new File(getDir("dex", Context.MODE_PRIVATE), "hackdex_dex.jar");
        Utils.prepareDex(this.getApplicationContext(), dexPath, "hackdex_dex.jar");
        HotFix.patch(this, dexPath.getAbsolutePath(), "dodola.hackdex.AntilazyLoad");
        try
        {
            this.getClassLoader().loadClass("dodola.hackdex.AntilazyLoad");
        } catch (ClassNotFoundException e)
        {
            e.printStackTrace();
        }

    }
}
ok,在app的私有目录创建一个文件,然后调用Utils.prepareDex将assets中的hackdex_dex.jar写入该文件。
接下来HotFix.patch就是去反射去修改dexElements了。我们深入看下源码:
/*
 * Copyright (C) 2015 Baidu, Inc. All Rights Reserved.
 */
package dodola.hotfix;

/**
 * Created by sunpengfei on 15/11/4.
 */
public class Utils {
    private static final int BUF_SIZE = 2048;

    public static boolean prepareDex(Context context, File dexInternalStoragePath, String dex_file) {
        BufferedInputStream bis = null;
        OutputStream dexWriter = null;
        bis = new BufferedInputStream(context.getAssets().open(dex_file));
        dexWriter = new BufferedOutputStream(new FileOutputStream(dexInternalStoragePath));
        byte[] buf = new byte[BUF_SIZE];
        int len;
        while ((len = bis.read(buf, 0, BUF_SIZE)) > 0) {
            dexWriter.write(buf, 0, len);
        }
        dexWriter.close();
        bis.close();
        return true;

}
ok,其实就是文件的一个读写,将assets目录的文件,写到app的私有目录中的文件。
下面主要看patch方法
/*
 * Copyright (C) 2015 Baidu, Inc. All Rights Reserved.
 */
package dodola.hotfixlib;

import android.annotation.TargetApi;
import android.content.Context;

import java.io.File;
import java.lang.reflect.Array;
import java.lang.reflect.Field;
import java.lang.reflect.InvocationTargetException;

import dalvik.system.DexClassLoader;
import dalvik.system.PathClassLoader;

/* compiled from: ProGuard */
public final class HotFix
{
    public static void patch(Context context, String patchDexFile, String patchClassName)
    {
        if (patchDexFile != null && new File(patchDexFile).exists())
        {
            try
            {
                if (hasLexClassLoader())
                {
                    injectInAliyunOs(context, patchDexFile, patchClassName);
                } else if (hasDexClassLoader())
                {
                    injectAboveEqualApiLevel14(context, patchDexFile, patchClassName);
                } else
                {

                    injectBelowApiLevel14(context, patchDexFile, patchClassName);

                }
            } catch (Throwable th)
            {
            }
        }
    }
 }
这里很据系统中ClassLoader的类型做了下判断,原理都是反射,我们看其中一个分支hasDexClassLoader();
private static boolean hasDexClassLoader()
{
    try
    {
        Class.forName("dalvik.system.BaseDexClassLoader");
        return true;
    } catch (ClassNotFoundException e)
    {
        return false;
    }
}


 private static void injectAboveEqualApiLevel14(Context context, String str, String str2)
            throws ClassNotFoundException, NoSuchFieldException, IllegalAccessException
{
    PathClassLoader pathClassLoader = (PathClassLoader) context.getClassLoader();
    Object a = combineArray(getDexElements(getPathList(pathClassLoader)),
            getDexElements(getPathList(
                    new DexClassLoader(str, context.getDir("dex", 0).getAbsolutePath(), str, context.getClassLoader()))));
    Object a2 = getPathList(pathClassLoader);
    setField(a2, a2.getClass(), "dexElements", a);
    pathClassLoader.loadClass(str2);
}
首先查找类dalvik.system.BaseDexClassLoader,如果找到则进入if体。
在injectAboveEqualApiLevel14中,根据context拿到PathClassLoader,然后通过getPathList(pathClassLoader),拿到PathClassLoader中的pathList对象,在调用getDexElements通过pathList取到dexElements对象。
ok,那么我们的hack_dex.jar如何转化为dexElements对象呢?
通过源码可以看出,首先初始化了一个DexClassLoader对象,前面我们说过DexClassLoader的父类也是BaseDexClassLoader,那么我们可以通过和PathClassLoader同样的方式取得dexElements。
ok,到这里,我们取得了,系统中PathClassLoader对象的间接引用dexElements,以及我们的hack_dex.jar中的dexElements,接下来就是合并这两个数组了。
可以看到上面的代码使用的是combineArray方法。
合并完成后,将新的数组通过反射的方式设置给pathList.
接下来看一下反射的细节:
private static Object getPathList(Object obj) throws ClassNotFoundException, NoSuchFieldException,
            IllegalAccessException
{
    return getField(obj, Class.forName("dalvik.system.BaseDexClassLoader"), "pathList");
}

private static Object getDexElements(Object obj) throws NoSuchFieldException, IllegalAccessException
{
    return getField(obj, obj.getClass(), "dexElements");
}

private static Object getField(Object obj, Class cls, String str)
            throws NoSuchFieldException, IllegalAccessException
{
    Field declaredField = cls.getDeclaredField(str);
    declaredField.setAccessible(true);
    return declaredField.get(obj);
}
其实都是取成员变量的过程,应该很容易懂~~
private static Object combineArray(Object obj, Object obj2)
{
    Class componentType = obj2.getClass().getComponentType();
    int length = Array.getLength(obj2);
    int length2 = Array.getLength(obj) + length;
    Object newInstance = Array.newInstance(componentType, length2);
    for (int i = 0; i < length2; i++)
    {
        if (i < length)
        {
            Array.set(newInstance, i, Array.get(obj2, i));
        } else
        {
            Array.set(newInstance, i, Array.get(obj, i - length));
        }
    }
    return newInstance;
}
ok,这里的两个数组合并,只需要注意一件事,将hack_dex.jar里面的dexElements放到新数组前面即可。
到此,我们就完成了在应用启动的时候,动态的将hack_dex.jar中包含的DexFile注入到ClassLoader的dexElements中。这样就不会查找不到AntilazyLoad这个类了。
ok,那么到此呢,还是没有看到我们如何打补丁,哈,其实呢,已经说过了,打补丁的过程和我们注入hack_dex.jar是一致的。
你现在运行HotFix的app项目,点击menu里面的测试:
会弹出:调用测试方法:bug class
接下来就看如何完成热修复。
五、完成热修复
ok,那么我们假设BugClass这个类有错误,需要修复:
package dodola.hotfix;

public class BugClass
{
    public String bug()
    {
        return "fixed class";
    }
}
可以看到字符串变化了:bug class -> fixed class .
然后,编译,将这个类的class->jar->dex。步骤和上面是一致的。
 jar cvf path.jar dodola/hotfix/BugClass.class
 dx  --dex --output path_dex.jar path.jar
拿到path_dex.jar文件。
正常情况下,这个玩意应该是下载得到的,当然我们介绍原理,你可以直接将其放置到sdcard上。
然后在Application的onCreate中进行读取,我们这里为了方便也放置到assets目录,然后在Application的onCreate中添加代码:
public class HotfixApplication extends Application
{

    @Override
    public void onCreate()
    {
        super.onCreate();
        File dexPath = new File(getDir("dex", Context.MODE_PRIVATE), "hackdex_dex.jar");
        Utils.prepareDex(this.getApplicationContext(), dexPath, "hack_dex.jar");
        HotFix.patch(this, dexPath.getAbsolutePath(), "dodola.hackdex.AntilazyLoad");
        try
        {
            this.getClassLoader().loadClass("dodola.hackdex.AntilazyLoad");
        } catch (ClassNotFoundException e)
        {
            e.printStackTrace();
        }

        dexPath = new File(getDir("dex", Context.MODE_PRIVATE), "path_dex.jar");
        Utils.prepareDex(this.getApplicationContext(), dexPath, "path_dex.jar");
        HotFix.patch(this, dexPath.getAbsolutePath(), "dodola.hotfix.BugClass");

    }
}
其实就是添加了后面的3行,这里需要说明一下,第一行依旧是复制到私有目录,如果你是sdcard上,那么操作基本是一致的,这里就别问:如果在sdcard或者网络上怎么处理~
ok,那么再次运行我们的app。

ok,最后说一下,说项目中有一个打补丁的按钮,在menu下,那么你也可以不在Application里面添加我们最后的3行。
你运行app后,先点击打补丁,然后点击测试也可以发现成功修复了。
如果先点击测试,再点击打补丁,再测试是不会变化的,因为类一旦加载以后,不会重新再去重新加载了。
ok,到此,我们的热修复的原理,已经解决方案,我相信已经很详细的介绍完成了,如果你有足够的耐心一定可以实现。中间制作补丁等操作,我们的操作比较麻烦,自动化的话,可以参考https://github.com/jasonross/Nuwa。
最后就是对于QQ空间团队,以及开源作者的感谢了~~
欢迎关注我的微博:
http://weibo.com/u/3165018720
群号:514447580,欢迎入群
微信公众号:hongyangAndroid
(欢迎关注,第一时间推送博文信息)
参考
- 安卓App热补丁动态修复技术介绍
- Android dex分包方案
- https://github.com/dodola/HotFix
- https://github.com/jasonross/Nuwa
- https://github.com/bunnyblue/DroidFix
- http://www.ibm.com/developerworks/cn/java/j-dyn0916/
- http://zhxing.iteye.com/blog/1703305
转载请标明出处:
http://blog.csdn.net/lmj623565791/article/details/49734867;
本文出自:【张鸿洋的博客】
一、概述
之前写了篇Android OkHttp完全解析 是时候来了解OkHttp了,其实主要是作为okhttp的普及文章,当然里面也简单封装了工具类,没想到关注和使用的人还挺多的,由于这股热情,该工具类中的方法也是剧增,各种重载方法,以致于使用起来极不方便,实在惭愧。
于是,在这个周末,抽点时间对该工具类,进行了重新的拆解与编写,顺便完善下功能,尽可能的提升其使用起来的方便性和易扩展性。
标题的改善,也是指的是对于我之前的代码进行改善。
如果你对okhttp不了解,可以通过Android OkHttp完全解析 是时候来了解OkHttp了进行了解。
ok,那么目前,该封装库志支持:
- 一般的get请求
- 一般的post请求
- 基于Http的文件上传
- 文件下载
- 上传下载的进度回调
- 加载图片
- 支持请求回调,直接返回对象、对象集合
- 支持session的保持
- 支持自签名网站https的访问,提供方法设置下证书就行
- 支持取消某个请求
源码地址:https://github.com/hongyangAndroid/okhttp-utils
引入:
-
Android Studio
使用前,对于Android Studio的用户,可以选择添加:
compile project(':okhttputils')主项目中无需再引用okhttp的依赖,也不需要再额外导入Gson的lib.
-
Eclipse
下载okhttputils.jar,添加到项目libs,同时需要下载okhttp.jar和gson-2.2.1.jar
二、基本用法
目前基本的用法格式为:
new OkHttpRequest.Builder()
    .url(url)
    .params(params)
    .headers(headers)
    .tag(tag)
    .get(callback);
通过Builder去根据自己的需要添加各种参数,最后调用get(callback)进行执行,传入callback则代表是异步。如果单纯的get()则代表同步的方法调用。
可以看到,取消了之前一堆的get重载方法,参数也可以进行灵活的选择了。
类似的,除了get方法,还有post、upload、download、displayImage。用法基本都一致。下面简单看一下。
(1)GET请求
//最基本
new OkHttpRequest.Builder()
    .url(url)
    .get(callback);
//扩展
new OkHttpRequest.Builder()
    .url(url)
    .params(params)
    .headers(headers)
    .tag(tag)
    .get(callback);
(2)POST请求
//最基本
new OkHttpRequest.Builder()
    .url(url)
    .params(params)
    .post(callback);
//扩展
new OkHttpRequest.Builder()
    .url(url)
    .params(params)
    .headers(headers)
    .tag(tag)
    .post(callback);
(3)基于POST的文件上传
//基本
new OkHttpRequest.Builder()
    .url(url)
    .files(files)
    .upload(callback);
//扩展
new OkHttpRequest.Builder()
    .url(url)
    .params(params)
    .headers(headers)
    .tag(tag)
    .files(files)
    .upload(callback);
(4)下载文件
//基本
new OkHttpRequest.Builder()
    .url(url)
    .destFileDir(destFileDir)
    .destFileName(destFileName)
    .download(callback);
//扩展
new OkHttpRequest.Builder()
    .url(url)
    .params(params)
    .headers(headers)
    .tag(tag)
    .destFileDir(destFileDir)
    .destFileName(destFileName)
    .download(callback);
(5)显示图片
//基本
 new OkHttpRequest.Builder()
    .url(url)
    .imageview(imageView)
    .displayImage(callback);
//扩展
new OkHttpRequest.Builder()
    .url(url)
    .params(params)
    .headers(headers)
    .tag(tag)
    .imageview(imageView)
    .errorResId(errorResId)
    .displayImage(callback);
会自动根据ImageView的大小进行压缩。
哈,目前来看,清晰多了。
三、对于上传下载的回调
new ResultCallback<List<User>>()
{
    //...
    @Override
    public void inProgress(float progress)
    {
       //use progress: 0 ~ 1
    }
}
对于传入的callback有个inProgress方法,当调用upload(callback),download(callback)方法时,progress回调0~1.(UI线程)。
四、对于自动解析为实体类
//对象
new ResultCallback <User>()
{
    //...
    @Override
    public void onResponse(User user)
    {
        mTv.setText(user.username);
    }
}

//集合
new ResultCallback<List<User>>()
{
    //...
    @Override
    public void onResponse(List<User> users)
    {
        mTv.setText(users.get(0).username);
    }
}
目前支持单个对象,或者集合,内部依赖Gson完成。
注意:泛型一定要设置,如果你不需要转化为实体对象,就写new ResultCallback<String>(){},
五、对于https单向认证
非常简单,拿到xxx.cert的证书。
然后调用
OkHttpClientManager.getInstance()
        .getHttpsDelegate()
       .setCertificates(inputstream);
建议使用方式,例如我的证书放在assets目录:
/**
 * Created by zhy on 15/8/25.
 */
public class MyApplication extends Application
{
    @Override
    public void onCreate()
    {
        super.onCreate();

        try
        {
            OkHttpClientManager.getInstance()
                        .getHttpsDelegate()
                    .setCertificates(getAssets().open("aaa.cer"),
                            getAssets().open("server.cer"));
        } catch (IOException e)
        {
            e.printStackTrace();
        }
    }
}
即可。别忘了注册Application。
注意:如果https网站为权威机构颁发的证书,不需要以上设置。自签名的证书才需要。
六、浅谈封装
其实整个封装的过程比较简单,这里简单描述下,对于okhttp一个请求的流程大致是这样的:
//创建okHttpClient对象
OkHttpClient mOkHttpClient = new OkHttpClient();
//创建一个Request
final Request request = new Request.Builder()
                .url("https://github.com/hongyangAndroid")
                .build();
//new call
Call call = mOkHttpClient.newCall(request);
//请求加入调度
call.enqueue(new Callback()
{
    @Override
    public void onFailure(Request request, IOException e)
    {
    }

    @Override
    public void onResponse(final Response response) throws IOException
    {
            //String htmlStr =  response.body().string();
    }
});
其中主要的差异,其实就是request的构建过程。
我对Request抽象了一个类:OkHttpRequest
public abstract class OkHttpRequest
{
    protected RequestBody requestBody;
    protected Request request;

    protected String url;
    protected String tag;
    protected Map<String, String> params;
    protected Map<String, String> headers;

    protected OkHttpRequest(String url, String tag,
                            Map<String, String> params, Map<String, String> headers)
    {
        this.url = url;
        this.tag = tag;
        this.params = params;
        this.headers = headers;
    }

    protected abstract Request buildRequest();
    protected abstract RequestBody buildRequestBody();

    protected void prepareInvoked(ResultCallback callback)
    {
        requestBody = buildRequestBody();
        requestBody = wrapRequestBody(requestBody, callback);
        request = buildRequest();
    }

    protected RequestBody wrapRequestBody(RequestBody requestBody, final ResultCallback callback)
    {
        return requestBody;
    }


    public void invokeAsyn(ResultCallback callback)
    {
        prepareInvoked(callback);
        mOkHttpClientManager.execute(request, callback);
    }


     // other common methods
 }
一个request的构建呢,我分三个步骤:buildRequestBody , wrapRequestBody ,buildRequest这样的次序,当以上三个方法没有问题时,我们就拿到了request,然后执行即可。
但是对于不同的请求,requestBody以及request的构建过程是不同的,所以大家可以看到buildRequestBody ,buildRequest为抽象的方法,也就是不同的请求类,比如OkHttpGetRequest、OkHttpPostRequest等需要自己去构建自己的request。
对于wrapRequestBody方法呢,可以看到它默认基本属于空实现,主要是因为并非所有的请求类都需要复写它,只有上传的时候呢,需要回调进度,需要对requestBody进行包装,所以这个方法类似于一个钩子。
其实这个过程有点类似模板方法模式,有兴趣可以看看一个短篇介绍设计模式 模版方法模式 展现程序员的一天 .
对于更加详细的用法,可以查看github上面的readme,以及demo,目前demo包含:
对于上传文件的两个按钮,需要自己搭建服务器,其他的按钮可以直接测试。
最后,由于本人水平有限,以及时间比较仓促~~发现问题,欢迎提issue,我会抽时间解决。 have a nice day ~
欢迎关注我的微博:
http://weibo.com/u/3165018720
群号:514447580,欢迎入群
微信公众号:hongyangAndroid
(欢迎关注,第一时间推送博文信息)
转载请标明出处:
http://blog.csdn.net/lmj623565791/article/details/49300989;
本文出自:【张鸿洋的博客】
一、概述
距离上一篇博客有段时间没更新了,主要是最近有些私事导致的,那么就先来一篇简单一点的博客脉动回来。
对于加载图片,大家都不陌生,一般为了尽可能避免OOM都会按照如下做法:
- 对于图片显示:根据需要显示图片控件的大小对图片进行压缩显示。
- 如果图片数量非常多:则会使用LruCache等缓存机制,将所有图片占据的内容维持在一个范围内。
其实对于图片加载还有种情况,就是单个图片非常巨大,并且还不允许压缩。比如显示:世界地图、清明上河图、微博长图等。
那么对于这种需求,该如何做呢?
首先不压缩,按照原图尺寸加载,那么屏幕肯定是不够大的,并且考虑到内存的情况,不可能一次性整图加载到内存中,所以肯定是局部加载,那么就需要用到一个类:
BitmapRegionDecoder
其次,既然屏幕显示不完,那么最起码要添加一个上下左右拖动的手势,让用户可以拖动查看。
那么综上,本篇博文的目的就是去自定义一个显示巨图的View,支持用户去拖动查看,大概的效果图如下:
好吧,这清明上河图太长了,想要观看全图,文末下载,图片在assets目录。当然如果你的图,高度也很大,肯定也是可以上下拖动的。
二、初识BitmapRegionDecoder
BitmapRegionDecoder主要用于显示图片的某一块矩形区域,如果你需要显示某个图片的指定区域,那么这个类非常合适。
对于该类的用法,非常简单,既然是显示图片的某一块区域,那么至少只需要一个方法去设置图片;一个方法传入显示的区域即可;详见:
-
BitmapRegionDecoder提供了一系列的newInstance方法来构造对象,支持传入文件路径,文件描述符,文件的inputstrem等。
例如:
BitmapRegionDecoder bitmapRegionDecoder = BitmapRegionDecoder.newInstance(inputStream, false); -
上述解决了传入我们需要处理的图片,那么接下来就是显示指定的区域。
bitmapRegionDecoder.decodeRegion(rect, options);参数一很明显是一个rect,参数二是BitmapFactory.Options,你可以控制图片的
inSampleSize,inPreferredConfig等。
那么下面看一个超级简单的例子:
package com.zhy.blogcodes.largeImage;

import android.graphics.Bitmap;
import android.graphics.BitmapFactory;
import android.graphics.BitmapRegionDecoder;
import android.graphics.Rect;
import android.os.Bundle;
import android.support.v7.app.AppCompatActivity;
import android.widget.ImageView;

import com.zhy.blogcodes.R;

import java.io.IOException;
import java.io.InputStream;

public class LargeImageViewActivity extends AppCompatActivity
{
    private ImageView mImageView;

    @Override
    protected void onCreate(Bundle savedInstanceState)
    {
        super.onCreate(savedInstanceState);
        setContentView(R.layout.activity_large_image_view);

        mImageView = (ImageView) findViewById(R.id.id_imageview);
        try
        {
            InputStream inputStream = getAssets().open("tangyan.jpg");

            //获得图片的宽、高
            BitmapFactory.Options tmpOptions = new BitmapFactory.Options();
            tmpOptions.inJustDecodeBounds = true;
            BitmapFactory.decodeStream(inputStream, null, tmpOptions);
            int width = tmpOptions.outWidth;
            int height = tmpOptions.outHeight;

            //设置显示图片的中心区域
            BitmapRegionDecoder bitmapRegionDecoder = BitmapRegionDecoder.newInstance(inputStream, false);
            BitmapFactory.Options options = new BitmapFactory.Options();
            options.inPreferredConfig = Bitmap.Config.RGB_565;
            Bitmap bitmap = bitmapRegionDecoder.decodeRegion(new Rect(width / 2 - 100, height / 2 - 100, width / 2 + 100, height / 2 + 100), options);
            mImageView.setImageBitmap(bitmap);


        } catch (IOException e)
        {
            e.printStackTrace();
        }


    }

}
上述代码,就是使用BitmapRegionDecoder去加载assets中的图片,调用bitmapRegionDecoder.decodeRegion解析图片的中间矩形区域,返回bitmap,最终显示在ImageView上。
效果图:
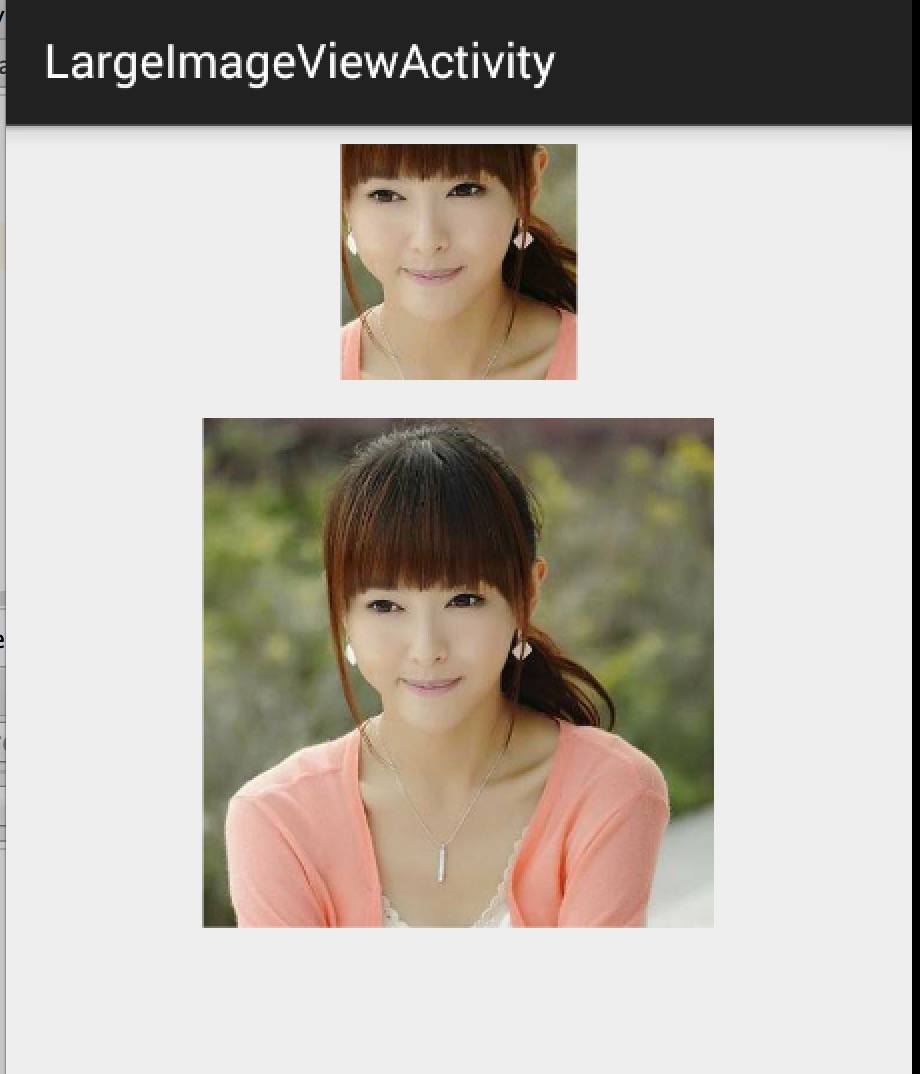
上面的小图显示的即为下面的大图的中间区域。
ok,那么目前我们已经了解了BitmapRegionDecoder的基本用户,那么往外扩散,我们需要自定义一个控件去显示巨图就很简单了,首先Rect的范围就是我们View的大小,然后根据用户的移动手势,不断去更新我们的Rect的参数即可。
三、自定义显示大图控件
根据上面的分析呢,我们这个自定义控件思路就非常清晰了:
- 提供一个设置图片的入口
- 重写onTouchEvent,在里面根据用户移动的手势,去更新显示区域的参数
- 每次更新区域参数后,调用invalidate,onDraw里面去regionDecoder.decodeRegion拿到bitmap,去draw
理清了,发现so easy,下面上代码:
package com.zhy.blogcodes.largeImage.view;

import android.content.Context;
import android.graphics.Bitmap;
import android.graphics.BitmapFactory;
import android.graphics.BitmapRegionDecoder;
import android.graphics.Canvas;
import android.graphics.Rect;
import android.util.AttributeSet;
import android.view.MotionEvent;
import android.view.View;

import java.io.IOException;
import java.io.InputStream;

/**
 * Created by zhy on 15/5/16.
 */
public class LargeImageView extends View
{
    private BitmapRegionDecoder mDecoder;
    /**
     * 图片的宽度和高度
     */
    private int mImageWidth, mImageHeight;
    /**
     * 绘制的区域
     */
    private volatile Rect mRect = new Rect();

    private MoveGestureDetector mDetector;


    private static final BitmapFactory.Options options = new BitmapFactory.Options();

    static
    {
        options.inPreferredConfig = Bitmap.Config.RGB_565;
    }

    public void setInputStream(InputStream is)
    {
        try
        {
            mDecoder = BitmapRegionDecoder.newInstance(is, false);
            BitmapFactory.Options tmpOptions = new BitmapFactory.Options();
            // Grab the bounds for the scene dimensions
            tmpOptions.inJustDecodeBounds = true;
            BitmapFactory.decodeStream(is, null, tmpOptions);
            mImageWidth = tmpOptions.outWidth;
            mImageHeight = tmpOptions.outHeight;

            requestLayout();
            invalidate();
        } catch (IOException e)
        {
            e.printStackTrace();
        } finally
        {

            try
            {
                if (is != null) is.close();
            } catch (Exception e)
            {
            }
        }
    }


    public void init()
    {
        mDetector = new MoveGestureDetector(getContext(), new MoveGestureDetector.SimpleMoveGestureDetector()
        {
            @Override
            public boolean onMove(MoveGestureDetector detector)
            {
                int moveX = (int) detector.getMoveX();
                int moveY = (int) detector.getMoveY();

                if (mImageWidth > getWidth())
                {
                    mRect.offset(-moveX, 0);
                    checkWidth();
                    invalidate();
                }
                if (mImageHeight > getHeight())
                {
                    mRect.offset(0, -moveY);
                    checkHeight();
                    invalidate();
                }

                return true;
            }
        });
    }


    private void checkWidth()
    {


        Rect rect = mRect;
        int imageWidth = mImageWidth;
        int imageHeight = mImageHeight;

        if (rect.right > imageWidth)
        {
            rect.right = imageWidth;
            rect.left = imageWidth - getWidth();
        }

        if (rect.left < 0)
        {
            rect.left = 0;
            rect.right = getWidth();
        }
    }


    private void checkHeight()
    {

        Rect rect = mRect;
        int imageWidth = mImageWidth;
        int imageHeight = mImageHeight;

        if (rect.bottom > imageHeight)
        {
            rect.bottom = imageHeight;
            rect.top = imageHeight - getHeight();
        }

        if (rect.top < 0)
        {
            rect.top = 0;
            rect.bottom = getHeight();
        }
    }


    public LargeImageView(Context context, AttributeSet attrs)
    {
        super(context, attrs);
        init();
    }

    @Override
    public boolean onTouchEvent(MotionEvent event)
    {
        mDetector.onToucEvent(event);
        return true;
    }

    @Override
    protected void onDraw(Canvas canvas)
    {
        Bitmap bm = mDecoder.decodeRegion(mRect, options);
        canvas.drawBitmap(bm, 0, 0, null);
    }

    @Override
    protected void onMeasure(int widthMeasureSpec, int heightMeasureSpec)
    {
        super.onMeasure(widthMeasureSpec, heightMeasureSpec);

        int width = getMeasuredWidth();
        int height = getMeasuredHeight();

        int imageWidth = mImageWidth;
        int imageHeight = mImageHeight;

         //默认直接显示图片的中心区域,可以自己去调节
        mRect.left = imageWidth / 2 - width / 2;
        mRect.top = imageHeight / 2 - height / 2;
        mRect.right = mRect.left + width;
        mRect.bottom = mRect.top + height;

    }


}
根据上述源码:
- setInputStream里面去获得图片的真实的宽度和高度,以及初始化我们的mDecoder
- onMeasure里面为我们的显示区域的rect赋值,大小为view的尺寸
- onTouchEvent里面我们监听move的手势,在监听的回调里面去改变rect的参数,以及做边界检查,最后invalidate
- 在onDraw里面就是根据rect拿到bitmap,然后draw了
ok,上面并不复杂,不过大家有没有注意到,这个监听用户move手势的代码写的有点奇怪,恩,这里模仿了系统的ScaleGestureDetector,编写了MoveGestureDetector,代码如下:
-
MoveGestureDetector
package com.zhy.blogcodes.largeImage.view; import android.content.Context; import android.graphics.PointF; import android.view.MotionEvent; public class MoveGestureDetector extends BaseGestureDetector { private PointF mCurrentPointer; private PointF mPrePointer; //仅仅为了减少创建内存 private PointF mDeltaPointer = new PointF(); //用于记录最终结果,并返回 private PointF mExtenalPointer = new PointF(); private OnMoveGestureListener mListenter; public MoveGestureDetector(Context context, OnMoveGestureListener listener) { super(context); mListenter = listener; } @Override protected void handleInProgressEvent(MotionEvent event) { int actionCode = event.getAction() & MotionEvent.ACTION_MASK; switch (actionCode) { case MotionEvent.ACTION_CANCEL: case MotionEvent.ACTION_UP: mListenter.onMoveEnd(this); resetState(); break; case MotionEvent.ACTION_MOVE: updateStateByEvent(event); boolean update = mListenter.onMove(this); if (update) { mPreMotionEvent.recycle(); mPreMotionEvent = MotionEvent.obtain(event); } break; } } @Override protected void handleStartProgressEvent(MotionEvent event) { int actionCode = event.getAction() & MotionEvent.ACTION_MASK; switch (actionCode) { case MotionEvent.ACTION_DOWN: resetState();//防止没有接收到CANCEL or UP ,保险起见 mPreMotionEvent = MotionEvent.obtain(event); updateStateByEvent(event); break; case MotionEvent.ACTION_MOVE: mGestureInProgress = mListenter.onMoveBegin(this); break; } } protected void updateStateByEvent(MotionEvent event) { final MotionEvent prev = mPreMotionEvent; mPrePointer = caculateFocalPointer(prev); mCurrentPointer = caculateFocalPointer(event); //Log.e("TAG", mPrePointer.toString() + " , " + mCurrentPointer); boolean mSkipThisMoveEvent = prev.getPointerCount() != event.getPointerCount(); //Log.e("TAG", "mSkipThisMoveEvent = " + mSkipThisMoveEvent); mExtenalPointer.x = mSkipThisMoveEvent ? 0 : mCurrentPointer.x - mPrePointer.x; mExtenalPointer.y = mSkipThisMoveEvent ? 0 : mCurrentPointer.y - mPrePointer.y; } /** * 根据event计算多指中心点 * * @param event * @return */ private PointF caculateFocalPointer(MotionEvent event) { final int count = event.getPointerCount(); float x = 0, y = 0; for (int i = 0; i < count; i++) { x += event.getX(i); y += event.getY(i); } x /= count; y /= count; return new PointF(x, y); } public float getMoveX() { return mExtenalPointer.x; } public float getMoveY() { return mExtenalPointer.y; } public interface OnMoveGestureListener { public boolean onMoveBegin(MoveGestureDetector detector); public boolean onMove(MoveGestureDetector detector); public void onMoveEnd(MoveGestureDetector detector); } public static class SimpleMoveGestureDetector implements OnMoveGestureListener { @Override public boolean onMoveBegin(MoveGestureDetector detector) { return true; } @Override public boolean onMove(MoveGestureDetector detector) { return false; } @Override public void onMoveEnd(MoveGestureDetector detector) { } } } -
BaseGestureDetector
package com.zhy.blogcodes.largeImage.view;

import android.content.Context;
import android.view.MotionEvent;


public abstract class BaseGestureDetector
{

    protected boolean mGestureInProgress;

    protected MotionEvent mPreMotionEvent;
    protected MotionEvent mCurrentMotionEvent;

    protected Context mContext;

    public BaseGestureDetector(Context context)
    {
        mContext = context;
    }


    public boolean onToucEvent(MotionEvent event)
    {

        if (!mGestureInProgress)
        {
            handleStartProgressEvent(event);
        } else
        {
            handleInProgressEvent(event);
        }

        return true;

    }

    protected abstract void handleInProgressEvent(MotionEvent event);

    protected abstract void handleStartProgressEvent(MotionEvent event);

    protected abstract void updateStateByEvent(MotionEvent event);

    protected void resetState()
    {
        if (mPreMotionEvent != null)
        {
            mPreMotionEvent.recycle();
            mPreMotionEvent = null;
        }
        if (mCurrentMotionEvent != null)
        {
            mCurrentMotionEvent.recycle();
            mCurrentMotionEvent = null;
        }
        mGestureInProgress = false;
    }


}
你可能会说,一个move手势搞这么多代码,太麻烦了。的确是的,move手势的检测非常简单,那么之所以这么写呢,主要是为了可以复用,比如现在有一堆的
XXXGestureDetector,当我们需要监听什么手势,就直接拿个detector来检测多方便。我相信大家肯定也郁闷过Google,为什么只有ScaleGestureDetector而没有RotateGestureDetector呢。
根据上述,大家应该理解了为什么要这么做,当时不强制,每个人都有个性。
不过值得一提的是:上面这个手势检测的写法,不是我想的,而是一个开源的项目https://github.com/rharter/android-gesture-detectors,里面包含很多的手势检测。对应的博文是:http://code.almeros.com/android-multitouch-gesture-detectors#.VibzzhArJXg那面上面两个类就是我偷学了的~ 哈
四、测试
测试其实没撒好说的了,就是把我们的LargeImageView放入布局文件,然后Activity里面去设置inputstream了。
<RelativeLayout xmlns:android="http://schemas.android.com/apk/res/android"
                xmlns:tools="http://schemas.android.com/tools"
                android:layout_width="match_parent"
                android:layout_height="match_parent">


    <com.zhy.blogcodes.largeImage.view.LargeImageView
        android:id="@+id/id_largetImageview"
        android:layout_width="match_parent"
        android:layout_height="match_parent"/>

</RelativeLayout>
然后在Activity里面去设置图片:
package com.zhy.blogcodes.largeImage;

import android.os.Bundle;
import android.support.v7.app.AppCompatActivity;

import com.zhy.blogcodes.R;
import com.zhy.blogcodes.largeImage.view.LargeImageView;

import java.io.IOException;
import java.io.InputStream;

public class LargeImageViewActivity extends AppCompatActivity
{
    private LargeImageView mLargeImageView;

    @Override
    protected void onCreate(Bundle savedInstanceState)
    {
        super.onCreate(savedInstanceState);
        setContentView(R.layout.activity_large_image_view);

        mLargeImageView = (LargeImageView) findViewById(R.id.id_largetImageview);
        try
        {
            InputStream inputStream = getAssets().open("world.jpg");
            mLargeImageView.setInputStream(inputStream);

        } catch (IOException e)
        {
            e.printStackTrace();
        }


    }

}
效果图:

ok,那么到此,显示巨图的方案以及详细的代码就描述完成了,总体还是非常简单的。
但是,在实际的项目中,可能会有更多的需求,比如增加放大、缩小;增加快滑手势等等,那么大家可以去参考这个库:https://github.com/johnnylambada/WorldMap,该库基本实现了绝大多数的需求,大家根据本文这个思路再去看这个库,也会简单很多,定制起来也容易。我这个地图的图就是该库里面提供的。
哈,掌握了这个,以后面试过程中也可以悄悄的装一把了,当你优雅的答完android加载图片的方案以后,然后接一句,其实还有一种情况,就是高清显示巨图,那么我们应该…相信面试官对你的印象会好很多~ have a nice day ~
欢迎关注我的微博:
http://weibo.com/u/3165018720
群号:463081660,欢迎入群
微信公众号:hongyangAndroid
(欢迎关注,第一时间推送博文信息)
参考链接
- http://code.almeros.com/android-multitouch-gesture-detectors#.VibzzhArJXg
- https://github.com/rharter/android-gesture-detectors
- https://github.com/johnnylambada/WorldMap
转载请标明出处:
http://blog.csdn.net/lmj623565791/article/details/48649563;
本文出自:【张鸿洋的博客】
一、概述
近期注意到QQ新版使用了沉浸式状态栏,ok,先声明一下:本篇博客效果下图:
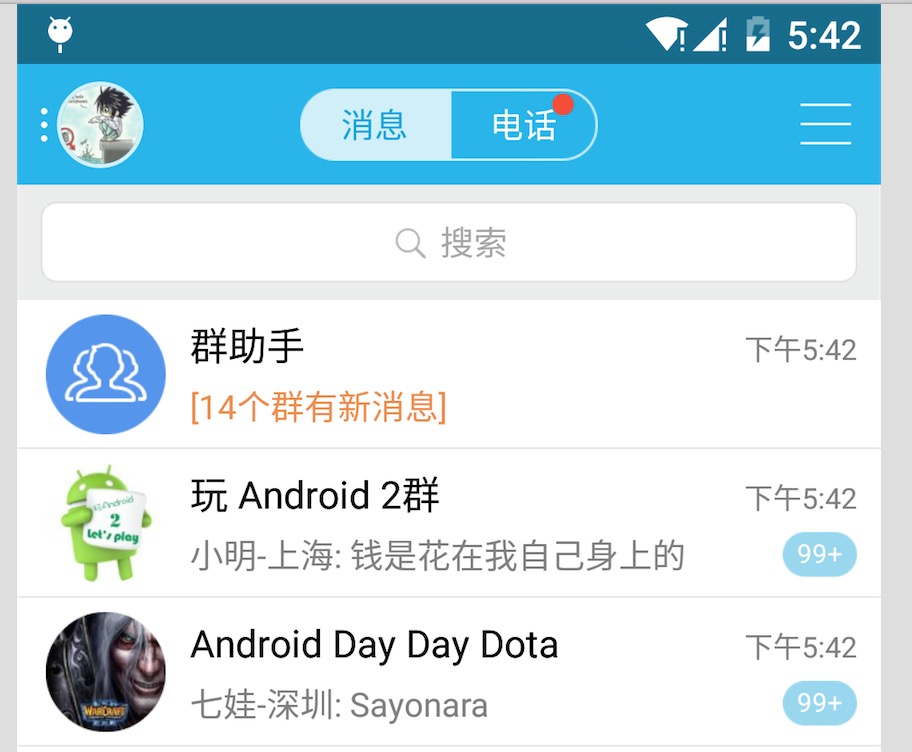
关于这个状态栏变色到底叫「Immersive Mode」/「Translucent Bars」有兴趣可以去 为什么在国内会有很多用户把 「透明栏」(Translucent Bars)称作 「沉浸式顶栏」?上面了解了解,请勿指点我说的博文标题起得不对,thx。
恩,接下来正题。
首先只有大于等于4.4版本支持这个半透明状态栏的效果,但是4.4和5.0的显示效果有一定的差异,所有本篇博文内容为:
- 如何实现半透明状态栏效果在大于4.4版本之上。
- 如何让4.4的效果与5.0的效果尽可能一致。
看了不少参考文章,都介绍到这个库,大家可以了解:SystemBarTint。
不过本篇博文并未基于此库,自己想了个hack,对于此库源码有空再看了。
二、效果图
先贴下效果图,以便和实现过程中做下对比
- 4.4 模拟器
- 5.x 真机
[new]贴个如果顶部是图片的效果图,其实是一样的,为了方便我就放侧栏的顶部了。

稍等,csdn图片服务器异常…
ok,有了效果图之后就开始看实现了。
三、实现半透明状态栏
因为本例使用了NavigationView,所以布局代码稍多,当然如果你不需要,可以自己进行筛减。
注意引入相关依赖:
 compile 'com.android.support:appcompat-v7:22.2.1'
 compile 'com.android.support:support-v4:22.2.1'
 compile 'com.android.support:design:22.2.0'
(一)colors.xml 和 styles.xml
首先我们定义几个颜色:
res/values/color.xml
<?xml version="1.0" encoding="utf-8"?>
<resources>
    <color name="primary">#FF03A9F4</color>
    <color name="primary_dark">#FF0288D1</color>
    <color name="status_bar_color">@color/primary_dark</color>
</resources>
下面定义几个styles.xml
注意文件夹的路径:
values/styles.xml
<resources>
    <style name="BaseAppTheme" parent="Theme.AppCompat.Light.NoActionBar">
        <!-- Customize your theme here. -->
        <item name="colorPrimary">@color/primary</item>
        <item name="colorPrimaryDark">@color/primary_dark</item>
        <item name="colorAccent">#FF4081</item>
    </style>

    <!-- Base application theme. -->
    <style name="AppTheme" parent="@style/BaseAppTheme">
    </style>
</resources>
values-v19
<resources>

    <style name="AppTheme" parent="@style/BaseAppTheme">
        <item name="android:windowTranslucentStatus">true</item>
    </style>
</resources>
ok,这个没撒说的。注意我们的主题是基于NoActionBar的,android:windowTranslucentStatus这个属性是v19开始引入的。
(二)布局文件
activity_main.xml
<android.support.v4.widget.DrawerLayout
    xmlns:android="http://schemas.android.com/apk/res/android"
    xmlns:app="http://schemas.android.com/apk/res-auto"
    xmlns:tools="http://schemas.android.com/tools"
    android:layout_width="match_parent"
    android:layout_height="match_parent"
    >


    <LinearLayout
        android:id="@+id/id_main_content"
        android:layout_width="match_parent"
        android:layout_height="match_parent"
        android:orientation="vertical">

        <android.support.v7.widget.Toolbar
            android:id="@+id/id_toolbar"
            android:layout_width="match_parent"
            android:layout_height="wrap_content"
            android:background="?attr/colorPrimary"
            android:fitsSystemWindows="true"
            app:popupTheme="@style/ThemeOverlay.AppCompat.Light"/>


        <TextView
            android:id="@+id/id_tv_content"
            android:layout_width="match_parent"
            android:layout_height="0dp"
            android:layout_weight="1"
            android:gravity="center"
            android:text="HelloWorld"
            android:textSize="30sp"/>
    </LinearLayout>


    <android.support.design.widget.NavigationView
        android:id="@+id/id_nv_menu"
        android:layout_width="match_parent"
        android:layout_height="match_parent"
        android:layout_gravity="start"
        android:fitsSystemWindows="true"
        app:headerLayout="@layout/header_just_username"
        app:menu="@menu/menu_drawer"
        />
</android.support.v4.widget.DrawerLayout>
DrawerLayout内部一个LinearLayout作为内容区域,一个NavigationView作为菜单。
注意下Toolbar的高度设置为wrap_content。
然后我们的NavigationView中又依赖一个布局文件和一个menu的文件。
header_just_username.xml
<?xml version="1.0" encoding="utf-8"?>
<RelativeLayout xmlns:android="http://schemas.android.com/apk/res/android"
                android:layout_width="match_parent"
                android:layout_height="192dp"
                android:background="?attr/colorPrimaryDark"
                android:orientation="vertical"
                android:padding="16dp"
                android:fitsSystemWindows="true"
                android:theme="@style/ThemeOverlay.AppCompat.Dark">

    <TextView
        android:id="@+id/id_link"
        android:layout_width="wrap_content"
        android:layout_height="wrap_content"
        android:layout_alignParentBottom="true"
        android:layout_marginBottom="16dp"
        android:text="http://blog.csdn.net/lmj623565791"/>

    <TextView
        android:id="@+id/id_username"
        android:layout_width="wrap_content"
        android:layout_height="wrap_content"
        android:layout_above="@id/id_link"
        android:text="Zhang Hongyang"/>

    <ImageView
        android:layout_width="72dp"
        android:layout_height="72dp"
        android:layout_above="@id/id_username"
        android:layout_marginBottom="16dp"
        android:src="@mipmap/ic_launcher"/>


</RelativeLayout>menu的文件就不贴了,更加详细的可以去参考Android 自己实现 NavigationView [Design Support Library(1)]。
大体看完布局文件以后,有几个点要特别注意:
- ToolBar高度设置为
wrap_content - ToolBar添加属性
android:fitsSystemWindows="true" - header_just_username.xml的跟布局RelativeLayout,添加属性
android:fitsSystemWindows="true"
android:fitsSystemWindows这个属性,主要是通过调整当前设置这个属性的view的padding去为我们的status_bar留下空间。
根据上面的解释,如果你不写,那么状态栏和Toolbar就会有挤一块的感觉了,类似会这样:

ok,最后看下代码。
(三)Activity的代码
package com.zhy.colorfulstatusbar;

import android.os.Bundle;
import android.support.v7.app.AppCompatActivity;
import android.support.v7.widget.Toolbar;

public class MainActivity extends AppCompatActivity
{

    @Override
    protected void onCreate(Bundle savedInstanceState)
    {
        super.onCreate(savedInstanceState);
        setContentView(R.layout.activity_main);
        Toolbar toolbar = (Toolbar) findViewById(R.id.id_toolbar);
        setSupportActionBar(toolbar);
        //StatusBarCompat.compat(this, getResources().getColor(R.color.status_bar_color));
        //StatusBarCompat.compat(this);
    }

}
没撒说的,就是setSupportActionBar。
那么现在4.4的效果图是:
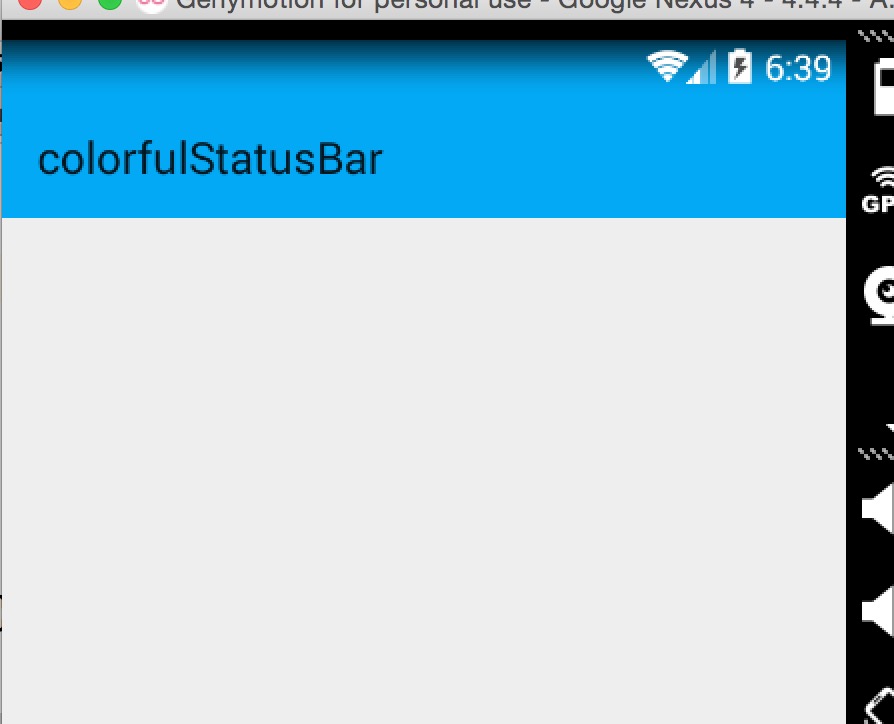
其实还不错,有个渐变的效果。
现在5.x的效果:
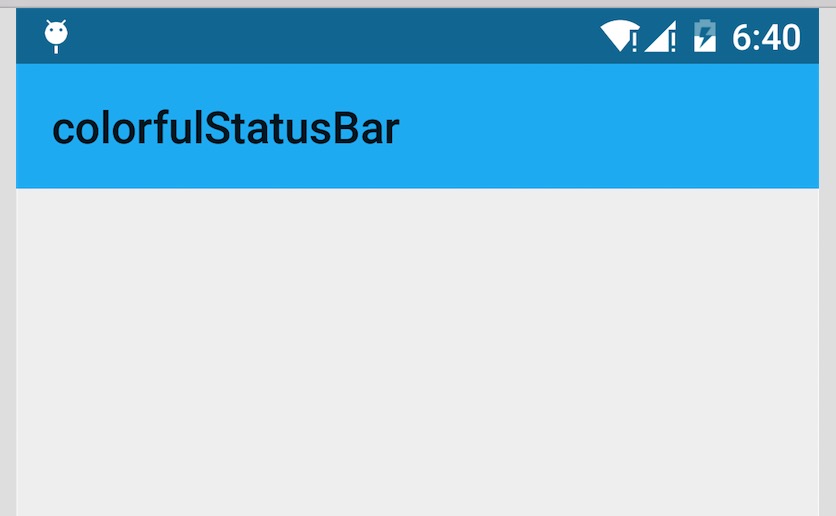
可以看到5.x默认并非是一个渐变的效果,类似是一个深一点的颜色。
在看看我们md的规范
状态栏应该是一个比Toolbar背景色,稍微深一点的颜色。
这么看来,我们还是有必要去为4.4做点适配工作,让其竟可能和5.x显示效果一致,或者说尽可能符合md的规范。
四、调整4.4的显示方案
那么问题来了?如何做呢?
咱们这么看,4.4之后加入windowTranslucentStatus的属性之后,也就是我们可以用到状态栏的区域了。
既然我们可以用到这块区域,那么我们只要在根布局去设置一个与状态栏等高的View,设置背景色为我们期望的颜色就可以了。
于是有了以下的代码:
package com.zhy.colorfulstatusbar;

import android.annotation.TargetApi;
import android.app.Activity;
import android.content.Context;
import android.graphics.Color;
import android.os.Build;
import android.view.View;
import android.view.ViewGroup;

/**
 * Created by zhy on 15/9/21.
 */
public class StatusBarCompat
{
    private static final int INVALID_VAL = -1;
    private static final int COLOR_DEFAULT = Color.parseColor("#20000000");

    @TargetApi(Build.VERSION_CODES.LOLLIPOP)
    public static void compat(Activity activity, int statusColor)
    {

        if (Build.VERSION.SDK_INT >= Build.VERSION_CODES.LOLLIPOP)
        {
            if (statusColor != INVALID_VAL)
            {
                activity.getWindow().setStatusBarColor(statusColor);
            }
            return;
        }

        if (Build.VERSION.SDK_INT >= Build.VERSION_CODES.KITKAT && Build.VERSION.SDK_INT < Build.VERSION_CODES.LOLLIPOP)
        {
            int color = COLOR_DEFAULT;
            ViewGroup contentView = (ViewGroup) activity.findViewById(android.R.id.content);
            if (statusColor != INVALID_VAL)
            {
                color = statusColor;
            }
            View statusBarView = new View(activity);
            ViewGroup.LayoutParams lp = new ViewGroup.LayoutParams(ViewGroup.LayoutParams.MATCH_PARENT,
                    getStatusBarHeight(activity));
            statusBarView.setBackgroundColor(color);
            contentView.addView(statusBarView, lp);
        }

    }

    public static void compat(Activity activity)
    {
        compat(activity, INVALID_VAL);
    }


    public static int getStatusBarHeight(Context context)
    {
        int result = 0;
        int resourceId = context.getResources().getIdentifier("status_bar_height", "dimen", "android");
        if (resourceId > 0)
        {
            result = context.getResources().getDimensionPixelSize(resourceId);
        }
        return result;
    }
}
代码的思路很简单,根据Activity找到android.R.content,在其中添加一个View(高度为statusbarHeight,背景色为我们设置的颜色,默认为半透明的黑色)。
那么只需要在Activity里面去写上:
StatusBarCompat.compat(this);就可以了。
如果你希望自己设置状态看颜色,那么就用这个方法:
StatusBarCompat.compat(this, getResources().getColor(R.color.status_bar_color));这样的话我们就解决了4.4到5.x的适配问题,一行代码解决,感觉还是不错的。
最后提一下,对于5.0由于提供了setStatusBarColor去设置状态栏颜色,但是这个方法不能在主题中设置windowTranslucentStatus属性。所以,可以编写一个value-v21文件夹,里面styles.xml写入:
<resources>
    <!-- Base application theme. -->
    <style name="AppTheme" parent="@style/BaseAppTheme">
    </style>
</resources>
其实就是不要有windowTranslucentStatus属性。
接下来,对于默认的效果就不测试了,参考上面的效果图。
我们测试个设置状态栏颜色的,我们这里设置个红色。
- 4.4 模拟器
- 5.x 真机
ok,这样就结束啦~~
源码地址:https://github.com/hongyangAndroid/ColorfulStatusBar
欢迎关注我的微博:
http://weibo.com/u/3165018720
群号:463081660,欢迎入群
微信公众号:hongyangAndroid
(欢迎关注,第一时间推送博文信息)
参考
- http://blog.raffaeu.com/archive/2015/04/11/android-and-the-transparent-status-bar.aspx
- https://mindofaandroiddev.wordpress.com/2013/12/28/making-the-status-bar-and-navigation-bar-transparent-with-a-listview-on-android-4-4-kitkat/
- http://www.jcodecraeer.com/a/anzhuokaifa/androidkaifa/2014/1117/1992.html
- http://developer.android.com/intl/zh-cn/reference/android/view/View.html#attr_android:fitsSystemWindows
转载请标明出处:
http://blog.csdn.net/lmj623565791/article/details/48393217;
本文出自:【张鸿洋的博客】
一、概述
本文之前,先提一下关于上篇博文的100多万访问量请无视,博文被刷,我也很郁闷,本来想把那个文章放到草稿箱,结果放不进去,还把日期弄更新了,实属无奈。
ok,开始今天的博文,今天要说的是TagFlowLayout,说这个之前必须提一下FlowLayout,如果你不了解,可以先阅读之前的博文:Android 自定义ViewGroup 实战篇 -> 实现FlowLayout或者观看视频
打造Android中的流式布局和热门标签 。
因为本身FlowLayout本身的预期是提供一种新的布局的方式,但是呢,在实际的开发中,大家更多的是使用在商品标签,搜索关键字的场景,那么就涉及到一些交互:
- 比如用户选择了某个标签,首先你要去改变标签的样子给用户一个反馈,其次你需要记录用户的选择。
- 那么在选择过程中还有多选的情况,比如4选2,4选3等等。
- 还有…
类似京东的这个选择商品的图:
对于上述的情况呢,FlowLayout只能说能够实现View的显示没有问题,而对于点击某个Tag,以及修改某个Tag的样子,可能需要编写大量的代码,且设计只要稍微的改下显示的效果,估计就得加班了。
既然这么多的不方便,那么我们现在就在FlowLayout的基础上,编写TagFlowLayout去完善,目前支持:
- 以setAdapter形式注入数据
- 直接设置selector为background即可完成标签选则的切换,类似CheckBox
- 支持控制选择的Tag数量,比如:单选、多选
- 支持setOnTagClickListener,当点击某个Tag回调
- 支持setOnSelectListener,当选择某个Tag后回调
- 支持adapter.notifyDataChanged
- Activity重建(或者旋转)后,选择的状态自动保存
我们的效果图:
github地址:FlowLayout
我需要思考几分钟本文的叙述方式…
ok,由于本文并非从无到有的去构造一个新的东西,所以你肯定没有办法根据我的分析,然后就能完整的写出来。这样的话,就非常建议大家下载源码,拿着源码比对着看;或者看完本文后去下载源码;或者仅仅是看看思路学学知识点(eclipse的用户,拷贝几个类不是难事,不要私聊我问我怎么整~)。
二、以setAdapter形式注入数据
首先我们完成的就是,去除大家痛苦的添加数据的方式。类似ListView,提供Adapter的方式,为我们的TagFlowLayout去添加数据,这种方式,大家用的肯定比较熟练了,而且也比较灵活。
(1) TagAdapter
那么首先我们得有个Adapter,这里叫做TagAdapter
package com.zhy.view.flowlayout;

import android.view.View;

import java.util.ArrayList;
import java.util.Arrays;
import java.util.List;

public abstract class TagAdapter<T>
{
    private List<T> mTagDatas;
    private OnDataChangedListener mOnDataChangedListener;

    public TagAdapter(List<T> datas)
    {
        mTagDatas = datas;
    }

    public TagAdapter(T[] datas)
    {
        mTagDatas = new ArrayList<T>(Arrays.asList(datas));
    }

    static interface OnDataChangedListener
    {
        void onChanged();
    }

    void setOnDataChangedListener(OnDataChangedListener listener)
    {
        mOnDataChangedListener = listener;
    }

    public int getCount()
    {
        return mTagDatas == null ? 0 : mTagDatas.size();
    }

    public void notifyDataChanged()
    {
        mOnDataChangedListener.onChanged();
    }

    public T getItem(int position)
    {
        return mTagDatas.get(position);
    }

    public abstract View getView(FlowLayout parent, int position, T t);

}
可以看到很简单,这是一个抽象类,那么具体的View的展示需要大家通过复写getView,用法和ListView及其类似,同时我们提供了notifyDataChanged()的方法,当你的数据集发生变化的时候,你可以调用该方法,UI会自动刷新。
当然,仅仅有了Adapter是不行的,我们需要添加相应的代码对其进行支持。
(2)TagFlowLayout对Adapter的支持
那么最主要就是提供一个setAdapter的方法:
public void setAdapter(TagAdapter adapter)
{
   mTagAdapter = adapter;
   mTagAdapter.setOnDataChangedListener(this);
   changeAdapter();

}

private void changeAdapter()
{
   removeAllViews();
   TagAdapter adapter = mTagAdapter;
   TagView tagViewContainer = null;

   for (int i = 0; i < adapter.getCount(); i++)
   {
       View tagView = adapter.getView(this, i, adapter.getItem(i));
       tagView.setDuplicateParentStateEnabled(true);
       tagViewContainer.setLayoutParams(tagView.getLayoutParams());
       tagViewContainer.addView(tagView);
       addView(tagViewContainer);
   }

}
@Override
public void onChanged()
{
   changeAdapter();
}ok,可以看到当你调用setAdapter进来,首先我们会注册mTagAdapter.setOnDataChangedListener这个回调,主要是用于响应notifyDataSetChanged()。然后进入changeAdapter方法,在这里首先移除所有的子View,然后根据mAdapter.getView的返回,开始逐个构造子View,然后进行添加。
这里注意下:我们的上述的代码,对mAdapter.getView返回的View,外围报了一层TagView,这里暂时不要去想,我们后面会细说。
到此,我们的Adapter添加完毕。
三、支持onTagClickListener
ok,这个接口也非常重要,当然我私下了解了下,很多同学都加上了,但是基本都是对单个标签View去setOnClickListener,然后去比对Tag确定点击的是哪个标签,最后回调出来。当然,我们这里考虑一种更优雅的方式:
我们从父控件下手,当我们确定用户点击在我们的TagFlowLayout上时,我们根据用户点击的坐标,看看是否点击的是我们的某个View,然后进行click回调。是不是有点像事件分发,哈,我们这里可以称为点击分发。
那么,我们需要关注的就是onTouchEvent和performClick方法。
 @Override
    public boolean onTouchEvent(MotionEvent event)
    {
        if (event.getAction() == MotionEvent.ACTION_UP)
        {
            mMotionEvent = MotionEvent.obtain(event);
        }
        return super.onTouchEvent(event);
    }

    @Override
    public boolean performClick()
    {
        if (mMotionEvent == null) return super.performClick();

        int x = (int) mMotionEvent.getX();
        int y = (int) mMotionEvent.getY();
        mMotionEvent = null;

        TagView child = findChild(x, y);
        int pos = findPosByView(child);
        if (child != null)
        {
            doSelect(child, pos);
            if (mOnTagClickListener != null)
            {
                return mOnTagClickListener.onTagClick(child.getTagView(), pos, this);
            }
        }
        return super.performClick();
    }

    private TagView findChild(int x, int y)
    {
        final int cCount = getChildCount();
        for (int i = 0; i < cCount; i++)
        {
            TagView v = (TagView) getChildAt(i);
            if (v.getVisibility() == View.GONE) continue;
            Rect outRect = new Rect();
            v.getHitRect(outRect);
            if (outRect.contains(x, y))
            {
                return v;
            }
        }
        return null;
}可以看到我们这里巧妙的利用了performClick这个回调,来确定的确是触发了click事件,而不是自己去判断什么算click的条件。但是呢,我们的performClick没有提供MotionEvent的参数,不过不要紧,我们都清楚click的事件发生在ACTION_UP之后,所以我们提供一个变量去记录最后一次触发ACTION_UP的mMotionEvent。
我们在performClick里面,根据mMotionEvent,去查找是否落在某个子View身上,如果落在,那么就确定点击在它身上了,直接回调即可,关于接口的定义如下,(ps:关于doSelect方法,我们后面说):
 public interface OnTagClickListener
    {
        boolean onTagClick(View view, int position, FlowLayout parent);
    }

    private OnTagClickListener mOnTagClickListener;


    public void setOnTagClickListener(OnTagClickListener onTagClickListener)
    {
        mOnTagClickListener = onTagClickListener;
        if (onTagClickListener != null) setClickable(true);
}可以看到,如果设置了setOnTagClickListener,我们显示的设置了父ViewsetClickable(true)。以防万一父View不具备消费事件的能力。
四、全面支持Checked
这一节呢,主要包含支持几个功能:
* 直接设置selector为background即可完成标签选则的切换,类似CheckBox
* 支持控制选择的Tag数量,比如:单选、多选
* 支持setOnSelectListener,当选择某个Tag后回调
首先,我们提供了两个自定义的属性,multi_suppout和max_select。一个是指出是否支持选择(如果为false,意味着你只能通过setOnTagClickListener去做一些操作),一个是设置最大的选择数量,-1为不限制数量。
ok,那么核心的代码依然在performClick中被调用的:
@Override
public boolean performClick()
{
     //省略了一些代码...
      doSelect(child, pos);
      if (mOnTagClickListener != null)
      {
          return mOnTagClickListener.onTagClick(child.getTagView(), pos, this);
      }
      //省略了一些代码...

}

private void doSelect(TagView child, int position)
{
   if (mSupportMulSelected)
   {
       if (!child.isChecked())
       {
           if (mSelectedMax > 0 && mSelectedView.size() >= mSelectedMax)
               return;
           child.setChecked(true);
           mSelectedView.add(position);
       } else
       {
           child.setChecked(false);
           mSelectedView.remove(position);
       }
       if (mOnSelectListener != null)
       {
           mOnSelectListener.onSelected(new HashSet<Integer>(mSelectedView));
       }
   }
}
ok,可以看到,如果点击了某个标签,进入doSelect方法,首先判断你是否开启了多选的支持(默认支持),然后判断当前的View是否是非Checked的状态,如果是非Checked状态,则判断最大的选择数量,如果没有达到,则设置checked=true,同时加入已选择的集合;反之已经是checked状态,就是取消选择状态了。同时如果设置了mOnSelectListener,回调一下。
ok,其实这里隐藏了一些东西,关于接口回调我们不多赘述了,大家都明白。这里主要看Checked。首先你肯定有几个问题:
- childView哪来的isChecked(),setChecked()方法?
- 这么做就能改变UI了?
下面我一一解答:首先,我们并非知道adapter#getView返回的是什么View,但是可以肯定的是,大部分View都是没有isChecked(),setChecked()方法的。但是我们需要有,怎么做?还记得我们setAdapter的时候,给getView外层包了一层TagView么,没错,就是TagView起到的作用:
package com.zhy.view.flowlayout;

import android.content.Context;
import android.view.View;
import android.widget.Checkable;
import android.widget.FrameLayout;

/**
 * Created by zhy on 15/9/10.
 */
public class TagView extends FrameLayout implements Checkable
{
    private boolean isChecked;
    private static final int[] CHECK_STATE = new int[]{android.R.attr.state_checked};

    public TagView(Context context)
    {
        super(context);
    }

    public View getTagView()
    {
        return getChildAt(0);
    }

    @Override
    public int[] onCreateDrawableState(int extraSpace)
    {
        int[] states = super.onCreateDrawableState(extraSpace + 1);
        if (isChecked())
        {
            mergeDrawableStates(states, CHECK_STATE);
        }
        return states;
    }


    /**
     * Change the checked state of the view
     *
     * @param checked The new checked state
     */
    @Override
    public void setChecked(boolean checked)
    {
        if (this.isChecked != checked)
        {
            this.isChecked = checked;
            refreshDrawableState();
        }
    }

    /**
     * @return The current checked state of the view
     */
    @Override
    public boolean isChecked()
    {
        return isChecked;
    }

    /**
     * Change the checked state of the view to the inverse of its current state
     */
    @Override
    public void toggle()
    {
        setChecked(!isChecked);
    }
}
我们的TagView实现了Checkable接口,所以提供了问题一的方法。
下面解释问题二: 这么做就能改变UI了?
我们继续看TagView这个类,这个类中我们复写了onCreateDrawableState,在里面添加了CHECK_STATE的支持。当我们调用setChecked方法的时候,我们会调用refreshDrawableState()来更新我们的UI。
但是你可能又会问了,你这个是TagView支持了CHECKED状态,关它的子View什么事?我们的background可是设置在子View上的。
没错,这个问题问的相当好,你还记得我们在setAdapter,addView之前有一行非常核心的代码:#mAdapter.getView().setDuplicateParentStateEnabled(true);,setDuplicateParentStateEnabled这个方法允许我们的CHECKED状态向下传递。
到这,你应该明白了吧~~
所以我们对于UI的变化,只需要设置View的Backgroud为:
<?xml version="1.0" encoding="utf-8"?>
<selector xmlns:android="http://schemas.android.com/apk/res/android">
    <item
          android:drawable="@drawable/checked_bg"
          android:state_checked="true"></item>
    <item android:drawable="@drawable/normal_bg"></item>
</selector>
这样,如果你的设计稿发生变化,大部分情况下,你只需要改改xml文件就可以了。
ok,到此我们的核心部分的剖析就结束了,接下来贴贴用法:
五、用法
用法其实很简单,大家可以参考例子,我这里大致贴一下:
(1)设置数据
mFlowLayout.setAdapter(new TagAdapter<String>(mVals)
   {
       @Override
       public View getView(FlowLayout parent, int position, String s)
       {
           TextView tv = (TextView) mInflater.inflate(R.layout.tv,
                   mFlowLayout, false);
           tv.setText(s);
           return tv;
       }
   });
getView中回调,类似ListView等用法。
(2)对于选中状态
你还在复杂的写代码设置选中后标签的显示效果么,翔哥说No!
<?xml version="1.0" encoding="utf-8"?>
<selector xmlns:android="http://schemas.android.com/apk/res/android">
    <item android:color="@color/tag_select_textcolor"
          android:drawable="@drawable/checked_bg"
          android:state_checked="true"></item>
    <item android:drawable="@drawable/normal_bg"></item>
</selector>
设置个background,上面一个状态为android:state_checked,另一个为正常。写写布局文件我都嫌慢,怎么能写一堆代码控制效果,设置改个效果,岂不是没时间dota了。
(3)事件
mFlowLayout.setOnTagClickListener(new TagFlowLayout.OnTagClickListener()
{
  @Override
  public boolean onTagClick(View view, int position, FlowLayout parent)
  {
      Toast.makeText(getActivity(), mVals[position], Toast.LENGTH_SHORT).show();
      return true;
  }
});
点击标签时的回调。
mFlowLayout.setOnSelectListener(new TagFlowLayout.OnSelectListener()
{
  @Override
  public void onSelected(Set<Integer> selectPosSet)
  {
      getActivity().setTitle("choose:" + selectPosSet.toString());
  }
});
选择多个标签时的回调。
最后肯定有人会问,支持字体变色吗?ScrollView会冲突吗?
附上最新效果图:
大家就自行查看源码了。
最后,源码下载地址:https://github.com/hongyangAndroid/FlowLayout
欢迎关注我的微博:
http://weibo.com/u/3165018720
群号:463081660,欢迎入群
微信公众号:hongyangAndroid
(欢迎关注,第一时间推送博文信息)
转载请标明出处:
http://blog.csdn.net/lmj623565791/article/details/48129405;
本文出自:【张鸿洋的博客】
一、概述
其实这篇文章理论上不限于okhttp去访问自签名的网站,不过接上篇博文了,就叫这个了。首先要了解的事,okhttp默认情况下是支持https协议的网站的,比如https://www.baidu.com,https://github.com/hongyangAndroid/okhttp-utils等,你可以直接通过okhttp请求试试。不过要注意的是,支持的https的网站基本都是CA机构颁发的证书,默认情况下是可以信任的。
当然我们今天要说的是自签名的网站,什么叫自签名呢?就是自己通过keytool去生成一个证书,然后使用,并不是CA机构去颁发的。使用自签名证书的网站,大家在使用浏览器访问的时候,一般都是报风险警告,好在有个大名鼎鼎的网站就是这么干的,https://kyfw.12306.cn/otn/,点击进入12306的购票页面就能看到了。
如下界面:
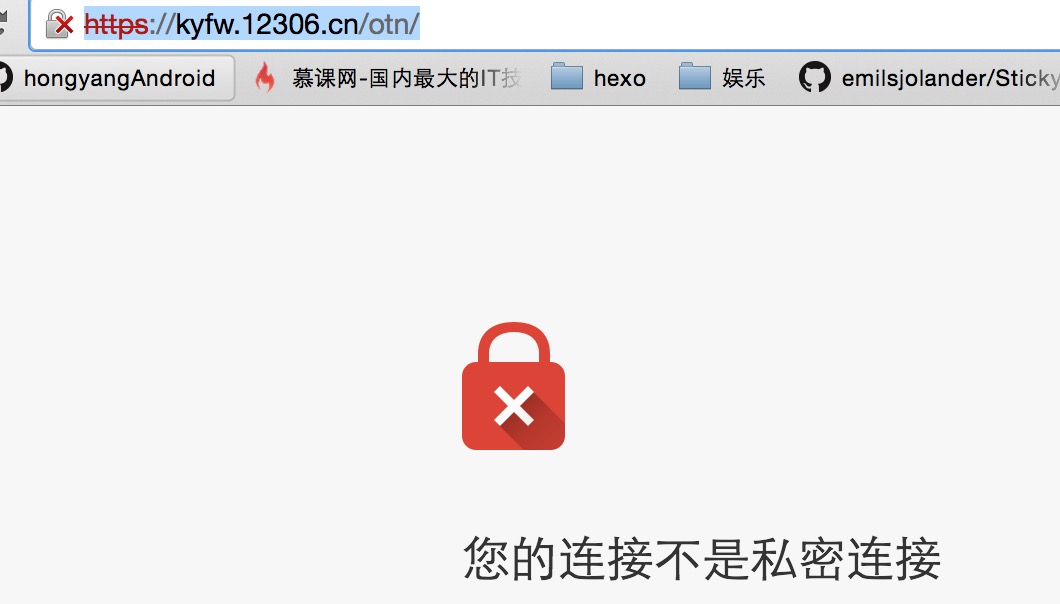
大家可以尝试拿okhttp访问下:
OkHttpClientManager.getAsyn
    ("https://kyfw.12306.cn/otn/", callack);
会爆出如下错误
javax.net.ssl.SSLHandshakeException:
    java.security.cert.CertPathValidatorException:
        Trust anchor for certification path not found.
好了,本篇博文当然不是去说如何去访问12306,而是以12306为例子来说明如何去访问自签名证书的网站。因为部分开发者app与自己服务端交互的时候可能也会遇到自签名证书的。甚至在开发安全级别很高的app时,需要用到双向证书的验证。
那么本篇博文的基本内容包含:
- https一些相关的知识
- okhttp访问自签名https网站
- 如何构建一个支持https的服务器(这里主要为了测试多个证书的时候,如何去加载)
- 如何进行双向证书验证
二、Https相关知识
关于特别理论的东西大家可以百度下自己去了解下,这里就简单说一下,HTTPS相当于HTTP的安全版本了,为什么安全呢?
因为它在HTTP的之下加入了SSL (Secure Socket Layer),安全的基础就靠这个SSL了。SSL位于TCP/IP和HTTP协议之间,那么它到底能干嘛呢?
它能够:
- 认证用户和服务器,确保数据发送到正确的客户机和服务器;(验证证书)
- 加密数据以防止数据中途被窃取;(加密)
- 维护数据的完整性,确保数据在传输过程中不被改变。(摘要算法)
以上3条来自百度
下面我们简单描述下HTTPS的工作原理,大家就能对应的看到上面3条作用的身影了:
HTTPS在传输数据之前需要客户端(浏览器)与服务端(网站)之间进行一次握手,在握手过程中将确立双方加密传输数据的密码信息。握手过程的简单描述如下:
- 浏览器将自己支持的一套加密算法、HASH算法发送给网站。
- 网站从中选出一组加密算法与HASH算法,并将自己的身份信息以证书的形式发回给浏览器。证书里面包含了网站地址,加密公钥,以及证书的颁发机构等信息。
- 浏览器获得网站证书之后,开始验证证书的合法性,如果证书信任,则生成一串随机数字作为通讯过程中对称加密的秘钥。然后取出证书中的公钥,将这串数字以及HASH的结果进行加密,然后发给网站。
- 网站接收浏览器发来的数据之后,通过私钥进行解密,然后HASH校验,如果一致,则使用浏览器发来的数字串使加密一段握手消息发给浏览器。
- 浏览器解密,并HASH校验,没有问题,则握手结束。接下来的传输过程将由之前浏览器生成的随机密码并利用对称加密算法进行加密。
握手过程中如果有任何错误,都会使加密连接断开,从而阻止了隐私信息的传输。
ok,以上的流程不一定完全正确,基本就是这样,当然如果有明显错误欢迎指出。
根据上面的流程,我们可以看到服务器端会有一个证书,在交互过程中客户端需要去验证证书的合法性,对于权威机构颁发的证书当然我们会直接认为合法。对于自己造的证书,那么我们就需要去校验合法性了,也就是说我们只需要让OkhttpClient去信任这个证书就可以畅通的进行通信了。
当然,对于自签名的网站的访问,网上的部分的做法是直接设置信任所有的证书,对于这种做法肯定是有风险的,所以这里我们不去介绍了,有需要自己去查。
下面我们去考虑,如何让OkHttpClient去信任我们的证书,接下里的例子就是靠12306这个福利站点了。
首先导出12306的证书,这里12306提供了下载地址:12306证书点击下载
下载完成,解压拿到里面的srca.cer,一会需要使用。ps:即使没有提供下载,也可以通过浏览器导出的,自行百度。
三、代码
(一)、访问自签名的网站
首先把我们下载的srca.cer放到assets文件夹下,其实你可以随便放哪,反正能读取到就行。
然后在我们的OkHttpClientManager里面添加如下的方法:
public void setCertificates(InputStream... certificates)
{
    try
    {
        CertificateFactory certificateFactory = CertificateFactory.getInstance("X.509");
        KeyStore keyStore = KeyStore.getInstance(KeyStore.getDefaultType());
        keyStore.load(null);
        int index = 0;
        for (InputStream certificate : certificates)
        {
            String certificateAlias = Integer.toString(index++);
            keyStore.setCertificateEntry(certificateAlias, certificateFactory.generateCertificate(certificate));

            try
            {
                if (certificate != null)
                    certificate.close();
            } catch (IOException e)
            {
            }
        }

        SSLContext sslContext = SSLContext.getInstance("TLS");

        TrustManagerFactory trustManagerFactory =
            TrustManagerFactory.getInstance(TrustManagerFactory.getDefaultAlgorithm());

        trustManagerFactory.init(keyStore);
        sslContext.init
            (
                null,
                trustManagerFactory.getTrustManagers(),
                new SecureRandom()
            );
       mOkHttpClient.setSslSocketFactory(sslContext.getSocketFactory());


    } catch (Exception e)
    {
        e.printStackTrace();
    }

}
为了代码可读性,我把异常捕获的部分简化了,可以看到我们提供了一个方法传入InputStream流,InputStream就对应于我们证书的输入流。
代码内部,我们:
- 构造CertificateFactory对象,通过它的
generateCertificate(is)方法得到Certificate。 - 然后讲得到的
Certificate放入到keyStore中。 - 接下来利用keyStore去初始化我们的
TrustManagerFactory - 由
trustManagerFactory.getTrustManagers获得TrustManager[]初始化我们的SSLContext - 最后,设置我们mOkHttpClient.setSslSocketFactory即可。
这样就完成了我们代码的编写,其实挺短的,当客户端进行SSL连接时,就可以根据我们设置的证书去决定是否新人服务端的证书。
记得在Application中进行初始化:
public class MyApplication extends Application
{
   @Override
    public void onCreate()
    {
        super.onCreate();

        try
        {
            OkHttpClientManager.getInstance()
                    .setCertificates(getAssets().open("srca.cer"));
        } catch (IOException e)
        {
            e.printStackTrace();
        }


}
然后尝试以下代码访问12306的网站:
 OkHttpClientManager.getAsyn("https://kyfw.12306.cn/otn/", new OkHttpClientManager.ResultCallback<String>()
{
    @Override
    public void onError(Request request, Exception e)
    {
        e.printStackTrace();
    }

    @Override
    public void onResponse(String u)
    {
        mTv.setText(u);
    }
});这样即可访问成功。完整代码已经更新至:https://github.com/hongyangAndroid/okhttp-utils,可以下载里面的sample进行测试,里面包含12306的证书。
ok,到这就可以看到使用Okhttp可以很方便的应对自签名的网站的访问,只需要拿到包含公钥的证书即可。
(二)、使用字符串替代证书
下面继续,有些人可能觉得把证书copy到assets下还是觉得不舒服,其实我们还可以将证书中的内容提取出来,写成字符串常量,这样就不需要证书根据着app去打包了。
zhydeMacBook-Pro:temp zhy$ keytool -printcert -rfc -file srca.cer
-----BEGIN CERTIFICATE-----
MIICmjCCAgOgAwIBAgIIbyZr5/jKH6QwDQYJKoZIhvcNAQEFBQAwRzELMAkGA1UEBhMCQ04xKTAn
BgNVBAoTIFNpbm9yYWlsIENlcnRpZmljYXRpb24gQXV0aG9yaXR5MQ0wCwYDVQQDEwRTUkNBMB4X
DTA5MDUyNTA2NTYwMFoXDTI5MDUyMDA2NTYwMFowRzELMAkGA1UEBhMCQ04xKTAnBgNVBAoTIFNp
bm9yYWlsIENlcnRpZmljYXRpb24gQXV0aG9yaXR5MQ0wCwYDVQQDEwRTUkNBMIGfMA0GCSqGSIb3
DQEBAQUAA4GNADCBiQKBgQDMpbNeb34p0GvLkZ6t72/OOba4mX2K/eZRWFfnuk8e5jKDH+9BgCb2
9bSotqPqTbxXWPxIOz8EjyUO3bfR5pQ8ovNTOlks2rS5BdMhoi4sUjCKi5ELiqtyww/XgY5iFqv6
D4Pw9QvOUcdRVSbPWo1DwMmH75It6pk/rARIFHEjWwIDAQABo4GOMIGLMB8GA1UdIwQYMBaAFHle
tne34lKDQ+3HUYhMY4UsAENYMAwGA1UdEwQFMAMBAf8wLgYDVR0fBCcwJTAjoCGgH4YdaHR0cDov
LzE5Mi4xNjguOS4xNDkvY3JsMS5jcmwwCwYDVR0PBAQDAgH+MB0GA1UdDgQWBBR5XrZ3t+JSg0Pt
x1GITGOFLABDWDANBgkqhkiG9w0BAQUFAAOBgQDGrAm2U/of1LbOnG2bnnQtgcVaBXiVJF8LKPaV
23XQ96HU8xfgSZMJS6U00WHAI7zp0q208RSUft9wDq9ee///VOhzR6Tebg9QfyPSohkBrhXQenvQ
og555S+C3eJAAVeNCTeMS3N/M5hzBRJAoffn3qoYdAO1Q8bTguOi+2849A==
-----END CERTIFICATE-----使用keytool命令,以rfc样式输出。keytool命令是JDK里面自带的。
有了这个字符串以后,我们就不需要srca.cer这个文件了,直接编写以下代码:
public class MyApplication extends Application
{
    private String CER_12306 = "-----BEGIN CERTIFICATE-----\n" +
            "MIICmjCCAgOgAwIBAgIIbyZr5/jKH6QwDQYJKoZIhvcNAQEFBQAwRzELMAkGA1UEBhMCQ04xKTAn\n" +
            "BgNVBAoTIFNpbm9yYWlsIENlcnRpZmljYXRpb24gQXV0aG9yaXR5MQ0wCwYDVQQDEwRTUkNBMB4X\n" +
            "DTA5MDUyNTA2NTYwMFoXDTI5MDUyMDA2NTYwMFowRzELMAkGA1UEBhMCQ04xKTAnBgNVBAoTIFNp\n" +
            "bm9yYWlsIENlcnRpZmljYXRpb24gQXV0aG9yaXR5MQ0wCwYDVQQDEwRTUkNBMIGfMA0GCSqGSIb3\n" +
            "DQEBAQUAA4GNADCBiQKBgQDMpbNeb34p0GvLkZ6t72/OOba4mX2K/eZRWFfnuk8e5jKDH+9BgCb2\n" +
            "9bSotqPqTbxXWPxIOz8EjyUO3bfR5pQ8ovNTOlks2rS5BdMhoi4sUjCKi5ELiqtyww/XgY5iFqv6\n" +
            "D4Pw9QvOUcdRVSbPWo1DwMmH75It6pk/rARIFHEjWwIDAQABo4GOMIGLMB8GA1UdIwQYMBaAFHle\n" +
            "tne34lKDQ+3HUYhMY4UsAENYMAwGA1UdEwQFMAMBAf8wLgYDVR0fBCcwJTAjoCGgH4YdaHR0cDov\n" +
            "LzE5Mi4xNjguOS4xNDkvY3JsMS5jcmwwCwYDVR0PBAQDAgH+MB0GA1UdDgQWBBR5XrZ3t+JSg0Pt\n" +
            "x1GITGOFLABDWDANBgkqhkiG9w0BAQUFAAOBgQDGrAm2U/of1LbOnG2bnnQtgcVaBXiVJF8LKPaV\n" +
            "23XQ96HU8xfgSZMJS6U00WHAI7zp0q208RSUft9wDq9ee///VOhzR6Tebg9QfyPSohkBrhXQenvQ\n" +
            "og555S+C3eJAAVeNCTeMS3N/M5hzBRJAoffn3qoYdAO1Q8bTguOi+2849A==\n" +
            "-----END CERTIFICATE-----";

    @Override
    public void onCreate()
    {
        super.onCreate();

        OkHttpClientManager.getInstance()
                .setCertificates(new Buffer()
                        .writeUtf8(CER_12306)
                        .inputStream());
}
注意Buffer是okio包下的,okhttp依赖okio。
ok,这样就省去将cer文件一起打包进入apk了。
接下来介绍,如何去生成证书以及在tomcat服务器下使用自签名证书部署服务。如果大家没这方面需要可以简单了解下。
四、tomcat下使用自签名证书部署服务
首先自行下载个tomcat的压缩包。
既然我们要支持https,那么肯定需要个证书,如何生成证书呢?使用keytool非常简单。
(一)生成证书
zhydeMacBook-Pro:temp zhy$ keytool -genkey -alias zhy_server -keyalg RSA -keystore zhy_server.jks -validity 3600 -storepass 123456
您的名字与姓氏是什么?
  [Unknown]:  zhang
您的组织单位名称是什么?
  [Unknown]:  zhang
您的组织名称是什么?
  [Unknown]:  zhang
您所在的城市或区域名称是什么?
  [Unknown]:  xian
您所在的省/市/自治区名称是什么?
  [Unknown]:  shanxi
该单位的双字母国家/地区代码是什么?
  [Unknown]:  cn
CN=zhang, OU=zhang, O=zhang, L=xian, ST=shanxi, C=cn是否正确?
  [否]:  y

输入 <zhy_server> 的密钥口令
(如果和密钥库口令相同, 按回车): 使用以上命令即可生成一个证书请求文件zhy_server.jks,注意密钥库口令为:123456.
接下来利用zhy_server.jks来签发证书:
zhydeMacBook-Pro:temp zhy$ keytool -export -alias zhy_server
 -file zhy_server.cer
 -keystore zhy_server.jks
-storepass 123456 即可生成包含公钥的证书zhy_server.cer。
(二)、配置Tomcat
找到tomcat/conf/sever.xml文件,并以文本形式打开。
在Service标签中,加入:
<Connector SSLEnabled="true" acceptCount="100" clientAuth="false"
    disableUploadTimeout="true" enableLookups="true" keystoreFile="" keystorePass="123456" maxSpareThreads="75"
    maxThreads="200" minSpareThreads="5" port="8443"
    protocol="org.apache.coyote.http11.Http11NioProtocol" scheme="https"
    secure="true" sslProtocol="TLS"
/> 注意keystoreFile的值为我们刚才生成的jks文件的路径:/Users/zhy/ (填写你的路径).keystorePass值为密钥库密码:
temp/zhy_server.jks123456。
然后启动即可,对于命令行启动,依赖环境变量JAVA_HOME;如果在MyEclispe等IDE下启动就比较随意了。
启动成功以后,打开浏览器输入url:https://localhost:8443/即可看到证书不可信任的警告了。选择打死也要进入,即可进入tomcat默认的主页:
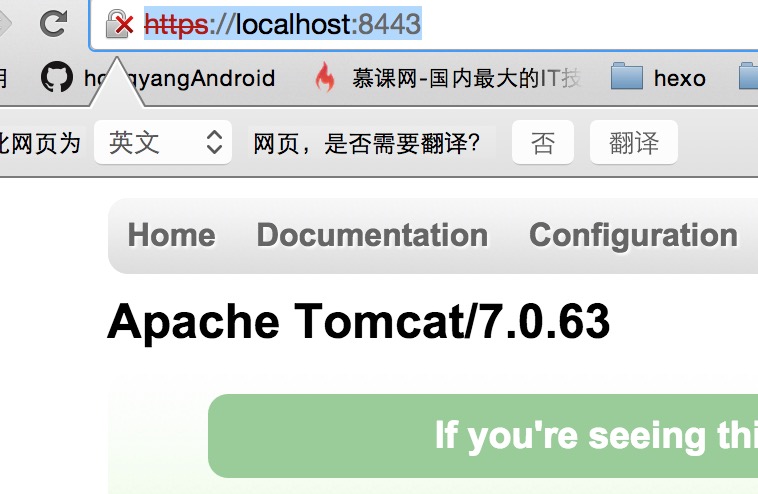
如果你在此tomcat中部署了项目,即可按照如下url方式访问:
https://192.168.1.103:8443/项目名/path,没有部署也没关系,直接拿默认的主页进行测试了,拿它的html字符串。
对于访问,还需要说么,我们刚才已经生成了zhy_server.cer证书。你可以选择copy到assets,或者通过命令拿到内部包含的字符串。我们这里选择copy。
依然选择在Application中设置信任证书:
public class MyApplication extends Application
{
    private String CER_12306 = "省略...";

    @Override
    public void onCreate()
    {
        super.onCreate();

        try
        {
            OkHttpClientManager.getInstance()
            .setCertificates(
                    new Buffer()
                    .writeUtf8(CER_12306).inputStream(),
                     getAssets().open("zhy_server.cer")
                    );
        } catch (IOException e)
        {
            e.printStackTrace();
        }

    }
}ok,这样就能正常访问你部署的https项目中的服务了,没有部署项目的尝试拿https://服务端ip:8443/测试即可。
注意:不要使用localhost,真机测试保证手机和服务器在同一局域网段内。
ok,到此我们介绍完了如果搭建https服务和如何访问,基本上可以应付极大部分的需求了。当然还是极少数的应用需要双向证书验证,比如银行、金融类app,我们一起来了解下。
五、双向证书验证
首先对于双向证书验证,也就是说,客户端也会有个“kjs文件”,服务器那边会同时有个“cer文件”与之对应。
我们已经生成了zhy_server.kjs和zhy_server.cer文件。
接下来按照生成证书的方式,再生成一对这样的文件,我们命名为:zhy_client.kjs,zhy_client.cer.
(一)配置服务端
首先我们配置服务端:
服务端的配置比较简单,依然是刚才的Connector标签,不过需要添加些属性。
 <Connector  其他属性与前面一致
    clientAuth="true"
    truststoreFile="/Users/zhy/temp/zhy_client.cer"
/> 将clientAuth设置为true,并且多添加一个属性truststoreFile,理论上值为我们的cer文件。这么加入以后,尝试启动服务器,会发生错误:Invalid keystore format。说keystore的格式不合法。
我们需要对zhy_client.cer执行以下步骤,将证书添加到kjs文件中。
keytool -import -alias zhy_client
    -file zhy_client.cer -keystore zhy_client_for_sever.jks
接下里修改server.xml为:
 <Connector  其他属性与前面一致
    clientAuth="true"
    truststoreFile="/Users/zhy/temp/zhy_client_for_sever.jks"
      />
此时启动即可。
此时再拿浏览器已经无法访问到我们的服务了,会显示基于证书的身份验证失败。
我们将目标来到客户端,即我们的Android端,我们的Android端,如何设置kjs文件呢。
(二)配置app端
目前我们app端依靠的应该是zhy_client.kjs。
ok,大家还记得,我们在支持https的时候调用了这么俩行代码:
sslContext.init(null, trustManagerFactory.getTrustManagers(),
    new SecureRandom());
mOkHttpClient.setSslSocketFactory(sslContext.getSocketFactory());注意sslContext.init的第一个参数我们传入的是null,第一个参数的类型实际上是KeyManager[] km,主要就用于管理我们客户端的key。
于是代码可以这么写:
public void setCertificates(InputStream... certificates)
{
    try
    {
        CertificateFactory certificateFactory = CertificateFactory.getInstance("X.509");
        KeyStore keyStore = KeyStore.getInstance(KeyStore.getDefaultType());
        keyStore.load(null);
        int index = 0;
        for (InputStream certificate : certificates)
        {
            String certificateAlias = Integer.toString(index++);
            keyStore.setCertificateEntry(certificateAlias, certificateFactory.generateCertificate(certificate));

            try
            {
                if (certificate != null)
                    certificate.close();
            } catch (IOException e)
            {
            }
        }

        SSLContext sslContext = SSLContext.getInstance("TLS");
        TrustManagerFactory trustManagerFactory = TrustManagerFactory.
                getInstance(TrustManagerFactory.getDefaultAlgorithm());
        trustManagerFactory.init(keyStore);

        //初始化keystore
        KeyStore clientKeyStore = KeyStore.getInstance(KeyStore.getDefaultType());
        clientKeyStore.load(mContext.getAssets().open("zhy_client.jks"), "123456".toCharArray());

        KeyManagerFactory keyManagerFactory = KeyManagerFactory.getInstance(KeyManagerFactory.getDefaultAlgorithm());
        keyManagerFactory.init(clientKeyStore, "123456".toCharArray());

        sslContext.init(keyManagerFactory.getKeyManagers(), trustManagerFactory.getTrustManagers(), new SecureRandom());
        mOkHttpClient.setSslSocketFactory(sslContext.getSocketFactory());


    } catch (Exception e)
    {
        e.printStackTrace();
    }

}
核心代码其实就是:
//初始化keystore
KeyStore clientKeyStore = KeyStore.getInstance(KeyStore.getDefaultType());
clientKeyStore.load(mContext.getAssets().open("zhy_client.jks"), "123456".toCharArray());

KeyManagerFactory keyManagerFactory = KeyManagerFactory.getInstance(KeyManagerFactory.getDefaultAlgorithm());
keyManagerFactory.init(clientKeyStore, "123456".toCharArray());

sslContext.init(keyManagerFactory.getKeyManagers(), trustManagerFactory.getTrustManagers(), new SecureRandom());
然而此时启动会报错:java.io.IOException: Wrong version of key store.
为什么呢?
因为:Java平台默认识别jks格式的证书文件,但是android平台只识别bks格式的证书文件。
这么就纠结了,我们需要将我们的jks文件转化为bks文件,怎么转化呢?
这里的方式可能比较多,大家可以百度,我推荐一种方式:
–
去Portecle下载Download portecle-1.9.zip (3.4 MB)。
解压后,里面包含bcprov.jar文件,使用jave -jar bcprov.jar即可打开GUI界面。
按照上图即可将zhy_client.jks转化为zhy_client.bks。
然后将zhy_client.bks拷贝到assets目录下,修改代码为:
//初始化keystore
KeyStore clientKeyStore = KeyStore.getInstance("BKS");
clientKeyStore.load(mContext.getAssets().open("zhy_client.bks"), "123456".toCharArray());

KeyManagerFactory keyManagerFactory = KeyManagerFactory.getInstance(KeyManagerFactory.getDefaultAlgorithm());
keyManagerFactory.init(clientKeyStore, "123456".toCharArray());

sslContext.init(keyManagerFactory.getKeyManagers(), trustManagerFactory.getTrustManagers(), new SecureRandom());
再次运行即可。然后就成功的做到了双向的验证,关于双向这块大家了解下即可。
源码都在https://github.com/hongyangAndroid/okhttp-utils之中。
ok,到此本篇博文就结束了,文章相当的长~~ 关于okhttp在https协议下的使用,应该没什么问题。
ps:如果大家对okhttp-utils有任何建议,非常欢迎提出,最近根据大家的需求修改相当频繁~~
欢迎关注我的微博:
http://weibo.com/u/3165018720
群号:463081660,欢迎入群
微信公众号:hongyangAndroid
(欢迎关注,第一时间推送博文信息)
参考
- http://blog.csdn.net/hfeng101/article/details/10163627
- http://www.ibm.com/developerworks/cn/java/j-lo-socketkeytool/index.html?ca=drs
- http://sourceforge.net/projects/portecle/files/
- http://blog.sina.com.cn/s/blog_7035c6ac01017hrx.html
- http://blog.csdn.net/cuker919/article/details/7599969
- http://www.cnblogs.com/devinzhang/archive/2012/02/28/2371631.html
- http://baike.baidu.com/link?url=eIodqEk7ATgau_jo74PvQdgqb_L6cajJWT9e7SzQrKfAomVY_05KB_dKyZYf-kbjupt_u9Bi0rn8l9wmnQobTa
- https://github.com/square/okhttp/blob/master/samples/guide/src/main/java/com/squareup/okhttp/recipes/CustomTrust.java
- http://blog.csdn.net/raptor/article/details/18896375
- http://blog.csdn.net/raptor/article/details/18898937
- http://nelenkov.blogspot.com/2011/12/using-custom-certificate-trust-store-on.html
转载请标明出处:
http://blog.csdn.net/lmj623565791/article/details/47911083;
本文出自:【张鸿洋的博客】
一、概述
最近在群里听到各种讨论okhttp的话题,可见okhttp的口碑相当好了。再加上Google貌似在6.0版本里面删除了HttpClient相关API,对于这个行为不做评价。为了更好的在应对网络访问,学习下okhttp还是蛮必要的,本篇博客首先介绍okhttp的简单使用,主要包含:
- 一般的get请求
- 一般的post请求
- 基于Http的文件上传
- 文件下载
- 加载图片
- 支持请求回调,直接返回对象、对象集合
- 支持session的保持
最后会对上述几个功能进行封装,完整的封装类的地址见:https://github.com/hongyangAndroid/okhttp-utils
使用前,对于Android Studio的用户,可以选择添加:
compile 'com.squareup.okhttp:okhttp:2.4.0'或者Eclipse的用户,可以下载最新的jar okhttp he latest JAR ,添加依赖就可以用了。
注意:okhttp内部依赖okio,别忘了同时导入okio:
gradle: compile 'com.squareup.okio:okio:1.5.0'
最新的jar地址:okio the latest JAR
二、使用教程
(一)Http Get
对了网络加载库,那么最常见的肯定就是http get请求了,比如获取一个网页的内容。
//创建okHttpClient对象
OkHttpClient mOkHttpClient = new OkHttpClient();
//创建一个Request
final Request request = new Request.Builder()
                .url("https://github.com/hongyangAndroid")
                .build();
//new call
Call call = mOkHttpClient.newCall(request);
//请求加入调度
call.enqueue(new Callback()
        {
            @Override
            public void onFailure(Request request, IOException e)
            {
            }

            @Override
            public void onResponse(final Response response) throws IOException
            {
                    //String htmlStr =  response.body().string();
            }
        });
-
以上就是发送一个get请求的步骤,首先构造一个Request对象,参数最起码有个url,当然你可以通过Request.Builder设置更多的参数比如:
header、method等。 -
然后通过request的对象去构造得到一个Call对象,类似于将你的请求封装成了任务,既然是任务,就会有
execute()和cancel()等方法。 -
最后,我们希望以异步的方式去执行请求,所以我们调用的是call.enqueue,将call加入调度队列,然后等待任务执行完成,我们在Callback中即可得到结果。
看到这,你会发现,整体的写法还是比较长的,所以封装肯定是要做的,不然每个请求这么写,得累死。
ok,需要注意几点:
-
onResponse回调的参数是response,一般情况下,比如我们希望获得返回的字符串,可以通过
response.body().string()获取;如果希望获得返回的二进制字节数组,则调用response.body().bytes();如果你想拿到返回的inputStream,则调用response.body().byteStream()看到这,你可能会奇怪,竟然还能拿到返回的inputStream,看到这个最起码能意识到一点,这里支持大文件下载,有inputStream我们就可以通过IO的方式写文件。不过也说明一个问题,这个
onResponse执行的线程并不是UI线程。的确是的,如果你希望操作控件,还是需要使用handler等,例如:@Override public void onResponse(final Response response) throws IOException { final String res = response.body().string(); runOnUiThread(new Runnable() { @Override public void run() { mTv.setText(res); } }); } - 我们这里是异步的方式去执行,当然也支持阻塞的方式,上面我们也说了Call有一个
execute()方法,你也可以直接调用call.execute()通过返回一个Response。
(二) Http Post 携带参数
看来上面的简单的get请求,基本上整个的用法也就掌握了,比如post携带参数,也仅仅是Request的构造的不同。
Request request = buildMultipartFormRequest(
        url, new File[]{file}, new String[]{fileKey}, null);
FormEncodingBuilder builder = new FormEncodingBuilder();
builder.add("username","张鸿洋");

Request request = new Request.Builder()
                   .url(url)
                .post(builder.build())
                .build();
 mOkHttpClient.newCall(request).enqueue(new Callback(){});
大家都清楚,post的时候,参数是包含在请求体中的;所以我们通过FormEncodingBuilder。添加多个String键值对,然后去构造RequestBody,最后完成我们Request的构造。
后面的就和上面一样了。
(三)基于Http的文件上传
接下来我们在介绍一个可以构造RequestBody的Builder,叫做MultipartBuilder。当我们需要做类似于表单上传的时候,就可以使用它来构造我们的requestBody。
File file = new File(Environment.getExternalStorageDirectory(), "balabala.mp4");

RequestBody fileBody = RequestBody.create(MediaType.parse("application/octet-stream"), file);

RequestBody requestBody = new MultipartBuilder()
     .type(MultipartBuilder.FORM)
     .addPart(Headers.of(
          "Content-Disposition",
              "form-data; name=\"username\""),
          RequestBody.create(null, "张鸿洋"))
     .addPart(Headers.of(
         "Content-Disposition",
         "form-data; name=\"mFile\";
         filename=\"wjd.mp4\""), fileBody)
     .build();

Request request = new Request.Builder()
    .url("http://192.168.1.103:8080/okHttpServer/fileUpload")
    .post(requestBody)
    .build();

Call call = mOkHttpClient.newCall(request);
call.enqueue(new Callback()
{
    //...
});上述代码向服务器传递了一个键值对username:张鸿洋和一个文件。我们通过MultipartBuilder的addPart方法可以添加键值对或者文件。
其实类似于我们拼接模拟浏览器行为的方式,如果你对这块不了解,可以参考:从原理角度解析Android (Java) http 文件上传
ok,对于我们最开始的目录还剩下图片下载,文件下载;这两个一个是通过回调的Response拿到byte[]然后decode成图片;文件下载,就是拿到inputStream做写文件操作,我们这里就不赘述了。
关于用法,也可以参考泡网OkHttp使用教程
接下来我们主要看如何封装上述的代码。
三、封装
由于按照上述的代码,写多个请求肯定包含大量的重复代码,所以我希望封装后的代码调用是这样的:
(一)使用
-
一般的get请求
 OkHttpClientManager.getAsyn("https://www.baidu.com", new OkHttpClientManager.ResultCallback<String>()
        {
            @Override
            public void onError(Request request, Exception e)
            {
                e.printStackTrace();
            }

            @Override
            public void onResponse(String u)
            {
                mTv.setText(u);//注意这里是UI线程
            }
        });
对于一般的请求,我们希望给个url,然后CallBack里面直接操作控件。
-
文件上传且携带参数
我们希望提供一个方法,传入url,params,file,callback即可。
  OkHttpClientManager.postAsyn("http://192.168.1.103:8080/okHttpServer/fileUpload",//
    new OkHttpClientManager.ResultCallback<String>()
    {
        @Override
        public void onError(Request request, IOException e)
        {
            e.printStackTrace();
        }

        @Override
        public void onResponse(String result)
        {

        }
    },//
    file,//
    "mFile",//
    new OkHttpClientManager.Param[]{
            new OkHttpClientManager.Param("username", "zhy"),
            new OkHttpClientManager.Param("password", "123")}
        );
键值对没什么说的,参数3为file,参数4为file对应的name,这个name不是文件的名字;
对应于http中的<input type="file" name="mFile" >对应的是name后面的值,即mFile.
-
文件下载
对于文件下载,提供url,目标dir,callback即可。
OkHttpClientManager.downloadAsyn( "http://192.168.1.103:8080/okHttpServer/files/messenger_01.png", Environment.getExternalStorageDirectory().getAbsolutePath(), new OkHttpClientManager.ResultCallback<String>() { @Override public void onError(Request request, IOException e) { } @Override public void onResponse(String response) { //文件下载成功,这里回调的reponse为文件的absolutePath } }); -
展示图片
展示图片,我们希望提供一个url和一个imageview,如果下载成功,直接帮我们设置上即可。
 OkHttpClientManager.displayImage(mImageView,
     "http://images.csdn.net/20150817/1.jpg");
内部会自动根据imageview的大小自动对图片进行合适的压缩。虽然,这里可能不适合一次性加载大量图片的场景,但是对于app中偶尔有几个图片的加载,还是可用的。
四、整合Gson
很多人提出项目中使用时,服务端返回的是Json字符串,希望客户端回调可以直接拿到对象,于是整合进入了Gson,完善该功能。
(一)直接回调对象
例如现在有个User实体类:
package com.zhy.utils.http.okhttp;

public class User {

    public String username ;
    public String password  ;

    public User() {
        // TODO Auto-generated constructor stub
    }

    public User(String username, String password) {
        this.username = username;
        this.password = password;
    }

    @Override
    public String toString()
    {
        return "User{" +
                "username='" + username + '\'' +
                ", password='" + password + '\'' +
                '}';
    }
}
服务端返回:
{"username":"zhy","password":"123"}客户端可以如下方式调用:
 OkHttpClientManager.getAsyn("http://192.168.56.1:8080/okHttpServer/user!getUser",
new OkHttpClientManager.ResultCallback<User>()
{
    @Override
    public void onError(Request request, Exception e)
    {
        e.printStackTrace();
    }

    @Override
    public void onResponse(User user)
    {
        mTv.setText(u.toString());//UI线程
    }
});
我们传入泛型User,在onResponse里面直接回调User对象。
这里特别要注意的事,如果在json字符串->实体对象过程中发生错误,程序不会崩溃,onError方法会被回调。
注意:这里做了少许的更新,接口命名从StringCallback修改为ResultCallback。接口中的onFailure方法修改为onError。
(二) 回调对象集合
依然是上述的User类,服务端返回
[{"username":"zhy","password":"123"},{"username":"lmj","password":"12345"}]则客户端可以如下调用:
OkHttpClientManager.getAsyn("http://192.168.56.1:8080/okHttpServer/user!getUsers",
new OkHttpClientManager.ResultCallback<List<User>>()
{
    @Override
    public void onError(Request request, Exception e)
    {
        e.printStackTrace();
    }
    @Override
    public void onResponse(List<User> us)
    {
        Log.e("TAG", us.size() + "");
        mTv.setText(us.get(1).toString());
    }
});唯一的区别,就是泛型变为List<User> ,ok , 如果发现bug或者有任何意见欢迎留言。
源码
ok,基本介绍完了,对于封装的代码其实也很简单,我就直接贴出来了,因为也没什么好介绍的,如果你看完上面的用法,肯定可以看懂:
package com.zhy.utils.http.okhttp;
import android.graphics.Bitmap;
import android.graphics.BitmapFactory;
import android.os.Handler;
import android.os.Looper;
import android.widget.ImageView;
import com.google.gson.Gson;
import com.google.gson.internal.$Gson$Types;
import com.squareup.okhttp.Call;
import com.squareup.okhttp.Callback;
import com.squareup.okhttp.FormEncodingBuilder;
import com.squareup.okhttp.Headers;
import com.squareup.okhttp.MediaType;
import com.squareup.okhttp.MultipartBuilder;
import com.squareup.okhttp.OkHttpClient;
import com.squareup.okhttp.Request;
import com.squareup.okhttp.RequestBody;
import com.squareup.okhttp.Response;
import java.io.File;
import java.io.FileOutputStream;
import java.io.IOException;
import java.io.InputStream;
import java.lang.reflect.ParameterizedType;
import java.lang.reflect.Type;
import java.net.CookieManager;
import java.net.CookiePolicy;
import java.net.FileNameMap;
import java.net.URLConnection;
import java.util.HashMap;
import java.util.Map;
import java.util.Set;
/**
* Created by zhy on 15/8/17.
*/
public class OkHttpClientManager
{
private static OkHttpClientManager mInstance;
private OkHttpClient mOkHttpClient;
private Handler mDelivery;
private Gson mGson;
private static final String TAG = "OkHttpClientManager";
private OkHttpClientManager()
{
mOkHttpClient = new OkHttpClient();
//cookie enabled
mOkHttpClient.setCookieHandler(new CookieManager(null, CookiePolicy.ACCEPT_ORIGINAL_SERVER));
mDelivery = new Handler(Looper.getMainLooper());
mGson = new Gson();
}
public static OkHttpClientManager getInstance()
{
if (mInstance == null)
{
synchronized (OkHttpClientManager.class)
{
if (mInstance == null)
{
mInstance = new OkHttpClientManager();
}
}
}
return mInstance;
}
/**
* 同步的Get请求
*
* @param url
* @return Response
*/
private Response _getAsyn(String url) throws IOException
{
final Request request = new Request.Builder()
.url(url)
.build();
Call call = mOkHttpClient.newCall(request);
Response execute = call.execute();
return execute;
}
/**
* 同步的Get请求
*
* @param url
* @return 字符串
*/
private String _getAsString(String url) throws IOException
{
Response execute = _getAsyn(url);
return execute.body().string();
}
/**
* 异步的get请求
*
* @param url
* @param callback
*/
private void _getAsyn(String url, final ResultCallback callback)
{
final Request request = new Request.Builder()
.url(url)
.build();
deliveryResult(callback, request);
}
/**
* 同步的Post请求
*
* @param url
* @param params post的参数
* @return
*/
private Response _post(String url, Param... params) throws IOException
{
Request request = buildPostRequest(url, params);
Response response = mOkHttpClient.newCall(request).execute();
return response;
}
/**
* 同步的Post请求
*
* @param url
* @param params post的参数
* @return 字符串
*/
private String _postAsString(String url, Param... params) throws IOException
{
Response response = _post(url, params);
return response.body().string();
}
/**
* 异步的post请求
*
* @param url
* @param callback
* @param params
*/
private void _postAsyn(String url, final ResultCallback callback, Param... params)
{
Request request = buildPostRequest(url, params);
deliveryResult(callback, request);
}
/**
* 异步的post请求
*
* @param url
* @param callback
* @param params
*/
private void _postAsyn(String url, final ResultCallback callback, Map<String, String> params)
{
Param[] paramsArr = map2Params(params);
Request request = buildPostRequest(url, paramsArr);
deliveryResult(callback, request);
}
/**
* 同步基于post的文件上传
*
* @param params
* @return
*/
private Response _post(String url, File[] files, String[] fileKeys, Param... params) throws IOException
{
Request request = buildMultipartFormRequest(url, files, fileKeys, params);
return mOkHttpClient.newCall(request).execute();
}
private Response _post(String url, File file, String fileKey) throws IOException
{
Request request = buildMultipartFormRequest(url, new File[]{file}, new String[]{fileKey}, null);
return mOkHttpClient.newCall(request).execute();
}
private Response _post(String url, File file, String fileKey, Param... params) throws IOException
{
Request request = buildMultipartFormRequest(url, new File[]{file}, new String[]{fileKey}, params);
return mOkHttpClient.newCall(request).execute();
}
/**
* 异步基于post的文件上传
*
* @param url
* @param callback
* @param files
* @param fileKeys
* @throws IOException
*/
private void _postAsyn(String url, ResultCallback callback, File[] files, String[] fileKeys, Param... params) throws IOException
{
Request request = buildMultipartFormRequest(url, files, fileKeys, params);
deliveryResult(callback, request);
}
/**
* 异步基于post的文件上传,单文件不带参数上传
*
* @param url
* @param callback
* @param file
* @param fileKey
* @throws IOException
*/
private void _postAsyn(String url, ResultCallback callback, File file, String fileKey) throws IOException
{
Request request = buildMultipartFormRequest(url, new File[]{file}, new String[]{fileKey}, null);
deliveryResult(callback, request);
}
/**
* 异步基于post的文件上传,单文件且携带其他form参数上传
*
* @param url
* @param callback
* @param file
* @param fileKey
* @param params
* @throws IOException
*/
private void _postAsyn(String url, ResultCallback callback, File file, String fileKey, Param... params) throws IOException
{
Request request = buildMultipartFormRequest(url, new File[]{file}, new String[]{fileKey}, params);
deliveryResult(callback, request);
}
/**
* 异步下载文件
*
* @param url
* @param destFileDir 本地文件存储的文件夹
* @param callback
*/
private void _downloadAsyn(final String url, final String destFileDir, final ResultCallback callback)
{
final Request request = new Request.Builder()
.url(url)
.build();
final Call call = mOkHttpClient.newCall(request);
call.enqueue(new Callback()
{
@Override
public void onFailure(final Request request, final IOException e)
{
sendFailedStringCallback(request, e, callback);
}
@Override
public void onResponse(Response response)
{
InputStream is = null;
byte[] buf = new byte[2048];
int len = 0;
FileOutputStream fos = null;
try
{
is = response.body().byteStream();
File file = new File(destFileDir, getFileName(url));
fos = new FileOutputStream(file);
while ((len = is.read(buf)) != -1)
{
fos.write(buf, 0, len);
}
fos.flush();
//如果下载文件成功,第一个参数为文件的绝对路径
sendSuccessResultCallback(file.getAbsolutePath(), callback);
} catch (IOException e)
{
sendFailedStringCallback(response.request(), e, callback);
} finally
{
try
{
if (is != null) is.close();
} catch (IOException e)
{
}
try
{
if (fos != null) fos.close();
} catch (IOException e)
{
}
}
}
});
}
private String getFileName(String path)
{
int separatorIndex = path.lastIndexOf("/");
return (separatorIndex < 0) ? path : path.substring(separatorIndex + 1, path.length());
}
/**
* 加载图片
*
* @param view
* @param url
* @throws IOException
*/
private void _displayImage(final ImageView view, final String url, final int errorResId)
{
final Request request = new Request.Builder()
.url(url)
.build();
Call call = mOkHttpClient.newCall(request);
call.enqueue(new Callback()
{
@Override
public void onFailure(Request request, IOException e)
{
setErrorResId(view, errorResId);
}
@Override
public void onResponse(Response response)
{
InputStream is = null;
try
{
is = response.body().byteStream();
ImageUtils.ImageSize actualImageSize = ImageUtils.getImageSize(is);
ImageUtils.ImageSize imageViewSize = ImageUtils.getImageViewSize(view);
int inSampleSize = ImageUtils.calculateInSampleSize(actualImageSize, imageViewSize);
try
{
is.reset();
} catch (IOException e)
{
response = _getAsyn(url);
is = response.body().byteStream();
}
BitmapFactory.Options ops = new BitmapFactory.Options();
ops.inJustDecodeBounds = false;
ops.inSampleSize = inSampleSize;
final Bitmap bm = BitmapFactory.decodeStream(is, null, ops);
mDelivery.post(new Runnable()
{
@Override
public void run()
{
view.setImageBitmap(bm);
}
});
} catch (Exception e)
{
setErrorResId(view, errorResId);
} finally
{
if (is != null) try
{
is.close();
} catch (IOException e)
{
e.printStackTrace();
}
}
}
});
}
private void setErrorResId(final ImageView view, final int errorResId)
{
mDelivery.post(new Runnable()
{
@Override
public void run()
{
view.setImageResource(errorResId);
}
});
}
//*************对外公布的方法************
public static Response getAsyn(String url) throws IOException
{
return getInstance()._getAsyn(url);
}
public static String getAsString(String url) throws IOException
{
return getInstance()._getAsString(url);
}
public static void getAsyn(String url, ResultCallback callback)
{
getInstance()._getAsyn(url, callback);
}
public static Response post(String url, Param... params) throws IOException
{
return getInstance()._post(url, params);
}
public static String postAsString(String url, Param... params) throws IOException
{
return getInstance()._postAsString(url, params);
}
public static void postAsyn(String url, final ResultCallback callback, Param... params)
{
getInstance()._postAsyn(url, callback, params);
}
public static void postAsyn(String url, final ResultCallback callback, Map<String, String> params)
{
getInstance()._postAsyn(url, callback, params);
}
public static Response post(String url, File[] files, String[] fileKeys, Param... params) throws IOException
{
return getInstance()._post(url, files, fileKeys, params);
}
public static Response post(String url, File file, String fileKey) throws IOException
{
return getInstance()._post(url, file, fileKey);
}
public static Response post(String url, File file, String fileKey, Param... params) throws IOException
{
return getInstance()._post(url, file, fileKey, params);
}
public static void postAsyn(String url, ResultCallback callback, File[] files, String[] fileKeys, Param... params) throws IOException
{
getInstance()._postAsyn(url, callback, files, fileKeys, params);
}
public static void postAsyn(String url, ResultCallback callback, File file, String fileKey) throws IOException
{
getInstance()._postAsyn(url, callback, file, fileKey);
}
public static void postAsyn(String url, ResultCallback callback, File file, String fileKey, Param... params) throws IOException
{
getInstance()._postAsyn(url, callback, file, fileKey, params);
}
public static void displayImage(final ImageView view, String url, int errorResId) throws IOException
{
getInstance()._displayImage(view, url, errorResId);
}
public static void displayImage(final ImageView view, String url)
{
getInstance()._displayImage(view, url, -1);
}
public static void downloadAsyn(String url, String destDir, ResultCallback callback)
{
getInstance()._downloadAsyn(url, destDir, callback);
}
//****************************
private Request buildMultipartFormRequest(String url, File[] files,
String[] fileKeys, Param[] params)
{
params = validateParam(params);
MultipartBuilder builder = new MultipartBuilder()
.type(MultipartBuilder.FORM);
for (Param param : params)
{
builder.addPart(Headers.of("Content-Disposition", "form-data; name=\"" + param.key + "\""),
RequestBody.create(null, param.value));
}
if (files != null)
{
RequestBody fileBody = null;
for (int i = 0; i < files.length; i++)
{
File file = files[i];
String fileName = file.getName();
fileBody = RequestBody.create(MediaType.parse(guessMimeType(fileName)), file);
//TODO 根据文件名设置contentType
builder.addPart(Headers.of("Content-Disposition",
"form-data; name=\"" + fileKeys[i] + "\"; filename=\"" + fileName + "\""),
fileBody);
}
}
RequestBody requestBody = builder.build();
return new Request.Builder()
.url(url)
.post(requestBody)
.build();
}
private String guessMimeType(String path)
{
FileNameMap fileNameMap = URLConnection.getFileNameMap();
String contentTypeFor = fileNameMap.getContentTypeFor(path);
if (contentTypeFor == null)
{
contentTypeFor = "application/octet-stream";
}
return contentTypeFor;
}
private Param[] validateParam(Param[] params)
{
if (params == null)
return new Param[0];
else return params;
}
private Param[] map2Params(Map<String, String> params)
{
if (params == null) return new Param[0];
int size = params.size();
Param[] res = new Param[size];
Set<Map.Entry<String, String>> entries = params.entrySet();
int i = 0;
for (Map.Entry<String, String> entry : entries)
{
res[i++] = new Param(entry.getKey(), entry.getValue());
}
return res;
}
private static final String SESSION_KEY = "Set-Cookie";
private static final String mSessionKey = "JSESSIONID";
private Map<String, String> mSessions = new HashMap<String, String>();
private void deliveryResult(final ResultCallback callback, Request request)
{
mOkHttpClient.newCall(request).enqueue(new Callback()
{
@Override
public void onFailure(final Request request, final IOException e)
{
sendFailedStringCallback(request, e, callback);
}
@Override
public void onResponse(final Response response)
{
try
{
final String string = response.body().string();
if (callback.mType == String.class)
{
sendSuccessResultCallback(string, callback);
} else
{
Object o = mGson.fromJson(string, callback.mType);
sendSuccessResultCallback(o, callback);
}
} catch (IOException e)
{
sendFailedStringCallback(response.request(), e, callback);
} catch (com.google.gson.JsonParseException e)//Json解析的错误
{
sendFailedStringCallback(response.request(), e, callback);
}
}
});
}
private void sendFailedStringCallback(final Request request, final Exception e, final ResultCallback callback)
{
mDelivery.post(new Runnable()
{
@Override
public void run()
{
if (callback != null)
callback.onError(request, e);
}
});
}
private void sendSuccessResultCallback(final Object object, final ResultCallback callback)
{
mDelivery.post(new Runnable()
{
@Override
public void run()
{
if (callback != null)
{
callback.onResponse(object);
}
}
});
}
private Request buildPostRequest(String url, Param[] params)
{
if (params == null)
{
params = new Param[0];
}
FormEncodingBuilder builder = new FormEncodingBuilder();
for (Param param : params)
{
builder.add(param.key, param.value);
}
RequestBody requestBody = builder.build();
return new Request.Builder()
.url(url)
.post(requestBody)
.build();
}
public static abstract class ResultCallback<T>
{
Type mType;
public ResultCallback()
{
mType = getSuperclassTypeParameter(getClass());
}
static Type getSuperclassTypeParameter(Class<?> subclass)
{
Type superclass = subclass.getGenericSuperclass();
if (superclass instanceof Class)
{
throw new RuntimeException("Missing type parameter.");
}
ParameterizedType parameterized = (ParameterizedType) superclass;
return $Gson$Types.canonicalize(parameterized.getActualTypeArguments()[0]);
}
public abstract void onError(Request request, Exception e);
public abstract void onResponse(T response);
}
public static class Param
{
public Param()
{
}
public Param(String key, String value)
{
this.key = key;
this.value = value;
}
String key;
String value;
}
}
源码地址okhttp-utils,大家可以自己下载查看。
欢迎关注我的微博:
http://weibo.com/u/3165018720
群号:463081660,欢迎入群
微信公众号:hongyangAndroid
(欢迎关注,第一时间推送博文信息)
参考文章
转载请标明出处:
http://blog.csdn.net/lmj623565791/article/details/47721631;
本文出自:【张鸿洋的博客】
一 概述
最近在完善图片加载方面的代码,于是就看看Volley的图片加载相关源码,取取经,顺便写篇博文作为笔记记录下。
在使用Volley作为图片加载库的时候,肯定需要做以下几件事:
- Application中初始化Volley请求队列
- 初始化ImageLoader,需要设置ImageCache
- 需要的时候,调用 getInstance().getImageLoader().get(url, new ImageLoader.ImageListener())
二 源码分析
(一) 初始化Volley请求队列
mReqQueue = Volley.newRequestQueue(mCtx);主要就是这一行了:
#Volley

public static RequestQueue newRequestQueue(Context context) {
        return newRequestQueue(context, null);
    }

public static RequestQueue newRequestQueue(Context context, HttpStack stack)
    {
        return newRequestQueue(context, stack, -1);
    }
public static RequestQueue newRequestQueue(Context context, HttpStack stack, int maxDiskCacheBytes) {
        File cacheDir = new File(context.getCacheDir(), DEFAULT_CACHE_DIR);

        String userAgent = "volley/0";
        try {
            String packageName = context.getPackageName();
            PackageInfo info = context.getPackageManager().getPackageInfo(packageName, 0);
            userAgent = packageName + "/" + info.versionCode;
        } catch (NameNotFoundException e) {
        }

        if (stack == null) {
            if (Build.VERSION.SDK_INT >= 9) {
                stack = new HurlStack();
            } else {
                // Prior to Gingerbread, HttpUrlConnection was unreliable.
                // See: http://android-developers.blogspot.com/2011/09/androids-http-clients.html
                stack = new HttpClientStack(AndroidHttpClient.newInstance(userAgent));
            }
        }

        Network network = new BasicNetwork(stack);

        RequestQueue queue;
        if (maxDiskCacheBytes <= -1)
        {
            // No maximum size specified
            queue = new RequestQueue(new DiskBasedCache(cacheDir), network);
        }
        else
        {
            // Disk cache size specified
            queue = new RequestQueue(new DiskBasedCache(cacheDir, maxDiskCacheBytes), network);
        }

        queue.start();

        return queue;
    }
这里主要就是初始化HttpStack,对于HttpStack在API大于等于9的时候选择HttpUrlConnetcion,反之则选择HttpClient,这里我们并不关注Http相关代码。
接下来初始化了RequestQueue,然后调用了start()方法。
接下来看RequestQueue的构造:
public RequestQueue(Cache cache, Network network) {
        this(cache, network, DEFAULT_NETWORK_THREAD_POOL_SIZE);
    }
public RequestQueue(Cache cache, Network network, int threadPoolSize) {
        this(cache, network, threadPoolSize,
                new ExecutorDelivery(new Handler(Looper.getMainLooper())));
    }
public RequestQueue(Cache cache, Network network, int threadPoolSize,
            ResponseDelivery delivery) {
        mCache = cache;
        mNetwork = network;
        mDispatchers = new NetworkDispatcher[threadPoolSize];
        mDelivery = delivery;
    }
初始化主要就是4个参数:mCache、mNetwork、mDispatchers、mDelivery。第一个是硬盘缓存;第二个主要用于Http相关操作;第三个用于转发请求的;第四个参数用于把结果转发到UI线程(ps:你可以看到new Handler(Looper.getMainLooper()))。
接下来看start方法
#RequestQueue
 /**
     * Starts the dispatchers in this queue.
     */
    public void start() {
        stop();  // Make sure any currently running dispatchers are stopped.
        // Create the cache dispatcher and start it.
        mCacheDispatcher = new CacheDispatcher(mCacheQueue, mNetworkQueue, mCache, mDelivery);
        mCacheDispatcher.start();

        // Create network dispatchers (and corresponding threads) up to the pool size.
        for (int i = 0; i < mDispatchers.length; i++) {
            NetworkDispatcher networkDispatcher = new NetworkDispatcher(mNetworkQueue, mNetwork,
                    mCache, mDelivery);
            mDispatchers[i] = networkDispatcher;
            networkDispatcher.start();
        }
    }
首先是stop,确保转发器退出,其实就是内部的几个线程退出,这里大家如果有兴趣可以看眼源码,参考下Volley中是怎么处理线程退出的(几个线程都是while(true){//doSomething})。
接下来初始化CacheDispatcher,然后调用start();初始化NetworkDispatcher,然后调用start();
上面的转发器呢,都是线程,可以看到,这里开了几个线程在帮助我们工作,具体的源码,我们一会在看。
好了,到这里,就完成了Volley的初始化的相关代码,那么接下来看初始化ImageLoader相关源码。
(二) 初始化ImageLoader
#VolleyHelper
mImageLoader = new ImageLoader(mReqQueue, new ImageCache()
        {
            private final LruCache<String, Bitmap> mLruCache = new LruCache<String, Bitmap>(
                    (int) (Runtime.getRuntime().maxMemory() / 10))
            {
                @Override
                protected int sizeOf(String key, Bitmap value)
                {
                    return value.getRowBytes() * value.getHeight();
                }
            };

            @Override
            public void putBitmap(String url, Bitmap bitmap)
            {
                mLruCache.put(url, bitmap);
            }

            @Override
            public Bitmap getBitmap(String url)
            {
                return mLruCache.get(url);
            }
        });

#ImageLoader

public ImageLoader(RequestQueue queue, ImageCache imageCache) {
        mRequestQueue = queue;
        mCache = imageCache;
    }
很简单,就是根据我们初始化的RequestQueue和LruCache初始化了一个ImageLoader。
(三) 加载图片
我们在加载图片时,调用的是:
 # VolleyHelper
 getInstance().getImageLoader().get(url, new ImageLoader.ImageListener());
接下来看get方法:
#ImageLoader
 public ImageContainer get(String requestUrl, final ImageListener listener) {
        return get(requestUrl, listener, 0, 0);
    }
public ImageContainer get(String requestUrl, ImageListener imageListener,
            int maxWidth, int maxHeight) {
        return get(requestUrl, imageListener, maxWidth, maxHeight, ScaleType.CENTER_INSIDE);
    }
public ImageContainer get(String requestUrl, ImageListener imageListener,
            int maxWidth, int maxHeight, ScaleType scaleType) {

        // only fulfill requests that were initiated from the main thread.
        throwIfNotOnMainThread();

        final String cacheKey = getCacheKey(requestUrl, maxWidth, maxHeight, scaleType);

        // Try to look up the request in the cache of remote images.
        Bitmap cachedBitmap = mCache.getBitmap(cacheKey);
        if (cachedBitmap != null) {
            // Return the cached bitmap.
            ImageContainer container = new ImageContainer(cachedBitmap, requestUrl, null, null);
            imageListener.onResponse(container, true);
            return container;
        }

        // The bitmap did not exist in the cache, fetch it!
        ImageContainer imageContainer =
                new ImageContainer(null, requestUrl, cacheKey, imageListener);

        // Update the caller to let them know that they should use the default bitmap.
        imageListener.onResponse(imageContainer, true);

        // Check to see if a request is already in-flight.
        BatchedImageRequest request = mInFlightRequests.get(cacheKey);
        if (request != null) {
            // If it is, add this request to the list of listeners.
            request.addContainer(imageContainer);
            return imageContainer;
        }

        // The request is not already in flight. Send the new request to the network and
        // track it.
        Request<Bitmap> newRequest = makeImageRequest(requestUrl, maxWidth, maxHeight, scaleType,
                cacheKey);

        mRequestQueue.add(newRequest);
        mInFlightRequests.put(cacheKey,
                new BatchedImageRequest(newRequest, imageContainer));
        return imageContainer;
}可以看到get方法,首先通过throwIfNotOnMainThread()方法限制必须在UI线程调用;
然后根据传入的参数计算cacheKey,获取cache;
=>如果cache存在,直接将返回结果封装为一个ImageContainer(cachedBitmap, requestUrl),然后直接回调imageListener.onResponse(container, true);我们就可以设置图片了。
=>如果cache不存在,初始化一个ImageContainer(没有bitmap),然后直接回调,imageListener.onResponse(imageContainer, true);,这里为了让大家在回调中判断,然后设置默认图片(所以,大家在自己实现listener的时候,别忘了判断resp.getBitmap()!=null);
接下来检查该url是否早已加入了请求对了,如果早已加入呢,则将刚初始化的ImageContainer加入BatchedImageRequest,返回结束。
如果是一个新的请求,则通过makeImageRequest创建一个新的请求,然后将这个请求分别加入mRequestQueue和mInFlightRequests,注意mInFlightRequests中会初始化一个BatchedImageRequest,存储相同的请求队列。
这里注意mRequestQueue是个对象,并不是队列数据结构,所以我们要看下add方法
#RequestQueue
public <T> Request<T> add(Request<T> request) {
        // Tag the request as belonging to this queue and add it to the set of current requests.
        request.setRequestQueue(this);
        synchronized (mCurrentRequests) {
            mCurrentRequests.add(request);
        }

        // Process requests in the order they are added.
        request.setSequence(getSequenceNumber());
        request.addMarker("add-to-queue");

        // If the request is uncacheable, skip the cache queue and go straight to the network.
        if (!request.shouldCache()) {
            mNetworkQueue.add(request);
            return request;
        }

        // Insert request into stage if there's already a request with the same cache key in flight.
        synchronized (mWaitingRequests) {
            String cacheKey = request.getCacheKey();
            if (mWaitingRequests.containsKey(cacheKey)) {
                // There is already a request in flight. Queue up.
                Queue<Request<?>> stagedRequests = mWaitingRequests.get(cacheKey);
                if (stagedRequests == null) {
                    stagedRequests = new LinkedList<Request<?>>();
                }
                stagedRequests.add(request);
                mWaitingRequests.put(cacheKey, stagedRequests);
                if (VolleyLog.DEBUG) {
                    VolleyLog.v("Request for cacheKey=%s is in flight, putting on hold.", cacheKey);
                }
            } else {
                // Insert 'null' queue for this cacheKey, indicating there is now a request in
                // flight.
                mWaitingRequests.put(cacheKey, null);
                mCacheQueue.add(request);
            }
            return request;
        }
    }
这里首先将请求加入mCurrentRequests,这个mCurrentRequests保存了所有需要处理的Request,主要为了提供cancel的入口。
如果该请求不应该被缓存则直接加入mNetworkQueue,然后返回。
然后判断该请求是否有相同的请求正在被处理,如果有则加入mWaitingRequests;如果没有,则
加入mWaitingRequests.put(cacheKey, null)和mCacheQueue.add(request)。
ok,到这里我们就分析完成了直观的代码,但是你可能会觉得,那么到底是在哪里触发的网络请求,加载图片呢?
那么,首先你应该知道,我们需要加载图片的时候,会makeImageRequest然后将这个请求加入到各种队列,主要包含mCurrentRequests、mCacheQueue。
然后,还记得我们初始化RequestQueue的时候,启动了几个转发线程吗?CacheDispatcher和NetworkDispatcher。
其实,网络请求就是在这几个线程中真正去加载的,我们分别看一下;
(四)CacheDispatcher
看一眼构造方法;
#CacheDispatcher
 public CacheDispatcher(
            BlockingQueue<Request<?>> cacheQueue, BlockingQueue<Request<?>> networkQueue,
            Cache cache, ResponseDelivery delivery) {
        mCacheQueue = cacheQueue;
        mNetworkQueue = networkQueue;
        mCache = cache;
        mDelivery = delivery;
    }
这是一个线程,那么主要的代码肯定在run里面。
#CacheDispatcher

 @Override
    public void run() {
        if (DEBUG) VolleyLog.v("start new dispatcher");
        Process.setThreadPriority(Process.THREAD_PRIORITY_BACKGROUND);

        // Make a blocking call to initialize the cache.
        mCache.initialize();

        while (true) {
            try {
                // Get a request from the cache triage queue, blocking until
                // at least one is available.
                final Request<?> request = mCacheQueue.take();
                request.addMarker("cache-queue-take");

                // If the request has been canceled, don't bother dispatching it.
                if (request.isCanceled()) {
                    request.finish("cache-discard-canceled");
                    continue;
                }

                // Attempt to retrieve this item from cache.
                Cache.Entry entry = mCache.get(request.getCacheKey());
                if (entry == null) {
                    request.addMarker("cache-miss");
                    // Cache miss; send off to the network dispatcher.
                    mNetworkQueue.put(request);
                    continue;
                }

                // If it is completely expired, just send it to the network.
                if (entry.isExpired()) {
                    request.addMarker("cache-hit-expired");
                    request.setCacheEntry(entry);
                    mNetworkQueue.put(request);
                    continue;
                }

                // We have a cache hit; parse its data for delivery back to the request.
                request.addMarker("cache-hit");
                Response<?> response = request.parseNetworkResponse(
                        new NetworkResponse(entry.data, entry.responseHeaders));
                request.addMarker("cache-hit-parsed");

                if (!entry.refreshNeeded()) {
                    // Completely unexpired cache hit. Just deliver the response.
                    mDelivery.postResponse(request, response);
                } else {
                    // Soft-expired cache hit. We can deliver the cached response,
                    // but we need to also send the request to the network for
                    // refreshing.
                    request.addMarker("cache-hit-refresh-needed");
                    request.setCacheEntry(entry);

                    // Mark the response as intermediate.
                    response.intermediate = true;

                    // Post the intermediate response back to the user and have
                    // the delivery then forward the request along to the network.
                    mDelivery.postResponse(request, response, new Runnable() {
                        @Override
                        public void run() {
                            try {
                                mNetworkQueue.put(request);
                            } catch (InterruptedException e) {
                                // Not much we can do about this.
                            }
                        }
                    });
                }

            } catch (InterruptedException e) {
                // We may have been interrupted because it was time to quit.
                if (mQuit) {
                    return;
                }
                continue;
            }
        }
}ok,首先要明确这个缓存指的是硬盘缓存(目录为context.getCacheDir()/volley),内存缓存在ImageLoader那里已经判断过了。
可以看到这里是个无限循环,不断的从mCacheQueue去取出请求,如果请求已经被取消就直接结束;
接下来从缓存中获取:
=>如果没有取到,则加入mNetworkQueue
=>如果缓存过期,则加入mNetworkQueue
否则,就是取到了可用的缓存了;调用request.parseNetworkResponse解析从缓存中取出的data和responseHeaders;接下来判断TTL(主要还是判断是否过期),如果没有过期则直接通过mDelivery.postResponse转发,然后回调到UI线程;如果ttl不合法,回调完成后,还会将该请求加入mNetworkQueue。
好了,这里其实就是如果拿到合法的缓存,则直接转发到UI线程;反之,则加入到NetworkQueue.
接下来我们看NetworkDispatcher。
(五)NetworkDispatcher
与CacheDispatcher类似,依然是个线程,核心代码依然在run中;
# NetworkDispatcher
//new NetworkDispatcher(mNetworkQueue, mNetwork,mCache, mDelivery)

public NetworkDispatcher(BlockingQueue<Request<?>> queue,
            Network network, Cache cache,
            ResponseDelivery delivery) {
        mQueue = queue;
        mNetwork = network;
        mCache = cache;
        mDelivery = delivery;
    }
@Override
    public void run() {
        Process.setThreadPriority(Process.THREAD_PRIORITY_BACKGROUND);
        while (true) {
            long startTimeMs = SystemClock.elapsedRealtime();
            Request<?> request;
            try {
                // Take a request from the queue.
                request = mQueue.take();
            } catch (InterruptedException e) {
                // We may have been interrupted because it was time to quit.
                if (mQuit) {
                    return;
                }
                continue;
            }

            try {
                request.addMarker("network-queue-take");

                // If the request was cancelled already, do not perform the
                // network request.
                if (request.isCanceled()) {
                    request.finish("network-discard-cancelled");
                    continue;
                }

                addTrafficStatsTag(request);

                // Perform the network request.
                NetworkResponse networkResponse = mNetwork.performRequest(request);
                request.addMarker("network-http-complete");

                // If the server returned 304 AND we delivered a response already,
                // we're done -- don't deliver a second identical response.
                if (networkResponse.notModified && request.hasHadResponseDelivered()) {
                    request.finish("not-modified");
                    continue;
                }

                // Parse the response here on the worker thread.
                Response<?> response = request.parseNetworkResponse(networkResponse);
                request.addMarker("network-parse-complete");

                // Write to cache if applicable.
                // TODO: Only update cache metadata instead of entire record for 304s.
                if (request.shouldCache() && response.cacheEntry != null) {
                    mCache.put(request.getCacheKey(), response.cacheEntry);
                    request.addMarker("network-cache-written");
                }

                // Post the response back.
                request.markDelivered();
                mDelivery.postResponse(request, response);
            } catch (VolleyError volleyError) {
                volleyError.setNetworkTimeMs(SystemClock.elapsedRealtime() - startTimeMs);
                parseAndDeliverNetworkError(request, volleyError);
            } catch (Exception e) {
                VolleyLog.e(e, "Unhandled exception %s", e.toString());
                VolleyError volleyError = new VolleyError(e);
                volleyError.setNetworkTimeMs(SystemClock.elapsedRealtime() - startTimeMs);
                mDelivery.postError(request, volleyError);
            }
        }
    }
看代码前,我们首先想一下逻辑,正常情况下我们会取出请求,让network去请求处理我们的请求,处理完成以后呢:加入缓存,然后转发。
那么看下是不是:
首先取出请求;然后通过mNetwork.performRequest(request)处理我们的请求,拿到NetworkResponse;接下来,使用request去解析我们的NetworkResponse。
注:因为我们NetworkResponse返回都是服务器返回的一些数据,而不同的请求对应的返回结果肯定不同,比如我们的ImageRequest,解析出来是个bitmap,所以我们的解析代码是在Request里面;这里大家想想,如果我们自定义Request,该方法是不是会重写呢?详情请戳Android Volley 之自定义Request
拿到Response以后,判断是否应该缓存,如果需要,则缓存。
最后mDelivery.postResponse(request, response);转发;
ok,和我们的预期差不多。
这样的话,我们的Volley去加载图片的核心逻辑就分析完成了,简单总结下:
- 首先初始化RequestQueue,主要就是开启几个Dispatcher线程,线程会不断读取请求(使用的阻塞队列,没有消息则阻塞)
- 当我们发出请求以后,会根据url,ImageView属性等,构造出一个cacheKey,然后首先从LruCache中获取(这个缓存我们自己构建的,凡是实现ImageCache接口的都合法);如果没有取到,则判断是否存在硬盘缓存,这一步是从getCacheDir里面获取(默认5M);如果没有取到,则从网络请求;
不过,可以发现的是Volley的图片加载,并没有LIFO这种策略;貌似对于图片的下载,也是完整的加到内存,然后压缩,这么看,对于巨图、大文件这样的就废了;
看起来还是蛮简单的,不过看完以后,对于如何更好的时候该库以及如何去设计图片加载库还是有很大的帮助的;
如果有兴趣,大家还可以在看源码分析的同时,想想某些细节的实现,比如:
- Dispatcher都是一些无限循环的线程,可以去看看Volley如何保证其关闭的。
- 对于图片压缩的代码,可以在ImageRequest的parseNetworkResponse里面去看看,是如何压缩的。
- so on…
最后贴个大概的流程图,方便记忆:
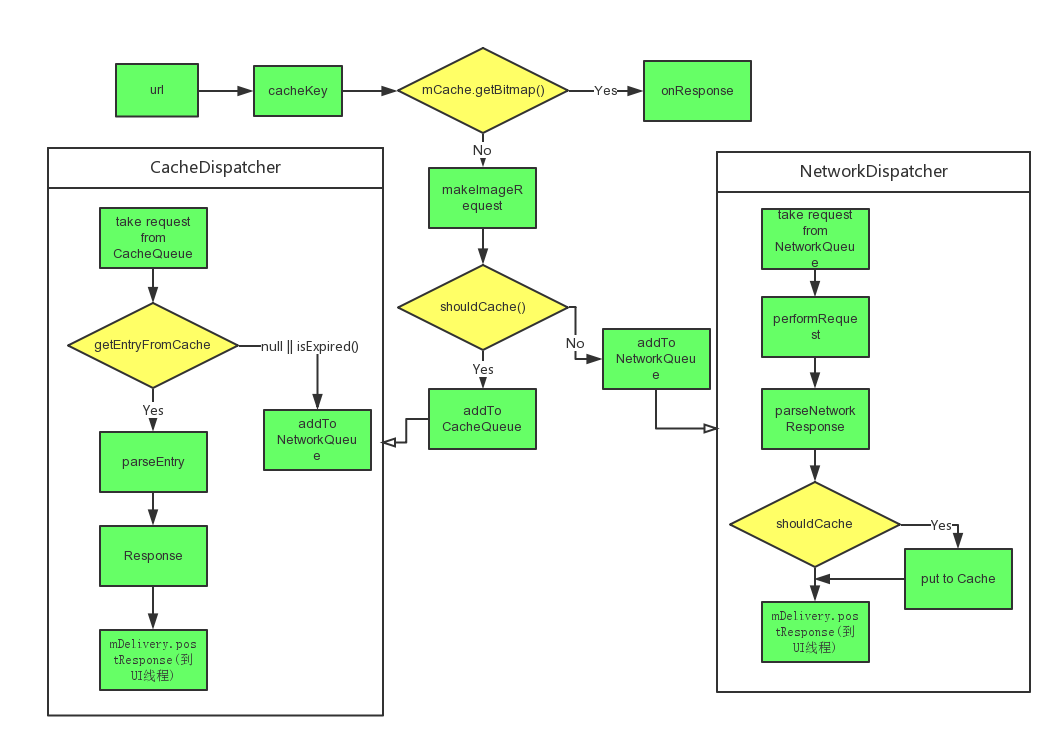
欢迎关注我的微博:
http://weibo.com/u/3165018720
群号:463081660,欢迎入群
微信公众号:hongyangAndroid
(欢迎关注,第一时间推送博文信息)
转载请标明出处:
http://blog.csdn.net/lmj623565791/article/details/47396187;
本文出自:【张鸿洋的博客】
一、概述
中间拖了蛮长时间了,在上一篇我们介绍了ViewDragHelper,详情:ViewDragHelper完全解析,当然了,上一篇都是小示例的形式去演示代码功能,并不能给人一种实用的感觉。那么,本篇博客就准备实用ViewDragHelper来实现一个DrawerLayout的效果,当然了,大家也可以选择直接去看Drawerlayout的源码。相信侧滑大家肯定不陌生,网络上流传无数个版本,其实利用ViewDragHelper就能方便的写出比较不错的侧滑代码~
那么首先上个效果图:
ok,其实和DrawerLayout效果类似,当然不是完全的一致~~本篇的主要目的也是演示VDH的实战用法,大家在选择侧滑的时候还是建议使用DrawerLayout.
二、实战
(一)布局文件
首先看一下布局文件:
<com.zhy.learn.view.LeftDrawerLayout
xmlns:android="http://schemas.android.com/apk/res/android"
xmlns:tools="http://schemas.android.com/tools"                                   android:layout_width="match_parent"
android:id="@+id/id_drawerlayout"                                     android:layout_height="match_parent"
    >

    <!--content-->
    <RelativeLayout
        android:clickable="true"
        android:layout_width="match_parent"
        android:background="#44ff0000"
        android:layout_height="match_parent">

        <TextView
            android:id="@+id/id_content_tv"
            android:layout_width="wrap_content"
            android:layout_height="wrap_content"
            android:text="hello world"
            android:textSize="40sp"
            android:layout_centerInParent="true"/>
    </RelativeLayout>

    <!--menu-->
    <FrameLayout
        android:id="@+id/id_container_menu"
        android:layout_width="match_parent"
        android:layout_height="match_parent"
        >
    </FrameLayout>


</com.zhy.learn.view.LeftDrawerLayout>
ok,可以看到我们的LeftDrawerLayout里面一个是content,一个是menu~为了方便,我们就默认child0为content,child1为menu。
(二)LeftDrawerLayout
package com.zhy.learn.view;

import android.content.Context;
import android.support.v4.widget.ViewDragHelper;
import android.util.AttributeSet;
import android.view.MotionEvent;
import android.view.View;
import android.view.ViewGroup;

import com.zhy.util.common.L;

/**
 * Created by zhy on 15/5/29.
 */
public class LeftDrawerLayout extends ViewGroup
{
    private static final int MIN_DRAWER_MARGIN = 64; // dp
    /**
     * Minimum velocity that will be detected as a fling
     */
    private static final int MIN_FLING_VELOCITY = 400; // dips per second

    /**
     * drawer离父容器右边的最小外边距
     */
    private int mMinDrawerMargin;

    private View mLeftMenuView;
    private View mContentView;

    private ViewDragHelper mHelper;
    /**
     * drawer显示出来的占自身的百分比
     */
    private float mLeftMenuOnScrren;


    public LeftDrawerLayout(Context context, AttributeSet attrs)
    {
        super(context, attrs);
        //setup drawer's minMargin
        final float density = getResources().getDisplayMetrics().density;
        final float minVel = MIN_FLING_VELOCITY * density;
        mMinDrawerMargin = (int) (MIN_DRAWER_MARGIN * density + 0.5f);

        mHelper = ViewDragHelper.create(this, 1.0f, new ViewDragHelper.Callback()
        {
            @Override
            public int clampViewPositionHorizontal(View child, int left, int dx)
            {
                int newLeft = Math.max(-child.getWidth(), Math.min(left, 0));
                return newLeft;
            }

            @Override
            public boolean tryCaptureView(View child, int pointerId)
            {
                L.e("tryCaptureView");
                return child == mLeftMenuView;
            }

            @Override
            public void onEdgeDragStarted(int edgeFlags, int pointerId)
            {
                L.e("onEdgeDragStarted");
                mHelper.captureChildView(mLeftMenuView, pointerId);
            }

            @Override
            public void onViewReleased(View releasedChild, float xvel, float yvel)
            {
                L.e("onViewReleased");
                final int childWidth = releasedChild.getWidth();
                float offset = (childWidth + releasedChild.getLeft()) * 1.0f / childWidth;
                mHelper.settleCapturedViewAt(xvel > 0 || xvel == 0 && offset > 0.5f ? 0 : -childWidth, releasedChild.getTop());
                invalidate();
            }

            @Override
            public void onViewPositionChanged(View changedView, int left, int top, int dx, int dy)
            {
                final int childWidth = changedView.getWidth();
                float offset = (float) (childWidth + left) / childWidth;
                mLeftMenuOnScrren = offset;
                //offset can callback here
                changedView.setVisibility(offset == 0 ? View.INVISIBLE : View.VISIBLE);
                invalidate();
            }

            @Override
            public int getViewHorizontalDragRange(View child)
            {
                return mLeftMenuView == child ? child.getWidth() : 0;
            }
        });
        //设置edge_left track
        mHelper.setEdgeTrackingEnabled(ViewDragHelper.EDGE_LEFT);
        //设置minVelocity
        mHelper.setMinVelocity(minVel);
    }

    @Override
    protected void onMeasure(int widthMeasureSpec, int heightMeasureSpec)
    {
        int widthSize = MeasureSpec.getSize(widthMeasureSpec);
        int heightSize = MeasureSpec.getSize(heightMeasureSpec);

        setMeasuredDimension(widthSize, heightSize);

        View leftMenuView = getChildAt(1);
        MarginLayoutParams lp = (MarginLayoutParams)
                leftMenuView.getLayoutParams();

        final int drawerWidthSpec = getChildMeasureSpec(widthMeasureSpec,
                mMinDrawerMargin + lp.leftMargin + lp.rightMargin,
                lp.width);
        final int drawerHeightSpec = getChildMeasureSpec(heightMeasureSpec,
                lp.topMargin + lp.bottomMargin,
                lp.height);
        leftMenuView.measure(drawerWidthSpec, drawerHeightSpec);


        View contentView = getChildAt(0);
        lp = (MarginLayoutParams) contentView.getLayoutParams();
        final int contentWidthSpec = MeasureSpec.makeMeasureSpec(
                widthSize - lp.leftMargin - lp.rightMargin, MeasureSpec.EXACTLY);
        final int contentHeightSpec = MeasureSpec.makeMeasureSpec(
                heightSize - lp.topMargin - lp.bottomMargin, MeasureSpec.EXACTLY);
        contentView.measure(contentWidthSpec, contentHeightSpec);

        mLeftMenuView = leftMenuView;
        mContentView = contentView;


    }

    @Override
    protected void onLayout(boolean changed, int l, int t, int r, int b)
    {
        View menuView = mLeftMenuView;
        View contentView = mContentView;

        MarginLayoutParams lp = (MarginLayoutParams) contentView.getLayoutParams();
        contentView.layout(lp.leftMargin, lp.topMargin,
                lp.leftMargin + contentView.getMeasuredWidth(),
                lp.topMargin + contentView.getMeasuredHeight());

        lp = (MarginLayoutParams) menuView.getLayoutParams();

        final int menuWidth = menuView.getMeasuredWidth();
        int childLeft = -menuWidth + (int) (menuWidth * mLeftMenuOnScrren);
        menuView.layout(childLeft, lp.topMargin, childLeft + menuWidth,
                lp.topMargin + menuView.getMeasuredHeight());
    }

    @Override
    public boolean onInterceptTouchEvent(MotionEvent ev)
    {
        boolean shouldInterceptTouchEvent = mHelper.shouldInterceptTouchEvent(ev);
        return shouldInterceptTouchEvent;
    }


    @Override
    public boolean onTouchEvent(MotionEvent event)
    {
        mHelper.processTouchEvent(event);
        return true;
    }


    @Override
    public void computeScroll()
    {
        if (mHelper.continueSettling(true))
        {
            invalidate();
        }
    }

    public void closeDrawer()
    {
        View menuView = mLeftMenuView;
        mLeftMenuOnScrren = 0.f;
        mHelper.smoothSlideViewTo(menuView, -menuView.getWidth(), menuView.getTop());
    }

    public void openDrawer()
    {
        View menuView = mLeftMenuView;
        mLeftMenuOnScrren = 1.0f;
        mHelper.smoothSlideViewTo(menuView, 0, menuView.getTop());
    }

    @Override
    protected LayoutParams generateDefaultLayoutParams()
    {
        return new MarginLayoutParams(LayoutParams.MATCH_PARENT, LayoutParams.MATCH_PARENT);
    }

    public LayoutParams generateLayoutParams(AttributeSet attrs)
    {
        return new MarginLayoutParams(getContext(), attrs);
    }

    protected LayoutParams generateLayoutParams(ViewGroup.LayoutParams p)
    {
        return new MarginLayoutParams(p);
    }

}
哈,很少的代码就完成了我们的侧滑的编写,目测如果使用横向的LinearLayout代码更短。构造方法中,主要就是初始化我们的mDragHelper了,接下来onMeasure和onLayout都比较简单,onLayout也只是去将我们的menu设置到屏幕的左侧以至于不可见。onInterceptTouchEvent和onTouchEvent中都只需要简单的调用mDragHelper的方法。那么核心代码都在我们的ViewDragHelper.Callback的实例中了。注意一点:我们LeftDrawerLayout默认的LayoutParams为MarginLayoutParams,注意复写相关方法。
接下来就把注意力放到我们的Callback中,我尽可能的按照调用的逻辑来解释各个方法:
-
onEdgeDragStarted 如果你仔细的看过上篇,那么一定知道这个方法的回调位置;因为我们的View不可见,所以我们没有办法直接通过触摸到它来把menu设置为captureView,所以我们只能设置边界检测,当MOVE时回调onEdgeDragStarted时,我们直接通过captureChildView手动捕获。
-
tryCaptureView 那么既然我们手动捕获了,为什么还需要这个方法呢?主要是因为当Drawer拉出的时候,我们通过拖拽Drawer也能进行移动菜单。
-
clampViewPositionHorizontal 主要是移动的时候去控制控制范围,可以看到我们的
int newLeft = Math.max(-child.getWidth(), Math.min(left, 0));一定>=-child.getWidth() && <=0 。 -
getViewHorizontalDragRange 为什么要复写,我们上篇已经描述过,返回captureView的移动范围。
-
onViewReleased 则是释放的时候触发的,我们计算当前显示的百分比,以及加速度来决定是否显示drawer,从代码可以看出,当
xvel > 0||xvel == 0 && offset > 0.5f显示我们的菜单,其他情况隐藏。这里注意一点xvel的值只有大于我们设置的minVelocity才会出现大于0,如果小于我们设置的值则一直是0。 -
onViewPositionChanged 整个pos变化的过程中,我们计算offset保存,这里可以使用接口将offset回调出去,方便做动画。
ok,我们重写的所有方法描述完成了~那么博文主要内容也就结束了~哈~是不是 so easy ~!
呃,忘了MainActivity和Fragment的代码了~~按顺序贴
(三)LeftDrawerLayoutActivity
package com.imooc.testandroid;

import android.os.Bundle;
import android.support.v4.app.FragmentManager;
import android.support.v7.app.ActionBarActivity;
import android.view.Menu;
import android.view.MenuItem;
import android.widget.TextView;

import com.zhy.learn.view.LeftDrawerLayout;


public class LeftDrawerLayoutActivity extends ActionBarActivity
{

    private LeftMenuFragment mMenuFragment;
    private LeftDrawerLayout mLeftDrawerLayout ;
    private TextView mContentTv ;


    @Override
    protected void onCreate(Bundle savedInstanceState)
    {
        super.onCreate(savedInstanceState);
        setContentView(R.layout.activity_left_drawer_layout);

        mLeftDrawerLayout = (LeftDrawerLayout) findViewById(R.id.id_drawerlayout);
        mContentTv = (TextView) findViewById(R.id.id_content_tv);

        FragmentManager fm = getSupportFragmentManager();
        mMenuFragment = (LeftMenuFragment) fm.findFragmentById(R.id.id_container_menu);
        if (mMenuFragment == null)
        {
            fm.beginTransaction().add(R.id.id_container_menu, mMenuFragment = new LeftMenuFragment()).commit();
        }

        mMenuFragment.setOnMenuItemSelectedListener(new LeftMenuFragment.OnMenuItemSelectedListener()
        {
            @Override
            public void menuItemSelected(String title)
            {
                mLeftDrawerLayout.closeDrawer();
                mContentTv.setText(title);
            }
        });

    }
可以看到drawer使用了一个Fragment ~~
(四) LeftMenuFragment
import android.os.Bundle;
import android.support.annotation.Nullable;
import android.support.v4.app.ListFragment;
import android.view.LayoutInflater;
import android.view.View;
import android.view.ViewGroup;
import android.widget.ListView;

/**
 * Created by zhy on 15/4/26.
 */
public class LeftMenuFragment extends ListFragment {

    private static final int SIZE_MENU_ITEM = 3;

    private MenuItem[] mItems = new MenuItem[SIZE_MENU_ITEM];

    private LeftMenuAdapter mAdapter;


    private LayoutInflater mInflater;

    @Override
    public void onCreate(@Nullable Bundle savedInstanceState) {
        super.onCreate(savedInstanceState);

        mInflater = LayoutInflater.from(getActivity());

        MenuItem menuItem = null;
        for (int i = 0; i < SIZE_MENU_ITEM; i++) {
            menuItem = new MenuItem(getResources().getStringArray(R.array.array_left_menu)[i], false, R.drawable.music_36px, R.drawable.music_36px_light);
            mItems[i] = menuItem;
        }
    }

    @Override
    public View onCreateView(LayoutInflater inflater, ViewGroup container, Bundle savedInstanceState) {
        return super.onCreateView(inflater, container, savedInstanceState);
    }

    @Override
    public void onViewCreated(View view, @Nullable Bundle savedInstanceState) {
        super.onViewCreated(view, savedInstanceState);
        view.setBackgroundColor(0xffffffff);
        setListAdapter(mAdapter = new LeftMenuAdapter(getActivity(), mItems));

    }

    @Override
    public void onListItemClick(ListView l, View v, int position, long id) {
        super.onListItemClick(l, v, position, id);

        if (mMenuItemSelectedListener != null) {
            mMenuItemSelectedListener.menuItemSelected(((MenuItem) getListAdapter().getItem(position)).text);
        }
        mAdapter.setSelected(position);
    }


    //选择回调的接口
    public interface OnMenuItemSelectedListener {
        void menuItemSelected(String title);
    }
    private OnMenuItemSelectedListener mMenuItemSelectedListener;

    public void setOnMenuItemSelectedListener(OnMenuItemSelectedListener menuItemSelectedListener) {
        this.mMenuItemSelectedListener = menuItemSelectedListener;
    }
}


public class MenuItem
{

    public MenuItem(String text, boolean isSelected, int icon, int iconSelected) {
        this.text = text;
        this.isSelected = isSelected;
        this.icon = icon;
        this.iconSelected = iconSelected;
    }

    boolean isSelected;
    String text;
    int icon;
    int iconSelected;
}


/**
 * Created by zhy on 15/4/26.
 */
public class LeftMenuAdapter extends ArrayAdapter<MenuItem> {


    private LayoutInflater mInflater;

    private int mSelected;


    public LeftMenuAdapter(Context context, MenuItem[] objects) {
        super(context, -1, objects);

        mInflater = LayoutInflater.from(context);

    }

    @Override
    public View getView(int position, View convertView, ViewGroup parent) {


        if (convertView == null) {
            convertView = mInflater.inflate(R.layout.item_left_menu, parent, false);
        }

        ImageView iv = (ImageView) convertView.findViewById(R.id.id_item_icon);
        TextView title = (TextView) convertView.findViewById(R.id.id_item_title);
        title.setText(getItem(position).text);
        iv.setImageResource(getItem(position).icon);
        convertView.setBackgroundColor(Color.TRANSPARENT);

        if (position == mSelected) {
            iv.setImageResource(getItem(position).iconSelected);
            convertView.setBackgroundColor(getContext().getResources().getColor(R.color.state_menu_item_selected));
        }

        return convertView;
    }

    public void setSelected(int position) {
        this.mSelected = position;
        notifyDataSetChanged();
    }


}
贴了一大串,主要就是Fragment的代码,内部有个ListView,所以还有个Adapter,这个Fragment在之前的博文中出现过,搬过来而已。item的布局文件就是一个TextView和ImageView~~不贴了~~大家自己下载源码~
源码点击下载(导入方式注意看下ReadMe)
ok,到此结束~~hava a nice day ~~
欢迎关注我的微博:
http://weibo.com/u/3165018720
群号:463081660,欢迎入群
微信公众号:hongyangAndroid
(欢迎关注,第一时间推送博文信息)
转载请标明出处:
http://blog.csdn.net/lmj623565791/article/details/47251585;
本文出自:【张鸿洋的博客】
一、概述
依旧是整理东西,所以近期的博客涉及的东西可能会比较老一点,会分析一些经典的框架,我觉得可能也是每个优秀的开发者必须掌握的东西;那么对于Disk Cache,DiskLruCache可以算佼佼者了,所以我们就来分析下其源码实现。
对于该库的使用,推荐老郭的blog Android DiskLruCache完全解析,硬盘缓存的最佳方案
如果你不是很了解用法,那么注意下面的几点描述,不然直接看源码分析可能雨里雾里的。
- 首先,这个框架会涉及到一个文件,叫做journal,这个文件中会存储每次读取操作的记录;
-
对于获取一个DiskLruCache,是这样的:
DiskLruCache.open(directory, appVersion, valueCount, maxSize) ; -
关于存一般是这么使用的:
String key = generateKey(url);
DiskLruCache.Editor editor = mDiskLruCache.edit(key);
OuputStream os = editor.newOutputStream(0);
因为每个实体都是个文件,所以你可以认为这个os指向一个文件的FileOutputStream,然后把你想存的东西写入就行了,写完以后记得调用:
editor.commit()。 -
关于取一般是这样的:
 DiskLruCache.Snapshot snapShot = mDiskLruCache.get(key);
if (snapShot != null) {
    InputStream is = snapShot.getInputStream(0);
}
还是那句,因为每个实体都是文件,所以你返回的is是个FileInputStream,你可以利用is读取出里面的内容,然后do what you want .
好了,关于Cache最主要就是存取了,了解这几点,就可以往下去看源码分析了。
还记得第一点说的journal文件么,首先就是它了。
二、journal文件
journal文件你打开以后呢,是这个格式;
libcore.io.DiskLruCache
1
1
1

DIRTY c3bac86f2e7a291a1a200b853835b664
CLEAN c3bac86f2e7a291a1a200b853835b664 4698
READ c3bac86f2e7a291a1a200b853835b664
DIRTY c59f9eec4b616dc6682c7fa8bd1e061f
CLEAN c59f9eec4b616dc6682c7fa8bd1e061f 4698
READ c59f9eec4b616dc6682c7fa8bd1e061f
DIRTY be8bdac81c12a08e15988555d85dfd2b
CLEAN be8bdac81c12a08e15988555d85dfd2b 99
READ be8bdac81c12a08e15988555d85dfd2b
DIRTY 536788f4dbdffeecfbb8f350a941eea3
REMOVE 536788f4dbdffeecfbb8f350a941eea3
首先看前五行:
- 第一行固定字符串
libcore.io.DiskLruCache - 第二行DiskLruCache的版本号,源码中为常量1
- 第三行为你的app的版本号,当然这个是你自己传入指定的
- 第四行指每个key对应几个文件,一般为1
- 第五行,空行
ok,以上5行可以称为该文件的文件头,DiskLruCache初始化的时候,如果该文件存在需要校验该文件头。
接下来的行,可以认为是操作记录。
- DIRTY 表示一个entry正在被写入(其实就是把文件的OutputStream交给你了)。那么写入分两种情况,如果成功会紧接着写入一行CLEAN的记录;如果失败,会增加一行REMOVE记录。
- REMOVE除了上述的情况呢,当你自己手动调用remove(key)方法的时候也会写入一条REMOVE记录。
- READ就是说明有一次读取的记录。
- 每个CLEAN的后面还记录了文件的长度,注意可能会一个key对应多个文件,那么就会有多个数字(参照文件头第四行)。
从这里看出,只有CLEAN且没有REMOVE的记录,才是真正可用的Cache Entry记录。
分析完journal文件,首先看看DiskLruCache的创建的代码。
三、DiskLruCache#open
public static DiskLruCache open(File directory, int appVersion, int valueCount, long maxSize)
      throws IOException {

    // If a bkp file exists, use it instead.
    File backupFile = new File(directory, JOURNAL_FILE_BACKUP);
    if (backupFile.exists()) {
      File journalFile = new File(directory, JOURNAL_FILE);
      // If journal file also exists just delete backup file.
      if (journalFile.exists()) {
        backupFile.delete();
      } else {
        renameTo(backupFile, journalFile, false);
      }
    }

    // Prefer to pick up where we left off.
    DiskLruCache cache = new DiskLruCache(directory, appVersion, valueCount, maxSize);
    if (cache.journalFile.exists()) {
      try {
        cache.readJournal();
        cache.processJournal();
        return cache;
      } catch (IOException journalIsCorrupt) {
        System.out
            .println("DiskLruCache "
                + directory
                + " is corrupt: "
                + journalIsCorrupt.getMessage()
                + ", removing");
        cache.delete();
      }
    }

    // Create a new empty cache.
    directory.mkdirs();
    cache = new DiskLruCache(directory, appVersion, valueCount, maxSize);
    cache.rebuildJournal();
    return cache;
  }
首先检查存不存在journal.bkp(journal的备份文件)
如果存在:然后检查journal文件是否存在,如果正主在,bkp文件就可以删除了。
如果不存在,将bkp文件重命名为journal文件。
接下里判断journal文件是否存在:
-
如果不存在
创建directory;重新构造disklrucache;调用rebuildJournal建立journal文件
/**
* Creates a new journal that omits redundant information. This replaces the
* current journal if it exists.
*/
private synchronized void rebuildJournal() throws IOException {
if (journalWriter != null) {
  journalWriter.close();
}

Writer writer = new BufferedWriter(
    new OutputStreamWriter(new FileOutputStream(journalFileTmp), Util.US_ASCII));
try {
  writer.write(MAGIC);
  writer.write("\n");
  writer.write(VERSION_1);
  writer.write("\n");
  writer.write(Integer.toString(appVersion));
  writer.write("\n");
  writer.write(Integer.toString(valueCount));
  writer.write("\n");
  writer.write("\n");

  for (Entry entry : lruEntries.values()) {
    if (entry.currentEditor != null) {
      writer.write(DIRTY + ' ' + entry.key + '\n');
    } else {
      writer.write(CLEAN + ' ' + entry.key + entry.getLengths() + '\n');
    }
  }
} finally {
  writer.close();
}

if (journalFile.exists()) {
  renameTo(journalFile, journalFileBackup, true);
}
renameTo(journalFileTmp, journalFile, false);
journalFileBackup.delete();

journalWriter = new BufferedWriter(
    new OutputStreamWriter(new FileOutputStream(journalFile, true), Util.US_ASCII));
}
可以看到首先构建一个journal.tmp文件,然后写入文件头(5行),然后遍历lruEntries(
lruEntries =),当然我们这里没有任何数据。接下来将tmp文件重命名为journal文件。
new LinkedHashMap<String, Entry>(0, 0.75f, true); -
如果存在
如果已经存在,那么调用
readJournal。private void readJournal() throws IOException { StrictLineReader reader = new StrictLineReader(new FileInputStream(journalFile), Util.US_ASCII); try { String magic = reader.readLine(); String version = reader.readLine(); String appVersionString = reader.readLine(); String valueCountString = reader.readLine(); String blank = reader.readLine(); if (!MAGIC.equals(magic) || !VERSION_1.equals(version) || !Integer.toString(appVersion).equals(appVersionString) || !Integer.toString(valueCount).equals(valueCountString) || !"".equals(blank)) { throw new IOException("unexpected journal header: [" + magic + ", " + version + ", " + valueCountString + ", " + blank + "]"); } int lineCount = 0; while (true) { try { readJournalLine(reader.readLine()); lineCount++; } catch (EOFException endOfJournal) { break; } } redundantOpCount = lineCount - lruEntries.size(); // If we ended on a truncated line, rebuild the journal before appending to it. if (reader.hasUnterminatedLine()) { rebuildJournal(); } else { journalWriter = new BufferedWriter(new OutputStreamWriter( new FileOutputStream(journalFile, true), Util.US_ASCII)); } } finally { Util.closeQuietly(reader); } }首先校验文件头,接下来调用
readJournalLine按行读取内容。我们来看看readJournalLine中的操作。private void readJournalLine(String line) throws IOException { int firstSpace = line.indexOf(' '); if (firstSpace == -1) { throw new IOException("unexpected journal line: " + line); } int keyBegin = firstSpace + 1; int secondSpace = line.indexOf(' ', keyBegin); final String key; if (secondSpace == -1) { key = line.substring(keyBegin); if (firstSpace == REMOVE.length() && line.startsWith(REMOVE)) { lruEntries.remove(key); return; } } else { key = line.substring(keyBegin, secondSpace); } Entry entry = lruEntries.get(key); if (entry == null) { entry = new Entry(key); lruEntries.put(key, entry); } if (secondSpace != -1 && firstSpace == CLEAN.length() && line.startsWith(CLEAN)) { String[] parts = line.substring(secondSpace + 1).split(" "); entry.readable = true; entry.currentEditor = null; entry.setLengths(parts); } else if (secondSpace == -1 && firstSpace == DIRTY.length() && line.startsWith(DIRTY)) { entry.currentEditor = new Editor(entry); } else if (secondSpace == -1 && firstSpace == READ.length() && line.startsWith(READ)) { // This work was already done by calling lruEntries.get(). } else { throw new IOException("unexpected journal line: " + line); } }大家可以回忆下:每个记录至少有一个空格,有的包含两个空格。首先,拿到key,如果是REMOVE的记录呢,会调用
lruEntries.remove(key);如果不是REMOVE记录,继续往下,如果该key没有加入到lruEntries,则创建并且加入。
接下来,如果是CLEAN开头的合法记录,初始化entry,设置readable=true,currentEditor为null,初始化长度等。
如果是DIRTY,设置currentEditor对象。
如果是READ,那么直接不管。
ok,经过上面这个过程,大家回忆下我们的记录格式,一般DIRTY不会单独出现,会和REMOVE、CLEAN成对出现(正常操作);也就是说,经过上面这个流程,基本上加入到lruEntries里面的只有CLEAN且没有被REMOVE的key。
好了,回到readJournal方法,在我们按行读取的时候,会记录一下lineCount,然后最后给redundantOpCount赋值,这个变量记录的应该是没用的记录条数(文件的行数-真正可以的key的行数)。
最后,如果读取过程中发现journal文件有问题,则重建journal文件。没有问题的话,初始化下journalWriter,关闭reader。
readJournal完成了,会继续调用processJournal()这个方法内部:private void processJournal() throws IOException { deleteIfExists(journalFileTmp); for (Iterator<Entry> i = lruEntries.values().iterator(); i.hasNext(); ) { Entry entry = i.next(); if (entry.currentEditor == null) { for (int t = 0; t < valueCount; t++) { size += entry.lengths[t]; } } else { entry.currentEditor = null; for (int t = 0; t < valueCount; t++) { deleteIfExists(entry.getCleanFile(t)); deleteIfExists(entry.getDirtyFile(t)); } i.remove(); } } }统计所有可用的cache占据的容量,赋值给size;对于所有非法DIRTY状态(就是DIRTY单独出现的)的entry,如果存在文件则删除,并且从lruEntries中移除。此时,剩的就真的只有CLEAN状态的key记录了。
ok,到此就初始化完毕了,太长了,根本记不住,我带大家总结下上面代码。
根据我们传入的dir,去找journal文件,如果找不到,则创建个,只写入文件头(5行)。
如果找到,则遍历该文件,将里面所有的CLEAN记录的key,存到lruEntries中。
这么长的代码,其实就两句话的意思。经过open以后,journal文件肯定存在了;lruEntries里面肯定有值了;size存储了当前所有的实体占据的容量;。
四、存入缓存
还记得,我们前面说过是怎么存的么?
String key = generateKey(url);
DiskLruCache.Editor editor = mDiskLruCache.edit(key);
OuputStream os = editor.newOutputStream(0);
//...after op
editor.commit();
那么首先就是editor方法;
/**
   * Returns an editor for the entry named {@code key}, or null if another
   * edit is in progress.
   */
  public Editor edit(String key) throws IOException {
    return edit(key, ANY_SEQUENCE_NUMBER);
  }

  private synchronized Editor edit(String key, long expectedSequenceNumber) throws IOException {
      checkNotClosed();
    validateKey(key);
    Entry entry = lruEntries.get(key);
    if (expectedSequenceNumber != ANY_SEQUENCE_NUMBER && (entry == null
        || entry.sequenceNumber != expectedSequenceNumber)) {
      return null; // Snapshot is stale.
    }
    if (entry == null) {
      entry = new Entry(key);
      lruEntries.put(key, entry);
    } else if (entry.currentEditor != null) {
      return null; // Another edit is in progress.
    }

    Editor editor = new Editor(entry);
    entry.currentEditor = editor;

    // Flush the journal before creating files to prevent file leaks.
    journalWriter.write(DIRTY + ' ' + key + '\n');
    journalWriter.flush();
    return editor;
  }
首先验证key,可以必须是字母、数字、下划线、横线(-)组成,且长度在1-120之间。
然后通过key获取实体,因为我们是存,只要不是正在编辑这个实体,理论上都能返回一个合法的editor对象。
所以接下来判断,如果不存在,则创建一个Entry加入到lruEntries中(如果存在,直接使用),然后为entry.currentEditor进行赋值为new Editor(entry);,最后在journal文件中写入一条DIRTY记录,代表这个文件正在被操作。
注意,如果entry.currentEditor != null不为null的时候,意味着该实体正在被编辑,会retrun null ;
拿到editor对象以后,就是去调用newOutputStream去获得一个文件输入流了。
/**
     * Returns a new unbuffered output stream to write the value at
     * {@code index}. If the underlying output stream encounters errors
     * when writing to the filesystem, this edit will be aborted when
     * {@link #commit} is called. The returned output stream does not throw
     * IOExceptions.
     */
    public OutputStream newOutputStream(int index) throws IOException {
      if (index < 0 || index >= valueCount) {
        throw new IllegalArgumentException("Expected index " + index + " to "
                + "be greater than 0 and less than the maximum value count "
                + "of " + valueCount);
      }
      synchronized (DiskLruCache.this) {
        if (entry.currentEditor != this) {
          throw new IllegalStateException();
        }
        if (!entry.readable) {
          written[index] = true;
        }
        File dirtyFile = entry.getDirtyFile(index);
        FileOutputStream outputStream;
        try {
          outputStream = new FileOutputStream(dirtyFile);
        } catch (FileNotFoundException e) {
          // Attempt to recreate the cache directory.
          directory.mkdirs();
          try {
            outputStream = new FileOutputStream(dirtyFile);
          } catch (FileNotFoundException e2) {
            // We are unable to recover. Silently eat the writes.
            return NULL_OUTPUT_STREAM;
          }
        }
        return new FaultHidingOutputStream(outputStream);
      }
    }
首先校验index是否在valueCount范围内,一般我们使用都是一个key对应一个文件所以传入的基本都是0。接下来就是通过entry.getDirtyFile(index);拿到一个dirty File对象,为什么叫dirty file呢,其实就是个中转文件,文件格式为key.index.tmp。
将这个文件的FileOutputStream通过FaultHidingOutputStream封装下传给我们。
最后,别忘了我们通过os写入数据以后,需要调用commit方法。
public void commit() throws IOException {
      if (hasErrors) {
        completeEdit(this, false);
        remove(entry.key); // The previous entry is stale.
      } else {
        completeEdit(this, true);
      }
      committed = true;
}首先通过hasErrors判断,是否有错误发生,如果有调用completeEdit(this, false)且调用remove(entry.key);。如果没有就调用completeEdit(this, true);。
那么这里这个hasErrors哪来的呢?还记得上面newOutputStream的时候,返回了一个os,这个os是FileOutputStream,但是经过了FaultHidingOutputStream封装么,这个类实际上就是重写了FilterOutputStream的write相关方法,将所有的IOException给屏蔽了,如果发生IOException就将hasErrors赋值为true.
这样的设计还是很nice的,否则直接将OutputStream返回给用户,如果出错没法检测,还需要用户手动去调用一些操作。
接下来看completeEdit方法。
private synchronized void completeEdit(Editor editor, boolean success) throws IOException {
    Entry entry = editor.entry;
    if (entry.currentEditor != editor) {
      throw new IllegalStateException();
    }

    // If this edit is creating the entry for the first time, every index must have a value.
    if (success && !entry.readable) {
      for (int i = 0; i < valueCount; i++) {
        if (!editor.written[i]) {
          editor.abort();
          throw new IllegalStateException("Newly created entry didn't create value for index " + i);
        }
        if (!entry.getDirtyFile(i).exists()) {
          editor.abort();
          return;
        }
      }
    }

    for (int i = 0; i < valueCount; i++) {
      File dirty = entry.getDirtyFile(i);
      if (success) {
        if (dirty.exists()) {
          File clean = entry.getCleanFile(i);
          dirty.renameTo(clean);
          long oldLength = entry.lengths[i];
          long newLength = clean.length();
          entry.lengths[i] = newLength;
          size = size - oldLength + newLength;
        }
      } else {
        deleteIfExists(dirty);
      }
    }

    redundantOpCount++;
    entry.currentEditor = null;
    if (entry.readable | success) {
      entry.readable = true;
      journalWriter.write(CLEAN + ' ' + entry.key + entry.getLengths() + '\n');
      if (success) {
        entry.sequenceNumber = nextSequenceNumber++;
      }
    } else {
      lruEntries.remove(entry.key);
      journalWriter.write(REMOVE + ' ' + entry.key + '\n');
    }
    journalWriter.flush();

    if (size > maxSize || journalRebuildRequired()) {
      executorService.submit(cleanupCallable);
    }
}首先判断if (success && !entry.readable)是否成功,且是第一次写入(如果以前这个记录有值,则readable=true),内部的判断,我们都不会走,因为written[i]在newOutputStream的时候被写入true了。而且正常情况下,getDirtyFile是存在的。
接下来,如果成功,将dirtyFile 进行重命名为 cleanFile,文件名为:key.index。然后刷新size的长度。如果失败,则删除dirtyFile.
接下来,如果成功或者readable为true,将readable设置为true,写入一条CLEAN记录。如果第一次提交且失败,那么就会从lruEntries.remove(key),写入一条REMOVE记录。
写入缓存,肯定要控制下size。于是最后,判断是否超过了最大size,或者需要重建journal文件,什么时候需要重建呢?
 private boolean journalRebuildRequired() {
    final int redundantOpCompactThreshold = 2000;
    return redundantOpCount >= redundantOpCompactThreshold //
        && redundantOpCount >= lruEntries.size();
  }
如果redundantOpCount达到2000,且超过了lruEntries.size()就重建,这里就可以看到redundantOpCount的作用了。防止journal文件过大。
ok,到此我们的存入缓存就分析完成了。再次总结下,首先调用editor,拿到指定的dirtyFile的OutputStream,你可以尽情的进行写操作,写完以后呢,记得调用commit.
commit中会检测是你是否发生IOException,如果没有发生,则将dirtyFile->cleanFile,将readable=true,写入CLEAN记录。如果发生错误,则删除dirtyFile,从lruEntries中移除,然后写入一条REMOVE记录。
五、读取缓存
DiskLruCache.Snapshot snapShot = mDiskLruCache.get(key);
if (snapShot != null) {
  InputStream is = snapShot.getInputStream(0);
}
那么首先看get方法:
public synchronized Snapshot get(String key) throws IOException {
    checkNotClosed();
    validateKey(key);
    Entry entry = lruEntries.get(key);
    if (entry == null) {
      return null;
    }

    if (!entry.readable) {
      return null;
    }

    // Open all streams eagerly to guarantee that we see a single published
    // snapshot. If we opened streams lazily then the streams could come
    // from different edits.
    InputStream[] ins = new InputStream[valueCount];
    try {
      for (int i = 0; i < valueCount; i++) {
        ins[i] = new FileInputStream(entry.getCleanFile(i));
      }
    } catch (FileNotFoundException e) {
      // A file must have been deleted manually!
      for (int i = 0; i < valueCount; i++) {
        if (ins[i] != null) {
          Util.closeQuietly(ins[i]);
        } else {
          break;
        }
      }
      return null;
    }

    redundantOpCount++;
    journalWriter.append(READ + ' ' + key + '\n');
    if (journalRebuildRequired()) {
      executorService.submit(cleanupCallable);
    }

    return new Snapshot(key, entry.sequenceNumber, ins, entry.lengths);
  }
get方法比较简单,如果取到的为null,或者readable=false,则返回null.否则将cleanFile的FileInputStream进行封装返回Snapshot,且写入一条READ语句。
然后getInputStream就是返回该FileInputStream了。
好了,到此,我们就分析完成了创建DiskLruCache,存入缓存和取出缓存的源码。
除此以外,还有一些别的方法我们需要了解的。
六、其他方法
remove()
/**
   * Drops the entry for {@code key} if it exists and can be removed. Entries
   * actively being edited cannot be removed.
   *
   * @return true if an entry was removed.
   */
  public synchronized boolean remove(String key) throws IOException {
    checkNotClosed();
    validateKey(key);
    Entry entry = lruEntries.get(key);
    if (entry == null || entry.currentEditor != null) {
      return false;
    }

    for (int i = 0; i < valueCount; i++) {
      File file = entry.getCleanFile(i);
      if (file.exists() && !file.delete()) {
        throw new IOException("failed to delete " + file);
      }
      size -= entry.lengths[i];
      entry.lengths[i] = 0;
    }

    redundantOpCount++;
    journalWriter.append(REMOVE + ' ' + key + '\n');
    lruEntries.remove(key);

    if (journalRebuildRequired()) {
      executorService.submit(cleanupCallable);
    }

    return true;
  }
如果实体存在且不在被编辑,就可以直接进行删除,然后写入一条REMOVE记录。
与open对应还有个remove方法,大家在使用完成cache后可以手动关闭。
close()
/** Closes this cache. Stored values will remain on the filesystem. */
  public synchronized void close() throws IOException {
    if (journalWriter == null) {
      return; // Already closed.
    }
    for (Entry entry : new ArrayList<Entry>(lruEntries.values())) {
      if (entry.currentEditor != null) {
        entry.currentEditor.abort();
      }
    }
    trimToSize();
    journalWriter.close();
    journalWriter = null;
  }
关闭前,会判断所有正在编辑的实体,调用abort方法,最后关闭journalWriter。至于abort方法,其实我们分析过了,就是存储失败的时候的逻辑:
public void abort() throws IOException {
      completeEdit(this, false);
    }
到此,我们的整个源码分析就结束了。可以看到DiskLruCache,利用一个journal文件,保证了保证了cache实体的可用性(只有CLEAN的可用),且获取文件的长度的时候可以通过在该文件的记录中读取。利用FaultHidingOutputStream对FileOutPutStream很好的对写入文件过程中是否发生错误进行捕获,而不是让用户手动去调用出错后的处理方法。其内部的很多细节都很值得推敲。
不过也可以看到,存取的操作不是特别的容易使用,需要大家自己去操作文件流,但在存储比较小的数据的时候(不存在内存问题),很多时候还是希望有类似put(key,value),getAsT(key)等方法直接使用。我看了ASimpleCache 提供的API属于比较好用的了。于是萌生想法,对DiskLruCache公开的API进行扩展,对外除了原有的存取方式以外,提供类似ASimpleCache那样比较简单的API用于存储,而内部的核心实现,依然是DiskLruCache原本的。
github地址: base-diskcache,欢迎star,fork。
欢迎关注我的微博:
http://weibo.com/u/3165018720
群号:463081660,欢迎入群
微信公众号:hongyangAndroid
(欢迎关注,第一时间推送博文信息)
转载请标明出处:
http://blog.csdn.net/lmj623565791/article/details/47143563;
本文出自:【张鸿洋的博客】
一 概述
大家都清楚,在Android的开发中,凡是遇到耗时的操作尽可能的会交给Service去做,比如我们上传多张图,上传的过程用户可能将应用置于后台,然后干别的去了,我们的Activity就很可能会被杀死,所以可以考虑将上传操作交给Service去做,如果担心Service被杀,还能通过设置startForeground(int, Notification)方法提升其优先级。
那么,在Service里面我们肯定不能直接进行耗时操作,一般都需要去开启子线程去做一些事情,自己去管理Service的生命周期以及子线程并非是个优雅的做法;好在Android给我们提供了一个类,叫做IntentService,我们看下注释。
IntentService is a base class for {@link Service}s that handle asynchronous
requests (expressed as {@link Intent}s) on demand. Clients send requests
through {@link android.content.Context#startService(Intent)} calls; the
service is started as needed, handles each Intent in turn using a worker
thread, and stops itself when it runs out of work.
意思说IntentService是一个基于Service的一个类,用来处理异步的请求。你可以通过startService(Intent)来提交请求,该Service会在需要的时候创建,当完成所有的任务以后自己关闭,且请求是在工作线程处理的。
这么说,我们使用了IntentService最起码有两个好处,一方面不需要自己去new Thread了;另一方面不需要考虑在什么时候关闭该Service了。
好了,那么接下来我们就来看一个完整的例子。
二 IntentService的使用
我们就来演示一个多个图片上传的案例,当然我们会模拟上传的耗时,毕竟我们的重心在IntentService的使用和源码解析上。
首先看下效果图
效果图
每当我们点击一次按钮,会将一个任务交给后台的Service去处理,后台的Service每处理完成一个请求就会反馈给Activity,然后Activity去更新UI。当所有的任务完成的时候,后台的Service会退出,不会占据任何内存。
Service
package com.zhy.blogcodes.intentservice;

import android.app.IntentService;
import android.content.Context;
import android.content.Intent;
import android.util.Log;

public class UploadImgService extends IntentService
{
    private static final String ACTION_UPLOAD_IMG = "com.zhy.blogcodes.intentservice.action.UPLOAD_IMAGE";
    public static final String EXTRA_IMG_PATH = "com.zhy.blogcodes.intentservice.extra.IMG_PATH";

    public static void startUploadImg(Context context, String path)
    {
        Intent intent = new Intent(context, UploadImgService.class);
        intent.setAction(ACTION_UPLOAD_IMG);
        intent.putExtra(EXTRA_IMG_PATH, path);
        context.startService(intent);
    }


    public UploadImgService()
    {
        super("UploadImgService");
    }

    @Override
    protected void onHandleIntent(Intent intent)
    {
        if (intent != null)
        {
            final String action = intent.getAction();
            if (ACTION_UPLOAD_IMG.equals(action))
            {
                final String path = intent.getStringExtra(EXTRA_IMG_PATH);
                handleUploadImg(path);
            }
        }
    }

    private void handleUploadImg(String path)
    {
        try
        {
            //模拟上传耗时
            Thread.sleep(3000);

            Intent intent = new Intent(IntentServiceActivity.UPLOAD_RESULT);
            intent.putExtra(EXTRA_IMG_PATH, path);
            sendBroadcast(intent);

        } catch (InterruptedException e)
        {
            e.printStackTrace();
        }


    }

    @Override
    public void onCreate()
    {
        super.onCreate();
        Log.e("TAG","onCreate");
    }

    @Override
    public void onDestroy()
    {
        super.onDestroy();
        Log.e("TAG","onDestroy");
    }
}
代码很短,主要就是继承IntentService,然后复写onHandleIntent方法,根据传入的intent来选择具体的操作。startUploadImg是我写的一个辅助方法,省的每次都去构建Intent,startService了。
Activity
package com.zhy.blogcodes.intentservice;

import android.content.BroadcastReceiver;
import android.content.Context;
import android.content.Intent;
import android.content.IntentFilter;
import android.os.Bundle;
import android.support.v7.app.AppCompatActivity;
import android.view.Menu;
import android.view.MenuItem;
import android.view.View;
import android.widget.LinearLayout;
import android.widget.TextView;

import com.zhy.blogcodes.R;

public class IntentServiceActivity extends AppCompatActivity
{

    public static final String UPLOAD_RESULT = "com.zhy.blogcodes.intentservice.UPLOAD_RESULT";

    private LinearLayout mLyTaskContainer;

    private BroadcastReceiver uploadImgReceiver = new BroadcastReceiver()
    {
        @Override
        public void onReceive(Context context, Intent intent)
        {
            if (intent.getAction() == UPLOAD_RESULT)
            {
                String path = intent.getStringExtra(UploadImgService.EXTRA_IMG_PATH);

                handleResult(path);

            }

        }
    };

    private void handleResult(String path)
    {
        TextView tv = (TextView) mLyTaskContainer.findViewWithTag(path);
        tv.setText(path + " upload success ~~~ ");
    }


    @Override
    protected void onCreate(Bundle savedInstanceState)
    {
        super.onCreate(savedInstanceState);
        setContentView(R.layout.activity_intent_service);

        mLyTaskContainer = (LinearLayout) findViewById(R.id.id_ll_taskcontainer);

        registerReceiver();
    }

    private void registerReceiver()
    {
        IntentFilter filter = new IntentFilter();
        filter.addAction(UPLOAD_RESULT);
        registerReceiver(uploadImgReceiver, filter);
    }

    int i = 0;

    public void addTask(View view)
    {
        //模拟路径
        String path = "/sdcard/imgs/" + (++i) + ".png";
        UploadImgService.startUploadImg(this, path);

        TextView tv = new TextView(this);
        mLyTaskContainer.addView(tv);
        tv.setText(path + " is uploading ...");
        tv.setTag(path);
    }


    @Override
    protected void onDestroy()
    {
        super.onDestroy();
        unregisterReceiver(uploadImgReceiver);
    }
}
Activity中,每当我点击一次按钮调用addTask,就回模拟创建一个任务,然后交给IntentService去处理。
注意,当Service的每个任务完成的时候,会发送一个广播,我们在Activity的onCreate和onDestroy里面分别注册和解注册了广播;当收到广播则更新指定的UI。
布局文件
<LinearLayout android:id="@+id/id_ll_taskcontainer"
              xmlns:android="http://schemas.android.com/apk/res/android"
              xmlns:tools="http://schemas.android.com/tools"
              android:layout_width="match_parent"
              android:layout_height="match_parent"
              android:orientation="vertical"
             >


    <Button android:layout_width="wrap_content" android:layout_height="wrap_content"
            android:onClick="addTask" android:text="add Task"/>
</LinearLayout>
ok,这样我们就完成了我们的效果图的需求;通过上例,大家可以看到我们可以使用IntentService非常方便的处理后台任务,屏蔽了诸多细节;而Service与Activity通信呢,我们选择了广播的方式(当然这里也可以使用LocalBroadcastManager)。
学会了使用之后,我们再一鼓作气的看看其内部的实现。
三 IntentService源码解析
直接看IntentService源码
/*
 * Copyright (C) 2008 The Android Open Source Project
 *
 * Licensed under the Apache License, Version 2.0 (the "License");
 * you may not use this file except in compliance with the License.
 * You may obtain a copy of the License at
 *
 *      http://www.apache.org/licenses/LICENSE-2.0
 *
 * Unless required by applicable law or agreed to in writing, software
 * distributed under the License is distributed on an "AS IS" BASIS,
 * WITHOUT WARRANTIES OR CONDITIONS OF ANY KIND, either express or implied.
 * See the License for the specific language governing permissions and
 * limitations under the License.
 */

package android.app;

import android.content.Intent;
import android.os.Handler;
import android.os.HandlerThread;
import android.os.IBinder;
import android.os.Looper;
import android.os.Message;


public abstract class IntentService extends Service {
    private volatile Looper mServiceLooper;
    private volatile ServiceHandler mServiceHandler;
    private String mName;
    private boolean mRedelivery;

    private final class ServiceHandler extends Handler {
        public ServiceHandler(Looper looper) {
            super(looper);
        }

        @Override
        public void handleMessage(Message msg) {
            onHandleIntent((Intent)msg.obj);
            stopSelf(msg.arg1);
        }
    }


    public IntentService(String name) {
        super();
        mName = name;
    }


    public void setIntentRedelivery(boolean enabled) {
        mRedelivery = enabled;
    }

    @Override
    public void onCreate() {
                super.onCreate();
        HandlerThread thread = new HandlerThread("IntentService[" + mName + "]");
        thread.start();

        mServiceLooper = thread.getLooper();
        mServiceHandler = new ServiceHandler(mServiceLooper);
    }

    @Override
    public void onStart(Intent intent, int startId) {
        Message msg = mServiceHandler.obtainMessage();
        msg.arg1 = startId;
        msg.obj = intent;
        mServiceHandler.sendMessage(msg);
    }


    @Override
    public int onStartCommand(Intent intent, int flags, int startId) {
        onStart(intent, startId);
        return mRedelivery ? START_REDELIVER_INTENT : START_NOT_STICKY;
    }

    @Override
    public void onDestroy() {
        mServiceLooper.quit();
    }


    @Override
    public IBinder onBind(Intent intent) {
        return null;
    }


    protected abstract void onHandleIntent(Intent intent);
}
可以看到它在onCreate里面初始化了一个HandlerThread,关于HandlerThread的使用和源码
分析参考:Android HandlerThread 完全解析,看到这估计已经能猜到它的逻辑了:
就是每次调用onStartCommand的时候,通过mServiceHandler发送一个消息,消息中包含我们的intent。然后在该mServiceHandler的handleMessage中去回调onHandleIntent(intent);就可以了。
那么我们具体看一下源码,果然是这样,onStartCommand中回调了onStart,onStart中通过mServiceHandler发送消息到该handler的handleMessage中去。最后handleMessage中回调onHandleIntent(intent)。
注意下:回调完成后回调用 stopSelf(msg.arg1),注意这个msg.arg1是个int值,相当于一个请求的唯一标识。每发送一个请求,会生成一个唯一的标识,然后将请求放入队列,当全部执行完成(最后一个请求也就相当于getLastStartId == startId),或者当前发送的标识是最近发出的那一个(getLastStartId == startId),则会销毁我们的Service.
如果传入的是-1则直接销毁。
那么,当任务完成销毁Service回调onDestory,可以看到在onDestroy中释放了我们的Looper:mServiceLooper.quit()。
ok~ 如果你的需求可以使用IntentService来做,可以尽可能的使用,设计的还是相当赞的。当然了,如果你需要考虑并发等等需求,那么可能需要自己去扩展创建线程池等。
ok~~
欢迎关注我的微博http://weibo.com/u/3165018720
群号:463081660,欢迎入群
微信公众号:hongyangAndroid
(欢迎关注,第一时间推送博文信息)
转载请标明出处:
http://blog.csdn.net/lmj623565791/article/details/47079737;
本文出自:【张鸿洋的博客】
1、概述
话说最近股市变动不变,也成了热火朝天的话题。不知道大家有没有考虑做个实时更新股市数据的app呢?假设我们要做一个股市数据实时更新的app,我们可以在网上找个第三方的股市数据接口,然后在我们的app中每隔1分钟(合适的时间)去更新数据,然后更新我们的UI即可。
当然了,本文不是要教大家做这样一个app,只是举个场景。言归正传,回到我们的HandlerThread,大家一定听说过Looper、Handler、Message三者的关系(如果不了解,可以查看Android 异步消息处理机制 让你深入理解 Looper、Handler、Message三者关系),在我们的UI线程默默的为我们服务。其实我们可以借鉴UI线程Looper的思想,搞个子线程,也通过Handler、Message通信,可以适用于很多场景。
对了,我之前写过一篇博文Android Handler 异步消息处理机制的妙用 创建强大的图片加载类,这篇博文中就在子线程中创建了Looper,Handler,原理和HandlerThread一模一样,可惜当时我并不知道这个类,不过大家也可以当做HandlerThread应用场景进行学习。
2、HandlerThread实例
下面看我们模拟大盘走势的代码,其实非常简单,就一个Activity
package com.zhy.blogcodes.intentservice;

import android.os.Bundle;
import android.os.Handler;
import android.os.HandlerThread;
import android.os.Message;
import android.support.v7.app.AppCompatActivity;
import android.text.Html;
import android.widget.TextView;

import com.zhy.blogcodes.R;


public class HandlerThreadActivity extends AppCompatActivity
{

    private TextView mTvServiceInfo;

    private HandlerThread mCheckMsgThread;
    private Handler mCheckMsgHandler;
    private boolean isUpdateInfo;

    private static final int MSG_UPDATE_INFO = 0x110;

    //与UI线程管理的handler
    private Handler mHandler = new Handler();


    @Override
    protected void onCreate(Bundle savedInstanceState)
    {
        super.onCreate(savedInstanceState);
        setContentView(R.layout.activity_thread_handler);

        //创建后台线程
        initBackThread();

        mTvServiceInfo = (TextView) findViewById(R.id.id_textview);

    }

    @Override
    protected void onResume()
    {
        super.onResume();
        //开始查询
        isUpdateInfo = true;
        mCheckMsgHandler.sendEmptyMessage(MSG_UPDATE_INFO);
    }

    @Override
    protected void onPause()
    {
        super.onPause();
        //停止查询
        isUpdateInfo = false;
        mCheckMsgHandler.removeMessages(MSG_UPDATE_INFO);

    }

    private void initBackThread()
    {
        mCheckMsgThread = new HandlerThread("check-message-coming");
        mCheckMsgThread.start();
        mCheckMsgHandler = new Handler(mCheckMsgThread.getLooper())
        {
            @Override
            public void handleMessage(Message msg)
            {
                checkForUpdate();
                if (isUpdateInfo)
                {
                    mCheckMsgHandler.sendEmptyMessageDelayed(MSG_UPDATE_INFO, 1000);
                }
            }
        };


    }

    /**
     * 模拟从服务器解析数据
     */
    private void checkForUpdate()
    {
        try
        {
            //模拟耗时
            Thread.sleep(1000);
            mHandler.post(new Runnable()
            {
                @Override
                public void run()
                {
                    String result = "实时更新中,当前大盘指数:<font color='red'>%d</font>";
                    result = String.format(result, (int) (Math.random() * 3000 + 1000));
                    mTvServiceInfo.setText(Html.fromHtml(result));
                }
            });

        } catch (InterruptedException e)
        {
            e.printStackTrace();
        }

    }

    @Override
    protected void onDestroy()
    {
        super.onDestroy();
        //释放资源
        mCheckMsgThread.quit();
    }


}
可以看到我们在onCreate中,去创建和启动了HandlerThread,并且关联了一个mCheckMsgHandler。然后我们分别在onResume和onPause中去开启和暂停我们的查询,最后在onDestory中去释放资源。
这样就实现了我们每隔5s去服务端查询最新的数据,然后更新我们的UI,当然我们这里通过Thread.sleep()模拟耗时,返回了一个随机数,大家可以很轻易的换成真正的数据接口。
布局文库
<RelativeLayout xmlns:android="http://schemas.android.com/apk/res/android"
                xmlns:tools="http://schemas.android.com/tools"
                android:layout_width="match_parent"
                android:layout_height="match_parent"
                android:paddingLeft="@dimen/activity_horizontal_margin"
                android:paddingRight="@dimen/activity_horizontal_margin"
                android:paddingTop="@dimen/activity_vertical_margin"
                android:paddingBottom="@dimen/activity_vertical_margin">

    <TextView
        android:id="@+id/id_textview"
        android:text="正在加载大盘指数..."
        android:layout_width="wrap_content"
        android:layout_height="wrap_content"/>

</RelativeLayout>
运行效果图
别问我为什么要用红色!!!
ok,当然了,我们的效果很单调,但是你完全可以去扩展,比如ListView显示用户关注的股票数据。或者是其他的需要一直检测更新的数据。
看到这,你是否好奇呢,HandlerThread的内部是如何做的呢?其实非常的简单,如果你看过Android 异步消息处理机制 让你深入理解 Looper、Handler、Message三者关系估计扫几眼就会了。
HandlerThread 源码分析
对于所有Looper,Handler相关细节统一参考上面提到的文章。
我们轻轻的掀开HandlerThread的源码,还记得我们是通过
 mCheckMsgThread = new HandlerThread("check-message-coming");
 mCheckMsgThread.start();
创建和启动的对象,那么随便扫一眼:
package android.os;


public class HandlerThread extends Thread {
    int mPriority;
    int mTid = -1;
    Looper mLooper;

    public HandlerThread(String name) {
        super(name);
        mPriority = Process.THREAD_PRIORITY_DEFAULT;
    }

    protected void onLooperPrepared() {
    }

    @Override
    public void run() {
        mTid = Process.myTid();
        Looper.prepare();
        synchronized (this) {
            mLooper = Looper.myLooper();
            notifyAll();
        }
        Process.setThreadPriority(mPriority);
        onLooperPrepared();
        Looper.loop();
        mTid = -1;
    }
看到了什么,其实我们就是初始化和启动了一个线程;然后我们看run()方法,可以看到该方法中调用了Looper.prepare(),Loop.loop();
prepare()呢,中创建了一个Looper对象,并且把该对象放到了该线程范围内的变量中(sThreadLocal),在Looper对象的构造过程中,初始化了一个MessageQueue,作为该Looper对象成员变量。
loop()就开启了,不断的循环从MessageQueue中取消息处理了,当没有消息的时候会阻塞,有消息的到来的时候会唤醒。如果你不明白我说的,参考上面推荐的文章。
接下来,我们创建了一个mCheckMsgHandler,是这么创建的:
mCheckMsgHandler = new Handler(mCheckMsgThread.getLooper())对应源码
public Looper getLooper() {
        if (!isAlive()) {
            return null;
        }

        // If the thread has been started, wait until the looper has been created.
        synchronized (this) {
            while (isAlive() && mLooper == null) {
                try {
                    wait();
                } catch (InterruptedException e) {
                }
            }
        }
        return mLooper;
    }
mCheckMsgThread.getLooper()返回的就是我们在run方法中创建的mLooper。
那么Handler的构造呢,其实就是在Handler中持有一个指向该Looper.mQueue对象,当handler调用sendMessage方法时,其实就是往该mQueue中去插入一个message,然后Looper.loop()就会取出执行。
好了,到这我们就分析完了,其实就几行代码;不过有一点我想提一下:
如果你够细心你会发现,run方法里面当mLooper创建完成后有个notifyAll(),getLooper()中有个wait(),这是为什么呢?因为的mLooper在一个线程中执行,而我们的handler是在UI线程初始化的,也就是说,我们必须等到mLooper创建完成,才能正确的返回getLooper();wait(),notify()就是为了解决这两个线程的同步问题。
不过对于这样的线程间的同步问题,我非常喜欢使用Semaphore。
还记得在Android Handler 异步消息处理机制的妙用 创建强大的图片加载类一文中有类似的说明:
如果你比较细心,可能会发现里面还有一些信号量的操作的代码,如果你不了解什么是信号量,可以参考:Java 并发专题 : Semaphore 实现 互斥 与 连接池 。 简单说一下mSemaphore(信号数为1)的作用,由于mPoolThreadHander实在子线程初始化的,所以我在初始化前调用了mSemaphore.acquire去请求一个信号量,然后在初始化完成后释放了此信号量,我为什么这么做呢?因为在主线程可能会立即使用到mPoolThreadHander,但是mPoolThreadHander是在子线程初始化的,虽然速度很快,但是我也不能百分百的保证,主线程使用时已经初始化结束。
哈,当时也有很多人问,为什么使用这个Semaphore,到这里我想大家应该清楚了。话说假设我当时真的HanderThread这个类,可能之前的代码能简化不少呢~
对了,你可能会问与Timer相比有什么优势呢?
直接参考这篇文章吧:Handler vs Timer
ok~~
欢迎关注我的微博http://weibo.com/u/3165018720
群号:463081660,欢迎入群
微信公众号:hongyangAndroid
(欢迎关注,第一时间推送博文信息)
转载请标明出处:
http://blog.csdn.net/lmj623565791/article/details/47017485;
本文出自:【张鸿洋的博客】
一、概述
说到Android进程间通信,大家肯定能想到的是编写aidl文件,然后通过aapt生成的类方便的完成服务端,以及客户端代码的编写。如果你对这个过程不熟悉,可以查看Android aidl Binder框架浅析;
当然今天要说的通信方式肯定不是通过编写aidl文件的方式,那么有请今天的主角:Messenger。ok,这是什么样的一个类呢?我们看下注释
This allows for the implementation of message-based communication across processes
允许实现基于消息的进程间通信的方式。
那么,什么叫基于消息的进程间通信方式呢?看个图理解下:
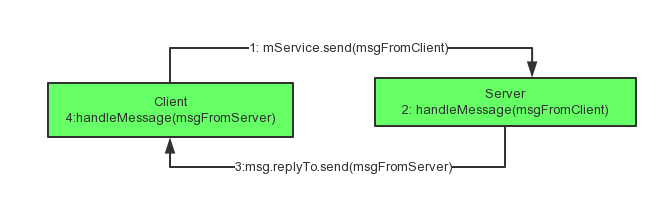
可以看到,我们可以在客户端发送一个Message给服务端,在服务端的handler中会接收到客户端的消息,然后进行对应的处理,处理完成后,再将结果等数据封装成Message,发送给客户端,客户端的handler中会接收到处理的结果。
这样的进程间通信是不是很爽呢?
- 基于Message,相信大家都很熟悉
- 支持回调的方式,也就是服务端处理完成长任务可以和客户端交互
- 不需要编写aidl文件
此外,还支持,记录客户端对象的Messenger,然后可以实现一对多的通信;甚至作为一个转接处,任意两个进程都能通过服务端进行通信,这个后面再说。
看到这,有没有一些的小激动,我们可以不写aidl文件,方便的实现进程间通信了,是不是又可以装一下了。哈,下面看个简单的例子。
二、通信实例
这个例子,通过两个apk演示,一个apk是Server端,一个是Client端;
(1) Server端
代码
package com.imooc.messenger_server;

import android.app.Service;
import android.content.Intent;
import android.os.Handler;
import android.os.IBinder;
import android.os.Message;
import android.os.Messenger;
import android.os.RemoteException;

public class MessengerService extends Service
{

    private static final int MSG_SUM = 0x110;

    //最好换成HandlerThread的形式
    private Messenger mMessenger = new Messenger(new Handler()
    {
        @Override
        public void handleMessage(Message msgfromClient)
        {
            Message msgToClient = Message.obtain(msgfromClient);//返回给客户端的消息
            switch (msgfromClient.what)
            {
                //msg 客户端传来的消息
                case MSG_SUM:
                    msgToClient.what = MSG_SUM;
                    try
                    {
                        //模拟耗时
                        Thread.sleep(2000);
                        msgToClient.arg2 = msgfromClient.arg1 + msgfromClient.arg2;
                        msgfromClient.replyTo.send(msgToClient);
                    } catch (InterruptedException e)
                    {
                        e.printStackTrace();
                    } catch (RemoteException e)
                    {
                        e.printStackTrace();
                    }
                    break;
            }

            super.handleMessage(msgfromClient);
        }
    });

    @Override
    public IBinder onBind(Intent intent)
    {
        return mMessenger.getBinder();
    }
}
服务端就一个Service,可以看到代码相当的简单,只需要去声明一个Messenger对象,然后onBind方法返回mMessenger.getBinder();
然后坐等客户端将消息发送到handleMessage想法,根据message.what去判断进行什么操作,然后做对应的操作,最终将结果通过 msgfromClient.replyTo.send(msgToClient);返回。
可以看到我们这里主要是取出客户端传来的两个数字,然后求和返回,这里我有意添加了sleep(2000)模拟耗时,注意在实际使用过程中,可以换成在独立开辟的线程中完成耗时操作,比如和HandlerThread结合使用。
注册文件
 <service
            android:name=".MessengerService"
            android:enabled="true"
            android:exported="true">
            <intent-filter>
                <action android:name="com.zhy.aidl.calc"></action>
                <category android:name="android.intent.category.DEFAULT" />
            </intent-filter>
        </service>
别忘了注册service,写完以后直接安装。
(二)客户端
Activity
package com.imooc.messenger_client;

import android.content.ComponentName;
import android.content.Context;
import android.content.Intent;
import android.content.ServiceConnection;
import android.os.Bundle;
import android.os.Handler;
import android.os.IBinder;
import android.os.Message;
import android.os.Messenger;
import android.os.RemoteException;
import android.support.v7.app.AppCompatActivity;
import android.util.Log;
import android.view.View;
import android.widget.Button;
import android.widget.LinearLayout;
import android.widget.TextView;

public class MainActivity extends AppCompatActivity
{
    private static final String TAG = "MainActivity";
    private static final int MSG_SUM = 0x110;

    private Button mBtnAdd;
    private LinearLayout mLyContainer;
    //显示连接状态
    private TextView mTvState;

    private Messenger mService;
    private boolean isConn;


    private Messenger mMessenger = new Messenger(new Handler()
    {
        @Override
        public void handleMessage(Message msgFromServer)
        {
            switch (msgFromServer.what)
            {
                case MSG_SUM:
                    TextView tv = (TextView) mLyContainer.findViewById(msgFromServer.arg1);
                    tv.setText(tv.getText() + "=>" + msgFromServer.arg2);
                    break;
            }
            super.handleMessage(msgFromServer);
        }
    });


    private ServiceConnection mConn = new ServiceConnection()
    {
        @Override
        public void onServiceConnected(ComponentName name, IBinder service)
        {
            mService = new Messenger(service);
            isConn = true;
            mTvState.setText("connected!");
        }

        @Override
        public void onServiceDisconnected(ComponentName name)
        {
            mService = null;
            isConn = false;
            mTvState.setText("disconnected!");
        }
    };

    private int mA;

    @Override
    protected void onCreate(Bundle savedInstanceState)
    {
        super.onCreate(savedInstanceState);
        setContentView(R.layout.activity_main);

        //开始绑定服务
        bindServiceInvoked();

        mTvState = (TextView) findViewById(R.id.id_tv_callback);
        mBtnAdd = (Button) findViewById(R.id.id_btn_add);
        mLyContainer = (LinearLayout) findViewById(R.id.id_ll_container);

        mBtnAdd.setOnClickListener(new View.OnClickListener()
        {
            @Override
            public void onClick(View v)
            {
                try
                {
                    int a = mA++;
                    int b = (int) (Math.random() * 100);

                    //创建一个tv,添加到LinearLayout中
                    TextView tv = new TextView(MainActivity.this);
                    tv.setText(a + " + " + b + " = caculating ...");
                    tv.setId(a);
                    mLyContainer.addView(tv);

                    Message msgFromClient = Message.obtain(null, MSG_SUM, a, b);
                    msgFromClient.replyTo = mMessenger;
                    if (isConn)
                    {
                        //往服务端发送消息
                        mService.send(msgFromClient);
                    }
                } catch (RemoteException e)
                {
                    e.printStackTrace();
                }
            }
        });

    }

    private void bindServiceInvoked()
    {
        Intent intent = new Intent();
        intent.setAction("com.zhy.aidl.calc");
        bindService(intent, mConn, Context.BIND_AUTO_CREATE);
        Log.e(TAG, "bindService invoked !");
    }

    @Override
    protected void onDestroy()
    {
        super.onDestroy();
        unbindService(mConn);
    }


}
代码也不复杂,首先bindService,然后在onServiceConnected中拿到回调的service(IBinder)对象,通过service对象去构造一个mService =new Messenger(service);然后就可以使用mService.send(msg)给服务端了。
我们消息的发送在Btn.onclick里面:
Message msgFromClient = Message.obtain(null, MSG_SUM, a, b);
msgFromClient.replyTo = mMessenger;
if (isConn)
{
    //往服务端发送消息
    mService.send(msgFromClient);
}
那么服务端会收到消息,处理完成会将结果返回,传到Client端的mMessenger中的Handler的handleMessage方法中。
布局文件
<LinearLayout android:id="@+id/id_ll_container"
              xmlns:android="http://schemas.android.com/apk/res/android"
              xmlns:tools="http://schemas.android.com/tools"
              android:layout_width="match_parent"
              android:layout_height="match_parent"
              android:orientation="vertical"
              android:paddingBottom="@dimen/activity_vertical_margin"
              android:paddingLeft="@dimen/activity_horizontal_margin"
              android:paddingRight="@dimen/activity_horizontal_margin"
              android:paddingTop="@dimen/activity_vertical_margin"
              tools:context=".MainActivity">

    <TextView
        android:id="@+id/id_tv_callback"
        android:layout_width="match_parent"
        android:layout_height="wrap_content"
        android:text="Messenger Test!"/>

    <Button android:id="@+id/id_btn_add"
            android:layout_width="wrap_content"
            android:layout_height="wrap_content"
            android:text="add"/>

</LinearLayout>
效果图
可以看到,我们每点击一次按钮,就往服务器发送个消息,服务器拿到消息执行完成后,将结果返回。
整个通信的代码看起来还是相当的清爽的,那么大家有没有对其内部的原理有一丝的好奇呢?下面我们就来看下其内部是如何实现的。
对了,源码分析前,这里插一句,大家通过代码可以看到服务端往客户端传递数据是通过msg.replyTo这个对象的。那么服务端完全可以做到,使用一个List甚至Map去存储所有绑定的客户端的msg.replyTo对象,然后想给谁发消息都可以。甚至可以把A进程发来的消息,通过B进程的msg.replyTo发到B进程那里去。相关代码呢,可以参考官方的文档:service,注意下拉找:Remote Messenger Service Sample。
三、源码分析
其实Messenger的内部实现的,实际上也是依赖于aidl文件实现的。
(一)首先我们看客户端向服务端通信
服务端
服务端的onBind是这么写的:
public IBinder onBind(Intent intent)
    {
        return mMessenger.getBinder();
    }
那么点进去:
public IBinder getBinder() {
        return mTarget.asBinder();
    }
可以看到返回的是mTarget.asBinder();
mTarget是哪来的呢?
别忘了我们前面去构造mMessenger对象的代码:new Messenger(new Handler());
 public Messenger(Handler target) {
        mTarget = target.getIMessenger();
    }
原来是Handler返回的,我们继续跟进去
    final IMessenger getIMessenger() {
        synchronized (mQueue) {
            if (mMessenger != null) {
                return mMessenger;
            }
            mMessenger = new MessengerImpl();
            return mMessenger;
        }
    }

     private final class MessengerImpl extends IMessenger.Stub {
        public void send(Message msg) {
            msg.sendingUid = Binder.getCallingUid();
            Handler.this.sendMessage(msg);
        }
    }
mTarget是一个MessengerImpl对象,那么asBinder实际上是返回this,也就是MessengerImpl对象;
这是个内部类,可以看到继承自IMessenger.Stub,然后实现了一个send方法,该方法就是将接收到的消息通过 Handler.this.sendMessage(msg);发送到handleMessage方法。
看到这,大家有没有想到什么,难道不觉得extends IMessenger.Stub这种写法异常的熟悉么?
我们传统写aidl文件,aapt给我们生成什么,生成IXXX.Stub类,然后我们服务端继承IXXX.Stub实现接口中的方法。
没错,其实这里内部其实也是依赖一个aidl生成的类,这个aidl位于:frameworks/base/core/java/android/os/IMessenger.aidl.
package android.os;

import android.os.Message;

/** @hide */
oneway interface IMessenger {
    void send(in Message msg);
} 看到这,你应该明白了,Messenger并没有什么神奇之处,实际上,就是依赖该aidl文件生成的类,继承了IMessenger.Stub类,实现了send方法,send方法中参数会通过客户端传递过来,最终发送给handler进行处理。这里不理解,请详细看下Android aidl Binder框架浅析;
客户端
客户端首先通过onServiceConnected拿到sevice(Ibinder)对象,这里没什么特殊的,我们平时的写法也是这样的,只不过我们平时会这么写:
IMessenger.Stub.asInterface(service)拿到接口对象进行调用;
而,我们的代码中是
mService = new Messenger(service);
跟进去,你会发现:
public Messenger(IBinder target) {
        mTarget = IMessenger.Stub.asInterface(target);
    }
soga,和我们平时的写法一模一样!
到这里就可以明白,客户端与服务端通信,实际上和我们平时的写法没有任何区别,通过编写aidl文件,服务端onBind利用Stub编写接口实现返回;客户端利用回调得到的IBinder对象,使用IMessenger.Stub.asInterface(target)拿到接口实例进行调用(内部实现,参考Android aidl Binder框架浅析)。
(2)服务端与客户端通信
那么,客户端与服务端通信的确没什么特殊的地方,我们完全也可以编写个类似的aidl文件实现;那么服务端是如何与客户端通信的呢?
还记得,客户端send方法发送的是一个Message,这个Message.replyTo指向的是一个mMessenger,我们在Activity中初始化的。
那么将消息发送到服务端,肯定是通过序列化与反序列化拿到Message对象,我们看下Message的反序列化的代码:
# Message

private void readFromParcel(Parcel source) {
        what = source.readInt();
        arg1 = source.readInt();
        arg2 = source.readInt();
        if (source.readInt() != 0) {
            obj = source.readParcelable(getClass().getClassLoader());
        }
        when = source.readLong();
        data = source.readBundle();
        replyTo = Messenger.readMessengerOrNullFromParcel(source);
        sendingUid = source.readInt();
}主要看replyTo,调用的是Messenger.readMessengerOrNullFromParcel
public static Messenger readMessengerOrNullFromParcel(Parcel in) {
        IBinder b = in.readStrongBinder();
        return b != null ? new Messenger(b) : null;
    }

    public static void writeMessengerOrNullToParcel(Messenger messenger,
            Parcel out) {
        out.writeStrongBinder(messenger != null ? messenger.mTarget.asBinder()
                : null);
    }
通过上面的writeMessengerOrNullToParcel可以看到,它将客户端的messenger.mTarget.asBinder()对象进行了恢复,客户端的message.mTarget.asBinder()是什么?
客户端也是通过Handler创建的Messenger,于是asBinder返回的是:
public Messenger(Handler target) {
        mTarget = target.getIMessenger();
    }
 final IMessenger getIMessenger() {
        synchronized (mQueue) {
            if (mMessenger != null) {
                return mMessenger;
            }
            mMessenger = new MessengerImpl();
            return mMessenger;
        }
    }

    private final class MessengerImpl extends IMessenger.Stub {
        public void send(Message msg) {
            msg.sendingUid = Binder.getCallingUid();
            Handler.this.sendMessage(msg);
        }
    }

   public IBinder getBinder() {
        return mTarget.asBinder();
    }
那么asBinder,实际上就是MessengerImpl extends IMessenger.Stub中的asBinder了。
#IMessenger.Stub

@Override
public android.os.IBinder asBinder()
{
return this;
}
那么其实返回的就是MessengerImpl对象自己。到这里可以看到message.mTarget.asBinder()其实返回的是客户端的MessengerImpl对象。
最终,发送给客户端的代码是这么写的:
msgfromClient.replyTo.send(msgToClient);

public void send(Message message) throws RemoteException {
        mTarget.send(message);
    }
这个mTarget实际上就是对客户端的MessengerImpl对象的封装,那么send(message)(屏蔽了transact/onTransact的细节),这个message最终肯定传到客户端的handler的handleMessage方法中。
好了,到此我们的源码分析就结束了~~
总结下:
- 客户端与服务端通信,利用的aidl文件,没什么特殊的
- 服务端与客户端通信,主要是在传输的消息上做了处理,让Messager.replyTo指向的客户端的Messenger,而Messenger又持有客户端的一个Binder对象(MessengerImpl)。服务端正是利用这个Binder对象做的与客户端的通信。
可以考虑自己编写aidl文件,实现下服务端对客户端的回调。
欢迎关注我的微博http://weibo.com/u/3165018720
群号:463081660,欢迎入群
微信公众号:hongyangAndroid
(欢迎关注,第一时间推送博文信息)
转载请标明出处:
http://blog.csdn.net/lmj623565791/article/details/46858663;
本文出自:【张鸿洋的博客】
一、概述
在自定义ViewGroup中,很多效果都包含用户手指去拖动其内部的某个View(eg:侧滑菜单等),针对具体的需要去写好onInterceptTouchEvent和onTouchEvent这两个方法是一件很不容易的事,需要自己去处理:多手指的处理、加速度检测等等。
好在官方在v4的支持包中提供了ViewDragHelper这样一个类来帮助我们方便的编写自定义ViewGroup。简单看一下它的注释:
ViewDragHelper is a utility class for writing custom ViewGroups. It offers a number
of useful operations and state tracking for allowing a user to drag and reposition
views within their parent ViewGroup.
本篇博客将重点介绍ViewDragHelper的使用,并且最终去实现一个类似DrawerLayout的一个自定义的ViewGroup。(ps:官方的DrawerLayout就是用此类实现)
二、入门小示例
首先我们通过一个简单的例子来看看其快捷的用法,分为以下几个步骤:
- 创建实例
- 触摸相关的方法的调用
- ViewDragHelper.Callback实例的编写
(一) 自定义ViewGroup
package com.zhy.learn.view;

import android.content.Context;
import android.support.v4.widget.ViewDragHelper;
import android.util.AttributeSet;
import android.view.MotionEvent;
import android.view.View;
import android.widget.LinearLayout;

/**
 * Created by zhy on 15/6/3.
 */
public class VDHLayout extends LinearLayout
{
    private ViewDragHelper mDragger;

    public VDHLayout(Context context, AttributeSet attrs)
    {
        super(context, attrs);
        mDragger = ViewDragHelper.create(this, 1.0f, new ViewDragHelper.Callback()
        {
            @Override
            public boolean tryCaptureView(View child, int pointerId)
            {
                return true;
            }

            @Override
            public int clampViewPositionHorizontal(View child, int left, int dx)
            {
                return left;
            }

            @Override
            public int clampViewPositionVertical(View child, int top, int dy)
            {
                return top;
            }
        });
    }

   @Override
    public boolean onInterceptTouchEvent(MotionEvent event)
    {
        return mDragger.shouldInterceptTouchEvent(event);
    }

    @Override
    public boolean onTouchEvent(MotionEvent event)
    {
        mDragger.processTouchEvent(event);
        return true;
    }
}
可以看到,上面整个自定义ViewGroup的代码非常简洁,遵循上述3个步骤:
1、创建实例
mDragger = ViewDragHelper.create(this, 1.0f, new ViewDragHelper.Callback()
        {
        });
创建实例需要3个参数,第一个就是当前的ViewGroup,第二个sensitivity,主要用于设置touchSlop:
helper.mTouchSlop = (int) (helper.mTouchSlop * (1 / sensitivity));可见传入越大,mTouchSlop的值就会越小。第三个参数就是Callback,在用户的触摸过程中会回调相关方法,后面会细说。
2、触摸相关方法
 @Override
    public boolean onInterceptTouchEvent(MotionEvent event)
    {
        return mDragger.shouldInterceptTouchEvent(event);
    }

    @Override
    public boolean onTouchEvent(MotionEvent event)
    {
        mDragger.processTouchEvent(event);
        return true;
}onInterceptTouchEvent中通过使用mDragger.shouldInterceptTouchEvent(event)来决定我们是否应该拦截当前的事件。onTouchEvent中通过mDragger.processTouchEvent(event)处理事件。
3、实现ViewDragHelper.CallCack相关方法
new ViewDragHelper.Callback()
        {
            @Override
            public boolean tryCaptureView(View child, int pointerId)
            {
                return true;
            }

            @Override
            public int clampViewPositionHorizontal(View child, int left, int dx)
            {
                return left;
            }

            @Override
            public int clampViewPositionVertical(View child, int top, int dy)
            {
                return top;
            }
        }
ViewDragHelper中拦截和处理事件时,需要会回调CallBack中的很多方法来决定一些事,比如:哪些子View可以移动、对个移动的View的边界的控制等等。
上面复写的3个方法:
- tryCaptureView如何返回ture则表示可以捕获该view,你可以根据传入的第一个view参数决定哪些可以捕获
- clampViewPositionHorizontal,clampViewPositionVertical可以在该方法中对child移动的边界进行控制,left , top 分别为即将移动到的位置,比如横向的情况下,我希望只在ViewGroup的内部移动,即:最小>=paddingleft,最大<=ViewGroup.getWidth()-paddingright-child.getWidth。就可以按照如下代码编写:
 @Override
            public int clampViewPositionHorizontal(View child, int left, int dx)
            {
                final int leftBound = getPaddingLeft();
                final int rightBound = getWidth() - mDragView.getWidth() - leftBound;

                final int newLeft = Math.min(Math.max(left, leftBound), rightBound);

                return newLeft;
            }
经过上述3个步骤,我们就完成了一个简单的自定义ViewGroup,可以自由的拖动子View。
简单看一下布局文件
(二) 布局文件
<com.zhy.learn.view.VDHLayout xmlns:android="http://schemas.android.com/apk/res/android"
                              xmlns:tools="http://schemas.android.com/tools"
                              android:layout_width="match_parent"
                              android:orientation="vertical"
                              android:layout_height="match_parent"
    >

    <TextView
        android:layout_margin="10dp"
        android:gravity="center"
        android:layout_gravity="center"
        android:background="#44ff0000"
        android:text="I can be dragged !"
        android:layout_width="100dp"
        android:layout_height="100dp"/>

    <TextView
        android:layout_margin="10dp"
        android:layout_gravity="center"
        android:gravity="center"
        android:background="#44ff0000"
        android:text="I can be dragged !"
        android:layout_width="100dp"
        android:layout_height="100dp"/>

    <TextView
        android:layout_margin="10dp"
        android:layout_gravity="center"
        android:gravity="center"
        android:background="#44ff0000"
        android:text="I can be dragged !"
        android:layout_width="100dp"
        android:layout_height="100dp"/>

</com.zhy.learn.view.VDHLayout>
我们的自定义ViewGroup中有三个TextView。
当前效果:
可以看到短短数行代码就可以玩起来了~~~
有了直观的认识以后,我们还需要对ViewDragHelper.CallBack里面的方法做下深入的理解。首先我们需要考虑的是:我们的ViewDragHelper不仅仅说只能够去让子View去跟随我们手指移动,我们继续往下学习其他的功能。
三、功能展示
ViewDragHelper还能做以下的一些操作:
- 边界检测、加速度检测(eg:DrawerLayout边界触发拉出)
- 回调Drag Release(eg:DrawerLayout部分,手指抬起,自动展开/收缩)
- 移动到某个指定的位置(eg:点击Button,展开/关闭Drawerlayout)
那么我们接下来对我们最基本的例子进行改造,包含上述的几个操作。
首先看一下我们修改后的效果:
简单的为每个子View添加了不同的操作:
第一个View,就是演示简单的移动
第二个View,演示除了移动后,松手自动返回到原本的位置。(注意你拖动的越快,返回的越快)
第三个View,边界移动时对View进行捕获。
好了,看完效果图,来看下代码的修改:
修改后的代码
package com.zhy.learn.view;

import android.content.Context;
import android.graphics.Point;
import android.support.v4.widget.ViewDragHelper;
import android.util.AttributeSet;
import android.view.MotionEvent;
import android.view.View;
import android.widget.LinearLayout;

/**
 * Created by zhy on 15/6/3.
 */
public class VDHLayout extends LinearLayout
{
    private ViewDragHelper mDragger;

    private View mDragView;
    private View mAutoBackView;
    private View mEdgeTrackerView;

    private Point mAutoBackOriginPos = new Point();

    public VDHLayout(Context context, AttributeSet attrs)
    {
        super(context, attrs);
        mDragger = ViewDragHelper.create(this, 1.0f, new ViewDragHelper.Callback()
        {
            @Override
            public boolean tryCaptureView(View child, int pointerId)
            {
                //mEdgeTrackerView禁止直接移动
                return child == mDragView || child == mAutoBackView;
            }

            @Override
            public int clampViewPositionHorizontal(View child, int left, int dx)
            {
                return left;
            }

            @Override
            public int clampViewPositionVertical(View child, int top, int dy)
            {
                return top;
            }


            //手指释放的时候回调
            @Override
            public void onViewReleased(View releasedChild, float xvel, float yvel)
            {
                //mAutoBackView手指释放时可以自动回去
                if (releasedChild == mAutoBackView)
                {
                    mDragger.settleCapturedViewAt(mAutoBackOriginPos.x, mAutoBackOriginPos.y);
                    invalidate();
                }
            }

            //在边界拖动时回调
            @Override
            public void onEdgeDragStarted(int edgeFlags, int pointerId)
            {
                mDragger.captureChildView(mEdgeTrackerView, pointerId);
            }
        });
        mDragger.setEdgeTrackingEnabled(ViewDragHelper.EDGE_LEFT);
    }


    @Override
    public boolean onInterceptTouchEvent(MotionEvent event)
    {
        return mDragger.shouldInterceptTouchEvent(event);
    }

    @Override
    public boolean onTouchEvent(MotionEvent event)
    {
        mDragger.processTouchEvent(event);
        return true;
    }

    @Override
    public void computeScroll()
    {
        if(mDragger.continueSettling(true))
        {
            invalidate();
        }
    }

    @Override
    protected void onLayout(boolean changed, int l, int t, int r, int b)
    {
        super.onLayout(changed, l, t, r, b);

        mAutoBackOriginPos.x = mAutoBackView.getLeft();
        mAutoBackOriginPos.y = mAutoBackView.getTop();
    }

    @Override
    protected void onFinishInflate()
    {
        super.onFinishInflate();

        mDragView = getChildAt(0);
        mAutoBackView = getChildAt(1);
        mEdgeTrackerView = getChildAt(2);
    }
}
布局文件我们仅仅是换了下文本和背景色就不重复贴了。
第一个View基本没做任何修改。
第二个View,我们在onLayout之后保存了最开启的位置信息,最主要还是重写了Callback中的onViewReleased,我们在onViewReleased中判断如果是mAutoBackView则调用settleCapturedViewAt回到初始的位置。大家可以看到紧随其后的代码是invalidate();因为其内部使用的是mScroller.startScroll,所以别忘了需要invalidate()以及结合computeScroll方法一起。
第三个View,我们在onEdgeDragStarted回调方法中,主动通过captureChildView对其进行捕获,该方法可以绕过tryCaptureView,所以我们的tryCaptureView虽然并为返回true,但却不影响。注意如果需要使用边界检测需要添加上mDragger.setEdgeTrackingEnabled(ViewDragHelper.EDGE_LEFT);。
到此,我们已经介绍了Callback中常用的回调方法了,当然还有一些方法没有介绍,接下来我们修改下我们的布局文件,我们把我们的TextView全部加上clickable=true,意思就是子View可以消耗事件。再次运行,你会发现本来可以拖动的View不动了,(如果有拿Button测试的兄弟应该已经发现这个问题了,我希望你看到这了,而不是已经提问了,哈~)。
原因是什么呢?主要是因为,如果子View不消耗事件,那么整个手势(DOWN-MOVE*-UP)都是直接进入onTouchEvent,在onTouchEvent的DOWN的时候就确定了captureView。如果消耗事件,那么就会先走onInterceptTouchEvent方法,判断是否可以捕获,而在判断的过程中会去判断另外两个回调的方法:getViewHorizontalDragRange和getViewVerticalDragRange,只有这两个方法返回大于0的值才能正常的捕获。
所以,如果你用Button测试,或者给TextView添加了clickable = true ,都记得重写下面这两个方法:
@Override
public int getViewHorizontalDragRange(View child)
{
     return getMeasuredWidth()-child.getMeasuredWidth();
}

@Override
public int getViewVerticalDragRange(View child)
{
     return getMeasuredHeight()-child.getMeasuredHeight();
}
方法的返回值应当是该childView横向或者纵向的移动的范围,当前如果只需要一个方向移动,可以只复写一个。
到此,我们列一下所有的Callback方法,看看还有哪些没用过的:
-
onViewDragStateChanged
当ViewDragHelper状态发生变化时回调(IDLE,DRAGGING,SETTING[自动滚动时])
-
onViewPositionChanged
当captureview的位置发生改变时回调
-
onViewCaptured
当captureview被捕获时回调
-
onViewReleased 已用
-
onEdgeTouched
当触摸到边界时回调。
-
onEdgeLock
true的时候会锁住当前的边界,false则unLock。
-
onEdgeDragStarted 已用
-
getOrderedChildIndex
改变同一个坐标(x,y)去寻找captureView位置的方法。(具体在:findTopChildUnder方法中)
-
getViewHorizontalDragRange 已用
- getViewVerticalDragRange 已用
- tryCaptureView 已用
- clampViewPositionHorizontal 已用
- clampViewPositionVertical 已用
ok,至此所有的回调方法都有了一定的认识。
总结下,方法的大致的回调顺序:
shouldInterceptTouchEvent:

DOWN:
    getOrderedChildIndex(findTopChildUnder)
    ->onEdgeTouched

MOVE:
    getOrderedChildIndex(findTopChildUnder)
    ->getViewHorizontalDragRange &
      getViewVerticalDragRange(checkTouchSlop)(MOVE中可能不止一次)
    ->clampViewPositionHorizontal&
      clampViewPositionVertical
    ->onEdgeDragStarted
    ->tryCaptureView
    ->onViewCaptured
    ->onViewDragStateChanged

processTouchEvent:

DOWN:
    getOrderedChildIndex(findTopChildUnder)
    ->tryCaptureView
    ->onViewCaptured
    ->onViewDragStateChanged
    ->onEdgeTouched
MOVE:
    ->STATE==DRAGGING:dragTo
    ->STATE!=DRAGGING:
        onEdgeDragStarted
        ->getOrderedChildIndex(findTopChildUnder)
        ->getViewHorizontalDragRange&
          getViewVerticalDragRange(checkTouchSlop)
        ->tryCaptureView
        ->onViewCaptured
        ->onViewDragStateChanged
ok,上述是正常情况下大致的流程,当然整个过程可能会存在很多判断不成立的情况。
从上面也可以解释,我们在之前TextView(clickable=false)的情况下,没有编写getViewHorizontalDragRange方法时,是可以移动的。因为直接进入processTouchEvent的DOWN,然后就onViewCaptured、onViewDragStateChanged(进入DRAGGING状态),接下来MOVE就直接dragTo了。
而当子View消耗事件的时候,就需要走shouldInterceptTouchEvent,MOVE的时候经过一系列的判断(getViewHorizontalDragRange,clampViewPositionVertical等),才能够去tryCaptureView。
ok,到此ViewDragHelper的入门用法我们就介绍结束了,下一篇,我们将使用ViewDragHelper去自己实现一个DrawerLayout。
有兴趣的也可以根据本文,以及DrawerLayout的源码去实现了~
参考链接
- http://flavienlaurent.com/blog/2013/08/28/each-navigation-drawer-hides-a-viewdraghelper/
- http://blog.denevell.org/android-viewdraghelper-example-tutorial.html
~~have a nice day ~~
ok~
群号:463081660,欢迎入群
微信公众号:hongyangAndroid
(欢迎关注,第一时间推送博文信息)
转载请标明出处:
http://blog.csdn.net/lmj623565791/article/details/46767825;
本文出自:【张鸿洋的博客】
一 概述
上周一我们发布了Android 百分比布局库(percent-support-lib) 解析与扩展中对percent-support这个库进行了解析和添加了PercentLinearLayout的支持。
那么为什么本篇博客的存在的意义是什么呢?
首先我们回顾下百分比布局库的用法,提供了PercentRelativeLayout、PercentFrameLayout供大家在编写的时候,对于以下属性:
layout_widthPercent、layout_heightPercent、
layout_marginPercent、layout_marginLeftPercent、
layout_marginTopPercent、layout_marginRightPercent、
layout_marginBottomPercent、layout_marginStartPercent、layout_marginEndPercent。
可以使用百分比进行设置宽、高、边距,的确给我们在适配上提供了极大的便利,但是在使用过程中,觉得存在一些场景无法得到满足。什么场景呢?下面我举几个例子。
-
当使用图片时,无法设置宽高的比例
比如我们的图片宽高是200*100的,我们在使用过程中我们设置宽高为20%、10%,这样会造成图片的比例失调。为什么呢?因为20%参考的是屏幕的宽度,而10%参考的是屏幕的高度。
-
很难使用百分比定义一个正方形的控件
比如,我现在界面的右下角有一个
FloatingActionButton,我希望其宽度和高度都为屏幕宽度的10%,很难做到。 -
一个控件的margin四个方向值一致
有些时候,我设置margin,我希望四边的边距一致的,但是如果目前设置5%,会造成,上下为高度的5%,左右边距为宽度的5%。
综合上述这些问题,可以发现目前的percent-support-lib并不能完全满足我们的需求,所以我们考虑对其进行扩展。说白了,我们就希望在布局的时候可以自己设定参考看度还是高度,比如上述2,我们对于宽高可以写成10%w,10%w。也就是在不改变原库的用法的前提下,添加一些额外的支持。
二 扩展的功能
目前我初步对该库进行了改写,github地址:android-percent-support-extend,对于官方库,做了如下的改变:
- 不改变原有库的用法
- 添加了
PercentLinearLayout -
支持百分比指定特定的参考值,比如宽度或者高度。
例如:
app:layout_heightPercent="50%w",app:layout_marginPercent="15%w",
app:layout_marginBottomPercent="20%h". - 支持通过app:layout_textSizePercent设置textView的textSize
- 对于外层套ScrollView的问题,目前可以在
PercentLinearLayout的外层使用ScrollView,不过对于宽度的百分比参考的就是android.R.id.content的高度(因为,无法参考父控件的高度,父控件的高度理论上依赖于子View高度,且模式为UNSPECIFIED)。
对于如何导入,也是相当的简单,android studio的用户,直接:
dependencies {
    //...
    compile 'com.zhy:percent-support-extends:1.0.1'
}
不需要导入官方的percent-support-lib了。
对于的三个类分别为:
com.zhy.android.percent.support.PercentLinearLayout
com.zhy.android.percent.support.PercentRelativeLayout
com.zhy.android.percent.support.PercentFrameLayout对于eclipse的用户:github上自行下载源码,就几个类和一个attrs.xml,也可以在bintray.com/percent-support-extends 下载相关文件。
下面看几个具体的示例。
三 具体的示例
Demo 1
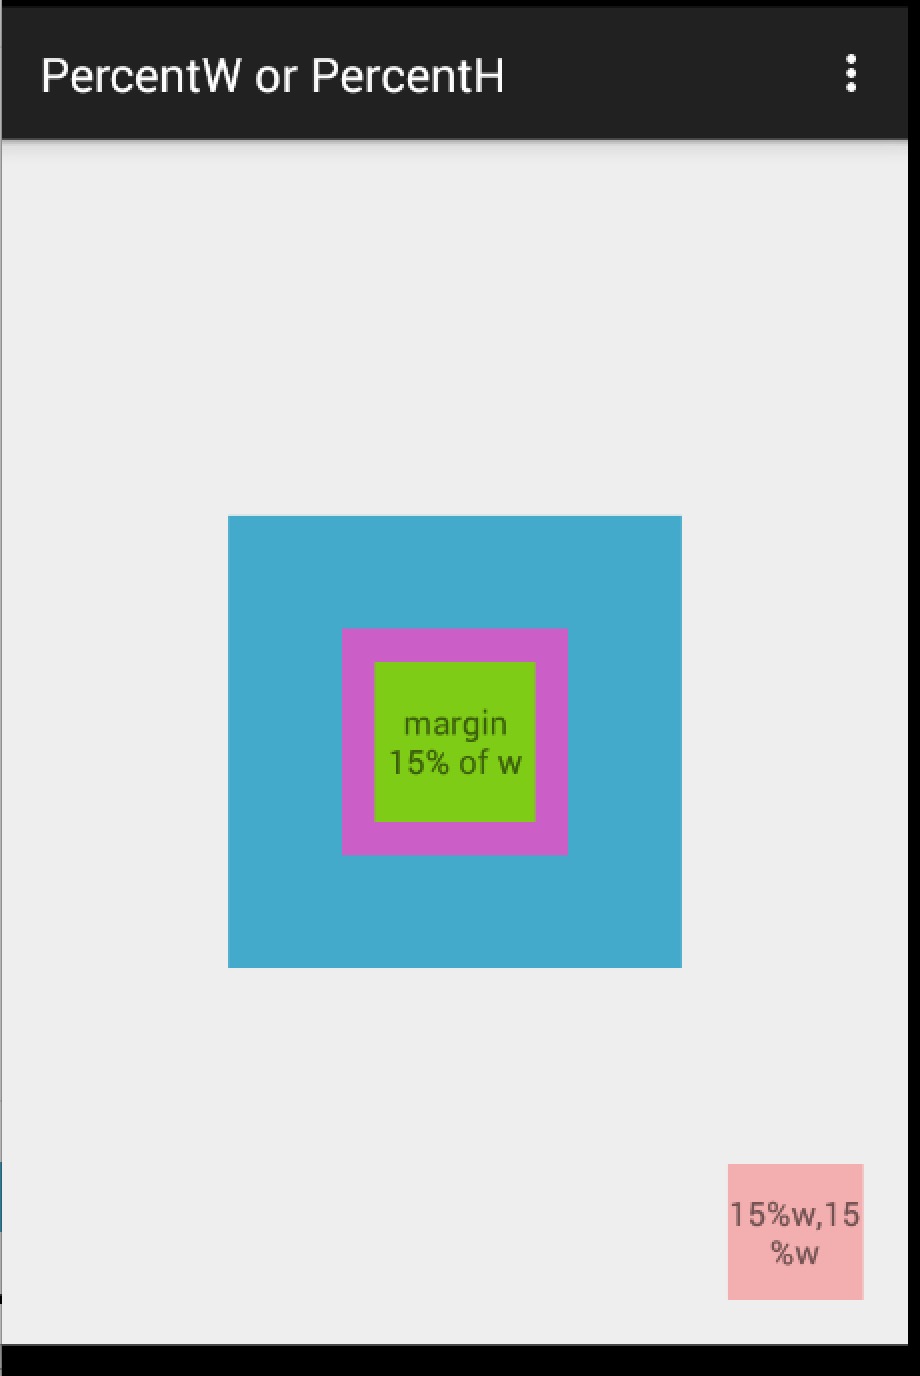
xml:
<?xml version="1.0" encoding="utf-8"?>


<com.zhy.android.percent.support.PercentFrameLayout
    xmlns:android="http://schemas.android.com/apk/res/android"
    xmlns:app="http://schemas.android.com/apk/res-auto"
    android:layout_width="match_parent"
    android:layout_height="match_parent"
    android:orientation="vertical">

    <com.zhy.android.percent.support.PercentFrameLayout
        android:layout_width="0dp"
        android:layout_height="0dp"
        android:layout_gravity="center"
        android:background="#ff44aacc"
        app:layout_heightPercent="50%w"
        app:layout_widthPercent="50%w">

        <com.zhy.android.percent.support.PercentFrameLayout
            android:layout_width="0dp"
            android:layout_height="0dp"
            android:layout_gravity="center"
            android:background="#ffcc5ec7"
            app:layout_heightPercent="50%w"
            app:layout_widthPercent="50%w">

            <TextView
                android:layout_width="match_parent"
                android:layout_height="match_parent"
                android:layout_gravity="center"
                android:background="#ff7ecc16"
                android:gravity="center"
                android:text="margin 15% of w"
                app:layout_marginPercent="15%w"
                />

        </com.zhy.android.percent.support.PercentFrameLayout>

    </com.zhy.android.percent.support.PercentFrameLayout>

    <TextView android:layout_width="0dp"
              android:layout_height="0dp"
              android:layout_gravity="bottom|right"
              android:background="#44ff0000"
              android:gravity="center"
              android:text="15%w,15%w"
              app:layout_heightPercent="15%w"
              app:layout_marginPercent="5%w"
              app:layout_widthPercent="15%w"/>


</com.zhy.android.percent.support.PercentFrameLayout>
Demo 2
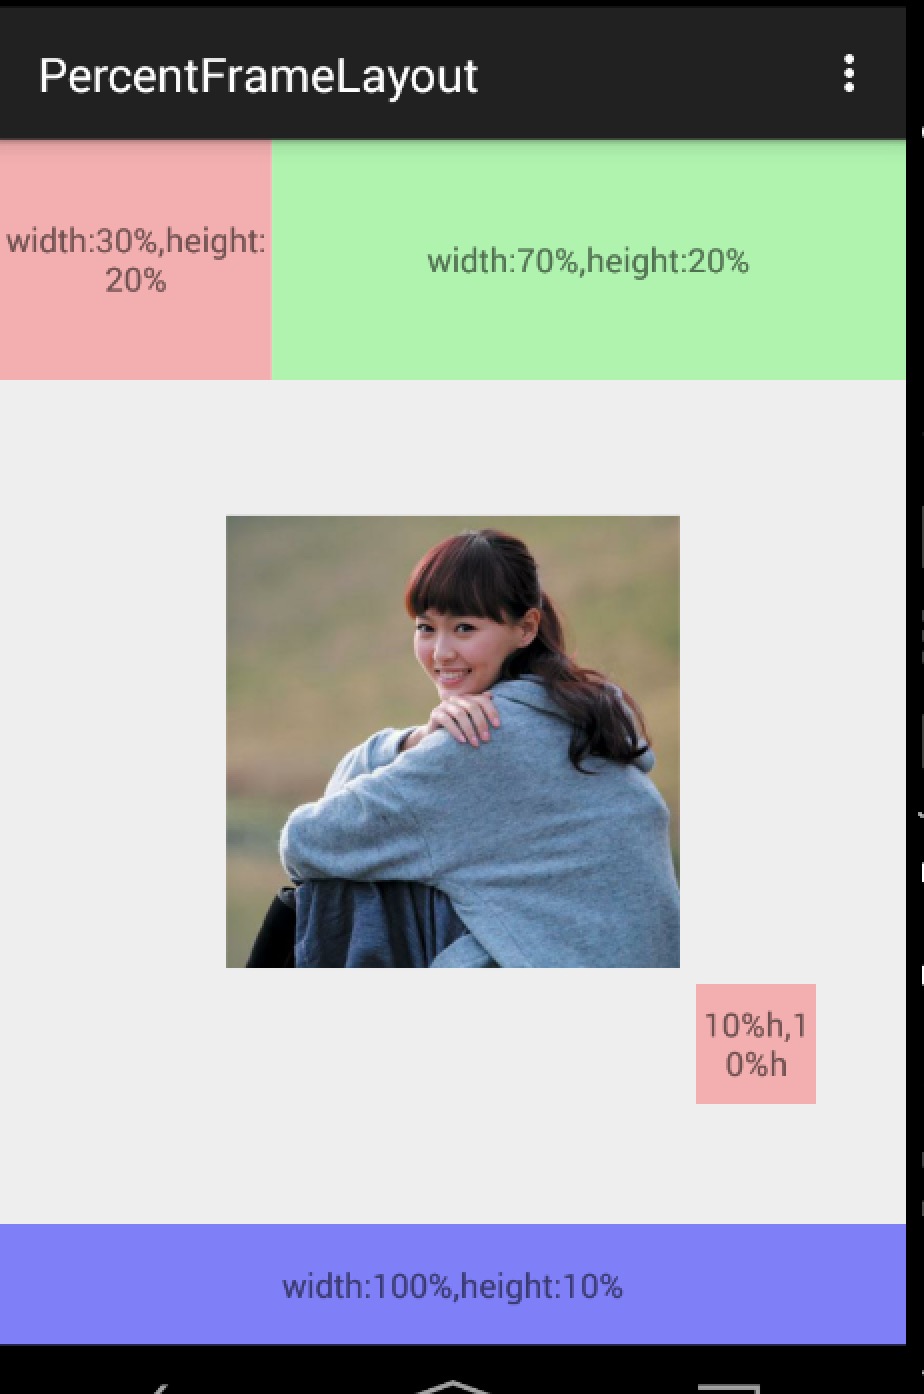
xml:
<?xml version="1.0" encoding="utf-8"?>
<com.zhy.android.percent.support.PercentRelativeLayout
    xmlns:android="http://schemas.android.com/apk/res/android"
    xmlns:app="http://schemas.android.com/apk/res-auto"
    android:layout_width="match_parent"
    android:layout_height="match_parent"
    android:clickable="true">

    <TextView
        android:id="@+id/row_one_item_one"
        android:layout_width="0dp"
        android:layout_height="0dp"
        android:layout_alignParentTop="true"
        android:background="#7700ff00"
        android:text="w:70%,h:20%"
        android:gravity="center"
        app:layout_heightPercent="20%"
        app:layout_widthPercent="70%"/>

    <TextView
        android:id="@+id/row_one_item_two"
        android:layout_width="0dp"
        android:layout_height="0dp"
        android:layout_toRightOf="@+id/row_one_item_one"
        android:background="#396190"
        android:text="w:30%,h:20%"
        app:layout_heightPercent="20%"
        android:gravity="center"
        app:layout_widthPercent="30%"/>


    <ImageView
        android:id="@+id/row_two_item_one"
        android:layout_width="match_parent"
        android:layout_height="0dp"
        android:src="@drawable/tangyan"
        android:scaleType="centerCrop"
        android:layout_below="@+id/row_one_item_one"
        android:background="#d89695"
        app:layout_heightPercent="70%"/>

    <TextView
        android:layout_width="0dp"
        android:layout_height="0dp"
        android:layout_below="@id/row_two_item_one"
        android:background="#770000ff"
        android:gravity="center"
        android:text="width:100%,height:10%"
        app:layout_heightPercent="10%"
        app:layout_widthPercent="100%"/>


</com.zhy.android.percent.support.PercentRelativeLayout>
ok,例子都比较简单,主要就一个布局文件,可以看出上述我们可以给宽度、高度,边距等指定参考值为宽度或者高度。这样的话,在保证图片宽、高比例、控件设置为正方形等需求就没问题了。
接下来还有个例子,功能主要是设置TextView对于textSize的百分比设置;以及对于ScrollView的支持。当然了,对于ScrollView的支持,这个理论上是不支持的,因为大家都清楚,如果PercentLinearLayout在ScrollView中,那么高度的模式肯定是UNSPECIFIED,那么理论上来说高度是无限制的,也就是依赖于子View的高度,而百分比布局的高度是依赖于父View的高度的,所有是互斥的。而我们支持是:考虑到编写代码的时候,大多参考的是屏幕高度(android.R.id.content)的高度,所以如果在ScrollView中,编写10%h,这个百分比是依赖于屏幕高度的(不包括ActionBar的高度)。
Demo 3
xml:
<?xml version="1.0" encoding="utf-8"?>

<ScrollView
    xmlns:android="http://schemas.android.com/apk/res/android"
    xmlns:app="http://schemas.android.com/apk/res-auto"
    android:layout_width="match_parent"
    android:layout_height="match_parent">
    <com.zhy.android.percent.support.PercentLinearLayout
        xmlns:android="http://schemas.android.com/apk/res/android"
        xmlns:app="http://schemas.android.com/apk/res-auto"
        android:layout_width="match_parent"
        android:layout_height="wrap_content"
        android:orientation="vertical">

        <TextView
            android:layout_width="0dp"
            android:layout_height="0dp"
            android:background="#ff44aacc"
            android:gravity="center"
            android:text="width:60%,height:5%,ts:3%"
            android:textColor="#ffffff"
            app:layout_heightPercent="5%"
            app:layout_marginBottomPercent="5%"
            app:layout_textSizePercent="3%"
            app:layout_widthPercent="60%"/>

        <TextView
            android:layout_width="0dp"
            android:layout_height="0dp"
            android:background="#ff4400cc"
            android:gravity="center"
            android:text="width:70%,height:10%"
            android:textColor="#ffffff"
            app:layout_heightPercent="10%"
            app:layout_marginBottomPercent="5%"
            app:layout_widthPercent="70%"/>
        <TextView
            android:layout_width="0dp"
            android:layout_height="0dp"
            android:background="#ff44aacc"
            android:gravity="center"
            android:text="w:80%,h:15%,textSize:5%"
            android:textColor="#ffffff"
            app:layout_heightPercent="15%"
            app:layout_marginBottomPercent="5%"
            app:layout_textSizePercent="5%"
            app:layout_widthPercent="80%"/>
        <TextView
            android:layout_width="0dp"
            android:layout_height="0dp"
            android:background="#ff4400cc"
            android:gravity="center"
            android:text="width:90%,height:5%"
            android:textColor="#ffffff"
            app:layout_heightPercent="20%"
            app:layout_marginBottomPercent="5%"
            app:layout_widthPercent="90%"/>

        <TextView
            android:layout_width="match_parent"
            android:layout_height="0dp"
            android:background="#ff44aacc"
            android:gravity="center"
            android:text="width:100%,height:25%"
            android:textColor="#ffffff"
            app:layout_heightPercent="25%"
            app:layout_marginBottomPercent="5%"
            />

        <TextView
            android:layout_width="match_parent"
            android:layout_height="0dp"
            android:background="#ff44aacc"
            android:gravity="center"
            android:text="width:100%,height:30%"
            android:textColor="#ffffff"
            app:layout_heightPercent="30%"
            app:layout_marginBottomPercent="5%"
            />


    </com.zhy.android.percent.support.PercentLinearLayout>
</ScrollView>
上面的第三个TextView的字体设置的就是5%(默认参考容器高度)。整个PercentLinearLayout在ScrollView中。ok~ 姑且这样,由于源码比较简单,大家可以根据自己的实际需求去修改,前提尽可能不要改变原有的功能。
四 扩展的相关源码
(一) 关于attrs.xml
原库中所有的属性的format为fraction,但是由于我期望的写法有10%w,10%h,10%,没有找到合适的format,就直接定义为string了~string我可以自己去解析~
<?xml version="1.0" encoding="utf-8"?>
<resources>
    <declare-styleable name="PercentLayout_Layout">
        <attr name="layout_widthPercent" format="string"/>
        <attr name="layout_heightPercent" format="string"/>
        <attr name="layout_marginPercent" format="string"/>
        <attr name="layout_marginLeftPercent" format="string"/>
        <attr name="layout_marginTopPercent" format="string"/>
        <attr name="layout_marginRightPercent" format="string"/>
        <attr name="layout_marginBottomPercent" format="string"/>
        <attr name="layout_marginStartPercent" format="string"/>
        <attr name="layout_marginEndPercent" format="string"/>
        <attr name="layout_textSizePercent" format="string"/>
    </declare-styleable>
</resources>
(二) 获取自定义属性的值及使用
如果看了上篇博文的话,应该清楚,对于自定义属性的值是在PercentLayoutHelper.getPercentLayoutInfo(c, attrs)中获取的。
简单看下修改后的代码:
    public static PercentLayoutInfo getPercentLayoutInfo(Context context,                                                    AttributeSet attrs)
    {
        PercentLayoutInfo info = null;
        TypedArray array = context.obtainStyledAttributes(attrs, R.styleable.PercentLayout_Layout);

        String sizeStr = array.getString(R.styleable.PercentLayout_Layout_layout_widthPercent);
        PercentLayoutInfo.PercentVal percentVal = getPercentVal(sizeStr, true);
        if (percentVal != null)
        {
            if (Log.isLoggable(TAG, Log.VERBOSE))
            {
                Log.v(TAG, "percent width: " + percentVal.percent);
            }
            info = info != null ? info : new PercentLayoutInfo();
            info.widthPercent = percentVal;
        }

        //省略了获取其他的类似属性
        array.recycle();
        return info;
    }


    private static final String REGEX_PERCENT = "^(([0-9]+)([.]([0-9]+))?|([.]([0-9]+))?)%([wh]?)$";

    /**
     * widthStr to PercentVal
     * <br/>
     * eg: 35%w => new PercentVal(35, true)
     *
     * @param percentStr
     * @param isOnWidth
     * @return
     */
    private static PercentLayoutInfo.PercentVal getPercentVal(String percentStr, boolean isOnWidth)
    {
        //valid param
        if (percentStr == null)
        {
            return null;
        }
        Pattern p = Pattern.compile(REGEX_PERCENT);
        Matcher matcher = p.matcher(percentStr);
        if (!matcher.matches())
        {
            throw new RuntimeException("the value of layout_xxxPercent invalid! ==>" + percentStr);
        }
        int len = percentStr.length();
        //extract the float value
        String floatVal = matcher.group(1);
        String lastAlpha = percentStr.substring(len - 1);

        float percent = Float.parseFloat(floatVal) / 100f;
        boolean isBasedWidth = (isOnWidth && !lastAlpha.equals("h")) || lastAlpha.equals("w");

        return new PercentLayoutInfo.PercentVal(percent, isBasedWidth);
    }
首先我们获取自定义属性的填写的值,通过getPercentVal方法,在该方法内部通过正则校验其合法性,如果合法,则将其拆解封装成PercentVal对象,该对象中记录百分比值,已经知否参考宽度的布尔值(如果参考宽度则为true,否则为false)。对于没有后缀w|h的,和原库的解析方式相同。
PercentVal对象如下:
public static class PercentVal
{

     public float percent = -1;
     public boolean isBaseWidth;

     public PercentVal(float percent, boolean isBaseWidth)
     {
          this.percent = percent;
          this.isBaseWidth = isBaseWidth;
     }
}
对于定义的自定义属性获取完成之后,剩下的无非是测量时候对于原本的LayoutParams中的宽度和高度的赋值做简单的修改。参考上一篇的源码,我们直接看 PercentLayoutInfo.fillLayoutParams(params, widthHint, heightHint);方法:
 public void fillLayoutParams(ViewGroup.LayoutParams params, int widthHint,
                                     int heightHint)
        {
            // Preserve the original layout params, so we can restore them after the measure step.
            mPreservedParams.width = params.width;
            mPreservedParams.height = params.height;
            /*
            if (widthPercent >= 0) {
                params.width = (int) (widthHint * widthPercent);
            }
            if (heightPercent >= 0) {
                params.height = (int) (heightHint * heightPercent);
            }*/
            if (widthPercent != null)
            {
                int base = widthPercent.isBaseWidth ? widthHint : heightHint;
                params.width = (int) (base * widthPercent.percent);
            }
            if (heightPercent != null)
            {
                int base = heightPercent.isBaseWidth ? widthHint : heightHint;
                params.height = (int) (base * heightPercent.percent);
            }

            if (Log.isLoggable(TAG, Log.DEBUG))
            {
                Log.d(TAG, "after fillLayoutParams: (" + params.width + ", " + params.height + ")");
            }
        }
原本的源码比较简单,只需要将widthHint/heightHint乘以百分比即可(见上代码注释),而我们修改的也比较容易,首先判断参考宽度还是高度,然后乘以百分比(根据我们的对象PercentVal的属性)。
ok,大概的源码修改就是上述的内容,有兴趣的可以直接查看源码。
当然了,上述库中肯定还存在或多或少的问题,大家可以fork完善下,或者直接留言提意见都可以。
github地址:android-percent-support-extend ,用法参考上文,或者README。欢迎star and fork 。
~~have a nice day ~~
ok~
群号:463081660,欢迎入群
微信公众号:hongyangAndroid
(欢迎关注,第一时间推送博文信息)
转载请标明出处:
http://blog.csdn.net/lmj623565791/article/details/46695347;
本文出自:【张鸿洋的博客】
一、概述
周末游戏打得过猛,于是周天熬夜码代码,周一早上浑浑噩噩的发现android-percent-support-lib-sample这个项目,Google终于开始支持百分比的方式布局了,瞬间脉动回来,啊咧咧。对于这种历史性的时刻,不出篇博客难以表达我内心的激动。
还记得不久前,发了篇博客:Android 屏幕适配方案,这篇博客以Web页面设计引出一种适配方案,最终的目的就是可以通过百分比控制控件的大小。当然了,存在一些问题,比如:
- 对于没有考虑到屏幕尺寸,可能会出现意外的情况;
- apk的大小会增加;
当然了android-percent-support这个库,基本可以解决上述问题,是不是有点小激动,稍等,我们先描述下这个support-lib。
这个库提供了:
-
两种布局供大家使用:
PercentRelativeLayout、PercentFrameLayout,通过名字就可以看出,这是继承自FrameLayout和RelativeLayout两个容器类; -
支持的属性有:
layout_widthPercent、layout_heightPercent、
layout_marginPercent、layout_marginLeftPercent、
layout_marginTopPercent、layout_marginRightPercent、
layout_marginBottomPercent、layout_marginStartPercent、layout_marginEndPercent。
可以看到支持宽高,以及margin。
也就是说,大家只要在开发过程中使用PercentRelativeLayout、PercentFrameLayout替换FrameLayout、RelativeLayout即可。
是不是很简单,不过貌似没有LinearLayout,有人会说LinearLayout有weight属性呀。但是,weight属性只能支持一个方向呀~~哈,没事,刚好给我们一个机会去自定义一个PercentLinearLayout。
好了,本文分为3个部分:
PercentRelativeLayout、PercentFrameLayout的使用- 对上述控件源码分析
- 自定义
PercentLinearLayout
二、使用
关于使用,其实及其简单,并且github上也有例子,android-percent-support-lib-sample。我们就简单过一下:
首先记得在build.gradle添加:
compile 'com.android.support:percent:22.2.0'(一)PercentFrameLayout
<?xml version="1.0" encoding="utf-8"?>
<android.support.percent.PercentFrameLayout
    xmlns:android="http://schemas.android.com/apk/res/android"
    xmlns:app="http://schemas.android.com/apk/res-auto"
    android:layout_width="match_parent"
    android:layout_height="match_parent">

    <TextView
        android:layout_width="0dp"
        android:layout_height="0dp"
        android:layout_gravity="left|top"
        android:background="#44ff0000"
        android:text="width:30%,height:20%"
        app:layout_heightPercent="20%"
        android:gravity="center"
        app:layout_widthPercent="30%"/>

    <TextView
        android:layout_width="0dp"
        android:layout_height="0dp"
        android:layout_gravity="right|top"
        android:gravity="center"
        android:background="#4400ff00"
        android:text="width:70%,height:20%"
        app:layout_heightPercent="20%"
        app:layout_widthPercent="70%"/>


    <TextView
        android:layout_width="0dp"
        android:layout_height="0dp"
        android:layout_gravity="bottom"
        android:background="#770000ff"
        android:text="width:100%,height:10%"
        android:gravity="center"
        app:layout_heightPercent="10%"
        app:layout_widthPercent="100%"/>


</android.support.percent.PercentFrameLayout>
3个TextView,很简单,直接看效果图:
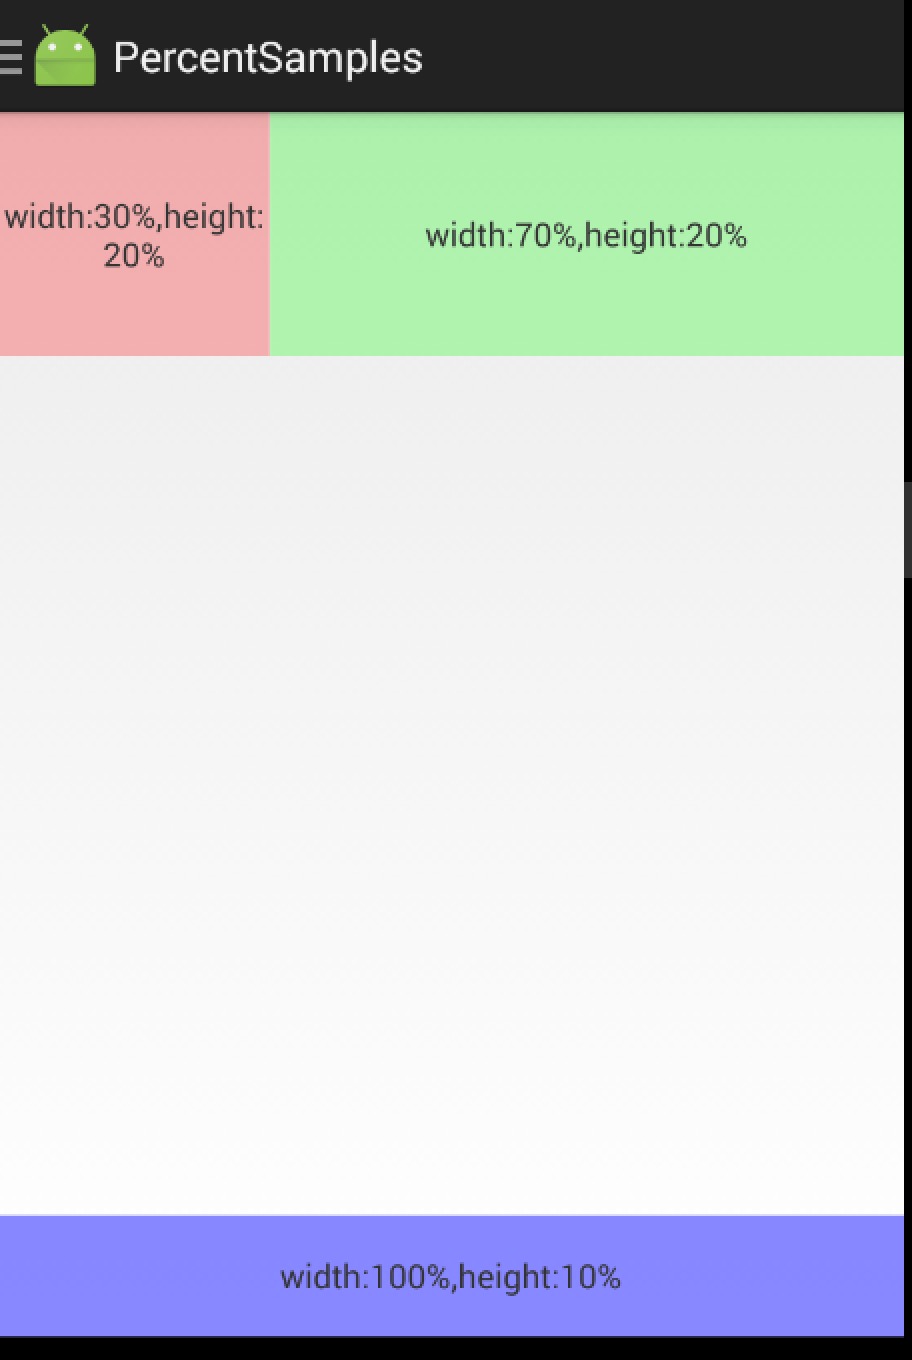
(二) PercentRelativeLayout
<?xml version="1.0" encoding="utf-8"?>
<android.support.percent.PercentRelativeLayout
    xmlns:android="http://schemas.android.com/apk/res/android"
    xmlns:app="http://schemas.android.com/apk/res-auto"
    android:layout_width="match_parent"
    android:layout_height="match_parent"
    android:clickable="true">

    <TextView
        android:id="@+id/row_one_item_one"
        android:layout_width="0dp"
        android:layout_height="0dp"
        android:layout_alignParentTop="true"
        android:background="#7700ff00"
        android:text="w:70%,h:20%"
        android:gravity="center"
        app:layout_heightPercent="20%"
        app:layout_widthPercent="70%"/>

    <TextView
        android:id="@+id/row_one_item_two"
        android:layout_width="0dp"
        android:layout_height="0dp"
        android:layout_toRightOf="@+id/row_one_item_one"
        android:background="#396190"
        android:text="w:30%,h:20%"
        app:layout_heightPercent="20%"
        android:gravity="center"
        app:layout_widthPercent="30%"/>


    <ImageView
        android:id="@+id/row_two_item_one"
        android:layout_width="match_parent"
        android:layout_height="0dp"
        android:src="@drawable/tangyan"
        android:scaleType="centerCrop"
        android:layout_below="@+id/row_one_item_one"
        android:background="#d89695"
        app:layout_heightPercent="70%"/>

    <TextView
        android:layout_width="0dp"
        android:layout_height="0dp"
        android:layout_below="@id/row_two_item_one"
        android:background="#770000ff"
        android:gravity="center"
        android:text="width:100%,height:10%"
        app:layout_heightPercent="10%"
        app:layout_widthPercent="100%"/>


</android.support.percent.PercentRelativeLayout>
ok,依然是直接看效果图:

使用没什么好说的,就是直观的看一下。
三、源码分析
其实细想一下,Google只是对我们原本熟悉的RelativeLayout和FrameLayout进行的功能的扩展,使其支持了percent相关的属性。
那么,我们考虑下,如果是我们添加这种扩展,我们会怎么做:
- 通过LayoutParams获取child设置的percent相关属性的值
- onMeasure的时候,将child的width,height的值,通过获取的自定义属性的值进行计算(eg:容器的宽 * fraction ),计算后传入给child.measure(w,h);
ok,有了上面的猜想,我们直接看PercentFrameLayout的源码。
public class PercentFrameLayout extends FrameLayout {
    private final PercentLayoutHelper mHelper = new PercentLayoutHelper(this);

    //省略了,两个构造方法

    public PercentFrameLayout(Context context, AttributeSet attrs) {
        super(context, attrs);
    }


    @Override
    public LayoutParams generateLayoutParams(AttributeSet attrs) {
        return new LayoutParams(getContext(), attrs);
    }

    @Override
    protected void onMeasure(int widthMeasureSpec, int heightMeasureSpec) {
        mHelper.adjustChildren(widthMeasureSpec, heightMeasureSpec);
        super.onMeasure(widthMeasureSpec, heightMeasureSpec);
        if (mHelper.handleMeasuredStateTooSmall()) {
            super.onMeasure(widthMeasureSpec, heightMeasureSpec);
        }
    }

    @Override
    protected void onLayout(boolean changed, int left, int top, int right, int bottom) {
        super.onLayout(changed, left, top, right, bottom);
        mHelper.restoreOriginalParams();
    }

    public static class LayoutParams extends FrameLayout.LayoutParams
            implements PercentLayoutHelper.PercentLayoutParams {
        private PercentLayoutHelper.PercentLayoutInfo mPercentLayoutInfo;

        public LayoutParams(Context c, AttributeSet attrs) {
            super(c, attrs);
            mPercentLayoutInfo = PercentLayoutHelper.getPercentLayoutInfo(c, attrs);
        }
        //省略了一些代码...

        @Override
        public PercentLayoutHelper.PercentLayoutInfo getPercentLayoutInfo() {
            return mPercentLayoutInfo;
        }

        @Override
        protected void setBaseAttributes(TypedArray a, int widthAttr, int heightAttr) {
            PercentLayoutHelper.fetchWidthAndHeight(this, a, widthAttr, heightAttr);
        }
    }
}代码是相当的短,可以看到PercentFrameLayout里面首先重写了generateLayoutParams方法,当然了,由于支持了一些新的layout_属性,那么肯定需要定义对应的LayoutParams。
(一)percent相关属性的获取
可以看到PercentFrameLayout.LayoutParams在原有的FrameLayout.LayoutParams基础上,实现了PercentLayoutHelper.PercentLayoutParams接口。
这个接口很简单,只有一个方法:
public interface PercentLayoutParams {
        PercentLayoutInfo getPercentLayoutInfo();
}而,这个方法的实现呢,也只有一行:return mPercentLayoutInfo;,那么这个mPercentLayoutInfo在哪完成赋值呢?
看PercentFrameLayout.LayoutParams的构造方法:
public LayoutParams(Context c, AttributeSet attrs) {
            super(c, attrs);
            mPercentLayoutInfo = PercentLayoutHelper.getPercentLayoutInfo(c, attrs);
        }
可以看到,将attrs传入给getPercentLayoutInfo方法,那么不用说,这个方法的内部,肯定是获取自定义属性的值,然后将其封装到PercentLayoutInfo对象中,最后返回。
代码如下:
public static PercentLayoutInfo getPercentLayoutInfo(Context context,
            AttributeSet attrs) {
        PercentLayoutInfo info = null;
        TypedArray array = context.obtainStyledAttributes(attrs, R.styleable.PercentLayout_Layout);
        float value = array.getFraction(R.styleable.PercentLayout_Layout_layout_widthPercent, 1, 1,
                -1f);
        if (value != -1f) {
            if (Log.isLoggable(TAG, Log.VERBOSE)) {
                Log.v(TAG, "percent width: " + value);
            }
            info = info != null ? info : new PercentLayoutInfo();
            info.widthPercent = value;
        }
        value = array.getFraction(R.styleable.PercentLayout_Layout_layout_heightPercent, 1, 1, -1f);
        if (value != -1f) {
            if (Log.isLoggable(TAG, Log.VERBOSE)) {
                Log.v(TAG, "percent height: " + value);
            }
            info = info != null ? info : new PercentLayoutInfo();
            info.heightPercent = value;
        }
        value = array.getFraction(R.styleable.PercentLayout_Layout_layout_marginPercent, 1, 1, -1f);
        if (value != -1f) {
            if (Log.isLoggable(TAG, Log.VERBOSE)) {
                Log.v(TAG, "percent margin: " + value);
            }
            info = info != null ? info : new PercentLayoutInfo();
            info.leftMarginPercent = value;
            info.topMarginPercent = value;
            info.rightMarginPercent = value;
            info.bottomMarginPercent = value;
        }
        value = array.getFraction(R.styleable.PercentLayout_Layout_layout_marginLeftPercent, 1, 1,
                -1f);
        if (value != -1f) {
            if (Log.isLoggable(TAG, Log.VERBOSE)) {
                Log.v(TAG, "percent left margin: " + value);
            }
            info = info != null ? info : new PercentLayoutInfo();
            info.leftMarginPercent = value;
        }
        value = array.getFraction(R.styleable.PercentLayout_Layout_layout_marginTopPercent, 1, 1,
                -1f);
        if (value != -1f) {
            if (Log.isLoggable(TAG, Log.VERBOSE)) {
                Log.v(TAG, "percent top margin: " + value);
            }
            info = info != null ? info : new PercentLayoutInfo();
            info.topMarginPercent = value;
        }
        value = array.getFraction(R.styleable.PercentLayout_Layout_layout_marginRightPercent, 1, 1,
                -1f);
        if (value != -1f) {
            if (Log.isLoggable(TAG, Log.VERBOSE)) {
                Log.v(TAG, "percent right margin: " + value);
            }
            info = info != null ? info : new PercentLayoutInfo();
            info.rightMarginPercent = value;
        }
        value = array.getFraction(R.styleable.PercentLayout_Layout_layout_marginBottomPercent, 1, 1,
                -1f);
        if (value != -1f) {
            if (Log.isLoggable(TAG, Log.VERBOSE)) {
                Log.v(TAG, "percent bottom margin: " + value);
            }
            info = info != null ? info : new PercentLayoutInfo();
            info.bottomMarginPercent = value;
        }
        value = array.getFraction(R.styleable.PercentLayout_Layout_layout_marginStartPercent, 1, 1,
                -1f);
        if (value != -1f) {
            if (Log.isLoggable(TAG, Log.VERBOSE)) {
                Log.v(TAG, "percent start margin: " + value);
            }
            info = info != null ? info : new PercentLayoutInfo();
            info.startMarginPercent = value;
        }
        value = array.getFraction(R.styleable.PercentLayout_Layout_layout_marginEndPercent, 1, 1,
                -1f);
        if (value != -1f) {
            if (Log.isLoggable(TAG, Log.VERBOSE)) {
                Log.v(TAG, "percent end margin: " + value);
            }
            info = info != null ? info : new PercentLayoutInfo();
            info.endMarginPercent = value;
        }
        array.recycle();
        if (Log.isLoggable(TAG, Log.DEBUG)) {
            Log.d(TAG, "constructed: " + info);
        }
        return info;
    }
是不是和我们平时的取值很类似,所有的值最终封装到PercentLayoutInfo对象中。
ok,到此我们的属性获取就介绍完成,有了这些属性,是不是onMeasure里面要进行使用呢?
(二) onMeasue中重新计算child的尺寸
@Override
    protected void onMeasure(int widthMeasureSpec, int heightMeasureSpec) {
        mHelper.adjustChildren(widthMeasureSpec, heightMeasureSpec);
        super.onMeasure(widthMeasureSpec, heightMeasureSpec);
        if (mHelper.handleMeasuredStateTooSmall()) {
            super.onMeasure(widthMeasureSpec, heightMeasureSpec);
        }
    }
可以看到onMeasure中的代码页很少,看来核心的代码都被封装在mHelper的方法中,我们直接看mHelper.adjustChildren方法。
/**
     * Iterates over children and changes their width and height to one calculated from percentage
     * values.
     * @param widthMeasureSpec Width MeasureSpec of the parent ViewGroup.
     * @param heightMeasureSpec Height MeasureSpec of the parent ViewGroup.
     */
    public void adjustChildren(int widthMeasureSpec, int heightMeasureSpec) {
        //...
        int widthHint = View.MeasureSpec.getSize(widthMeasureSpec);
        int heightHint = View.MeasureSpec.getSize(heightMeasureSpec);
        for (int i = 0, N = mHost.getChildCount(); i < N; i++) {
            View view = mHost.getChildAt(i);
            ViewGroup.LayoutParams params = view.getLayoutParams();

            if (params instanceof PercentLayoutParams) {
                PercentLayoutInfo info =
                        ((PercentLayoutParams) params).getPercentLayoutInfo();
                if (Log.isLoggable(TAG, Log.DEBUG)) {
                    Log.d(TAG, "using " + info);
                }
                if (info != null) {
                    if (params instanceof ViewGroup.MarginLayoutParams) {
                        info.fillMarginLayoutParams((ViewGroup.MarginLayoutParams) params,
                                widthHint, heightHint);
                    } else {
                        info.fillLayoutParams(params, widthHint, heightHint);
                    }
                }
            }
        }
    }
通过注释也能看出,此方法中遍历所有的孩子,通过百分比的属性重新设置其宽度和高度。
首先在widthHint、heightHint保存容器的宽、高,然后遍历所有的孩子,判断其LayoutParams是否是PercentLayoutParams类型,如果是,通过params.getPercentLayoutInfo拿出info对象。
是否还记得,上面的分析中,PercentLayoutInfo保存了percent相关属性的值。
如果info不为null,则判断是否需要处理margin;我们直接看fillLayoutParams方法(处理margin也是类似的)。
 /**
         * Fills {@code ViewGroup.LayoutParams} dimensions based on percentage values.
         */
        public void fillLayoutParams(ViewGroup.LayoutParams params, int widthHint,
                int heightHint) {
            // Preserve the original layout params, so we can restore them after the measure step.
            mPreservedParams.width = params.width;
            mPreservedParams.height = params.height;

            if (widthPercent >= 0) {
                params.width = (int) (widthHint * widthPercent);
            }
            if (heightPercent >= 0) {
                params.height = (int) (heightHint * heightPercent);
            }
            if (Log.isLoggable(TAG, Log.DEBUG)) {
                Log.d(TAG, "after fillLayoutParams: (" + params.width + ", " + params.height + ")");
            }
}首先保存原本的width和height,然后重置params的width和height为(int) (widthHint * widthPercent)和(int) (heightHint * heightPercent);。
到此,其实我们的百分比转换就结束了,理论上就已经实现了对于百分比的支持,不过Google还考虑了一些细节。
我们回到onMeasure方法:
@Override
    protected void onMeasure(int widthMeasureSpec, int heightMeasureSpec) {
        mHelper.adjustChildren(widthMeasureSpec, heightMeasureSpec);
        super.onMeasure(widthMeasureSpec, heightMeasureSpec);
        if (mHelper.handleMeasuredStateTooSmall()) {
            super.onMeasure(widthMeasureSpec, heightMeasureSpec);
        }
    }
下面还有个mHelper.handleMeasuredStateTooSmall的判断,也就是说,如果你设置的百分比,最终计算出来的MeasuredSize过小的话,会进行一些操作。
代码如下:
public boolean handleMeasuredStateTooSmall() {
        boolean needsSecondMeasure = false;
        for (int i = 0, N = mHost.getChildCount(); i < N; i++) {
            View view = mHost.getChildAt(i);
            ViewGroup.LayoutParams params = view.getLayoutParams();
            if (Log.isLoggable(TAG, Log.DEBUG)) {
                Log.d(TAG, "should handle measured state too small " + view + " " + params);
            }
            if (params instanceof PercentLayoutParams) {
                PercentLayoutInfo info =
                        ((PercentLayoutParams) params).getPercentLayoutInfo();
                if (info != null) {
                    if (shouldHandleMeasuredWidthTooSmall(view, info)) {
                        needsSecondMeasure = true;
                        params.width = ViewGroup.LayoutParams.WRAP_CONTENT;
                    }
                    if (shouldHandleMeasuredHeightTooSmall(view, info)) {
                        needsSecondMeasure = true;
                        params.height = ViewGroup.LayoutParams.WRAP_CONTENT;
                    }
                }
            }
        }
        if (Log.isLoggable(TAG, Log.DEBUG)) {
            Log.d(TAG, "should trigger second measure pass: " + needsSecondMeasure);
        }
        return needsSecondMeasure;
}首先遍历所有的孩子,拿出孩子的layoutparams,如果是PercentLayoutParams实例,则取出info。如果info不为null,调用shouldHandleMeasuredWidthTooSmall判断:
private static boolean shouldHandleMeasuredWidthTooSmall(View view, PercentLayoutInfo info) {
        int state = ViewCompat.getMeasuredWidthAndState(view) & ViewCompat.MEASURED_STATE_MASK;
        return state == ViewCompat.MEASURED_STATE_TOO_SMALL && info.widthPercent >= 0 &&
                info.mPreservedParams.width == ViewGroup.LayoutParams.WRAP_CONTENT;
    }
这里就是判断,如果你设置的measuredWidth或者measureHeight过小的话,并且你在布局文件中layout_w/h 设置的是WRAP_CONTENT的话,将params.width / height= ViewGroup.LayoutParams.WRAP_CONTENT,然后重新测量。
哈,onMeasure终于结束了~~~现在我觉得应该代码结束了吧,尺寸都设置好了,还需要干嘛么,but,你会发现onLayout也重写了,我们又不改变layout规则,在onLayout里面干什么毛线:
@Override
    protected void onLayout(boolean changed, int left, int top, int right, int bottom) {
        super.onLayout(changed, left, top, right, bottom);
        mHelper.restoreOriginalParams();
}继续看mHelper.restoreOriginalParams
 /**
     * Iterates over children and restores their original dimensions that were changed for
     * percentage values. Calling this method only makes sense if you previously called
     * {@link PercentLayoutHelper#adjustChildren(int, int)}.
     */
    public void restoreOriginalParams() {
        for (int i = 0, N = mHost.getChildCount(); i < N; i++) {
            View view = mHost.getChildAt(i);
            ViewGroup.LayoutParams params = view.getLayoutParams();
            if (Log.isLoggable(TAG, Log.DEBUG)) {
                Log.d(TAG, "should restore " + view + " " + params);
            }
            if (params instanceof PercentLayoutParams) {
                PercentLayoutInfo info =
                        ((PercentLayoutParams) params).getPercentLayoutInfo();
                if (Log.isLoggable(TAG, Log.DEBUG)) {
                    Log.d(TAG, "using " + info);
                }
                if (info != null) {
                    if (params instanceof ViewGroup.MarginLayoutParams) {
                        info.restoreMarginLayoutParams((ViewGroup.MarginLayoutParams) params);
                    } else {
                        info.restoreLayoutParams(params);
                    }
                }
            }
        }
    }
噗,原来是重新恢复原本的尺寸值,也就是说onMeasure里面的对值进行了改变,测量完成后。在这个地方,将值又恢复成如果布局文件中的值,上面写的都是0。恢复很简单:
public void restoreLayoutParams(ViewGroup.LayoutParams params) {
            params.width = mPreservedParams.width;
            params.height = mPreservedParams.height;
        }
你应该没有忘在哪存的把~忘了的话,麻烦Ctrl+F ‘mPreservedParams.width’ 。
也就是说,你去打印上面写法,布局文件中view的v.getLayoutParams().width,这个值应该是0。
这里感觉略微不爽~这个0没撒用处呀,还不如不重置~~
好了,到此就分析完了,其实主要就几个步骤:
- LayoutParams中属性的获取
- onMeasure中,改变params.width为百分比计算结果,测量
- 如果测量值过小且设置的w/h是wrap_content,重新测量
- onLayout中,重置params.w/h为布局文件中编写的值
可以看到,有了RelativeLayout、FrameLayout的扩展,竟然没有LinearLayout几个意思。好在,我们的核心代码都由PercentLayoutHelper封装了,自己扩展下LinearLayout也不复杂。
三、实现PercentLinearlayout
可能有人会说,有了weight呀,但是weight能做到宽、高同时百分比赋值嘛?
好了,代码很简单,如下:
(一)PercentLinearLayout
package com.juliengenoud.percentsamples;

import android.content.Context;
import android.content.res.TypedArray;
import android.support.percent.PercentLayoutHelper;
import android.util.AttributeSet;
import android.view.ViewGroup;
import android.widget.LinearLayout;

/**
 * Created by zhy on 15/6/30.
 */
public class PercentLinearLayout extends LinearLayout
{

    private PercentLayoutHelper mPercentLayoutHelper;

    public PercentLinearLayout(Context context, AttributeSet attrs)
    {
        super(context, attrs);

        mPercentLayoutHelper = new PercentLayoutHelper(this);
    }


    @Override
    protected void onMeasure(int widthMeasureSpec, int heightMeasureSpec)
    {
        mPercentLayoutHelper.adjustChildren(widthMeasureSpec, heightMeasureSpec);
        super.onMeasure(widthMeasureSpec, heightMeasureSpec);
        if (mPercentLayoutHelper.handleMeasuredStateTooSmall())
        {
            super.onMeasure(widthMeasureSpec, heightMeasureSpec);
        }
    }

    @Override
    protected void onLayout(boolean changed, int l, int t, int r, int b)
    {
        super.onLayout(changed, l, t, r, b);
        mPercentLayoutHelper.restoreOriginalParams();
    }

    @Override
    public LayoutParams generateLayoutParams(AttributeSet attrs)
    {
        return new LayoutParams(getContext(), attrs);
    }


    public static class LayoutParams extends LinearLayout.LayoutParams
            implements PercentLayoutHelper.PercentLayoutParams
    {
        private PercentLayoutHelper.PercentLayoutInfo mPercentLayoutInfo;

        public LayoutParams(Context c, AttributeSet attrs)
        {
            super(c, attrs);
            mPercentLayoutInfo = PercentLayoutHelper.getPercentLayoutInfo(c, attrs);
        }

        @Override
        public PercentLayoutHelper.PercentLayoutInfo getPercentLayoutInfo()
        {
            return mPercentLayoutInfo;
        }

        @Override
        protected void setBaseAttributes(TypedArray a, int widthAttr, int heightAttr)
        {
            PercentLayoutHelper.fetchWidthAndHeight(this, a, widthAttr, heightAttr);
        }

        public LayoutParams(int width, int height) {
            super(width, height);
        }


        public LayoutParams(ViewGroup.LayoutParams source) {
            super(source);
        }

        public LayoutParams(MarginLayoutParams source) {
            super(source);
        }

    }

}
如果你详细看了上面的源码分析,这个代码是不是没撒解释的了~
(二)测试布局
<?xml version="1.0" encoding="utf-8"?>


<com.juliengenoud.percentsamples.PercentLinearLayout
    xmlns:android="http://schemas.android.com/apk/res/android"
    xmlns:app="http://schemas.android.com/apk/res-auto"
    android:layout_width="match_parent"
    android:layout_height="match_parent"
    android:orientation="vertical">

    <TextView
        android:layout_width="0dp"
        android:layout_height="0dp"
        android:background="#ff44aacc"
        android:text="width:60%,height:5%"
        android:textColor="#ffffff"
        app:layout_heightPercent="5%"
        app:layout_marginBottomPercent="5%"
        app:layout_widthPercent="60%"/>

    <TextView
        android:layout_width="0dp"
        android:layout_height="0dp"
        android:background="#ff4400cc"
        android:gravity="center"
        android:textColor="#ffffff"
        android:text="width:70%,height:10%"
        app:layout_heightPercent="10%"
        app:layout_marginBottomPercent="5%"
        app:layout_widthPercent="70%"/>
    <TextView
        android:layout_width="0dp"
        android:layout_height="0dp"
        android:background="#ff44aacc"
        android:gravity="center"
        android:text="width:80%,height:15%"
        android:textColor="#ffffff"
        app:layout_heightPercent="15%"
        app:layout_marginBottomPercent="5%"
        app:layout_widthPercent="80%"/>
    <TextView
        android:layout_width="0dp"
        android:layout_height="0dp"
        android:background="#ff4400cc"
        android:gravity="center"
        android:text="width:90%,height:5%"
        android:textColor="#ffffff"
        app:layout_heightPercent="20%"
        app:layout_marginBottomPercent="10%"
        app:layout_widthPercent="90%"/>

    <TextView
        android:layout_width="match_parent"
        android:layout_height="0dp"
        android:background="#ff44aacc"
        android:gravity="center"
        android:text="width:100%,height:25%"
        android:textColor="#ffffff"
        app:layout_heightPercent="25%"
        app:layout_marginBottomPercent="5%"
        />


</com.juliengenoud.percentsamples.PercentLinearLayout>
我们纵向排列的几个TextView,分别设置宽/高都为百分比,且之间的间隔为5%p。
(三)效果图
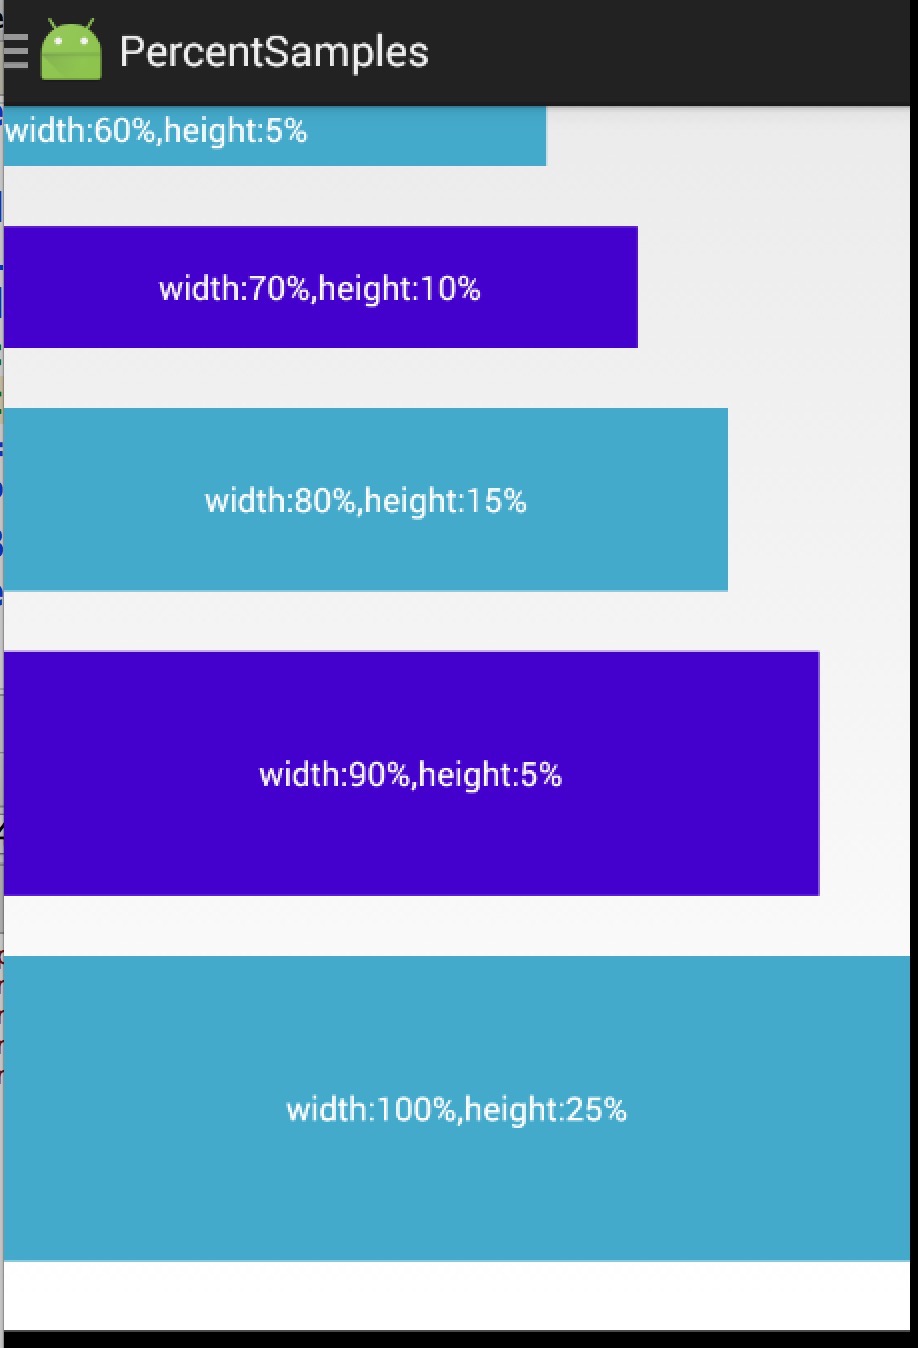
ok,到此,我们使用、源码分析、扩展PercentLinearLayout就结束了。
添加PercentLinearLayout后的地址:点击查看
扩展下载:android-percent-support-extend 包含android studio, eclipse项目,以及上述源码。
~~have a nice day ~~
群号:463081660
微信公众号:hongyangAndroid
(欢迎关注,第一时间推送博文信息)
转载请标明出处:
http://blog.csdn.net/lmj623565791/article/details/46405409;
本文出自:【张鸿洋的博客】
一、概述
Google I/O 2015 给大家带来了Android Design Support Library,对于希望做md风格的app的来说,简直是天大的喜讯了~大家可以通过Android Design Support Library该文章对其进行了解,也可以直接在github上下载示例代码运行学习。为了表达我心中的喜悦,我决定针对该库写一系列的文章来分别介绍新增加的控件。
ok,那么首先介绍的就是NavigationView。
注意下更新下as的SDK,然后在使用的过程中,在build.gradle中添加:
compile 'com.android.support:design:22.2.0'在md风格的app中,例如如下风格的侧滑菜单非常常见:
在之前的设计中,你可能需要考虑如何去布局实现,例如使用ListView;再者还要去设计Item的选中状态之类~~
but,现在,google提供了NavigationView,你只需要写写布局文件,这样的效果就ok了,并且兼容到Android 2.1,非常值得去体验一下。接下来我们来介绍如何去使用这个NavigationView!
二、使用
使用起来very simple ,主要就是写写布局文件~
(一)布局文件
<?xml version="1.0" encoding="utf-8"?>
<android.support.v4.widget.DrawerLayout
    android:id="@+id/id_drawer_layout"
    xmlns:android="http://schemas.android.com/apk/res/android"
    xmlns:app="http://schemas.android.com/apk/res-auto"
    android:layout_width="match_parent"
    android:layout_height="match_parent"
    android:fitsSystemWindows="true"
    >

    <RelativeLayout
        android:layout_width="match_parent"
        android:layout_height="match_parent">

        <android.support.v7.widget.Toolbar
            android:id="@+id/id_toolbar"
            android:layout_width="match_parent"
            android:layout_height="?attr/actionBarSize"
            android:background="?attr/colorPrimary"
            app:layout_scrollFlags="scroll|enterAlways"
            app:popupTheme="@style/ThemeOverlay.AppCompat.Light"/>

        <TextView
            android:id="@+id/id_tv_content"
            android:layout_width="wrap_content"
            android:layout_height="wrap_content"
            android:layout_centerInParent="true"
            android:text="HelloWorld"
            android:textSize="30sp"/>
    </RelativeLayout>

    <android.support.design.widget.NavigationView
        android:id="@+id/id_nv_menu"
        android:layout_width="match_parent"
        android:layout_height="match_parent"
        android:layout_gravity="left"
        android:fitsSystemWindows="true"
        app:headerLayout="@layout/header_just_username"
        app:menu="@menu/menu_drawer"
        />

</android.support.v4.widget.DrawerLayout>
可以看到我们的最外层是DrawerLayout,里面一个content,一个作为drawer。我们的drawer为NavigationView。
注意这个view的两个属性app:headerLayout="@layout/header_just_username"和app:menu="@menu/menu_drawer",分别代表drawer布局中的header和menuitem区域,当然你可以根据自己的情况使用。
接下来看看header的布局文件和menu配置文件:
<?xml version="1.0" encoding="utf-8"?>
<RelativeLayout xmlns:android="http://schemas.android.com/apk/res/android"
                android:layout_width="match_parent"
                android:layout_height="192dp"
                android:background="?attr/colorPrimaryDark"
                android:orientation="vertical"
                android:padding="16dp"
                android:theme="@style/ThemeOverlay.AppCompat.Dark">


    <TextView
        android:id="@+id/id_link"
        android:layout_width="wrap_content"
        android:layout_height="wrap_content"
        android:layout_alignParentBottom="true"
        android:layout_marginBottom="16dp"
        android:text="http://blog.csdn.net/lmj623565791"/>

    <TextView
        android:id="@+id/id_username"
        android:layout_width="wrap_content"
        android:layout_height="wrap_content"
        android:layout_above="@id/id_link"
        android:text="Zhang Hongyang"/>

    <ImageView
        android:layout_width="72dp"
        android:layout_height="72dp"
        android:layout_above="@id/id_username"
        android:layout_marginBottom="16dp"
        android:src="@mipmap/icon"/>


</RelativeLayout>
<?xml version="1.0" encoding="utf-8"?>
<menu xmlns:android="http://schemas.android.com/apk/res/android">

    <group android:checkableBehavior="single">
        <item
            android:id="@+id/nav_home"
            android:icon="@drawable/ic_dashboard"
            android:title="Home"/>
        <item
            android:id="@+id/nav_messages"
            android:icon="@drawable/ic_event"
            android:title="Messages"/>
        <item
            android:id="@+id/nav_friends"
            android:icon="@drawable/ic_headset"
            android:title="Friends"/>
        <item
            android:id="@+id/nav_discussion"
            android:icon="@drawable/ic_forum"
            android:title="Discussion"/>
    </group>

    <item android:title="Sub items">
        <menu>
            <item
                android:icon="@drawable/ic_dashboard"
                android:title="Sub item 1"/>
            <item
                android:icon="@drawable/ic_forum"
                android:title="Sub item 2"/>
        </menu>
    </item>

</menu>
别放错文件夹哈~
布局文件写完了,基本就好了,是不是很爽~看似复杂的效果,写写布局文件就ok。
ps:默认的颜色很多是从当前的主题中提取的,比如icon的stateColor,当然你也可以通过以下属性修改部分样式:
app:itemIconTint=""
app:itemBackground=""
app:itemTextColor=""
(二)Activity
最后是Activity:
package com.imooc.testandroid;

import android.os.Bundle;
import android.support.design.widget.NavigationView;
import android.support.v4.widget.DrawerLayout;
import android.support.v7.app.ActionBar;
import android.support.v7.app.ActionBarActivity;
import android.support.v7.widget.Toolbar;
import android.view.MenuItem;


public class NavigationViewActivity extends ActionBarActivity
{

    private DrawerLayout mDrawerLayout;
    private NavigationView mNavigationView;

    @Override
    protected void onCreate(Bundle savedInstanceState)
    {
        super.onCreate(savedInstanceState);
        setContentView(R.layout.activity_navigation_view);

        mDrawerLayout = (DrawerLayout) findViewById(R.id.id_drawer_layout);
        mNavigationView = (NavigationView) findViewById(R.id.id_nv_menu);

        Toolbar toolbar = (Toolbar) findViewById(R.id.id_toolbar);
        setSupportActionBar(toolbar);

        final ActionBar ab = getSupportActionBar();
        ab.setHomeAsUpIndicator(R.drawable.ic_menu);
        ab.setDisplayHomeAsUpEnabled(true);

        setupDrawerContent(mNavigationView);


    }

    private void setupDrawerContent(NavigationView navigationView)
    {
        navigationView.setNavigationItemSelectedListener(

                new NavigationView.OnNavigationItemSelectedListener()
                {

                    @Override
                    public boolean onNavigationItemSelected(MenuItem menuItem)
                    {
                        menuItem.setChecked(true);
                        mDrawerLayout.closeDrawers();
                        return true;
                    }
                });
    }


    @Override
    public boolean onCreateOptionsMenu(Menu menu)
    {
        // Inflate the menu; this adds items to the action bar if it is present.
        getMenuInflater().inflate(R.menu.menu_navigation_view, menu);
        return true;
    }

    @Override
    public boolean onOptionsItemSelected(MenuItem item)
    {
        if(item.getItemId() == android.R.id.home)
        {
            mDrawerLayout.openDrawer(GravityCompat.START);
            return true ;
        }
        return super.onOptionsItemSelected(item);
    }

}
我们在Activity里面可以通过navigationView去navigationView.setNavigationItemSelectedListener,当selected的时候,menuItem去setChecked(true)。
别忘了设置theme~
<resources>

    <!-- Base application theme. -->
    <style name="AppTheme" parent="Theme.AppCompat.Light.DarkActionBar">
        <!-- Customize your theme here. -->
    </style>

    <style name="Theme.DesignDemo" parent="Base.Theme.DesignDemo">
    </style>

    <style name="Base.Theme.DesignDemo" parent="Theme.AppCompat.Light.NoActionBar">
        <item name="colorPrimary">#673AB7</item>
        <item name="colorPrimaryDark">#512DA8</item>
        <item name="colorAccent">#FF4081</item>
        <item name="android:windowBackground">@color/window_background</item>
    </style>

</resources>


<color name="window_background">#FFF5F5F5</color>

 <activity
    android:name=".NavigationViewActivity"
    android:label="@string/title_activity_navigation_view"
    android:theme="@style/Theme.DesignDemo">
</activity>
ok,到此就搞定了~~
不过存在一个问题,此时你如果点击Sub items里面的Sub item,如果你期望当前选中应该是Sub item,你会发现不起作用。那怎么办呢?
(三)Sub Item支持Cheable
这里可以修改menu的配置文件:
<?xml version="1.0" encoding="utf-8"?>
<menu xmlns:android="http://schemas.android.com/apk/res/android">

    <group>
        <item
            android:id="@+id/nav_home"
            android:checkable="true"
            android:icon="@drawable/ic_dashboard"
            android:title="Home"/>
        <item
            android:id="@+id/nav_messages"
            android:checkable="true"
            android:icon="@drawable/ic_event"
            android:title="Messages"/>
        <item
            android:id="@+id/nav_friends"
            android:checkable="true"
            android:icon="@drawable/ic_headset"
            android:title="Friends"/>
        <item
            android:id="@+id/nav_discussion"
            android:checkable="true"
            android:icon="@drawable/ic_forum"
            android:title="Discussion"/>
    </group>

    <item android:title="Sub items">
        <menu>
            <item
                android:checkable="true"
                android:icon="@drawable/ic_dashboard"
                android:title="Sub item 1"/>
            <item
                android:checkable="true"
                android:icon="@drawable/ic_forum"
                android:title="Sub item 2"/>
        </menu>
    </item>

</menu>将android:checkableBehavior="single"去掉,然后给每个item项添加android:checkable="true"。
然后在代码中:
navigationView.setNavigationItemSelectedListener(

                new NavigationView.OnNavigationItemSelectedListener()
                {

                    private MenuItem mPreMenuItem;

                    @Override
                    public boolean onNavigationItemSelected(MenuItem menuItem)
                    {
                        if (mPreMenuItem != null) mPreMenuItem.setChecked(false);
                        menuItem.setChecked(true);
                        mDrawerLayout.closeDrawers();
                        mPreMenuItem = menuItem;
                        return true;
                    }
                });
存一下preMenuItem,手动切换。
效果:
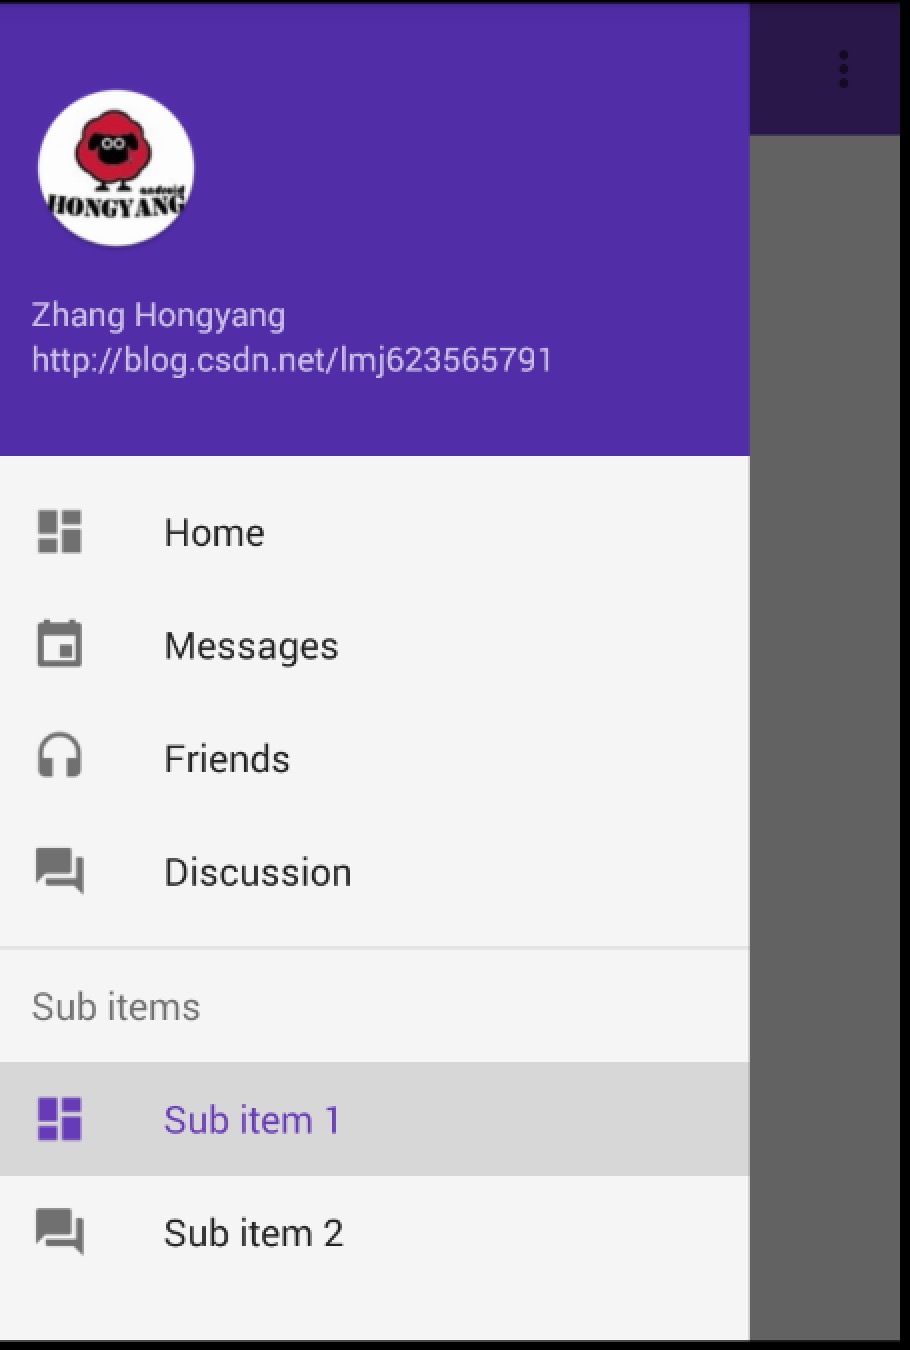
ok,哈~其实这个还是参考链接2里面的一个评论说的~~
到此用法就介绍完了有木有一点小激动~ 但是还有个问题,对于app,就像ActionBar最初的出现,一开始大家都欢欣鼓舞,后来发现app中多数情况下需要去定制,尼玛,是不是忽然觉得ActionBar太死板了,恶心死了(当然了现在有了ToolBar灵活度上好多了)对于上述NavigationView可能也会存在定制上的问题,比如我希望选中的Item左边有个高亮的竖线之类的效果。那么,针对于各种需求,想要能解决各种问题,最好的方式就是说对于NavigationView的效果自己可以实现。最好,我们就来看看NavigationView自己实现有多难?
三、自己实现NavigationView效果
其实NavigationView的实现非常简单,一个ListView就可以了,甚至都不需要去自定义,简单写一个Adapter就行了~~
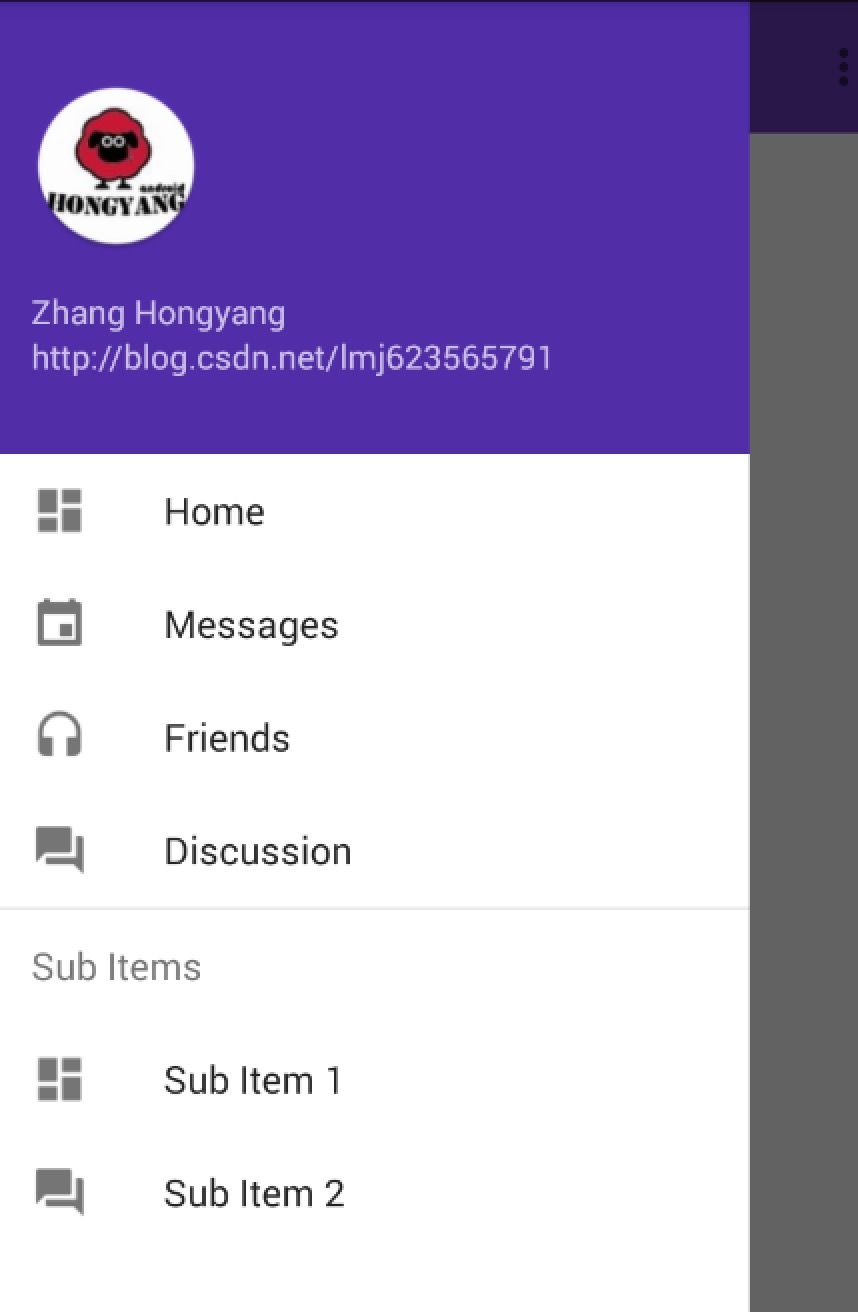
首先观察该图,有没有发现神奇之处,恩,你肯定发现不了,因为我们做的太像了。
其实这个图就是我通过ListView写的一个~是不是和原版很像(~哈~参考了源码的实现,当然像。)
接下来分析,如果说是ListView,那么Item的type肯定不止一种,那我们数一数种类:
- 带图标和文本的
- 仅仅是文本的 Sub Items
- 分割线
你会说还有顶部那个,顶部是headview呀~~
这么分析完成,是不是瞬间觉得没有难度了~
(一)首先布局文件
<?xml version="1.0" encoding="utf-8"?>
<android.support.v4.widget.DrawerLayout
    android:id="@+id/id_drawer_layout"
    xmlns:android="http://schemas.android.com/apk/res/android"
    xmlns:app="http://schemas.android.com/apk/res-auto"
    android:layout_width="match_parent"
    android:layout_height="match_parent"
    android:fitsSystemWindows="true"
    >

    <RelativeLayout
        android:layout_width="match_parent"
        android:layout_height="match_parent">

        <android.support.v7.widget.Toolbar
            android:id="@+id/id_toolbar"
            android:layout_width="match_parent"
            android:layout_height="?attr/actionBarSize"
            android:background="?attr/colorPrimary"
            app:layout_scrollFlags="scroll|enterAlways"
            app:popupTheme="@style/ThemeOverlay.AppCompat.Light"/>

        <TextView
            android:id="@+id/id_tv_content"
            android:layout_width="wrap_content"
            android:layout_height="wrap_content"
            android:layout_centerInParent="true"
            android:text="HelloWorld"
            android:textSize="30sp"/>
    </RelativeLayout>

    <ListView
        android:id="@+id/id_lv_left_menu"
        android:layout_width="match_parent"
        android:layout_height="match_parent"
        android:layout_gravity="start"
        android:paddingTop="0dp"
        android:background="#ffffffff"
        android:clipToPadding="false"
        android:divider="@null"
        android:listSelector="?attr/selectableItemBackground"
        />

</android.support.v4.widget.DrawerLayout>
布局文件上:和上文对比,我们仅仅把NavigationView换成了ListView.
下面注意了,一大波代码来袭.
(二) Activity
package com.imooc.testandroid;

public class NavListViewActivity extends ActionBarActivity
{
    private ListView mLvLeftMenu;
    private DrawerLayout mDrawerLayout;


    @Override
    protected void onCreate(Bundle savedInstanceState)
    {
        super.onCreate(savedInstanceState);
        setContentView(R.layout.activity_nav_list_view);

        mDrawerLayout = (DrawerLayout) findViewById(R.id.id_drawer_layout);
        mLvLeftMenu = (ListView) findViewById(R.id.id_lv_left_menu);

        Toolbar toolbar = (Toolbar) findViewById(R.id.id_toolbar);
        setSupportActionBar(toolbar);

        final ActionBar ab = getSupportActionBar();
        ab.setHomeAsUpIndicator(R.drawable.ic_menu);
        ab.setDisplayHomeAsUpEnabled(true);

        setUpDrawer();
    }

    private void setUpDrawer()
    {
        LayoutInflater inflater = LayoutInflater.from(this);
        mLvLeftMenu.addHeaderView(inflater.inflate(R.layout.header_just_username, mLvLeftMenu, false));
        mLvLeftMenu.setAdapter(new MenuItemAdapter(this));
    }

    @Override
    public boolean onCreateOptionsMenu(Menu menu)
    {
        // Inflate the menu; this adds items to the action bar if it is present.
        getMenuInflater().inflate(R.menu.menu_nav_list_view, menu);
        return true;
    }

    @Override
    public boolean onOptionsItemSelected(MenuItem item)
    {
        // Handle action bar item clicks here. The action bar will
        // automatically handle clicks on the Home/Up button, so long
        // as you specify a parent activity in AndroidManifest.xml.
        int id = item.getItemId();

        //noinspection SimplifiableIfStatement
        if (id == android.R.id.home)
        {
            mDrawerLayout.openDrawer(GravityCompat.START);
            return true;
        }

        return super.onOptionsItemSelected(item);
    }


}
直接看onCreate中的setUpDrawer(),可以看到我们首先去addHeadView,然后去setAdapter。
那么核心代码就是我们的Adapter了~~
(三)MenuItemAdapter
    public class LvMenuItem
    {
        public LvMenuItem(int icon, String name)
        {
            this.icon = icon;
            this.name = name;

            if (icon == NO_ICON && TextUtils.isEmpty(name))
            {
                type = TYPE_SEPARATOR;
            } else if (icon == NO_ICON)
            {
                type = TYPE_NO_ICON;
            } else
            {
                type = TYPE_NORMAL;
            }

            if (type != TYPE_SEPARATOR && TextUtils.isEmpty(name))
            {
                throw new IllegalArgumentException("you need set a name for a non-SEPARATOR item");
            }

            L.e(type + "");


        }

        public LvMenuItem(String name)
        {
            this(NO_ICON, name);
        }

        public LvMenuItem()
        {
            this(null);
        }

        private static final int NO_ICON = 0;
        public static final int TYPE_NORMAL = 0;
        public static final int TYPE_NO_ICON = 1;
        public static final int TYPE_SEPARATOR = 2;

        int type;
        String name;
        int icon;

    }

    public class MenuItemAdapter extends BaseAdapter
    {
        private final int mIconSize;
        private LayoutInflater mInflater;
        private Context mContext;

        public MenuItemAdapter(Context context)
        {
            mInflater = LayoutInflater.from(context);
            mContext = context;

            mIconSize = context.getResources().getDimensionPixelSize(R.dimen.drawer_icon_size);//24dp
        }

        private List<LvMenuItem> mItems = new ArrayList<LvMenuItem>(
                Arrays.asList(
                        new LvMenuItem(R.drawable.ic_dashboard, "Home"),
                        new LvMenuItem(R.drawable.ic_event, "Messages"),
                        new LvMenuItem(R.drawable.ic_headset, "Friends"),
                        new LvMenuItem(R.drawable.ic_forum, "Discussion"),
                        new LvMenuItem(),
                        new LvMenuItem("Sub Items"),
                        new LvMenuItem(R.drawable.ic_dashboard, "Sub Item 1"),
                        new LvMenuItem(R.drawable.ic_forum, "Sub Item 2")
                ));


        @Override
        public int getCount()
        {
            return mItems.size();
        }


        @Override
        public Object getItem(int position)
        {
            return mItems.get(position);
        }


        @Override
        public long getItemId(int position)
        {
            return position;
        }

        @Override
        public int getViewTypeCount()
        {
            return 3;
        }

        @Override
        public int getItemViewType(int position)
        {
            return mItems.get(position).type;
        }

        @Override
        public View getView(int position, View convertView, ViewGroup parent)
        {
            LvMenuItem item = mItems.get(position);
            switch (item.type)
            {
                case LvMenuItem.TYPE_NORMAL:
                    if (convertView == null)
                    {
                        convertView = mInflater.inflate(R.layout.design_drawer_item, parent,
                                false);
                    }
                    TextView itemView = (TextView) convertView;
                    itemView.setText(item.name);
                    Drawable icon = mContext.getResources().getDrawable(item.icon);
                    setIconColor(icon);
                    if (icon != null)
                    {
                        icon.setBounds(0, 0, mIconSize, mIconSize);
                        TextViewCompat.setCompoundDrawablesRelative(itemView, icon, null, null, null);
                    }

                    break;
                case LvMenuItem.TYPE_NO_ICON:
                    if (convertView == null)
                    {
                        convertView = mInflater.inflate(R.layout.design_drawer_item_subheader,
                                parent, false);
                    }
                    TextView subHeader = (TextView) convertView;
                    subHeader.setText(item.name);
                    break;
                case LvMenuItem.TYPE_SEPARATOR:
                    if (convertView == null)
                    {
                        convertView = mInflater.inflate(R.layout.design_drawer_item_separator,
                                parent, false);
                    }
                    break;
            }

            return convertView;
        }

        public void setIconColor(Drawable icon)
        {
            int textColorSecondary = android.R.attr.textColorSecondary;
            TypedValue value = new TypedValue();
            if (!mContext.getTheme().resolveAttribute(textColorSecondary, value, true))
            {
                return;
            }
            int baseColor = mContext.getResources().getColor(value.resourceId);
            icon.setColorFilter(baseColor, PorterDuff.Mode.MULTIPLY);
        }
    }
首先我们的每个Item对应于一个LvMenuItem,包含icon、name、type,可以看到我们的type分为3类。
那么adapter中代码就很简单了,多Item布局的写法。
这样就完成了,我们自己去书写NavigationView,是不是很简单~~如果你的app需要类似效果,但是又与NavigationView的效果并非一模一样,可以考虑按照上面的思路自己写一个。
最后贴一下用到的Item的布局文件:
- design_drawer_item_subheader.xml
<?xml version="1.0" encoding="utf-8"?>
<TextView xmlns:android="http://schemas.android.com/apk/res/android"
          android:layout_width="match_parent"
          android:layout_height="?attr/listPreferredItemHeightSmall"
          android:gravity="center_vertical|start"
          android:maxLines="1"
          android:paddingLeft="?attr/listPreferredItemPaddingLeft"
          android:paddingRight="?attr/listPreferredItemPaddingRight"
          android:textAppearance="?attr/textAppearanceListItem"
          android:textColor="?android:textColorSecondary"/>
- design_drawer_item_separator.xml
<?xml version="1.0" encoding="utf-8"?>
<FrameLayout xmlns:android="http://schemas.android.com/apk/res/android"
             android:layout_width="match_parent"
             android:layout_height="wrap_content">

    <View android:layout_width="match_parent"
          android:layout_height="1dp"
          android:background="?android:attr/listDivider"/>

</FrameLayout>
- design_drawer_item,xml:
<?xml version="1.0" encoding="utf-8"?>
<TextView
        xmlns:android="http://schemas.android.com/apk/res/android"
        android:layout_width="match_parent"
        android:layout_height="?attr/listPreferredItemHeightSmall"
        android:paddingLeft="?attr/listPreferredItemPaddingLeft"
        android:paddingRight="?attr/listPreferredItemPaddingRight"
        android:drawablePadding="32dp"
        android:gravity="center_vertical|start"
        android:maxLines="1"
        android:textAppearance="?attr/textAppearanceListItem"
android:textColor="?android:attr/textColorPrimary"/>ok,其实上述ListView的写法也正是NavigationView的源码实现~~item的布局文件直接从源码中拖出来的,还是爽爽哒~
源码点击下载
~~hava a nice day ~~
微信公众号:hongyangAndroid
(欢迎关注,第一时间推送博文信息)
参考链接
- https://guides.codepath.com/android/Fragment-Navigation-Drawer
- http://antonioleiva.com/navigation-view/
- http://android-developers.blogspot.com/2015/05/android-design-support-library.html
转载请标明出处:
[http://blog.csdn.net/lmj623565791/article/details/46678867](http://blog.csdn.net/lmj623565791/article/details/46678867;
本文出自:【张鸿洋的博客】
哈,跟随着上篇Android 自己实现 NavigationView [Design Support Library(1)]之后,下面介绍个Design Support Library中极其简单的控件:FloatingActionButton。
一、简单使用
布局:
        <android.support.design.widget.FloatingActionButton
            android:layout_width="wrap_content"
            android:layout_height="wrap_content"
            android:layout_gravity="right|bottom"
            android:src="@drawable/ic_discuss"
            />
使用非常简单,直接当成ImageView来用即可。
效果图:
可以看到我们的FloatingActionButton正常显示的情况下有个填充的颜色,有个阴影;点击的时候会有一个rippleColor,并且阴影的范围可以增大,那么问题来了:
-
这个填充色以及rippleColor如何自定义呢?
默认的颜色取的是,theme中的colorAccent,所以你可以在style中定义colorAccent。
colorAccent 对应EditText编辑时、RadioButton选中、CheckBox等选中时的颜色。详细请参考:Android 5.x Theme 与 ToolBar 实战
rippleColor默认取的是theme中的colorControlHighlight。
我们也可以直接用过属性定义这两个的颜色:
app:backgroundTint="#ff87ffeb" app:rippleColor="#33728dff" -
立体感有没有什么属性可以动态指定?
和立体感相关有两个属性,elevation和pressedTranslationZ,前者用户设置正常显示的阴影大小;后者是点击时显示的阴影大小。大家可以自己设置尝试下。
综上,如果你希望自定义颜色、以及阴影大小,可以按照如下的方式(当然,颜色你也可以在theme中设置):
<android.support.design.widget.FloatingActionButton
android:layout_width="wrap_content"
android:layout_height="wrap_content"
android:layout_gravity="right|bottom"
android:src="@drawable/ic_discuss"
app:backgroundTint="#ff87ffeb"
app:rippleColor="#33728dff"
app:elevation="6dp"
app:pressedTranslationZ="12dp"
/>至于点击事件,和View的点击事件一致就不说了~~
二、5.x存在的一些问题
在5.x的设备上运行,你会发现一些问题(测试系统5.0):
- 木有阴影
记得设置app:borderWidth="0dp"。
- 按上述设置后,阴影出现了,但是竟然有矩形的边界(未设置margin时,可以看出)
需要设置一个margin的值。在5.0之前,会默认就有一个外边距(不过并非是margin,只是效果相同)。
so,良好的实践是:
- 添加属性
app:borderWidth="0dp" - 对于5.x设置一个合理的margin
如下:
<android.support.design.widget.FloatingActionButton
android:layout_width="wrap_content"
android:layout_height="wrap_content"
android:layout_gravity="end|bottom"
app:borderWidth="0dp"
android:layout_margin="@dimen/fab_margin"
android:src="@drawable/ic_headset" />values
<dimen name="fab_margin">0dp</dimen>values-v21
<dimen name="fab_margin">16dp</dimen>三、简单实现FloatActionButton
参考参考资料4
可以通过drawable来实现一个简单的阴影效果:
drawable/fab.xml
<?xml version="1.0" encoding="utf-8"?>
<selector xmlns:android="http://schemas.android.com/apk/res/android">
<item android:state_pressed="true">
<layer-list>
<!-- Shadow -->
<item android:top="1dp" android:right="1dp">
<layer-list>
<item>
<shape android:shape="oval">
<solid android:color="#08000000"/>
<padding
android:bottom="3px"
android:left="3px"
android:right="3px"
android:top="3px"
/>
</shape>
</item>
<item>
<shape android:shape="oval">
<solid android:color="#09000000"/>
<padding
android:bottom="2px"
android:left="2px"
android:right="2px"
android:top="2px"
/>
</shape>
</item>
<item>
<shape android:shape="oval">
<solid android:color="#10000000"/>
<padding
android:bottom="2px"
android:left="2px"
android:right="2px"
android:top="2px"
/>
</shape>
</item>
<item>
<shape android:shape="oval">
<solid android:color="#11000000"/>
<padding
android:bottom="1px"
android:left="1px"
android:right="1px"
android:top="1px"
/>
</shape>
</item>
<item>
<shape android:shape="oval">
<solid android:color="#12000000"/>
<padding
android:bottom="1px"
android:left="1px"
android:right="1px"
android:top="1px"
/>
</shape>
</item>
<item>
<shape android:shape="oval">
<solid android:color="#13000000"/>
<padding
android:bottom="1px"
android:left="1px"
android:right="1px"
android:top="1px"
/>
</shape>
</item>
<item>
<shape android:shape="oval">
<solid android:color="#14000000"/>
<padding
android:bottom="1px"
android:left="1px"
android:right="1px"
android:top="1px"
/>
</shape>
</item>
<item>
<shape android:shape="oval">
<solid android:color="#15000000"/>
<padding
android:bottom="1px"
android:left="1px"
android:right="1px"
android:top="1px"
/>
</shape>
</item>
<item>
<shape android:shape="oval">
<solid android:color="#16000000"/>
<padding
android:bottom="1px"
android:left="1px"
android:right="1px"
android:top="1px"
/>
</shape>
</item>
</layer-list>
</item>
<!-- Blue button pressed -->
<item>
<shape android:shape="oval">
<solid android:color="#90CAF9"/>
</shape>
</item>
</layer-list>
</item>
<item android:state_enabled="true">
<layer-list>
<!-- Shadow -->
<item android:top="2dp" android:right="1dp">
<layer-list>
<item>
<shape android:shape="oval">
<solid android:color="#08000000"/>
<padding
android:bottom="4px"
android:left="4px"
android:right="4px"
android:top="4px"
/>
</shape>
</item>
<item>
<shape android:shape="oval">
<solid android:color="#09000000"/>
<padding
android:bottom="2px"
android:left="2px"
android:right="2px"
android:top="2px"
/>
</shape>
</item>
<item>
<shape android:shape="oval">
<solid android:color="#10000000"/>
<padding
android:bottom="2px"
android:left="2px"
android:right="2px"
android:top="2px"
/>
</shape>
</item>
<item>
<shape android:shape="oval">
<solid android:color="#11000000"/>
<padding
android:bottom="1px"
android:left="1px"
android:right="1px"
android:top="1px"
/>
</shape>
</item>
<item>
<shape android:shape="oval">
<solid android:color="#12000000"/>
<padding
android:bottom="1px"
android:left="1px"
android:right="1px"
android:top="1px"
/>
</shape>
</item>
<item>
<shape android:shape="oval">
<solid android:color="#13000000"/>
<padding
android:bottom="1px"
android:left="1px"
android:right="1px"
android:top="1px"
/>
</shape>
</item>
<item>
<shape android:shape="oval">
<solid android:color="#14000000"/>
<padding
android:bottom="1px"
android:left="1px"
android:right="1px"
android:top="1px"
/>
</shape>
</item>
<item>
<shape android:shape="oval">
<solid android:color="#15000000"/>
<padding
android:bottom="1px"
android:left="1px"
android:right="1px"
android:top="1px"
/>
</shape>
</item>
<item>
<shape android:shape="oval">
<solid android:color="#16000000"/>
<padding
android:bottom="1px"
android:left="1px"
android:right="1px"
android:top="1px"
/>
</shape>
</item>
</layer-list>
</item>
<!-- Blue button -->
<item>
<shape android:shape="oval">
<solid android:color="#03A9F4"/>
</shape>
</item>
</layer-list>
</item>
</selector>
一个相当长的drawable,不过并不复杂,也比较好记忆。首先为一个View添加阴影,使用的是color从#08000000到#1500000,取的padding值为4、2、2、1…1;这样就可以为一个View的四边都添加上阴影效果。
当然了,为了阴影更加逼真,把上述的Layer-list又包含到了一个item中,并为该item设置了top和right,为了让左,下的阴影效果比上、右重,当然你可以设置其他两边,改变效果。
最后添加一个item设置为按钮的填充色(注意该item的层级)。
该drawable为一个selector,所以press和默认状态写了两次基本一致的代码,除了填充色不同。
使用:
<ImageButton
android:layout_width="56dp"
android:layout_height="56dp"
android:layout_gravity="bottom|right"
android:layout_margin="20dp"
android:background="@drawable/fab"
android:src="@drawable/ic_done"
/>效果图:

ok,到此FloatActionButton就介绍完毕啦~~有兴趣的话,也可以从github挑选个库看看别人的实现。
ok~
新浪微博
微信公众号:hongyangAndroid
(欢迎关注,第一时间推送博文信息)
参考资料
- http://antonioleiva.com/floating-action-button/
- https://code.google.com/p/android/issues/detail?id=175067
- https://github.com/chrisbanes/cheesesquare
- http://www.myandroidsolutions.com/2015/01/01/android-floating-action-button-fab-tutorial/
转载请标明出处:
http://blog.csdn.net/lmj623565791/article/details/46596109;
本文出自:【张鸿洋的博客】
一、概述
对于MVP(Model View Presenter),大多数人都能说出一二:“MVC的演化版本”,“让Model和View完全解耦”等等。本篇博文仅是为了做下记录,提出一些自己的看法,和帮助大家如何针对一个Activity页面去编写针对MVP风格的代码。
对于MVP,我的内心有一个问题:
为何这个模式出来后,就能被广大的Android的程序员接受呢?
问了些程序员,他们对于MVP的普遍的认识是:“代码很清晰,不过增加了很多类”。我在第一次看到MVP的时候,看了一个demo,看完以后觉得非常nice(但是回过头来,自己想个例子写,就头疼写不出来,当然这在后文会说)。nice的原因还是因为,这个模式的确让代码的清晰度有了很大的提升。
那么,提升一般都是对比出来的,回顾下,没有应用MVP的代码结构。很多人说明显是MVC么:
- View:对应于布局文件
- Model:业务逻辑和实体模型
- Controllor:对应于Activity
看起来的确像那么回事,但是细细的想想这个View对应于布局文件,其实能做的事情特别少,实际上关于该布局文件中的数据绑定的操作,事件处理的代码都在Activity中,造成了Activity既像View又像Controller(当然了Data-Binder的出现,可能会让View更像View吧)。这可能也就是为何,在该文中有一句这样的话:
Most of the modern Android applications just use View-Model architecture,everything is connected with Activity.
而当将架构改为MVP以后,Presenter的出现,将Actvity视为View层,Presenter负责完成View层与Model层的交互。现在是这样的:
- View 对应于Activity,负责View的绘制以及与用户交互
- Model 依然是业务逻辑和实体模型
- Presenter 负责完成View于Model间的交互
ok,先简单了解下,文中会有例子到时候可以直观的感受下。
小总结下,也就是说,之所以让人觉得耳目一新,是因为这次的跳跃是从并不标准的MVC到MVP的一个转变,减少了Activity的职责,简化了Activity中的代码,将复杂的逻辑代码提取到了Presenter中进行处理。与之对应的好处就是,耦合度更低,更方便的进行测试。借用两张图(出自:该文),代表上述的转变:
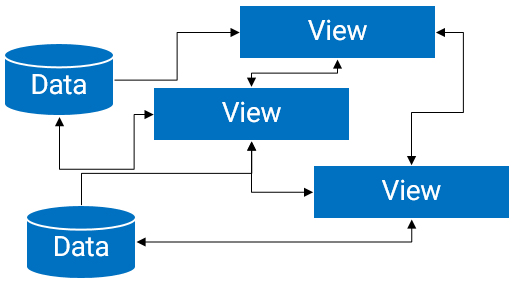
转变为:
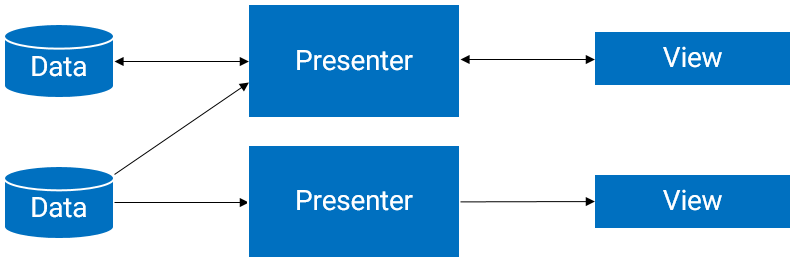
二、MVP 与 MVC 区别
ok,上面说了一堆理论,下面我们还是需要看一看MVC与MVP的一个区别,请看下图(来自:本文):
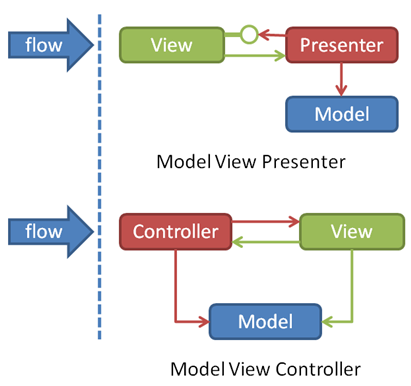
其实最明显的区别就是,MVC中是允许Model和View进行交互的,而MVP中很明显,Model与View之间的交互由Presenter完成。还有一点就是Presenter与View之间的交互是通过接口的(代码中会体现)。
还有一堆概念性的东西,以及优点就略了,有兴趣自行百度。下面还是通过一些简单的需求来展示如何编写MVP的demo。
三、Simple Login Demo
效果图:
看到这样的效果,先看下完工后的项目结构:
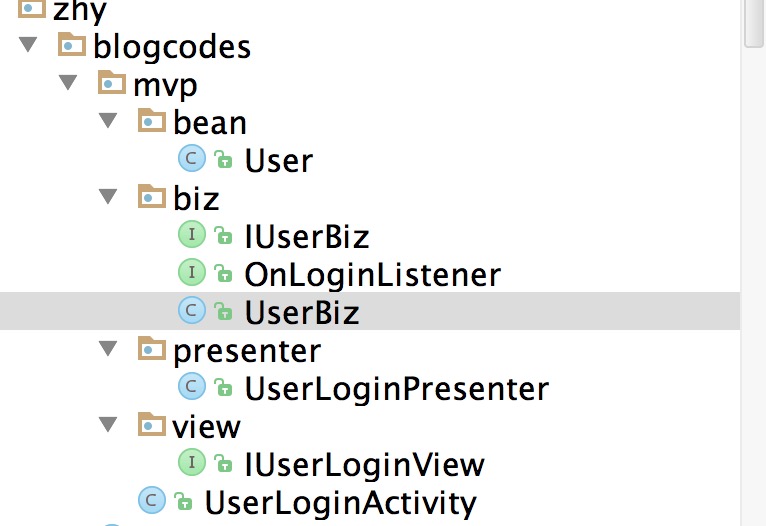
ok,接下来开始一步一步的编写思路。
(一)Model
首先实体类User不用考虑这个肯定有,其次从效果图可以看到至少有一个业务方法login(),这两点没什么难度,我们首先完成:
package com.zhy.blogcodes.mvp.bean;
/**
* Created by zhy on 15/6/18.
*/
public class User
{
private String username ;
private String password ;
public String getUsername()
{
return username;
}
public void setUsername(String username)
{
this.username = username;
}
public String getPassword()
{
return password;
}
public void setPassword(String password)
{
this.password = password;
}
}
package com.zhy.blogcodes.mvp.biz;
/**
* Created by zhy on 15/6/19.
*/
public interface IUserBiz
{
public void login(String username, String password, OnLoginListener loginListener);
}
package com.zhy.blogcodes.mvp.biz;
import com.zhy.blogcodes.mvp.bean.User;
/**
* Created by zhy on 15/6/19.
*/
public class UserBiz implements IUserBiz
{
@Override
public void login(final String username, final String password, final OnLoginListener loginListener)
{
//模拟子线程耗时操作
new Thread()
{
@Override
public void run()
{
try
{
Thread.sleep(2000);
} catch (InterruptedException e)
{
e.printStackTrace();
}
//模拟登录成功
if ("zhy".equals(username) && "123".equals(password))
{
User user = new User();
user.setUsername(username);
user.setPassword(password);
loginListener.loginSuccess(user);
} else
{
loginListener.loginFailed();
}
}
}.start();
}
}
package com.zhy.blogcodes.mvp.biz;
import com.zhy.blogcodes.mvp.bean.User;
/**
* Created by zhy on 15/6/19.
*/
public interface OnLoginListener
{
void loginSuccess(User user);
void loginFailed();
}
实体类不用说,至于业务类,我们抽取了一个接口,一个实现类这也很常见~~login方法,一般肯定是连接服务器的,是个耗时操作,所以我们开辟了子线程,Thread.sleep(2000)模拟了耗时,由于是耗时操作,所以我们通过一个回调接口来通知登录的状态。
其实这里还是比较好写的,因为和传统写法没区别。
(二) View
上面我们说过,Presenter与View交互是通过接口。所以我们这里需要定义一个ILoginView,难点就在于应该有哪些方法,我们看一眼效果图:
可以看到我们有两个按钮,一个是login,一个是clear;
login说明了要有用户名、密码,那么对应两个方法:
String getUserName();
String getPassword();再者login是个耗时操作,我们需要给用户一个友好的提示,一般就是操作ProgressBar,所以再两个:
void showLoading();
void hideLoading();login当然存在登录成功与失败的处理,我们主要看成功我们是跳转Activity,而失败可能是去给个提醒:
void toMainActivity(User user);
void showFailedError();ok,login这个方法我们分析完了~~还剩个clear那就简单了:
void clearUserName();
void clearPassword();综上,接口完整为:
package com.zhy.blogcodes.mvp.view;
import com.zhy.blogcodes.mvp.bean.User;
/**
* Created by zhy on 15/6/19.
*/
public interface IUserLoginView
{
String getUserName();
String getPassword();
void clearUserName();
void clearPassword();
void showLoading();
void hideLoading();
void toMainActivity(User user);
void showFailedError();
}有了接口,实现就太好写了~~~
总结下,对于View的接口,去观察功能上的操作,然后考虑:
- 该操作需要什么?(getUserName, getPassword)
- 该操作的结果,对应的反馈?(toMainActivity, showFailedError)
- 该操作过程中对应的友好的交互?(showLoading, hideLoading)
下面贴一下我们的View的实现类,哈,其实就是Activity,文章开始就说过,MVP中的View其实就是Activity。
package com.zhy.blogcodes.mvp;
import android.os.Bundle;
import android.support.v7.app.ActionBarActivity;
import android.view.View;
import android.widget.Button;
import android.widget.EditText;
import android.widget.ProgressBar;
import android.widget.Toast;
import com.zhy.blogcodes.R;
import com.zhy.blogcodes.mvp.bean.User;
import com.zhy.blogcodes.mvp.presenter.UserLoginPresenter;
import com.zhy.blogcodes.mvp.view.IUserLoginView;
public class UserLoginActivity extends ActionBarActivity implements IUserLoginView
{
private EditText mEtUsername, mEtPassword;
private Button mBtnLogin, mBtnClear;
private ProgressBar mPbLoading;
private UserLoginPresenter mUserLoginPresenter = new UserLoginPresenter(this);
@Override
protected void onCreate(Bundle savedInstanceState)
{
super.onCreate(savedInstanceState);
setContentView(R.layout.activity_user_login);
initViews();
}
private void initViews()
{
mEtUsername = (EditText) findViewById(R.id.id_et_username);
mEtPassword = (EditText) findViewById(R.id.id_et_password);
mBtnClear = (Button) findViewById(R.id.id_btn_clear);
mBtnLogin = (Button) findViewById(R.id.id_btn_login);
mPbLoading = (ProgressBar) findViewById(R.id.id_pb_loading);
mBtnLogin.setOnClickListener(new View.OnClickListener()
{
@Override
public void onClick(View v)
{
mUserLoginPresenter.login();
}
});
mBtnClear.setOnClickListener(new View.OnClickListener()
{
@Override
public void onClick(View v)
{
mUserLoginPresenter.clear();
}
});
}
@Override
public String getUserName()
{
return mEtUsername.getText().toString();
}
@Override
public String getPassword()
{
return mEtPassword.getText().toString();
}
@Override
public void clearUserName()
{
mEtUsername.setText("");
}
@Override
public void clearPassword()
{
mEtPassword.setText("");
}
@Override
public void showLoading()
{
mPbLoading.setVisibility(View.VISIBLE);
}
@Override
public void hideLoading()
{
mPbLoading.setVisibility(View.GONE);
}
@Override
public void toMainActivity(User user)
{
Toast.makeText(this, user.getUsername() +
" login success , to MainActivity", Toast.LENGTH_SHORT).show();
}
@Override
public void showFailedError()
{
Toast.makeText(this,
"login failed", Toast.LENGTH_SHORT).show();
}
}对于在Activity中实现我们上述定义的接口,是一件很容易的事,毕竟接口引导我们去完成。
最后看我们的Presenter。
(三)Presenter
Presenter是用作Model和View之间交互的桥梁,那么应该有什么方法呢?
其实也是主要看该功能有什么操作,比如本例,两个操作:login和clear。
package com.zhy.blogcodes.mvp.presenter;
import android.os.Handler;
import com.zhy.blogcodes.mvp.bean.User;
import com.zhy.blogcodes.mvp.biz.IUserBiz;
import com.zhy.blogcodes.mvp.biz.OnLoginListener;
import com.zhy.blogcodes.mvp.biz.UserBiz;
import com.zhy.blogcodes.mvp.view.IUserLoginView;
/**
* Created by zhy on 15/6/19.
*/
public class UserLoginPresenter
{
private IUserBiz userBiz;
private IUserLoginView userLoginView;
private Handler mHandler = new Handler();
public UserLoginPresenter(IUserLoginView userLoginView)
{
this.userLoginView = userLoginView;
this.userBiz = new UserBiz();
}
public void login()
{
userLoginView.showLoading();
userBiz.login(userLoginView.getUserName(), userLoginView.getPassword(), new OnLoginListener()
{
@Override
public void loginSuccess(final User user)
{
//需要在UI线程执行
mHandler.post(new Runnable()
{
@Override
public void run()
{
userLoginView.toMainActivity(user);
userLoginView.hideLoading();
}
});
}
@Override
public void loginFailed()
{
//需要在UI线程执行
mHandler.post(new Runnable()
{
@Override
public void run()
{
userLoginView.showFailedError();
userLoginView.hideLoading();
}
});
}
});
}
public void clear()
{
userLoginView.clearUserName();
userLoginView.clearPassword();
}
}
注意上述代码,我们的presenter完成二者的交互,那么肯定需要二者的实现类。大致就是从View中获取需要的参数,交给Model去执行业务方法,执行的过程中需要的反馈,以及结果,再让View进行做对应的显示。
ok,拿到一个例子经过上述的分解基本就能完成。以上纯属个人见解,欢迎讨论和吐槽~ have a nice day ~。
微信公众号:hongyangAndroid
(欢迎关注,第一时间推送博文信息)
参考资料
- https://github.com/zhengxiaopeng/Rocko-Android-Demos/tree/master/android-mvp
- https://github.com/antoniolg/androidmvp
- https://github.com/pedrovgs/EffectiveAndroidUI
- http://zhengxiaopeng.com/2015/02/06/Android%E4%B8%AD%E7%9A%84MVP/
- http://magenic.com/Blog/Post/6/An-MVP-Pattern-for-Android
- http://antonioleiva.com/mvp-android/
- http://konmik.github.io/introduction-to-model-view-presenter-on-android.html


 605
605

 被折叠的 条评论
为什么被折叠?
被折叠的 条评论
为什么被折叠?
 到【灌水乐园】发言


