


找到属于你的适配器,让你的控件展现更佳。
重要的更新公告
GDPU小伙伴可看,前端跟移动端尽量周更一篇,大家觉得哪个更难可以在上一个评论区进行留言哦。
RecyclerView控件
1.PC排名页界面设计
要求:排名界面上部分为表头(用TextView)下部分为列表(用RecyclerView或者ListView)。其中,每个列表项目的搜索指数自动拉伸占满屏幕宽度,文字对齐,能够适配不同的屏幕宽度。排名为TextView,PC品牌名为TextView,搜索指数为TextView
(1)排名数字需要控制字体大小
(2)PC品牌名称需要控制字体大小
(3)为美观,整个列表左右与屏幕需要有适当的空隙
2.使用RecyclerView
新建ListActivity,在ListActivity中加载题目1中的布局。填充图1中显示的列表数据。当点击条目时跳转到ItemDetailActivity并显示条目的名称等信息。
首先,在模块文件app的build.gradle添加RecyclerView依赖库。想用更便捷的视图绑定也可在andriod项里加上buildFeatures {viewBinding = true },用了视图绑定后,编写的xml文件名将会转换命名让后端kotlin识别到,如a_ball在kotlin即ABoll。
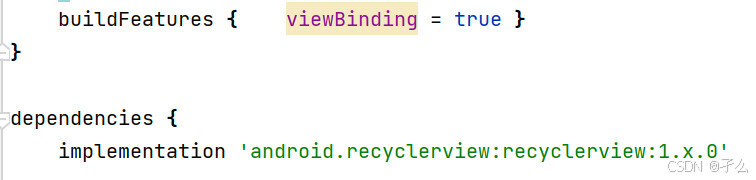
配置好依赖项后,点击sync now进行更新,然后可以看一下控制台有没有报错。要是有报错,很大概率是哪个配置项的版本出现的问题。
接着,在布局文件中添加RecyclerView控件。
<LinearLayout
    xmlns:android="http://schemas.android.com/apk/res/android"
    android:layout_width="match_parent"
    android:layout_height="match_parent"
    android:orientation="vertical"
    android:padding="16dp">

    <!-- 表头 -->
    <LinearLayout
        android:layout_width="match_parent"
        android:layout_height="wrap_content"
        android:orientation="horizontal"
        android:layout_marginBottom="16dp">

        <TextView
            android:id="@+id/header_rank"
            android:layout_width="0dp"
            android:layout_height="wrap_content"
            android:layout_weight="1"
            android:text="排名"
            android:textSize="18sp"
            android:textStyle="bold" />

        <TextView
            android:id="@+id/header_search_index"
            android:layout_width="0dp"
            android:layout_height="wrap_content"
            android:layout_weight="1"
            android:text="搜索指数"
            android:textSize="18sp"
            android:textStyle="bold"
            android:gravity="end" />
    </LinearLayout>

    <!-- RecyclerView -->
    <androidx.recyclerview.widget.RecyclerView
        android:id="@+id/recyclerView"
        android:layout_width="match_parent"
        android:layout_height="0dp"
        android:layout_weight="1" />

</LinearLayout>
然后,这只是页面的静态布局,还要为RecyclerView加子项布局,便于数据视图绑定。
<LinearLayout
    xmlns:android="http://schemas.android.com/apk/res/android"
    android:layout_width="match_parent"
    android:layout_height="wrap_content"
    android:orientation="horizontal"
    android:padding="8dp"
    android:gravity="center_vertical">

    <!-- 排名部分 -->
    <LinearLayout
        android:layout_width="0dp"
        android:layout_height="wrap_content"
        android:layout_weight="1"
        android:orientation="horizontal"
        android:gravity="center_vertical">

        <TextView
            android:id="@+id/rank"
            android:layout_width="wrap_content"
            android:layout_height="wrap_content"
            android:minWidth="30dp"
            android:background="@drawable/small_square"
            android:padding="4dp"
            android:text="1"
            android:textSize="16sp"
            android:textStyle="bold"
            android:gravity="center"/>

        <TextView
            android:id="@+id/brandName"
            android:layout_width="wrap_content"
            android:layout_height="wrap_content"
            android:layout_marginStart="8dp"
            android:text="品牌名称"
            android:textSize="16sp"
            android:textStyle="bold" />
    </LinearLayout>

    <!-- 搜索指数部分 -->
    <LinearLayout
        android:layout_width="0dp"
        android:layout_height="wrap_content"
        android:layout_weight="1"
        android:orientation="horizontal"
        android:gravity="end|center_vertical">

        <TextView
            android:id="@+id/searchIndex"
            android:layout_width="wrap_content"
            android:layout_height="wrap_content"
            android:text="53540"
            android:textColor="@android:color/darker_gray"
            android:textSize="16sp"
            android:textStyle="bold" /> <!-- 添加 textStyle -->

        <TextView
            android:layout_width="wrap_content"
            android:layout_height="wrap_content"
            android:layout_marginStart="2dp"
            android:text="-"
            android:textColor="@android:color/holo_blue_dark"
            android:textSize="20sp" />
    </LinearLayout>
</LinearLayout>
这里用了个小方格的样式,在drawable下写一个xml即可。
<shape xmlns:android="http://schemas.android.com/apk/res/android"
    android:shape="rectangle">
    <solid android:color="#ADD8E6" />
    <corners android:radius="2dp" />
    <size android:width="10dp" android:height="10dp" />
</shape>
做好视图后,定义实体类,这里类似JavaBean。
data class PCBrand(
    val rank: Int,
    val brandName: String,
    val searchIndex: Int
)
然后创建一个Adapter类适配器进行数据与视图的绑定,这里要创建一个ViewHolder类进行获取视图的控件,然后其它的方法就是传数据绑定视图了。这里没有用视图绑定就是findViewById进行获取。
import android.content.Intent
import android.view.LayoutInflater
import android.view.ViewGroup
import androidx.recyclerview.widget.RecyclerView
import com.example.t5.databinding.ItemPcRankingBinding

class RankingAdapter( val pcList: List<PCBrand>) : RecyclerView.Adapter<RankingAdapter.ViewHolder>() {

    inner class ViewHolder( val binding: ItemPcRankingBinding) : RecyclerView.ViewHolder(binding.root) {
        fun bind(pc: PCBrand) {
            binding.rank.text = pc.rank.toString()
            binding.brandName.text = pc.brandName
            binding.searchIndex.text = pc.searchIndex.toString()

            // 设置点击监听器
            binding.root.setOnClickListener {
                val context = binding.root.context
                val intent = Intent(context, ItemDetailActivity::class.java).apply {
                    putExtra("brandName", pc.brandName)
                    putExtra("rank", pc.rank)
                    putExtra("searchIndex", pc.searchIndex)
                }
                context.startActivity(intent)
            }
        }
    }

    override fun onCreateViewHolder(parent: ViewGroup, viewType: Int): ViewHolder {
        val binding = ItemPcRankingBinding.inflate(LayoutInflater.from(parent.context), parent, false)
        return ViewHolder(binding)
    }

    override fun onBindViewHolder(holder: ViewHolder, position: Int) {
        holder.bind(pcList[position])
    }

    override fun getItemCount() = pcList.size
}
接着就可以写主活动 ,其中要创建一个LayoutManager类并设置给RecyclerView 将Adapter设置给RecyclerView,初始化写入数据操作也可在这里进行。
import android.os.Bundle
import androidx.appcompat.app.AppCompatActivity
import androidx.recyclerview.widget.LinearLayoutManager
import com.example.t5.databinding.ActivityRankingBinding
class ListActivity : AppCompatActivity() {
private lateinit var binding: ActivityRankingBinding
private lateinit var adapter: RankingAdapter
private val pcList = mutableListOf<PCBrand>()
override fun onCreate(savedInstanceState: Bundle?) {
super.onCreate(savedInstanceState)
binding = ActivityRankingBinding.inflate(layoutInflater)
setContentView(binding.root)
// 设置 RecyclerView
binding.recyclerView.layoutManager = LinearLayoutManager(this)
val pcList = ArrayList<PCBrand>() // 初始化 pcList
val adapter = RankingAdapter(pcList)
binding.recyclerView.adapter = adapter
// 示例数据
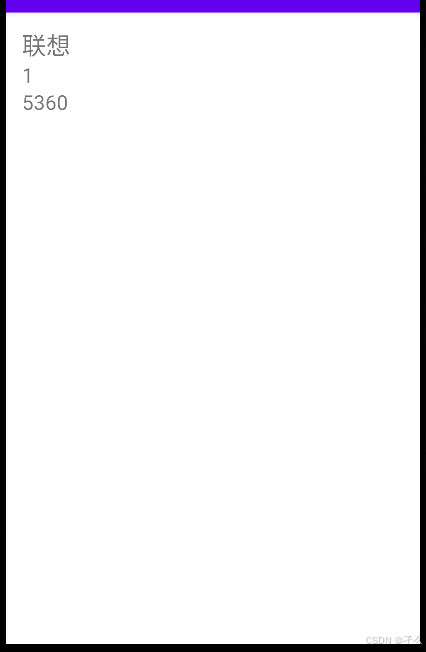
pcList.add(PCBrand(1, "联想", 5360))
pcList.add(PCBrand(2, "戴尔", 3860))
pcList.add(PCBrand(3, "惠普", 3290))
pcList.add(PCBrand(4, "苹果", 3000))
pcList.add(PCBrand(5, "华硕", 2800))
pcList.add(PCBrand(6, "宏碁", 2100))
pcList.add(PCBrand(7, "索尼", 1150))
pcList.add(PCBrand(8, "三星", 1300))
pcList.add(PCBrand(9, "神舟", 900))
pcList.add(PCBrand(10, "东芝", 700))
adapter.notifyDataSetChanged() // 更新适配器
}
}
这样一套下来,即可把这个大致的排名界面做好了。感觉相比web的三大件是不是复杂不少,要是用js就是用dom直接获取元素然后进行写入,样式在css改,这题用vue写也不难。然后,题中还写了当点击条目时跳转到ItemDetailActivity并显示条目的名称等信息,接着新建一个活动跟布局文件。
<LinearLayout
    xmlns:android="http://schemas.android.com/apk/res/android"
    android:layout_width="match_parent"
    android:layout_height="match_parent"
    android:orientation="vertical"
    android:padding="16dp">

    <TextView
        android:id="@+id/brandNameTextView"
        android:layout_width="wrap_content"
        android:layout_height="wrap_content"
        android:textSize="24sp"/>

    <TextView
        android:id="@+id/rankTextView"
        android:layout_width="wrap_content"
        android:layout_height="wrap_content"
        android:textSize="20sp"/>

    <TextView
        android:id="@+id/searchIndexTextView"
        android:layout_width="wrap_content"
        android:layout_height="wrap_content"
        android:textSize="20sp"/>
</LinearLayout>
import android.os.Bundle
import androidx.appcompat.app.AppCompatActivity
import com.example.t5.databinding.ActivityItemDetailBinding
class ItemDetailActivity : AppCompatActivity() {
private lateinit var binding: ActivityItemDetailBinding
override fun onCreate(savedInstanceState: Bundle?) {
super.onCreate(savedInstanceState)
binding = ActivityItemDetailBinding.inflate(layoutInflater)
setContentView(binding.root)
// 获取传递的数据
val brandName = intent.getStringExtra("brandName")
val rank = intent.getIntExtra("rank", 0)
val searchIndex = intent.getIntExtra("searchIndex", 0)
// 设置显示内容
binding.brandNameTextView.text = brandName
binding.rankTextView.text = rank.toString()
binding.searchIndexTextView.text = searchIndex.toString()
}
}
实验心得
一个控件界面的制作,又控住你多久了。


 被折叠的 条评论
为什么被折叠?
被折叠的 条评论
为什么被折叠?
 到【灌水乐园】发言


