


前期认识
- 切面(Aspect):切面编程的完整定义模块,包含了何时、对谁、如何等等所有的内容
- 连接点(Join point):能够植入切面的部分,被运用到哪些方法上
- 通知(Advice):要对切面添加的功能代码,比如权限、guava 限流、事务,日志等功能代码
- 切入点(Pointcut):针对哪些方法植入通知,也就是指定具体的拦截地点
- 引入(Introduction):对目标类添加新方法及属性
- 目标对象(Target object):被切面处理的对象,目标对象无法感知到切面的存在
- 代理(proxy):实现 AOP 方式,基于 JDK、CGLIB
- 织入(Weaving):将切面应用到目标对象来创建新的代理对象的过程,有三种方式:spring 采用的是运行时
通知(Advice)五种类型
- @Before:前置通知,在调用目标方法之前执行通知定义的任务
- @After:后置通知,在目标方法执行结束后,如果执行成功,则执行通知定义的任务
- @AfterReturning:最终通知,在目标方法执行结束后,无论执行结果如何,都要执行通知定义的任务
- @AfterThrowing:异常通知,如果目标方法执行过程中抛出异常,则执行通知定义的任务
- @Around:环绕通知,在目前方法执行的前后,都需要执行通知定义的任务
我们如何做?
- 先编写额外的逻辑类,也就是切面:AspectJ
- 具体的哪些方法要被执行处理,需要配置表达式:expression、point-cut
- 额外的逻辑处理,有几个通知消息或者说有哪些逻辑可以被执行
AOP 注解方式读取准备工作
先介绍在使用 AOP 时的一些核心接口、类、方法:
- Advisor:AOP 顶级接口,用来管理 advice、point-cut,其下有两个子接口:
PointcutAdvisor、IntroductionAdvisor,它们之间的区别在于
IntroductionAdvisor 应用于类级别的拦截,只能使用 Introduction 类型的 Advice
PointcutAdvisor 应用于方法级别的拦截 ,可以使用任何类型的 Pointcut,以及几乎任何类型的 Advice
- AspectJPointcutAdvisor:最外层的通知者类,内部含有 Advice > 包含五种实现增强器、AspectJExpressionPointcut 类型
- AspectJExpressionPointcut:该类属于原型模式,每一个 advisor 都会依赖一个新的该类型,它还实现了两个接口:分别是类表达式匹配器 ClassFilter > 只有一个匹配方法函数式编程接口,只应用于接口和类上的匹配、方法表达式匹配器 MethodMatcher > 内部有三个方法,可以支持无参数的静态匹配,也支持有参数的动态匹配
- AnnotationAwareAspectJAutoProxyCreator:AspectJAwareAdvisorAutoProxyCreator 子类,使用 AspectJ 语法创建 Advisor 和代理对象的类,<aop:aspectj-autoproxy /> 标签默认注入到 BeanDefinitionNames、BeanDefinitionMaps 中,SpringBoot 方式也是会通过该类型去进行相关类型的解析工作.
Advisor、Advice
resolveBeforeInstantiation -> applyBeanPostProcessorsBeforeInstantiation -> AbstractAutoProxyCreator#postProcessBeforeInstantiation -> shouldSkip(beanClass, beanName)
// 查找通知器
@Override
protected List<Advisor> findCandidateAdvisors() {
  // 找到系统中实现了Advisor接口的bean,如果存在就放入缓存,并进行创建,然后返回
  List<Advisor> advisors = super.findCandidateAdvisors();
  // 找到系统中使用 @Aspect 标注 bean,并且找到该 bean 中使用 @Before,@After 等标注的方法
  if (this.aspectJAdvisorsBuilder != null) {
    // 将这些方法封装为一个个 Advisor
    advisors.addAll(this.aspectJAdvisorsBuilder.buildAspectJAdvisors());
  }
  return advisors;
}
先是找到所有实现了 Advisor 接口 Bean,再获取到有标识 @AspectJ 注解的类,然后扫描它下面的所有除了标识 @PointCut 注解的 advisor 方法后,设置表达式:可能是方法也可能是表达式,取决于配置的方式,再进行 advisor 实例化,advisor 实例化也是需要三个对象的,分别是 MetadataAwareAspectInstanceFactory、Method、AspectJExpressionPointcut
buildAspectJAdvisors->this.advisorFactory.isAspect(beanType)->this.advisorFactory.getAdvisors(factory)->getAdvisor(method,…) ->new InstantiationModelAwarePointcutAdvisorImpl(expressionPointcut,…)->instantiateAdvice(this.declaredPointcut)
private Advice instantiateAdvice(AspectJExpressionPointcut pointcut) {
    // 入参为切点表达式类
    // 这里是通过调用 aspectJAdvisorFactory 获取 Advice
    // aspectJAdvisorFactory 实例是 ReflectiveAspectJAdvisorFactory
    // 所以最终我们还是要到 ReflectiveAspectJAdvisorFactory 中去分析 Advice 获取过程
    // ReflectiveAspectJAdvisorFactory 是一个重要的类 Advisor 和 Advice 获取都是在这个类中完成的
    // 入参为:通知方法、切点表达式类、切面实例、切面的一个顺序、切面类名
    Advice advice = this.aspectJAdvisorFactory.getAdvice(this.aspectJAdviceMethod, pointcut,this.aspectInstanceFactory, this.declarationOrder, this.aspectName);
    return (advice != null ? advice : EMPTY_ADVICE);
}
到这里,就会提前把每个 Bean 需要增强的通知提前准备好,存入到缓存中
总结创建过程
- 创建 AspectJPointcutAdvisor#0-4,先通过
带参的构造方法进行对象的创建,但是想使用带参数的构造参数,必须要把参数对象提前准备好,因此要先准备创建好内置包含的对象,例如:AspectJAroundAdvice - 创建 AspectJAroundAdvice,也需要通过带参的构造函数进行创建,提前准备好具体的参数对象,包含三个参数:MethodLocatingFactoryBean、AspectJExpressionPointcut、SimpleBeanFactoryAwareAspectInstanceFactory
- 分别创建好上述的三个对象,其创建过程都是调用无参的构造方法,直接反射生成即可
- 总体来说,XML 文件配置 AOP、注解配置 AOP 在流程上是差不多的,只是注解是一次性全部到位,但 XML 要提前做 BeanDefinition 准备工作
代码部分
顶级接口
public interface Calculator {
    public Integer add(Integer i,Integer j) throws NoSuchMethodException;
    public Integer sub(Integer i,Integer j) throws NoSuchMethodException;
    public Integer mul(Integer i,Integer j) throws NoSuchMethodException;
    public Integer div(Integer i,Integer j) throws NoSuchMethodException;
}
接口实现类
// 实现接口采用的就是 JDK 代理
public class MyCalculator /*implements Calculator*/ {
    public Integer add(Integer i, Integer j) throws NoSuchMethodException {
        Integer result = i+j;
        return result;
    }

    public Integer sub(Integer i, Integer j) throws NoSuchMethodException {
        Integer result = i-j;
        return result;
    }

    public Integer mul(Integer i, Integer j) throws NoSuchMethodException {
        Integer result = i*j;
        return result;
    }

    public Integer div(Integer i, Integer j) throws NoSuchMethodException {
        Integer result = i/j;
        return result;
    }

    public Integer show(Integer i){
        System.out.println("show .....");
        return i;
    }

    @Override
    public String toString() {
        return "super.toString()";
    }
}
配置 XML 文件
<bean id="logUtil" class="com.vnjohn.aop.xml.util.LogUtil"/>
<bean id="myCalculator" class="com.vnjohn.aop.xml.service.MyCalculator"/>
<!-- <aop:config>
     <aop:aspect ref="logUtil">
            <aop:pointcut id="myPoint" expression="execution( Integer com.vnjohn.aop.xml.service.MyCalculator.*  (..))"/>
            <aop:around method="around" pointcut-ref="myPoint"/>
            <aop:before method="start" pointcut-ref="myPoint"/>
            <aop:after method="logFinally" pointcut-ref="myPoint"/>
            <aop:after-returning method="stop" pointcut-ref="myPoint" returning="result"/>
            <aop:after-throwing method="logException" pointcut-ref="myPoint" throwing="e"/>
        </aop:aspect>
    </aop:config>-->
<aop:aspectj-autoproxy/>
AOP 代理增强类
@Aspect
public class LogUtil {

    @Pointcut("execution(public Integer com.vnjohn.aop.xml.service.MyCalculator.*(Integer,Integer))")
    public void myPointCut(){}

//    @Pointcut("execution(* *(..))")
    public void myPointCut1(){}

    @Before(value = "myPointCut()")
    private int start(JoinPoint joinPoint){
        //获取方法签名
        Signature signature = joinPoint.getSignature();
        //获取参数信息
        Object[] args = joinPoint.getArgs();
        System.out.println("log---"+signature.getName()+"方法开始执行:参数是"+Arrays.asList(args));
        return 100;
    }

//    @AfterReturning(value = "myPointCut()",returning = "result")
    public static void stop(JoinPoint joinPoint,Object result){
        Signature signature = joinPoint.getSignature();
        System.out.println("log---"+signature.getName()+"方法执行结束,结果是:"+result);
    }

//    @AfterThrowing(value = "myPointCut()",throwing = "e")
    public static void logException(JoinPoint joinPoint,Exception e){
        Signature signature = joinPoint.getSignature();
        System.out.println("log---"+signature.getName()+"方法抛出异常:"+e.getMessage());
    }

//    @After("myPointCut()")
    public static void logFinally(JoinPoint joinPoint){
        Signature signature = joinPoint.getSignature();
        System.out.println("log---"+signature.getName()+"方法执行结束。。。。。over");

    }

//     @Around("myPointCut()")
    public Object around(ProceedingJoinPoint pjp) throws Throwable {
        Signature signature = pjp.getSignature();
        Object[] args = pjp.getArgs();
        Object result = null;
        try {
            System.out.println("log---环绕通知start:"+signature.getName()+"方法开始执行,参数为:"+Arrays.asList(args));
            //通过反射的方式调用目标的方法,相当于执行method.invoke(),可以自己修改结果值
            result = pjp.proceed(args);
//            result=100;
            System.out.println("log---环绕通知stop"+signature.getName()+"方法执行结束");
        } catch (Throwable throwable) {
            System.out.println("log---环绕异常通知:"+signature.getName()+"出现异常");
            throw throwable;
        }finally {
            System.out.println("log---环绕返回通知:"+signature.getName()+"方法返回结果是:"+result);
        }
        return result;
    }
}
测试基础类
public class TestAop {

    public static void main(String[] args) throws Exception {
        saveGeneratedCGlibProxyFiles(System.getProperty("user.dir")+"/proxy");
        ApplicationContext ac = new ClassPathXmlApplicationContext("aop.xml");
        MyCalculator bean = ac.getBean(MyCalculator.class);
        System.out.println(bean);
        bean.add(1,1);
        bean.sub(1,1);
    }

    public static void saveGeneratedCGlibProxyFiles(String dir) throws Exception {
        Field field = System.class.getDeclaredField("props");
        field.setAccessible(true);
        Properties props = (Properties) field.get(null);
        System.setProperty(DebuggingClassWriter.DEBUG_LOCATION_PROPERTY, dir);//dir为保存文件路径
        props.put("net.sf.cglib.core.DebuggingClassWriter.traceEnabled", "true");
    }
}
FAQ
当使用 AOP 时,需要进行 N 多个对象的创建,但是在创建过程中需要做很多判断,判断当前对象是否需要被代理,而代理之前,需要的 advisor 对象必须提前准备好,才能进行后续的判断
若定义了一个普通的对象,会进入 resolveBeforeInstantation 方法的处理吗?
不会,普通对象会在执行初始化方法时,调用
BeanPostProcessor#after方法进行处理;判断是否需要被代理,需要才返回代理对象,否则仍然是普通对象.
动态代理对象创建过程
AbstractAutoProxyCreator#postProcessAfterInitialization->wrapIfNecessary->createProxy
前言
Spring 创建代理对象只是在原有基础上作了一些额外的扩展,使用到了一个新的接口:Advised;proxyFactory 只是其中的一个实现 > AOP 中的一个核心类,它组合了 advisor、targetSource(目标对象)
- advisor:通知器包含 advice、pointCut
- advice:具体的某一个消息通知
- advised:用来配置代理 > proxyFactory
创建过程
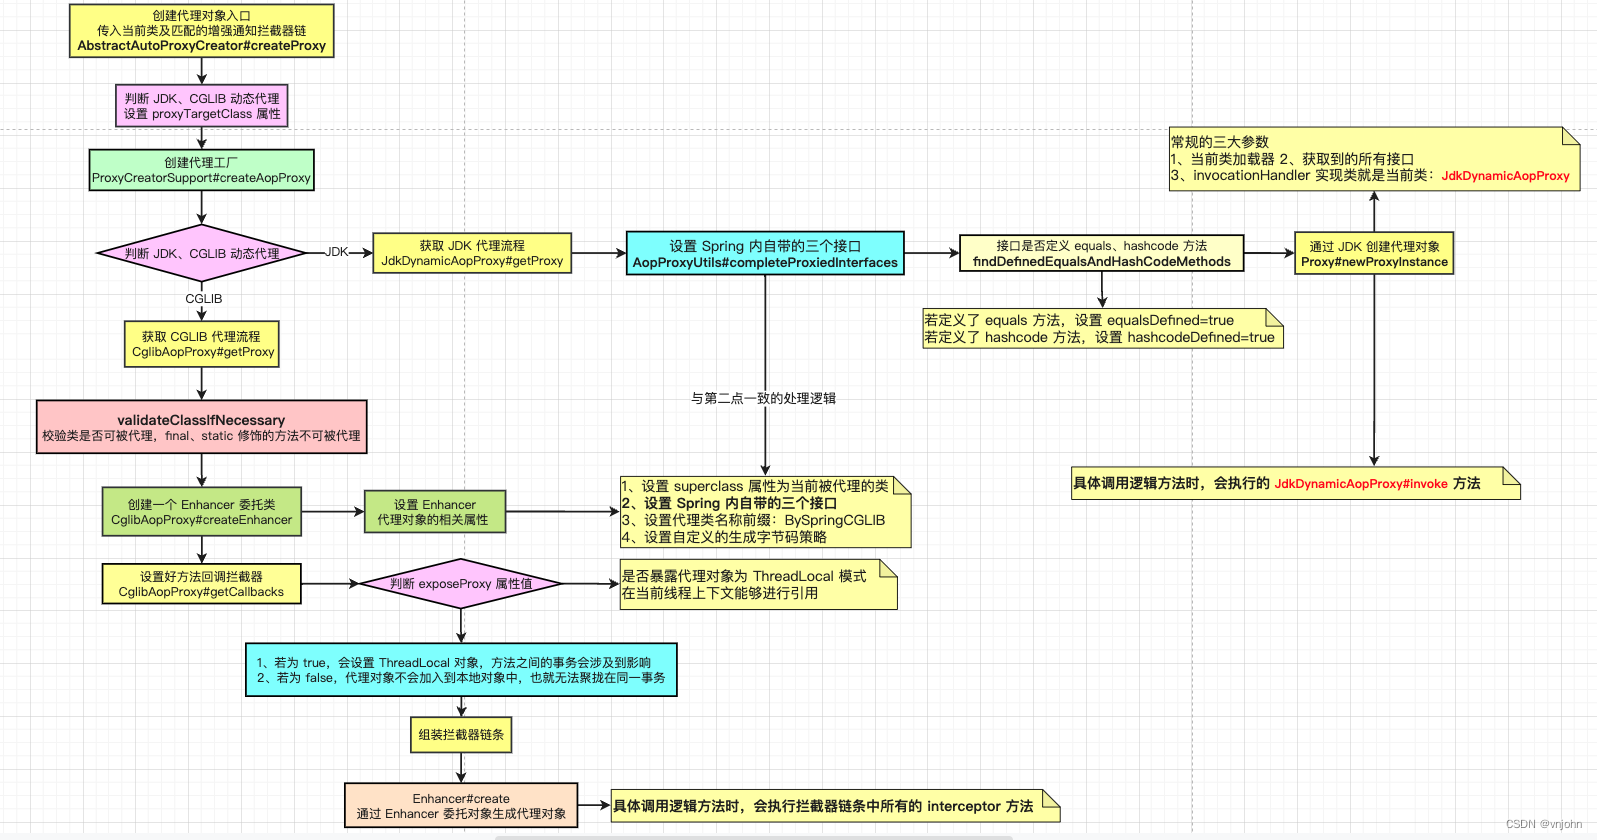
CGLIB 生成动态代理对象过程
CGLIB 生成动态代理对象过程,如下:
- 首先,通过当前类是否有实现接口以及通过 proxyTargetClass 属性值是否为 true,如果目标类实现了接口采用的是 JDK 动态代理实现,否则就采用 CGLIB 动态代理实现
- Advised 接口实现类 ProxyFactory,它包揽了目标类以及所有 advisor 通知的实现
- validateClassIfNecessary 用于校验类是否可被代理,final、static 修饰的方法不可被代理
- 创建 CGLIB 代理对象时,底层实现流程主要的几个对象、属性:ClassLoaderData(管理类加载的数据对象)、通过 Generator#generateClass 方法生成类的键值(键:EnhanceKey、value:存放的是生成 Enhancer 代理对象回调接口的实现)
前置对象准备好以后,就到了生成目标类的代理对象,先设置好扩展的一些属性
1、Spring 自带的前缀策略生成器,主要是为代理对象取名时追加的前缀-BySpringCGLIB
2、设置自定义的生成字节码策略器(内部实现主要是设置上下文对象,具体的生成还是调用了默认的策略生成器)
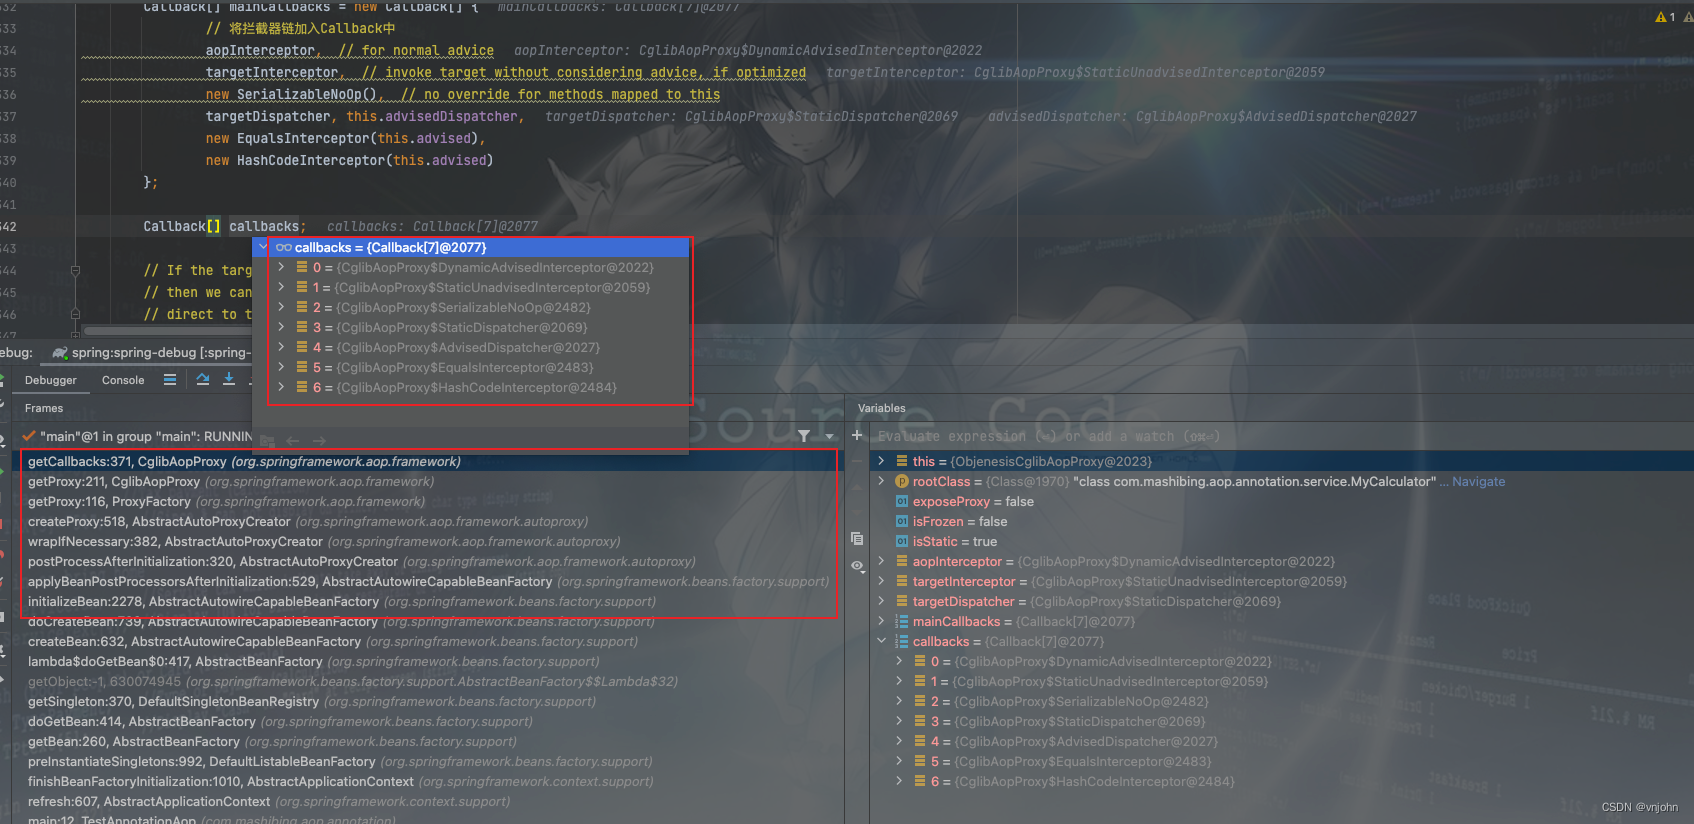
重要部分:设置好代理对象的一些拦截器回调实现类,存在七个实现 MethodInterceptor 接口的回调类型,DynamicAdvisedInterceptor 类才是最重要的入口
- 判断 exposeProxy 属性值是否为 true,如果是则需要将当前的代理对象设置为 ThreadLocal 线程本地变量模式,使其能够在上下文进行调用.
Spring 配合
<aop:aspectj-autoproxy expose-proxy="true"/>,在 SpringBoot 需要配合@EnableAspectJAutoProxy(exposeProxy=true)使用;比如在ProxyClazz 类 A、B 方法中进行调用时事务会失效的情况下,就是因为这个类实现了代理,若直接相互调用,事务就会失效,若要确保它不失效:前者先要进行配置 exposeProxy 属性为 true,后者在方法期间通过(ProxyClazz)AopContext.getProxy().B()这种方式调用才能确保事务是有效的.
以下源码是否有 exposeProxy 属性时,设置目标拦截器的区别
// 源码方法:CglibAopProxy#getCallbacks
if (exposeProxy) {
// 区别目标源对象的 isStatic 方法返回值为真或假
	targetInterceptor = (isStatic ?
			new StaticUnadvisedExposedInterceptor(this.advised.getTargetSource().getTarget()) :
			new DynamicUnadvisedExposedInterceptor(this.advised.getTargetSource()));
} else {
	targetInterceptor = (isStatic ?
			new StaticUnadvisedInterceptor(this.advised.getTargetSource().getTarget()) :
			new DynamicUnadvisedInterceptor(this.advised.getTargetSource()));
}
通过 Debug 断点获取到的拦截器链以及创建方法执行的旅程 > 重要的入口:wrapIfNecessary,如下图:
JDK 生成动态代理对象过程
JDK 生成动态代理对象过程,如下:
- 获取目标类上的接口并且判断是否需要添加 SpringProxy、Advised、DecoratingProxy 接口
- 判断获取到的接口是否定义了 equals、hashCode 方法,一般是没有定义的,若有定义 equals 方法,标识
equalsDefined为 true;若有定义 hashCode 方法,标识hashCodeDefined为 true - 设置好接口和属性以后,创建我们的代理对象,
Proxy.newProxyInstance(classLoader, proxiedInterfaces, this),基本的三件套
第一个参数是类加载器
第二个参数是在第一步获取到的所有接口
第三个参数是当前的JdkDynamicAopProxy类,它实现了 InvocationHandler 接口,后续在它的 invoke 方法调用处理.
动态代理执行流程
CGLIB 执行流程
如下图,AOP 拦截器对代码进行增强处理的详细执行流程图
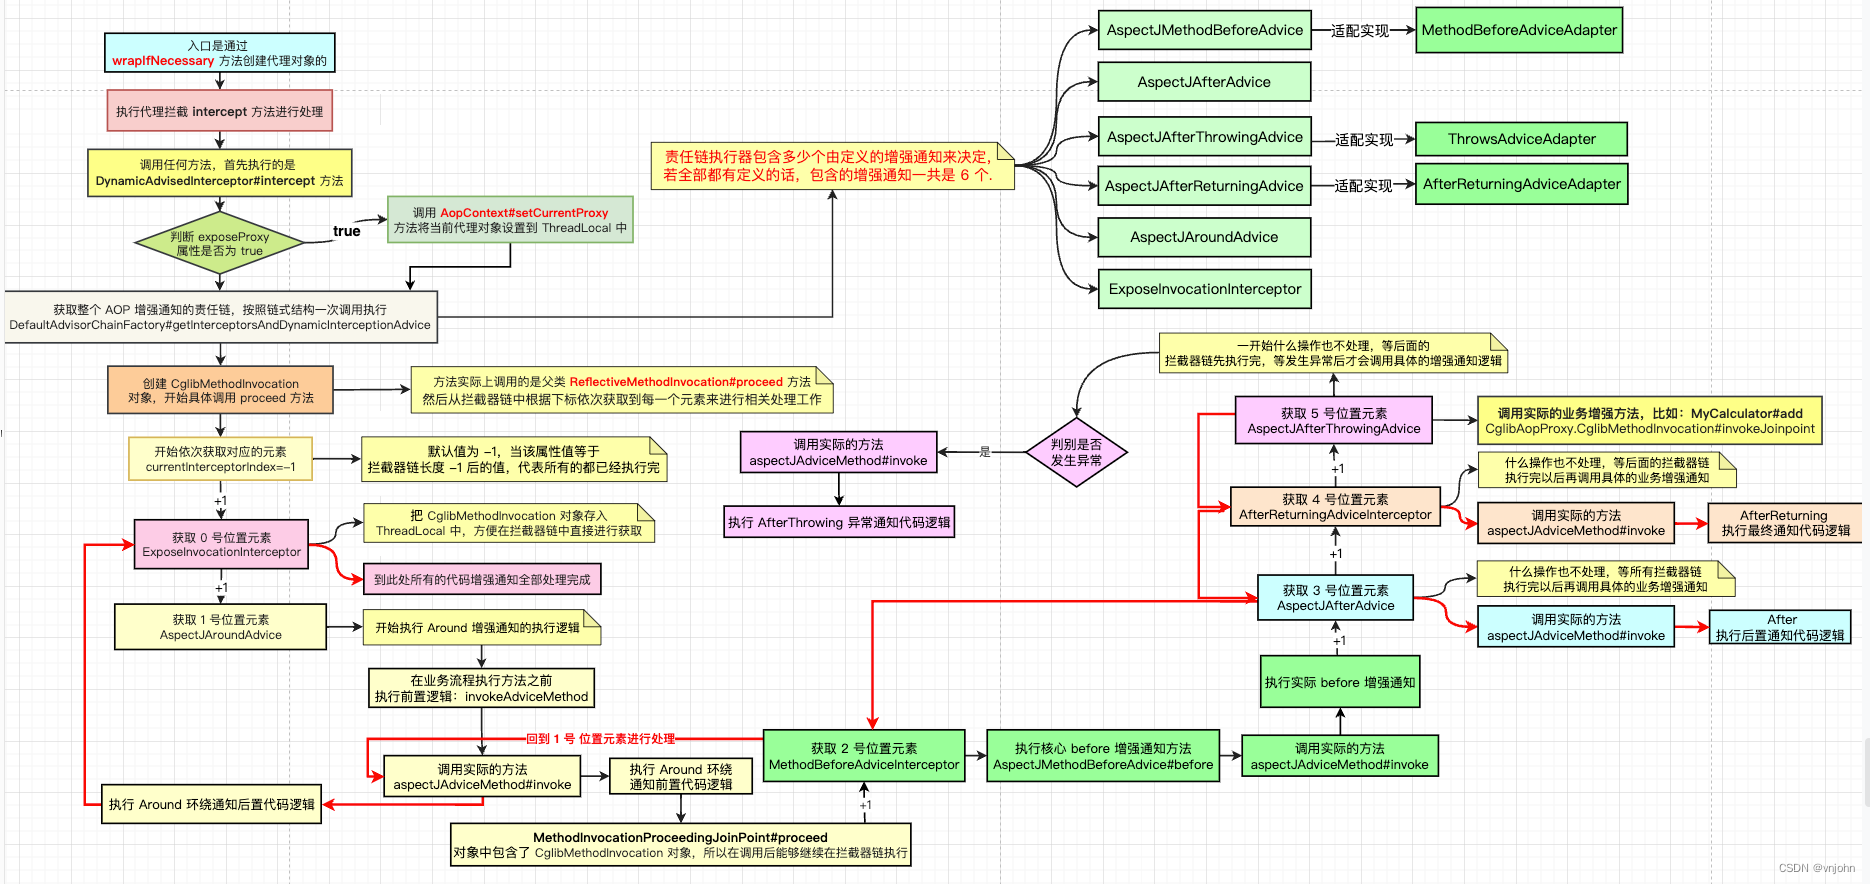
上图中虽然能看出 Advice 执行的具体顺序,但是根据你实际的配置情况,顺序可能有所不同,所以要根据你的业务代码来判断具体要先执行那一个
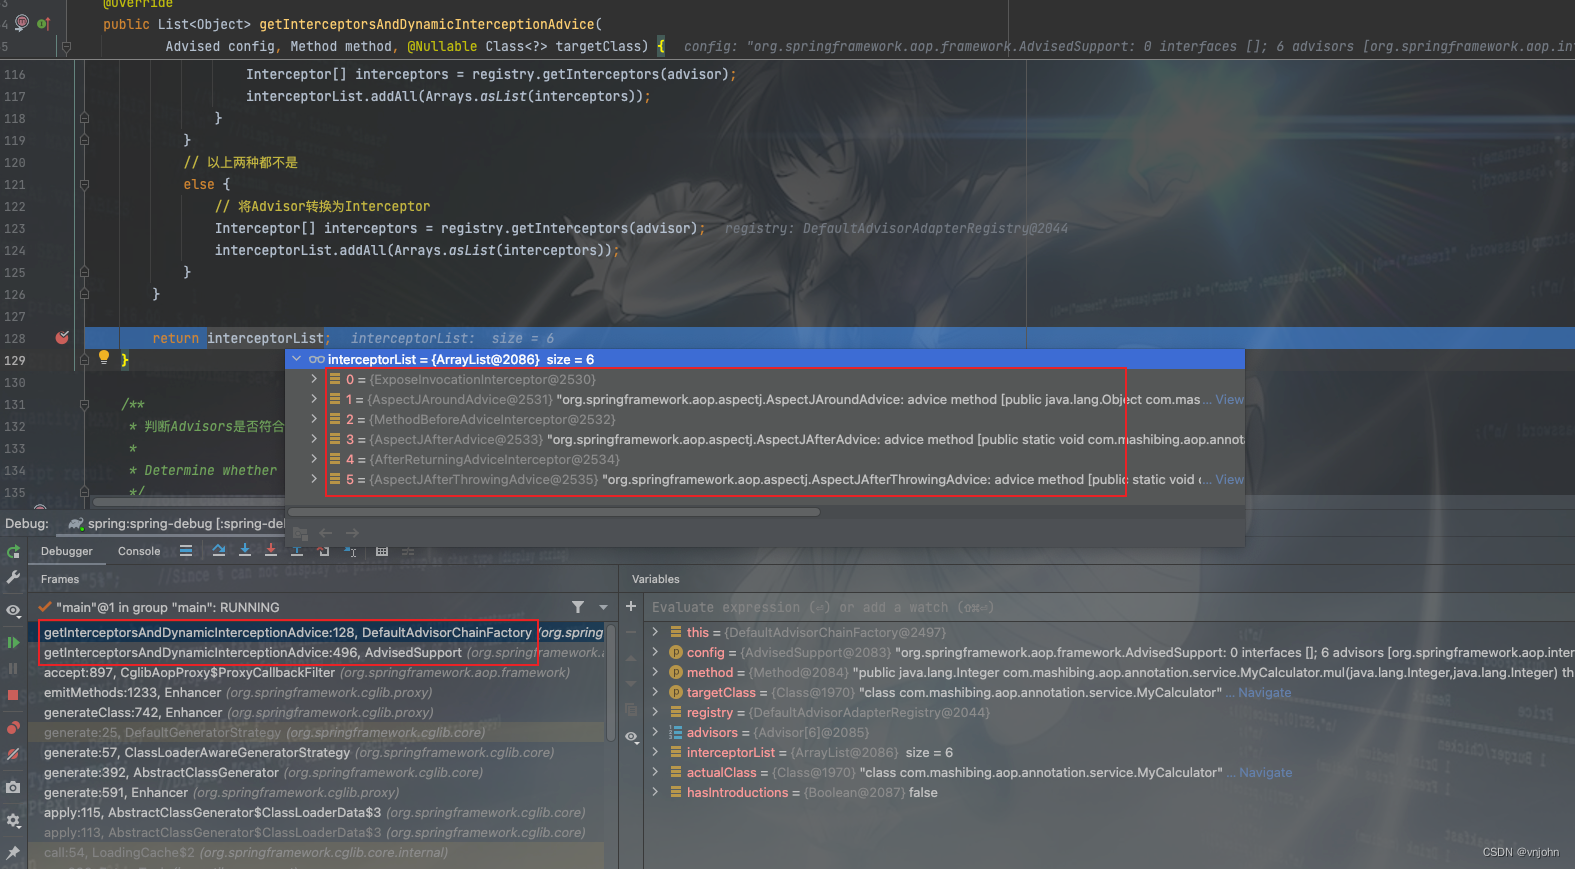
当生成代理对象之后,会进行具体的逻辑方法调用,此时,AOP 若是 5 个增强通知都能适配的话,一共会有 6 个 Advisor,除了五种增强通知以外,还有一个是 ExposeInvocationInterceptor,它起着一个桥梁的作用,会将当前 MethodInvocation 对象存入线程上下文对象,它们在执行时是按照某个顺序来执行的,而且是由一个通知跳转到另外一个通知执行;所以此时,我们需要构建一个拦截器链条(责任链模式)只有创建好链式结构,才能顺利的向下执行。
1、首先它会通过切入点表达式,先进行类、方法匹配,获取到匹配的通知之后,会判别当前通知是否实现了 MethodInterceptor 接口,若没有实现的话,它会先作一层适配
2、前置、后置、最终通知都没有实现方法拦截器接口:MethodInterceptor,所以要在其类上先进行一层适配实现,使其方法能够被增强,AspectJMethodBeforeAdvice —> MethodBeforeAdviceInterceptor、AspectJAfterReturningAdvice —> AfterReturningAdviceInterceptor
3、原本所有 Advice 都可以实现 MethodInterceptor 接口,但是为了提高可扩展性,提供了适配器的模式,那么在进行 MethodInterceptor 组装的过程中,需要多加一些额外的判断逻辑,不能被添加两次,所以才需要把未实现 MethodInterceptor 接口的某些 Advice 直接通过适配器方式来实现,而不再需要通过原来的方式
4、组装拦截器链条是通过拓扑排序方式来进行组合的,会先挑选没有前驱节点的元素先进行执行;在 CGLIB 是通过CglibMethodInvocation来启动 Advice 通知,它又是ReflectiveMethodInvocation类型的子类,JDK 是通过它来启动 Advice 通知的
下图是通过 Debug 断点获取到的所有拦截器
观察 AOP 注解方式读取准备工作>代码部分,将所有的 AOP 注解放开,修改测试基类如下:
public class TestAnnotationAop {

    public static void main(String[] args) throws NoSuchMethodException {
    	saveGeneratedCGlibProxyFiles(System.getProperty("user.dir")+"/proxy");
        AnnotationConfigApplicationContext ac = new AnnotationConfigApplicationContext();
        ac.register(SpringConfiguration.class);
        ac.refresh();
        MyCalculator bean = ac.getBean(MyCalculator.class);
        System.out.println(bean.add(1, 1));
    }

    public static void saveGeneratedCGlibProxyFiles(String dir) throws Exception {
        Field field = System.class.getDeclaredField("props");
        field.setAccessible(true);
        Properties props = (Properties) field.get(null);
        System.setProperty(DebuggingClassWriter.DEBUG_LOCATION_PROPERTY, dir);//dir为保存文件路径
        props.put("net.sf.cglib.core.DebuggingClassWriter.traceEnabled", "true");
    }
}
当 MyCalculator#add 方法进行调用时,找到保存到本地生成的代理对象上,会看到如下的调用:
// CGLIB$CALLBACK_0:就是拦截器链的第一个拦截器:DynamicAdvisedInterceptor
public final Integer add(Integer var1, Integer var2) throws NoSuchMethodException {
  MethodInterceptor var10000 = this.CGLIB$CALLBACK_0;
  if (var10000 == null) {
    CGLIB$BIND_CALLBACKS(this);
    var10000 = this.CGLIB$CALLBACK_0;
  }
  return var10000 != null ? (Integer)var10000.intercept(this, CGLIB$add$4$Method, new Object[]{var1, var2}, CGLIB$add$4$Proxy) : super.add(var1, var2);
}
CGLIB$CALLBACK_0 指的就是 DynamicAdvisedInterceptor 拦截器,会调用 intercept 方法

- 执行顺序大致如上,在排序 Advisor 时,会出现前置通知执行在前或环绕通知执行在前的情况,这种顺序是不固定的
在编写 Around 最终增强通知的方法逻辑时,需要通过 ProceedingJoinPoint#proceed 方法的调用来执行下一条链路,若没有编写此方法实现的话,这时候程序执行就不完整了,链路到此处就没有办法去获取下一个拦截器去进行处理.
- 在源码处理中,基本上所有的增强通知都是调用的
ReflectiveMethodInvocation#proceed或Joinpoint#proceed方法,因为它们需要先去判定是否还有下一个拦截器,若还有的话就继续调用,没有的话就执行当前方法中的剩余逻辑.
// 来自于 ReflectiveMethodInvocation 源码,其子类 CglibMethodInvocation 也是调用的这部分实现
// super.process():当前调用的是 CGLIB 动态代理
// mi.process():当前调用的是 JDK 动态代理
public Object proceed() throws Throwable {
  // 从索引为-1的拦截器开始调用,并按序递增,如果拦截器链中的拦截器迭代调用完毕,开始调用 target 函数,这个函数是通过反射机制完成的
  // 具体实现在 AopUtils.invokeJoinPointUsingReflection 方法中
  if (this.currentInterceptorIndex == this.interceptorsAndDynamicMethodMatchers.size() - 1) {
    return invokeJoinpoint();
  }

  // 获取下一个要执行的拦截器,沿着定义好的 interceptorOrInterceptionAdvice 链进行处理
  Object interceptorOrInterceptionAdvice =
    this.interceptorsAndDynamicMethodMatchers.get(++this.currentInterceptorIndex);
  if (interceptorOrInterceptionAdvice instanceof InterceptorAndDynamicMethodMatcher) {
    // 这里对拦截器进行动态匹配的判断,这里是对pointcut触发进行匹配的地方,如果和定义的pointcut匹配,那么这个advice将会得到执行
    InterceptorAndDynamicMethodMatcher dm =
      (InterceptorAndDynamicMethodMatcher) interceptorOrInterceptionAdvice;
    Class<?> targetClass = (this.targetClass != null ? this.targetClass : this.method.getDeclaringClass());
    if (dm.methodMatcher.matches(this.method, targetClass, this.arguments)) {
      return dm.interceptor.invoke(this);
    }
    else {
      // 如果不匹配,那么 proceed 会被递归调用,直到所有的拦截器都被运行
      return proceed();
    }
  }
  else {
    // 普通拦截器,直接调用拦截器,将 this 作为参数传递以保证当前实例中调用链的执行
    return ((MethodInterceptor) interceptorOrInterceptionAdvice).invoke(this);
  }
}
总结
CGLIB 和 JDK 动态代理实现,区别是 CGLIB 是采用继承类的方式实现,如果方法中为 final 或 static 将不会被代理增强,生成的代理类会比较多;而 JDK 是采用实现接口的方式;如果它包含的接口中有存在 equals 或 hashCode 方法时将不会被代理增强,生成的代理类只有一个;它们的底层实现都是通过 ASM 字节码框架操作的.
两者在处理整个流程时,都是先将所有的 advisor 进行匹配,然后再将需要进行增强的 advisor 拦截器找到并组装起来,等待调用实际逻辑方法时会调用生成处理类的地方,按照链条一个个执行.
如果觉得博文不错,关注我 vnjohn,后续会有更多实战、源码、架构干货分享!
推荐专栏:Spring,订阅一波不再迷路
大家的「关注❤️ + 点赞👍 + 收藏⭐」就是我创作的最大动力!谢谢大家的支持,我们下文见!


 1137
1137


 被折叠的 条评论
为什么被折叠?
被折叠的 条评论
为什么被折叠?
 到【灌水乐园】发言


