


USB HID 报文描述符简单示例-翻译
原文地址 https://eleccelerator.com/tutorial-about-usb-hid-report-descriptors/
更多编程知识请关注我的公众号 “我叫电池”

原文标题:tutorial-about-usb-hid-report-descriptors
This page is from my old website, and it is sort of popular, so I’ve moved it here.
鉴于该文章在作者以前的网站上挺受欢迎的,所以作者将其移动到了当前网站(博主自己的博客站)
A USB HID report descriptor is one of the descriptors that a USB host can request from a USB device.
USB HID报文(又称报告)描述符是USB主机向USB从机请求的多种报文中的其中一种。
HID devices send data to the host using reports, and the descriptor tells the host how to interpret the data.
HID设备发送报文描述符给USB主机,然后主机就可以根据其描述判断改用怎样的协议去解析设备端发送的数据。
I will try to show you how to write one of these descriptors.
我会尽可能的向你展示如何编写一个这样的报文描述符信息
First, go to this page http://www.usb.org/developers/hidpage/ and find the document titled “Device Class Definition for HID”.
首先,到http://www.usb.org/developers/hidpage/网站获取名为“Device Class Definition for HID”的文档,该文档目前版本是1.11,点击此处下载
What I will be talking about is essentially paraphrasing the important sections of that document.
接下来我要讲的基本上就是对该文档中主要内容的解释。
Thanks for visiting! If you appreciate my content, please consider making a donation to a charity. Thank you ~ Frank
这一行中的连接是作者要打赏的,如果可以的话,我也想要打赏。。。。。。。
Second, go get the HID descriptor tool from the same page.
第二步,在同一页面下载HID descriptor tool,点击下载,目前版本是2.4,好像是2001年的版本。
You’ll want to play with it as you go through this tutorial. It is an absolute headache to write the HID report descriptors manually (converting between binary and hex and looking up the meanings of the numbers) so this tool is essential.
这意思就是你不用这个工具,你就会被搞死的。
What is a USB HID report descriptor?啥是USB HID报文描述符
The HID protocol makes implementation of devices very simple. Devices define their data packets and then present a “HID descriptor” to the host. The HID descriptor is a hard coded array of bytes that describe the device’s data packets. This includes: how many packets the device supports, how large are the packets, and the purpose of each byte and bit in the packet. For example, a keyboard with a calculator program button can tell the host that the button’s pressed/released state is stored as the 2nd bit in the 6th byte in data packet number 4 (note: these locations are only illustrative and are device specific). The device typically stores the HID descriptor in ROM and does not need to intrinsically understand or parse the HID descriptor. Some mouse and keyboard hardware in the market today are implemented using only an 8-bit CPU.
– Wikipedia on Human Interface Device
以上是Wiki上对HID的解释,我就不翻译了。。。。。
I’m going to try teaching you about USB HID report descriptors by walking you through writing a few.
我会试着通过写一些简单示例的形式告诉你什么是USB HID 报文描述符
For a simple starting point, let us make a standard mouse.
简单点,先来个标准鼠标
Just three buttons, and movement on the X and Y axis.
三个按键(鼠标中键不要忘记了)和XY两个方向的移动
So we want to send data regarding the buttons and movement.
我们要发送包含按钮状态和位移的数据
It takes one bit to represent each button, and one byte to represent the movement on one axis as a signed integer.
我们把每个按钮用1bit表示(1或0即可),然后1BYTE代表X方向的位移,1BYTE代表Y方向的位移(位移都是带符号整型的,****这里位移是采用的相对位置,所以是有负数的)
So we can say that we want the data structure to look something like this
所以我们的数据结构如下所示
| Bit 7 | Bit 6 | Bit 5 | Bit 4 | Bit 3 | Bit 2 | Bit 1 | Bit 0 | |
|---|---|---|---|---|---|---|---|---|
| Byte 0 | Useless 没用 | Useless | Useless | Useless | Useless | Left Button | Middle Button | Right Button |
| Byte 1 | X Axis Relative Movement as Signed Integer | |||||||
| Byte 2 | Y Axis Relative Movement as Signed Integer |
And then we can say our data structure in C looks like
用C结构体表示就是这样的
struct mouse_report_t
{
	uint8_t buttons;
	int8_t x;
	int8_t y;
}
So now in our descriptor, our first item must describe buttons, three of them
到此为止,我们就可以写报文描述符了,首先是三个按钮(说实话,下边这一块我整的不是非常明白,反正大体是这个意思)
USAGE_PAGE (Button)			//说明这块是按钮的操作
USAGE_MINIMUM (Button 1)	//三个按钮,最小的按钮是1,最大的是3
USAGE_MAXIMUM (Button 3)
each button status is represented by a bit, 0 or 1
每个按钮的状态(状态值只有0和1,所以最小值是0,最大值是1)
LOGICAL_MINIMUM (0)		//最小值0
LOGICAL_MAXIMUM (1)		//最大值1
there are three of these bits
一共有3bit
REPORT_COUNT (3)	//报文次数是3次,按钮是3个单独的按钮
REPORT_SIZE (1)		//每次1bit,原因如上,这块理解不透彻
send this variable data to the computer
发送数据给电脑
INPUT (Data,Var,Abs) //发送的是数据,var应该是值,abs是绝对的意思,和后边的“rel相对”相对
and the final result looks like
所以针对按钮来说,最终看起来就是这样子
USAGE_PAGE (Button)
USAGE_MINIMUM (Button 1)
USAGE_MAXIMUM (Button 3)
LOGICAL_MINIMUM (0)
LOGICAL_MAXIMUM (1)
REPORT_COUNT (3)
REPORT_SIZE (1)
INPUT (Data,Var,Abs)
that will represent the buttons
以上是对按钮的设置
but what about the five useless padding bits?
那么剩下的5bit没用的数据呢
REPORT_COUNT (1)		//1次
REPORT_SIZE (5)			//5bit都没用到,是相同的类型
INPUT (Cnst,Var,Abs)	//发送
now we make the X axis movement
现在我们搞X轴的位移
USAGE_PAGE (Generic Desktop)	//通用桌面的设备类型
USAGE (X)						//指定X轴
we want it to be a signed integer that takes one byte, so it has a value between -127 and +127 (actually -128 and +127, but I want to keep things even)
我们用1byte的带符号整型来表示位移,所以取值范围是-128127,但是为了保证对阵,这里取-127127(实际上,由于这个值我们自己指定,你要愿意,-64~64也行。。)
LOGICAL_MINIMUM (-127)	//最小值-127
LOGICAL_MAXIMUM (127)	//最大值128
we want it to take an entire byte which is 8 bits
8bit数据同时发出去
REPORT_SIZE (8)		//8bit
REPORT_COUNT (1)	//1次
and send it to the computer as a variable relative coordinate
然后作为相对坐标系的一个值发送给电脑
INPUT (Data,Var,Rel) //以相对值的方式发送该数据
you end up with something like this to represent the X axis movement
所以X轴就设置完了
USAGE_PAGE (Generic Desktop)
USAGE (X)
LOGICAL_MINIMUM (-127)
LOGICAL_MAXIMUM (127)
REPORT_SIZE (8)
REPORT_COUNT (1)
INPUT (Data,Var,Rel)
How about Y axis? You can try
Y轴怎么办,把USAGE (X)换成USAGE (Y)就行了
USAGE_PAGE (Generic Desktop)
USAGE (X)
LOGICAL_MINIMUM (-127)
LOGICAL_MAXIMUM (127)
REPORT_SIZE (8)
REPORT_COUNT (1)
INPUT (Data,Var,Rel)
USAGE_PAGE (Generic Desktop)
USAGE (Y)
LOGICAL_MINIMUM (-127)
LOGICAL_MAXIMUM (127)
REPORT_SIZE (8)
REPORT_COUNT (1)
INPUT (Data,Var,Rel)
Which will work, but to save memory, we can do this instead
为了节省内存空间,我们可以将X、Y的设置放到一起
USAGE_PAGE (Generic Desktop)
USAGE (X)
USAGE (Y)
LOGICAL_MINIMUM (-127)
LOGICAL_MAXIMUM (127)
REPORT_SIZE (8)
REPORT_COUNT (2)
INPUT (Data,Var,Rel)
So all your data will end up looking like
所以最终的数据看起来是这个样子的
USAGE_PAGE (Button)
USAGE_MINIMUM (Button 1)
USAGE_MAXIMUM (Button 3)
LOGICAL_MINIMUM (0)
LOGICAL_MAXIMUM (1)
REPORT_COUNT (3)
REPORT_SIZE (1)
INPUT (Data,Var,Abs)
REPORT_COUNT (1)
REPORT_SIZE (5)
INPUT (Cnst,Var,Abs)
USAGE_PAGE (Generic Desktop)
USAGE (X)
USAGE (Y)
LOGICAL_MINIMUM (-127)
LOGICAL_MAXIMUM (127)
REPORT_SIZE (8)
REPORT_COUNT (2)
INPUT (Data,Var,Rel)
Ah but we are not done, in order to make the computer know that this is a mouse, we do
但是,到这里还没完(以上只描述了鼠标应该发送的数据)为了让电脑知道我们的设备是个鼠标,我们还需要添加以下信息
USAGE_PAGE (Generic Desktop)		//普通桌面应用
USAGE (Mouse)						//是个鼠标
COLLECTION (Application)			//应用集定义,这个后边还会再说
	USAGE (Pointer)
	COLLECTION (Physical)

	... What we wrote already goes here	//把上边那些内容粘贴到这里就完整了

	END COLLECTION
END COLLECTION						//应用集定义结束符
So in the end, this is the USB HID report descriptor for a standard mouse
到这里位置,一个标准鼠标的报文描述符就描述完了,不过还需要转换为代码,转换代码可以借助最开始下载的__HID descriptor tool进行生成,否则,呵呵,头疼去吧
0x05, 0x01,                    // USAGE_PAGE (Generic Desktop)
0x09, 0x02,                    // USAGE (Mouse)
0xa1, 0x01,                    // COLLECTION (Application)
0x09, 0x01,                    //   USAGE (Pointer)
0xa1, 0x00,                    //   COLLECTION (Physical)
0x05, 0x09,                    //     USAGE_PAGE (Button)
0x19, 0x01,                    //     USAGE_MINIMUM (Button 1)
0x29, 0x03,                    //     USAGE_MAXIMUM (Button 3)
0x15, 0x00,                    //     LOGICAL_MINIMUM (0)
0x25, 0x01,                    //     LOGICAL_MAXIMUM (1)
0x95, 0x03,                    //     REPORT_COUNT (3)
0x75, 0x01,                    //     REPORT_SIZE (1)
0x81, 0x02,                    //     INPUT (Data,Var,Abs)
0x95, 0x01,                    //     REPORT_COUNT (1)
0x75, 0x05,                    //     REPORT_SIZE (5)
0x81, 0x03,                    //     INPUT (Cnst,Var,Abs)
0x05, 0x01,                    //     USAGE_PAGE (Generic Desktop)
0x09, 0x30,                    //     USAGE (X)
0x09, 0x31,                    //     USAGE (Y)
0x15, 0x81,                    //     LOGICAL_MINIMUM (-127)
0x25, 0x7f,                    //     LOGICAL_MAXIMUM (127)
0x75, 0x08,                    //     REPORT_SIZE (8)
0x95, 0x02,                    //     REPORT_COUNT (2)
0x81, 0x06,                    //     INPUT (Data,Var,Rel)
0xc0,                          //   END_COLLECTION
0xc0                           // END_COLLECTION
This is actually the example descriptor provided with the USB HID documentation, and you can also find this as an example provided with the HID tool.
以上实际上是USB HID文档中提供的一个实例,你可以在HID tool中找到这个示例(话说我好像没有找,反正没看见)
Cool, at this point, you will have encountered some concepts that you may have questions about, you should research the following:
*酷~~~~~儿,到这里,你可能会有一些概念上的疑问(我确实是有的),接着看*
---------分割线是我私自添加的-----------
以下是针对一些名词的解释_
Usage Pages
There’s one thing that I think isn’t explained well in the documentation, USAGE, USAGE_PAGE, USAGE_MINIMUM and USAGE_MAXIMUM.
我(作者,不是我说的,我还没仔细看文档)觉得这几个名词在文档中解释的都不是非常好(我觉得这个作者解释的也不怎么样,所以下边我就不翻译了,我截个图你们就明白了)
- 当我们的USAGE_PAGE选择的是Generic Desktop的时候,我们的USAGE可以选择右边那些设备,鼠标、键盘、手柄等等

- 当我们的USAGE_PAGE选择的是LEDs的时候,我们能选择的USAGE就变成了,大写灯、数字灯等等等等这样的一些功能

所以我们可以看出,USAGE_PAGE规定的是一些功能集合,如作者所说,和命名空间类似,而USAGE则制定了具体的功能
In a descriptor, you first set a USAGE_PAGE, and certain USAGEs are available. In the mouse example, USAGE_PAGE (Generic Desktop) allowed you to use USAGE (Mouse), and when the usage page was changed to USAGE_PAGE (Button), then the USAGE_MINIMUM and USAGE_MAXIMUM allowed you to specify the buttons, and before you can use USAGE (X) and USAGE (Y), the usage page was changed back to USAGE_PAGE (Generic Desktop). The usage page is like a namespace, changing the usage page affects what “usages” are available. Read the documentation called ” HID Usage Tables” for more info.
Collections
直译叫集合,这里特指多个应用,举个例子,我们可以见到一些键盘上自带了触摸板,也就是键盘和鼠标实现在了一台设备上,那么就相当于包含了“键盘”和“鼠标”两个应用,这两个功能是可以同时使用的,只需要在集合中包含两个设备的设置信息,同时指定“报文ID”即可,发送信息时,键盘带键盘的ID,鼠标发送鼠标的ID,电脑就可以对这两个信息进行区分并分别解析
Read the documentation about the official proper use of collections. In my own words, collections can be used to organize your data, for example, a keyboard may have a built-in touchpad, then the data for the keyboard should be kept in one application collection while the touchpad data is kept in another. We can assign an “Report ID” to each collection, which I will show you later.
---------分割线是我私自添加的-----------
Hey here’s something you can do, by turning “USAGE (Mouse)” into “USAGE (Gamepad)”, you make the computer think that it’s a game pad with one joystick and 3 buttons.
好了,我们把USAGE (Mouse)改成USAGE (Gamepad),然后你就得到了一个有三个按键的游戏手柄
How about converting a Playstation 2 controller into a USB gamepad? The controller has 16 buttons and two thumb sticks, so we want the data to look like
把PS2(这是个什么玩意,游戏机吗)控制器换成USB手柄怎么样?这个控制器有16个按键,两个摇杆,所以我们的数据变成了这个样子
| Bit 7 | Bit 6 | Bit 5 | Bit 4 | Bit 3 | Bit 2 | Bit 1 | Bit 0 | |
|---|---|---|---|---|---|---|---|---|
| Byte 0 | Button | Button | Button | Button | Button | Button | Button | Button |
| Byte 1 | Button | Button | Button | Button | Button | Button | Button | Button |
| Byte 2 | Left X Axis as Signed Integer左摇杆 | |||||||
| Byte 3 | Left Y Axis as Signed Integer | |||||||
| Byte 4 | Right X Axis as Signed Integer右摇杆 | |||||||
| Byte 5 | Right Y Axis as Signed Integer |
So our data structure looks like
所以结构体是这个样子
struct gamepad_report_t
{
	uint16_t buttons;
	int8_t left_x;
	int8_t left_y;
	int8_t right_x;
	int8_t right_y;
}
We make the computer understand that it’s a game pad
设置描述符,让电脑知道我们这回变成了手柄了
USAGE_PAGE (Generic Desktop)
USAGE (Game Pad)			//设置设备为手柄
COLLECTION (Application)
	COLLECTION (Physical)

	...

	END COLLECTION
END COLLECTION
for the buttons
按钮配置
USAGE_PAGE (Button)
USAGE_MINIMUM (Button 1)
USAGE_MAXIMUM (Button 16)
LOGICAL_MINIMUM (0)
LOGICAL_MAXIMUM (1)
REPORT_COUNT (16)
REPORT_SIZE (1)
INPUT (Data,Var,Abs)
for the four thumb stick axis
摇杆的四个轴
USAGE_PAGE (Generic Desktop)
USAGE (X)
USAGE (Y)
USAGE (Z)
USAGE (Rx)
LOGICAL_MINIMUM (-127)
LOGICAL_MAXIMUM (127)
REPORT_SIZE (8)
REPORT_COUNT (4)
INPUT (Data,Var,Abs)
NOTE: Z is used to represent the right stick’s X axis, Rx is used to represent the right stick’s Y axis.
注意:Z代表右摇杆的X轴,Rx代表右摇杆的Y轴(实际上是有Rx、Ry、Rz这三个值的)
This doesn’t make sense but this is how most existing USB game pads work. I have tested this using Battlefield Bad Company 2, it works.
这没关系,但是大多数USB手柄都是这么干的,我在****Battlefield Bad Company 2这个游戏中测试过了,可以放心使用
NOTE: Use “absolute” for something like joysticks, but “relative” for things like mouse.
再注意:手柄中使用绝对坐标,而鼠标中使用相对坐标(为什么,这到底是为什么???)
So now you end up with
所以我们有了下边这些东西
USAGE_PAGE (Generic Desktop)
USAGE (Game Pad)
COLLECTION (Application)
	COLLECTION (Physical)
		USAGE_PAGE (Button)
		USAGE_MINIMUM (Button 1)
		USAGE_MAXIMUM (Button 16)
		LOGICAL_MINIMUM (0)
		LOGICAL_MAXIMUM (1)
		REPORT_COUNT (16)
		REPORT_SIZE (1)
		INPUT (Data,Var,Abs)
		USAGE_PAGE (Generic Desktop)
		USAGE (X)
		USAGE (Y)
		USAGE (Z)
		USAGE (Rx)
		LOGICAL_MINIMUM (-127)
		LOGICAL_MAXIMUM (127)
		REPORT_SIZE (8)
		REPORT_COUNT (4)
		INPUT (Data,Var,Abs)
	END COLLECTION
END COLLECTION
Hey how about two players? Here’s where collections get handy
双人运动怎么样??(多人运动也可以哦),只需要在集合中添加两个设备就可以了,同时指定“报文ID”
USAGE_PAGE (Generic Desktop)
USAGE (Game Pad)
COLLECTION (Application)
	COLLECTION (Physical)
		REPORT_ID (1)		//指定报文ID  1
		...
	END COLLECTION
END COLLECTION
USAGE_PAGE (Generic Desktop)
USAGE (Game Pad)
COLLECTION (Application)
	COLLECTION (Physical)
		REPORT_ID (2)		//指定报文ID  2,第二个设备
		...
	END COLLECTION
END COLLECTION
fill in the data areas and you end up with
完整数据如下所示(注意,他这个写法也行,我测试的时候,还有一种写法,我没测试,但我感觉他这个写法并不好,没有题现COLLECTION (Application)的意义所在)
USAGE_PAGE (Generic Desktop)
USAGE (Game Pad)
COLLECTION (Application)
	COLLECTION (Physical)
		REPORT_ID (1)
		USAGE_PAGE (Button)
		USAGE_MINIMUM (Button 1)
		USAGE_MAXIMUM (Button 16)
		LOGICAL_MINIMUM (0)
		LOGICAL_MAXIMUM (1)
		REPORT_COUNT (16)
		REPORT_SIZE (1)
		INPUT (Data,Var,Abs)
		USAGE_PAGE (Generic Desktop)
		USAGE (X)
		USAGE (Y)
		USAGE (Z)
		USAGE (Rx)
		LOGICAL_MINIMUM (-127)
		LOGICAL_MAXIMUM (127)
		REPORT_SIZE (8)
		REPORT_COUNT (4)
		INPUT (Data,Var,Abs)
	END COLLECTION
END COLLECTION
USAGE_PAGE (Generic Desktop)	//个人认为,在设备类型相同或类似的情况下,这个是不需要再写一遍的
USAGE (Game Pad)				//我也没测试
COLLECTION (Application)
	COLLECTION (Physical)
		REPORT_ID (2)
		USAGE_PAGE (Button)
		USAGE_MINIMUM (Button 1)
		USAGE_MAXIMUM (Button 16)
		LOGICAL_MINIMUM (0)
		LOGICAL_MAXIMUM (1)
		REPORT_COUNT (16)
		REPORT_SIZE (1)
		INPUT (Data,Var,Abs)
		USAGE_PAGE (Generic Desktop)
		USAGE (X)
		USAGE (Y)
		USAGE (Z)
		USAGE (Rx)
		LOGICAL_MINIMUM (-127)
		LOGICAL_MAXIMUM (127)
		REPORT_SIZE (8)
		REPORT_COUNT (4)
		INPUT (Data,Var,Abs)
	END COLLECTION
END COLLECTION
This is really important: You must change your data structure to include the report ID
非常重要的一点,你必须更改你的数据结构,使其包含“报文ID”
| Bit 7 | Bit 6 | Bit 5 | Bit 4 | Bit 3 | Bit 2 | Bit 1 | Bit 0 | |
|---|---|---|---|---|---|---|---|---|
| Byte 0 | Report ID | |||||||
| Byte 1 | Button | Button | Button | Button | Button | Button | Button | Button |
| Byte 2 | Button | Button | Button | Button | Button | Button | Button | Button |
| Byte 3 | Left X Axis as Signed Integer | |||||||
| Byte 4 | Left Y Axis as Signed Integer | |||||||
| Byte 5 | Right X Axis as Signed Integer | |||||||
| Byte 6 | Right Y Axis as Signed Integer |
struct multiplayer_gamepad_report_t
{
	uint8_t report_id;
	uint16_t buttons;
	int8_t left_x;
	int8_t left_y;
	int8_t right_x;
	int8_t right_y;
}
You must manually set the report ID before you send the data to the computer in order for the computer to understand which player the data belongs to.
发送数据给电脑前必须手动设置当前数据的“报文ID”,这样电脑就可以知道数据是哪个玩家来的了
multiplayer_gamepad_report_t player1_report;
multiplayer_gamepad_report_t player2_report;
player1_report.report_id = 1;
player2_report.report_id = 2;
You can also use collections and report IDs to make composite devices. So far I’ve shown you the keyboard, mouse, and gamepad.
你可以利用应用集和报文ID制作混合功能的设备,目前位置我已经向你展示了键盘(在哪里呀啊喂,我找到这篇文章的目的就是看键盘的,可是并没有啊)、鼠标和手柄
Here’s something that describes a composite device that is a keyboard, mouse, and two player game pad.
这是一个包含键盘、鼠标、两个手柄的描述符基本框架
USAGE_PAGE (Generic Desktop)
USAGE (Keyboard)
COLLECTION (Application)
	REPORT_ID (1)
	...
END COLLECTION
USAGE_PAGE (Generic Desktop)
USAGE (Mouse)
COLLECTION (Application)
	USAGE (Pointer)
	COLLECTION (Physical)
		REPORT_ID (2)
		...
	END COLLECTION
END COLLECTION
USAGE_PAGE (Generic Desktop)
USAGE (Game Pad)
COLLECTION (Application)
	COLLECTION (Physical)
		REPORT_ID (3)
		...
	END COLLECTION
END COLLECTION
USAGE_PAGE (Generic Desktop)
USAGE (Game Pad)
COLLECTION (Application)
	COLLECTION (Physical)
		REPORT_ID (4)
		...
	END COLLECTION
END COLLECTION
and of course, your data structures with the added report ID.
当然,你的结构体需要包含报文ID
struct keyboard_report_t
{
	uint8_t report_id;
	uint8_t modifier;
	uint8_t reserved;
	uint8_t keycode[6];
}

struct mouse_report_t
{
	uint8_t report_id;
	uint8_t buttons;
	int8_t x;
	int8_t y;
}

struct gamepad_report_t
{
	uint8_t report_id;
	uint16_t buttons;
	int8_t left_x;
	int8_t left_y;
	int8_t right_x;
	int8_t right_y;
}
But since we changed the data structure, your device no-longer supports boot protocol, and hence you will not need to define a protocol. So make sure you change usbconfig.h accordingly.
但是由于我们更改了结构体,我们的设备不再支持boot protocol(现在支持的叫report protocol,简单来说bios中只识别标准设备,也就是boot protocol,不能识别report protocol,参考连接也是英文的,就不翻译了**),因此你也不需要定义一个新的协议,只需要对应的更改“usbconfig.h”就可以(怎么改,没说呀,这是个啥头文件,不知道呀,拉到)**
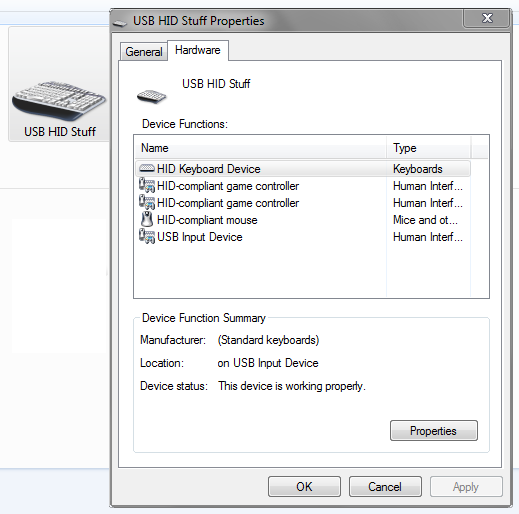
Want to see this in action? Load up this example project into USnooBie and let Windows’s “Devices and Printers” show you!
想测试上述的示例吗,点击下方的连接,下载示例工程并烧录到USnooBie(AVR的一个板子,很显然我没有),然后在windows硬件与打印机中就可以看到了。
Example Project Files

search term: hid_tutorial_1


 861
861


 被折叠的 条评论
为什么被折叠?
被折叠的 条评论
为什么被折叠?
 到【灌水乐园】发言


