


mybatis的概括
- 它封装了jdbc操作的很多细节,使开发者只需要关注sql语句的本身,而无需关注注册驱动,创建连接等复杂的过程。
- 它使用了ORM思想实现了结果集的封装,
1. ORM:Object Relational Mapping 对象的关系映射
2. 简单来说:就是把数据库和实体类的属性对应起来, 让我们可以 操作实体类就实现操作数据库表
mybatis的开发前的准备
首先要在官网上现下载mybatis:
https://github.com/mybatis/mybatis-3/releases
然后开始创建项目
1.第一步:点击create New Project,然后选中Maven,然后勾上Create from archetype,然后选中maven-archetype-quickstart,然后进入下一步。

2.这里的Groupld:是项目文件名。ArtifactId:这个是你Module的的名字。其他的不用动,然后下一步。直到完成(版本不一样有可能会有点差别)

3.当几秒钟后下面出现BULLD SUCCESS表示项目创建成功

4.创建好后会出现这个,这个是让你设置是否自动导入Maven,直接点击Enable Auto-Import(自动导入)就好。这个时候项目就算是创建好了。

mybatis导入依赖
1.在maven中加入mybatis坐标 ,mysql驱动和mybatis驱动
<?xml version="1.0" encoding="UTF-8"?>

<project xmlns="http://maven.apache.org/POM/4.0.0" xmlns:xsi="http://www.w3.org/2001/XMLSchema-instance"
  xsi:schemaLocation="http://maven.apache.org/POM/4.0.0 http://maven.apache.org/xsd/maven-4.0.0.xsd">
  <modelVersion>4.0.0</modelVersion>
<!--当前的坐标-->
  <groupId>com.xw</groupId>
  <artifactId>mybatis01</artifactId>
  <version>1.0-SNAPSHOT</version>
  <!--默认打包,可省略
  <packaging>jar</packaging>-->

  <properties>
    <project.build.sourceEncoding>UTF-8</project.build.sourceEncoding>
    <maven.compiler.source>1.8</maven.compiler.source>
    <maven.compiler.target>1.8</maven.compiler.target>
  </properties>

  <dependencies>
    <dependency>
      <groupId>junit</groupId>
      <artifactId>junit</artifactId>
      <version>4.11</version>
      <scope>test</scope>
    </dependency>

    <!--mybatis的依赖-->
    <dependency>
      <groupId>org.mybatis</groupId>
      <artifactId>mybatis</artifactId>
      <version>3.5.1</version>
    </dependency>
    <!--mysql驱动-->
    <dependency>
      <groupId>mysql</groupId>
      <artifactId>mysql-connector-java</artifactId>
      <version>5.1.9</version>
    </dependency>
 </dependencies>
   <build>
    <!--这个插件的作用是:会把main里面的properties和xml文件都扫描出来放入target文件中,
        并且在的位置与main中所在位置相对应-->
    <resources>
      <resource>
        <!--所在的目录-->
        <directory>src/main/java</directory>
        <!--包括目录下的。properties,xml文件都会扫描到-->
        <includes>
          <include>**/*.properties</include>
          <include>**/*.xml</include>
        </includes>
        <filtering>false</filtering>
      </resource>
    </resources>
</build>
入门案例
1.首先要注意主项目的java包的颜色,如果不对就右键选中Mark Directory as进行设置。或者点击file–>Project Structure–>Modules在里面进行设置。这里的resource是你自己创建的,按照上面的设置设置成如图的样子。
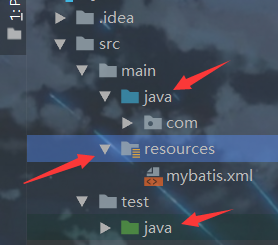
2.在resource里创建一个mybatis的主配置文件。主配置文件提供了数据的信息连接和sql映射文件的位置信息.。(这里的数据库连接信息要写自己的)
<?xml version="1.0" encoding="UTF-8" ?><!DOCTYPE configuration
        PUBLIC "-//mybatis.org//DTD Config 3.0//EN"
        "http://mybatis.org/dtd/mybatis-3-config.dtd">
<configuration>
    <!--
        添加的日志信息
        settings:控制mybatis全局行为。
    -->
    <settings>
        <setting name="logImpl" value="STDOUT_LOGGING"/>
    </settings>
    <!--
        环境配置:数据库的连接信息
        default:必须和某个environment的id值一样
        告诉mybatis使用那个数据库的连接信息。也就是访问那个数据库
        (如果此时想访问线上的数据库就把default里面的development改成online)
    -->
    <environments default="development">
        <!--
            environment:一个数据库信息的配置,环境
            id:唯一的值,自定义,表示环境的名称。
        -->
        <environment id="development">
            <!--
                transactionManager:mybatis的事务类型
                    type:JDBC(表示使用JDBC中的Connection对象的commit,rollback做事务处理)
            -->
            <transactionManager type="JDBC"/>
            <!--
                dataSource:表示数据源,连接数据库的
                    type:表示数据源的类型,POOLED表示使用的连接池
            -->
            <dataSource type="POOLED">
                <!--数据库的驱动着-->
                <property name="driver" value="com.mysql.jdbc.Driver"/>
                <!--数据库的url字符串-->
                <property name="url" value="jdbc:mysql://localhost:3306/ssm?characterEncoding=utf8"/>
                <!--访问数据库的用户名-->
                <property name="username" value="root"/>
                <!--密码-->
                <property name="password" value="******"/>
            </dataSource>
        </environment>
    </environments>
    <!--sql mapper(sql映射文件)的位置-->
    <mappers>
        <!--
            一个mapper标签指定一个文件的位置
            从类路径开始的路径信息。target/classes(类路径)
            如过想指定多次就要写入多个mapper标签
        -->
        <mapper resource="com/xw/dao/StudentDao.xml"/>
    </mappers>
</configuration>
3.创建一个domain包:里面创建Student类(这里的属性名要最好和数据库的列名是一样的)
/*推荐和表名一样容易记忆*/
public class Student {
    //定义属性,目前要求是属性名和列名一样
    private Integer id;
    private String name;
    private String email;
    private Integer age;

    -----setter and getter方法------
4.创建一个dao包:dao包内创建StudentDao接口和StudentDao.xml。
/*接口操作student表*/
public interface StudentDao {
    //查询student表的所有数据
    public List<Student> selectStudents();
}
<?xml version="1.0" encoding="UTF-8" ?>
<!DOCTYPE mapper
        PUBLIC "-//mybatis.org//DTD Mapper 3.0//EN"
        "http://mybatis.org/dtd/mybatis-3-mapper.dtd">

    <mapper namespace="com.xw.dao.StudentDao">
    <!--
        select:表示查询操作。
        id:你要执行的sql语句的唯一标识,mybatis会使用这个id的值来找到要执行的sql语句
            可以自定义,但是要求你使用接口中的方法名称。
        resultType:表示结果类型的,是sql语句执行后的到ResultSet,遍历这个ResultSet得到Java对象的类型
            值写的类型的全限定名称
    -->
    <select id="selectStudents" resultType="com.xw.domain.Student">
        select id,name,email,age from student order by id
    </select>
    </mapper>
<!--
    sql映射文件(sql mapper):写sql语句的,mybatis会执行这些sql
    1.指定约束文件
        <!DOCTYPE mapper
        PUBLIC "-//mybatis.org//DTD Mapper 3.0//EN"
        "http://mybatis.org/dtd/mybatis-3-mapper.dtd">
        mybatis-3-mapper.dtd是约束文件的名称,扩展名是dtd的(这个在maven中学到过)
    2.约束文件作用:限制,检查在当前的文件中出现的标签,属性必须符合mybatis的要求。

    3.mapper 是当前文件的根标签,必须的。
        namespace:叫做命名空间,唯一值的,可以自定义的字符串。
        (要求你使用dao接口的全限定名称。com.xw.dao.StudentDao)

    4.在当前文件中,可以使用特定的标签,表示数据库的特定操作。
        <select>:表示执行查询。
        <update>:表示更新数据库的操作,就是在<update>标签中 写的是update的 sql语句
        <insert>:表示插入,放的是insert语句。
        <delete>:表示删除,执行的delete语句。
-->
5.创建一个utils包,里面放入工具类:MybatisUtils工具类(简洁代码)
package com.xw.utils;

import org.apache.ibatis.io.Resources;
import org.apache.ibatis.session.SqlSession;
import org.apache.ibatis.session.SqlSessionFactory;
import org.apache.ibatis.session.SqlSessionFactoryBuilder;
import java.io.IOException;
import java.io.InputStream;

public class MybatisUtils {
    private static SqlSessionFactory factory=null;
    static {
        //需要和你项目中的文件名一样
        String config="mybatis.xml";
        try {
            InputStream in = Resources.getResourceAsStream(config);
            //创建SqlSessionFactory对象,使用SqlSessionFactoryBuilder
            factory= new SqlSessionFactoryBuilder().build(in);
        } catch (IOException e) {
            e.printStackTrace();
        }
    }
    //获取SqlSession的方法
    public static SqlSession getSqlSession(){
        SqlSession sqlSession =null;
        if(factory!=null){
            //非自动提交事务
             sqlSession=factory.openSession();
        }
        return sqlSession;
    }
}
6.最后进行测试代码
    @Test
    public void testFindALlStudent() throws IOException {
        //获取SqlSession对象,从SqlSessionFactory中获取SqlSession
        SqlSession sqlsession= MybatisUtils.getSqlSession();
        //6.【重要】指定要执行的sql语句的标识。sql映射文件中的namespace+"."+标签的id值
        String sqlId="com.xw.dao.StudentDao"+"."+"selectStudents";
        //7.执行sql语句,通过sqlId找到语句
        List<Student> studentList=sqlsession.selectList(sqlId);
        //8.输出结果(两种输出结果)
        studentList.forEach(student -> System.out.println(student));
//        for (Student stu: studentList) {
//            System.out.println(stu);
//        }
        //9.关闭SqlSession
        sqlsession.close();
    }
最后补充一下,如果不使用工具类的情况下如何实现代码的(这里使用添加数据方式进行实现)。
    @Test
    public void test() throws IOException {
        //访问mybatis读取student数据
        //1.定义mybatis主配置文件的名称,从类中的根开始(target/classes)
        String config= "mybatis.xml";
        //2.读取这个config表示的文件(记住这个Resource是org.apache.ibatis.io包下的)
        InputStream in= Resources.getResourceAsStream(config);
        //3.创建了SQLSessionFactoryBuilder对象
        SqlSessionFactoryBuilder builder=new SqlSessionFactoryBuilder();
        //4.创建SqlSessionFactory对象
        SqlSessionFactory factory=builder.build(in);
        //5.【重要】获取SqlSession对象,从SqlSessionFactory中获取sqlSession
        SqlSession Sqlsession=factory.openSession();
        //6.【重要】指定要执行的sql语句的标识。sql映射文件中的namespace+"."+标签的id值
        String sqlId="com.xw.dao.StudentDao"+"."+"selectStudents";
        Student student=new Student();
        student.setId(1111);
        student.setName("张三");
        student.setEmail("zhangsan@163.com");
        student.setAge(25);
        //7.执行sql语句,通过sqlId找到语句
        int nums = Sqlsession.insert(sqlId, student);
        //8.输出结果
        System.out.println("执行影响的行数:"+nums);
        //mybatis默认不是自动提交事务,所以insert,update,delete后要手工提交事务。
        Sqlsession.commit();
        //9.关闭SqlSession
        Sqlsession.close();
    }
总结:相信刚学mybatis的同学看到上面的代码一定很迷茫吧,没关系,这里只是演示了一下mybatis的实现过程。


 8120
8120


 被折叠的 条评论
为什么被折叠?
被折叠的 条评论
为什么被折叠?
 到【灌水乐园】发言


