


1、安装apache环境依赖
yum -y install mod_ssl openssl httpd
2、创建CA证书存放目录
mkdir /etc/httpd/ca
3、修改配置文件,在下面配置文件中修改下面对应的字段,如果是被#号键注释掉之后,就放开,如果已经是放开的,就不要保持原样。
vi /etc/httpd/conf.d/ssl.conf
      5 Listen 443 https

     59 DocumentRoot "/var/www/html"
     60 ServerName www.example.com:443

     64 ErrorLog logs/ssl_error_log
     65 TransferLog logs/ssl_access_log
     66 LogLevel warn

     70 SSLEngine on

     75 SSLProtocol all -SSLv2 -SSLv3

     80 SSLCipherSuite HIGH:3DES:!aNULL:!MD5:!SEED:!IDEA

     92 SSLCipherSuite RC4-SHA:AES128-SHA:HIGH:MEDIUM:!aNULL:!MD5
     93 SSLHonorCipherOrder on

    100 SSLCertificateFile /etc/pki/tls/certs/localhost.crt

    107 SSLCertificateKeyFile /etc/pki/tls/private/localhost.key
创建Apache的CA证书
1、进入存放证书的目录
cd /etc/httpd/ca/
2、创建自己的CA证书
[root@localhost ca]# openssl req -newkey rsa:4096 -nodes -sha256 -keyout apache.xyc.com.key -out apache.xyc.com.csr
Generating a 4096 bit RSA private key
.........................................................++
.................................................................................................................................................................++
writing new private key to 'apache.xyc.com.key'
-----
You are about to be asked to enter information that will be incorporated
into your certificate request.
What you are about to enter is what is called a Distinguished Name or a DN.
There are quite a few fields but you can leave some blank
For some fields there will be a default value,
If you enter '.', the field will be left blank.
-----
Country Name (2 letter code) [XX]:CN
State or Province Name (full name) []:GD
Locality Name (eg, city) [Default City]:SZ
Organization Name (eg, company) [Default Company Ltd]:SXF
Organizational Unit Name (eg, section) []:yf
Common Name(eg, your name or your server's hostname) []:apache.xyc.com
Email Address []:
上面代码中执行结果如下,会需要输入一些信息,就是位置以及公司信息,这些信息就填你已有的,如果不重要仅仅只是内部测试就随便填也无所谓,上面没填的就是可选的,我在测试中都输入为空。注:可以看到我写的是1000天,也就是大概三年的时间,自己可以随意设置!
上面执行结束之后会在当前目录下生成下面文件
ca.crt ca.key
3、生成CA证书签名请求
openssl req -newkey rsa:4096 -nodes -sha256 -keyout apache.xyc.com.key -out apache.xyc.com.csr
Generating a 4096 bit RSA private key
.........................................................++
.................................................................................................................................................................++
writing new private key to 'apache.xyc.com.key'
-----
You are about to be asked to enter information that will be incorporated
into your certificate request.
What you are about to enter is what is called a Distinguished Name or a DN.
There are quite a few fields but you can leave some blank
For some fields there will be a default value,
If you enter '.', the field will be left blank.
-----
Country Name (2 letter code) [XX]:CN
State or Province Name (full name) []:GD
Locality Name (eg, city) [Default City]:SZ
Organization Name (eg, company) [Default Company Ltd]:SXF
Organizational Unit Name (eg, section) []:yf
Common Name (eg, your name or your server's hostname) []:apache.xyc.com
Email Address []:

Please enter the following 'extra' attributes
to be sent with your certificate request
A challenge password []:
An optional company name []:
[root@localhost ca]# ls
apache.xyc.com.csr  apache.xyc.com.key  ca.crt  ca.key
输入同上个命令。
4、生成注册主机的证书
[root@localhost ca]# openssl x509 -req -days 365 -in apache.xyc.com.csr -CA ca.crt -CAkey ca.key -CAcreateserial -out apache.xyc.com.crt
Signature ok
subject=/C=CN/ST=GD/L=SZ/O=SXF/OU=yf/CN=apache.xyc.com
Getting CA Private Key
注:可以看到以上截图写的是365天,有的童鞋可能不太理解,简单说一下,现在代表的意思是证书三年有效期,而客户端使用认证期限是一年,当然了写1000天就和证书一样三年后失效。
上面执行完成之后会生成下面几个文件:
5、将证书拷贝到配置文件中路径相对应的目录
//进入证书目录
cd /etc/httpd/ca/
//拷贝证书到默认指定目录
cp apache.xyc.com.crt /etc/pki/tls/certs/
cp apache.xyc.com.key /etc/pki/tls/private/
6、重启Apache服务
systemctl restart httpd
7、测试
接下来可以直接使用域名在浏览器上登陆,显示如下图:
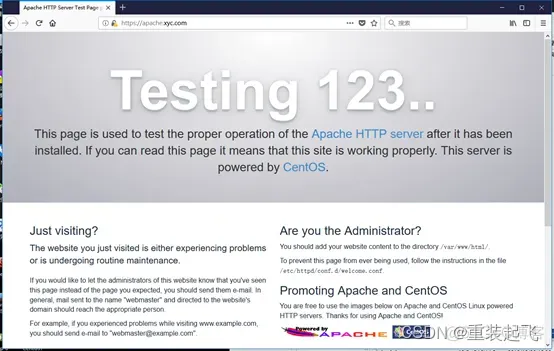 如果你使用了你的服务器的域名能被dns转换成IP就可以像上面那样使用域名登陆,如果在你的客户端(就是使用浏览器所在的那台PC),在hosts将某个域名配置成你的服务器IP,你也可以使用域名像示例一样在浏览器上访问服务器。如果都没有,那就可以直接在浏览器使用IP访问你的服务器,比如:https://192.168.1.1,将后面的IP换成你自己的服务器IP。


 1029
1029


 被折叠的 条评论
为什么被折叠?
被折叠的 条评论
为什么被折叠?
 到【灌水乐园】发言


