


POI实现EXCEL单元格合并及边框样式
来自CODE的代码片
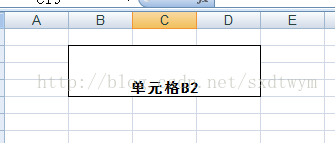
效果为:
下面例子为创建产生一个excel,合并单元格,然后为合并后的单元格添加边框
1 2 3 4 5 6 7 8 9 10 11 12 13 14 15 16 17 18 19 20 21 22 23 24 25 26 27 28 29 30 31 32 33 34 35 36 37 38 39 40 41 42 43 44 45 46 47 48 49 50 51 52 53 54 55 56 57 58 59 60 61 62 63 64 65 66 67 68 69 70 71 72 73 74 75 76 |
|
来自CODE的代码片
ExcelPoiTest.java
生成的excel样式为
简单说明:
1.excel生成过程: excel-->sheet-->row-->cell
2.索引从0开始
3.合并单元格后保留最左上角的单元格(B3单元格被B2单元格覆盖)
4.合并后单元格边框通过RegionUtil设置,如果删除以下代码
- <span style="font-size:18px;"><strong> // 使用RegionUtil类为合并后的单元格添加边框
- RegionUtil.setBorderBottom(1, cra, sheet); // 下边框
- RegionUtil.setBorderLeft(1, cra, sheet); // 左边框
- RegionUtil.setBorderRight(1, cra, sheet); // 有边框
- RegionUtil.setBorderTop(1, cra, sheet); // 上边框</strong></span>
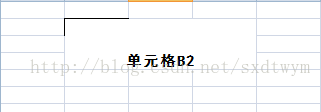
可以看到只有B2单元格有边框。


 310
310

 被折叠的 条评论
为什么被折叠?
被折叠的 条评论
为什么被折叠?
 到【灌水乐园】发言


