


 本文介绍如何使用Swagger2与SpringBoot结合,构建RESTful API文档,包括依赖添加、配置类编写、注解使用及API分组配置。
Swagger介绍
由于Spring Boot能够快速开发、便捷部署等特性,相信有很大一部分Spring Boot的用户会用来构建RESTful API。而我们构建RESTful API的目的通常都是由于多终端的原因,这些终端会共用很多底层业务逻辑,因此我们会抽象出这样一层来同时服务于多个移动端或者Web前端。
这样一来,我们的RESTful API就有可能要面对多个开发人员或多个开发团队:IOS开发、Android开发或是Web开发等。为了减少与其他团队平时开发期间的频繁沟通成本,传统做法我们会创建一份RESTful API文档来记录所有接口细节,然而这样的做法有以下几个问题:
- 由于接口众多,并且细节复杂(需要考虑不同的HTTP请求类型、HTTP头部信息、HTTP请求内容等),高质量地创建这份文档本身就是件非常吃力的事,下游的抱怨声不绝于耳。
- 随着时间推移,不断修改接口实现的时候都必须同步修改接口文档,而文档与代码又处于两个不同的媒介,除非有严格的管理机制,不然很容易导致不一致现象。
为了解决上面这样的问题,本文将介绍RESTful API的重磅好伙伴Swagger2,它可以轻松的整合到Spring Boot中,并与Spring MVC程序配合组织出强大RESTful API文档。它既可以减少我们创建文档的工作量,同时说明内容又整合入实现代码中,让维护文档和修改代码整合为一体,可以让我们在修改代码逻辑的同时方便的修改文档说明。另外Swagger2也提供了强大的页面测试功能来调试每个RESTful API。具体效果如下图所示:

添加swagger2依赖
<dependency>
    <groupId>io.springfox</groupId>
    <artifactId>springfox-swagger2</artifactId>
    <version>2.2.2</version>
</dependency>
<dependency>
    <groupId>io.springfox</groupId>
    <artifactId>springfox-swagger-ui</artifactId>
    <version>2.2.2</version>
</dependency>
创建swagger2配置类
@Configuration
@EnableSwagger2
public class Swagger2Config {

    @Bean
    public Docket testRestApi(){
	return new Docket(DocumentationType.SWAGGER_2)
                .apiInfo(testApiInfo()) // 设置api的基本信息
                .select()
                .apis(RequestHandlerSelectors.basePackage("com.bo.springboot")) // 声明扫描的包路径
                .paths(PathSelectors.any()) // 不过滤任何路径
                .build();
    }

    public ApiInfo testApiInfo(){
	return new ApiInfoBuilder()
		.title("Swagger2测试API文档") // 标题
		.description("这里是测试相关接口描述信息") // 描述信息
		.termsOfServiceUrl("https://blog.csdn.net/w47_csdn") // 服务条款
		.contact("博") // 联系人
		.version("1.0") // 版本号
		.license("北京XX信息科技有限公司") // 执照信息
		.licenseUrl("http://www.XXX.com") // 执照信息链接地址
		.build();
    }
}如上代码所示,通过@Configuration注解,让Spring来加载该类配置。再通过@EnableSwagger2注解来启用Swagger2。再通过createRestApi函数创建Docket的Bean之后,apiInfo()用来创建该Api的基本信息(这些基本信息会展现在文档页面中)。select()函数返回一个ApiSelectorBuilder实例用来控制哪些接口暴露给Swagger来展现,本例采用指定扫描的包路径来定义,Swagger会扫描该包下所有Controller定义的API,并产生文档内容(除了被@ApiIgnore指定的请求)。
编写访问接口以及文档内容
在完成了上述配置后,其实已经可以生产文档内容,但是这样的文档主要针对请求本身,而描述主要来源于函数等命名产生,对用户并不友好,我们通常需要自己增加一些说明来丰富文档内容。如下所示,我们通过@ApiOperation注解来给API增加说明、通过@ApiImplicitParams、@ApiImplicitParam注解来给参数增加说明。
@Slf4j
@Api(value = "TestController", tags = {"测试接口"})
@RestController
@RequestMapping("/test")
public class TestController {

    @RequestMapping(value = "/show", method = RequestMethod.GET)
    @ApiOperation(value = "show标题", notes = "这里是show接口描述")
    public String show(
	@ApiParam(required = true, name = "text", value = "参数文本")
        @RequestParam String text){
	log.info("test show -> params: " + text);
	return "print out: " + text;
    }

    @RequestMapping(value = "/hello", method = RequestMethod.POST)
    @ApiOperation(value = "hello标题", notes = "这里是hello接口描述")
    @ApiImplicitParam(name = "user", value = "用户实体", dataType = "User", paramType = "body", required = true)
    public String hello(@RequestBody User user){
	log.info("test hello -> params: " + user);
	return "hello: " + user.getName();
    }
}Swagger2默认将所有的Controller中的RequestMapping方法都会暴露,然而在实际开发中,我们并不一定需要把所有API都体现在文档中查看,这种情况下,使用注解@ApiIgnore来解决,如果应用在Controller范围上,则当前Controller中的所有方法都会被忽略,如果应用在方法上,则对应用的API方法进行忽略。
启动测试
完成上述代码添加上,启动Spring Boot程序,访问:http://localhost:8080/swagger-ui.html 就能看到前文所展示的REST API的页面。我们可以再点开具体的API请求,以POST类型的/test/hello请求为例,可找到上述代码中我们配置的Notes信息以及参数user的描述信息,如下图所示。
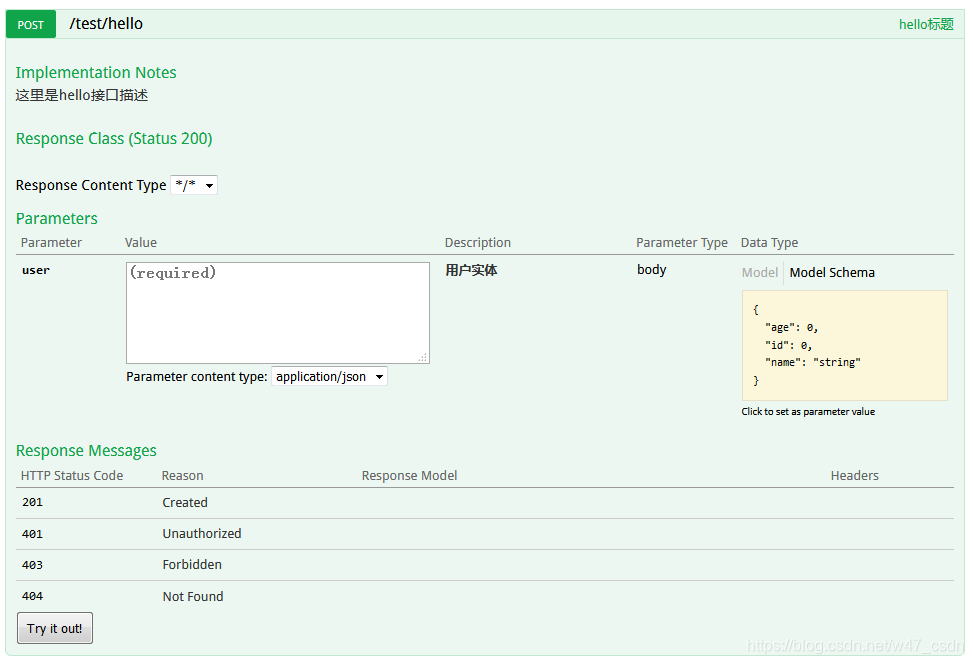
API文档调试
在上图请求的页面中,我们看到user的Value是个输入框,Swagger除了查看接口功能外,还提供了调试测试功能,我们可以点击上图中右侧的Model Schema(黄色区域:它指明了User的数据结构),此时Value中就有了user对象的模板,我们只需要稍适修改,点击下方"Try it out!"按钮,即可完成了一次请求调用!此时,你也可以通过几个GET请求来验证之前的POST请求是否正确。相比为这些接口编写文档的工作,我们增加的配置内容是非常少而且精简的,对于原有代码的侵入也在忍受范围之内。因此,在构建REST API的同时,加入Swagger来对API文档进行管理,是个不错的选择。
Swagger2常用注解
@Api用于描述类,标识这个类是swagger的资源
value – 表示说明;
tags – 也表示说明,它可以是一个列表。
注:tags和value同时存在时优先使用tags;
@ApiOperation用于描述方法,表示一个http请求的操作
value - 描述接口标题
notes - 描述接口详情
tags - 对当前接口分组,默认与所在controller一组(视情况而用)
@ApiParam用于方法,参数,字段说明,表示对参数的添加元数据(说明或是否必填等)
name–参数名
value – 参数说明
required – 是否必填
注:一般用于对单个方法参数进行描述,对方法或类进行描述貌似无效
@ApiModel用于类,表示对类进行说明,描述接收参数的实体类
value – 类名
description – 类描述
@ApiModelProperty用于类的方法,字段,表示对model属性的说明或者数据操作更改
value – 字段说明
name – 重写字段名字
dataType – 重写字段类型
required – 是否必填
position - 字段排序
example – 举例说明
hidden – 隐藏
@ApiIgnore用于类,方法,方法参数,表示这个方法或者类被忽略
@ApiImplicitParam用于方法,表示单独的请求参数
name – 参数名
value – 参数说明
defaultValue - 默认值
required - 是否必填
dataType – 数据类型
paramType – 参数类型
example - 举例说明
@ApiImplicitParams用于方法存在多个参数时使用,包含多个 @ApiImplicitParam
更多注解说明参见:swagger2官方注解文档
Swagger2分组API配置
当一个页面中的API文档篇幅过多时,可以对不同访问路径的API文档进行分组显示,下面展示分组配置:
@Configuration
@EnableSwagger2
public class Swagger2Config {

    @Bean
    public Docket testRestApi(){
	return new Docket(DocumentationType.SWAGGER_2)
                .groupName("test") // 如果存在多个Docket实例则需要指定组名,默认为"default"
                .apiInfo(testApiInfo()) // 设置api的基本信息
                .select()
                .apis(RequestHandlerSelectors.basePackage("com.bo.springboot")) // 声明扫描的包路径
                .paths(Predicates.or(PathSelectors.regex("/test/.*"), PathSelectors.regex("/testapi/.*")))
                .build();
    }

    public ApiInfo testApiInfo(){
	return new ApiInfoBuilder()
		.title("Swagger2测试API文档") // 标题
		.description("这里是测试相关接口描述信息") // 描述信息
		.termsOfServiceUrl("https://blog.csdn.net/w47_csdn") // 服务条款
		.contact("博") // 联系人
		.version("1.0") // 版本号
		.license("北京XX信息科技有限公司") // 执照信息
		.licenseUrl("http://www.XXX.com") // 执照信息链接地址
		.build();
    }

    @Bean
    public Docket userRestApi(){
	return new Docket(DocumentationType.SWAGGER_2)
                .groupName("user") // 如果存在多个Docket实例则需要指定组名,默认为"default"
                .apiInfo(userApiInfo()) // 设置api的基本信息
                .select()
                .apis(RequestHandlerSelectors.basePackage("com.bo.springboot")) // 声明扫描的包路径
                .paths(Predicates.or(PathSelectors.regex("/user/.*"), PathSelectors.regex("/userapi/.*")))
                .build();
    }

    public ApiInfo userApiInfo(){
	return new ApiInfoBuilder()
		.title("Swagger2用户管理API文档") // 标题
		.description("这里是用户管理相关接口描述信息") // 描述信息
		.termsOfServiceUrl("https://blog.csdn.net/w47_csdn") // 服务条款
		.contact("博") // 联系人
		.version("1.0") // 版本号
		.license("北京XX信息科技有限公司") // 执照信息
		.licenseUrl("http://www.XXX.com") // 执照信息链接地址
		.build();
    }

}
上述配置分了2组API,分组名称分别是"test"和"user",test分组的拦截路径是"/test/.*"或"/testapi/.*",而user分组的拦截路径是"/user/.*"或"/userapi/.*",这样2个分组生成的API不会发生冲突,可自由切换分组如下图:

新增的user分组的接口定义如下:
@Slf4j
@Api(value = "user-controller", tags = {"用户管理接口"})
@RestController
@RequestMapping("/user")
public class UserController {

    private static Map<Long, User> userMap = Collections.synchronizedMap(new HashMap<Long, User>());

    @ApiOperation(value = "查询用户", notes = "获取全部用户列表")
    @GetMapping("/getAll")
    public ResponseDto<GetUserRespBody> getAllUser(){
        ResponseDto<GetUserRespBody> responseDto = new ResponseDto<>();
	try {
	    GetUserRespBody respBody = new GetUserRespBody();
	    respBody.setUsers(new ArrayList<>(userMap.values()));
	    responseDto.setRetCode(0);
	    responseDto.setRetMsg("success");
            responseDto.setBody(respBody);
        } catch (Exception e) {
            log.info("get all user error", e.getMessage());
            responseDto.setRetCode(-1);
            responseDto.setRetMsg("system error");
        }
        return responseDto;
    }

    @ApiOperation(value="查询用户信息", notes="根据用户ID来获取用户详细信息")
    @ApiImplicitParam(name = "id", value = "用户ID", required = true, dataType = "String")
    @RequestMapping(value="/getOne/{id}", method=RequestMethod.GET)
    public ResponseDto<User> getUser(@PathVariable Long id) {
        log.info("get user -> params: " + id);
	ResponseDto<User> responseDto = new ResponseDto<>();
	if(id != null && userMap.containsKey(id)){
	    responseDto.setBody(userMap.get(id));
	}else {
	    responseDto.setRetCode(404);
	    responseDto.setRetMsg("not found");
	}
	    return responseDto;
    }

    @ApiOperation(value = "创建用户", notes = "根据指定的用户信息创建一个新用户")
    @ApiImplicitParam(name = "requestDto", value = "创建用户请求参数", required = true, dataType = "RequestDto«CreateUserReqBody»")
    @PostMapping("/create")
    public ResponseDto<Object> createUser(@RequestBody RequestDto<CreateUserReqBody> requestDto){
        log.info("create user -> params: " + requestDto.getBody());
	ResponseDto<Object> responseDto = new ResponseDto<>();
	try {
	    User user = new User();
	    user.setId(requestDto.getBody().getId());
	    user.setName(requestDto.getBody().getName());
	    user.setAge(requestDto.getBody().getAge());
	    userMap.put(requestDto.getBody().getId(), user);
	    responseDto.setRetCode(0);
	    responseDto.setRetMsg("create user success");
	} catch (Exception e) {
	    log.info("create user error", e.getMessage());
	    responseDto.setRetCode(-1);
	    responseDto.setRetMsg("system error");
	}
	    return responseDto;
    }

    @ApiOperation(value="更新用户信息", notes="根据用户ID来指定更新对象并根据传过来的user信息来更新用户信息")
    @ApiImplicitParam(name = "requestDto", value = "更新用户请求参数", required = true, dataType = "RequestDto«UpdateUserReqBody»")
    @RequestMapping(value="/update", method=RequestMethod.PUT)
    public ResponseDto<Object> updateUser(@RequestBody RequestDto<UpdateUserReqBody> requestDto) {
        log.info("update user -> params: " + requestDto.getBody());
	ResponseDto<Object> responseDto = new ResponseDto<>();
	try {
	    if(userMap.containsKey(requestDto.getBody().getId())){
	        User user = userMap.get(requestDto.getBody().getId());
	        if(requestDto.getBody().getName() != null){
	            user.setName(requestDto.getBody().getName());
	        }
	        if(requestDto.getBody().getAge() != null){
	            user.setAge(requestDto.getBody().getAge());
	        }
	        userMap.put(requestDto.getBody().getId(), user);
	        responseDto.setRetCode(0);
	        responseDto.setRetMsg("update user success");
	    }else {
		responseDto.setRetCode(405);
		responseDto.setRetMsg("update user failed");
	    }
        } catch (Exception e) {
	    log.info("update user error");
	    responseDto.setRetCode(-1);
	    responseDto.setRetMsg("system error");
	}
            return responseDto;
    }

    @ApiOperation(value="删除用户", notes="根据url的id来指定删除对象")
    @ApiImplicitParam(name = "id", value = "用户ID", required = true, dataType = "String")
    @RequestMapping(value="/delete", method=RequestMethod.DELETE)
    public ResponseDto<Object> deleteUser(@RequestParam Long id) {
        log.info("delete user -> params: " + id);
        ResponseDto<Object> responseDto = new ResponseDto<>();
        if(id != null && userMap.containsKey(id)){
            userMap.remove(id);
            responseDto.setRetCode(0);
            responseDto.setRetMsg("delete user success");
        }else {
            responseDto.setRetCode(405);
            responseDto.setRetMsg("delete user failed");
        }
            return responseDto;
    }

}
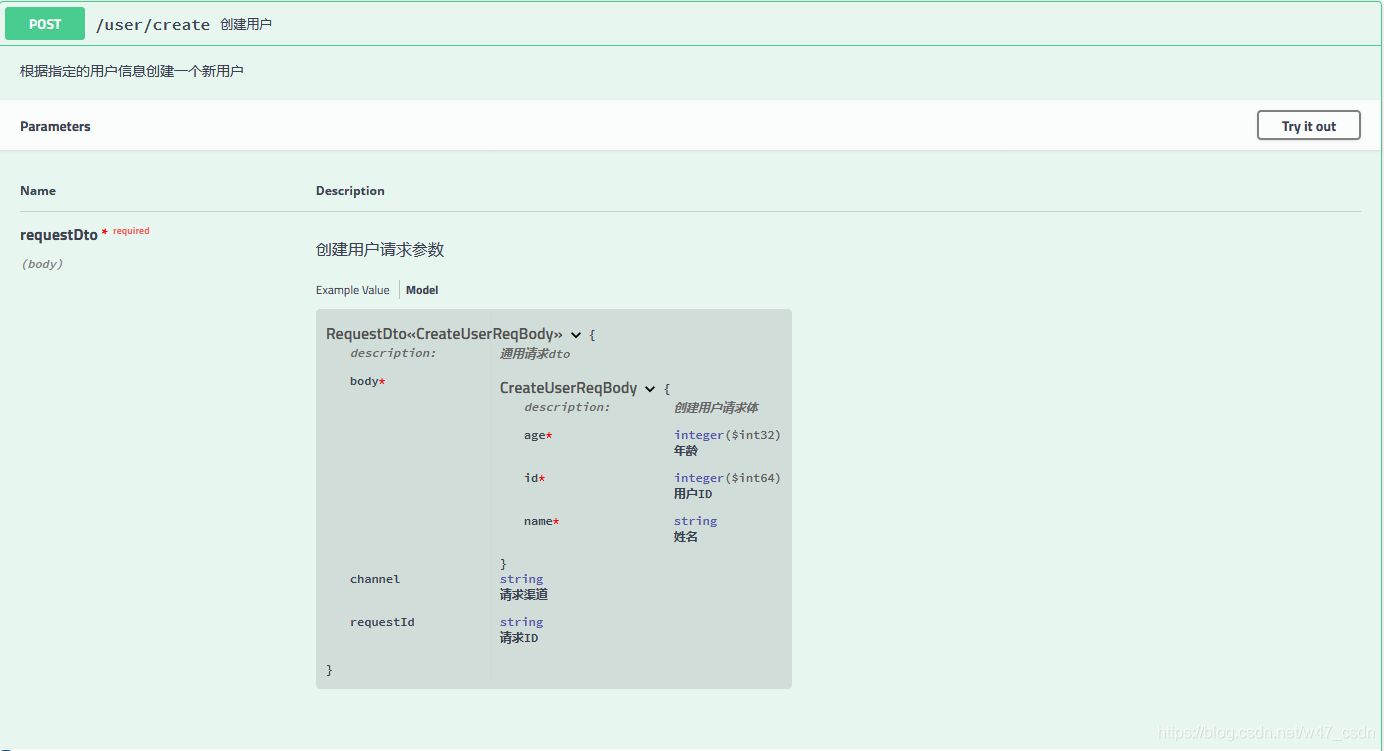
在swagger2页面点击打开user分组的"/user/create"API文档说明,可以看到上面定义的创建用户接口的请求参数是一个带有请求体的泛型参数,这时必须声明注解@ApiImplicitParam的dataType属性,否则将看不到请求模型的json结构,即使用双尖括号对泛型进行包裹,例如:RequestDto«CreateUserReqBody»,在swagger2页面看到请求参数模型如下图:
执行try it out 创建一个用户,返回结果如下:
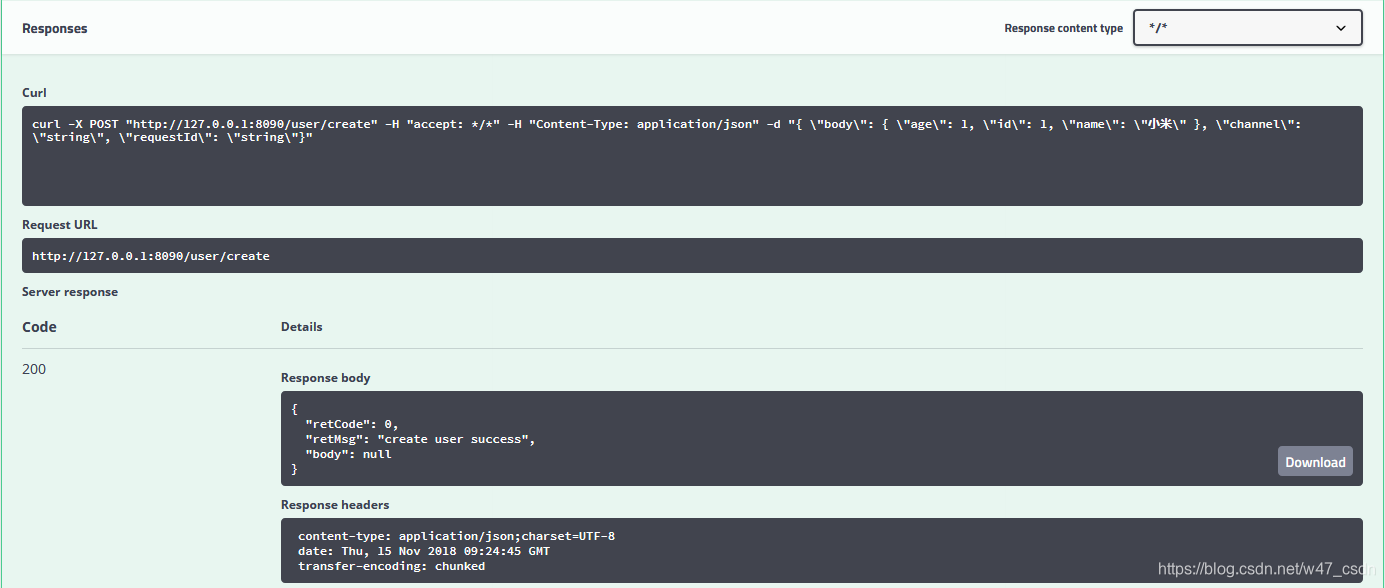
返回结果模型结构如果带有泛型swagger2会自动解析,如下图:

参考博客:


 182
182

 被折叠的 条评论
为什么被折叠?
被折叠的 条评论
为什么被折叠?
 到【灌水乐园】发言


