


在平板上实现的效果如下:
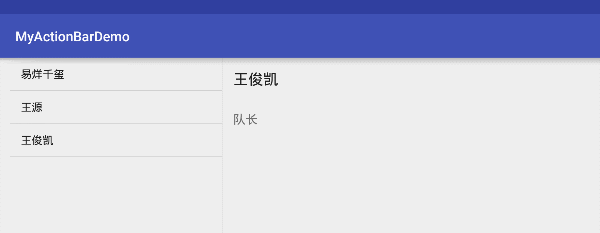
左边使用ListFragment,静态加载,调用setAdapter()设置Adapter即可。右边使用了动态加载。Activity通过实现在ListFragment中的内部接口,这样Fragment就可以调用该回调方法将数据传给Activity。
- 首先用于内容显示的数据类
package com.example.myactionbardemo.model;

import java.util.ArrayList;
import java.util.HashMap;
import java.util.List;
import java.util.Map;

/**
 *
 * Created by W on 2016/7/30.
 */
public class StartContent {
    //定义一个内部类
    public static class Star{
        public Integer id;
        public String name;
        public String desc;

        public Star(Integer id, String name, String desc) {
            this.id = id;
            this.name = name;
            this.desc = desc;
        }

        @Override
        public String toString() {
            return name;
        }
    }

    public static List<Star> ITEMS = new ArrayList<Star>();

    public static Map<Integer, Star> ITEM_MAP = new HashMap<Integer, Star>();
    static {
        addItem(new Star(1, "易烊千玺", "跳舞担当"));
        addItem(new Star(2, "王源", "特别可爱"));
        addItem(new Star(3, "王俊凯", "队长"));
    }

    public static void addItem(Star star){
        ITEMS.add(star);
        ITEM_MAP.put(star.id, star);
    }
}
- 然后布局视图,左边添加了StarListFragment,右边是一个FrameLayout 的容器
<?xml version="1.0" encoding="utf-8"?>
<LinearLayout xmlns:android="http://schemas.android.com/apk/res/android"
    android:orientation="horizontal"
    android:layout_width="match_parent"
    android:layout_height="match_parent"
    android:layout_marginLeft="16dp"
    android:layout_marginRight="16dp"
    android:divider="?android:attr/dividerHorizontal"
    android:showDividers="middle">
    <fragment
        android:name="com.example.myactionbardemo.StarListFragment"
        android:id="@+id/star_list"
        android:layout_width="0dp"
        android:layout_height="match_parent"
        android:layout_weight="1"/>
    <FrameLayout
        android:id="@+id/star_list_detail"
        android:layout_width="0dp"
        android:layout_height="match_parent"
        android:layout_weight="3"/>

</LinearLayout>- 左边的ListFragment代码如下
package com.example.myactionbardemo;

import android.app.Activity;
import android.app.ListFragment;
import android.os.Bundle;
import android.view.View;
import android.widget.ArrayAdapter;
import android.widget.ListView;

import com.example.myactionbardemo.model.StartContent;

/**
 *
 * Created by W on 2016/7/30.
 */
public class StarListFragment extends ListFragment {

    private Callbacks mCallbacks;
    //定义一个回调接口,在Activity中需要实现
    //该Framgent将通过该接口与他它所在的Activity交互
    public interface Callbacks{
      void onItemSelectedListener(Integer id);
    }

    @Override

    public void onCreate(Bundle savedInstanceState) {
        super.onCreate(savedInstanceState);
        //ArrayAdapter()里的第二个参数是系统提供的布局,第三个是布局里TextView的id
        setListAdapter(new ArrayAdapter<StartContent.Star>(getActivity()
                , android.R.layout.simple_list_item_activated_1,
                android.R.id.text1, StartContent.ITEMS));
    }

    @Override
    public void onAttach(Activity activity) {
        super.onAttach(activity);
        if (!(activity instanceof Callbacks)){
            throw new IllegalStateException("必须实现Callbacks接口");
        }
        mCallbacks = (Callbacks) activity;
    }

    @Override
    public void onDetach() {
        super.onDetach();

        mCallbacks = null;
    }

    @Override
    public void onListItemClick(ListView l, View v, int position, long id) {
        super.onListItemClick(l, v, position, id);
        //回调该接口,传入了id
        mCallbacks.onItemSelectedListener(StartContent.ITEMS.get(position).id);
    }
}
- StarDetailFragmentjava
package com.example.myactionbardemo;

import android.app.Fragment;
import android.os.Bundle;
import android.support.annotation.Nullable;
import android.view.LayoutInflater;
import android.view.View;
import android.view.ViewGroup;
import android.widget.TextView;

import com.example.myactionbardemo.model.StartContent;


/**
 *
 * Created by W on 2016/7/30.
 */
public class StarDetailFragment extends Fragment{
    public static final String ITEM_ID = "item_id";
    StartContent.Star star;

    @Override
    public void onCreate(Bundle savedInstanceState) {
        super.onCreate(savedInstanceState);
        if (getArguments().containsKey(ITEM_ID)){
          star = StartContent.ITEM_MAP.get(getArguments().getInt(ITEM_ID));
        }
    }

    @Nullable
    @Override
    //传入布局
    public View onCreateView(LayoutInflater inflater, ViewGroup container, Bundle savedInstanceState) {
        View view = inflater.inflate(R.layout.activity_start_detail, container, false);
        if (star != null){
            TextView textView = (TextView) view.findViewById(R.id.star_name);
            textView.setText(star.name);
            TextView textView1 = (TextView) view.findViewById(R.id.star_desc);
            textView1.setText(star.desc);

        }
        return view;

    }
}
- 显示在StarDetailFragment的布局
<?xml version="1.0" encoding="utf-8"?>
<LinearLayout xmlns:android="http://schemas.android.com/apk/res/android"
              android:orientation="vertical"
              android:layout_width="match_parent"
              android:layout_height="match_parent">
    <TextView
        style="?android:attr/textAppearanceLarge"
        android:layout_width="match_parent"
        android:layout_height="wrap_content"
        android:id="@+id/star_name"
        android:padding="16dp"/>
    <TextView
        style="?android:attr/textAppearanceMedium"
        android:layout_width="match_parent"
        android:layout_height="match_parent"
        android:id="@+id/star_desc"
        android:padding="16dp"/>


</LinearLayout>- 最后的Activity实现了从ListFrgment到StarDetailFragment的数据传递。
package com.example.myactionbardemo;

import android.os.Bundle;
import android.support.annotation.Nullable;
import android.support.v7.app.AppCompatActivity;

/**
 *
 * Created by W on 2016/7/30.
 */
 //实现了内部接口
public class ListFragmentActivity extends AppCompatActivity implements StarListFragment.Callbacks{

    @Override
    protected void onCreate(@Nullable Bundle savedInstanceState) {
        super.onCreate(savedInstanceState);
        setContentView(R.layout.activity_star_two);
    }

    @Override
    public void onItemSelectedListener(Integer id) {
        Bundle bundle = new Bundle();
        bundle.putInt(StarDetailFragment.ITEM_ID, id);
        StarDetailFragment fragment = new StarDetailFragment();
        fragment.setArguments(bundle);
        getFragmentManager().beginTransaction().replace(R.id.star_list_detail,fragment).commit();
    }
}
使用内部接口来进行Fragment和Activity传递数据,真的很奇妙,编程就是如此奇妙啊啊啊


 629
629

 被折叠的 条评论
为什么被折叠?
被折叠的 条评论
为什么被折叠?
 到【灌水乐园】发言


