


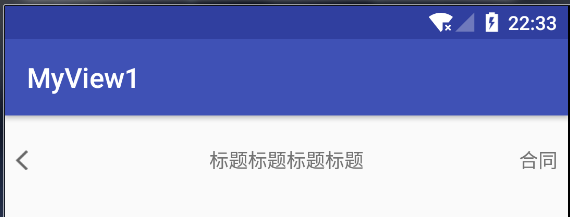
上一篇,我们做了一个带有背景色的TextView,属于自定义控件,这一片我们看一下,如何进行自定义布局。首先,我们事先一个简单的布局,以常见的标题栏为列,如下图:

一个返回键,一个标题,还有右边按钮。由图可知,该标题栏中有三个控件,有多个控件,就会涉及到排布的问题,那么用之前的继承View,重写onMeasure和onDraw就不能解决问题了,这时,我们要继承ViewGroup,重写onLayout方法。也就是今天的主要内筒,自定义布局。
1,先看主函数:
public class ThreadActivity extends AppCompatActivity{

    @Override
    public void onCreate(@Nullable Bundle savedInstanceState) {
        super.onCreate(savedInstanceState);
        setContentView(R.layout.thread_activity);
    }
}
什么也没写;
2.MyViewGroup:
public class MyViewGroup extends ViewGroup{

    private int MargnLeft = 20;
    private int MargnRight = 20;
    private int MargnTop = 20;
    public MyViewGroup(Context context) {
        this(context,null);
    }

    public MyViewGroup(Context context, AttributeSet attrs) {
        this(context, attrs,0);
    }

    public MyViewGroup(Context context, AttributeSet attrs, int defStyleAttr) {
        super(context, attrs, defStyleAttr);
    }

    @Override
    protected void onMeasure(int widthMeasureSpec, int heightMeasureSpec) {
        super.onMeasure(widthMeasureSpec, heightMeasureSpec);
        //遍历子View,测量每个View的大小
        for(int i = 0; i < getChildCount(); i++){
            View view = getChildAt(i);
            measureChild(view,widthMeasureSpec,heightMeasureSpec);
        }
    }

    @Override
    protected void onLayout(boolean b, int i, int i1, int i2, int i3) {
        for(int j = 0; j < getChildCount(); j++){
            View view = getChildAt(j);
            if(j == 0){//返回键的位置
                view.layout(MargnLeft,MargnTop,MargnLeft + view.getMeasuredWidth(),
                        MargnTop +view.getMeasuredHeight());
            }else if(j == 1){//标题居中
                view.layout(getWidth()/2 - view.getMeasuredWidth() / 2,MargnTop,
                        getWidth()/2 + view.getMeasuredWidth() / 2,MargnTop + view.getMeasuredHeight());
            }else if(j == 2){//右边按钮位置
                view.layout(getWidth() - MargnRight - view.getMeasuredWidth(),MargnTop,getWidth() -MargnRight,
                         MargnTop +view.getMeasuredHeight());
            }
        }
    }
}
可以看到MyViewGroup继承了ViewGroup,很明显,这是一个自定义的布局,紧接着重写了onMeasure()和onlayout()这两个方法,在onMeasure中通过一个for循环,对ViewGroup中的子控件进行遍历,然后通过
View view = getChildAt(i);
measureChild(view,widthMeasureSpec,heightMeasureSpec);
可以得到子控件View的尺寸。
然后主要看onLayout()方法,在这里对各个子控件进行了排布,以确定,控件在画布上的具体位置。关于onLayout()的介绍我们在第一节自定义View系列(一)中,已经介绍过了。关于源码这里不再贴出,这里着重说一下里面参数的含义:第一个是判断子控件view的位置是否发生变化。剩下的四个,分别表示子控件相对于父控件ViewGroup的左、上、右、下边界的距离。如下图:
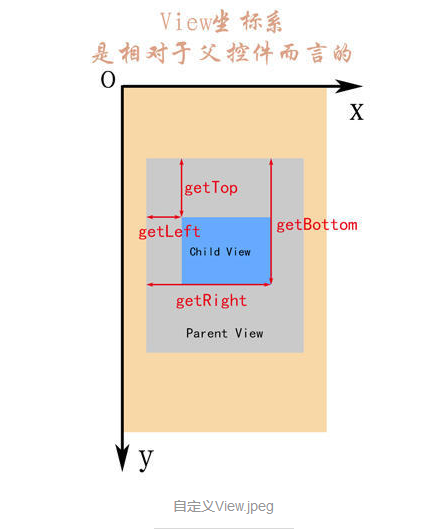
看到上面的图片,onlayout中各个View的位置的设置就不难看懂了。位置设置好之后基本就完成了,我们就可以像里面放控件了:
3.xml:
<com.example.administrator.myview1.MyViewGroup
    xmlns:android="http://schemas.android.com/apk/res/android"
    android:layout_width="match_parent"
    android:layout_height="50dp">

    <ImageView
        android:layout_width="wrap_content"
        android:layout_height="match_parent"
        android:src="@mipmap/icon_black_back"/>

    <TextView
        android:layout_width="wrap_content"
        android:layout_height="match_parent"
        android:gravity="center"
        android:text="标题标题标题标题"/>
    <TextView
        android:layout_width="wrap_content"
        android:layout_height="match_parent"
        android:gravity="center"
        android:text="合同"/>
,运行一下看效果,如下图:
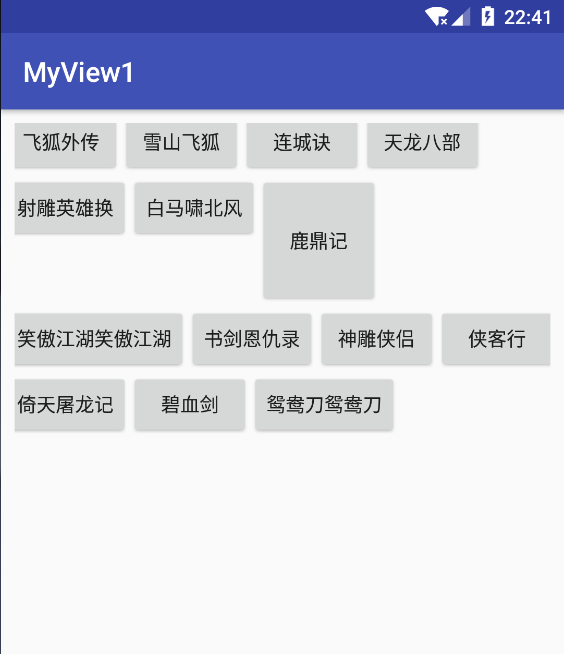
可以看到效果已经实现了。当然具体项目中的各种设置,这里没有添加,主要是为了看一下效果。网上很多大神都通关自定义ViewGroup实现一个流式布局,像搜索记录类似的。这里呢,小编也参考一位道友的博客撸出了下面的一段代码,有兴趣的可以看看:
1.MyViewGroup2:
public class MyViewGroup2 extends ViewGroup{

    public MyViewGroup2(Context context) {
        this(context,null);
    }

    public MyViewGroup2(Context context, AttributeSet attrs) {
        this(context, attrs,0);
    }

    public MyViewGroup2(Context context, AttributeSet attrs, int defStyleAttr) {
        super(context, attrs, defStyleAttr);
    }

    @Override
    protected void onMeasure(int widthMeasureSpec, int heightMeasureSpec) {
        super.onMeasure(widthMeasureSpec, heightMeasureSpec);
        measureChildren(widthMeasureSpec, heightMeasureSpec);
    }

    @Override
    protected void onLayout(boolean bo, int l, int t, int r, int b) {
        //获得子控件的数量
        int childCount = getChildCount();
        //当前子控件的左边坐标
        int cLeft = 0;
        //当前子控件的上边坐标
        int cTop = 0;
        //ViewGroup整体宽度
        int width = getWidth();
        //行高
        int lineHeight = 0;
        //遍历所有子控件
        for(int i = 0; i < childCount; i++){
            //获取当前控件
            View childAt = getChildAt(i);
            //获取宽度
            int cWidth = childAt.getMeasuredWidth();
            //获取高度
            int cHeight = childAt.getMeasuredHeight();
            //当前控件右边
            int cRight = cLeft + cWidth;
            //当前控件下边
            int cBottom = cTop + cHeight;
            //判断是否换行
            if(cRight > width){
                //如果换行重新计算上下左右地值
                cLeft = 0;
                cRight = cLeft + cWidth;
                cTop += lineHeight;
                cBottom = cTop + cHeight;
                //换行后,取第一个控件高度作为最大行高
                lineHeight = cHeight;
            }else{
                //如果不换行,需要计算最大高度,控0件最大高度最为行高
                lineHeight = Math.max(lineHeight,cHeight);
            }
            childAt.layout(cLeft,cTop,cRight,cBottom);
            //横向向后移动一个,前面控件的右边作为后面控件的左边
            cLeft = cRight;
        }
    }
}
2.xml:
<LinearLayout
    xmlns:android="http://schemas.android.com/apk/res/android"
    android:layout_width="match_parent"
    android:layout_height="match_parent">
    <com.example.administrator.myview1.MyViewGroup2
        android:id="@+id/myviewgroup"
        android:layout_width="match_parent"
        android:layout_height="match_parent"
        android:padding="10dp"/>

</LinearLayout>
button_layout:
<LinearLayout
    xmlns:android="http://schemas.android.com/apk/res/android"
    android:layout_width="match_parent"
    android:layout_height="match_parent">
    <Button
        android:id="@+id/btn"
        android:layout_width="wrap_content"
        android:layout_height="wrap_content"/>
3.主函数:
public class FourActivity extends AppCompatActivity{

    private MyViewGroup2 mGroup2;
    private String [] team = {"飞狐外传","雪山飞狐","连城诀","天龙八部","射雕英雄换","白马啸北风","鹿鼎记",
            "笑傲江湖笑傲江湖","书剑恩仇录","神雕侠侣","侠客行","倚天屠龙记","碧血剑","鸳鸯刀鸳鸯刀"};
    @Override
    public void onCreate(@Nullable Bundle savedInstanceState) {
        super.onCreate(savedInstanceState);
        setContentView(R.layout.four_activity);
        init();
    }

    private void init() {
        mGroup2 = findViewById(R.id.myviewgroup);
        mGroup2.removeAllViews();
        for(int i = 0; i < 14; i++){
            View view = LayoutInflater.from(this).inflate(R.layout.button_layout,null);
            final Button button = view.findViewById(R.id.btn);
            if(i == 6 )
                button.setPadding(0,100,0,100);
            button.setText(team[i]);
            mGroup2.addView(view,i);

            button.setOnClickListener(new View.OnClickListener() {
                @Override
                public void onClick(View view) {
                    Toast.makeText(FourActivity.this,button.getText().toString(),Toast.LENGTH_LONG).show();
                }
            });
        }
    }
效果如下:


 308
308

 被折叠的 条评论
为什么被折叠?
被折叠的 条评论
为什么被折叠?
 到【灌水乐园】发言


