


目录
一、相关版本
| 工具 | 版本 |
| Idea | 2022.3.2 |
| Springboot | 2.7.12 |
| Kotlin | 1.8.20 |
| MyBatis | 3.5.3.1 |
| MySQL | 8.0.28 |
| JDK | 1.8 |
相关代码已分享到Gitee:
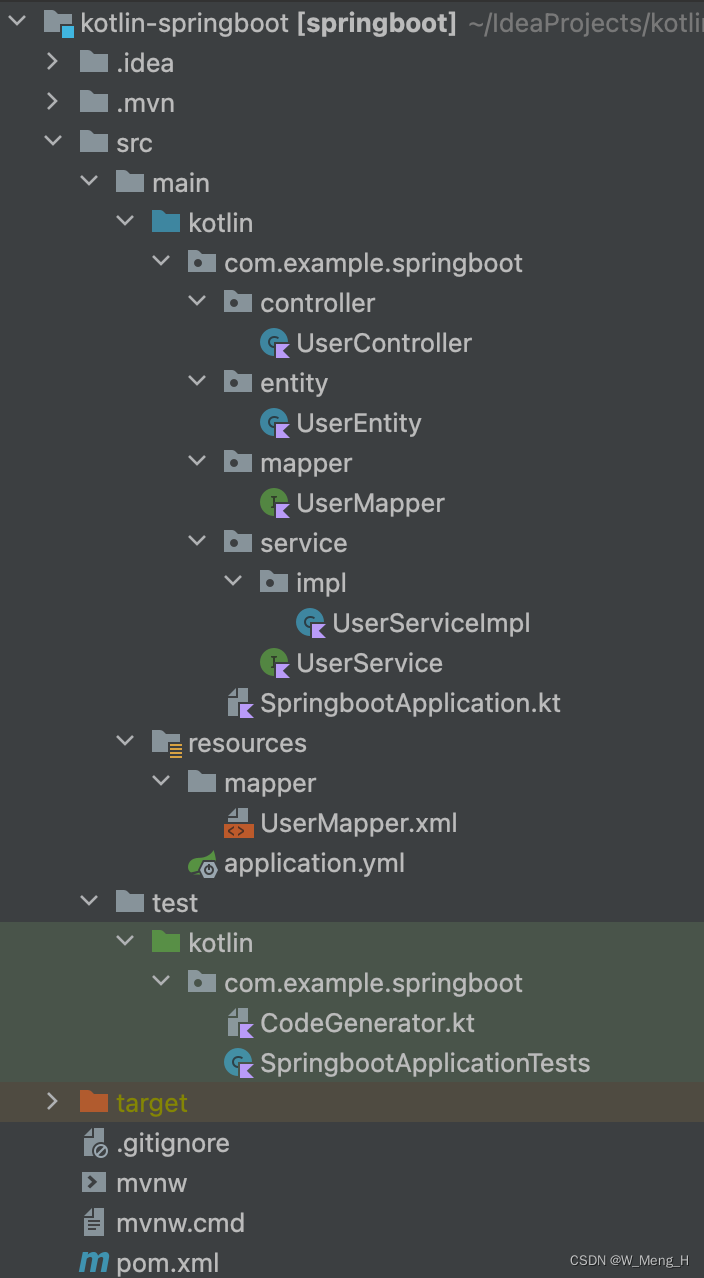
https://gitee.com/Vmetrio/kotlin-springboot![]() https://gitee.com/Vmetrio/kotlin-springboot项目结构:
https://gitee.com/Vmetrio/kotlin-springboot项目结构:
二、Maven因引入相关依赖
<?xml version="1.0" encoding="UTF-8"?>
<project xmlns="http://maven.apache.org/POM/4.0.0" xmlns:xsi="http://www.w3.org/2001/XMLSchema-instance"
         xsi:schemaLocation="http://maven.apache.org/POM/4.0.0 https://maven.apache.org/xsd/maven-4.0.0.xsd">
    <modelVersion>4.0.0</modelVersion>
    <parent>
        <groupId>org.springframework.boot</groupId>
        <artifactId>spring-boot-starter-parent</artifactId>
        <version>2.7.12</version>
        <relativePath/> <!-- lookup parent from repository -->
    </parent>
    <groupId>com.example</groupId>
    <artifactId>springboot</artifactId>
    <version>0.0.1-SNAPSHOT</version>
    <name>springboot</name>
    <description>springboot</description>
    <properties>
        <java.version>1.8</java.version>
        <kotlin.version>1.8.20</kotlin.version>
    </properties>
    <dependencies>
        <dependency>
            <groupId>org.springframework.boot</groupId>
            <artifactId>spring-boot-starter-web</artifactId>
        </dependency>
        <dependency>
            <groupId>com.fasterxml.jackson.module</groupId>
            <artifactId>jackson-module-kotlin</artifactId>
        </dependency>
        <dependency>
            <groupId>org.jetbrains.kotlin</groupId>
            <artifactId>kotlin-reflect</artifactId>
        </dependency>
        <dependency>
            <groupId>org.jetbrains.kotlin</groupId>
            <artifactId>kotlin-stdlib-jdk8</artifactId>
        </dependency>

        <dependency>
            <groupId>org.springframework.boot</groupId>
            <artifactId>spring-boot-starter-test</artifactId>
            <scope>test</scope>
        </dependency>

        <!--mysql-->
        <dependency>
            <groupId>com.mysql</groupId>
            <artifactId>mysql-connector-j</artifactId>
        </dependency>

        <!--mybatis-->
        <dependency>
            <groupId>com.baomidou</groupId>
            <artifactId>mybatis-plus-boot-starter</artifactId>
            <version>3.5.3.1</version>
        </dependency>
        <dependency>
            <groupId>com.baomidou</groupId>
            <artifactId>mybatis-plus-annotation</artifactId>
            <version>3.5.3.1</version>
        </dependency>
        <dependency>
            <groupId>com.baomidou</groupId>
            <artifactId>mybatis-plus-extension</artifactId>
            <version>3.5.3.1</version>
        </dependency>

        <!--MyabtisPlus 代码生成器-->
        <dependency>
            <groupId>com.baomidou</groupId>
            <artifactId>mybatis-plus-generator</artifactId>
            <version>3.5.3.1</version>
        </dependency>
        <dependency>
            <groupId>org.apache.velocity</groupId>
            <artifactId>velocity-engine-core</artifactId>
            <version>2.3</version>
        </dependency>
    </dependencies>

    <build>
        <sourceDirectory>${project.basedir}/src/main/kotlin</sourceDirectory>
        <testSourceDirectory>${project.basedir}/src/test/kotlin</testSourceDirectory>
        <plugins>
            <plugin>
                <groupId>org.springframework.boot</groupId>
                <artifactId>spring-boot-maven-plugin</artifactId>
            </plugin>
            <plugin>
                <groupId>org.jetbrains.kotlin</groupId>
                <artifactId>kotlin-maven-plugin</artifactId>
                <configuration>
                    <args>
                        <arg>-Xjsr305=strict</arg>
                    </args>
                    <compilerPlugins>
                        <plugin>spring</plugin>
                    </compilerPlugins>
                </configuration>
                <dependencies>
                    <dependency>
                        <groupId>org.jetbrains.kotlin</groupId>
                        <artifactId>kotlin-maven-allopen</artifactId>
                        <version>${kotlin.version}</version>
                    </dependency>
                </dependencies>
            </plugin>
        </plugins>
    </build>

</project>
三、SpringBoot配置文件
server:
  port: 8080

spring:
  datasource:
    url: jdbc:mysql://${MYSQL_HOST:localhost}:${MYSQL_PORT:3306}/${MYSQL_DB:demo}?useSSL=false&useUnicode=true&characterEncoding=utf-8&zeroDateTimeBehavior=convertToNull&transformedBitIsBoolean=true&serverTimezone=Asia/Shanghai&nullCatalogMeansCurrent=true&allowPublicKeyRetrieval=true
    username: ${MYSQL_USERNAME:root}
    password: ${MYSQL_PWD:123456789}
    driverClassName: com.mysql.cj.jdbc.Driver
    ##  Hikari 连接池配置
    hikari:
      ## 最小空闲连接数量
      minimum-idle: 10
      ## 空闲连接存活最大时间,默认600000(10分钟)
      idle-timeout: 18000
      ## 连接池最大连接数,默认是10
      maximum-pool-size: 1000
      ## 此属性控制从池返回的连接的默认自动提交行为,默认值:true
      auto-commit: true
      ## 连接池母子
      pool-name: DatebookHikariCP
      ## 此属性控制池中连接的最长生命周期,值0表示无限生命周期,默认1800000即30分钟
      max-lifetime: 1800000
      ## 数据库连接超时时间,默认30秒,即30000
      connection-timeout: 300000
      connection-test-query: SELECT 1
  jackson:
    date-format: yyyy-MM-dd HH:mm:ss
    time-zone: Asia/Shanghai

mybatis-plus:
  mapper-locations: classpath*:mapper/*.xml,classpath*:mapping/*.xml
  #MyBatis 别名包扫描路径,通过该属性可以给包中的类注册别名,多个路径用逗号分割
  type-aliases-package: com.example.springboot.entity
  global-config:
    db-config:
      id-type: AUTO # 全局默认主键策略,默认为雪花ID,若表中设置了自增,则生成的实体自动添加自增ID属性,参考 TestDelete
      logic-delete-field: deleted # 全局逻辑删除的实体字段名,若不配置,则不启用
      logic-delete-value: 1 # 逻辑已删除值(默认为 1)
      logic-not-delete-value: 0 # 逻辑未删除值(默认为 0)
  configuration:
    map-underscore-to-camel-case: true # 驼峰转下划线(默认)
    log-impl: org.apache.ibatis.logging.stdout.StdOutImpl # 日志输出
四、代码生成工具
package com.example.springboot

import com.baomidou.mybatisplus.generator.AutoGenerator
import com.baomidou.mybatisplus.generator.config.DataSourceConfig
import com.baomidou.mybatisplus.generator.config.GlobalConfig
import com.baomidou.mybatisplus.generator.config.PackageConfig
import com.baomidou.mybatisplus.generator.config.StrategyConfig

/**
 * 代码生成
 */
fun main() {
    AutoGenerator(
        // 设置数据源
        /**
         * url: jdbc:mysql://localhost:3306/demo?serverTimezone=UTC&useUnicode=true&characterEncoding=utf-8&AllowPublicKeyRetrieval=True
         * username: 用户名
         * password: 密码
         */
        DataSourceConfig.Builder(
            "jdbc:mysql://localhost:3306/demo?serverTimezone=UTC&useUnicode=true&characterEncoding=utf-8&AllowPublicKeyRetrieval=True",
            "root",
            "123456789"
        ).build()
    ).run {
        // 全局配置
        global(
            GlobalConfig.Builder()
                // 启用 Kotlin
                .enableKotlin()
                /**
                 * 输出路径
                 * System.getProperty("user.dir") 得到的是这个项目的目录
                 * /src/main/kotlin 是你代码的存放目录,如果你是多模块项目,记得加上你的模块名
                 * 比如 service-oa-parent
                 *              |- service-oa
                 *              |- model
                 * 你想在 service-oa 中生成,那么应该填入: System.getProperty("user.dir") + "/service-oa/src/main/kotlin"
                 */
                .outputDir(System.getProperty("user.dir") + "/src/main/kotlin")
                // 作者
                .author("meng")
                // 设置生成完毕后是否展开你 idea 的目录,不影响结果
                .disableOpenDir()
                .build()
        )
        // 包信息配置
        packageInfo(
            PackageConfig.Builder()
                /**
                 * 假定下列代码的目录结构为:
                 * com.goxiaogle.auth
                 *  |- controller
                 *  |- service
                 *      |- impl
                 *  |- mapper
                 *  则 com.goxiaogle 为父包,auth 为模块名
                 */
                // 设置父包
                .parent("com.example")
                // 设置模块名
                .moduleName("springboot")
                // 以下四个可以去掉,如果你的分包命名和他一样
                // 设置 Controller 层包名,默认就是 controller
                .controller("controller")
                // 设置 Service 层包名,默认就是 service
                .service("service")
                // 设置 Mapper 层包名,默认就是 mapper
                .mapper("mapper")
                // 设置 Entity 包名,默认就是 entity
                .entity("entity")
                .build()
        )
        // 策略配置
        strategy(
            StrategyConfig.Builder()
                // 设置要生成代码的数据库表名,可以设置多个,如 addInclude(a, b, c)
                .addInclude("user")
                // 设置生成的 service 接口命名方式,默认是 IXxxService,这里改成 XxxService
                // serviceBuilder() 方法建议在 build 后使用,此处偷懒直接用了
                .serviceBuilder().formatServiceFileName("%sService")
                .mapperBuilder().enableFileOverride().enableBaseColumnList().enableBaseResultMap()
                .build()
            // 设置其它几层的内容
            // .entityBuilder()
            // .controllerBuilder()
            // .mapperBuilder().build()
        )
        // 执行
        execute()
    }
}
五、实现用户服务模块案例
1、Controller
package com.example.springboot.controller;

import com.example.springboot.entity.UserEntity
import com.example.springboot.service.UserService
import org.springframework.web.bind.annotation.RequestMapping;
import org.springframework.web.bind.annotation.PostMapping
import org.springframework.web.bind.annotation.RestController
import javax.annotation.Resource
import javax.servlet.http.HttpServletRequest

/**
 * <p>
 *  用户服务
 * </p>
 *
 * @author meng
 * @since 2024-02-03
 */
@RestController
@RequestMapping("/user")
class UserController {

    // 需要注意和java不同的是,如果有bean的注入,需要在前面加上lateinit
    @Resource
    lateinit var userService: UserService;

    @PostMapping("/getUserById")
    fun getUserById(req: HttpServletRequest): UserEntity {
        val id: String = req.getParameter("id")
        val info: UserEntity = userService.findUserById(id)
        return info
    }
}
2、Service
package com.example.springboot.service;

import com.example.springboot.entity.UserEntity;
import com.baomidou.mybatisplus.extension.service.IService;

/**
 * <p>
 *  服务类
 * </p>
 *
 * @author meng
 * @since 2024-02-03
 */
interface UserService : IService<UserEntity> {
    fun findUserById(userId: String): UserEntity
}
package com.example.springboot.service.impl;

import com.example.springboot.entity.UserEntity;
import com.example.springboot.mapper.UserMapper;
import com.example.springboot.service.UserService;
import com.baomidou.mybatisplus.extension.service.impl.ServiceImpl;
import org.springframework.stereotype.Service;
import javax.annotation.Resource

/**
 * <p>
 *  服务实现类
 * </p>
 *
 * @author meng
 * @since 2024-02-03
 */
@Service
open class UserServiceImpl : ServiceImpl<UserMapper, UserEntity>(), UserService {

    @Resource
    lateinit var userMapper: UserMapper

    override fun findUserById(userId: String): UserEntity {
        return userMapper.findUserById(userId)
    }

}
3、Entity
package com.example.springboot.entity;

import java.io.Serializable;

/**
 * <p>
 *
 * </p>
 *
 * @author meng
 * @since 2024-02-03
 */
class UserEntity : Serializable {

    var id: String? = null

    var name: String? = null

    override fun toString(): String {
        return "User{" +
        "id=" + id +
        ", name=" + name +
        "}"
    }
}
4、Mapper
package com.example.springboot.mapper;

import com.example.springboot.entity.UserEntity;
import com.baomidou.mybatisplus.core.mapper.BaseMapper;
import org.apache.ibatis.annotations.Mapper

/**
 * <p>
 *  Mapper 接口
 * </p>
 *
 * @author meng
 * @since 2024-02-03
 */
@Mapper
interface UserMapper : BaseMapper<UserEntity> {
    //根据id获取用户信息
    fun findUserById(id: String): UserEntity
}
xml:
<?xml version="1.0" encoding="UTF-8"?>
<!DOCTYPE mapper PUBLIC "-//mybatis.org//DTD Mapper 3.0//EN" "http://mybatis.org/dtd/mybatis-3-mapper.dtd">
<mapper namespace="com.example.springboot.mapper.UserMapper">

    <!-- 通用查询映射结果 -->
    <resultMap id="BaseResultMap" type="com.example.springboot.entity.UserEntity">
        <id column="id" property="id" />
        <result column="name" property="name" />
    </resultMap>

    <!-- 通用查询结果列 -->
    <sql id="Base_Column_List">
        id, name
    </sql>

    <select id="findUserById" resultMap="BaseResultMap" >
        SELECT
        <include refid="Base_Column_List" />
        FROM user
        WHERE id = #{id}
    </select>

</mapper>
5、接口测试
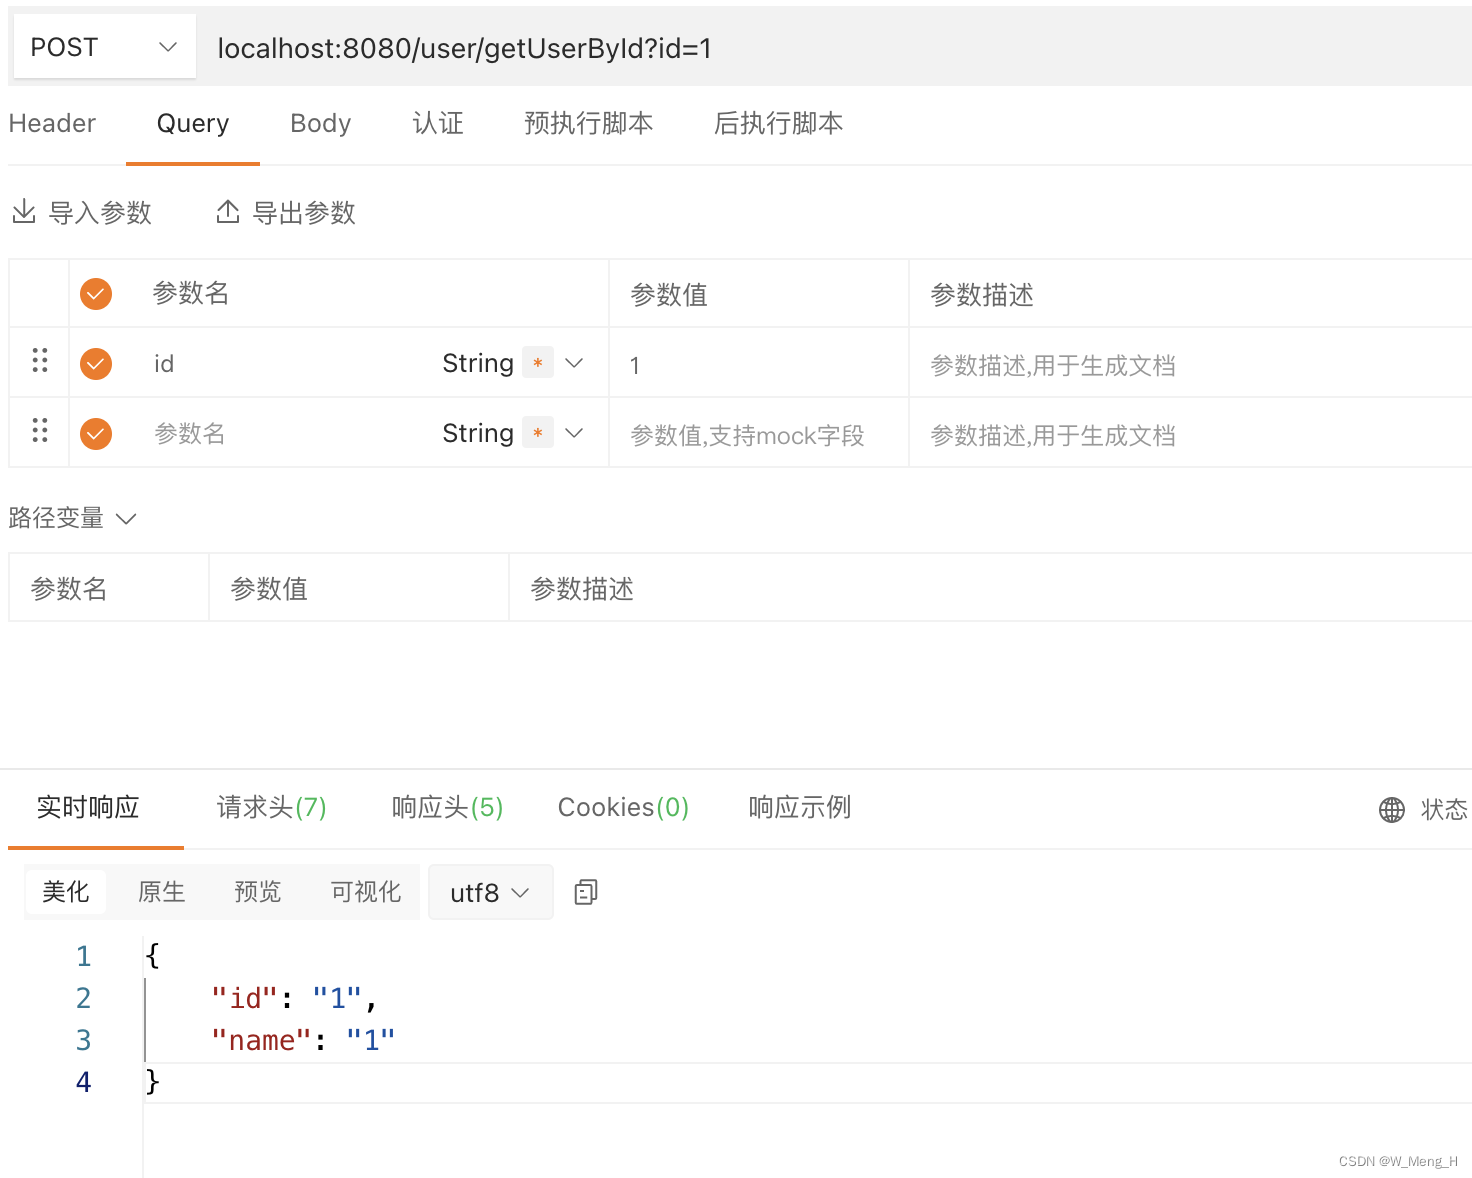


 7730
7730


 被折叠的 条评论
为什么被折叠?
被折叠的 条评论
为什么被折叠?
 到【灌水乐园】发言


