


搭建
大部分参考官方教程
https://github.com/chatchat-space/Langchain-Chatchat/blob/master/docs/install/README_docker.md
下面是docker-composer.yaml文件,我修改了本地映射的目录。本地目录我都提前建好了。
version: '3.9'
services:
  xinference:
    image: xprobe/xinference:v0.12.3
    restart: always
    command: xinference-local -H 0.0.0.0
    ports: # 不使用 host network 时可打开.
     - "9997:9997"
    # network_mode: "host"
    # 将本地路径(~/xinference)挂载到容器路径(/root/.xinference)中,
    # 详情见: https://inference.readthedocs.io/zh-cn/latest/getting_started/using_docker_image.html
    volumes:
      - /root/xxx/langchain-chatchat/model_data/xinference:/root/.xinference
      - /root/xxx/langchain-chatchat/model_data/cache/huggingface:/root/.cache/huggingface
      - /root/xxx/langchain-chatchat/model_data/cache/modelscope:/root/.cache/modelscope
    deploy:
      resources:
        reservations:
          devices:
            - driver: nvidia
              count: all
              capabilities: [gpu]
    runtime: nvidia
    # 模型源更改为 ModelScope, 默认为 HuggingFace
    environment:
      - XINFERENCE_MODEL_SRC=modelscope
  chatchat:
    image: chatimage/chatchat:0.3.1.3-0f4eb00-20240729
    # image: ccr.ccs.tencentyun.com/chatchat/chatchat:0.3.1.2-2024-0720
    restart: always
    ports: # 不使用 host network 时可打开.
      - "7861:7861"
      - "8501:8501"
    # network_mode: "host"
    # 将本地路径(~/chatchat)挂载到容器默认数据路径($CHATCHAT_ROOT)中
    volumes:
      - /root/xxx/langchain-chatchat/chatchat_data:/root/chatchat_data
根据教程执行到 第五步 5. 启动 chatchat & xinference 服务 发现又报错

解决如下(写教程的人,估计由于是已经部署好过一次,所以不记得先后顺序了)
- 下载数据库初始文件
cd /root/xxx/langchain-chatchat/chatchat_data
wget https://github.com/chatchat-space/Langchain-Chatchat/blob/master/docker/data.tar.gz
tar -xvf data.tar.gz
rm -rf data.tar.gz
6.检查服务启动情况
docker-compose up -d
WARN[0000] /root/docker-compose.yaml: version is obsolete
NAME IMAGE COMMAND SERVICE CREATED STATUS PORTS
root-chatchat-1 chatimage/chatchat:0.3.1.2-2024-0720 “chatchat -a” chatchat 3 minutes ago Up 3 minutes
root-xinference-1 xprobe/xinference:v0.12.1 “/opt/nvidia/nvidia_…” xinference 3 minutes ago Up 3 minutes
ss -anptl | grep -E ‘(8501|7861|9997)’
LISTEN 0 128 0.0.0.0:9997 0.0.0.0:* users:((“pt_main_thread”,pid=1489804,fd=21))
LISTEN 0 128 0.0.0.0:8501 0.0.0.0:* users:((“python”,pid=1490078,fd=10))
LISTEN 0 128 0.0.0.0:7861 0.0.0.0:* users:((“python”,pid=1490014,fd=9))
如上, 服务均已正常启动, 即可体验使用.
提示: 先登陆 xinference ui http://<your_ip>:9997 启动 llm 和 embedding 后, 再登陆 chatchat ui http://<your_ip>:8501 进行体验.
详细文档:
-
Langchain-chatchat 使用请参考: LangChain-Chatchat
-
Xinference 使用请参考: 欢迎来到 Xinference!
映射setttings.py
修改docker-compose.yaml将配置文件setttings.py映射出来
先将settings.py拷贝出来,拷贝到/root/xxx/langchain-chatchat目录下
cd /root/xxx/langchain-chatchat
docker cp langchain-chatchat-chatchat-1:/root/Langchain-Chatchat/libs/chatchat-server/chatchat/settings.py .
docker-compose down
新的docker-compose.yaml文件如下
version: '3.9'
services:
  xinference:
    image: xprobe/xinference:v0.12.3
    restart: always
    command: xinference-local -H 0.0.0.0
    ports: # 不使用 host network 时可打开.
     - "9997:9997"
    # network_mode: "host"
    # 将本地路径(~/xinference)挂载到容器路径(/root/.xinference)中,
    # 详情见: https://inference.readthedocs.io/zh-cn/latest/getting_started/using_docker_image.html
    volumes:
      - /root/xxx/langchain-chatchat/model_data/xinference:/root/.xinference
      - /root/xxx/langchain-chatchat/model_data/cache/huggingface:/root/.cache/huggingface
      - /root/xxx/langchain-chatchat/model_data/cache/modelscope:/root/.cache/modelscope
    deploy:
      resources:
        reservations:
          devices:
            - driver: nvidia
              count: all
              capabilities: [gpu]
    runtime: nvidia
    # 模型源更改为 ModelScope, 默认为 HuggingFace
    environment:
      - XINFERENCE_MODEL_SRC=modelscope
  chatchat:
    image: chatimage/chatchat:0.3.1.3-0f4eb00-20240729
    # image: ccr.ccs.tencentyun.com/chatchat/chatchat:0.3.1.2-2024-0720
    restart: always
    ports: # 不使用 host network 时可打开.
      - "7861:7861"
      - "8501:8501"
    # network_mode: "host"
    # 将本地路径(~/chatchat)挂载到容器默认数据路径($CHATCHAT_ROOT)中
    volumes:
      - /root/xxx/langchain-chatchat/chatchat_data:/root/chatchat_data
      - ./settings.py:/root/Langchain-Chatchat/libs/chatchat-server/chatchat/settings.py
networks:
  langchain_chatchat_network:
    driver: bridge
    ipam:
      driver: default
      config:
        - subnet: 172.16.238.0/24
修改setttings.py
然后修改 settings.py
DEFAULT_LLM_MODEL: str = "xxxxx"
DEFAULT_EMBEDDING_MODEL: str = "bge-large-zh-v1.5"
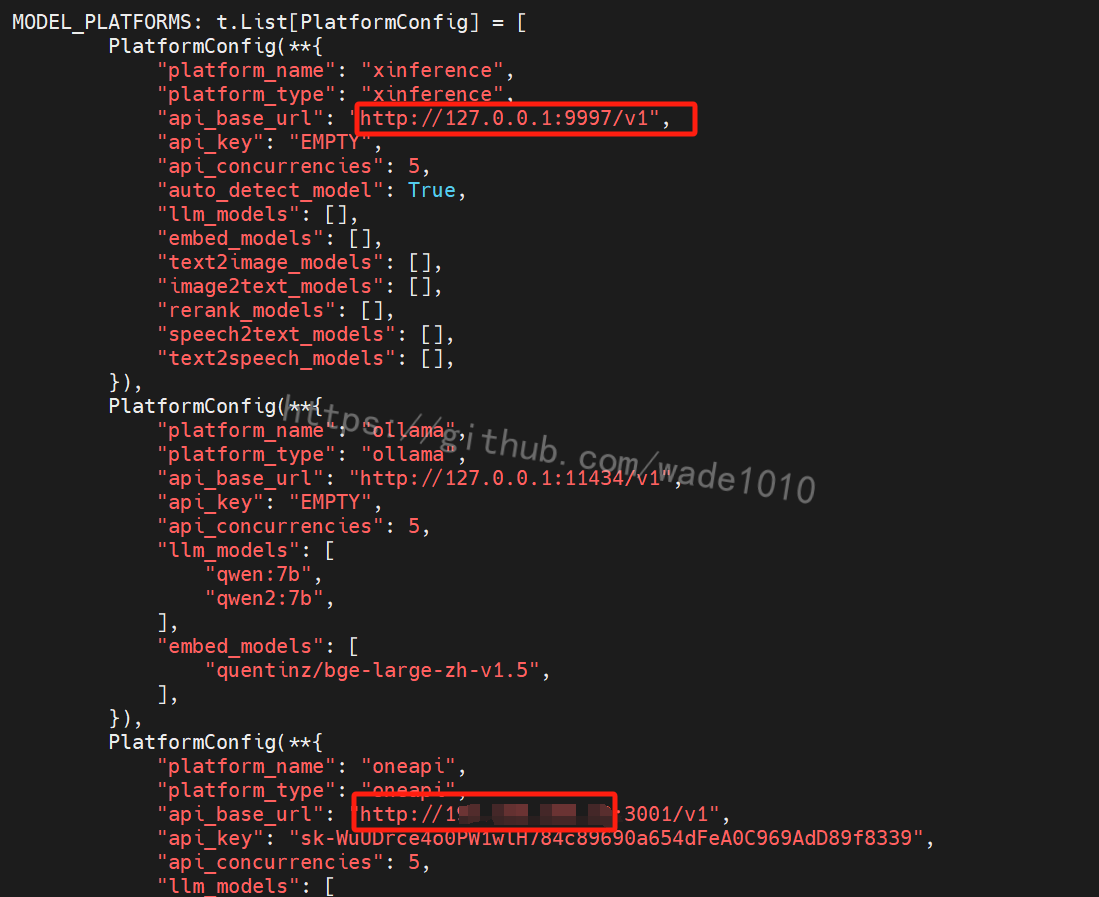
还有修改如下图,上面的xxxxx对应下图llm_models里面的名称
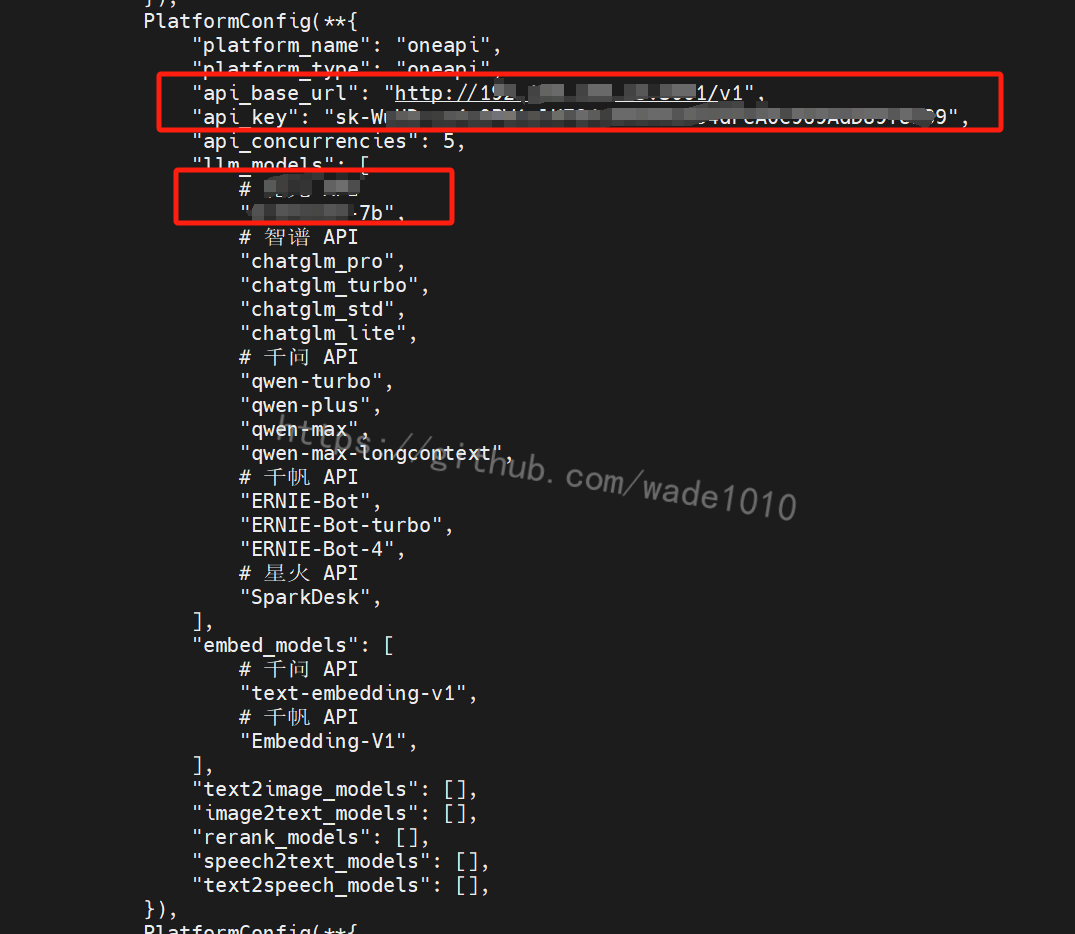
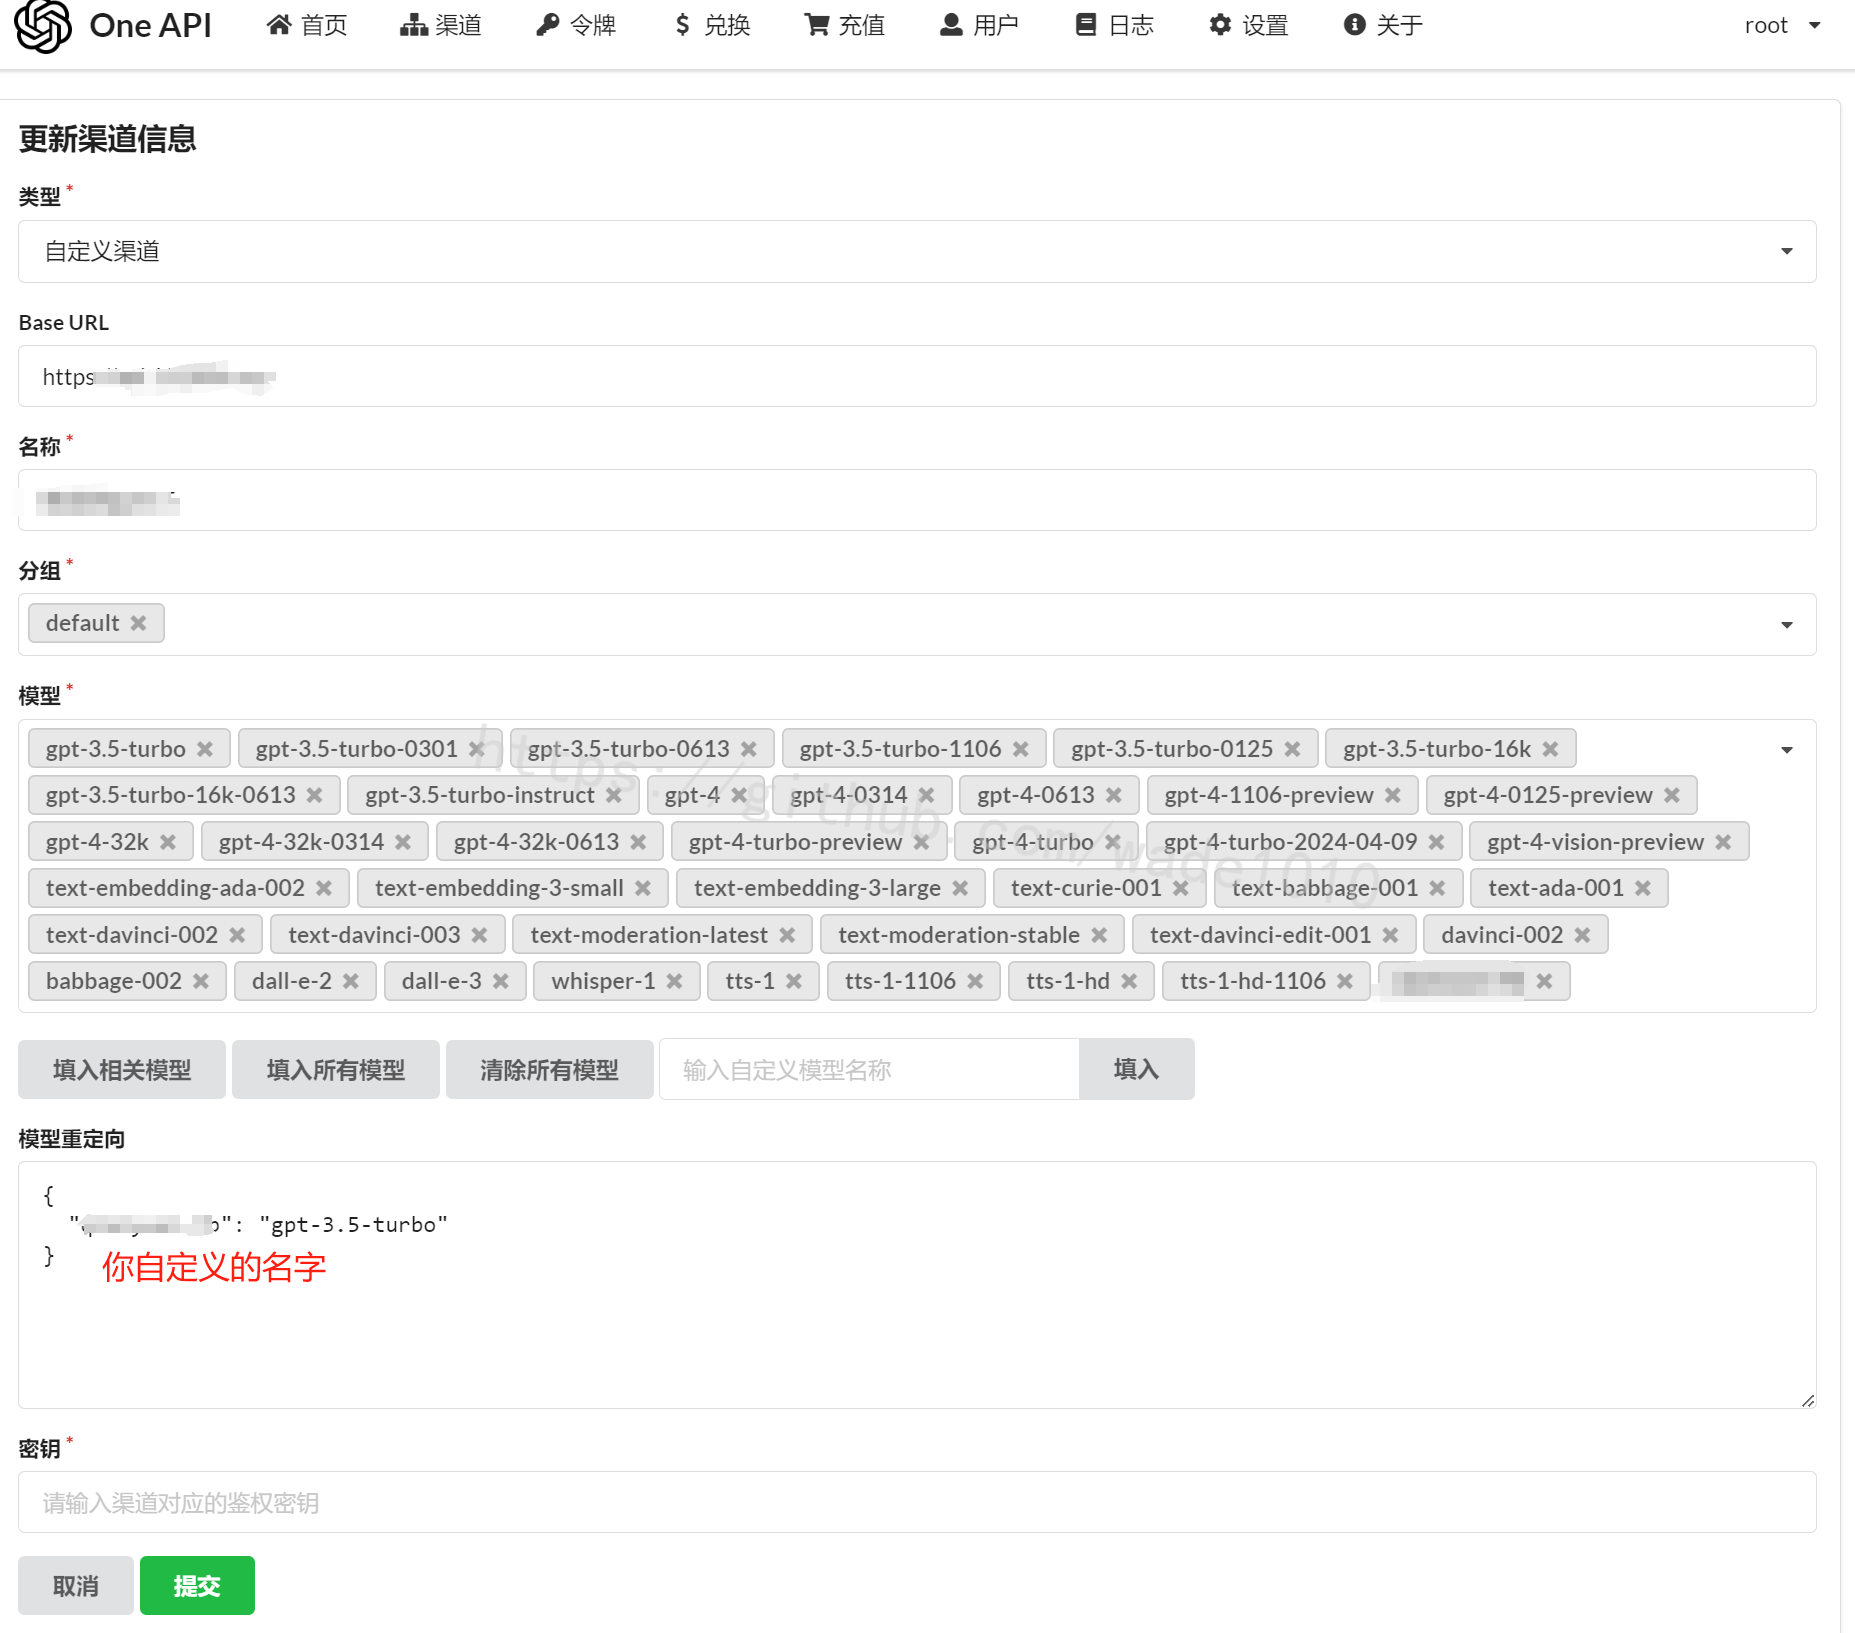
有时候后台对应的是chatgpt,但是你不想让用户看到是chatgpt,这里可以起一个你自定义的名字,然后在oneapi那里做一个映射。如下图
另外还要注意,需要将127.0.0.1修改为对应的IP,其它的127.0.0.1如果有需要使用,也改下。
再启动
docker-compose up -d
检查服务启动情况
docker-compose up -d
WARN[0000] /root/docker-compose.yaml: version is obsolete NAME IMAGE COMMAND SERVICE CREATED STATUS PORTS root-chatchat-1 chatimage/chatchat:0.3.1.2-2024-0720 “chatchat -a” chatchat 3 minutes ago Up 3 minutes root-xinference-1 xprobe/xinference:v0.12.1 “/opt/nvidia/nvidia_…” xinference 3 minutes ago Up 3 minutes
ss -anptl | grep -E ‘(8501|7861|9997)’
LISTEN 0 128 0.0.0.0:9997 0.0.0.0:* users:((“pt_main_thread”,pid=1489804,fd=21)) LISTEN 0 128 0.0.0.0:8501 0.0.0.0:* users:((“python”,pid=1490078,fd=10)) LISTEN 0 128 0.0.0.0:7861 0.0.0.0:* users:((“python”,pid=1490014,fd=9))
如上, 服务均已正常启动, 即可体验使用.
提示: 先登陆 xinference ui http://:9997 启动 llm 和 embedding 后, 再登陆 chatchat ui http://:8501 进行体验.
详细文档:
Langchain-chatchat 使用请参考: LangChain-Chatchat
Xinference 使用请参考: 欢迎来到 Xinference!
配置向量模型
打开http://192.168.1.xxx:9997/ui/#/launch_model/embedding
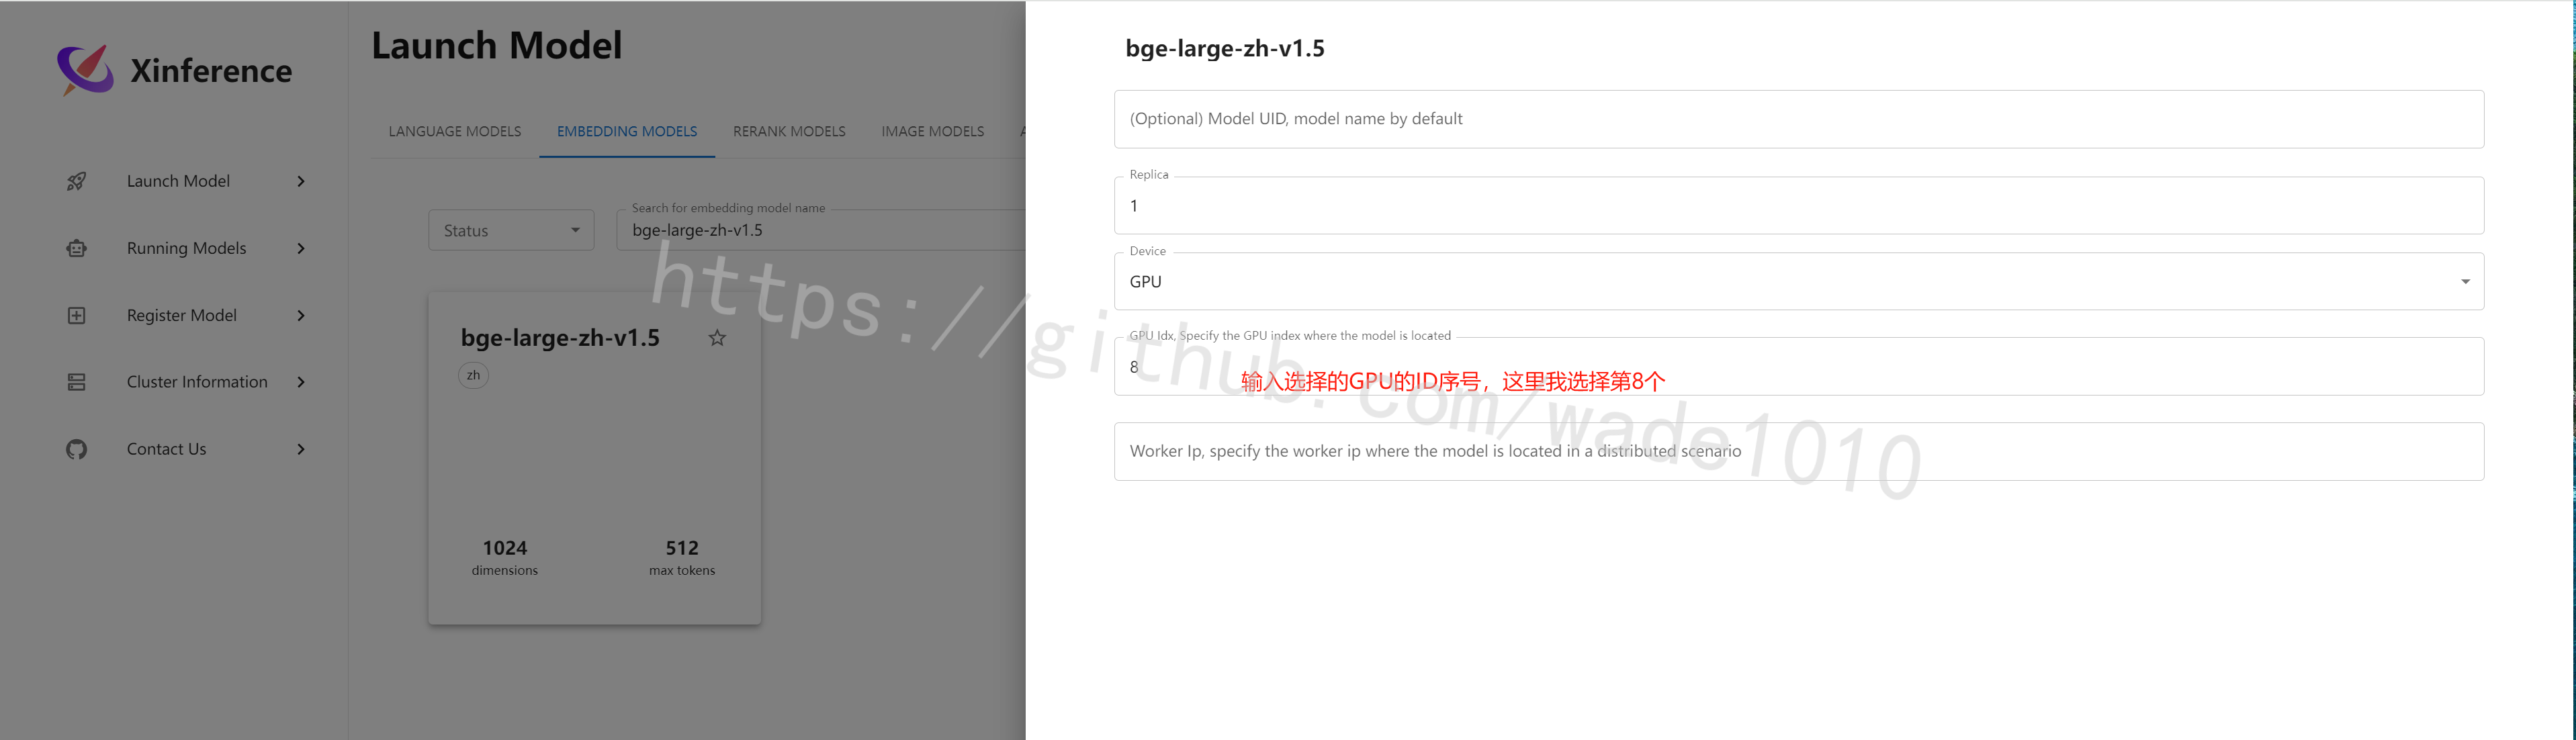
然后点击上图右下方的确认(是一个图标),就可以等待安装即可。
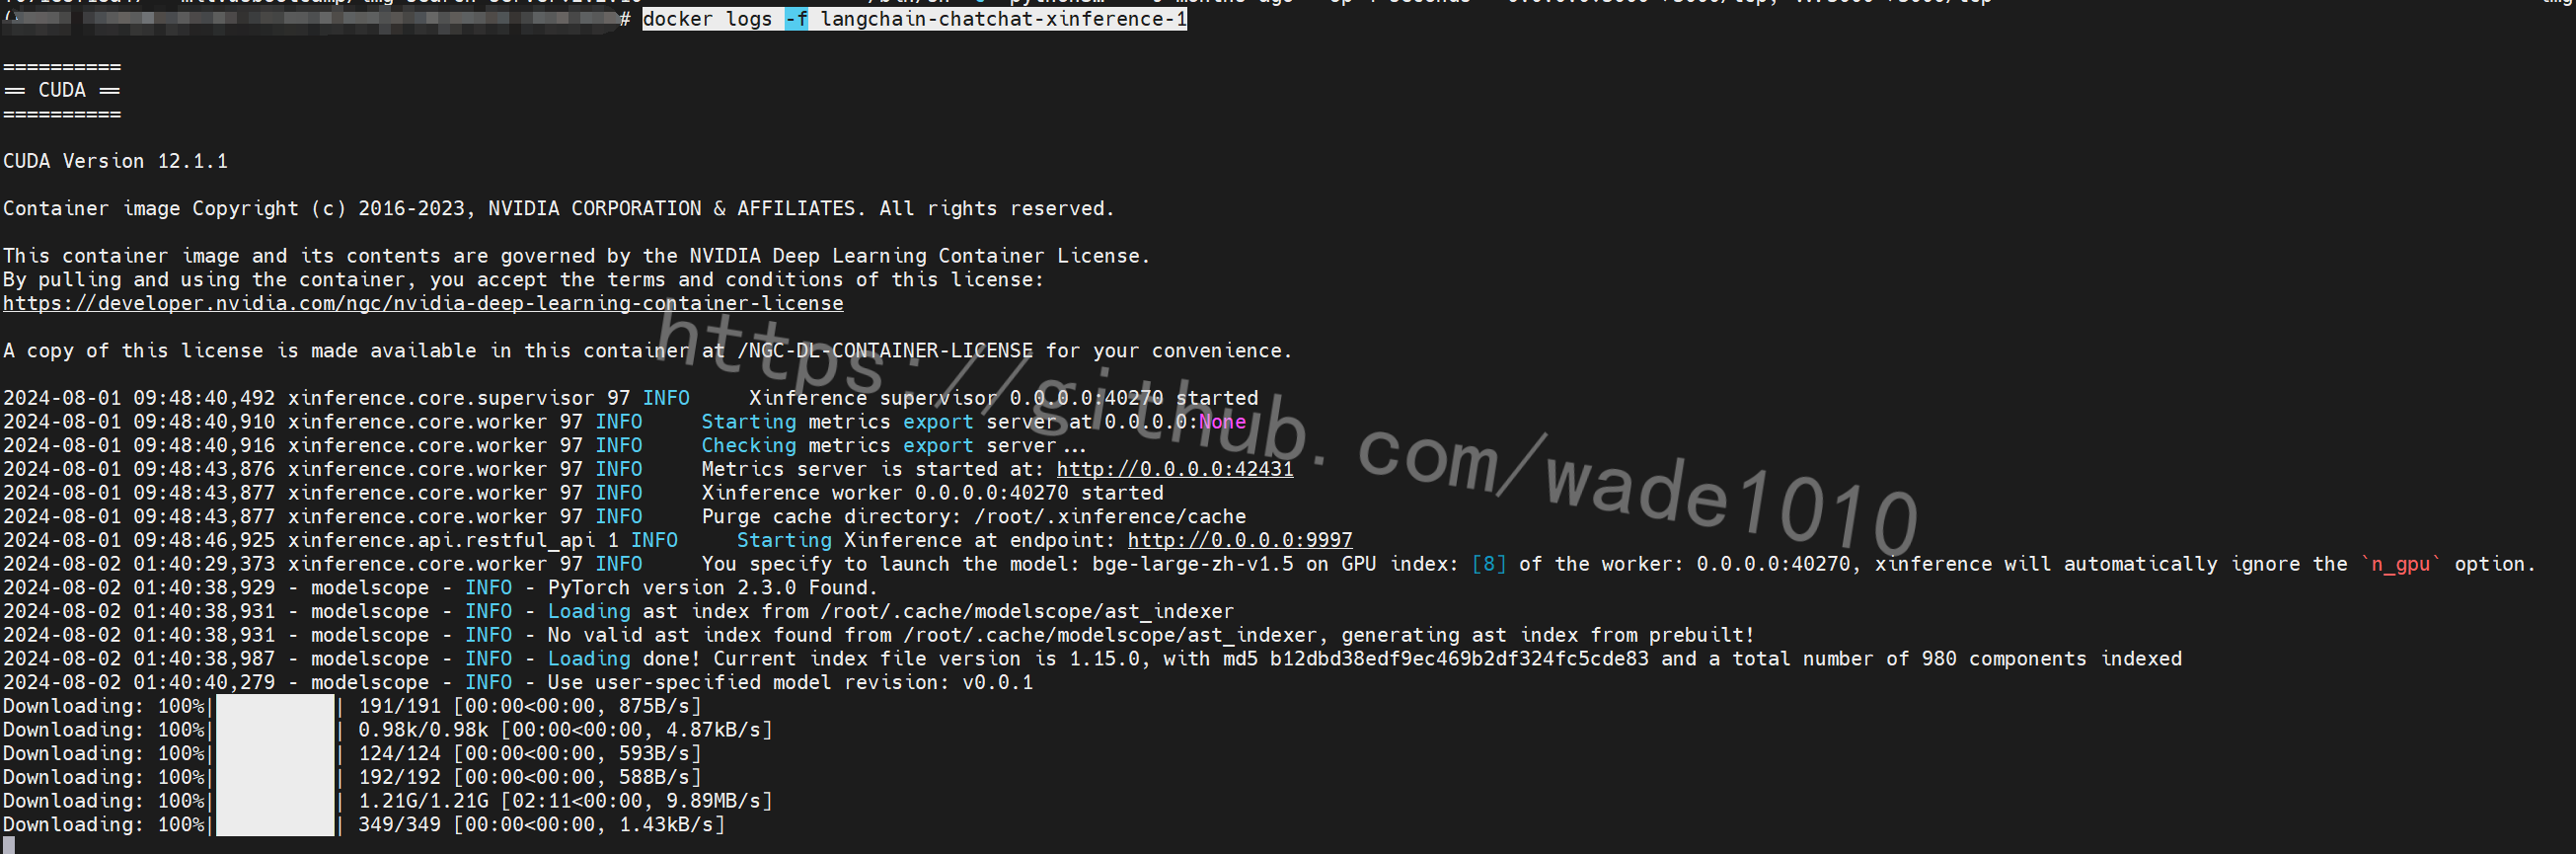
可以查看下安装进度
docker logs -f langchain-chatchat-xinference-1
使用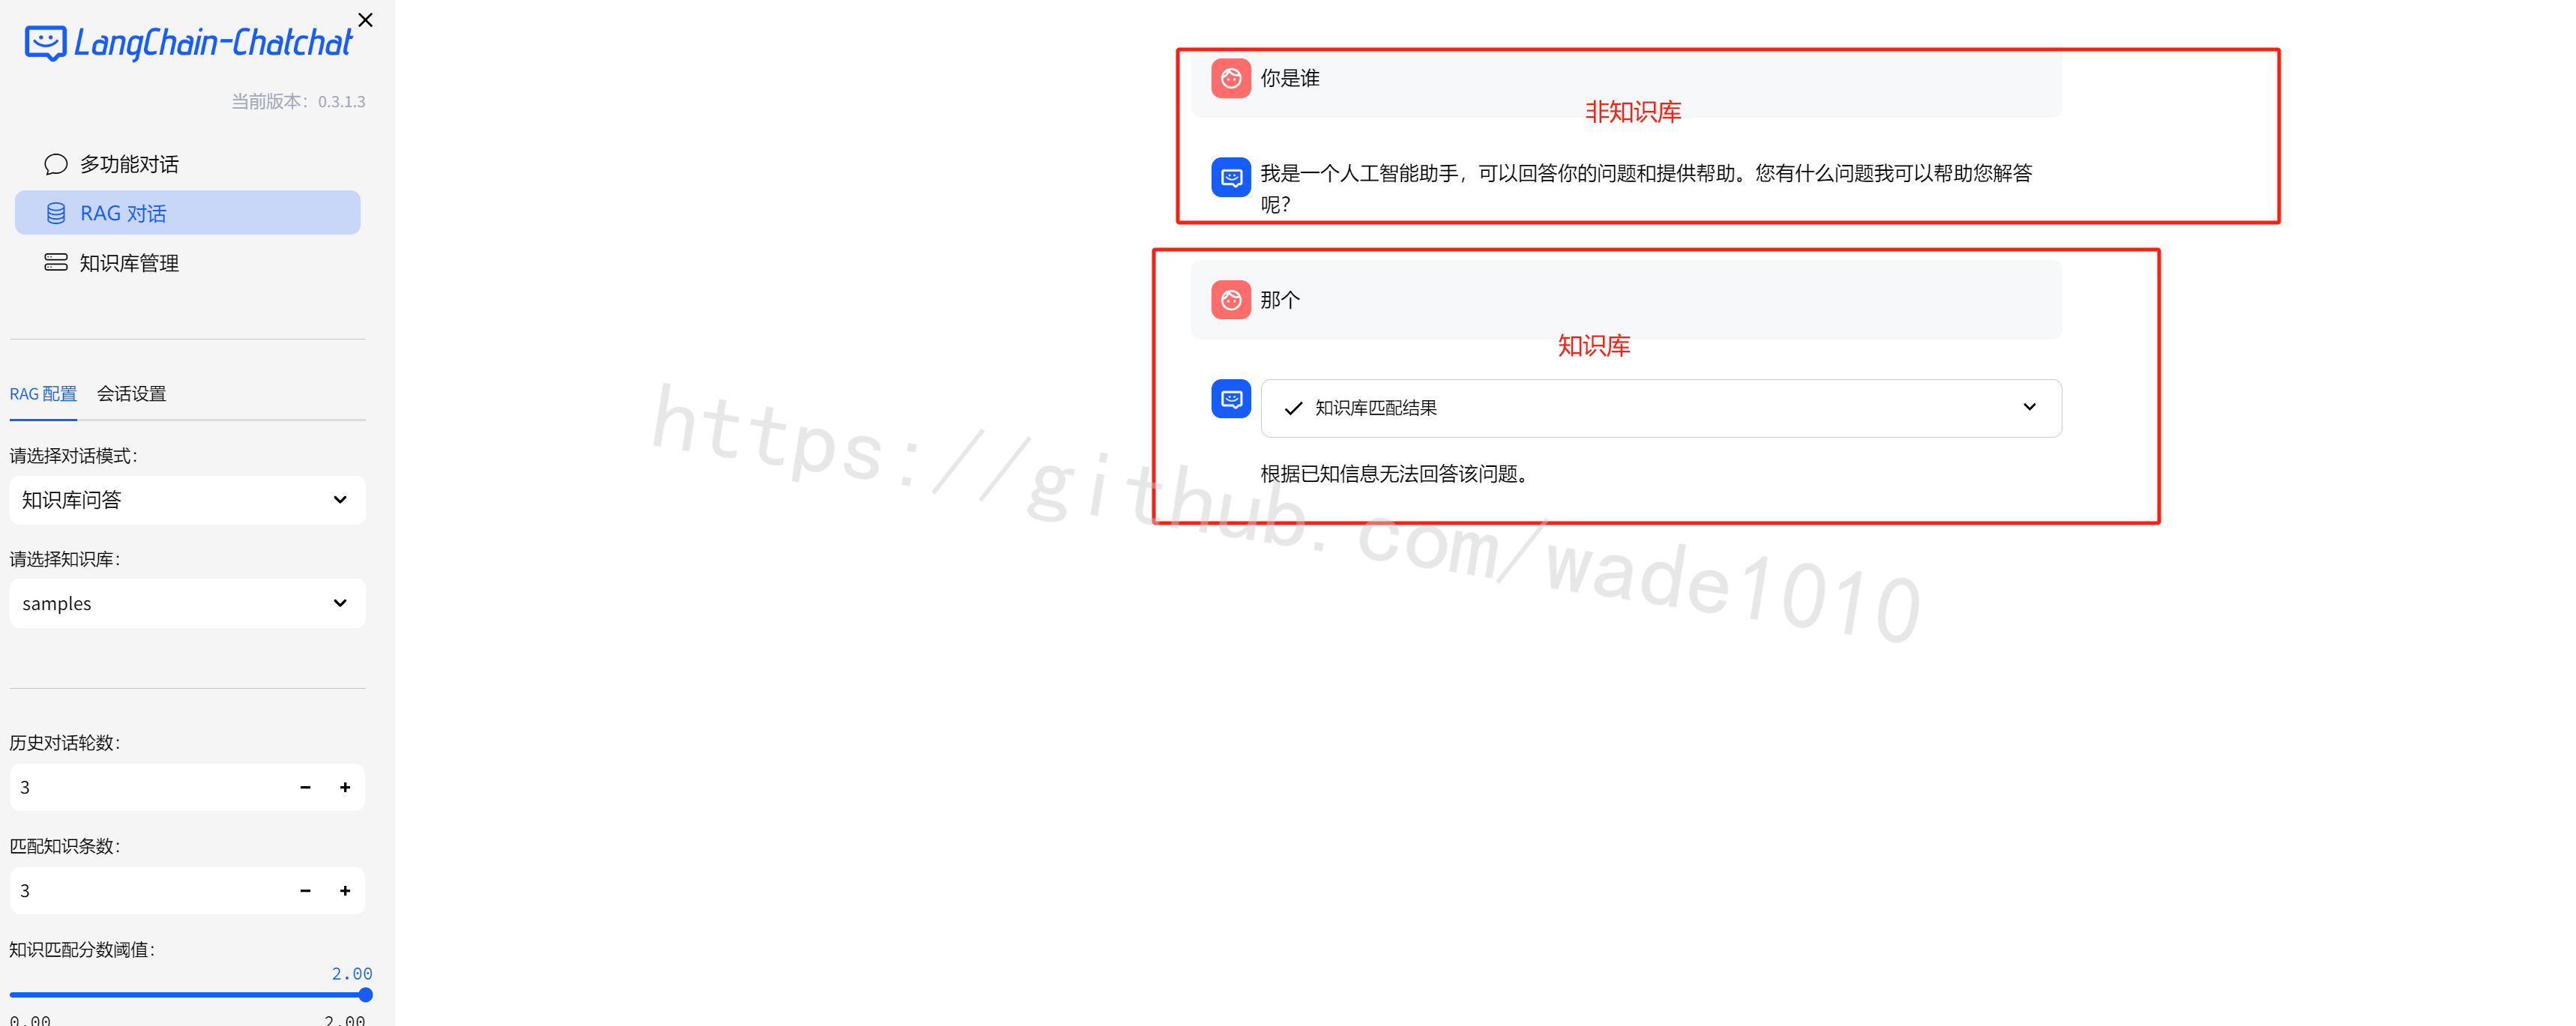


 6610
6610

 被折叠的 条评论
为什么被折叠?
被折叠的 条评论
为什么被折叠?
 到【灌水乐园】发言


