


想了半天没想好该怎么起一个头。
写这个博客呢,是因为目前相把公司的项目都做成高可用的,能够应对紧急情况的服务器宕机事件。
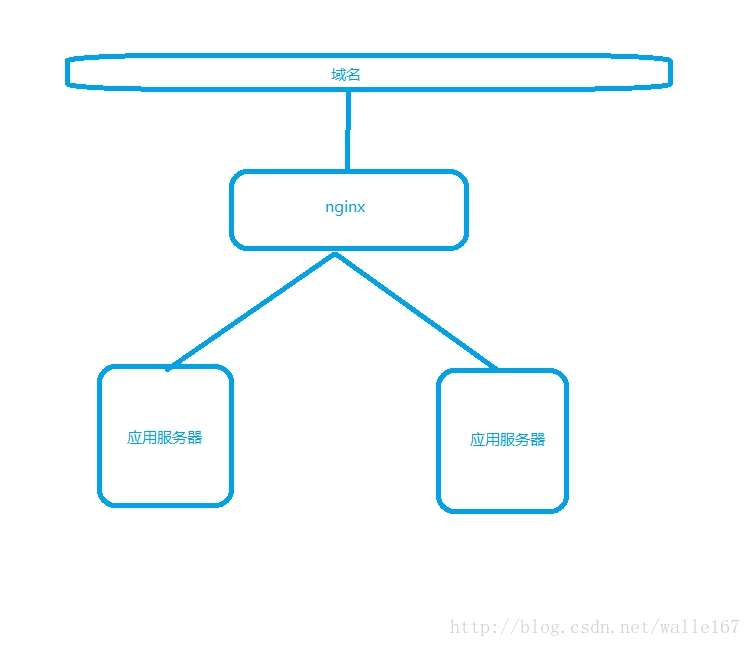
之前项目部署如下图:
图是比较简单的,域名指向 单机的nginx 一个nginx 指向2台应用服务器(负载均衡方式) 。
基本的服务都能满足,但是如果nginx服务器宕机了,那整个应用都无法运行了,有风险。为了更好的是程序能达到高可用,所有要对nginx 要做主备模式。
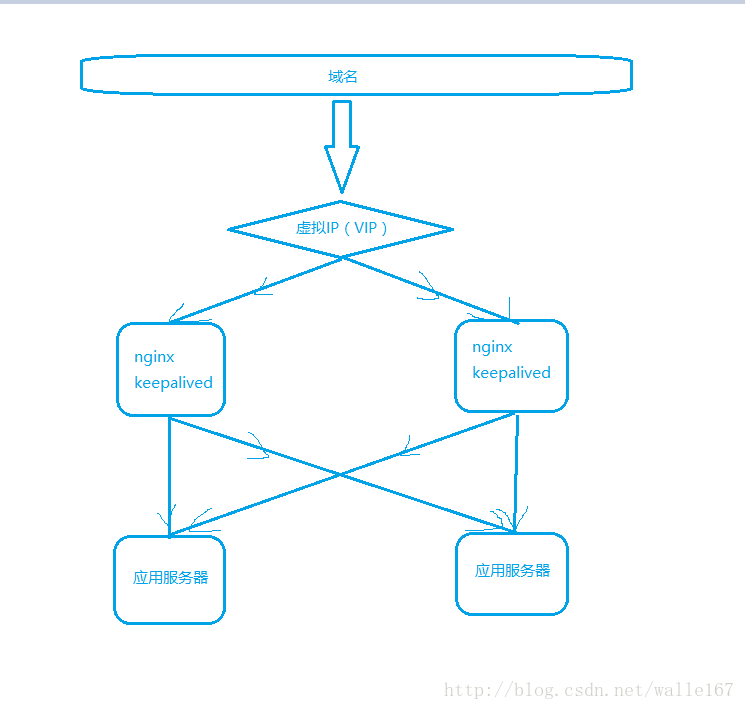
然后就需要在LINUX服务器上部署keepalived ,绑定虚拟IP(VIP),监控服务状态。
话不想多说,再画一个图吧
上面的这种模式使用了一个虚拟IP,一个虚拟IP绑定在2台WEB服务器上,一主一备(使用keepalived,一个虚拟IP只能是一主一备,就算2个keepalived都配置为主,但是还是会变成一主一备的)。
这种模式下,始终有一台服务器是浪费的状态。
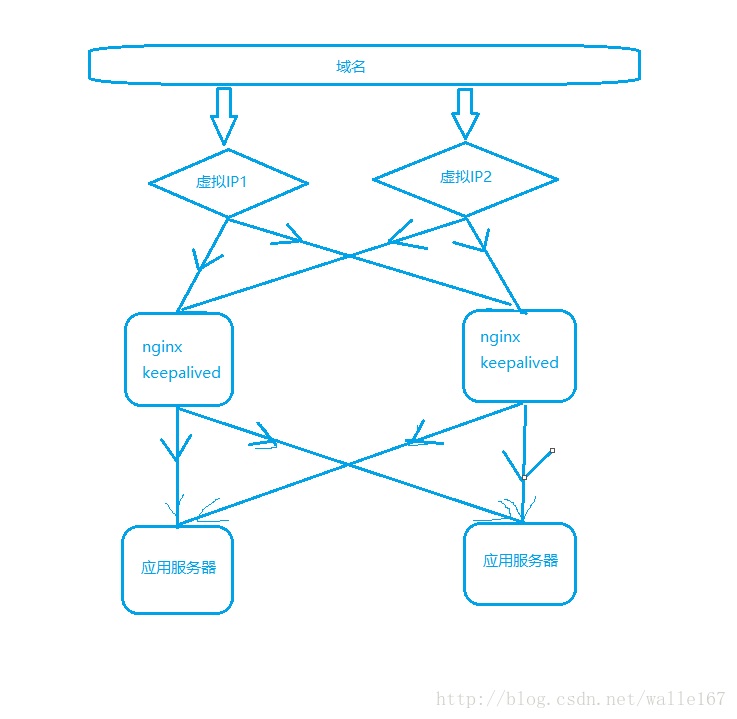
如果不想有服务器浪费,就使用2个虚拟IP,如下图
域名在网络层可以使用硬负载做到负载均衡到 2个IP,或者是更多,这样就避免了浪费资源的情况。
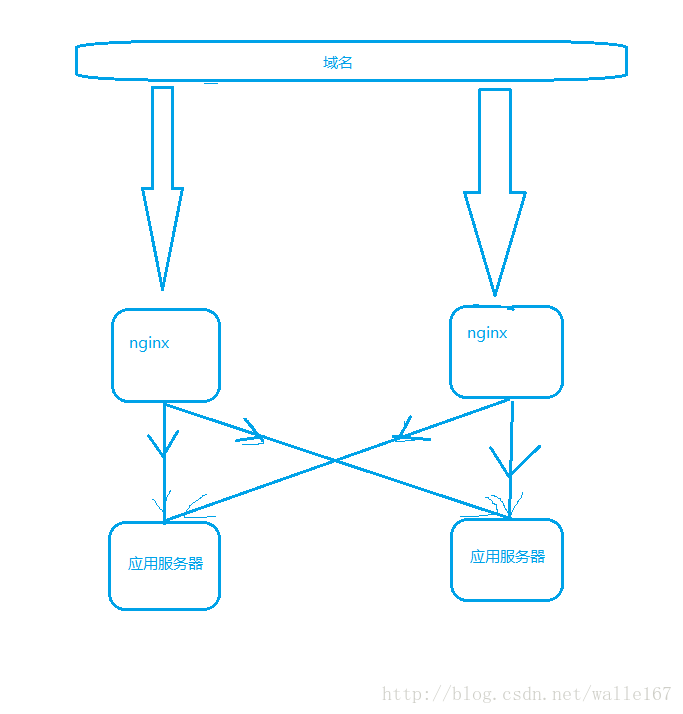
还有一种情况,不使用keepalived 也能实现高可用,如下图
这种方式就是 使用网络硬件做硬负载,域名直接和 web服务器绑定。
但是这种模式有一个不好的地方,如果是内网环境 需要指定IP,那就只能给一个WEB的IP了。
图画的难看就将就着看看吧
下面说说安装keepalived 和 nginx 配置和步骤。
keepalived 和 nginx 安装和配置
####1. nginx 安装
nginx 安装了无数次了,但是一直都是网上找了教程,也没什么难度,这里主要说说配置相关的东西吧
1.下载包(网上找包吧)
2.安装nginx依赖
yum -y install gcc pcre-devel zlib-devel openssl-devel
3.配置nginx
解压nginx tar zxf nginx-1.8.1.tar.gz
进入nginx 目录配置:./configure --prefix=/home/smkapp/nginx --with-http_stub_status_module --with-http_realip_module --with-http_gzip_static_module --add-module=/home/smkapp/software/nginx-goodies-nginx-sticky-module-ng-08a395c66e42 --add-module=/home/smkapp/software/nginx-http-sysguard-master --add-module=/home/smkapp/software/nginx_upstream_check_module-master
这里有一篇说明的比较详细:http://www.ttlsa.com/nginx/nginx-configure-descriptions/
这里做说明:–prefix= 指定安装目录
–with-http_stub_status_module NGINX的状态
–with-http_gzip_static_module 获取先压缩好的GZ 文件读取)
–with-http_realip_module 获取真实IP
//(基于cookie的会话保持) session粘连
–add-module=/home/smkapp/software/nginx-goodies-nginx-sticky-module-ng
//防止高负载
–add-module=/home/smkapp/software/nginx-http-sysguard-master
//检查负载均衡的 存活性
–add-module=/home/smkapp/software/nginx_upstream_check_module-master
配置查看nginx状态
location /nginx_status {
# Turn on nginx stats
stub_status on;
# I do not need logs for stats
access_log off;
# Security: Only allow access from 192.168.1.100 IP #
#allow 192.168.1.100;
# Send rest of the world to /dev/null #
#deny all;
}
检查负载均衡的状态
upstream uec_portal{
#添加sticky模块后加入此配置
sticky;
#被代理的服务
server 192.168.12.56:80;
server 192.168.12.70:8080;
#添加了nginx_upstream_check_module模块之后,该项生效
#用于检测后方realserver的健康状态,如果后端服务器不可用,则请求不转发到这台服务器。
#interval:每隔3s检测一次
#rise:检测次数,如果连续检测2次都成功,那就证明该后端服务器好使
#fall:检测次数,如果连续检测5次都失败,那就证明该后端服务器不好使
#timeout:超时时间为1s
check interval=3000 rise=2 fall=5 timeout=1000;
}
4. 编译和安装
make && make install
5.配置nginx配置文件
直接给一个样例
nginx/conf/nginx.conf
#work_process的运行用户,只当nginx以root用户启动时开启
#user  smkapp;

#启动运行进程数
#普通1个运行进程带足够量的连接数就可以了
#如果是消耗cpu的应用(SSL、gzip或者静态资源大于内存)可以设置多个运行进程
#运行进程数一般设成和cpu核数相等
worker_processes  4;

#可以打开的文件句柄数,与ulimit -n 的值保持一致。
worker_rlimit_nofile 65535;

#为每个进程分配cpu
worker_cpu_affinity 0001 0010 0100 1000;

#错误日志,默认设置为warn级别
error_log  /home/smkapp/nginx/log/error.log warn;

#主进程ID
pid        /home/smkapp/nginx/run/nginx.pid;

events {
    #客户端请求的轮询方法,linux用epoll,macos用kqueue
    use epoll;

    #每个work进程的最大连接数,受制于系统socket限制、防火墙限制等,没有必要设
    #的过分高,一般可以设10k
    worker_connections  10240;

    #nginx收到一个新连接通知后接受尽可能多的连接
    multi_accept on;
}


http {
    #mine.type配置
    #引入mine.type定义文件
    include       /home/smkapp/nginx/config/mime.types;
    #设置默认mine.type为二进制流
    default_type  application/octet-stream;
    #头文件字符集
    charset UTF-8;

    #关闭在错误页面中的nginx版本数字,这样对于安全性是有好处的
    server_tokens off;

    #增加socket和磁盘通讯效率
    sendfile       on;

    #数据传输方式设置
    #nginx在一个数据包里发送所有头文件,而不一个接一个的发送
    tcp_nopush     on;
    #nginx不要缓存数据,而是一段一段的发送,当需要及时发送数
    #据时,就应该给应用设置这个属性,这样发送一小块数据信息时
    #就不能立即得到返回值
    tcp_nodelay on;

    #超时设置
    #设置nginx长连接保持时间
    #如果出现502错误需增大该参数=120
    keepalive_timeout  65;
    #请求头超时时间
    client_header_timeout 3m;
    #请求体超时时间
    client_body_timeout 3m;
    #关闭不响应的客户端连接
    reset_timedout_connection on;
    #两次客户端读取操作之间的超时时间
    send_timeout 3m;

    #缓存大小设置
    #server name的hash table buffer大小
    server_names_hash_bucket_size 256;
    #处理客户端报头的buffer大小
    #根据客户端报头大小调整,一般为系统PAGESIZE的整数倍
    #getconf PAGESIZE获取系统参数值,一般为4096
    client_header_buffer_size 256k;
    #处理大客户端报头的buffer大小
    large_client_header_buffers 4 256k;
    #客户端请求最大报体,默认1m
    client_max_body_size 50m;
    #客户端报体buffer,默认2*内存页大小8k(32),16k(64)
    client_body_buffer_size 256k;

    #客户端连接设置
    #防DDOS
    #白名单设置
    #geo 模块定义了一个默认值是 1 的变量 whiteiplist,当在 ip 在白名单中,变量 whiteiplist 的值为 0,反之为 1
    #如果在白名单中--> whiteiplist=0 --> $limit="" --> 不会存储到 10m 的会话状态(one 或者 addr)中 --> 不受限制;
    #反之,不在白名单中 --> whiteiplist=1 --> $limit=二进制远程地址 -->存储进 10m 的会话状态中 --> 受到限制。
    #geo $whiteiplist  {
    #    default 1;
    #    10.11.15.1610;
    #}
    #map $whiteiplist$limit {
    #    1$binary_remote_addr;
    #    0"";
    #}
    #限制客户端单ip连接数的缓存空间至$server_name
    #和server模块的limit_conn成对出现
    #32位系统$binary_remote_addr为4(32byte)一个连接,1m=32k连接
    #64位系统$binary_remote_addr为16(64byte)一个连接,1m=16k连接
    limit_conn_zone $binary_remote_addr zone=activity_conn:10m;
    #限制单ip并发率,单ip每秒1000个连接
    limit_req_zone  $binary_remote_addr  zone=activity_req:10m rate=1000r/s;
    #流量限制
    #超过5m后限制流量
    limit_rate_after 50m;
    #流量不大于500k
    limit_rate 500k;
    #访问权限控制
    #deny 192.168.1.1;
    #allow 192.168.1.0/24;
    #allow 10.1.1.0/16;
    #allow 2001:0db8::/32;
    #deny  all;

    #本地静态文件缓存配置
    #作为反向代理或者负载均衡不需要配置
    #打开文件缓存数量和事件,数量一般设置和ulimit -n一致
    #open_file_cache max=65535 inactive=60s;
    #指多长时间检查一次缓存的有效信息
    #open_file_cache_valid 80s;
    #inactive 参数时间内文件的最少使用次数
    #open_file_cache_min_uses 1;

    #日志配置
    #access日志格式
    log_format main '<$time_local> <$remote_addr> <$http_user_agent> <$request> <$status> <$body_bytes_sent> <$upstream_addr> <$upstream_status> <$request_time>';

    #设置access日志保存
    access_log  /home/smkapp/nginx/log/access.log  main buffer=16k;
    #日志文件句柄缓存
    open_log_file_cache max=10 inactive=30s min_uses=2 valid=60s;


    #upstream设置
    #上游返回大于300时是否跳转error page页
    proxy_intercept_errors on;
    #把客户端真实请求参数传递给被代理的服务器
    #这一段设置在这里可能有问题,放到location里面
    proxy_set_header Host $host:$server_port;
    proxy_set_header X-Real-IP $remote_addr;
    proxy_set_header REMOTE-HOST $remote_addr;
    proxy_set_header X-Forwarded-For $proxy_add_x_forwarded_for;
    proxy_set_header Cookie $http_cookie;
    proxy_set_header X-Forwarded-Proto  $scheme;
    #设置被代理服务器的cookie域名
    #proxy_cookie_domain localhost 96225.com;
    #设置被代理服务器应答报头中不返回给客户端的参数
    proxy_hide_header X-Powered-By;
    proxy_hide_header X-Mod-Pagespeed;
    #客户端关闭连接不关闭和被代理服务器的连接,防止499错误
    proxy_ignore_client_abort on;
    #根据返回状态,设置被代理服务器返回的缓存时间
    #proxy_cache_valid any 10m;
    #和被代理服务器连接超时时间
    #官方文档建议不超过75s
    proxy_connect_timeout   75;
    #发送报文到被代理服务器,2次写之间的超时时间
    proxy_send_timeout   300;
    #接受被代理服务器报文,2次读之间的超时时间
    proxy_read_timeout  300;
    #开启对被代理应带报文的buffer,默认开启
    proxy_buffering off;
    #对被代理服务器应答报文buffer大小
    proxy_buffers 8 32k;
    #对被代理服务器第一部分应答内容的buffer大小
    proxy_buffer_size 128k;
    #设置加急返回客户端的应答内容buffer大小
    proxy_busy_buffers_size   128k;
    #设定对被代理服务器应答buffer文件大小,大于这个值,将从upstream服务器传
    proxy_temp_file_write_size  128k;
    #指定buffer临时文件在哪个目录下
    proxy_temp_path /home/smkapp/nginx/tmp/;
    #缓存静态文件,和server内的proxy_cache参数以keys_zone配对使用
    proxy_cache_path /home/smkapp/nginx/cache/ levels=1:2 keys_zone=cache_one:200m inactive=1d max_size=30g;
    #开启静态文件缓存
    proxy_cache cache_one;
    #设置使用http 1.1,使用长连接,减少TIME_WAIT
    proxy_http_version 1.1;
    proxy_set_header Connection "";

    #压缩设置
    #开启压缩
    gzip  on;
    #在应答报头中添加“Vary: Accept-Encoding”,保证老浏览器的兼容性
    gzip_vary on;
    #小于16k不启用压缩
    gzip_min_length 16k;
    #gzip压缩buffer,默认为1 PAGESIZE
    gzip_buffers    8 32k;
    #对于大于等于http版本请求,应答开启压缩
    gzip_http_version 1.1;
    #压缩等级1-9,9最大
    gzip_comp_level 4;
    #允许或者禁止压缩基于请求和响应的响应流。设置为any,意味着将会压缩所有的请求。
    gzip_proxied expired no-cache no-store private auth;
    #设置需要压缩的数据格式
    gzip_types text/plain text/xml text/css application/x-javascript application/xml application/vnd.ms-word application/xml+rss text/javascript application/ms word application/zip;
    #ie6禁用压缩
    gzip_disable "MSIE [1-6]\.";

    #fastcgi设置
    #上游返回大于300时是否跳转error page页
    #fastcgi_intercept_errors on;
    #fastcgi静态缓存
    #fastcgi_cache TEST;
    #fastcgi_cache_path /home/smkapp/nginx/cache levels=1:2 keys_zone=TEST:10m inactive=5m;
    #fastcgi_connect_timeout 75;
    #fastcgi_send_timeout 300;
    #fastcgi_read_timeout 300;
    #fastcgi_buffer_size 128k;
    #fastcgi_buffers 8 32k;
    #fastcgi_busy_buffers_size 128k;
    #fastcgi_temp_file_write_size 128k;
    #fastcgi_cache_valid 200 302 1h;
    #fastcgi_cache_valid 301 1d;
    #fastcgi_cache_valid any 1m;
    #fastcgi_cache_min_uses 1;
    #fastcgi_cache_use_stale error timeout invalid_header http_500;

    #包含server配置文件
    include /home/smkapp/nginx/config/server/*.conf;
}
/home/smkapp/nginx/config/server/ff.conf;
#负载均衡
upstream extactivity.com {
    #session粘连
    #sticky name=activity;
    #server 172.16.23.38:8082;
    server 172.16.23.38:8081;
        #upstream存活检查
        #check interval=3000 rise=2 fall=5 timeout=1000;
}


server {
    #监听的本地请求端口
    listen       8080;
    #server_name和proxy_set_header Host对应,不然就配置localhost
    #可以有多个,空格分开
    server_name  extactivity.com;

    #配置https连接,有需要时开启。
    #ssl on;
    #ssl_certificate /home/smkapp/nginx/config/server/server.crt;
    #ssl_certificate_key /home/smkapp/nginx/config/server/server.key;
    #返回报头地址转换
    #如果前端开启https需要开启这个转换
    #proxy_redirect http:// https://;

    #同一IP最大并发连接
    limit_conn activity_conn 800;
    #同一IP并发率
    limit_req zone=activity_req burst=50 nodelay;

    #错误页面设置
    error_page 403 404 410 = http://activity.com/40x.html;
    error_page 500 502 503 504 = http://activity.com/50x.html;

    #客户端请求限制
    #客户端请求方法限制
    if ($request_method !~ ^(GET|HEAD|POST|OPTIONS)$) {
         return 404;
    }
    #限制客户端爬虫
    if ($http_user_agent ~* LWP::Simple|BBBike|wget) {
        return 403;
    }
    if ($http_user_agent ~* Sosospider|YodaoBot) {
        return 403;
    }
    #限制只允许微信访问,否则返回503
    #if ($http_user_agent ~* MicroMessenger|micromessenger|Android|webOS|iPhone|iPod|BlackBerry){
    #    set $mobile_request '1';
    #}
    #if ($request_uri ~* /weixinfeixianglog.png){
    #    set $mobile_request '1';
    #}
    #if ($request_uri ~* /40x.hmtl){
    #    set $mobile_request '1';
    #}
    #if ($request_uri ~* /50x.html){
    #    set $mobile_request '1';
    #}
    #if ($mobile_request != '1') {
    #    return 503;
    #}

    #防盗链
    #none 有问题,可以测试一下
    #location ~* \.(gif|jpg|png|swf|flv)$ {
    #    valid_referers none blocked activity.96225.com weixin.qq.com weixin.96225.com;
    #    if ($invalid_referer) {
    #          return 404;
    #    }
    #}

    #单独开通相关配置页面及图片
    location ~ ^/favicon\.ico$ {
      root /home/smkapp/nginx/html;
    }

    location =/40x.html {
       root /home/smkapp/nginx/html;
    }
    location =/50x.html {
       root /home/smkapp/nginx/html;
    }
    #upstream存活状态页
    #location /nstatus {
    #check_status;
    #    access_log off;
    #    #allow SOME.IP.ADD.RESS;
    #    #deny all;
    #}

    #防止高负载
    sysguard on;
    sysguard_load load=10.5 action=/loadlimit;
    sysguard_mem swapratio=20% action=/swaplimit;
    location /loadlimit {
        return 503;
    }
    location /swaplimit {
        return 503;
    }

    #对于java应用文件的安全控制
    location ~ ^/(WEB-INF)/ {
        deny all;
    }

    #维护控制
    set $weihu_flg '0';#系统维护标识,1为维护中
    location /sysimgs/{
       root html;
    }
    location /weihu.html{
         if ($weihu_flg = '1'){
            root html;
         }
         if ($weihu_flg = '0'){
            return 404;
         }
    }

    #设置缓存的图片后缀
   # location ~ .*\.(gif|jpg|png|css|js)(.*){
    #   proxy_pass http://activity.96225.com;
    #   proxy_redirect off;
    #   proxy_cache_valid 200 304 12h;#为不同的应答设置不同的缓存时间 如200返回12个小时
    #   proxy_cache_valid 301 302 1d;
    #   proxy_cache_valid any 1m;
    #   expires 30d;
   # }


    #web代理到应用
    location /{
        proxy_pass http://172.16.23.37:8081;
        proxy_set_header Host $host:80;
        proxy_redirect Host $host:80;

    }


    location /exthtml/ {
        if ($weihu_flg = '1'){
            rewrite ^/(.*)$ /weihu.html last;
        }
        root /home/smkapp/;

#       proxy_cache cache_one;
#       proxy_cache_valid 200 304 12h;#为不同的应答设置不同的缓存时间 如200返回12个小时
#       proxy_cache_valid 301 302 1d;
#       proxy_cache_valid any 1m;
#       expires 30d;
#       proxy_redirect off;
#       proxy_set_header Host $host:80;
#       proxy_redirect Host $host:80;

    }


  location ^~ /my_activity/ {
        if ($weihu_flg = '1'){
            rewrite ^/(.*)$ /weihu.html last;
        }
        proxy_pass http://172.16.23.37:8081/my_activity/;
        proxy_set_header Host $host:80;
        proxy_redirect Host $host:80;
     }


  location ^~ /ext_my_activity/ {
        if ($weihu_flg = '1'){
            rewrite ^/(.*)$ /weihu.html last;
        }
        proxy_pass http://extactivity.com/ext_my_activity/;
        proxy_set_header Host $host:80;
        proxy_redirect Host $host:80;
     }


}
6.配置nginx系统启动
直接在/etc/profile 里面添加配置、
export PATH=/home/spp/nginx1.8.2
保存后 刷新配置文件即可
source /etc/profile
####2. keepalived 安装
1.编译安装
tar -zxvf keepalived-1.2.24.tar.gz 解压
./configure --prefix=/usr/local/keepalived 配置安装目录
make && make install 编译和安装
这几部做好了之后需要拷贝配置文件
先创建文件夹 /etc/keepalived /etc/keepalived/sysconfig/
cp /home/smkapp/keepalived/etc/keepalived/keepalived.conf /etc/keepalived
cp /home/smkapp/keepalived/etc/sysconfig/keepalived /etc/keepalived/sysconfig/
这篇文章写的很好
https://blog.csdn.net/bbwangj/article/details/80346428


 1390
1390

 被折叠的 条评论
为什么被折叠?
被折叠的 条评论
为什么被折叠?
 到【灌水乐园】发言


