


提示:以下是本篇文章正文内容,下面案例可供参考
一、视屏样式
二、使用步骤
1.router.js配置
代码如下(示例):
import Vue from 'vue'
import VueRouter from 'vue-router'
import Home from '../views/Home.vue'

Vue.use(VueRouter)

const routes = [
  {
    path: '/',
    name: 'Home',
    component: Home
  },
  {//主页面
    path: '/about',
    name: 'About',
    component: () => import('../views/About.vue'),
    children:[
        {
    path: '/sindex',
    name: 'sindex',
    component: () => import('../views/Sindex.vue')
  },
  {
    path: '/wen',
    name: 'wen',
    component: () => import('../views/Wen.vue')
  }
    ]
  },
]
const router = new VueRouter({
  routes
})
export default router
2.首页About.vue代码
代码如下(示例):
<template>
<div>
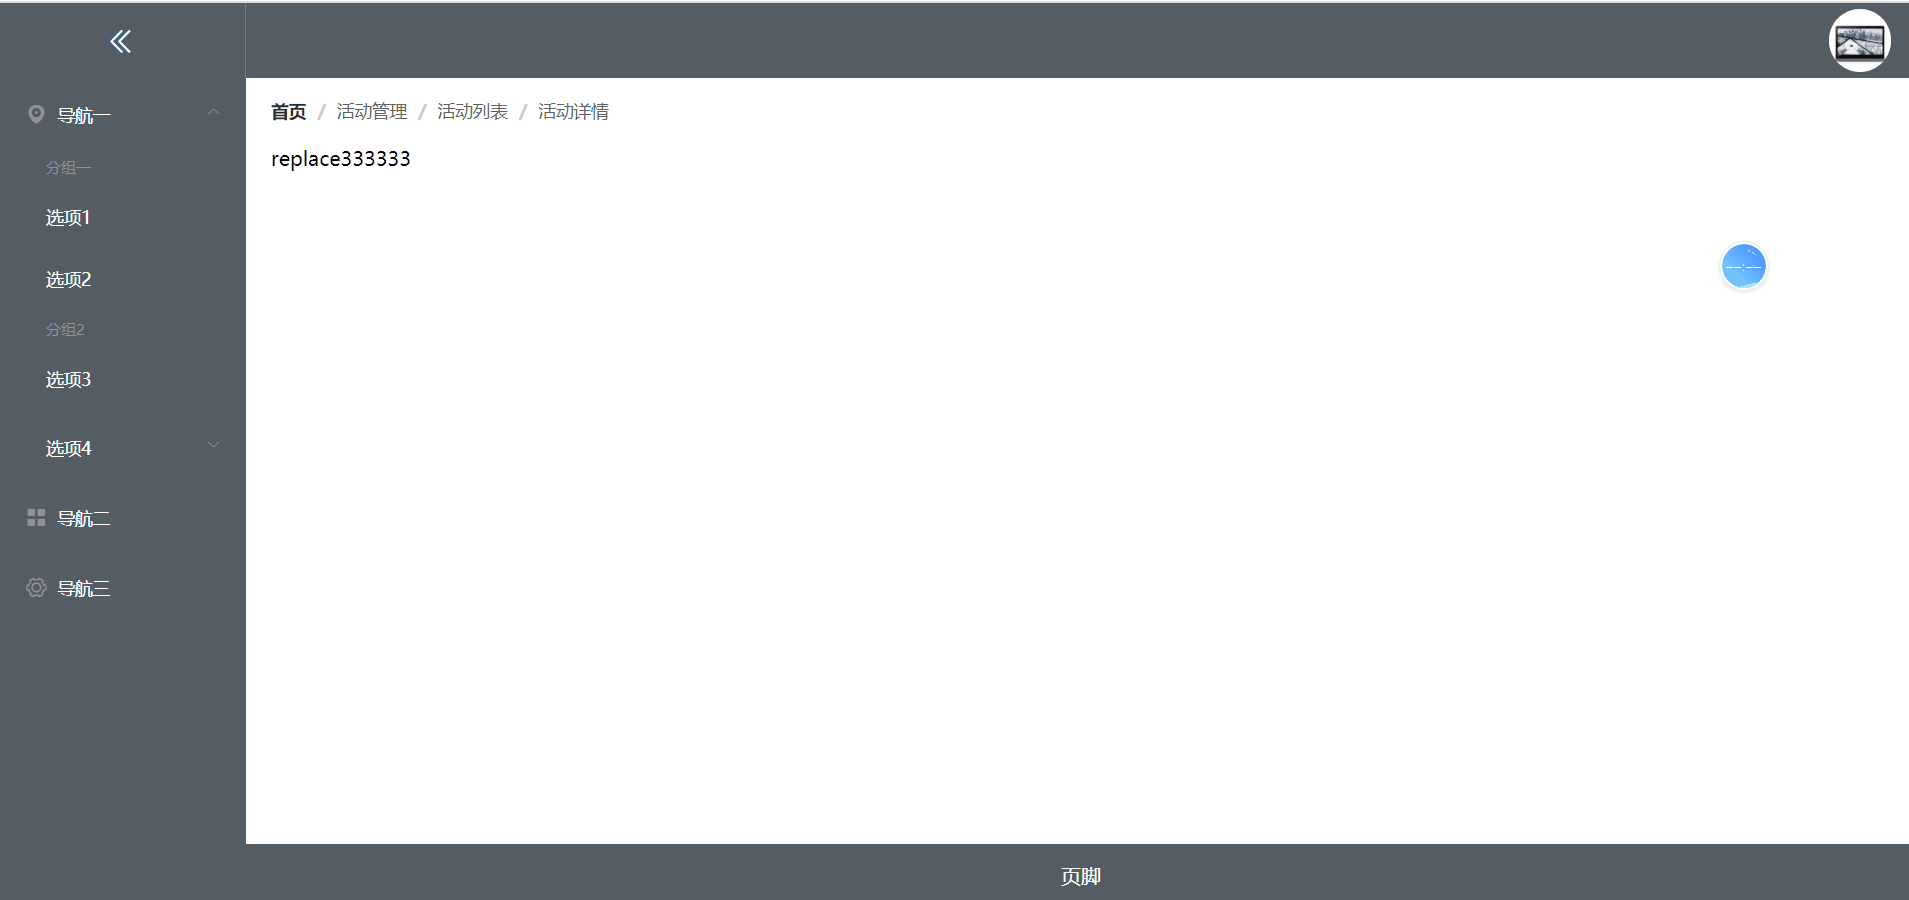
<el-container class="main">
<el-aside :width="tabWidth + 'px'">
<div>
<div class="isClossTab" @click="isClossTabFun">
<i
:class="
isCollapse ? 'el-icon-d-arrow-right' : 'el-icon-d-arrow-left'
"
></i>
</div>
<el-menu
:class="'menu'"
default-active="1-4-1"
class="el-menu-vertical-demo"
@open="handleOpen"
@close="handleClose"
:collapse="isCollapse"
background-color="#545c64"
text-color="#fff"
active-text-color="#ffd04b"
router
>
<!-- router就是用这个来进行路由跳转 必须要加-->
<el-submenu index="1">
<template slot="title">
<i class="el-icon-location"></i>
<span slot="title">导航一</span>
</template>
<el-menu-item-group>
<span slot="title">分组一</span>
<el-menu-item index="/sindex">选项1</el-menu-item><!--/sindex跳转到对应页面 -->
<el-menu-item index="1-2">选项2</el-menu-item>
</el-menu-item-group>
<el-menu-item-group title="分组2">
<el-menu-item index="1-3">选项3</el-menu-item>
</el-menu-item-group>
<el-submenu index="1-4">
<span slot="title">选项4</span>
<el-menu-item index="/wen">选项1</el-menu-item><!--/wen跳转到对应页面 -->
</el-submenu>
</el-submenu>
<el-menu-item index="2">
<i class="el-icon-menu"></i>
<span slot="title">导航二</span>
</el-menu-item>
<el-menu-item index="3">
<i class="el-icon-setting"></i>
<span slot="title">导航三</span>
</el-menu-item>
</el-menu>
</div>
</el-aside>
<el-container>
<el-header class="main-header">
<el-dropdown>
<span class="el-dropdown-link">
<img src="http://jd.itying.com/upload/Hfe1i8QDOkfVt-PuGcxCA0fs.jpg" alt="" />
</span>
<el-dropdown-menu slot="dropdown">
<el-dropdown-item>退出登录</el-dropdown-item>
</el-dropdown-menu>
</el-dropdown>
</el-header>
<el-main>
<el-breadcrumb separator="/" class="crumbs">
<el-breadcrumb-item :to="{ path: '/' }">首页</el-breadcrumb-item>
<el-breadcrumb-item>活动管理</el-breadcrumb-item>
<el-breadcrumb-item>活动列表</el-breadcrumb-item>
<el-breadcrumb-item>活动详情</el-breadcrumb-item>
</el-breadcrumb>
<div>
<router-view></router-view>
</div>
</el-main>
<el-footer class="main-footer" height="50px">
<p>页脚</p>
</el-footer>
</el-container>
</el-container>
</div>
</template>
<script>
export default {
data() {
return {
isCollapse: false,
tabWidth: 200,
test1: 1,
intelval: null,
};
},
methods: {
handleOpen(key, keyPath) {
console.log(key, keyPath);
},
handleClose(key, keyPath) {
console.log(key, keyPath);
},
isClossTabFun() {
clearInterval(this.intelval);
if (!this.isCollapse) {
this.intelval = setInterval(() => {
if (this.tabWidth <= 64) clearInterval(this.intelval);
this.tabWidth -= 1;
}, 1);
} else {
this.tabWidth = 200;
}
this.isCollapse = !this.isCollapse;
},
},
};
</script>
<style>
* {
padding: 0;
margin: 0;
}
</style>
<style scoped lang="scss">
$header-height: 60px;
$background-color: #545c64;
$color: #fff;
.main {
height: 100vh;
min-width: 800px;
min-height: 600px;
overflow: hidden;
}
aside {
overflow: visible;
height: 100%;
background-color: $background-color;
color: $color;
}
.isClossTab {
width: 100%;
height: $header-height;
cursor: pointer;
font-size: 25px;
text-align: center;
line-height: $header-height;
font-weight: bold;
border-right: 1px solid #807c7c;
box-sizing: border-box;
}
.menu {
width: 100%;
border-right: 0;
}
.main-header {
background-color: $background-color;
color: $color;
}
.el-dropdown {
cursor: pointer;
float: right;
}
.el-dropdown-link img {
$imgMargin: (($header-height - 50)/2);
display: inline-block;
width: 50px;
height: 50px;
border-radius: 25px;
background-color: #fff;
margin-top: $imgMargin;
}
.crumbs {
margin-bottom: 20px;
}
.main-footer {
text-align: center;
background-color: $background-color;
color: $color;
line-height: 50px;
}
</style>
总结

一共有3个页面About.vue为主页面,Sindex.vue和Wen.vue为主页面下面的路由,写内容即可,【注意】一定要在<el-menu 里面加上router,不然路由跳转就不在主页面显示了
~ 喜欢的小伙伴点个赞呗,评论区留下宝贵的意见-谢谢呐♥~
- 如果文章当中有问题,或者有什么好的意见,大家可以指出来,一起学习。
- 本文版权归作者所有,欢迎转载。


 9374
9374


 被折叠的 条评论
为什么被折叠?
被折叠的 条评论
为什么被折叠?
 到【灌水乐园】发言


