


文章目录
总结
android系统是基于linux的,启动大致分为如下几个阶段
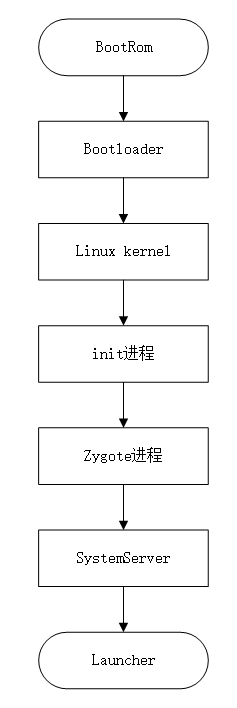
- BootRom
启动电源以及系统启动。当电源按下时,引导芯片代码从预定义的地方(固化在ROM中)开始执行。加载引导程序BootLoader到RAM,然后执行。 - 引导程序Bootloader
引导程序BootLoader是在android操作系统开始运行前的一个小程序,他的主要作用是把系统OS拉起来并运行。 - Linux kernel启动
当内核启动时,设置缓存、被保护存储器、计划列表、加载驱动。当内核完成系统设置时,它首先在系统文件中寻找init.rc文件,并启动init进程。 - init进程启动
初始化和启动属性服务,并且启动Zygote进程。 - Zygote进程启动
创建Java虚拟机并为Java虚拟机注册JNI方法,创建服务器端Socket,启动SystemServer进程。 - systemserver进程启动
启动Binder线程池和SystemServiceManager,并且启动各种系统服务。 - Launcher进程启动
被SystemServer进程启动的AMS会启动Launcher,Launcher启动后会将已安装应用的快捷图标显示到界面上
下面基于aosp11-13进行分析,因为多次阅读和使用的源码不一样,可能出现的代码并不是同一个Android版本代码
1.rc脚本语法规则
源码中提供了一个官方文档(aosp\system\core\init\README.md)来说明rc脚本使用规则。rc脚本由Actions、Commands、Services、Options、Improts组成。
这部分内容可以参考《深入理解Android内核设计思想(第2版)》—第七章 Android启动过程
-
Actions:当达到某个触发条件时,执行命令,即响应某事件的过程
Actions take the form of: on <trigger> [&& <trigger>]* // 触发条件 <command> // 执行命令 <command> <command> -
Commands:命令将在所属事件发生时被一个个地执行,rc脚本中定义了许多命令,如
boot:init程序启动后触发的第一个事件 class_start <serviceclass>:启动服务 class_stop <serviceclass>:停止服务 ...... -
Services:可执行程序
Services take the form of: service <name> <pathname> [ <argument> ]* <option> <option> ... // name:服务名称 // pathname:服务路径 // argument:启动服务传递的参数 // option:对服务的约束项 -
Options:服务修饰符,影响init进程运行服务的方式和时间。即上面的
critical:表明这是对设备至关重要的一个服务。如果它在指定的时间内退出超过四次,则设备将重启进入恢复模式 onrestart:重启服务 -
Imports:引入其他rc配置文件,语法格式为
import <path>
2.init进程启动
init是一个Linux程序,位于设备中/system/bin/init。
通过解析init.rc脚本(system\core\rootdir\init.rc)来构建出系统的初始运行形态,其他Android系统服务 程序大多是在这个rc脚本中描述并被相继启动的。
init源码位于system/core/init,从编译脚本中可以看出,init程序分为两个阶段:init_first_stage和init_second_stage
// /system/core/init/Android.bp
phony {
    name: "init",
    required: [
        "init_second_stage",
    ],
}

cc_binary {
    name: "init_second_stage",
    ...
}

// /system/core/init/Android.mk
LOCAL_MODULE := init_first_stage
LOCAL_MODULE_STEM := init
LOCAL_FORCE_STATIC_EXECUTABLE := true
include $(BUILD_EXECUTABLE)


LOCAL_MODULE := init_system
LOCAL_REQUIRED_MODULES := \
   init_second_stage \

include $(BUILD_PHONY_PACKAGE)

LOCAL_MODULE := init_vendor
ifneq ($(BOARD_BUILD_SYSTEM_ROOT_IMAGE),true)
LOCAL_REQUIRED_MODULES := \
   init_first_stage \

endif
include $(BUILD_PHONY_PACKAGE)
在系统启动时过滤init进程相关日志,发现init开始是0号进程,后面变为1号进程,整个过程为:
由0号进程创建1号进程(内核态),1号负责执行内核的初始化工作及进行系统配置,并创建若干个用于高速缓存和虚拟主存管理的内核线程。随后,1号进程调用execve()运行可执行程序init,并演变成用户态1号进程,即init进程。
Linux系统中的init进程(pid=1)是除了idle进程(pid=0,也就是init_task)之外另一个比较特殊的进程,它是Linux内核开始建立起进程概念时第一个通过kernel_thread产生的进程,其开始在内核态执行,然后通过一个系统调用,开始执行用户空间的/sbin/init程序,期间Linux内核也经历了从内核态到用户态的特权级转变。
2023-03-13 00:37:52.600     0-0     init                           kernel                               I  init first stage started!
2023-03-13 00:37:57.209     0-0     init                           kernel                               I  init second stage started!
2023-03-13 00:37:59.823     0-0     <no-tag>                       kernel                               W  init (pid 1) is setting deprecated v1 encryption policy; recommend upgrading to v2.
2023-03-13 00:38:05.672     1-1     /system/bin/init               pid-1                                W  type=1107 audit(0.0:6): uid=0 auid=4294967295 ses=4294967295 subj=u:r:init:s0 msg='avc: denied { set } for property=vendor.wlan.firmware.version pid=296 uid=1010 gid=1010 scontext=u:r:hal_wifi_default:s0 tcontext=u:object_r:vendor_default_prop:s0 tclass=property_service permissive=0' b/131598173
可以通过ps命令查看init进程号为1,父进程号为0。
generic_x86:/ # ps -ef -Z | grep init
u:r:init:s0                    root              1      0 0 16:14:24 ?     00:00:03 init second_stage
u:r:vendor_init:s0             root            120      1 0 16:14:30 ?     00:00:00 init subcontext u:r:vendor_init:s0 15
我们看init程序的main方法,当没有传参时会执行first_init阶段,当参数为second_stage,会执行second_stage阶段。这个两个阶段源码比较清晰,就不贴出来了。
// system/core/init/main.cpp
int main(int argc, char** argv) {
#if __has_feature(address_sanitizer)
    __asan_set_error_report_callback(AsanReportCallback);
#endif
    if (!strcmp(basename(argv[0]), "ueventd")) {
        return ueventd_main(argc, argv);
    }

    if (argc > 1) {
        if (!strcmp(argv[1], "subcontext")) {
            android::base::InitLogging(argv, &android::base::KernelLogger);
            const BuiltinFunctionMap& function_map = GetBuiltinFunctionMap();

            return SubcontextMain(argc, argv, &function_map);
        }

        if (!strcmp(argv[1], "selinux_setup")) {
            return SetupSelinux(argv);
        }

        if (!strcmp(argv[1], "second_stage")) {
            return SecondStageMain(argc, argv);
        }
    }

    return FirstStageMain(argc, argv);
}
首先会执行FirstStageMain,最终运行形态在第二阶段:
generic_x86:/ # cat proc/1/cmdline
/system/bin/initsecond_stage
init_first_stage
主要执行了system/core/init/first_stage_init.cpp:FirstStageMain(),主要做了下面几种事情:
-
挂载必要的文件系统
-
初始化kmsg
-
加载内核模块、驱动
-
创建设备节点
-
再次运行init程序,参数为“selinux_setup”,设置SELinux环境
// system/core/init/first_stage_init.cpp int FirstStageMain(int argc, char** argv) { // ...... const char* path = "/system/bin/init"; const char* args[] = {path, "selinux_setup", nullptr}; auto fd = open("/dev/kmsg", O_WRONLY | O_CLOEXEC); dup2(fd, STDOUT_FILENO); dup2(fd, STDERR_FILENO); close(fd); execv(path, const_cast<char**>(args)); PLOG(FATAL) << "execv(\"" << path << "\") failed"; return 1; } -
设置SELinux环境完成后,执行"second_stage"
int SetupSelinux(char** argv) {
    SetStdioToDevNull(argv);
    InitKernelLogging(argv);

    if (REBOOT_BOOTLOADER_ON_PANIC) {
        InstallRebootSignalHandlers();
    }

    boot_clock::time_point start_time = boot_clock::now();

    MountMissingSystemPartitions();

    // Set up SELinux, loading the SELinux policy.
    SelinuxSetupKernelLogging();
    SelinuxInitialize();

    setenv(kEnvSelinuxStartedAt, std::to_string(start_time.time_since_epoch().count()).c_str(), 1);

    const char* path = "/system/bin/init";
    const char* args[] = {path, "second_stage", nullptr};
    execv(path, const_cast<char**>(args));

    PLOG(FATAL) << "execv(\"" << path << "\") failed";

    return 1;
}
init_second_stage
int SecondStageMain(int argc, char** argv)是在system/core/init/init.cpp中,主要做的的事情如下:
- 设置
/proc/1/oom_score_adj,值为-1000 - 启动
Property服务 - 挂载
一些tmpfs中文件目录 - 启动selinux环境
- 启动
PropertyService - 启动Treble框架
- fork subContext
- 启动系统服务
因此,整个流程图如下:
3.ServiceManager启动
ServiceManager是在rc脚本中启动的:
 // system\core\rootdir\init.rc
on init
   # Start essential services.
   start servicemanager
servicemanager服务定义在frameworks\native\cmds\servicemanager\servicemanager.rc。可以看到,servicemanger是一个Linux程序,它在设备中的存储路径是/system/bin/servicemanager,源码路径则是/frameworks/native/cmds/servicemanager。
从rc脚本中可以知道,servicemanager作为系统核心服务,遇到异常重启时会同时启动audioserver等其他核心服务。
// frameworks\native\cmds\servicemanager\servicemanager.rc
service servicemanager /system/bin/servicemanager
    class core animation
    user system
    group system readproc
    critical
    onrestart restart apexd
    onrestart restart audioserver
    onrestart restart gatekeeperd
    onrestart class_restart --only-enabled main
    onrestart class_restart --only-enabled hal
    onrestart class_restart --only-enabled early_hal
    task_profiles ServiceCapacityLow
    shutdown critical
servicemanager启动后做了什么事情,详情见ServiceManager(Native)启动分析
4.Zygote进程启动
zygote进程也是由init进程解析rc脚本启动:
 // system\core\rootdir\init.rc
on late-init
# Now we can start zygote for devices with file based encryption
trigger zygote-start
根据不同的硬件类型分了几种(可以通过ro.hardware系统属性查看),下面以init.zygote64.rc为例进行说明
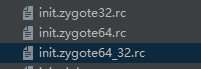
// system\core\rootdir\init.zygote64.rc
service zygote /system/bin/app_process64 -Xzygote /system/bin --zygote --start-system-server
    class main
    priority -20
    user root
    group root readproc reserved_disk
    socket zygote stream 660 root system
    socket usap_pool_primary stream 660 root system
    onrestart exec_background - system system -- /system/bin/vdc volume abort_fuse
    onrestart write /sys/power/state on
    onrestart restart audioserver
    onrestart restart cameraserver
    onrestart restart media
    onrestart restart media.tuner
    onrestart restart netd
    onrestart restart wificond
    task_profiles ProcessCapacityHigh
    critical window=${zygote.critical_window.minute:-off} target=zygote-fatal
从zygote的path路径可以看出,它所在的程序名叫 “app_process64”,而不像ServiceManager一样在一个独立的程序 中。通过指定–zygote参数,app_process可以识别出用户是否需要启动zygote。app_process源码位于aosp\frameworks\base\cmds\app_process,从Android.bp文件中可以看出,针对不同的平台生成相应的目标
// frameworks\base\cmds\app_process\Android.bp
cc_binary {
    name: "app_process",

    srcs: ["app_main.cpp"],

    multilib: {
        lib32: {
            suffix: "32",
        },
        lib64: {
            suffix: "64",
        },
    },
    ....
}
接着我们看app_main.cpp的main(),整个过程大致分为下面几个阶段:
- 创建AndroidRuntime
- 通过不同的传参执行不同的逻辑,如参数为–zygote时,则启动Zygote进程
- 启动了ZygoteInit
- forkSystemServer
- 开启uds
// frameworks/base/cmds/app_process/app_main.cpp
int main(int argc, char* const argv[])
{
    AppRuntime runtime(argv[0], computeArgBlockSize(argc, argv));
    // Process command line arguments
    // ignore argv[0]
    argc--;
    argv++;

    // Everything up to '--' or first non '-' arg goes to the vm.
    //
    // The first argument after the VM args is the "parent dir", which
    // is currently unused.
    //
    // After the parent dir, we expect one or more the following internal
    // arguments :
    //
    // --zygote : Start in zygote mode
    // --start-system-server : Start the system server.
    // --application : Start in application (stand alone, non zygote) mode.
    // --nice-name : The nice name for this process.
    //
    // For non zygote starts, these arguments will be followed by
    // the main class name. All remaining arguments are passed to
    // the main method of this class.
    //
    // For zygote starts, all remaining arguments are passed to the zygote.
    // main function.
    //
    // Note that we must copy argument string values since we will rewrite the
    // entire argument block when we apply the nice name to argv0.
    //
    // As an exception to the above rule, anything in "spaced commands"
    // goes to the vm even though it has a space in it.
    const char* spaced_commands[] = { "-cp", "-classpath" };

   // .......

    bool zygote = false;
    bool startSystemServer = false;
    bool application = false;
    String8 niceName;
    String8 className;
    ++i;  // Skip unused "parent dir" argument.
    while (i < argc) {
        const char* arg = argv[i++];
        if (strcmp(arg, "--zygote") == 0) {
            zygote = true;
            niceName = ZYGOTE_NICE_NAME;
        } else if (strcmp(arg, "--start-system-server") == 0) {
            startSystemServer = true;
        } else if (strcmp(arg, "--application") == 0) {
            application = true;
        } else if (strncmp(arg, "--nice-name=", 12) == 0) {
            niceName.setTo(arg + 12);
        } else if (strncmp(arg, "--", 2) != 0) {
            className.setTo(arg);
            break;
        } else {
            --i;
            break;
        }
    }
   // .......
    if (!niceName.isEmpty()) {
        runtime.setArgv0(niceName.string(), true /* setProcName */);
    }

    if (zygote) {
        runtime.start("com.android.internal.os.ZygoteInit", args, zygote);
    } else if (!className.isEmpty()) {
        runtime.start("com.android.internal.os.RuntimeInit", args, zygote);
    } else {
        fprintf(stderr, "Error: no class name or --zygote supplied.\n");
        app_usage();
        LOG_ALWAYS_FATAL("app_process: no class name or --zygote supplied.");
    }
}
我们看runtime.start逻辑:
- 启动VM:
startVm() - 注册Android相关的vm方法:
startReg() - 通过jni创建java层对象
// frameworks/base/core/jni/AndroidRuntime.cpp

/*
 * Start the Android runtime.  This involves starting the virtual machine
 * and calling the "static void main(String[] args)" method in the class
 * named by "className".
 *
 * Passes the main function two arguments, the class name and the specified
 * options string.
 */
void AndroidRuntime::start(const char* className, const Vector<String8>& options, bool zygote)
{
    static const String8 startSystemServer("start-system-server");
    // Whether this is the primary zygote, meaning the zygote which will fork system server.
    bool primary_zygote = false;

    /*
     * 'startSystemServer == true' means runtime is obsolete and not run from
     * init.rc anymore, so we print out the boot start event here.
     */
    for (size_t i = 0; i < options.size(); ++i) {
        if (options[i] == startSystemServer) {
            primary_zygote = true;
           /* track our progress through the boot sequence */
           const int LOG_BOOT_PROGRESS_START = 3000;
           LOG_EVENT_LONG(LOG_BOOT_PROGRESS_START,  ns2ms(systemTime(SYSTEM_TIME_MONOTONIC)));
        }
    }
    /* start the virtual machine */
    JniInvocation jni_invocation;
    jni_invocation.Init(NULL);
    JNIEnv* env;
    if (startVm(&mJavaVM, &env, zygote, primary_zygote) != 0) {
        return;
    }
    onVmCreated(env);

    /*
     * Register android functions.
     */
    if (startReg(env) < 0) {
        ALOGE("Unable to register all android natives\n");
        return;
    }

    /*
     * We want to call main() with a String array with arguments in it.
     * At present we have two arguments, the class name and an option string.
     * Create an array to hold them.
     */
    jclass stringClass;
    jobjectArray strArray;
    jstring classNameStr;

    stringClass = env->FindClass("java/lang/String");
    assert(stringClass != NULL);
    strArray = env->NewObjectArray(options.size() + 1, stringClass, NULL);
    assert(strArray != NULL);
    classNameStr = env->NewStringUTF(className);
    assert(classNameStr != NULL);
    env->SetObjectArrayElement(strArray, 0, classNameStr);

    for (size_t i = 0; i < options.size(); ++i) {
        jstring optionsStr = env->NewStringUTF(options.itemAt(i).string());
        assert(optionsStr != NULL);
        env->SetObjectArrayElement(strArray, i + 1, optionsStr);
    }

    /*
     * Start VM.  This thread becomes the main thread of the VM, and will
     * not return until the VM exits.
     */
    char* slashClassName = toSlashClassName(className != NULL ? className : "");
    jclass startClass = env->FindClass(slashClassName);
    if (startClass == NULL) {
        ALOGE("JavaVM unable to locate class '%s'\n", slashClassName);
        /* keep going */
    } else {
        jmethodID startMeth = env->GetStaticMethodID(startClass, "main",
            "([Ljava/lang/String;)V");
        if (startMeth == NULL) {
            ALOGE("JavaVM unable to find main() in '%s'\n", className);
            /* keep going */
        } else {
            env->CallStaticVoidMethod(startClass, startMeth, strArray);

#if 0
            if (env->ExceptionCheck())
                threadExitUncaughtException(env);
#endif
        }
    }
    free(slashClassName);

    ALOGD("Shutting down VM\n");
    if (mJavaVM->DetachCurrentThread() != JNI_OK)
        ALOGW("Warning: unable to detach main thread\n");
    if (mJavaVM->DestroyJavaVM() != 0)
        ALOGW("Warning: VM did not shut down cleanly\n");
}
通过上面分析,可以知道会分别创建Java层RuntimeInit和ZygoteInit对象。
当ZygoteInit创建时,会开启UDS,等在app执行fork操作,并且会创建SystemServer。ZygoteInit日志如下:
03-19 17:09:33.767   263   263 D Zygote  : begin preload
03-19 17:09:33.767   263   263 I Zygote  : Calling ZygoteHooks.beginPreload()
03-19 17:09:35.065   263   263 I zygote  : VMRuntime.preloadDexCaches finished
03-19 17:09:35.142   263   263 D Zygote  : end preload
03-19 17:09:35.270   263   263 D Zygote  : Forked child process 475
03-19 17:09:35.270   263   263 I Zygote  : System server process 475 has been created
03-19 17:09:35.271   263   263 I Zygote  : Accepting command socket connections
03-19 17:09:35.861   475   475 I SystemServerTiming: InitBeforeStartServices
03-19 17:09:35.862   475   475 I SystemServer: Entered the Android system server!
03-19 17:09:36.155   475   475 I SystemServerTiming: StartServices
03-19 17:09:42.807   475   475 I SystemServer: Making services ready


03-19 17:09:36.425   475   475 I SystemServerTiming: StartActivityManager
03-19 17:09:36.425   475   475 I SystemServiceManager: Starting com.android.server.wm.ActivityTaskManagerService$Lifecycle
03-19 17:09:36.445   475   475 I SystemServiceManager: Starting com.android.server.am.ActivityManagerService$Lifecycle
03-19 17:09:36.675   475   475 D SystemServerTiming: StartActivityManager took to complete: 251ms

03-19 17:09:43.016   475   475 I SystemServerTiming: StartSystemUI
03-19 17:09:43.019   475   475 D SystemServerTiming: StartSystemUI took to complete: 3ms

03-19 17:09:43.305   475   475 I SystemServerTiming: startPersistentApps

03-19 17:09:43.314   475   475 D SystemServerTiming: startHomeOnAllDisplays took to complete: 7ms
03-19 17:09:43.306   475   475 I ActivityTaskManager: START u0 {act=android.intent.action.MAIN cat=[android.intent.category.HOME] flg=0x10000100 cmp=com.android.settings/.FallbackHome} from uid 0
03-19 17:09:43.306   475   475 I SystemServerTiming: startHomeOnAllDisplays
03-19 17:09:50.945   475   489 I ActivityTaskManager: START u0 {act=android.intent.action.MAIN cat=[android.intent.category.HOME] flg=0x10000100 cmp=com.android.launcher3/.uioverrides.QuickstepLauncher} from uid 0
5.Launcher启动
参考文档:
-
《深入理解Android内核设计思想(第2版)》
-
https://blog.csdn.net/L12ThMicrowave/article/details/126303805
-
https://zhuanlan.zhihu.com/p/585387856


 1278
1278


 被折叠的 条评论
为什么被折叠?
被折叠的 条评论
为什么被折叠?
 到【灌水乐园】发言


