


一、Windows服务概述
1、Windows服务应用程序是一种需要长期运行的应用程序,它适合服务器环境。
2、无用户界面,任何消息都会写进Windows事件日志。
3、随计算机启动而启动,不需要用户一定登录Windows。
4、通过服务控制管理器,可以终止、暂停及当需要时启动Windows服务。
5、类继承关系
- Object
- Component
- ServiceBase
- ServiceController
- Installer
- ComponentInstaller
- ServiceInstaller
- ServiceProcessInstaller
- Component
6、体系结构
1) 服务程序 实现系统的业务需求。
ServiceBase服务程序,实现系统的业务需求。 在创建新的服务类时,必须从 ServiceBase 派生。一个服务拥有能从SCM收到信号和命令所必需的的特殊代码,并且能够在处理后将它的状态回传给SCM。
Service Control Manager(SCM)。SCM是操作系统的一个组成部分(services.exe),储存着已安装的服务和驱动程序的信息的数据库,统一管理各服务。
2 )服务控制程序 是一个Service Control Dispatcher(SCP)。
它是一个拥有用户界面,允许用户开始、停止、暂停、继续,并且控制一个或多个安装在计算机上服务的Win32应用程序。
SCP的作用是与SCM通讯,Windows 管理工具中的“服务”就是一个典型的SCP。
ServiceController:(服务控制程序)表示 Windows 服务并允许连接到正在运行或者已停止的服务、对其进行操作或获取有关它的信息。
3) 服务配置程序
配置程序可以安装服务,向注册表注册服务,设置服务的启动类型、服务的用户及依存关系等。
ServiceInstaller:(服务安装配置程序)继承自Installer类。该类扩展 ServiceBase 来实现服务。 在安装服务应用程序时由安装实用工具调用该类。
ServiceProcessInstaller :(服务安装配置程序)继承自Installer类。安装一个可执行文件,该文件包含扩展 ServiceBase 的类。 该类由安装实用工具(如 InstallUtil.exe)在安装服务应用程序时调用。
二、创建Windows服务:ServiceBase
新建一个“Windows服务”项目,添加一个System.Timers.Timer组件。
1)单个服务
static void Main()
{
    ServiceBase[] ServicesToRun;
    ServicesToRun = new ServiceBase[]
    {
        new  MyService1()
    };
    ServiceBase.Run(ServicesToRun);
}
服务程序:
public partial class MyService1 : ServiceBase
{
    public MyService1()
    {
        InitializeComponent();
myTimer = new System.Timers.Timer();
myTimer.Interval = 60000; //设置计时器事件间隔执行时间
myTimer.Elapsed += (timer1_Elapsed);
         this.ServiceName = "我的服务";
        this.AutoLog = true;//是否自行写入系统的事件日志
        this.CanHandlePowerEvent = true;//是否接受电源事件
        this.CanPauseAndContinue = true;//是否能暂停或继续
        this.CanShutdown = true;//是否在计算机关闭时收到通知
        this.CanStop = true;//是否接受停止运行的请求
    }

    private void timer1_Elapsed(object sender, ElapsedEventArgs e)
    {
        File.AppendAllText("C:\\1.txt", "Service Runing");
    }

    string filePath = @"D:\MyServiceLog.txt";

    protected override void OnStart(string[] args)
    {
        this.timer1.Enabled = true;
        File.AppendAllText("C:\\1.txt", "Service Started");
    }

    protected override void OnStop()
    {
        this.timer1.Enabled = false;
        File.AppendAllText("C:\\1.txt", "Service Stoped");
    }
}
服务在运行时,获取其可执行文件的父目录:
AppDomain.CurrentDomain.BaseDirectory;
2)多个服务
static void Main()
{
    ServiceBase[] ServicesToRun;

    string Line = Directory.CreateDirectory(AppDomain.CurrentDomain.BaseDirectory).Name;

    DCWinService lineService = new DCWinService(Line);
    lineService.ServiceName = "GPE.PAMSDC.DCService(" + Line + ")";

    ServicesToRun = new ServiceBase[] { lineService };
    ServiceBase.Run(ServicesToRun);
}
服务程序:
public partial class DCWinService : ServiceBase
{
    public DCWinService()
    {
        InitializeComponent();
    }
    string line;

    public DCWinService(string line)
    {
        this.line = line;
    }
    protected override void OnStart(string[] args)
    {
        // TODO: 在此处添加代码以启动服务。
        GPE.PAMSDC.DCServer.Start(line);//动态加载
    }

    protected override void OnStop()
    {
        // TODO: 在此处添加代码以执行停止服务所需的关闭操作。
        GPE.PAMSDC.DCServer.Stop(line);
    }
}
}
三、添加服务安装程序:(与服务程序同一项目)
创建一个Windows服务,仅用InstallUtil程序去安装这个服务是不够的。你必须还要把一个服务安装程序添加到你的Windows服务当中,这样便于InstallUtil或是任何别的安装程序知道应用你服务的是怎样的
配置设置。
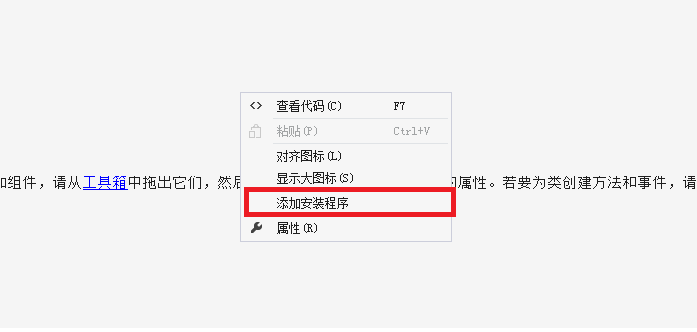
在服务程序的设计视图右击“添加安装程序”,自动添加一个ProjectInstaller文件“DCServiceInstaller”。
在ProjectInstaller的设计视图中,分别设置serviceInstaller1组件和serviceProcessInstaller1的属性。
1) 单个服务
// serviceInstaller1
this.serviceInstaller1.Description = "消息发送服务.";
this.serviceInstaller1.DisplayName = "MyService1";
this.serviceInstaller1.ServiceName = "MyService1";//要与前面的定义的服务名一致。
this.serviceInstaller1.StartType = System.ServiceProcess.ServiceStartMode.Automatic;

// serviceProcessInstaller1
this.serviceProcessInstaller1.Account = System.ServiceProcess.ServiceAccount.LocalSystem;
this.serviceProcessInstaller1.Password = null;
this.serviceProcessInstaller1.Username = null;

// DCServiceInstaller
this.Installers.AddRange(new System.Configuration.Install.Installer[] {
        this.serviceInstaller1,
        this.serviceProcessInstaller1});
2)多个服务
string[] lines = new string[] { "T1", "T2" };
ServiceInstaller serviceInstaller1;

foreach (string line in lines)
{
    // serviceInstaller1
    serviceInstaller1 = new ServiceInstaller();
    serviceInstaller1.Description = "消息发送服务.";
    serviceInstaller1.DisplayName = "GPE.PAMSDC.DCService(" + line + ")";
    serviceInstaller1.ServiceName = "GPE.PAMSDC.DCService(" + line + ")";
    this.Installer.Add(this.serviceInstaller1);//serviceInstaller可以有多个

}
// serviceProcessInstaller1
this.serviceProcessInstaller1.Account = System.ServiceProcess.ServiceAccount.LocalSystem;
// DCServiceInstaller
this.Installers.Add(this.serviceProcessInstaller1);//serviceProcessInstaller只能有一个
注意:在服务安装程序中,获取可执行文件的父目录:
Directory.CreateDirectory("./").Name
四、Windows服务的安装程序
1、创建一个“安装部署”的项目,右键项目名称,选择“添加”-“项目输出”,选择前面创建的服务项目,再选择“主输出”。也可以右击安装项目,“视图”,“添加自定义操作”。
2、使用InstallUtil.exe工具,批处理文件为:
- 安装:
C:\WINDOWS\Microsoft.NET\Framework\v4.0.30319\InstallUtil.exe ./GPE.PAMSDC.DCService.exe
Net Start DCService
sc config DCServicestart= auto
- 卸载:
C:\WINDOWS\Microsoft.NET\Framework\v4.0.30319\InstallUtil.exe -u ./GPE.PAMSDC.DCService.exe
通过第三方组件 (Topshelf)创建C# Windows服务应用程序。
五、服务控制程序:ServiceController
List<ServiceController> services = new List<ServiceController>(ServiceController.GetServices());
services = services.FindAll(s => s.DisplayName.StartsWith("GPE.PAMSDC.DCService"));
services.Sort((s1, s2) => s1.DisplayName.CompareTo(s2.DisplayName));

List<ServiceControllerInfo> serviceInfo = services.ConvertAll(s => new ServiceControllerInfo(s));
foreach (ServiceControllerInfo si in serviceInfo)
{
    if (si.EnableStart)
    {
        si.Controller.Start();
        si.Controller.WaitForStatus(ServiceControllerStatus.Running);
    }
}
六、调试Windows服务
必须首先启动服务,然后将一个调试器附加到正在运行的服务的进程中。
1、用VS加载这个服务项目。
2、“调试”菜单,“附加到进程”。
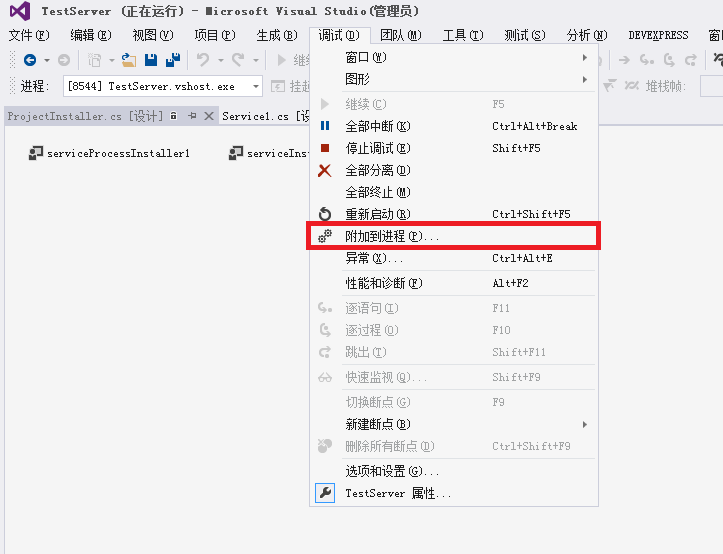
3、确保“显示所有用户进行”被选择。
4、在“可用进程”列表中,选中你的可执行文件的名称。
5、点击“附加”按钮。

6、在timer_Elapsed方法中设置断点,然后执行,从而实现调试的目的。


 3753
3753


 被折叠的 条评论
为什么被折叠?
被折叠的 条评论
为什么被折叠?
 到【灌水乐园】发言


