使用zabbix监控ceph集群的三种方式

18 篇文章 3 订阅

微信公众号:运维开发故事,作者:wanger

使用zabbix有多种方式可以监控ceph集群,这里依次介绍一下,本文只是提供监控ceph的思路或者方法,不涉及详细的配置

1.使用agent2监控ceph

从zabbix5.0开始,zabbix agent2开始支持对ceph的监控,ceph提供了Restful的模块,利用restful模块调用命令获取ceph的相关状态,restful模块的监听端口为8003,关于此模块的使用方法可以参考这个文档,ceph restful模块使用文档
接下来介绍使用此模块的方法

启用restful模块
ceph mgr module enable restful
生成ssl证书

此命令生成的是自签证书

ceph restful create-self-signed-cert
创建API用户

zabbix为创建的用户名

ceph restful create-key zabbix

查看所有的api 密钥

ceph restful list-keys

![image.png](https://img-blog.csdnimg.cn/img_convert/d77b474ffa7f25c65abd8ece6b7171a8.png#align=left&display=inline&height=50&margin=[object Object]&name=image.png&originHeight=99&originWidth=428&size=5828&status=done&style=none&width=214)
验证api用户是否可用,ceph-mgr为所在mgr节点的主机名或IP,端口8003

curl -k https://api:52dffd92-a103-4a10-bfce-5b60f48f764e@<ceph-mgr>:<port>/server
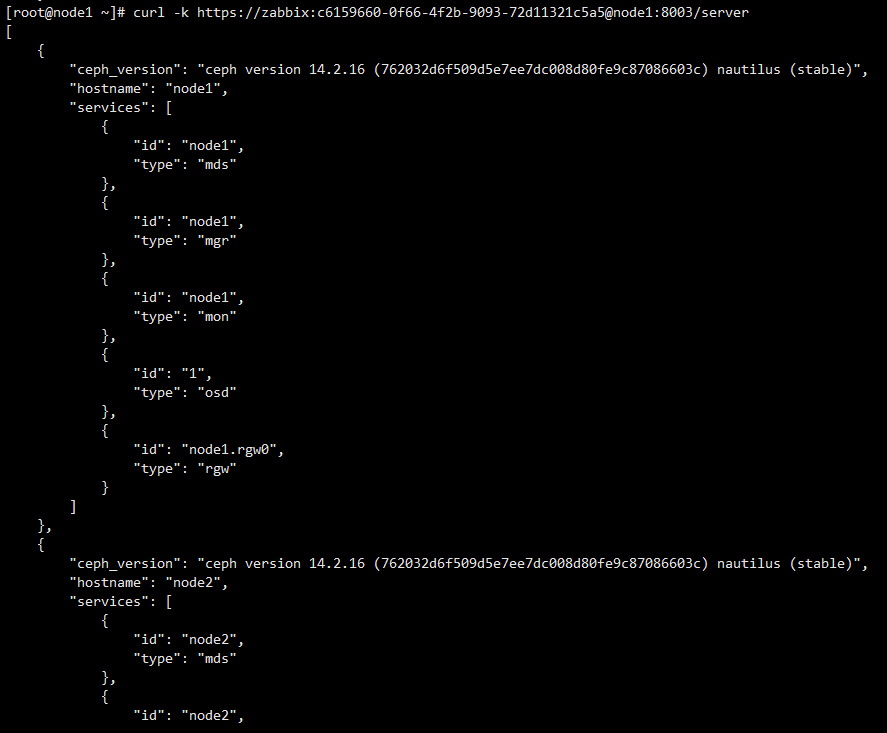
![image.png](https://img-blog.csdnimg.cn/img_convert/9a154cf8c8b9ddd5a8488760e540c260.png#align=left&display=inline&height=367&margin=[object Object]&name=image.png&originHeight=733&originWidth=887&size=40497&status=done&style=none&width=443.5)

添加模板并修改宏

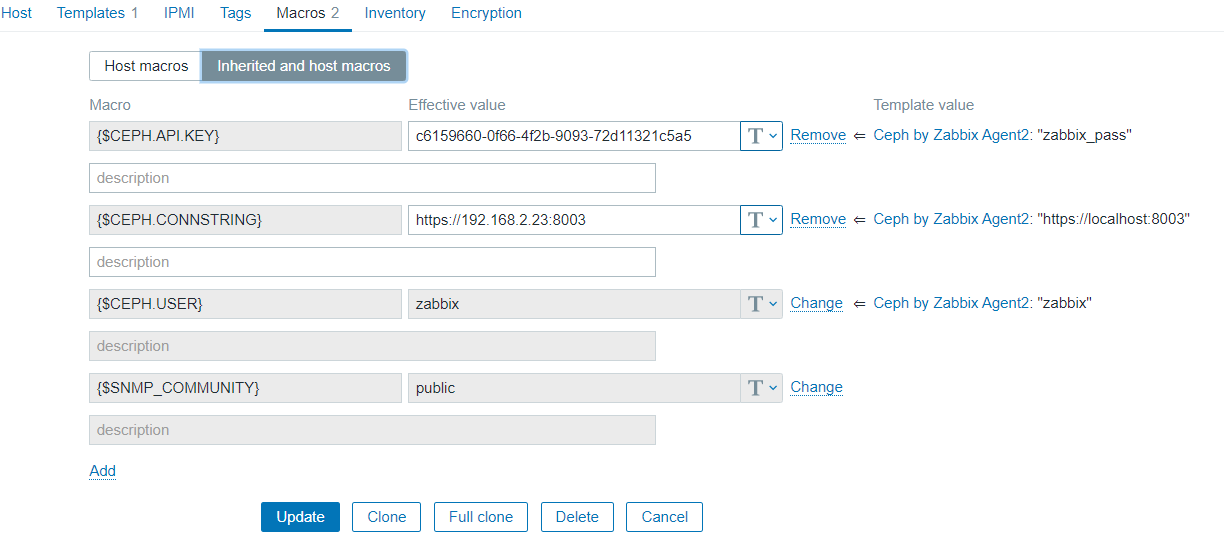
将url修改为mgr所在的host,
![image.png](https://img-blog.csdnimg.cn/img_convert/26b62947425eb82a24affcc08e9230e9.png#align=left&display=inline&height=275&margin=[object Object]&name=image.png&originHeight=550&originWidth=1224&size=49548&status=done&style=none&width=612)

修改配置文件跳过TLS验证

由于刚才用的是自签证书,所以需要修改配置文件来跳过TLS的验证

vim /etc/zabbix/zabbix_agent2.conf
Plugins.Ceph.InsecureSkipVerify=true
systemctl restart zabbix-agent2

可以看到已经收集到数据了
![image.png](https://img-blog.csdnimg.cn/img_convert/217d99d6d444f6243ea5d0c74f5606ef.png#align=left&display=inline&height=133&margin=[object Object]&name=image.png&originHeight=266&originWidth=1572&size=33004&status=done&style=none&width=786)
但是使用这种方法有一个问题
使用restful模块调用ceph pg dump命令时访问拒绝
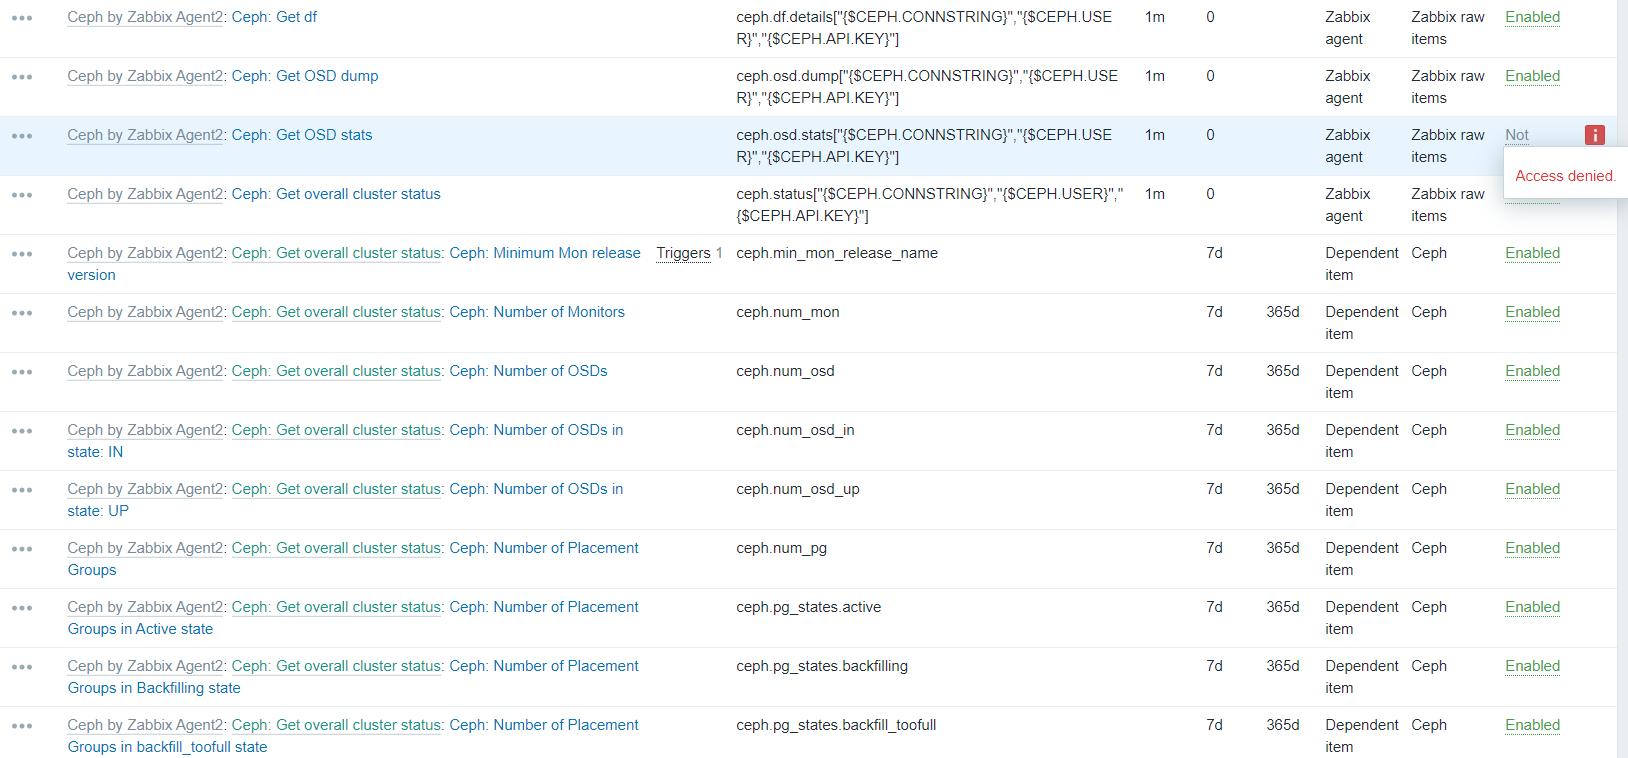
![image.png](https://img-blog.csdnimg.cn/img_convert/547184334bb1c83ea7e0ffcee181cbac.png#align=left&display=inline&height=379&margin=[object Object]&name=image.png&originHeight=758&originWidth=1628&size=136434&status=done&style=none&width=814)
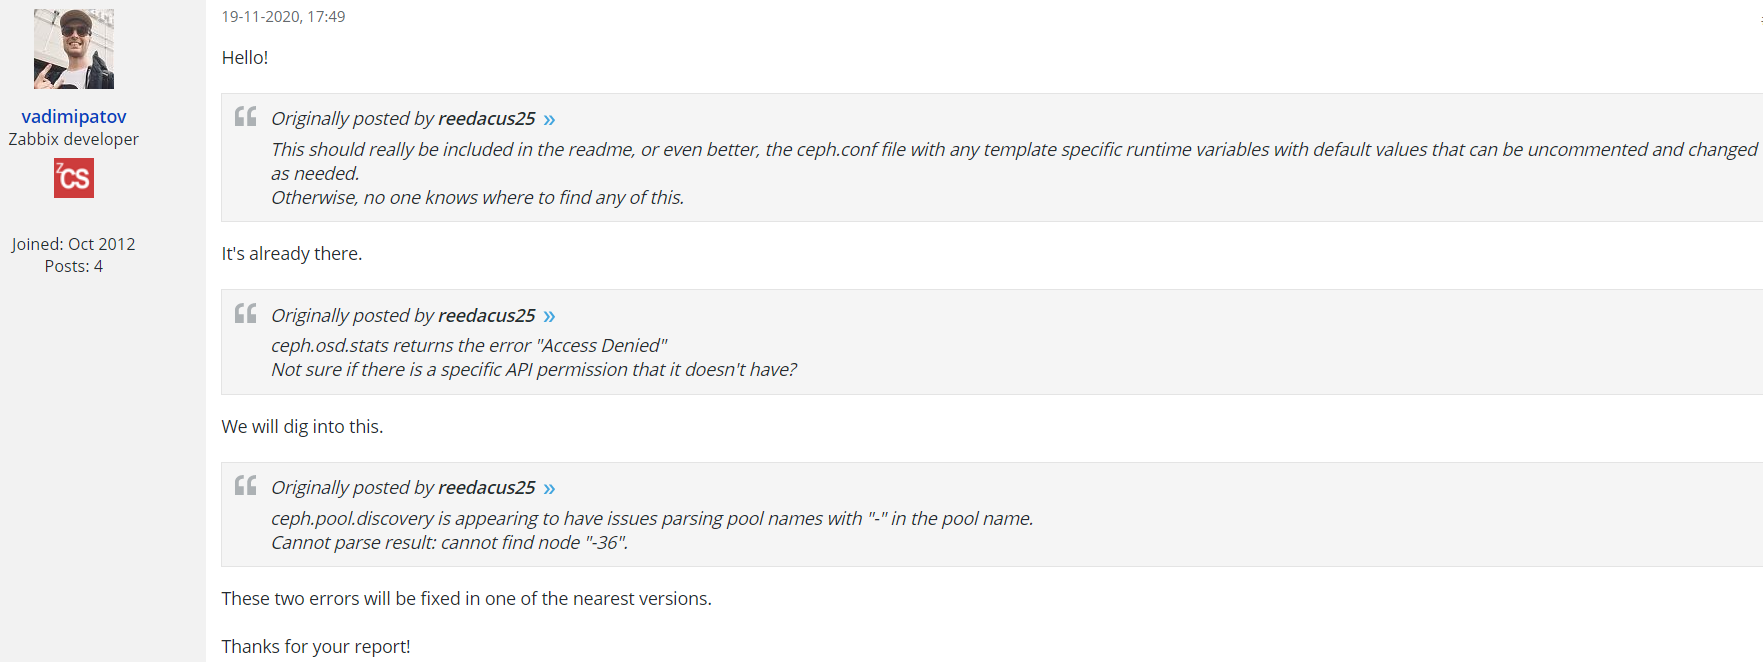
查看官方论坛ceph模板的主题发现有其他人也遇到了这个问题
![image.png](https://img-blog.csdnimg.cn/img_convert/dc80a10b48a492548bc368a2c47c2ff0.png#align=left&display=inline&height=229&margin=[object Object]&name=image.png&originHeight=457&originWidth=1527&size=70059&status=done&style=none&width=763.5)
![image.png](https://img-blog.csdnimg.cn/img_convert/03ebc6aa723a28ecea083bd6e442c401.png#align=left&display=inline&height=126&margin=[object Object]&name=image.png&originHeight=251&originWidth=1368&size=26721&status=done&style=none&width=684)
zabbix的开发人员也在帖子后面回复说是最近版本会解决这个问题,不过这个问题应该跟zabbix无关,而是pg dump拒绝了mgr的访问
![image.png](https://img-blog.csdnimg.cn/img_convert/e81f36c807290687c76859d2d1250207.png#align=left&display=inline&height=331&margin=[object Object]&name=image.png&originHeight=662&originWidth=1763&size=130337&status=done&style=none&width=881.5)

2.使用Zabbix Sender监控ceph集群

从ceph Luminous版本起,ceph-mgr开始提供zabbix模块用于对ceph的监控,接下来介绍使用此模块的方法

安装zabbix-sender
rpm -Uvh https://repo.zabbix.com/zabbix/5.2/rhel/7/x86_64/zabbix-release-5.2-1.el7.noarch.rpm
yum install zabbix-sender -y
启用zabbix模块
ceph mgr module enable zabbix
配置Zabbix Server和host信息
ceph zabbix config-set zabbix_host 192.168.2.24
ceph zabbix config-set identifier node1
ceph zabbix config-show
导入模板并链接到主机

我们可以从zabbix模块的源码目录获取模板,模板位置位于,导入之后链接模板即可

/usr/share/ceph/mgr/zabbix/zabbix_template.xml
手动发送数据测试

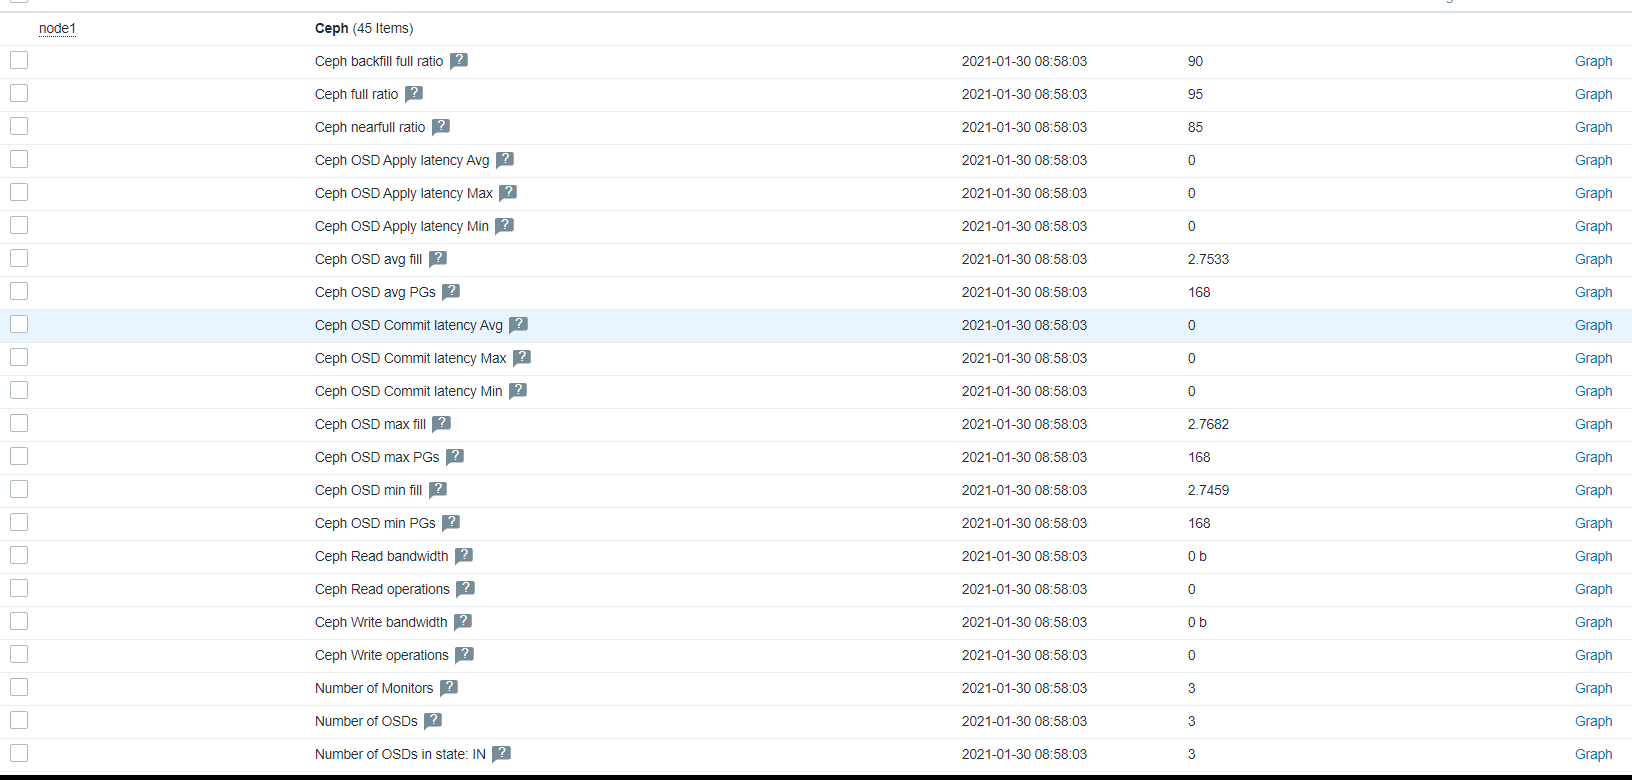
可以看到zabbix上已经获取到数据了

ceph zabbix send
![image.png](https://img-blog.csdnimg.cn/img_convert/a7051cfd6aa04be9b90c51fd0af31a6a.png#align=left&display=inline&height=390&margin=[object Object]&name=image.png&originHeight=780&originWidth=1632&size=91508&status=done&style=none&width=816)
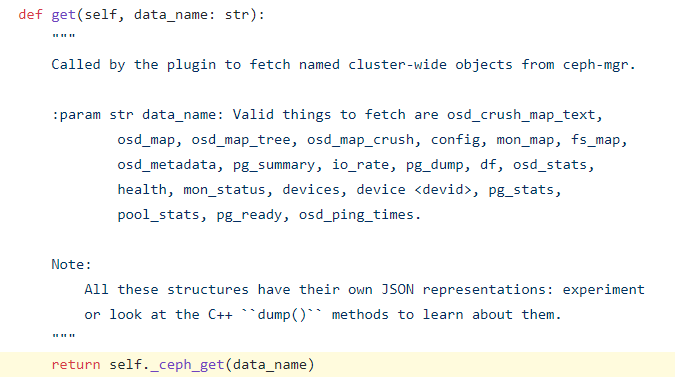
源码目录位于/usr/share/ceph/mgr/zabbix/module.py,可以看到其实是使用了mgr_module模块来获取ceph的数据,支持如下的传入参数
![image.png](https://img-blog.csdnimg.cn/img_convert/89b5e722fe3042a89a3a0e2d90cf238b.png#align=left&display=inline&height=189&margin=[object Object]&name=image.png&originHeight=378&originWidth=675&size=28045&status=done&style=none&width=337.5)
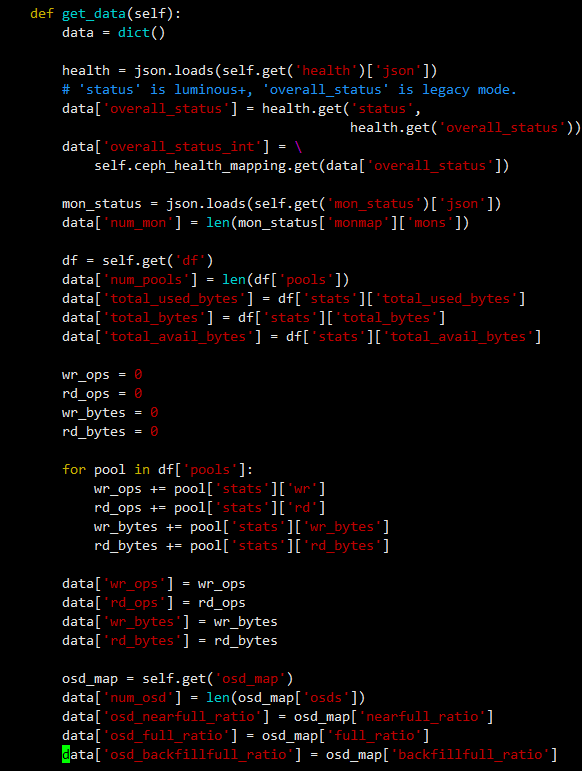
如果有其他的监控需求可以直接通过在module.py中传入参数来返回对应信息
![image.png](https://img-blog.csdnimg.cn/img_convert/b73418fe4834c8e02756532b570f6a97.png#align=left&display=inline&height=386&margin=[object Object]&name=image.png&originHeight=771&originWidth=582&size=54418&status=done&style=none&width=291)

使用自定义脚本监控ceph

可以使用shell或者python脚本来调用ceph命令或者利用Restful模块来进行监控,网上也有很多开源的自定义脚本可以参考。这里不多介绍

  • 0
    点赞
  • 0
    收藏
    觉得还不错? 一键收藏
  • 0
    评论
评论
添加红包

请填写红包祝福语或标题

红包个数最小为10个

红包金额最低5元

当前余额3.43前往充值 >
需支付:10.00
成就一亿技术人!
领取后你会自动成为博主和红包主的粉丝 规则
hope_wisdom
发出的红包
实付
使用余额支付
点击重新获取
扫码支付
钱包余额 0

抵扣说明:

1.余额是钱包充值的虚拟货币,按照1:1的比例进行支付金额的抵扣。
2.余额无法直接购买下载,可以购买VIP、付费专栏及课程。

余额充值