Android Design 28 版本 BottomNavigationView 使用

前言
- 之前项目中一直使用 BottomNavigationView 来做首页导航,最近 Google 的支持库 28 版本发布了,立马就把支持库更新到了最新版本,然后就是一堆报错,发现很多在支持库上进行自定义的功能都出现了问题,╮(╯_╰)╭ 而其中最重要的首页导航已经无法实现之前的效果了,因此有了这篇文章。
BottomNavigationView 的使用
- 在说明 28 版本上的处理之前,我们还是先来简单的说一下 BottomNavigationView 的使用吧。
- 首先在项目中导入 Design 支持库
implementation 'com.android.support:design:27.1.1'
<android.support.design.widget.BottomNavigationView
            android:id="@+id/bnv"
            android:layout_width="match_parent"
            android:layout_height="@dimen/app_spacing_multiple_12"
            android:background="@color/white"
            android:bind_bnv_onItemSelected="@{viewModel.command.onItemSelected}"
            android:textSize="@dimen/app_text_size_14"
            app:itemIconTint="@color/app_selector_main_bottom_tint"
            app:itemTextColor="@color/app_selector_main_bottom_tint"
            app:menu="@menu/app_menu_main_bottom" />
<menu xmlns:android="http://schemas.android.com/apk/res/android">

    <item
        android:id="@+id/menu_hospital"
        android:icon="@drawable/app_selector_main_bottom_hospital"
        android:title="@string/app_main_bottom_hospital" />
    <item
        android:id="@+id/menu_consult"
        android:icon="@drawable/app_selector_main_bottom_consult"
        android:title="@string/app_main_bottom_consult" />
    <item
        android:id="@+id/menu_contacts"
        android:icon="@drawable/app_selector_main_bottom_contacts"
        android:title="@string/app_main_bottom_contacts" />
    <item
        android:id="@+id/menu_setting"
        android:icon="@drawable/app_selector_main_bottom_setting"
        android:title="@string/app_main_bottom_setting" />
</menu>

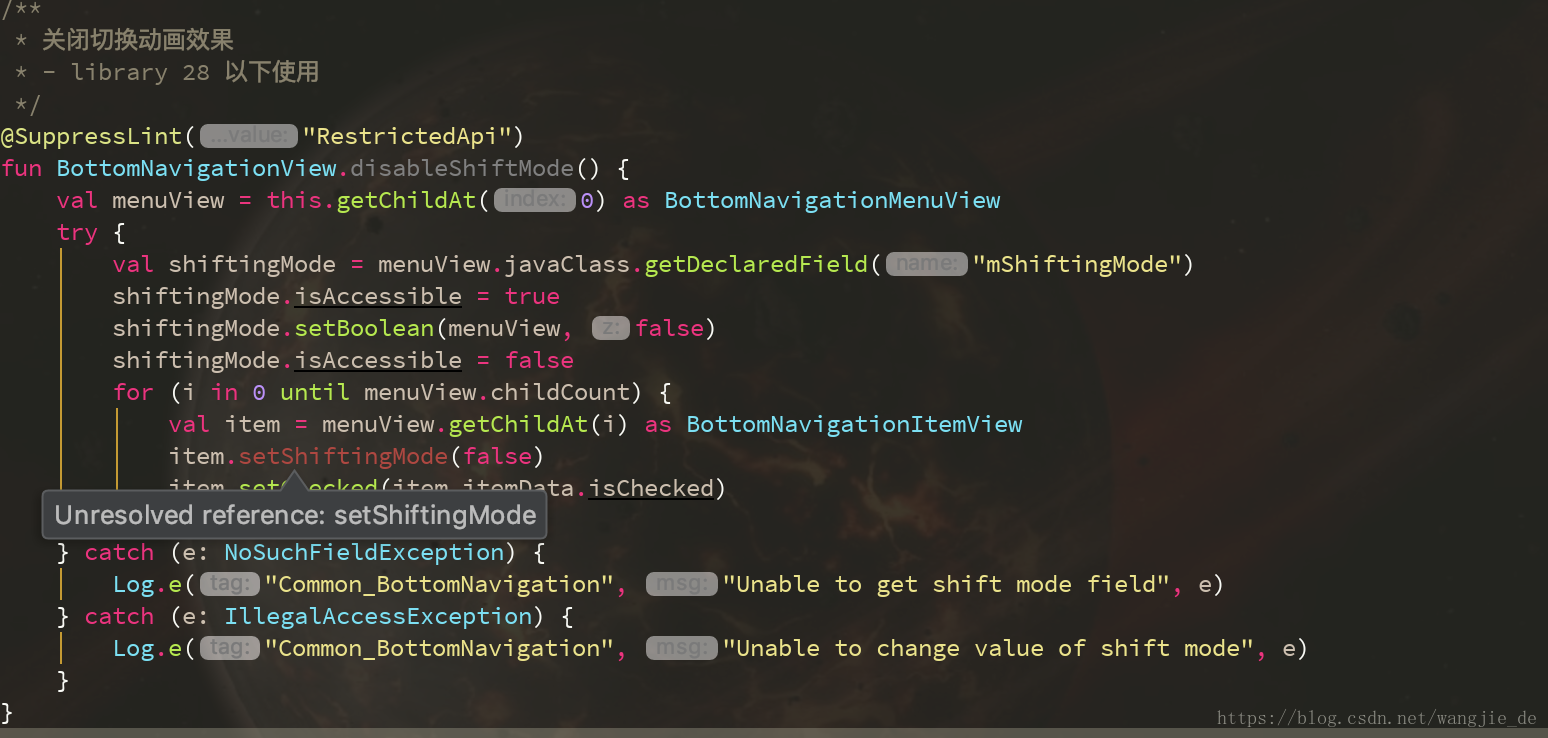
- 然后实现出来的是这种效果,如果想要像普通的导航栏一样使用呢?这时候你需要用的反射。
@SuppressLint("RestrictedApi")
fun BottomNavigationView.disableShiftMode() {
val menuView = this.getChildAt(0) as BottomNavigationMenuView
try {
val shiftingMode = menuView.javaClass.getDeclaredField("mShiftingMode")
shiftingMode.isAccessible = true
shiftingMode.setBoolean(menuView, false)
shiftingMode.isAccessible = false
for (i in 0 until menuView.childCount) {
val item = menuView.getChildAt(i) as BottomNavigationItemView
item.setShiftingMode(false)
item.setChecked(item.itemData.isChecked)
}
} catch (e: NoSuchFieldException) {
Log.e("Common_BottomNavigation", "Unable to get shift mode field", e)
} catch (e: IllegalAccessException) {
Log.e("Common_BottomNavigation", "Unable to change value of shift mode", e)
}
}
- 没错,使用反射来修改对应属性,来实现我们想要的样式。代码中使用:
mNavigation.disableShiftMode()

- 好了,关于 BottomNavigationView 的使用就讲这么多,想要知道更详细的使用方法可以去百度、Google,今天的重点不在这里。
Design 28 中的变化
- 接下来就说到重点了,我们把依赖升级到 28,像这样
implementation 'com.android.support:design:28.0.0'
- 然后你就会发现,之前定义的 disableShiftMode() 方法报错了。
- 甚至你在 BottomNavigationMenuView 里面都找不到 mShiftingMode 这个变量。
- 那么我们要怎么实现上面使用的样式呢?
- 我们知道,使用 BottomNavigationView 的时候,如果 item 的个数小于 4 个,就是我们需要的样式,这里我们查看 BottomNavigationView 的代码,查找哪里有和 item 的数量有关,和数字 3 或者 4 有关。
BottomNavigationMenuView.class
private boolean isShifting(int labelVisibilityMode, int childCount) {
        return labelVisibilityMode == -1 ? childCount > 3 : labelVisibilityMode == 0;
    }
- 我们找到了 BottomNavigationMenuView 里面的代码,从这里我们可以看到,如果 item 数量为 3,也就是说
labelVisibilityMode == -1 且 childCount == 3 时,这个时候,显示的是我们需要的样式,再查找 labelVisibilityMode 在哪里被使用。
BottomNavigationItemView.class
public void setChecked(boolean checked) {
        this.largeLabel.setPivotX((float)(this.largeLabel.getWidth() / 2));
        this.largeLabel.setPivotY((float)this.largeLabel.getBaseline());
        this.smallLabel.setPivotX((float)(this.smallLabel.getWidth() / 2));
        this.smallLabel.setPivotY((float)this.smallLabel.getBaseline());
        switch(this.labelVisibilityMode) {
        case -1:
            if (this.isShifting) {
                if (checked) {
                    this.setViewLayoutParams(this.icon, this.defaultMargin, 49);
                    this.setViewValues(this.largeLabel, 1.0F, 1.0F, 0);
                } else {
                    this.setViewLayoutParams(this.icon, this.defaultMargin, 17);
                    this.setViewValues(this.largeLabel, 0.5F, 0.5F, 4);
                }

                this.smallLabel.setVisibility(4);
            } else if (checked) {
                this.setViewLayoutParams(this.icon, (int)((float)this.defaultMargin + this.shiftAmount), 49);
                this.setViewValues(this.largeLabel, 1.0F, 1.0F, 0);
                this.setViewValues(this.smallLabel, this.scaleUpFactor, this.scaleUpFactor, 4);
            } else {
                this.setViewLayoutParams(this.icon, this.defaultMargin, 49);
                this.setViewValues(this.largeLabel, this.scaleDownFactor, this.scaleDownFactor, 4);
                this.setViewValues(this.smallLabel, 1.0F, 1.0F, 0);
            }
            break;
        case 0:
            if (checked) {
                this.setViewLayoutParams(this.icon, this.defaultMargin, 49);
                this.setViewValues(this.largeLabel, 1.0F, 1.0F, 0);
            } else {
                this.setViewLayoutParams(this.icon, this.defaultMargin, 17);
                this.setViewValues(this.largeLabel, 0.5F, 0.5F, 4);
            }

            this.smallLabel.setVisibility(4);
            break;
        case 1:
            if (checked) {
                this.setViewLayoutParams(this.icon, (int)((float)this.defaultMargin + this.shiftAmount), 49);
                this.setViewValues(this.largeLabel, 1.0F, 1.0F, 0);
                this.setViewValues(this.smallLabel, this.scaleUpFactor, this.scaleUpFactor, 4);
            } else {
                this.setViewLayoutParams(this.icon, this.defaultMargin, 49);
                this.setViewValues(this.largeLabel, this.scaleDownFactor, this.scaleDownFactor, 4);
                this.setViewValues(this.smallLabel, 1.0F, 1.0F, 0);
            }
            break;
        case 2:
            this.setViewLayoutParams(this.icon, this.defaultMargin, 17);
            this.largeLabel.setVisibility(8);
            this.smallLabel.setVisibility(8);
        }

        this.refreshDrawableState();
        this.setSelected(checked);
    }
- 当
labelVisibilityMode == -1 且 childCount == 3 时,isShifting == false,也就是说,执行的代码是
if (checked) {
                this.setViewLayoutParams(this.icon, (int)((float)this.defaultMargin + this.shiftAmount), 49);
                this.setViewValues(this.largeLabel, 1.0F, 1.0F, 0);
                this.setViewValues(this.smallLabel, this.scaleUpFactor, this.scaleUpFactor, 4);
            } else {
                this.setViewLayoutParams(this.icon, this.defaultMargin, 49);
                this.setViewValues(this.largeLabel, this.scaleDownFactor, this.scaleDownFactor, 4);
                this.setViewValues(this.smallLabel, 1.0F, 1.0F, 0);
            }
- 而我们会看到在下方,当
labelVisibilityMode == 1 时,执行的代码和 labelVisibilityMode == -1 且 childCount == 3 是一样的,也就是说,如果 labelVisibilityMode == 1,就能实现我们需要的效果。 - 接下来我们就可以查找 labelVisibilityMode 这个参数是在哪里设置的。
BottomNavigationView.class
this.setLabelVisibilityMode(a.getInteger(styleable.BottomNavigationView_labelVisibilityMode, -1));
- 没错,Google 专门为这种效果添加了对应的属性 ┭┮﹏┭┮
- 我们可以查看支持库中的资源文件
<attr name="labelVisibilityMode">

      <enum name="auto" value="-1"/>

      <enum name="selected" value="0"/>

      <enum name="labeled" value="1"/>

      <enum name="unlabeled" value="2"/>
    </attr>
<android.support.design.widget.BottomNavigationView
            android:id="@+id/bnv"
            android:layout_width="match_parent"
            android:layout_height="@dimen/app_spacing_multiple_12"
            android:background="@color/white"
            android:bind_bnv_onItemSelected="@{viewModel.command.onItemSelected}"
            android:textSize="@dimen/app_text_size_14"
            app:itemIconTint="@color/app_selector_main_bottom_tint"
            app:itemTextColor="@color/app_selector_main_bottom_tint"
            app:labelVisibilityMode="labeled"
            app:menu="@menu/app_menu_main_bottom" />
- 完美解决 (づ。◕‿‿◕。)づ
总结
- 所以,支持库低于 28 的时候使用 BottomNavigationView,我们可能需要利用反射来处理相关属性,升级到 28 之后,就可以更简单的使用了,只用添加
app:labelVisibilityMode="labeled" 就可以了。


 2635
2635

 被折叠的 条评论
为什么被折叠?
被折叠的 条评论
为什么被折叠?
 到【灌水乐园】发言


