


引言:iMove的cli工具,通过imove -d会启动一个本地服务,这个本地服务负责监听来自画布的请求,实现dsl存储以及代码的落库,本文围绕dsl如何落库成代码来进行介绍。
当在画布上发出/api/save请求时,会进入packages/cli/src/cmd/dev/index.js文件中的save方法:
async save(req, res) {
    const { outputPath, plugins = [] } = this.config;

    // check outputPath whether exsited
    await fs.ensureDir(outputPath);

    // check dsl whether existed
    if (!req.body || !req.body.dsl) {
      res.status(500).json({ isCompiled: false }).end();
      return;
    }

    // compile
    try {
      const { dsl } = req.body;
      const output = compileForProject(dsl, plugins);
      await this.writeOutputIntoFiles(outputPath, output);
      await mergePkg(dsl, this.projectPath); // 合并包依赖
      await fs.outputFile(CACHE_DSL_FILE, JSON.stringify(dsl, null, 2));
      res.status(200).json({ isCompiled: true }).end();
      console.log('compile successfully!');
    } catch (err) {
      res.status(500).json({ isCompiled: false }).end();
      console.log('compile failed! the error is:', err);
    }
}
此方法的主要目的就是把画布中传输过来dsl落库成代码,由compileForProject和writeOutputIntoFiles实现。
1、compileForProject
compileForProject实际执行的是packages/compile-code/src/compileForProject.ts中的compile方法,该方法返回一个对象,这个对像存储了要落库的文件名及其内容。
const compile = (dsl: DSL, plugins = []): IOutput => {
  const output: IOutput = {
    nodeFns: extractNodeFns(dsl),
    'context.js': contextTpl, // 模版文件
    'dsl.json': JSON.stringify(simplifyDSL(dsl), null, 2),// 简化后的dsl
    'index.js': addPlugins(indexTpl, plugins),//引入插件
    'logic.js': logicTpl,//模版文件
  };
  return output;
};
这里我们只需要关注extractNodeFns方法,它负责从dsl提取代码,算法大概如下图所示:
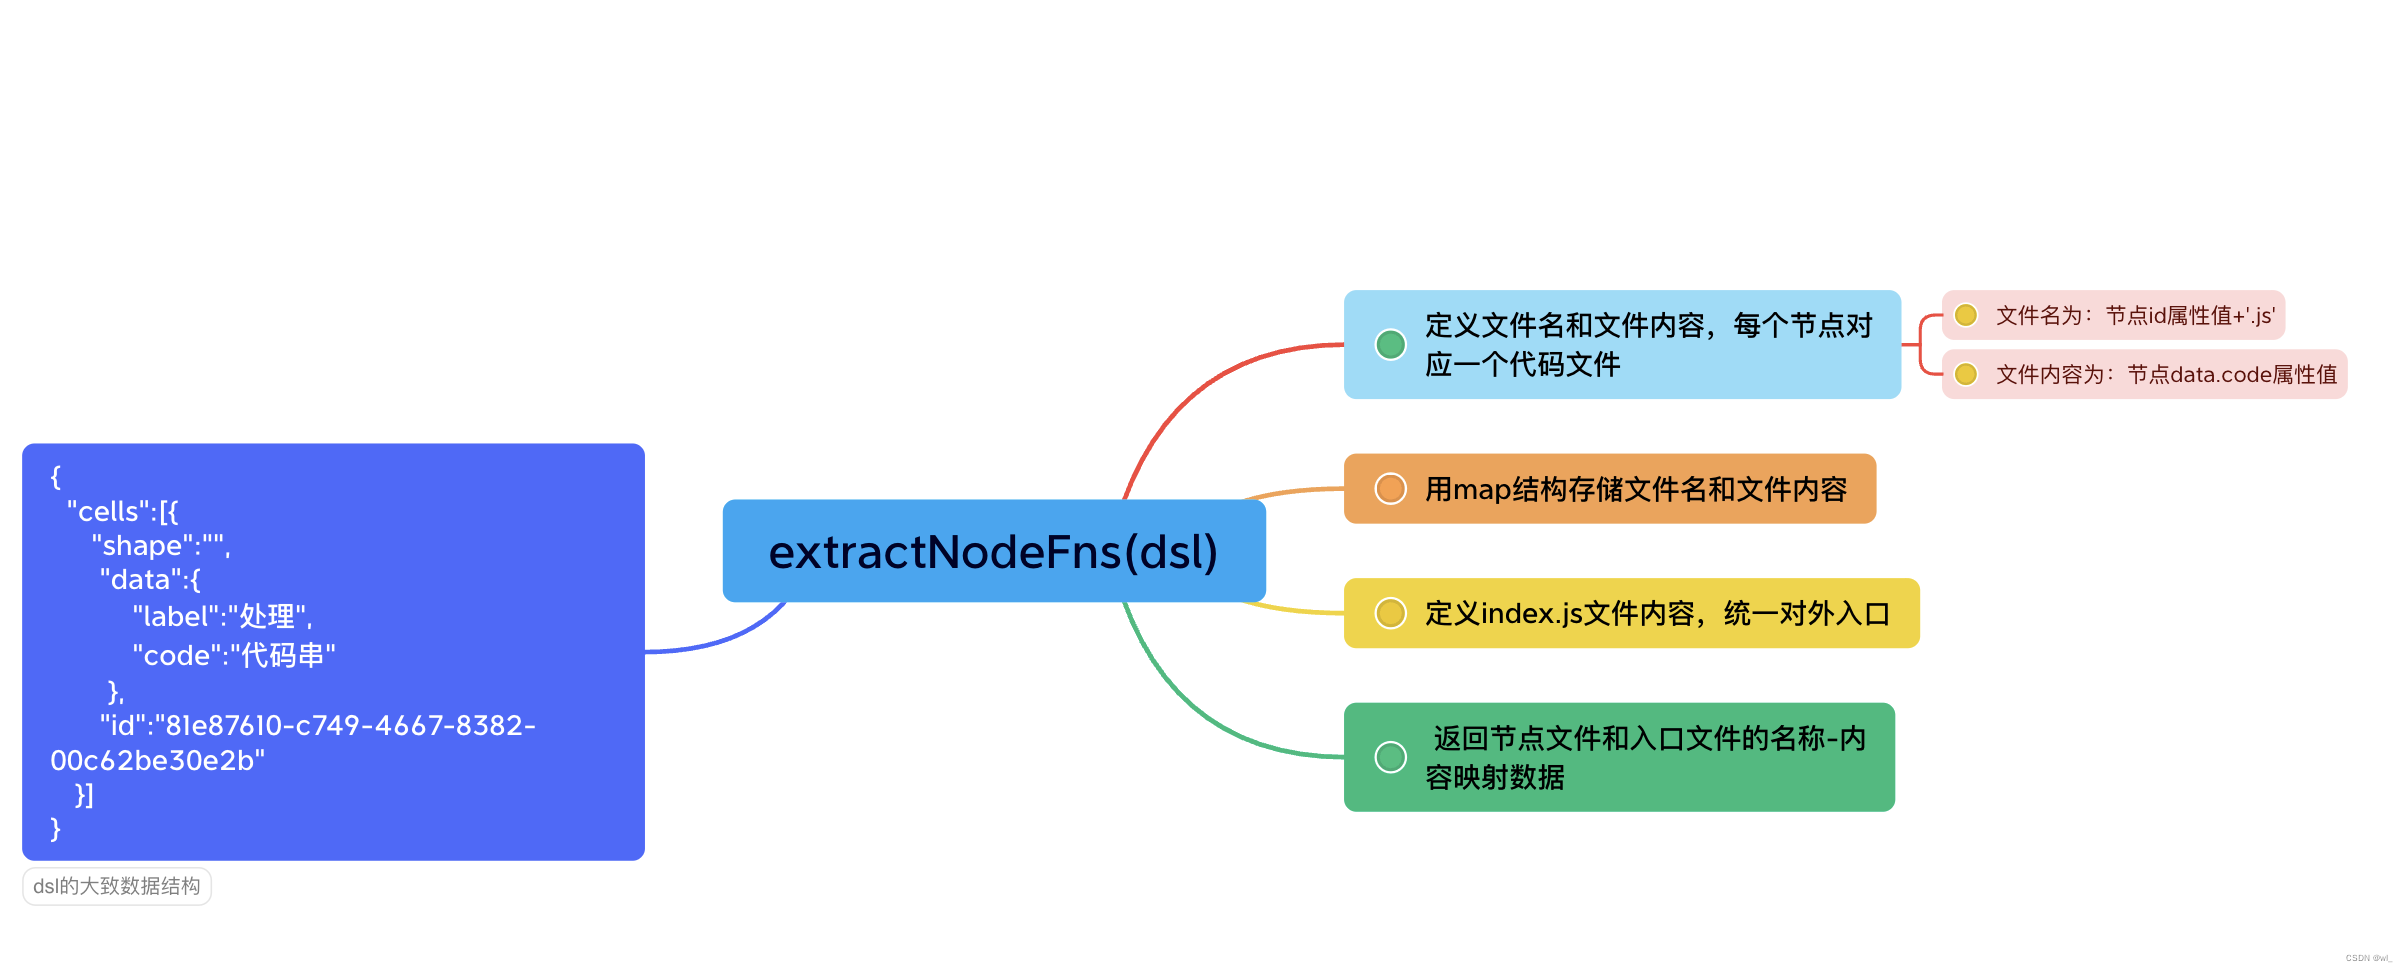
packages/compile-code/src/extractNodeFns.ts
关键代码:
// 提取图中节点的data.code属性值
const genNodeFns = (dsl: DSL): INodesFns => {
  const nodeFns: INodesFns = {};
  const { cells = [] } = dsl;
  const nodes = cells.filter((cell) => cell.shape !== 'edge');
  for (const {
    id,
    shape,
    data: { label, code },
  } of nodes) {
    const fileName: string = id + '.js';
    const descData = `// ${shape}: ${label}\n`;
    const saveData = `${descData}\n${code}`;
    nodeFns[fileName] = saveData;
  }
  return nodeFns;
};
// 生成入口文件
const genEntryFile = (nodeIds: string[]): string => {
const imports: string[] = [];
const funcMaps: string[] = [];
nodeIds.forEach((id, idx) => {
const funcName = `fn_${idx}`;
imports.push(`import ${funcName} from './${id}';`);
funcMaps.push(`'${id}': ${funcName}`);
});
const fileContent: string = [
imports.join('\n'),
`const nodeFns = {\n ${funcMaps.join(',\n ')}\n};`,
'export default nodeFns;',
].join('\n');
return fileContent;
};const extract = (dsl: DSL): INodesFns => {
const nodeFns = genNodeFns(dsl);
const nodeIds = Object.keys(nodeFns).map((fileName) => fileName.slice(0, -3));// 去掉后缀名'.js'
const entryFileContent = genEntryFile(nodeIds);
nodeFns['index.js'] = entryFileContent;
return nodeFns;
};2、writeOutputIntoFiles
writeOutputIntoFiles实际上是把compileForProject返回的结果,用node的文件读写API,实现文件写操作,从而实现代码落库。
packages/cli/src/cmd/dev/index.js
async writeOutputIntoFiles(curPath, output) {
    for (const key in output) {
      const newPath = path.join(curPath, key);
      if (path.extname(newPath)) {
        await fs.writeFile(newPath, output[key]);
      } else {
        await fs.ensureDir(newPath);
        await this.writeOutputIntoFiles(newPath, output[key]);
      }
    }
  }
小结:通过以上的介绍,相信各位已经了解了iMove代码落库的大致逻辑,如果想了解更详细的内容,大家可以移步源码。


 110
110


 被折叠的 条评论
为什么被折叠?
被折叠的 条评论
为什么被折叠?
 到【灌水乐园】发言


