


在分析Robotium的运行原理之前,我们有必要先搞清楚Instrumentation的一些相关知识点,因为Robotium就是基于Instrumentation而开发出来的一套自动化测试框架。鉴于之前本人已经转载和编写了Instrumentation的一些文章,所以建议大家如果没有看过的还是翻看下先对Instrumentation有个基本的理解。然后带着疑问再来看这篇文章看是否能帮上自己。
既然是分析Instrumentation,那么我们必须要先看下Instrumentation 这个类的类图,直接网上截获,就不花时间另外去画了,但请注意网上该图是比较老的,一些新的注入事件的方法是没有加进去的,注意红色部分:
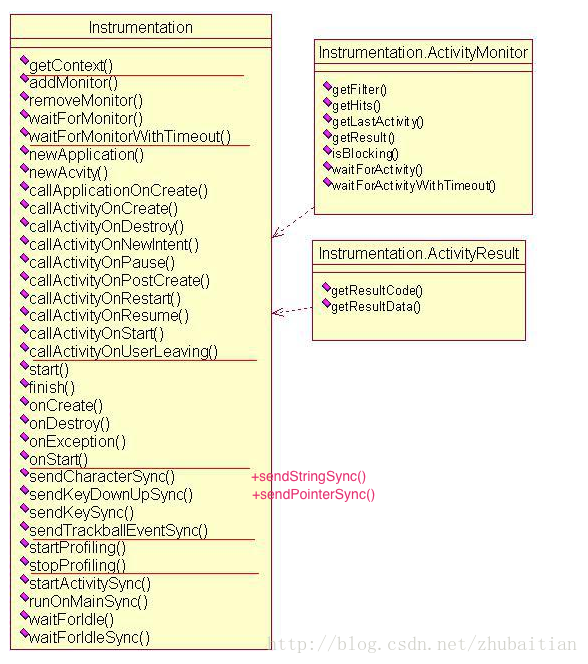
开始分析之前我们要搞清楚Instrumentation的几点
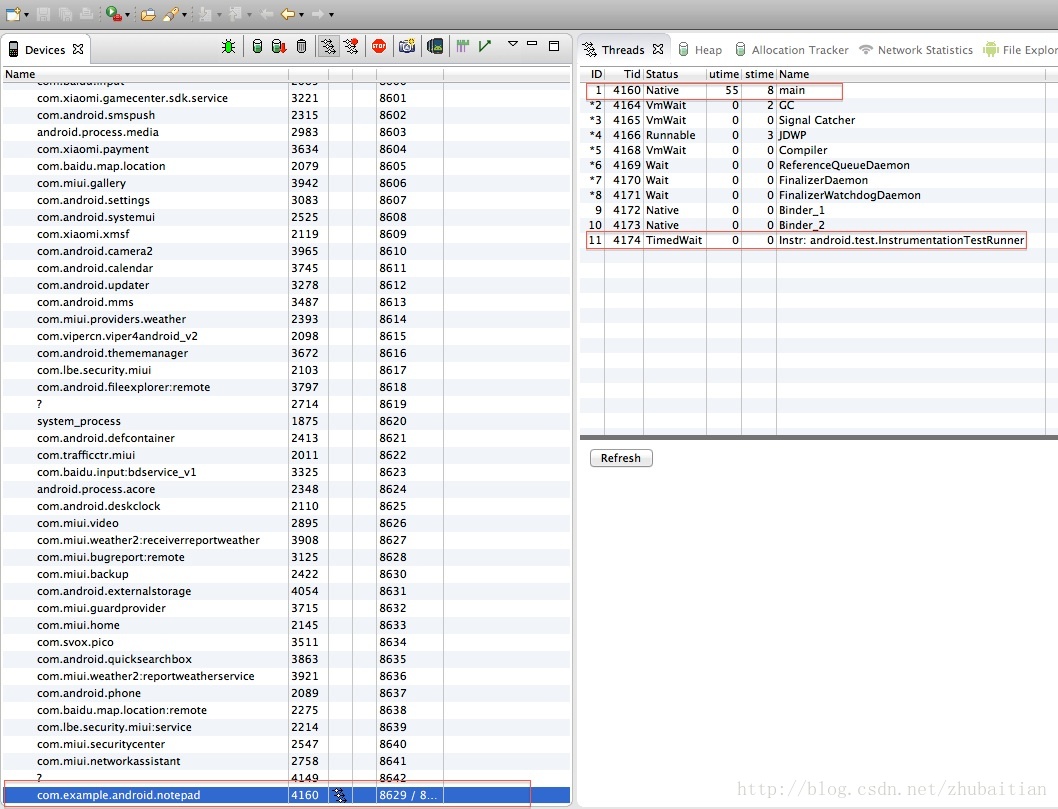
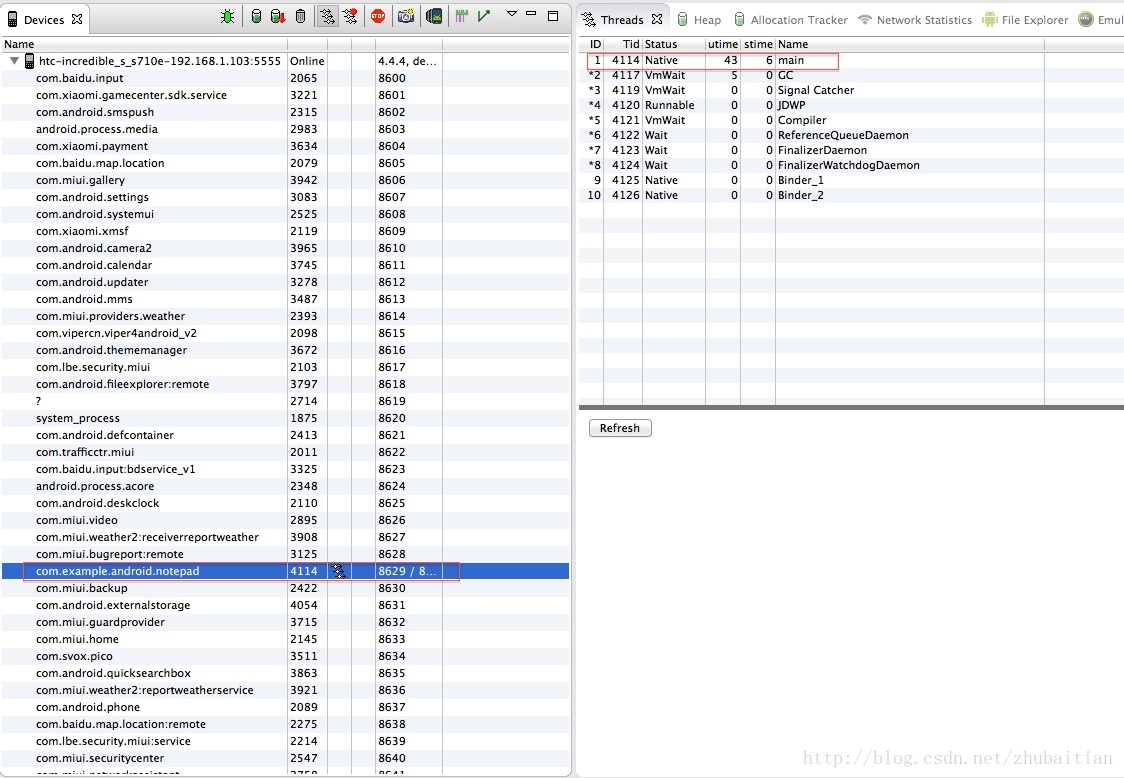
1. Instrumentation测试脚本和目标app在同一个进程中运行
- /* */ public class InstrumentationTestRunner
- /* */ extends Instrumentation
- /* */ implements TestSuiteProvider
- /* */ {
- ...
- }
- /* */ public void onCreate(Bundle arguments)
- /* */ {
- /* 303 */ super.onCreate(arguments);
- ...
- /* 343 */ TestSuiteBuilder testSuiteBuilder = new TestSuiteBuilder(getClass().getName(), getTargetContext().getClassLoader());
- /* */
- /* */
- /* 346 */ if (testSizePredicate != null) {
- /* 347 */ testSuiteBuilder.addRequirements(new Predicate[] { testSizePredicate });
- /* */ }
- /* 349 */ if (testAnnotationPredicate != null) {
- /* 350 */ testSuiteBuilder.addRequirements(new Predicate[] { testAnnotationPredicate });
- /* */ }
- /* 352 */ if (testNotAnnotationPredicate != null) {
- /* 353 */ testSuiteBuilder.addRequirements(new Predicate[] { testNotAnnotationPredicate });
- /* */ }
- /* */
- /* 356 */ if (testClassesArg == null) {
- ...
- /* */ } else {
- /* 370 */ parseTestClasses(testClassesArg, testSuiteBuilder);
- /* */ }
- /* */
- /* 373 */ testSuiteBuilder.addRequirements(getBuilderRequirements());
- /* */
- /* 375 */ this.mTestRunner = getAndroidTestRunner();
- /* 376 */ this.mTestRunner.setContext(getTargetContext());
- /* 377 */ this.mTestRunner.setInstrumentation(this);
- /* 378 */ this.mTestRunner.setSkipExecution(logOnly);
- /* 379 */ this.mTestRunner.setTest(testSuiteBuilder.build());
- /* 380 */ this.mTestCount = this.mTestRunner.getTestCases().size();
- /* 381 */ if (this.mSuiteAssignmentMode) {
- /* 382 */ this.mTestRunner.addTestListener(new SuiteAssignmentPrinter());
- /* */ } else {
- /* 384 */ WatcherResultPrinter resultPrinter = new WatcherResultPrinter(this.mTestCount);
- /* 385 */ this.mTestRunner.addTestListener(new TestPrinter("TestRunner", false));
- /* 386 */ this.mTestRunner.addTestListener(resultPrinter);
- /* 387 */ this.mTestRunner.setPerformanceResultsWriter(resultPrinter);
- /* */ }
- /* 389 */ start();
- /* */ }
- /* */ public void start()
- /* */ {
- /* 122 */ if (this.mRunner != null) {
- /* 123 */ throw new RuntimeException("Instrumentation already started");
- /* */ }
- /* 125 */ this.mRunner = new InstrumentationThread("Instr: " + getClass().getName());
- /* 126 */ this.mRunner.start();
- /* */ }
- /* */ private final class InstrumentationThread
- /* */ extends Thread {
- /* 1689 */ public InstrumentationThread(String name) { super(); }
- /* */
- /* */ public void run() {
- /* */ try {
- /* 1693 */ Process.setThreadPriority(-8);
- /* */ } catch (RuntimeException e) {
- /* 1695 */ Log.w("Instrumentation", "Exception setting priority of instrumentation thread " + Process.myTid(), e);
- /* */ }
- /* */
- /* 1698 */ if (Instrumentation.this.mAutomaticPerformanceSnapshots) {
- /* 1699 */ Instrumentation.this.startPerformanceSnapshot();
- /* */ }
- /* 1701 */ Instrumentation.this.onStart();
- /* */ }
- /* */ }
- /**
- * Initialize the current thread as a looper.
- * <p/>
- * Exposed for unit testing.
- */
- void prepareLooper() {
- Looper.prepare();
- }
- @Override
- public void onStart() {
- prepareLooper();
- if (mJustCount) {
- mResults.putString(Instrumentation.REPORT_KEY_IDENTIFIER, REPORT_VALUE_ID);
- mResults.putInt(REPORT_KEY_NUM_TOTAL, mTestCount);
- finish(Activity.RESULT_OK, mResults);
- } else {
- if (mDebug) {
- Debug.waitForDebugger();
- }
- ByteArrayOutputStream byteArrayOutputStream = new ByteArrayOutputStream();
- PrintStream writer = new PrintStream(byteArrayOutputStream);
- try {
- StringResultPrinter resultPrinter = new StringResultPrinter(writer);
- mTestRunner.addTestListener(resultPrinter);
- long startTime = System.currentTimeMillis();
- mTestRunner.runTest();
- long runTime = System.currentTimeMillis() - startTime;
- resultPrinter.printResult(mTestRunner.getTestResult(), runTime);
- } catch (Throwable t) {
- // catch all exceptions so a more verbose error message can be outputted
- writer.println(String.format("Test run aborted due to unexpected exception: %s",
- t.getMessage()));
- t.printStackTrace(writer);
- } finally {
- mResults.putString(Instrumentation.REPORT_KEY_STREAMRESULT,
- String.format("\nTest results for %s=%s",
- mTestRunner.getTestClassName(),
- byteArrayOutputStream.toString()));
- if (mCoverage) {
- generateCoverageReport();
- }
- writer.close();
- finish(Activity.RESULT_OK, mResults);
- }
- }
- }
如果,我们需要新建一个线程,并且这个线程要能够循环处理其他线程发来的消息事件,或者需要长期与其他线程进行复杂的交互,这时就需要用到Looper来给线程建立消息队列。
建立好消息队列后往下的重点就是调用AndroidTestRunner的runTest方法开始测试用例的执行了:
- public void runTest(TestResult testResult) {
- mTestResult = testResult;
- for (TestListener testListener : mTestListeners) {
- mTestResult.addListener(testListener);
- }
- Context testContext = mInstrumentation == null ? mContext : mInstrumentation.getContext();
- for (TestCase testCase : mTestCases) {
- setContextIfAndroidTestCase(testCase, mContext, testContext);
- setInstrumentationIfInstrumentationTestCase(testCase, mInstrumentation);
- setPerformanceWriterIfPerformanceCollectorTestCase(testCase, mPerfWriter);
- testCase.run(mTestResult);
- }
- }
2. runOnUiThread和runOnMainSync的区别
- 子线程是可以直接获取主线程UiThread的控件以及内容的
- 子线程是不能直接操作主线程UiThread的控件以及内容的
- 1、handler
- 2、Activity.runOnUIThread(Runnable)
- 3、View.Post(Runnable)
- 4、View.PostDelayed(Runnabe,long)
- 5、AsyncTask
- /**
- * Runs the specified action on the UI thread. If the current thread is the UI
- * thread, then the action is executed immediately. If the current thread is
- * not the UI thread, the action is posted to the event queue of the UI thread.
- *
- * @param action the action to run on the UI thread
- */
- public final void runOnUiThread(Runnable action) {
- if (Thread.currentThread() != mUiThread) {
- mHandler.post(action);
- } else {
- action.run();
- }
- }
- 如果这个方法不是在运行Activity的主线程UiThread上被调用的,也就是在子线程上调用的,那么把action提交到主线程的Main Looper消息队列中排队然后返回
- 如果这个方法是在运行Activity的主线程UiThread上被调用的,那么不需要进入Main Looper队列排队,直接调用执行
- /* */ public void runOnMainSync(Runnable runner)
- /* */ {
- /* 344 */ validateNotAppThread();
- /* 345 */ SyncRunnable sr = new SyncRunnable(runner);
- /* 346 */ this.mThread.getHandler().post(sr);
- /* 347 */ sr.waitForComplete();
- /* */ }
- /* */ private static final class SyncRunnable implements Runnable {
- /* */ private final Runnable mTarget;
- /* */ private boolean mComplete;
- /* */
- /* 1715 */ public SyncRunnable(Runnable target) { this.mTarget = target; }
- /* */
- /* */ public void run()
- /* */ {
- /* 1719 */ this.mTarget.run();
- /* 1720 */ synchronized (this) {
- /* 1721 */ this.mComplete = true;
- /* 1722 */ notifyAll();
- /* */ }
- /* */ }
- /* */
- /* */ public void waitForComplete() {
- /* 1727 */ synchronized (this) {
- /* 1728 */ while (!this.mComplete) {
- /* */ try {
- /* 1730 */ wait();
- /* */ }
- /* */ catch (InterruptedException e) {}
- /* */ }
- /* */ }
- /* */ }
- /* */ }
- /* */ private final void validateNotAppThread()
- /* */ {
- /* 1650 */ if (Looper.myLooper() == Looper.getMainLooper()) {
- /* 1651 */ throw new RuntimeException("This method can not be called from the main application thread");
- /* */ }
- /* */ }
3. Instrumentation注入事件统一方式-- InputManager
| Method | Description | Comment |
| Key Events | ||
| sendKeySync | 发送一个键盘事件,注意同一时间只有一个action,或者是按下,或者是弹起,所有下面其他key相关的事件注入都是以这个方法为基础的 | |
| sendKeyDownUpSync | 基于sendKeySync发送一个按键的按下和弹起两个事件 | |
| sendCharacterSync | 发送键盘上的一个字符,完整的过程包括一个按下和弹起事件 | |
| sendStringSync | 往应用发送一串字符串 | |
| Tackball Event | ||
| sendTrackballEventSync | 发送轨迹球事件。个人没有用过,应该是像黑莓的那种轨迹球吧 | |
| Pointer Event | ||
| sendPointerSync | 发送点击事件 | |
- /**
- * Send a key event to the currently focused window/view and wait for it to
- * be processed. Finished at some point after the recipient has returned
- * from its event processing, though it may <em>not</em> have completely
- * finished reacting from the event -- for example, if it needs to update
- * its display as a result, it may still be in the process of doing that.
- *
- * @param event The event to send to the current focus.
- */
- public void sendKeySync(KeyEvent event) {
- validateNotAppThread();
- long downTime = event.getDownTime();
- long eventTime = event.getEventTime();
- int action = event.getAction();
- int code = event.getKeyCode();
- int repeatCount = event.getRepeatCount();
- int metaState = event.getMetaState();
- int deviceId = event.getDeviceId();
- int scancode = event.getScanCode();
- int source = event.getSource();
- int flags = event.getFlags();
- if (source == InputDevice.SOURCE_UNKNOWN) {
- source = InputDevice.SOURCE_KEYBOARD;
- }
- if (eventTime == 0) {
- eventTime = SystemClock.uptimeMillis();
- }
- if (downTime == 0) {
- downTime = eventTime;
- }
- KeyEvent newEvent = new KeyEvent(downTime, eventTime, action, code, repeatCount, metaState,
- deviceId, scancode, flags | KeyEvent.FLAG_FROM_SYSTEM, source);
- InputManager.getInstance().injectInputEvent(newEvent,
- InputManager.INJECT_INPUT_EVENT_MODE_WAIT_FOR_FINISH);
- }
- /**
- * Dispatch a trackball event. Finished at some point after the recipient has
- * returned from its event processing, though it may <em>not</em> have
- * completely finished reacting from the event -- for example, if it needs
- * to update its display as a result, it may still be in the process of
- * doing that.
- *
- * @param event A motion event describing the trackball action. (As noted in
- * {@link MotionEvent#obtain(long, long, int, float, float, int)}, be sure to use
- * {@link SystemClock#uptimeMillis()} as the timebase.
- */
- public void sendTrackballEventSync(MotionEvent event) {
- validateNotAppThread();
- if ((event.getSource() & InputDevice.SOURCE_CLASS_TRACKBALL) == 0) {
- event.setSource(InputDevice.SOURCE_TRACKBALL);
- }
- InputManager.getInstance().injectInputEvent(event,
- InputManager.INJECT_INPUT_EVENT_MODE_WAIT_FOR_FINISH);
- }
- /**
- * Dispatch a pointer event. Finished at some point after the recipient has
- * returned from its event processing, though it may <em>not</em> have
- * completely finished reacting from the event -- for example, if it needs
- * to update its display as a result, it may still be in the process of
- * doing that.
- *
- * @param event A motion event describing the pointer action. (As noted in
- * {@link MotionEvent#obtain(long, long, int, float, float, int)}, be sure to use
- * {@link SystemClock#uptimeMillis()} as the timebase.
- */
- public void sendPointerSync(MotionEvent event) {
- validateNotAppThread();
- if ((event.getSource() & InputDevice.SOURCE_CLASS_POINTER) == 0) {
- event.setSource(InputDevice.SOURCE_TOUCHSCREEN);
- }
- InputManager.getInstance().injectInputEvent(event,
- InputManager.INJECT_INPUT_EVENT_MODE_WAIT_FOR_FINISH);
- }
4. 文本输入的两种方式
- 通过runOnMainSync调用直接把文本修改的动作运行在UiThread这个主线程中
- 通过注入事件模拟用户通过按键输入字符
- runOnMainSync: 直接在主线程中修改控件的文本,所以不需要通过键盘驱动,也就是说不需要调出任何的键盘。这样的好处是效率以及不需要担心中英文输入的问题
- 事件注入方式:模拟用户的输入,所以肯定会调出键盘,这样在中文等非默认英文输入的情况下容易碰到问题,毕竟中文字串也是通过拼音组合而成,那么拼音出来后选择哪个出来的组合就成问题了。比如输入"changan"可能出来的是"长安“,”长按“等组合,那么哪个是我们想要的呢?
5. 跨进程和安全问题
众所周知Instrumentation和基于Instrumentation的Robotium对跨进程跨应用的支持是不支持的(其实Robotium从android 4.3之后开始支持UiAutomation框架,理应可以支持跨应用的,这个往后文章我们会进行分析).- 首先,一个应用要使用Instrumentation进行测试的话首先必须要在其Manifest.xml做相应的配置,那么一个应用真正发布的时候肯定是把这些配置给去掉的,所以Instrumentation或基于Instrumentation的Robotium肯定是不能对其他应用进行操作的,不然它就可以随意的打开一个流量消耗大户应用来消耗你的流量了。
- 其次,既然大家里面都用了InputManager进行事件注入,那么为什么Monkey可以跨应用而Robotium不行呢?你Robotium也可以绕开Instrumentation框架直接调用InputManager来做事情啊!这里就要说到INJECT_EVENTS这个系统权限了,大家请参考《Monkey源码分析番外篇之Android注入事件的三种方法比较》。人家Monkey是google亲生的,获取个INJECT_EVENTS系统权限还不容易吗,你Robotium跟我什么关系,我google凭什么给你这些第三方应用开放这个权限呢?鬼知道给你开放这个权限后会不会搞破坏啊!所以你还是待在配置了Mainifest.xml的你的目标测试应用中做事情吧,别到处跑了
6.所谓钩子
| Method | Control by User(Instrumentation) | Control by OS | Comment |
| onCreate | callActivityOnCreate | onCreate | |
| onDestroy | callActivityOnDestroy | onDestroy | |
| onStart | callActivityOnStart | onStarty | |
| … | | | |
- /**
- * Perform calling of an activity's {@link Activity#onCreate}
- * method. The default implementation simply calls through to that method.
- *
- * @param activity The activity being created.
- * @param icicle The previously frozen state (or null) to pass through to
- * onCreate().
- */
- public void callActivityOnCreate(Activity activity, Bundle icicle) {
- ...
- activity.performCreate(icicle);
- ...
- }
- final void performCreate(Bundle icicle) {
- onCreate(icicle);
- mVisibleFromClient = !mWindow.getWindowStyle().getBoolean(
- com.android.internal.R.styleable.Window_windowNoDisplay, false);
7. Instrumentation跨应用的考虑
- /**
- * Gets the {@link UiAutomation} instance.
- * <p>
- * <strong>Note:</strong> The APIs exposed via the returned {@link UiAutomation}
- * work across application boundaries while the APIs exposed by the instrumentation
- * do not. For example, {@link Instrumentation#sendPointerSync(MotionEvent)} will
- * not allow you to inject the event in an app different from the instrumentation
- * target, while {@link UiAutomation#injectInputEvent(android.view.InputEvent, boolean)}
- * will work regardless of the current application.
- * </p>
- * <p>
- * A typical test case should be using either the {@link UiAutomation} or
- * {@link Instrumentation} APIs. Using both APIs at the same time is not
- * a mistake by itself but a client has to be aware of the APIs limitations.
- * </p>
- * @return The UI automation instance.
- *
- * @see UiAutomation
- */
- public UiAutomation getUiAutomation() {
- if (mUiAutomationConnection != null) {
- if (mUiAutomation == null) {
- mUiAutomation = new UiAutomation(getTargetContext().getMainLooper(),
- mUiAutomationConnection);
- mUiAutomation.connect();
- }
- return mUiAutomation;
- }
- return null;
- }
8.Instrumentation使用例子
- /*
- * Copyright (C) 2008 The Android Open Source Project
- *
- * Licensed under the Apache License, Version 2.0 (the "License");
- * you may not use this file except in compliance with the License.
- * You may obtain a copy of the License at
- *
- * http://www.apache.org/licenses/LICENSE-2.0
- *
- * Unless required by applicable law or agreed to in writing, software
- * distributed under the License is distributed on an "AS IS" BASIS,
- * WITHOUT WARRANTIES OR CONDITIONS OF ANY KIND, either express or implied.
- * See the License for the specific language governing permissions and
- * limitations under the License.
- */
- package come.example.android.notepad.test;
- import android.test.ActivityInstrumentationTestCase2;
- import com.example.android.notepad.NotesList;
- import com.example.android.notepad.NoteEditor;
- import com.example.android.notepad.NotesList;
- import com.example.android.notepad.R;
- import android.app.Activity;
- import android.app.Instrumentation;
- import android.app.Instrumentation.ActivityMonitor;
- import android.content.Intent;
- import android.os.SystemClock;
- import android.test.InstrumentationTestCase;
- import android.view.KeyEvent;
- import android.widget.TextView;
- /**
- * Make sure that the main launcher activity opens up properly, which will be
- * verified by {@link #testActivityTestCaseSetUpProperly}.
- */
- public class NotePadTest extends ActivityInstrumentationTestCase2<NotesList> {
- NotesList mActivity = null;
- /**
- * Creates an {@link ActivityInstrumentationTestCase2} for the {@link NotesList} activity.
- */
- public NotePadTest() {
- super(NotesList.class);
- }
- //private static Instrumentation instrumentation = new Instrumentation();
- @Override
- protected void setUp() throws Exception {
- super.setUp();
- //Start the NotesList activity by instrument
- Intent intent = new Intent();
- intent.setClassName("com.example.android.notepad", NotesList.class.getName());
- intent.setFlags(Intent.FLAG_ACTIVITY_NEW_TASK);
- Instrumentation inst = getInstrumentation();
- mActivity = (NotesList) inst.startActivitySync(intent);
- }
- @Override
- protected void tearDown() {
- mActivity.finish();
- try {
- super.tearDown();
- } catch (Exception e) {
- e.printStackTrace();
- }
- }
- /**
- * Verifies that the activity under test can be launched.
- */
- /*
- public void testActivityTestCaseSetUpProperly() {
- assertNotNull("activity should be launched successfully", getActivity());
- }
- */
- public void testActivity() throws Exception {
- //Add activity monitor to check whether the NoteEditor activity's ready
- ActivityMonitor am = getInstrumentation().addMonitor(NoteEditor.class.getName(), null, false);
- //Evoke the system menu and press on the menu entry "Add note";
- getInstrumentation().sendKeyDownUpSync(KeyEvent.KEYCODE_MENU);
- getInstrumentation().invokeMenuActionSync(mActivity, R.id.menu_add, 0);
- //Direct to the NoteEditor activity
- Activity noteEditorActivity = getInstrumentation().waitForMonitorWithTimeout(am, 60000);
- assertEquals(NoteEditor.class,noteEditorActivity.getClass());
- SystemClock.sleep(3000);
- //assertEquals(true, getInstrumentation().checkMonitorHit(am, 1));
- TextView noteEditor = (TextView) noteEditorActivity.findViewById(R.id.note);
- //Get the text directly, DON'T need to runOnMainSync at all!!!
- String text = noteEditor.getText().toString();
- assertEquals(text,"");
- //runOnMainSync to change the text
- getInstrumentation().runOnMainSync(new PerformSetText(noteEditor,"Note1"));
- //inject events to change the text
- getInstrumentation().sendCharacterSync(KeyEvent.KEYCODE_1);
- getInstrumentation().sendCharacterSync(KeyEvent.KEYCODE_2);
- getInstrumentation().sendCharacterSync(KeyEvent.KEYCODE_P);
- getInstrumentation().sendStringSync("gotohell");
- //getInstrumentation().callActivityOnPause(noteEditorActivity);
- Thread.sleep(5000);
- //getInstrumentation().callActivityOnResume(noteEditorActivity);
- //Save the new created note
- getInstrumentation().sendKeyDownUpSync(KeyEvent.KEYCODE_MENU);
- getInstrumentation().invokeMenuActionSync(noteEditorActivity, R.id.menu_save, 0);
- }
- private class PerformSetText implements Runnable {
- TextView tv;
- String txt;
- public PerformSetText(TextView t,String text) {
- tv = t;
- txt = text;
- }
- public void run() {
- tv.setText(txt);
- }
- }
- }
| Item | Description | Warning |
| Author | 天地会珠海分舵 | 转载请注明出处! 更多精彩文章请查看本人博客! |
| Blog Address |


 778
778

 被折叠的 条评论
为什么被折叠?
被折叠的 条评论
为什么被折叠?
 到【灌水乐园】发言


