


vmware上跑ecos (wanglibo_2004@yahoo.com.cn)
突然发现网上有人再转我的文章。
高兴之余也发觉转载者的搜索排名在我之前。:(
加点废话 版权所有,转载请注明出处 http://blog.csdn.net/wanglibo1981/archive/2008/11/04/3219108.aspx
下载ecos2.0
设置好工具链,x86的编译工具链带有 i386-elf- 前缀
设置好工具链,x86的编译工具链带有 i386-elf- 前缀
解开ecos2.0代码,设置环境变量ECOS_REPOSITORY和交叉编译工具的PATH
我是写了一个脚本ecos.env内容如下
我是写了一个脚本ecos.env内容如下
export ECOS_REPOSITORY=/home/wang_libo/opensource/ecos-2.0/packages/
export PATH=$PATH:/home/share/iros-tools/ecos/gnutools/i386-elf/bin/:/home/wang_libo/opensource/ecos-2.0/tools/bin/
export PATH=$PATH:/home/share/iros-tools/ecos/gnutools/i386-elf/bin/:/home/wang_libo/opensource/ecos-2.0/tools/bin/
其中/home/share/iros-tools/ecos/gnutools/i386-elf/bin/ 是i386-elf-工具链的路径
/home/wang_libo/opensource/ecos-2.0/tools/bin/ 是 ecosconfig的路径
/home/wang_libo/opensource/ecos-2.0/tools/bin/ 是 ecosconfig的路径
运行 source ecos.env设置好环境变量
step 1
在build目录下运行 ecosconfig new pc redboot ;生成了 ecos.ecc
U CYGSEM_HAL_USE_ROM_MONITOR, new inferred value 0
在build目录下运行 ecosconfig new pc redboot ;生成了 ecos.ecc
U CYGSEM_HAL_USE_ROM_MONITOR, new inferred value 0
之后修改
cdl_component CYG_HAL_STARTUP {
...
# line 2781 modified form
# "# user_value RAM"
# to
user_value FLOPPY
...
};
...
# line 2781 modified form
# "# user_value RAM"
# to
user_value FLOPPY
...
};
cdl_option CYGNUM_HAL_VIRTUAL_VECTOR_CONSOLE_CHANNEL_DEFAULT {
...
# line 2914 modified form
# "# user_value 0"
# to
user_value 2
...
};
...
# line 2914 modified form
# "# user_value 0"
# to
user_value 2
...
};
step 2
运行 ecosconfig check
Target: pc
Template: redboot
No conflicts
这里ecosconfig check的作用是因为ecos的各个组件互相有依赖关系,我们step1修改了两个独立变量,依赖于这两个变量的其他变量值需要重
运行 ecosconfig check
Target: pc
Template: redboot
No conflicts
这里ecosconfig check的作用是因为ecos的各个组件互相有依赖关系,我们step1修改了两个独立变量,依赖于这两个变量的其他变量值需要重
新计算。it's very important
step3
ecosconfig tree
生成hal infra install io isoinfra language makefile net redboot services这一堆build tree
ecosconfig tree
生成hal infra install io isoinfra language makefile net redboot services这一堆build tree
step4
make
生成目标文件./install/bin/redboot.bin
make
生成目标文件./install/bin/redboot.bin
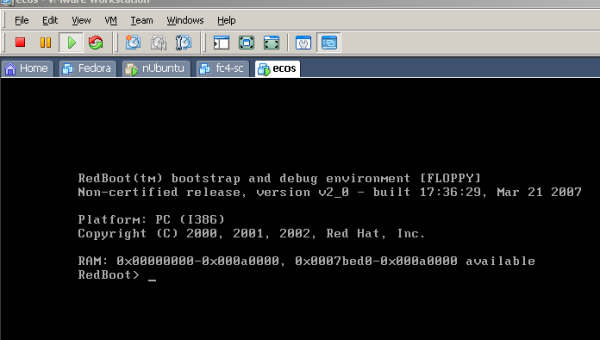
把这个redboot.bin作为vmware的软盘镜像,poweron
就可以看到redboot的提示了,如附件中的右图
/
Hello world!!!
///
接下来我们来跑个hello world,程序员最浪漫的约会.
step1 运行 ecosconfig new pc
同上修改 cdl_component CYG_HAL_STARTUP {user_value FlOPPY}
cdl_option CYGNUM_HAL_VIRTUAL_VECTOR_CONSOLE_CHANNEL_DEFAULT {user_value 2}
step1 运行 ecosconfig new pc
同上修改 cdl_component CYG_HAL_STARTUP {user_value FlOPPY}
cdl_option CYGNUM_HAL_VIRTUAL_VECTOR_CONSOLE_CHANNEL_DEFAULT {user_value 2}
step2 运行 ecosconfig check
step3 运行 ecosconfig tree
这里生成生成hal infra install io isoinfra language makefile net redboot services等相关文件加
这里生成生成hal infra install io isoinfra language makefile net redboot services等相关文件加
step4 运行 make
这里生成的目标文件是 ./install/lib/libextras.a 和 ./install/lib/libtarget.a(主要是这个)
这里生成的目标文件是 ./install/lib/libextras.a 和 ./install/lib/libtarget.a(主要是这个)
step5 在ecos的example目录下copy一个hello.c到当前目录
i386-elf-gcc -g -D_ECOS -I./install/include hello.c -L./install/lib -Ttarget.ld -nostdlib
i386-elf-objcopy -O binary a.out hello.bin
生成了目标文件hello.bin
同样把hello.bin作为vmware的虚拟软驱启动,可以看到hello .ecos world! 如附件中的右图
i386-elf-gcc -g -D_ECOS -I./install/include hello.c -L./install/lib -Ttarget.ld -nostdlib
i386-elf-objcopy -O binary a.out hello.bin
生成了目标文件hello.bin
同样把hello.bin作为vmware的虚拟软驱启动,可以看到hello .ecos world! 如附件中的右图
说明一下运行ecos的虚拟机把ide硬盘去掉,就是不要挂ide硬盘.否则会处错.


 2297
2297

 被折叠的 条评论
为什么被折叠?
被折叠的 条评论
为什么被折叠?
 到【灌水乐园】发言


