


//cell右边视图类型 >

cell.accessoryType = UITableViewCellAccessoryDisclosureIndicator;
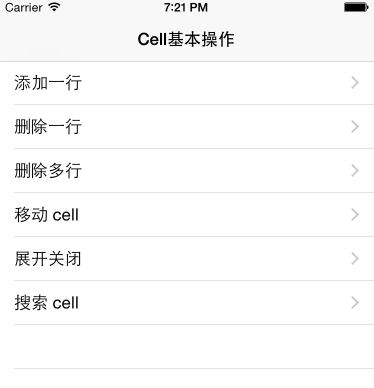
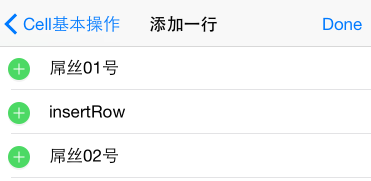
添加一行
//代理方法
//返回cell的类型
-(UITableViewCellEditingStyle)tableView:(UITableView *)tableView editingStyleForRowAtIndexPath:(NSIndexPath *)indexPath{
    return UITableViewCellEditingStyleInsert;
}
//如图当点击左边绿色加号的时候触发此方法
-(void)tableView:(UITableView *)tableView commitEditingStyle:(UITableViewCellEditingStyle)editingStyle forRowAtIndexPath:(NSIndexPath *)indexPath{
    if (editingStyle ==UITableViewCellEditingStyleInsert ) {
//先插入数据
[self.dataModel insertRowAtIndexPath:indexPath];
//开始加载
[tableView beginUpdates];
[tableView insertRowsAtIndexPaths:@[indexPath] withRowAnimation:UITableViewRowAnimationAutomatic];
//结束加载
[tableView endUpdates];
//所有数据会被重新加载一次,有点耗时
//[tableView reloadData];
    }
}
删除一行

//删除也是下面两个代理方法,比较简单
//返回cell的样式
-(UITableViewCellEditingStyle)tableView:(UITableView *)tableView editingStyleForRowAtIndexPath:(NSIndexPath *)indexPath{
    return UITableViewCellEditingStyleDelete;
}
//当点击右边的删除时触发此方法
-(void)tableView:(UITableView *)tableView commitEditingStyle:(UITableViewCellEditingStyle)editingStyle forRowAtIndexPath:(NSIndexPath *)indexPath{
    if (editingStyle == UITableViewCellEditingStyleDelete) {
        NSLog(@"h2");
        //先更新数据
        [self.dataModel removeRowAtIndexPath:indexPath];
        [tableView beginUpdates];
        //再更新界面
        [tableView deleteRowsAtIndexPaths:@[indexPath] withRowAnimation:UITableViewRowAnimationAutomatic];
        [tableView endUpdates];
    }

}
//测试,增加、删除状态下此方法不会被执行,因为此时tableview处于编辑状态下cell不具有选择状态,跟cell 的style相关
-(void)tableView:(UITableView *)tableView didSelectRowAtIndexPath:(NSIndexPath *)indexPath{
    NSLog(@"h1");
}
//返回右边删除按钮自定义标题
-(NSString *)tableView:(UITableView *)tableView titleForDeleteConfirmationButtonForRowAtIndexPath:(NSIndexPath *)indexPath{
    return @"删除";
}
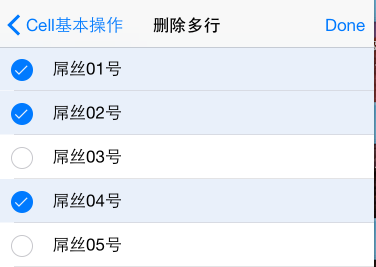
删除多行
//代理方法
//返回cell的类型
-(UITableViewCellEditingStyle)tableView:(UITableView *)tableView editingStyleForRowAtIndexPath:(NSIndexPath *)indexPath{
    return UITableViewCellEditingStyleDelete|
    UITableViewCellEditingStyleInsert;
}
//此方法用于把选中的cell行号保存在一个临时数组中
-(void)tableView:(UITableView *)tableView didSelectRowAtIndexPath:(NSIndexPath *)indexPath{
    //选中时保存
    [_selectedIndexPaths addObject:indexPath];
}
//此方法用于把选中之后再取消的cell行号从临时数组中去除
-(void)tableView:(UITableView *)tableView didDeselectRowAtIndexPath:(NSIndexPath *)indexPath{
    //取消时移除
    [_selectedIndexPaths removeObject:indexPath];
}
//重写父类方法,此方法当点击右边按钮时触发,用于把数据和多行cell一次性删除
-(void)rightButtonHandle:(UIBarButtonItem *)item{
    [super rightButtonHandle:item];
    //判断tableView是否处于编辑状态
    if (self.tableView.editing) {
        [_selectedIndexPaths removeAllObjects];
    }else{
        //注意:删除时应该倒序删除
        [self.dataModel removeRowsAtIndexPaths:_selectedIndexPaths];
//        [self.tableView beginUpdates];
        [self.tableView deleteRowsAtIndexPaths:_selectedIndexPaths withRowAnimation:UITableViewRowAnimationAutomatic];
//      [self.tableView endUpdates];
        [self.tableView reloadData];
    }
}
//下面方法是对后台数据的删除
-(void)removeRowsAtIndexPaths:(NSArray *)indexPaths{
//删除数据前需要对数组进行排序,以便后序删除
NSArray *array = [indexPaths sortedArrayUsingSelector:@selector(compare:)];
//倒序删除
for (NSInteger i=array.count-1;i>=0;i--) {
[self removeRowAtIndexPath:array[i]];
}
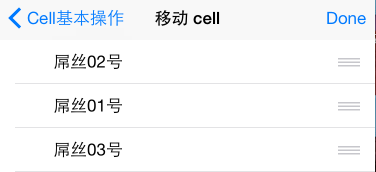
}移动cell
//代理方法
//返回cell类型
-(UITableViewCellEditingStyle)tableView:(UITableView *)tableView editingStyleForRowAtIndexPath:(NSIndexPath *)indexPath{
    return UITableViewCellEditingStyleNone;
}
//移动触发的代理方法
-(void)tableView:(UITableView *)tableView moveRowAtIndexPath:(NSIndexPath *)sourceIndexPath toIndexPath:(NSIndexPath *)destinationIndexPath{
//如果前后位置相同,则不移动
    if ([sourceIndexPath isEqual:destinationIndexPath]) {
        return;
    }
    [self.dataModel moveRowAtIndexPath:sourceIndexPath toIndexPath:destinationIndexPath];
// 跨区移动会崩溃,无需手动刷新页面,会自动刷新
//    [self.tableView moveRowAtIndexPath:sourceIndexPath toIndexPath:destinationIndexPath];

}
下面的两个功能实现比较麻烦,特别是最后一个
展开关闭
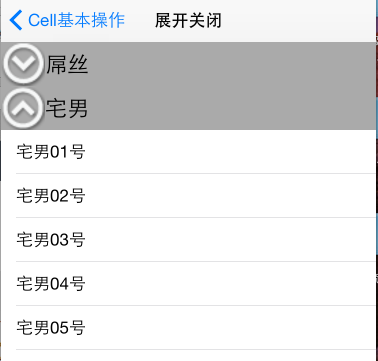
//用于记录每个区的开关状态,0:关 1:开
NSMutableArray *_sectionsStatus;//代理方法
//此方法返回headerView的高度,赋予headerView状态,block动态改变headerView状态,并且此方法调用较多,每次点击headerView都会局部刷新section从而调用此方法
-(CGFloat)tableView:(UITableView *)tableView heightForHeaderInSection:(NSInteger)section{
    return 44.0;
}
//此方法用于返回headerView,
-(UIView *)tableView:(UITableView *)tableView viewForHeaderInSection:(NSInteger)section{
    CGRect frame = CGRectMake(0, 0, VIEW_WIDTH, 44);
    SectionHeaderView *headerView = [[SectionHeaderView alloc] initWithFrame:frame];
    //获取区的标题
    NSString *sectionTitle = [self.dataModel titleOfSection:section];
    BOOL status = [_sectionsStatus[section] boolValue];
    //头视图更新标题及图片
    [headerView updateWithTitle:sectionTitle status:status];
    headerView.block = ^{
        //改变开关状态
        [_sectionsStatus replaceObjectAtIndex:section withObject:@(!status)];
        //局部刷新section,从而循环调用此方法,赋予headerView状态
        [tableView reloadSections:[NSIndexSet indexSetWithIndex:section] withRowAnimation:UITableViewRowAnimationAutomatic];
    };
    return [headerView autorelease];
}
//每次局部刷新section调用此方法,从而返回cell个数
-(NSInteger)tableView:(UITableView *)tableView numberOfRowsInSection:(NSInteger)section{
    if ([_sectionsStatus[section] isEqualToNumber:@0]) {
        return 0;
    }
    return [self.dataModel numberOfRowsInSection:section];
}
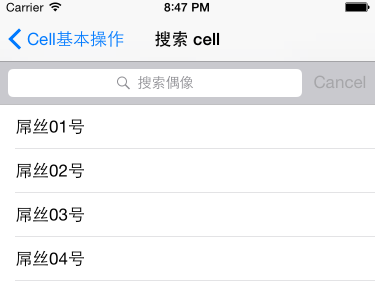
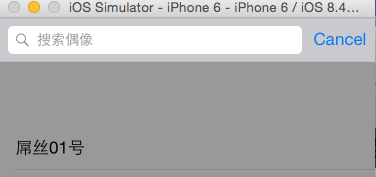
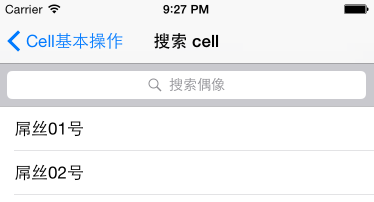
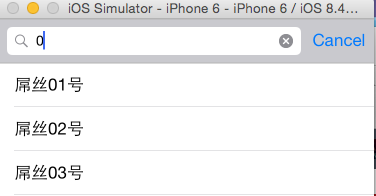
搜索cell
//搜索相关的变量
{
    //搜索框
    UISearchBar *_searchBar;
    //搜索控制器,不过已被UISearchController替代
    UISearchDisplayController *_searchDC;
    //搜索结果保存在数组中
    NSMutableArray *_searchResult;
}
//创建搜索框
- (void)createSearchBar
{
    //先修改tableView的frame
    CGRect frame = self.tableView.frame;
    frame.origin.y += 44;
    frame.size.height -= 44;
    self.tableView.frame = frame;
    //设置searchBar
    _searchBar = [[UISearchBar alloc] init];
    _searchBar.frame = CGRectMake(0, 64, VIEW_WIDTH, 44);
    _searchBar.placeholder = @"搜索偶像";
    //显示右边cancel按钮
    _searchBar.showsCancelButton = YES;

    //设置代理
    _searchBar.delegate = self;

    [self.view addSubview:_searchBar];
}
//设置_searchDC
- (void)createSearchDisplayController
{
    //创建UISearchDisplayController并绑定searchBar
    //以及搜索结果要显示的视图控制器
    _searchDC = [[UISearchDisplayController alloc] initWithSearchBar:_searchBar contentsController:self];
    //设置搜索结果的tableView的代理
    _searchDC.searchResultsDataSource = self;
    _searchDC.searchResultsDelegate = self;
    //注册搜索结果的tableView的复用标识及cell类型
    [_searchDC.searchResultsTableView registerClass:[UITableViewCell class] forCellReuseIdentifier:@"searchCellId"];
}
//searchBar的代理方法
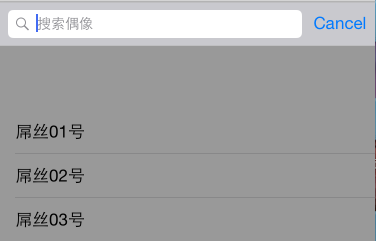
//编辑时隐藏导航栏、状态栏
- (void)searchBarTextDidBeginEditing:(UISearchBar *)searchBar
{
    //隐藏状态栏及导航条
    [self.navigationController setNavigationBarHidden:YES animated:YES];
    [self setNeedsStatusBarAppearanceUpdate];

    //动画向上偏移64
    [UIView animateWithDuration:0.5 animations:^{
        _searchBar.transform = CGAffineTransformMakeTranslation(0, -64);
    }];
}
//点击cancel按钮结束编辑时调用方法显示导航条和状态栏
- (void)searchBarTextDidEndEditing:(UISearchBar *)searchBar
{
    //显示状态栏及导航条
    [self.navigationController setNavigationBarHidden:NO animated:YES];
    [self setNeedsStatusBarAppearanceUpdate];

    //还原transform
    [UIView animateWithDuration:0.3 animations:^{
        _searchBar.transform = CGAffineTransformIdentity;
    }];
}
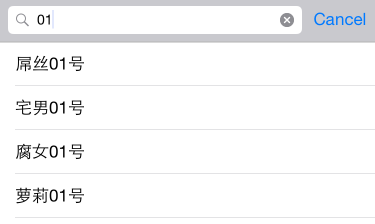
//进行编辑时调用此方法,每次change都会调用
- (void)searchBar:(UISearchBar *)searchBar textDidChange:(NSString *)searchText
{
    _searchResult.array = [self.dataModel searchWithText:searchText];
}
//当点击cancel按钮时会调用此方法,隐藏键盘
- (void)searchBarCancelButtonClicked:(UISearchBar *)searchBar
{
    [_searchBar resignFirstResponder];
}
//下面代理方法是重写父类代理方法,用于区分时是searchDC返回的tableView还是self.tableView,从而控制数据的显示
#pragma mark - UITableViewDataSource
//返回section数
- (NSInteger)numberOfSectionsInTableView:(UITableView *)tableView
{
if (tableView == self.tableView) {
return [super numberOfSectionsInTableView:tableView];
} else if (tableView == _searchDC.searchResultsTableView) {
return 1;
}
return 0;
}
//返回cell行数
- (NSInteger)tableView:(UITableView *)tableView numberOfRowsInSection:(NSInteger)section
{
if (tableView == self.tableView) {
return [super tableView:tableView numberOfRowsInSection:section];
} else if (tableView == _searchDC.searchResultsTableView) {
return _searchResult.count;
}
return 0;
}
//返回cell
- (UITableViewCell *)tableView:(UITableView *)tableView cellForRowAtIndexPath:(NSIndexPath *)indexPath
{
if (tableView == self.tableView) {
return [super tableView:tableView cellForRowAtIndexPath:indexPath];
} else if (tableView == _searchDC.searchResultsTableView) {
UITableViewCell *cell = [tableView dequeueReusableCellWithIdentifier:@"searchCellId"];
cell.textLabel.text = _searchResult[indexPath.row];
return cell;
}
return nil;
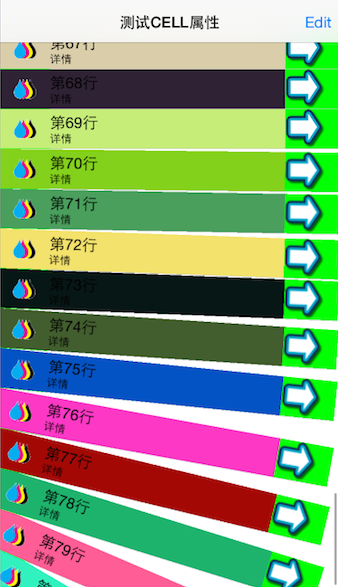
}UITableViewCell基本属性
此代理方法会在每次tableview布局时首先执行,如果返回值为0,则不会执行下面的代理方法
- (NSInteger)tableView:(UITableView *)tableView numberOfRowsInSection:(NSInteger)section
{
return self.dataSource.count;
}
两种复用cell的方法:
1. 这种复用如果复用池里不存在复用的对象,则不自动创建cell对象,由用户手动创建想要的类型,所以前面不需要注册cell
ITableViewCell *cell = [tableView dequeueReusableCellWithIdentifier:@”cell”];
- 这种复用如果复用池中不存在复用的对象,系统则根据前面注册的cell类型自动创建cell,所以前面需要注册
[tableView dequeueReusableCellWithIdentifier:@”cell” forIndexPath:indexPath];
- (UITableViewCell *)tableView:(UITableView *)tableView cellForRowAtIndexPath:(NSIndexPath *)indexPath
{
    UITableViewCell *cell = [tableView dequeueReusableCellWithIdentifier:@"cellId"];
    if (!cell) {
    /*      风格                      详情          图片
     UITableViewCellStyleDefault     不支持        支持
     UITableViewCellStyleValue1       支持         支持
     UITableViewCellStyleValue2       支持        不支持
     UITableViewCellStyleSubtitle 在textLabel下    支持
     */
        cell = [[UITableViewCell alloc] initWithStyle:UITableViewCellStyleSubtitle reuseIdentifier:@"cellId"];
    }
    //textLabel
    cell.textLabel.text = [NSString stringWithFormat:@"第%.2ld行",indexPath.row+1];
    //detailTextLabel
    cell.detailTextLabel.text = @"详情";
    //imageView
    cell.imageView.image = [UIImage imageNamed:@"colors"];

    /*右边附加视图式样
     UITableViewCellAccessoryDisclosureIndicator    >
     UITableViewCellAccessoryDetailDisclosureButton ¡>
     UITableViewCellAccessoryCheckmark              √
     UITableViewCellAccessoryDetailButton           ¡
    */
    cell.accessoryType = UITableViewCellAccessoryDetailButton;
    cell.editingAccessoryType = UITableViewCellAccessoryCheckmark;
    //设置自定义附加视图,accessoryType无效
    UIImageView *normalView = [[UIImageView alloc] initWithImage:[UIImage imageNamed:@"next.jpg"]];
    cell.accessoryView = [normalView autorelease];
    UIImageView *editingView = [[UIImageView alloc] initWithImage:[UIImage imageNamed:@"prev.jpg"]];
    cell.editingAccessoryView = [editingView autorelease];

    //背景色
    cell.backgroundColor = [UIColor greenColor];
    //包含视图背景色
    cell.contentView.backgroundColor = [UIColor colorWithRed:RandomValue green:RandomValue blue:RandomValue alpha:1.0];
    /*选中风格
     UITableViewCellSelectionStyleNone,     无效
     UITableViewCellSelectionStyleBlue,     浅灰
     UITableViewCellSelectionStyleGray,     浅灰
     UITableViewCellSelectionStyleDefault   浅灰
     */
    cell.selectionStyle = UITableViewCellSelectionStyleDefault;
    //设置选中视图,frame无效,只有颜色有效
    UIView *backView = [[UIView alloc] init];
    backView.backgroundColor = [UIColor redColor];
    cell.selectedBackgroundView = backView;
    [backView release];

    return cell;
}
//附加视图按钮(带button风格)点击回调方法
- (void)tableView:(UITableView *)tableView accessoryButtonTappedForRowWithIndexPath:(NSIndexPath *)indexPath
{
NSLog(@"click%ld", indexPath.row);
}
动态返回cell的高度
//heightForRowAtIndexPath的调用优先于cellForRowAtIndexPaht,调用的次数跟行数相同,目的是先计算tableView的内容大小
//如果在这里调用cellForRowAtIndexPath 会导致所有的cell先构建一遍,效率低
- (CGFloat)tableView:(UITableView *)tableView heightForRowAtIndexPath:(NSIndexPath *)indexPath{
    CommonModel *model = [self.dataSource objectAtIndex:indexPath.row];
    //以下写法不推荐
//    UITableViewCell *cell = [self.tableView cellForRowAtIndexPath:indexPath];
//    [cell calculateCellHeight:model];
    //通常在cell中写一个类方法来完成计算cell的高度问题
    return [CommonTableViewCell cellHeightForModel:model];
}
锚点、cell3D旋转
//在cell显示前,改变cell的锚点,设置动画进行旋转
- (void)tableView:(UITableView *)tableView willDisplayCell:(UITableViewCell *)cell forRowAtIndexPath:(NSIndexPath *)indexPath
{
    //先保存frame
    CGRect frame = cell.frame;
    //锚点(旋转的中心点),默认是(0.5,0.5)
    cell.layer.anchorPoint = CGPointMake(0, _isDownward);
    //锚点在父视图中的坐标
    cell.layer.position = CGPointMake(frame.origin.x, frame.origin.y+_isDownward*frame.size.height);
    char flag = _isDownward ? -1 : 1;
    cell.layer.transform = CATransform3DMakeRotation(flag*M_PI_2, 0, 0, 1);
    [UIView animateWithDuration:1 animations:^{
        cell.layer.transform = CATransform3DIdentity;
    }];
}
自定义cell
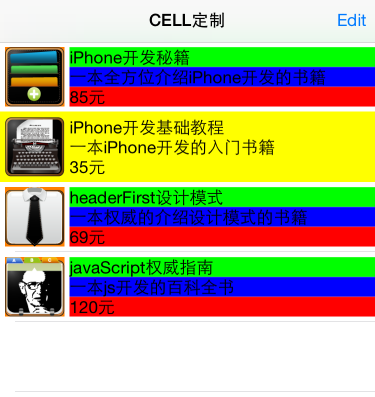
//定制cell需要继承UITableViewCell
//默认创建cell时调用的方法,所以定制时需要重写
//在此方法中把定制的内容添加到self.contentView上面,不进行布局
- (instancetype)initWithStyle:(UITableViewCellStyle)style reuseIdentifier:(NSString *)reuseIdentifier;
//粘贴视图,若添加到self上编辑时会出现覆盖
[self.contentView addSubview:_iconView];
[self.contentView addSubview:_titleLabel];
//下面的方法对添加的视图进行布局,自动调用
//在布局时会自动调用,不能手动调用,
//若想手动更新,调用[self layoutIfNeeded];
- (void)layoutSubviews
{
    [super layoutSubviews];

    CGSize size = self.contentView.frame.size;
    ......
}
//下面方法是自己定义的方法,用于外部赋予数据
- (void)updateWithDataModel:(BookModel *)book{}


 731
731

 被折叠的 条评论
为什么被折叠?
被折叠的 条评论
为什么被折叠?
 到【灌水乐园】发言


