


After installing TeamViewer and first connection to the network, program receives a unique identification number (ID). It allows you to perform a remote connection to your computer. If you are using a free version of TeamViewer to connect to different computers (commercial purposes), here is a high probability that your remote connections will be limited on the TeamViewer server to a value not exceeding five minutes, after which the connection will be terminated.
In the event that the TeamViewer server decides that you are using the utility for commercial purposes to connect to multiple customer computers, a warning window may appear:
Your trial period has expired
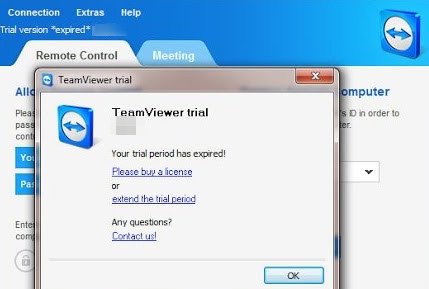
In this case, you can try to reinstall apps, but that won’t help you. The only way to unblock the limitation is to reset TeamViewer ID (or purchase a license  ).
).
You can see your TeamViewer ID on the main screen when running application.
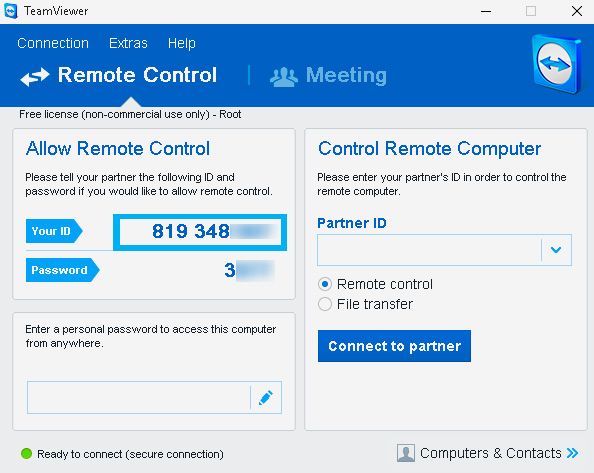
TeamViewer ID is generated basing on several unique attributes of your computer:
- MAC address of the network card
- VolumeID of disk partition
- Creation date of folder Program Files
Accordingly, in order to change TeamViewer ID, you need to change these 3 values.
Reset or Change TeamViewer ID in Windows
To reset the TeamViewer ID, you need to perform a few steps.
First of all, terminate TeamViewer process. Then you need to remove current TeamViewer ID from the registry.
- For Windows x86, TeamViewer version [X], open regedit.exe, go to the branch HKLM\SOFTWARE\TeamViewer\Version[X] and delete DWORD value ClientID;
- For Windows x64, delete value ClientID from HKLM\SOFTWARE\Wow6432Node\TeamViewer\Version[X];
- Check if the registry key HKEY_CURRENT_USER\Software\TeamViewer exists and delete it.
To change the creation date of Program Files folder, you can use NirCMD utility. Download it and run the following command in a Command prompt console:
nircmdc.exe setfilefoldertime "C:\Program Files" now now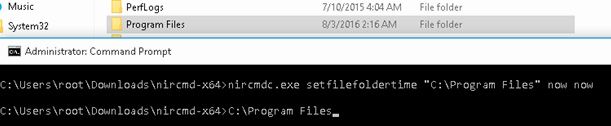
To change MAC address of the network card, you can use special utilities or use the following instructions for manually edit MAC address in registry.
To get the current MAC address of your network card, open Command prompt and execute following command:
Ipconfig /all
We are interested in two parameters:
- Description (LAN card description) Intel(R) 82574L Gigabit Network Connection
- Physical Address (MAC address) 00-50-56-9E-FC-CB
Then, open Registry Editor and go to branch HKLM\SYSTEM\CurrentControlSet\Control\Class\{4d36e972-e325-11ce-bfc1-08002be10318}.
Each network component in this branch is indicated by four digits starting from 0000, 0001 and so on. You can find the right branch by browsing it and looking for DriverDesc option, where must be specified the description (name) of your network card, for example: Intel(R) 82574L Gigabit Network Connection.
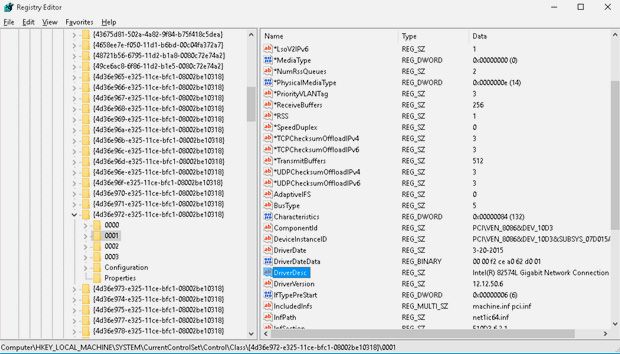
Once the correct network card is found, add or modify REG_SZ key with name NetworkAddress, which determines MAC (hardware) address of the network card. It is enough to change a single digit in the current address, for example 0050560EFCCB.

So, MAC address of the network card is changed. Now you need to change VolumeID of system partition. VolumeID (or Volume Serial Number) is a unique identifier of a volume on hard drive, which is set during formatting.
Note. In some cases, TeamViewer is linked to a non-system volume of disk, or even to the removable media volume, so it is likely that we need to change VolumeID of other partitions.
To change VolumeID use the console utility VolumeID v2.1. Download and extract archive VolumeId.zip.
Check the current VolumeID by opening command prompt with Administrator privileges and execute command:
vol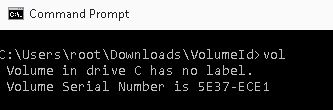
Volume Serial Number is 5E37-ECE1.
Change current value to new value 5E37-EC11:
Cd c:\users\root\Downloads\VolumeIDVolumeid.exe c: 5E37-EC11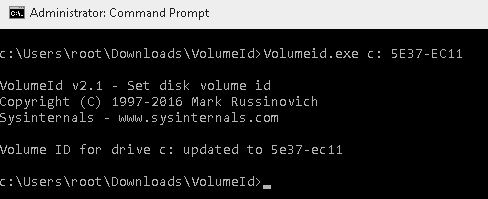
OnceVolumeId utility updated the volume serial number of your system partition, close the Command Prompt window, and reboot your computer.
After rebooting, run the app and you will be assigned a new TeamViewer ID.
评论
It worked great on Windows 7 x64 with Teamviewer 13. Thanks! As a good measure, beforehand I deleted all Teamviewer folders from AppData and ProgramData.
How to Reset TeamViewer ID on Linux
In case you are using TeamViewer on one of the Linux distributions, you can follow the instructions below in order to reset the TeamViewer ID (the method is tested on Debian 9 and with some modifications you can use it on any Linux distribution).
- Uninstall Teamviewer with su privileges;
- Remove the file /var/lib/dbus/machine-id if exist;
- Edit the GUID (you can just replace the last character): mc -e id.txt;
- Change the MAC address of the network card:
ifconfig eth0 down

ifconfig eth0 hw ether New_MAC_HERE

ifconfig eth0 up

nano /etc/network/interfaces
- Correct string:
pre-up ifconfig eth0 hw ether New_MAC_HERE
- Reboot OS;
- Install Teamviewer, it should get a new ClientID.
To change ClientID on clonned Linux machine it’s enough to:
- Stop the teamviewer daemon;
- Delete teamviewer settings:
rm -r ~/.teamviewer - Remove folder /opt/teamviewer{TW_VERSION_Here)/config;
- Start the teamviewer daemon.
How to Change TeamViewer ID on Mac OS
To change Teamviewer ClientID on Mac OS, you can use the python script TeamViewer-id-changer.py from GitHub. Follow these steps
- Download script from Git Hub;
- Close TeamViewer (make sure the process has completely disappeared);
- Run the script: sudo ./TeamViewer-id-changer.py;
- Reboot the device.
This script works correctly for TeamViewer 11 and 12.


 8406
8406

 被折叠的 条评论
为什么被折叠?
被折叠的 条评论
为什么被折叠?
 到【灌水乐园】发言


