


一、SRv6 Policy 操作实例
EVPN L3VPNv4 over SRv6 TE Policy (静态)
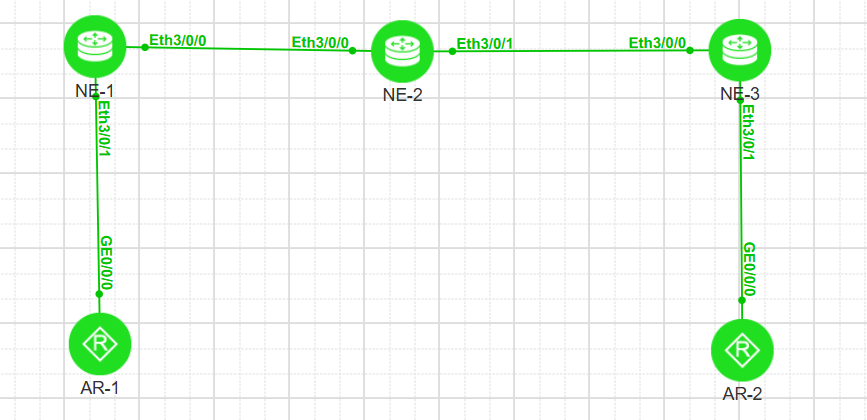
一、组网需求:SRv6 Policy承载EVPN L3v4业务
1.PE1和PE2设备各有一个CE属于实例VRF。
2.在骨干网络中部署EVPN L3迭代SRv6 Policy,使得CE1和CE2的loopback1接口可以相互通信。
配置注意事项:
(1)配置SRv6 TE Policy需要使用End SID或End.X SID。 SID可以通过手工静态配置,也可以由IGP动态生成。在静态配置SRv6 TE Policy场景中,如果使用动态SID,则SID在IGP协议重启后可能发生变化,此时静态SRv6 TE Policy也需要人工介入做相应的调整才能保持Up,在现网中实际无法大规模部署,基于上述原因,建议用户手工配置SID,禁止使用动态SID。
(2)SRv6 TE Policy基于路由的Color引流时,首先需要为路由配置扩展团体属性Color,可以使用入口策略也可以使用出口策略。然后还需要配置隧道策略,允许路由迭代SRv6 TE Policy。
上述配置都完成后,如果路由的Color和下一跳分别与SRv6 TE Policy的Color和Endpoint地址相同时,则路由成功迭代到SRv6 TE Policy,流量被导入对应的SRv6 TE Policy。
二、配置思路
配置思路:
1.完成设备接口IPv6地址及IS-IS配置。
2.PE1和PE2配置VRF实例
3.PE和CE之间建立EBGP邻居关系
4.PE1与PE2之间建立BGP EVPN 对等体关系。
5.骨干网上使能Segment Routing,建立SRv6 Policy路径。配置SRv6 SID,配置ISIS SRv6;同时在PE上配置VRF私网
路由携带SID属性。
6.PE配置SRv6 TE Policy
7.PE配置隧道策略,优选SRv6 TE Policy Group,引入私网流量。
8.结果验证。
三、配置过程:
步骤1.完成设备接口IPv6地址及IS-IS配置。
PE1配置
[PE1]dis cur int Ethernet 3/0/0
#
interface Ethernet3/0/0
undo shutdown
ipv6 enable
ip address 10.1.12.1 255.255.255.0
ipv6 address 2001:DB88:12::1/96
isis enable 65000
isis ipv6 enable 65000
#
return
[PE1]dis cur int lo0
#
interface LoopBack0
ipv6 enable
ip address 1.1.1.1 255.255.255.255
ipv6 address 2001:DB8:1::1/128
isis enable 65000
isis ipv6 enable 65000
#
return
[PE1]dis cur con isis
[PE1]dis cur con isis
#
isis 65000
is-level level-2
cost-style wide
network-entity 49.0000.0000.0001.00
#
ipv6 enable topology ipv6
segment-routing ipv6 locator srv6 auto-sid-disable
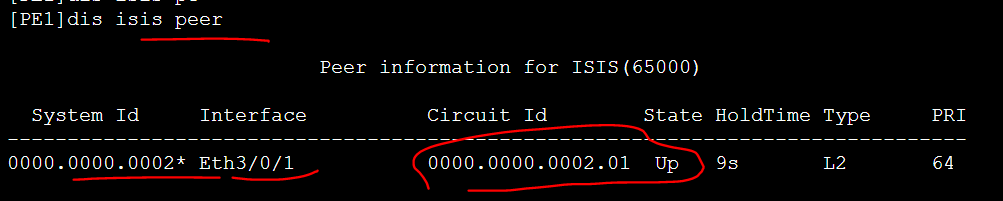
#显示ISIS邻居关系是否正常,以PE1为例
PE1 dis isis peer
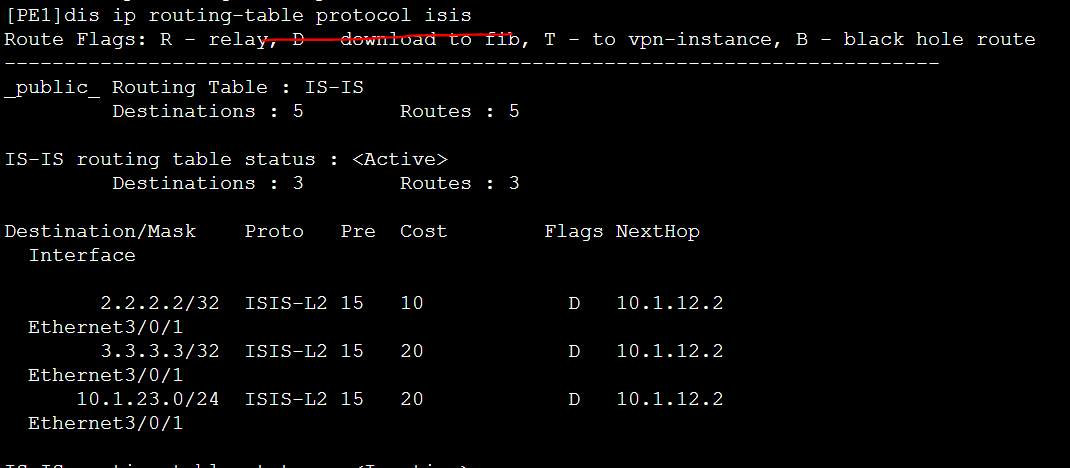
查看PE1 ISIS路由
dis ip routing-table protocol isis
步骤2:在PE上使能IPv4地址族的vrf实例;并将IPv4 L3实例绑定到接入侧接口
PE1配置:VRF实例
[PE1]dis cur con vpn
#
ip vpn-instance vpna
 ipv4-family
  route-distinguisher 1:100
  apply-label per-instance
  vpn-target 1:111 export-extcommunity evpn
  vpn-target 1:111 import-extcommunity evpn
[PE1]dis cur int Ethernet 3/0/1
#
interface Ethernet3/0/1
 undo shutdown
 ip binding vpn-instance vpna
 ip address 10.0.14.254 255.255.255.0
#
PE2 配置
[PE2]dis cur con vpn
#
ip vpn-instance vpna
 ipv4-family
  route-distinguisher 1:200
  apply-label per-instance
  vpn-target 1:111 export-extcommunity evpn
  vpn-target 1:111 import-extcommunity evpn
[PE2]dis cur int Ethernet 3/0/1
#
interface Ethernet3/0/1
 undo shutdown
 ip binding vpn-instance vpna
 ip address 10.0.35.254 255.255.255.0
#
命令:
ipv4-family vpn-instance vpna
  import-route direct
执行命令import-route { direct | isis process-id | static | ospf process-id | ripprocess-id } [ med med | route-policy route-policy-name ] *,将其他协议路由引入到当前BGP-VPN实例IPv4地址族视图中。如果要发布主机IP路由,则只需配置引入直连路由即可。如果要发布主机所在的网段路由,需要先利用动态路由协议(如OSPF等)发布该网段路由,此处再配置引入相应动态协议的路由。
ipv4-family vpn-instance vpna
advertise l2vpn evpn /发布L2VPN 的EVPN路由/
执行命令advertise l2vpn evpn [ import-route-multipath ],配置发布IP前缀类型的路由。此类型路由既可以用于发布主机IP路由,也可以用于发布主机所在的网段路由。
步骤3:PE与CE建立EBGP邻居关系
CE1配置
[AR1]dis cur con bgp
#
bgp 65000
 private-4-byte-as enable
 peer 10.0.14.254 as-number 100
 #
 ipv4-family unicast
  network 10.1.4.4 255.255.255.255
  peer 10.0.14.254 enable
#
return
PE1配置
[PE1]dis cur int Ethernet 3/0/2
#
interface Ethernet3/0/2
 undo shutdown
 ip binding vpn-instance vpna
 ip address 10.0.14.254 255.255.255.0
#
[PE1-bgp]dis th
#
bgp 100
 router-id 1.1.1.1
 private-4-byte-as enable
 #
 ipv4-family unicast
  undo synchronization
 #
 ipv4-family vpn-instance vpna
  import-route direct
  peer 10.0.14.1 as-number 65000
#
CE2配置
[AR2-bgp]dis th
#
bgp 65001
 private-4-byte-as enable
 peer 10.0.35.254 as-number 100
 #
 ipv4-family unicast
  network 10.1.5.5 255.255.255.255
  peer 10.0.35.254 enable
#
return
PE2配置
[PE2-Ethernet3/0/2]dis th
#
interface Ethernet3/0/2
undo shutdown
ip binding vpn-instance vpna
ip address 10.0.35.254 255.255.255.0
#
[PE2-bgp]dis th
#
bgp 100
router-id 3.3.3.3
private-4-byte-as enable
#
ipv4-family unicast
undo synchronization
#
ipv4-family vpn-instance vpna
import-route direct
peer 10.0.35.1 as-number 65001
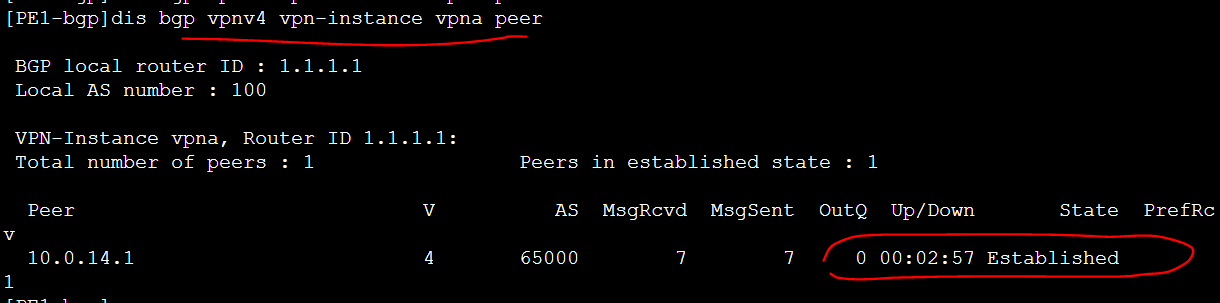
#检查PE和CE之间的ebgp邻居关系
PE1:命令:dis bgp vpnv4 vpn-instance vpna peer
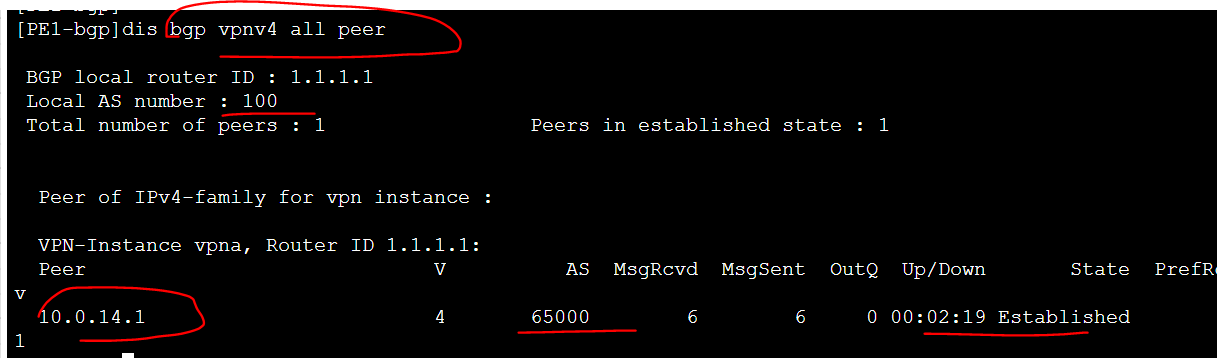
命令:dis bgp vpnv4 vpn-instance vpna peer
步骤4:PE之间建立BGP EVPN邻居关系
PE1
[PE1-bgp]dis th
#
bgp 100
 router-id 1.1.1.1
 private-4-byte-as enable
 peer 2001:DB8:3::3 as-number 100
 peer 2001:DB8:3::3 connect-interface LoopBack0
 #
 ipv4-family unicast
  undo synchronization
 #
 ipv4-family vpn-instance vpna
  import-route direct
  advertise l2vpn evpn
  peer 10.0.14.1 as-number 65000
 #
 l2vpn-family evpn
  policy vpn-target
  peer 2001:DB8:3::3 enable
#
PE2:
[PE2-bgp]dis th
#
bgp 100
 router-id 3.3.3.3
 private-4-byte-as enable
 peer 2001:DB8:1::1 as-number 100
 peer 2001:DB8:1::1 connect-interface LoopBack0
 #
 ipv4-family unicast
  undo synchronization
 #
 ipv4-family vpn-instance vpna
  import-route direct
  advertise l2vpn evpn
  peer 10.0.35.1 as-number 65001
 #
 l2vpn-family evpn
  policy vpn-target
  peer 2001:DB8:1::1 enable
#
PE1上检查BGP EVPN邻居关系
命令:dis bgp evpn peer

步骤5:骨干网上使能Segment Routing,建立SRv6 Policy路径。配置SRv6 SID,配置ISIS SRv6;同时在PE上配置VRF私网路由携带SID属性。
PE1配置
[PE1-segment-routing-ipv6]dis th
#
segment-routing ipv6
 encapsulation source-address 2001:DB8:1::1
 locator srv6 ipv6-prefix 2001:DB8:1000:: 64 static 32
  opcode ::111 end-x interface Ethernet3/0/0 nexthop 2001:DB88:12::2 psp
  opcode ::100 end-dt4 vpn-instance vpna evpn
#
[PE1-bgp-vpna]dis th
 #
 ipv4-family vpn-instance vpna
  import-route direct
  advertise l2vpn evpn
  segment-routing ipv6 locator srv6 evpn
  segment-routing ipv6 traffic-engineer best-effort evpn
  peer 10.0.14.1 as-number 65000
#
 l2vpn-family evpn
  policy vpn-target
  peer 2001:DB8:3::3 enable
  peer 2001:DB8:3::3 advertise encap-type srv6
#
isis 65000
 ipv6 enable topology ipv6
 segment-routing ipv6 locator srv6 auto-sid-disable
 #
P1配置
[P1-segment-routing-ipv6]dis th
#
segment-routing ipv6
 encapsulation source-address 2001:DB8:2::2
 locator srv6 ipv6-prefix 2001:DB8:2000:: 64 static 32
  opcode ::111 end-x interface Ethernet3/0/0 nexthop 2001:DB88:12::1 psp
  opcode ::222 end-x interface Ethernet3/0/1 nexthop 2001:DB88:23::3 psp
#
return
PE2配置
[PE2-segment-routing-ipv6]dis th
#
segment-routing ipv6
encapsulation source-address 200:DB8:3::3
locator srv6 ipv6-prefix 2001:DB8:3000:: 64 static 32
opcode ::333 end-x interface Ethernet3/0/0 nexthop 2001:DB88:23::2 psp
opcode ::100 end-dt4 vpn-instance vpna evpn
#
[PE2-bgp-vpna]dis th
#
ipv4-family vpn-instance vpna
import-route direct
advertise l2vpn evpn
segment-routing ipv6 locator srv6 evpn
segment-routing ipv6 traffic-engineer best-effort evpn
peer 10.0.35.1 as-number 65001
#
l2vpn-family evpn
peer 2001:DB8:1::1 enable
peer 2001:DB8:1::1 advertise encap-type srv6
#
isis 65000
ipv6 enable topology ipv6
segment-routing ipv6 locator srv6 auto-sid-disable
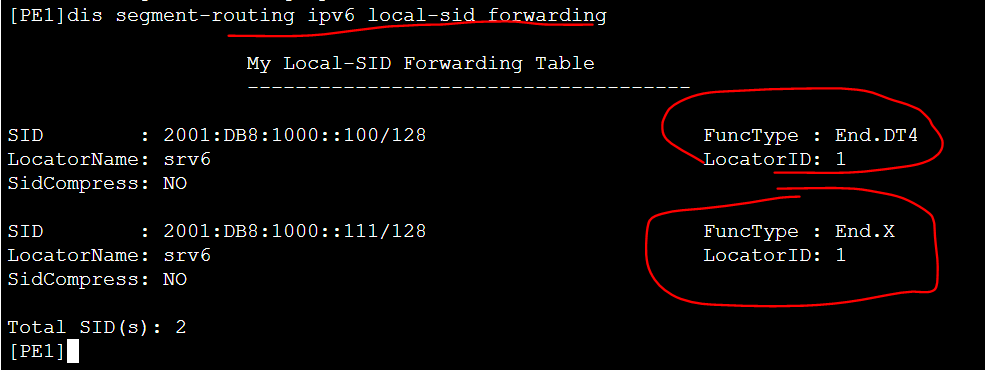
#检查srv6 segment ipv6 命令:
dis segment-routing ipv6 local-sid forwarding
重要命令n source-address X.X.X.X
/配置SRv6的报文源地址,一般是loopback0的地址/
opcode ::111 end psp
/配置静态End SID的Opcode/
执行命令opcode func-opcode end-dt4 vpn-instance vpn-instancename,配置静态SID的Opcode。
locator srv6 ipv6-prefix 2001:DB8:1000:: 64 static 32
/配置SID的节点路由段。配置的Locator指定了SID静态段长度,动态SID分配会在去除静态段的SID范围内申请,确保SID不会冲突/
BGP配置
ipv4-family vpnv4
peer 2001:DB8:3::3 prefix-sid
执行命令peer ipv6-address prefix-sid,使能与指定IPv6对等体之间交换IPv4 Prefix SID信息。
ISIS配置
isis 65000
segment-routing ipv6 locator srv6 auto-sid-disable
执行命令segment-routing ipv6 locator locator-name [ auto-sid-disable ],
使能VPN私网路由携带SID属性。
如果没有配置auto-sid-disable参数,表示支持动态SID分配。此时如果locatorname下存在静态SID,则使用静态SID,没有静态SID时则使用动态分配的SID。
如果配置auto-sid-disable参数,则BGP不会动态分配SID。
segment-routing ipv6
执行命令segment-routing ipv6,使能IPv6转发平面的Segment Routing功能,并且进入SRv6视图。
ipv4-family vpn-instance vpna
segment-routing ipv6 locator srv6 evpn
segment-routing ipv6 traffic-engineer best-effort evpn
segment-routing ipv6 locator srv6 evpn
执行命令segment-routing ipv6 locator locator-name evpn,使能私网路由上送EVPN协议时携带SID属性功能。
segment-routing ipv6 traffic-engineer best-effort evpn
#使能EVPN L3VPNv4业务迭代SRv6 TE Policy隧道的功能
执行命令segment-routing ipv6 traffic-engineer [ best-effort ] evpn,使能EVPN L3VPNv4业务迭代SRv6 TE Policy隧道的功能。
当网络中存在SRv6 BE路径时,可以配置best-effort参数,这样当SRv6 TE Policy隧道故障时业务可以使用SRv6 BE路径作为逃生路径。
步骤6:配置STv6 TE Policy
PE1配置
[PE1-segment-routing-ipv6]dis th
#
segment-routing ipv6
 encapsulation source-address 2001:DB8:1::1
 locator srv6 ipv6-prefix 2001:DB8:1000:: 64 static 32
  opcode ::111 end-x interface Ethernet3/0/0 nexthop 2001:DB88:12::2 psp
  opcode ::100 end-dt4 vpn-instance vpna evpn
 srv6-te-policy locator srv6
 segment-list list1
  index 5 sid ipv6 2001:DB8:1000::111
  index 10 sid ipv6 2001:DB8:2000::222
 srv6-te policy policy1 endpoint 2001:DB8:3::3 color 101
  candidate-path preference 100
   segment-list list1
#
PE2配置
[PE2-segment-routing-ipv6]dis th
#
segment-routing ipv6
encapsulation source-address 200:DB8:3::3
locator srv6 ipv6-prefix 2001:DB8:3000:: 64 static 32
opcode ::333 end-x interface Ethernet3/0/0 nexthop 2001:DB88:23::2 psp
opcode ::100 end-dt4 vpn-instance vpna evpn
srv6-te-policy locator srv6
segment-list list1
index 5 sid ipv6 2001:DB8:3000::333
index 10 sid ipv6 2001:DB8:2000::111
srv6-te policy policy1 endpoint 2001:DB8:1::1 color 101
candidate-path preference 100
segment-list list1
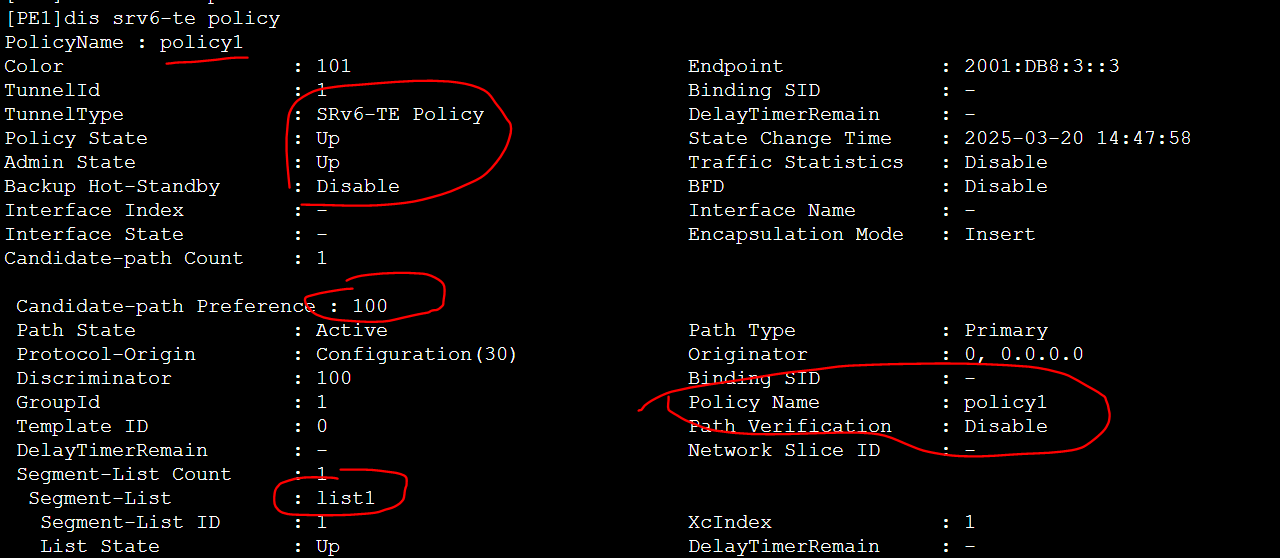
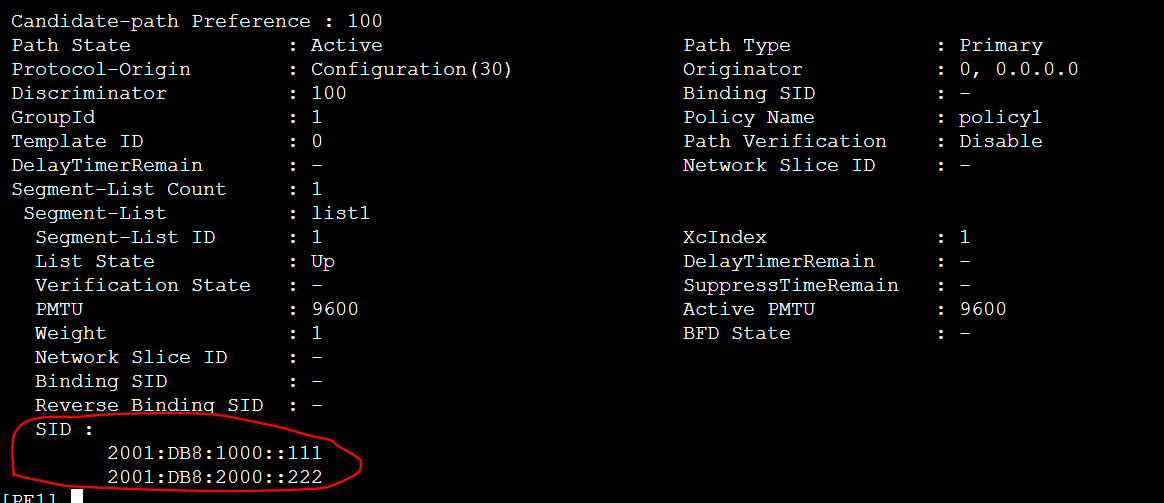
#查看SRv6 TE Policy信息
命令:dis srv6-te policy
重要命令:
配置segment List:
segment-list list1
执行命令segment-list list-name,创建SRv6 TE Policy候选路径的显式路径,并且进入显式路径视图
index 5 sid ipv6 2001:DB8:2000::222
执行命令index index sid ipv6 ipv6address,配置在Segment List中指定下一跳SID。
该命令允许多次执行,系统按照index index从小到大的顺序生成Segment List的SID栈。当SRv6 TE Policy下候选路径被优选后,按照候选路径下的Segment List转发流量。每个Segment List中最多配置10个SID
配置SRv6 TE Policy
srv6-te-policy locator srv6
执行命令srv6-te-policy locator locator-name,配置SRv6 TE Policy关联的Locator。用于在Locator下指定SRv6 TE Policy的Binding SID。
srv6-te policy policy1 endpoint 2001:DB8:1::1 color 101
执行命令srv6-te policy policy-name endpoint ipv6-address color colorvalue,创建SRv6 TE Policy,并且进入SRv6 TE Policy视图。
binding-sid 2001:DB8:3000::100
(可选)执行命令binding-sid binding-sid,配置SRv6 TE Policy的Binding SID。
binding-sid取值需要在locator locator-name [ ipv6-prefix ipv6-address prefixlength [ static static-length | args args-length ] * ]命令定义的静态段范围内。
candidate-path preference 100
执行命令candidate-path preference preference,配置SRv6 TE Policy的候选路径及其优先级。
每一个SRv6 TE Policy允许配置多个候选路径。 preference越大,候选路径优先级越高,存在多个候选路径时,优先级最高的生效。
segment-list list1
执行命令segment-list list-name [ weight weight-value | path-mtu mtuvalue ] *,配置SRv6 TE Policy候选路径的Segment List。
Segment List需要提前通过segment-list (Segment-routing IPv6 view)命令创建
步骤8::骨干网上配置隧道策略,引入私网流量
PE1配置
[PE1-bgp-af-evpn]dis cur con route-policy
#
route-policy p1 permit node 10
 apply extcommunity color 0:101
#
[PE1-bgp-af-evpn]dis th
 #
 l2vpn-family evpn
  policy vpn-target
  peer 2001:DB8:3::3 enable
  peer 2001:DB8:3::3 route-policy p1 import
  peer 2001:DB8:3::3 advertise encap-type srv6
#
#
tunnel-policy p1
 tunnel select-seq ipv6 srv6-te-policy load-balance-number 1
#
[PE1-vpn-instance-vpna-af-ipv4]dis th
 ipv4-family
  tnl-policy p1 evpn
#
PE2配置
[PE2-route-policy]dis th
#
route-policy p1 permit node 10
 apply extcommunity color 0:101
#
[PE2-bgp-af-evpn]dis th
 #
 l2vpn-family evpn
  peer 2001:DB8:1::1 route-policy p1 import
#
#
tunnel-policy p1
 tunnel select-seq ipv6 srv6-te-policy load-balance-number 1
#
[PE2-vpn-instance-vpna-af-ipv4]dis th
 ipv4-family
  tnl-policy p1 evpn
#
配置L3VPN实例:
命令:
ip vpn-instance vpna
ipv4-family
vpn-target 1:111 export-extcommunity evpn
vpn-target 1:111 import-extcommunity evpn
执行命令vpn-target vpn-target &<1-8> [ both | export-extcommunity |import-extcommunity ] evpn,为VPN实例IPv4地址族配置用于与EVPN实例交叉的VPN-Target属性。
ipv4-family vpn-instance vpna
import-route direct
执行命令import-route { direct | isis process-id | static | ospf process-id | rip process-id } [ med med | route-policy route-policy-name ] *,将其他协议路由引入到当前BGP-VPN实例IPv4地址族视图中。如果要发布主机IP路由,则只需配置引入直连路由即可。如果要发布主机所在的网段路由,需要先利用动态路由协议(如OSPF等)发布该网段路由,此处再配置引入相应动态协议的路由。
执行命令l2vpn-family evpn,进入BGP-EVPN地址族视图。
peer 2001:DB8:3::3 enable
执行命令peer { ipv6-address | group-name } enable,使能对等体或组间交换EVPN路由信息的能力。
l2vpn-family evpn
peer 2001:DB8:3::3 advertise encap-type srv6
执行命令peer { ipv6-address | group-name } advertise encap-type srv6,配置向邻居发送携带SRv6封装属性的EVPN路由。
(1) 配置隧道策略
如果是基于Color引流
a. 执行命令system-view,进入系统视图。
b. 执行命令tunnel-policy policy-name,创建隧道策略,并进入隧道策略视图。
c. (可选)执行命令description description-information,对隧道策略配置描述信息。
d. 执行命令tunnel select-seq ipv6 srv6-te-policy load-balance-number
load-balance-number,配置选择隧道的优先级顺序和负载分担条数。
执行命令tunnel select-seq ipv6 srv6-te-policy-group load-balancenumber loadBalanceNumber,配置隧道选择策略。
说明
完成上述配置后,允许路由迭代SRv6 TE Policy,此时如果路由的Color和下一跳分别与SRv6 TE Policy的Color和Endpoint地址相同时,则路由成功迭代到SRv6 TE Policy,流量被导入对应的SRv6 TE Policy。
e. 执行命令commit,提交配置。
(2)配置业务迭代到SRv6 TE Policy
配置BGP L3VPN迭代到SRv6 TE Policy
a. 执行命令system-view,进入系统视图。
b. 执行命令ip vpn-instance vpn-instance-name,进入VPN实例视图。
c. 执行命令ipv4-family,进入VPN实例IPv4地址族视图。
d. 执行命令tnl-policy policy-name,对VPN实例IPv4地址族应用隧道策略。
e. 执行命令commit,提交配置。
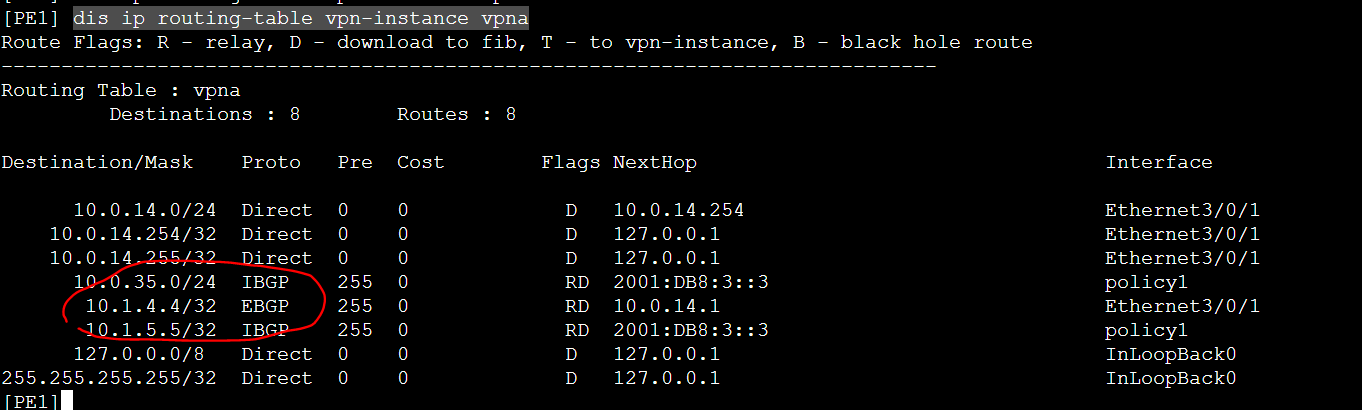
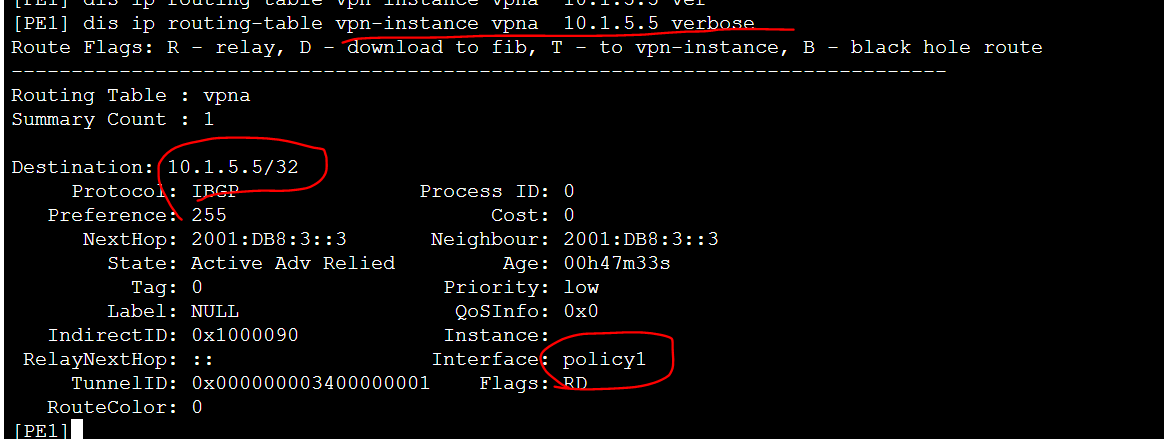
dis ip routing-table vpn-instance vpna
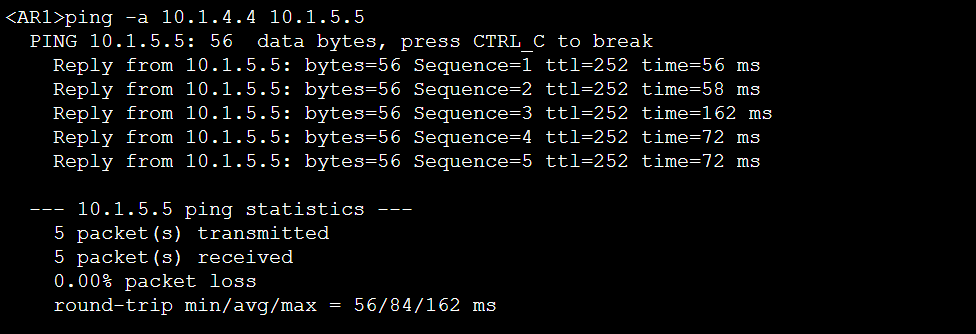
CE1 ping CE2
配置要点
ip vpn-instance <vpn1>
ipv4-family
route-distinguisher 200:1
vpn-target 1:1 export-extcommunity evpn
vpn-target 1:1 import-extcommunity evpn
tnl-policy <p1> evpn
//创建VPN实例并绑定EVPN属性,应用隧道策略。注意这里私网为IPv4网络类型,因此地址族为IPv4。
tunnel-policy <p1>
tunnel select-seq ipv6 srv6-te-policy load-balance-number 1
//配置VPN应用隧道策略时将优先选择SRv6 TE Policy类型的隧道。
ISIS 100
segment-routing ipv6 locator <PE1> auto-sid-disable
//IGP关联SRv6,用于传递SID信息搭建公网IPv6隧道。
segment-routing ipv6
encapsulation source-address 2001:DB8:1::1
locator <PE1> ipv6-prefix 2001:DB8:100:: 64 static 32
opcode ::1 end-x interface GE1/0/1 nexthop 2001:DB8:10::2 psp
opcode ::100 end-dt4 vpn-instance <vpn1> evpn
segment-list <pe1-pe2>
index 5 sid ipv6 2001:DB8:100::1
index 10 sid ipv6 2001:DB8:200::2
srv6-te policy <policy1> endpoint 2001:DB8:3::3 color 101
candidate-path preference 200
segment-list <pe1-pe2>
//创建SRv6隧道,为各节点定义SID值。并且创建SRv6 Candidate Path。
bgp 100
router-id 1.1.1.1
peer 2001:DB8:3::3 as-number 100
peer 2001:DB8:3::3 connect-interface LoopBack1
ipv4-family vpn-instance <vpn1>
import-route direct
advertise l2vpn evpn
segment-routing ipv6 locator <PE1> evpn
segment-routing ipv6 traffic-engineer best-effort evpn
peer 10.1.1.2 as-number 65410
l2vpn-family evpn
policy vpn-target
peer 2001:DB8:3::3 enable
peer 2001:DB8:3::3 advertise encap-type srv6
peer 2001:DB8:3::3 route-policy <rp1> import
//建立EVPN邻居关系,传递EVPN Type-5 IP-Prefix路由。
在VPN实例下,使能私网路由携带SID属性。
在VPN实例下,使能SRV6模式EVPN L3VPN迭代SRv6 TE Policy隧道的功能。
在VPN实例下,将私网路由通告为EVPN路由。
在EVPN地址族下,为通告出去的EVPN携带SRv6封装属性。
在EVPN地址族下,为EVPN路由着色以便路由可正确迭代SRv6 TE Policy隧道。
route-policy <rp1> permit node 10
apply extcommunity color 0:101


 被折叠的 条评论
为什么被折叠?
被折叠的 条评论
为什么被折叠?
 到【灌水乐园】发言


