


其实我的初衷就是用nexus来做maven私服的,在看了官方文档之后,我才发现自己真的是井底之蛙啊,哈哈!
登录nexus之后点击导航栏的"齿轮",这里面是nexus的服务管理和配置。

点击左侧菜单栏的"Repository"–>“Repositories”
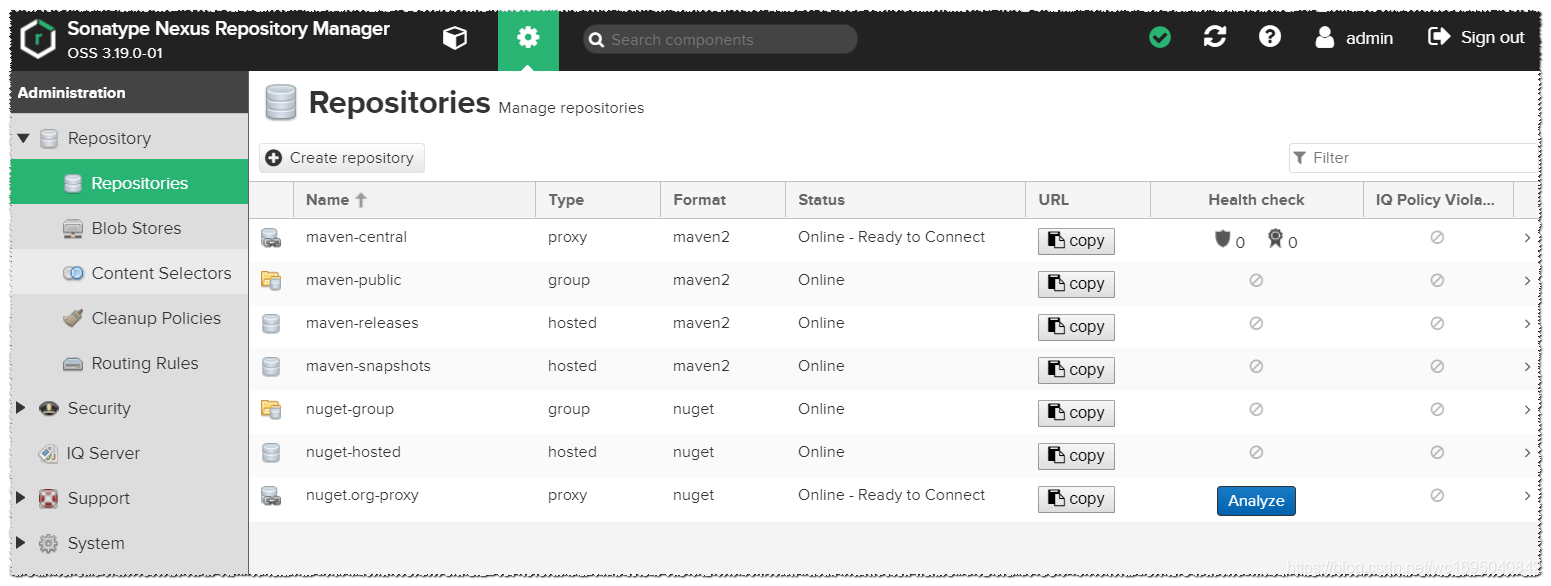
上面这些是nexus自带的仓库,已经有了maven和nuget的仓库了。当然,你完全可以直接使用这些默认建好的仓库或者对仓库的配置稍加修改再使用,我之前的公司就是用的这些自带的仓库。哈哈,这其实这是一种偷懒!
为了看得更清楚,我会先把这些自带的仓库删除,等到需要哪个仓库时再创建。
一、创建Blob Stores
1、Blob Stores介绍
repository是需要存储的,nexus以Blob格式存储。Blob Stores可以被一个或者多个仓库或者仓库组使用。默认的Blob Stores是基于文件系统的,可以简单的理解为服务器上的一个目录。
可以通过"Repository"–>“Blob Store"来管理后端的存储媒介。可以看到默认就存在了一个名为"default”,类型为"File"的Blob Store。
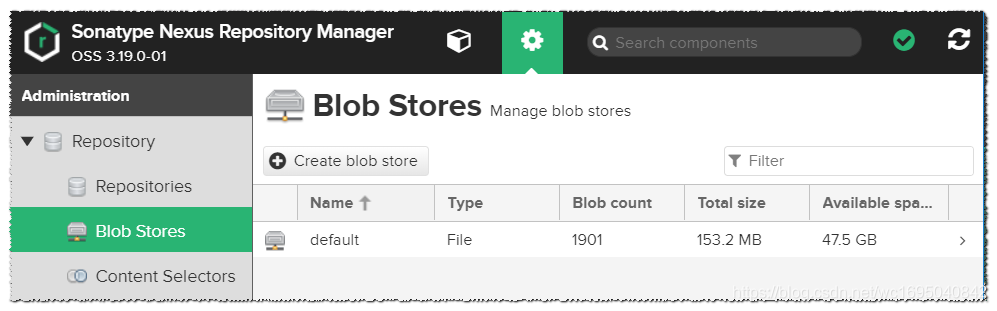
Blob Stores参数如下:
| 参数 | 含义 |
|---|---|
| Name | Blob Stores的名称,是唯一的 |
| Type | 类型,一般为File |
| Blob count | Blob数目 |
| Total size | 现在该存储目录的大小 |
| Available space | 可用的空间,就是存储目录所在分区的磁盘剩余空间 |
2、新建Blob Store
点击"Repository"–>“Blob Store”–>“Create blob store”
1)Type
Type的select选项框中有"File"和"S3"两个选项,这里选File就行。"S3"是亚马逊S3云存储,是不是很高大上,但是不好意思,我们用不上!
2)Name
名字就叫"maven-blob"吧,我也只能想出这样的名字了。
3)Enable Soft Quota
限制目录的大小。我这边就不限制了。如果要限制的话,就勾选上,并填上限制的条件和限制的值就OK了。
4)Path
在填入Name之后,path会自动生成。
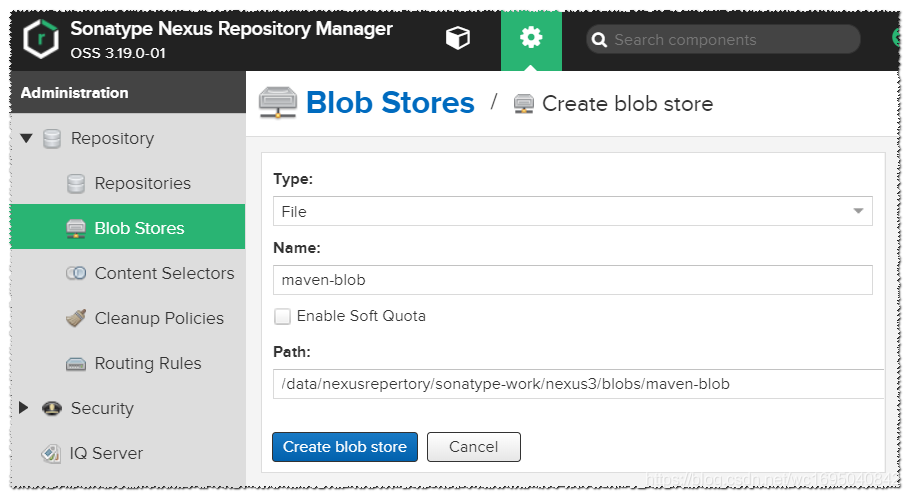
最后点击"Create blob store"就完成了。

二、创建hosted类型的仓库
| 用户可以把一些自己的构件手动上传至宿主仓库(Hosted Repository)中,比如自己封装的一些工具类,在中央仓库是找不到的。 |
1、maven中snapshot快照库和release发布库的区别
如果眼睛亮一点的话,就会发现之前nexus自带的仓库中有两个hosted仓库,分别是snapshot快照库和release发布库。那这两个库到底有什么区别呢?为什么要建两个hosted类型的maven仓库呢?
在maven的使用过程中,开发人员在开发阶段经常性的会有很多的公共库处于不稳定的状态,随时需要修改并发布,可能一天就要发布一次,遇到bug时甚至是一天发布N次。maven的依赖管理是基于版本管理的,对于发布状态的artifact,如果版本号相同,即使我们的镜像服务器上的组件比本地新,maven也不会主动下载的。如果开发人员在开发阶段是基于正式版本发布的,那么遇到这个问题,就需要升级组件的版本号,可这样就明显不符合要求和实际情况了。但是,如果是基于快照版本,那么问题就自问题就自然而然的解决了。
也就是说,snapshot快照仓库用于保存开发过程中的不稳定版本,release正式仓库是用来保存稳定的发行版本。
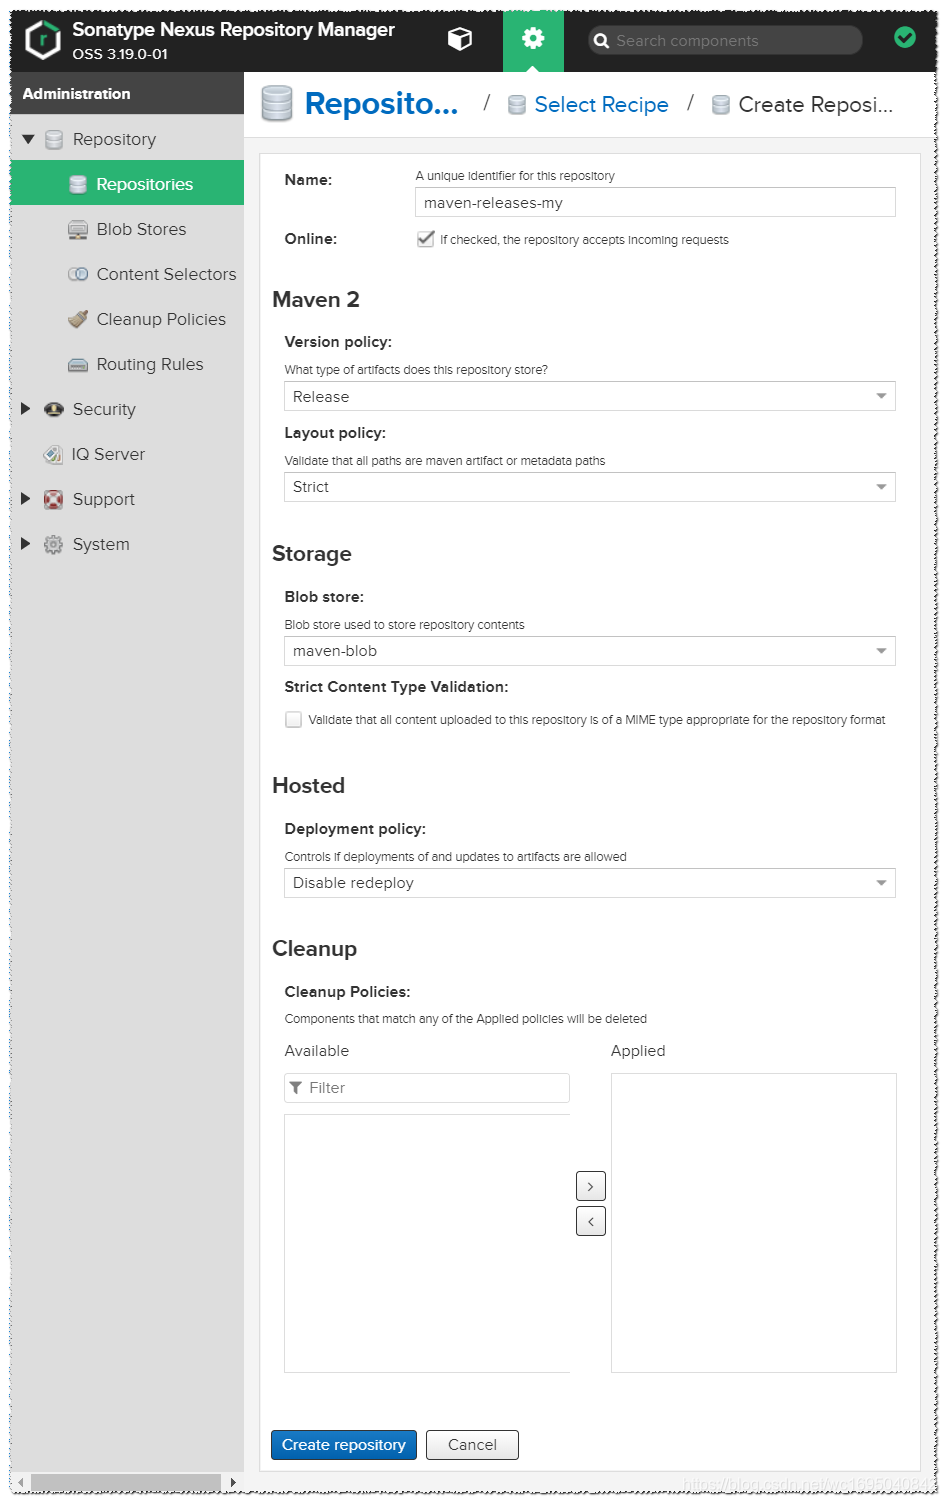
2、创建release发布库
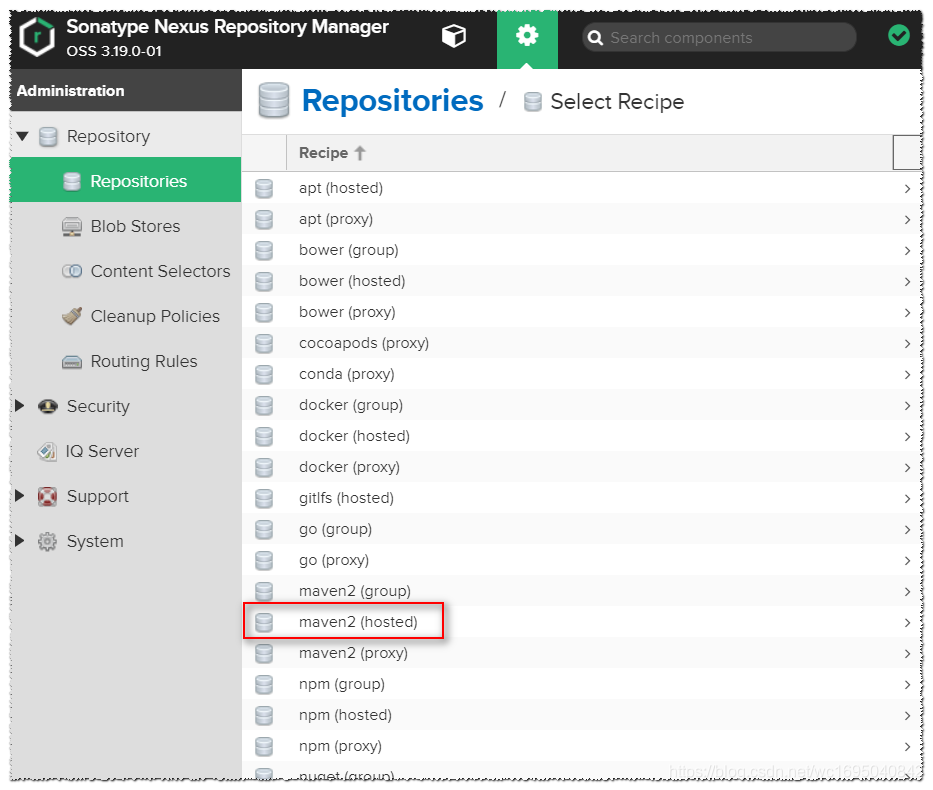
点击"Repository"–>“Repositories”–>“Create repository”,选择maven2(hosted)。
1)Name
又要起名字了,就叫maven-releases-my吧。
2)Online
勾选,可以设置这个仓库是在线还是离线。
3)Mavne 2
Version Policy:版本策略,有三个选项,分别是:
Release:正式版本
Snapshot:快照版本
Mixed:混合模式
这里选择Release。
Layout Policy:布局策略
Strict:严格
Permissive:宽松
这里选择默认的Strict。
4)Storage
Blob store:选择此仓库使用的Blob存储,这里选择之前创建的maven-blob。
Strict Content Type Validation:验证上传内容格式,这里不勾选。
5)Hosted
Deployment Policy:部署策略,有三个选项,分别是:
Allow Redeploy:允许重新部署
Disable Redeploy:禁止重新部署
Read-Only:只读
因为是release发布库,这里选"Disable Redeploy"。
6)Cleanup
Cleanup Policies:清除策略,这个是新增的功能,这里先不进行设置。
配置完成后见下图
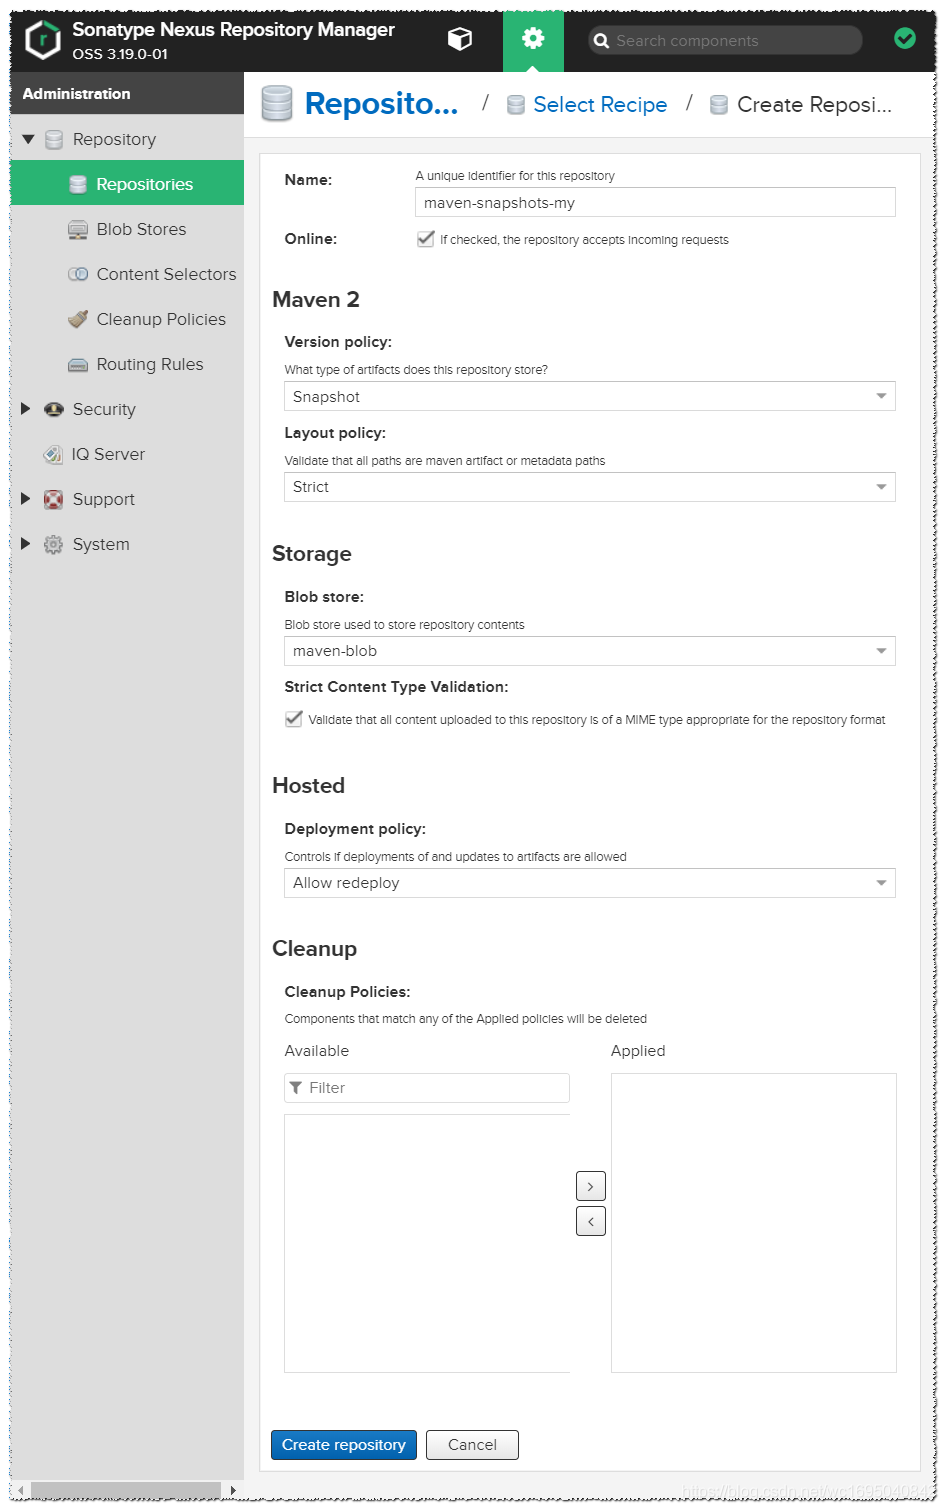
3、创建snapshot快照库
和创建release发布库一样,点击"Repository"–>“Repositories”–>“Create repository”,选择maven2(hosted)。
1)Name
起一个叫"maven-snapshots-my"。
maven-snapshots-my
2)Online
勾选,设置成在线
3)Mavne 2
Version Policy:这里选Snapshot
Layout Policy:选择默认的Strict
4)Storage
Blob store:选择maven-blob
Strict Content Type Validation:不勾选
5)Hosted
Deployment Policy:因为是snapshot快照库,所以这里选择"Allow Redeploy"
6)Cleanup
这里不设置。
三、创建一个proxy类型的仓库
| 代理仓库(Proxy Repository)是远程仓库的代理,当用户向这个代理仓库请求一个依赖包时,这个代理仓库会先在本地查找,如果存在,会直接提供给用户进行下载;如果在代理仓库本地查找不到,就会从配置的远程中央仓库中进行下载,下载到私服上之后再提供给用户下载。所以一般我们把私服架设在内网之中,这样可以节省外网带宽,并且大大提高了用户下载依赖的速度。 |
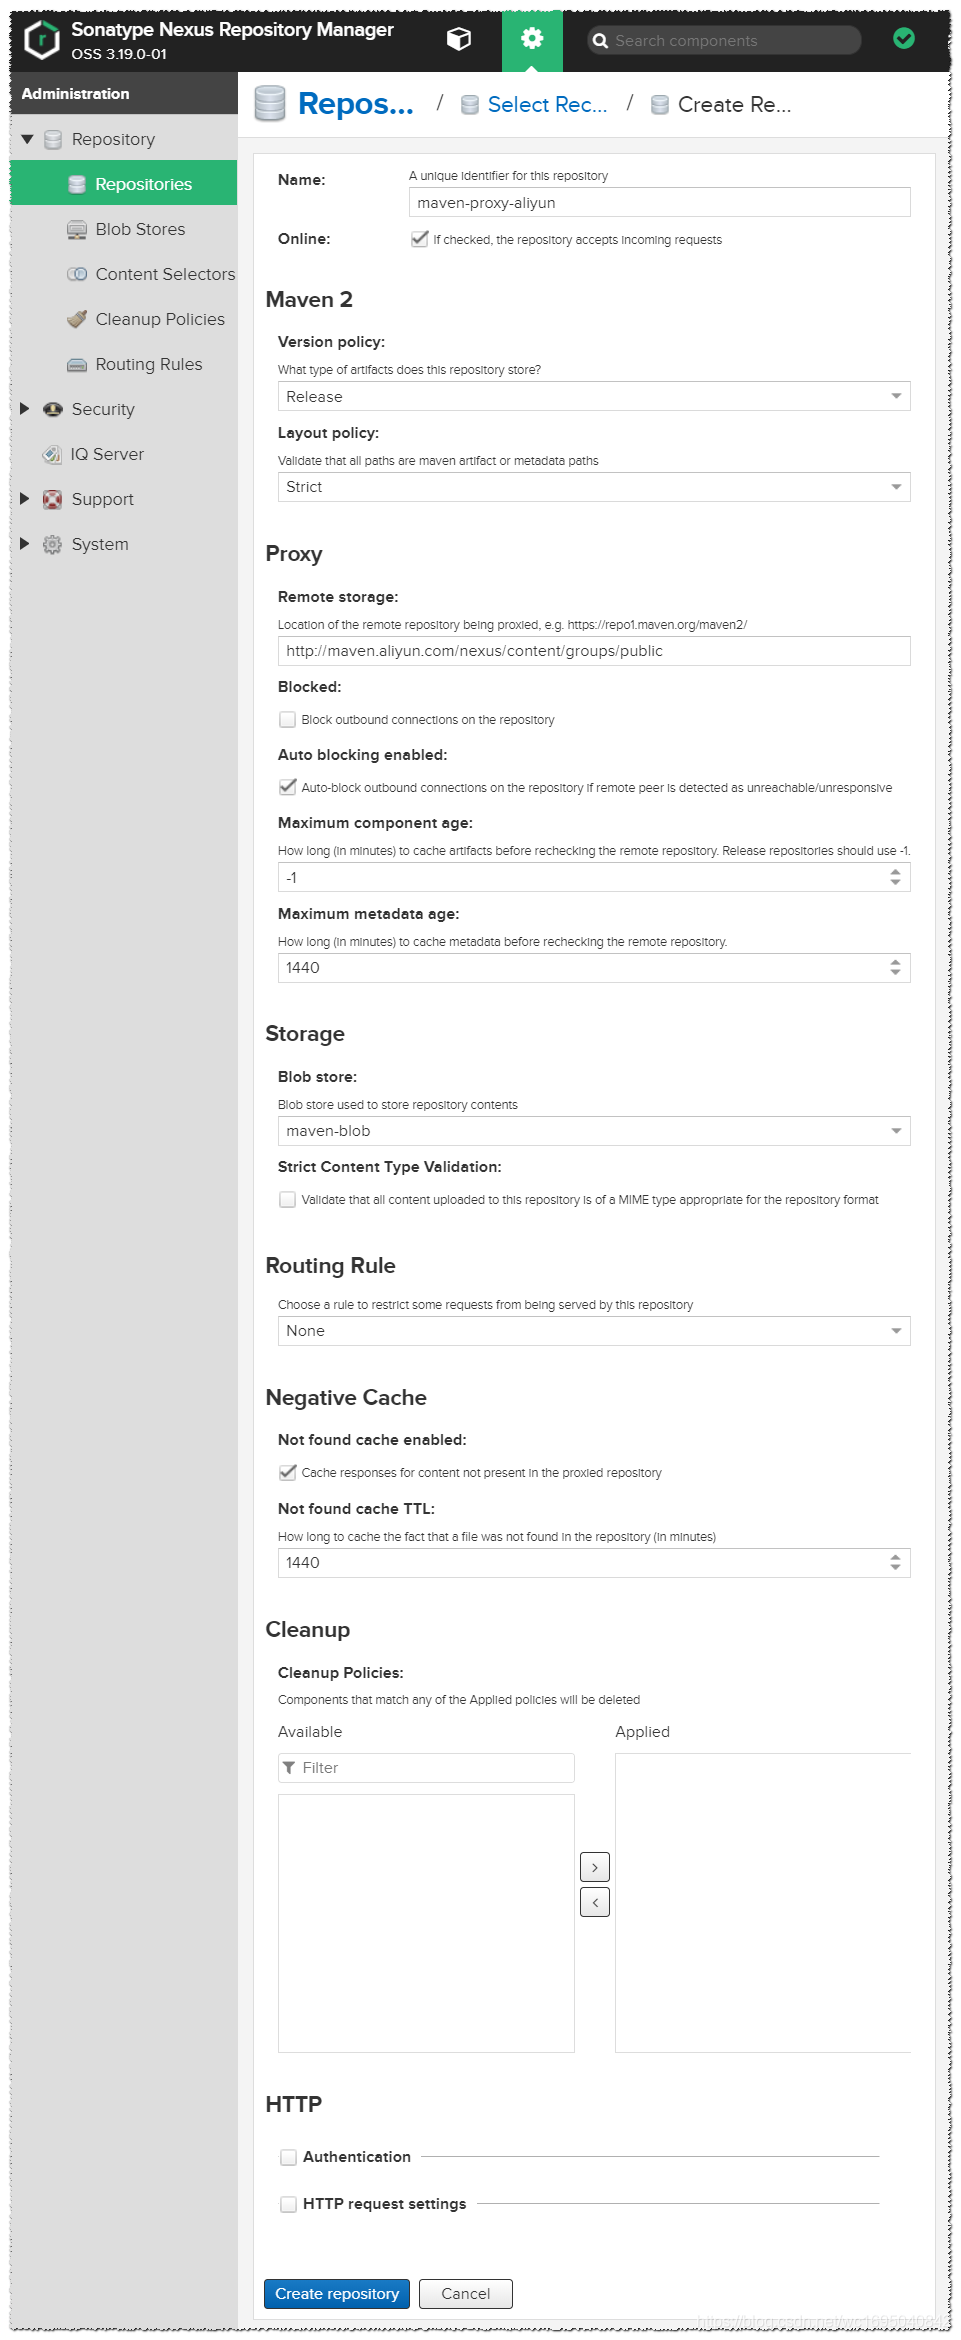
点击"Repository"–>“Repositories”–>“Create repository”,选择maven2(proxy)。
1)Name
因为我要代理阿里云的maven,所以就叫"maven-proxy-aliyun"
2)Online
勾选,设置成在线
3)Mavne 2
使用默认配置
4)Proxy
Remote storage:设置远程中央仓库的地址,我这里设置成阿里云的maven仓库地址—http://maven.aliyun.com/nexus/content/groups/public
其他的用默认值即可。
5)Storage
Blob store:选择maven-blob
Strict Content Type Validation:不勾选
6)Routing,Negative Cache,Cleanup,HTTP
都使用默认配置
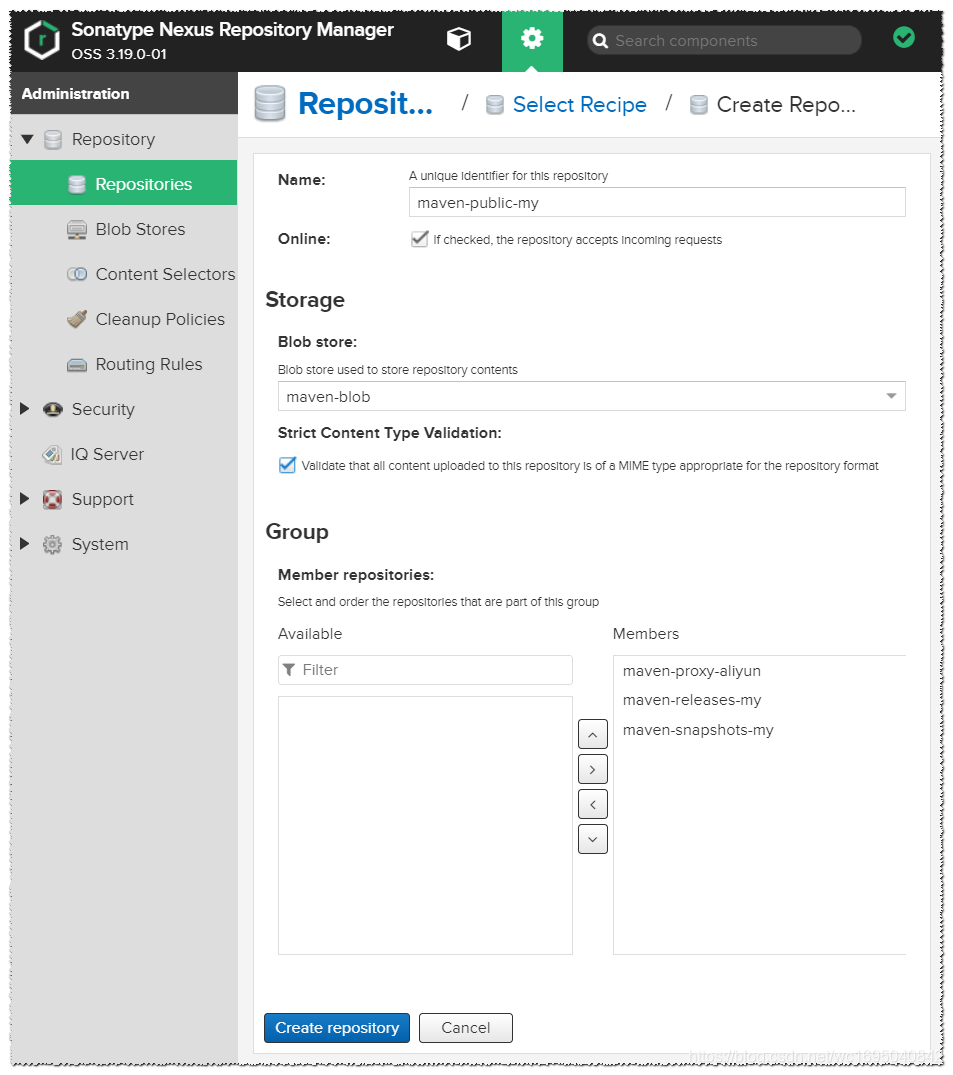
四、创建一个group类型的仓库
| 仓库组(Repository Group)的目的是将多个仓库(代理仓库和宿主仓库)聚合,对用户暴露统一的地址。当用户需要获取某一个依赖包时,请求的是仓库组的地址,系统将会根据仓库组配置的仓库顺序依次查找。 |
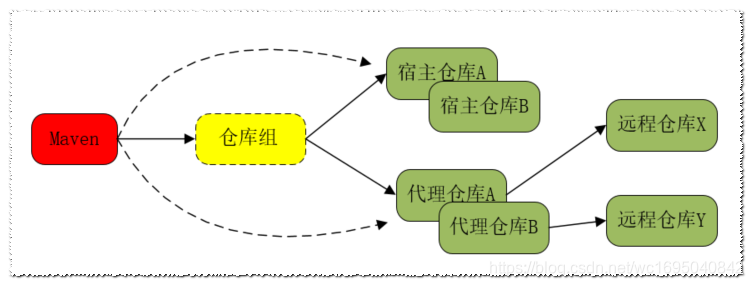
点击"Repository"–>“Repositories”–>“Create repository”,选择maven2(gruop)。
1)Name
maven-public-my
2)Online
勾选,设置成在线
3)Storage
Blob store:选择maven-blob
Strict Content Type Validation:勾选
4)Group
将左侧的Available中的仓库列表添加到右侧的Members中,顺序建议阿里云的代理仓库放第一,因为maven代理仓库下载顺序是从上往下的,建议将速度快的仓库放在最前面。
五、验证测试
| maven仓库建好之后,需要来验证下能不能用。巧合的是,我的java同事刚刚写了个工具类。那我就刚好拿来做打包和上传的验证了,哈哈。征得他的同意之后,我把代码放到了github上。地址是https://github.com/wangchaoforever/nexus_javatest.git, 我这里再准备一台服务器对上面的java代码进行打包测试。 |
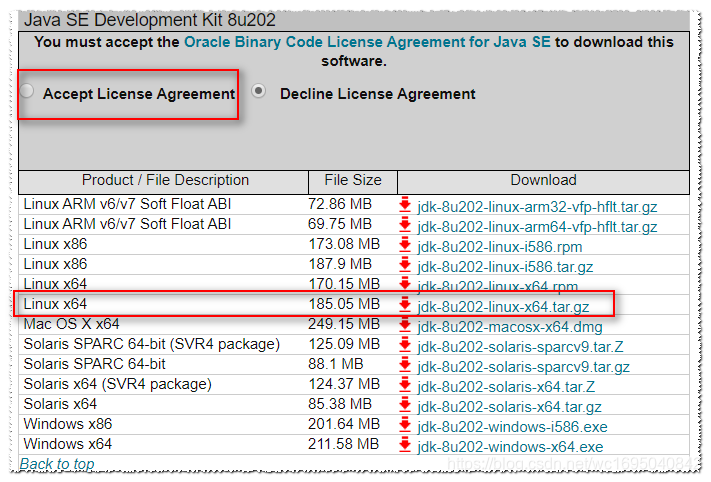
1、安装jdk
这边下载jdk1.8,下载地址为:https://www.oracle.com/technetwork/java/javase/downloads/java-archive-javase8-2177648.html
下载的时候记得点击"Accept License Agreement",然后下载对应版本的jdk。
安装jdk很简单,步骤为:解压–>添加环境变量–>使环境变量生–>验证
[root@localhost ~]# tar -zxf jdk-8u202-linux-x64.tar.gz -C /usr/local/
[root@localhost ~]# vim /etc/profile
[root@localhost ~]# tail -n 2 /etc/profile
export JAVA_HOME=/usr/local/jdk1.8.0_202
export PATH=$PATH:$JAVA_HOME/bin
[root@localhost ~]# source /etc/profile
[root@localhost ~]# java -version
java version "1.8.0_202"
Java(TM) SE Runtime Environment (build 1.8.0_202-b08)
Java HotSpot(TM) 64-Bit Server VM (build 25.202-b08, mixed mode)
2、安装maven
下载地址:http://maven.apache.org/download.cgi,这个是最新版本maven的下载地址,直接下载二进制的tar.gz的压缩包即可。
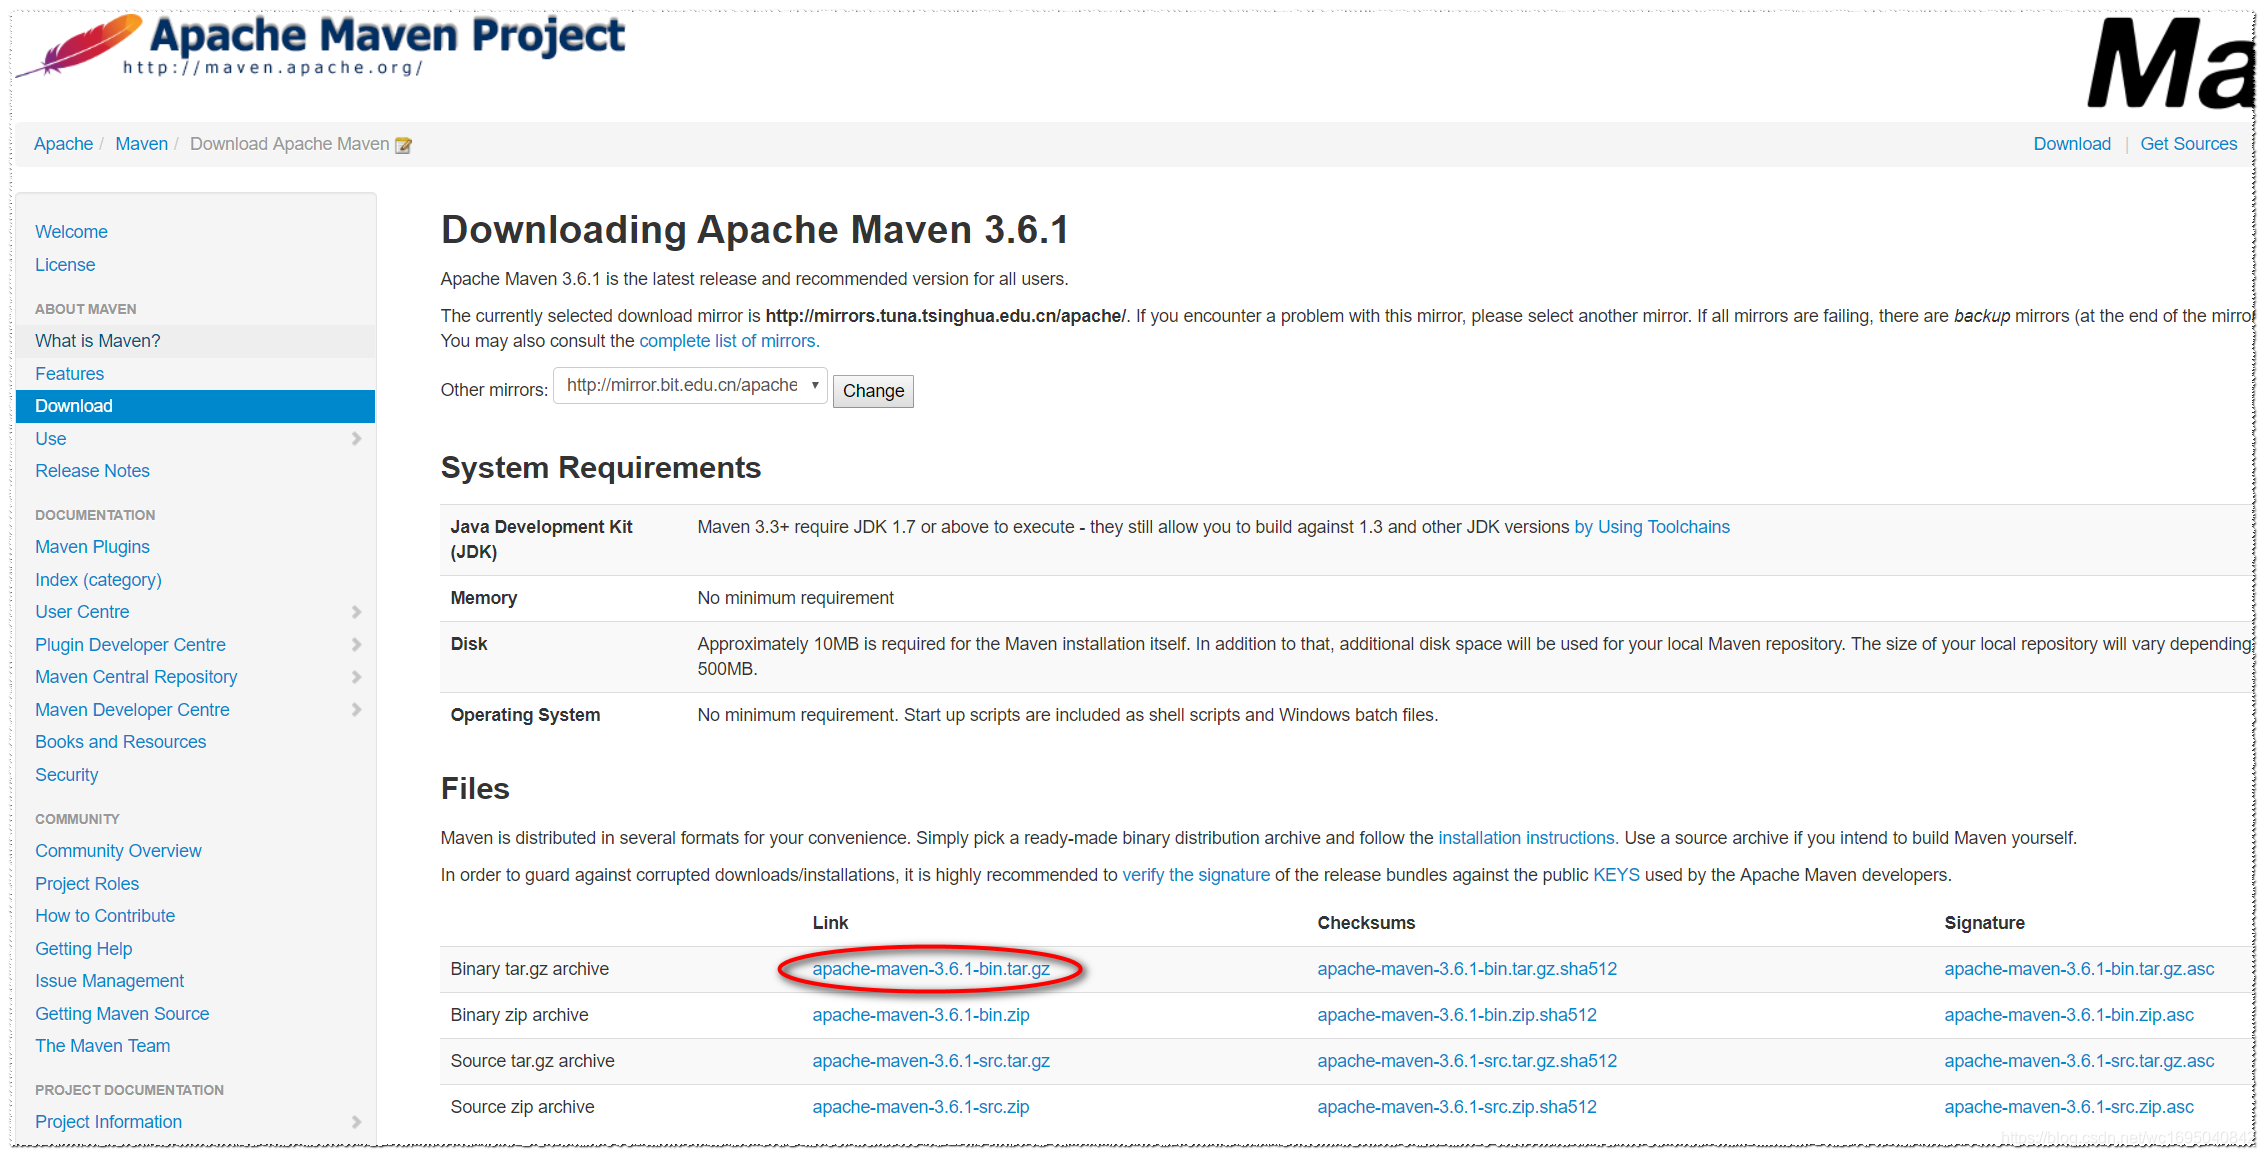
历史版本的maven下载地址为https://mirrors.tuna.tsinghua.edu.cn/apache/maven/maven-3/,你想要的这里都有。
安装步骤很简单,解压–>添加环境变–>使环境变量生–>验证
[root@localhost ~]# tar -zxf apache-maven-3.6.1-bin.tar.gz -C /usr/local/
[root@localhost ~]# vim /etc/profile
[root@localhost ~]# tail -n 2 /etc/profile
export MAVEN_HOME=/usr/local/apache-maven-3.6.1
export PATH=$PATH:$JAVA_HOME/bin:$MAVEN_HOME/bin
[root@localhost ~]# source /etc/profile
[root@localhost ~]# mvn -v
Apache Maven 3.6.1 (d66c9c0b3152b2e69ee9bac180bb8fcc8e6af555; 2019-04-05T03:00:29+08:00)
Maven home: /usr/local/apache-maven-3.6.1
Java version: 1.8.0_202, vendor: Oracle Corporation, runtime: /usr/local/jdk1.8.0_202/jre
Default locale: en_US, platform encoding: UTF-8
OS name: "linux", version: "3.10.0-693.el7.x86_64", arch: "amd64", family: "unix"
3、验证从私服下载
接下来修改maven的配置文件,让maven用上我们搭建的私服。我这里配置文件在/usr/local/apache-maven-3.6.1/conf/settings.xml,修改前记得备份哦。
<?xml version="1.0" encoding="UTF-8"?>

<settings xmlns="http://maven.apache.org/SETTINGS/1.0.0"
          xmlns:xsi="http://www.w3.org/2001/XMLSchema-instance"
          xsi:schemaLocation="http://maven.apache.org/SETTINGS/1.0.0 http://maven.apache.org/xsd/settings-1.0.0.xsd">
  <!--本地仓库地址-->
  <localRepository>/data/localrepository</localRepository>

  <pluginGroups>
    <!-- pluginGroup
     | Specifies a further group identifier to use for plugin lookup.
    <pluginGroup>com.your.plugins</pluginGroup>
    -->
  </pluginGroups>

  <proxies>
    <!-- proxy
     | Specification for one proxy, to be used in connecting to the network.
     |
    <proxy>
      <id>optional</id>
      <active>true</active>
      <protocol>http</protocol>
      <username>proxyuser</username>
      <password>proxypass</password>
      <host>proxy.host.net</host>
      <port>80</port>
      <nonProxyHosts>local.net|some.host.com</nonProxyHosts>
    </proxy>
    -->
  </proxies>

 <servers>
    <!--第一个nexus-wang要和下面的mirror中的id一致,代表拉取是也需要进行身份校验-->
    <server>
      <id>nexus-wang</id>
      <username>admin</username>
      <password>Abc@123456</password>
    </server>
     <server>
      <!--这两个前面讲过,是jar上传时候进行的验证,id对应的是pom中id属性的值-->
      <id>releases</id>
      <username>admin</username>
      <password>Abc@123456</password>
    </server>
     <server>
      <id>snapshots</id>
      <username>admin</username>
      <password>Abc@123456</password>
    </server>
  </servers>

  <mirrors>
    <mirror>
        <id>nexus-wang</id>
        <name>internal nexus repository</name>
        <!--镜像采用配置好的组的地址-->
        <url>http://192.168.0.125:9081/repository/maven-public-my/</url>
        <mirrorOf>!internal.repo,*</mirrorOf>
    </mirror>
  </mirrors>

  <profiles>
		<profile>
		<!--ID用来确定该profile的唯一标识-->
           <id>jdk-1.8</id>
           <activation>
               <activeByDefault>true</activeByDefault>
               <jdk>1.8</jdk>
           </activation>
           <properties>
               <maven.compiler.source>1.8</maven.compiler.source>
               <maven.compiler.target>1.8</maven.compiler.target>
               <maven.compiler.compilerVersion>1.8</maven.compiler.compilerVersion>
           </properties>
   </profile>

	<profile>
	  <id>nexus-pr</id>
	   <!-- 远程仓库列表 -->
	  <repositories>
		<repository>
		  <id>nexus</id>
		  <name>Nexus Central</name>
		 <!-- 虚拟的URL形式,指向镜像的URL-->
		  <url>http://192.168.0.125:9081/repository/maven-public-my/</url>
		  <layout>default</layout>
		 <!-- 表示可以从这个仓库下载releases版本的构件-->
		  <releases>
			<enabled>true</enabled>
		  </releases>
		 <!-- 表示可以从这个仓库下载snapshot版本的构件 -->
		  <snapshots>
			<enabled>true</enabled>
		  </snapshots>
		</repository>
	  </repositories>


	   <!-- 插件仓库列表 -->
	  <pluginRepositories>
		<pluginRepository>
		  <id>nexus</id>
		  <name>Nexus Central</name>
		  <url>http://192.168.0.125:9081/repository/maven-public-my/</url>
		  <layout>default</layout>
		  <snapshots>
			<enabled>true</enabled>
		  </snapshots>
		  <releases>
			 <enabled>true</enabled>
		  </releases>
		</pluginRepository>
	  </pluginRepositories>
	   </profile>
  </profiles>

  <activeProfiles>
     <!--需要激活 <profile>中的ID才生效-->
    <activeProfile>nexus-pr</activeProfile>
    <activeProfile>jdk-1.8</activeProfile>
  </activeProfiles>


</settings>
再将上面github上的代码克隆到服务器上。

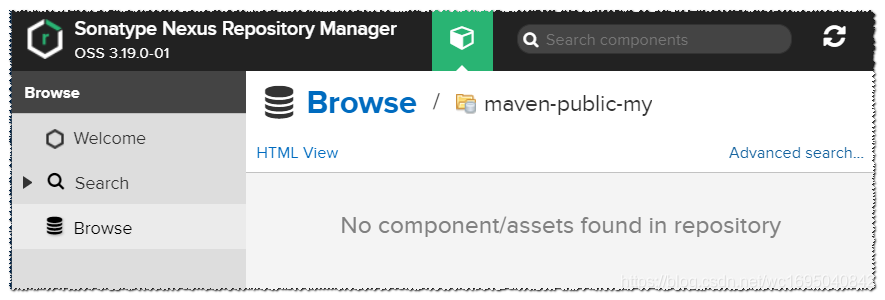
在打包之前,先看一眼现在私服上的maven-public-my仓库是没有任何的构件的。
好了,万事具备,开始打包吧。
[root@localhost test2]# ls
nexus_javatest
[root@localhost test2]# cd nexus_javatest/
[root@localhost nexus_javatest]# ls
hgbUtil.iml pom.xml src
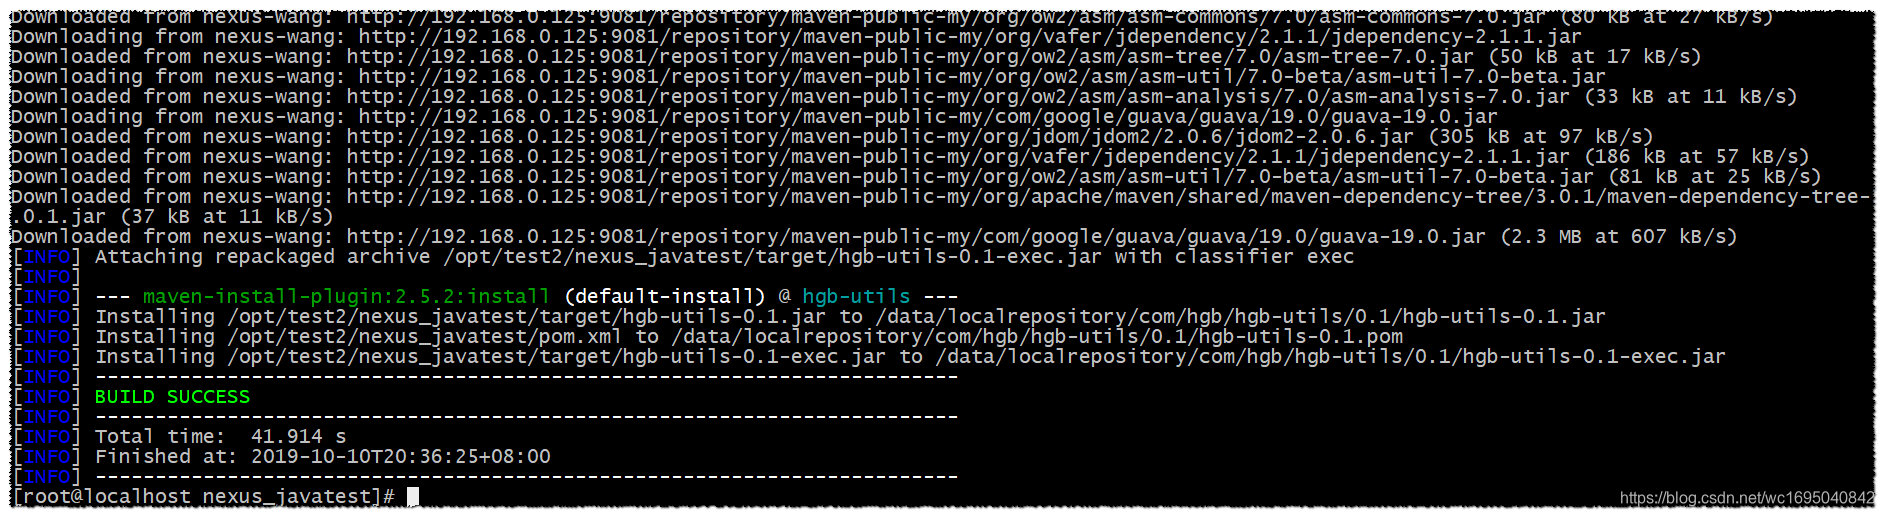
[root@localhost nexus_javatest]# mvn clean install -DskipTests=true
打包的过程中一直在从私服中下载依赖包,这里截取一小部分看一下。
然后再看一眼私服上的maven-public-my仓库。
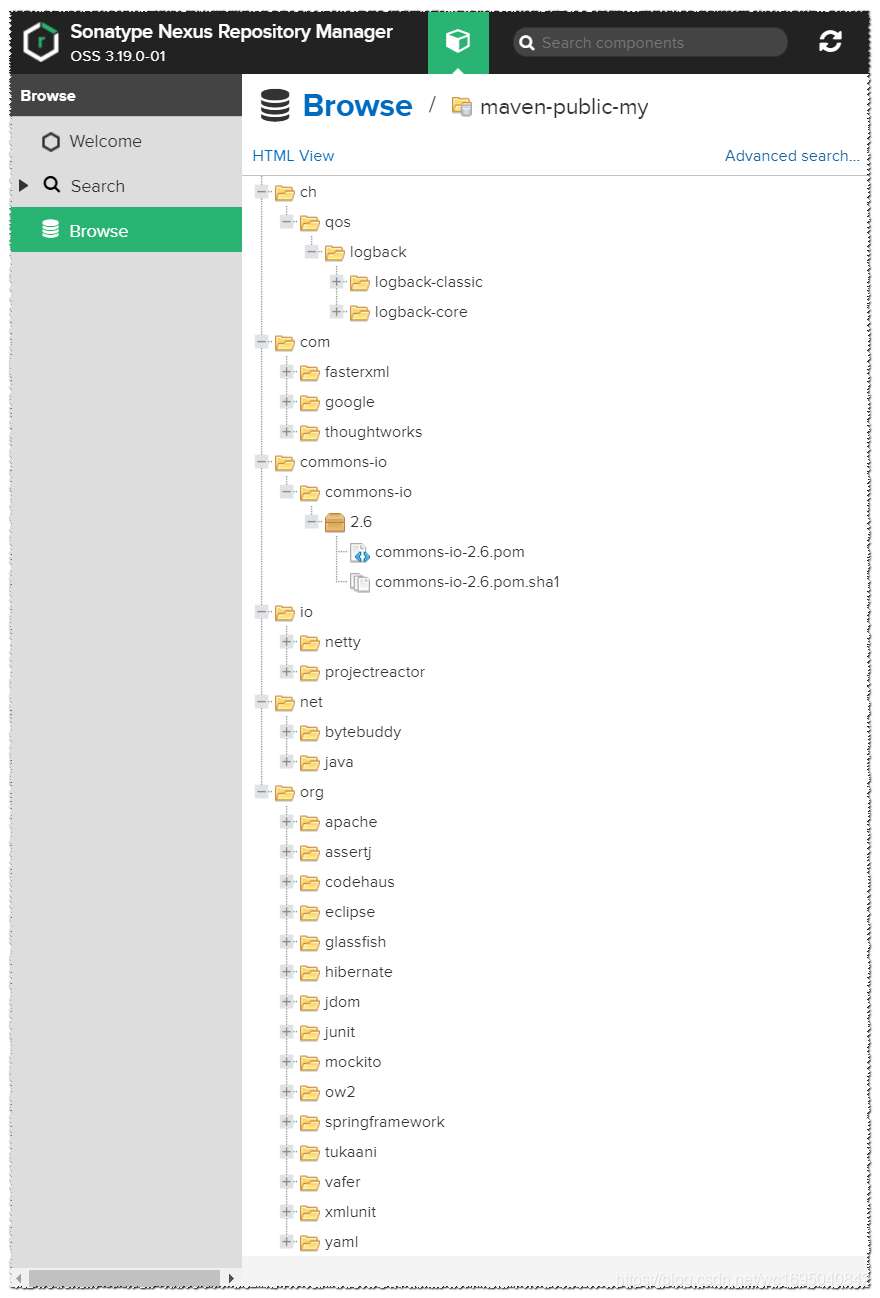
跟预想的一样,私服上已经从远程中央仓库下载了刚才打包所需的依赖构件。
4、验证将jar包上传到私服
需在pom.xml文件中加入distributionManagement,加好之后的pom文件如下
<?xml version="1.0" encoding="UTF-8"?>
<project xmlns="http://maven.apache.org/POM/4.0.0" xmlns:xsi="http://www.w3.org/2001/XMLSchema-instance"
	xsi:schemaLocation="http://maven.apache.org/POM/4.0.0 http://maven.apache.org/xsd/maven-4.0.0.xsd">
	<modelVersion>4.0.0</modelVersion>

	<parent>
		<groupId>org.springframework.boot</groupId>
		<artifactId>spring-boot-starter-parent</artifactId>
		<version>2.1.3.RELEASE</version>
	</parent>

	<groupId>com.hgb</groupId>
	<artifactId>hgb-utils</artifactId>
	<version>0.1</version>
	<packaging>jar</packaging>

	<properties>
		<java.version>1.8</java.version>
	</properties>

	<dependencies>
		<dependency>
			<groupId>org.springframework.boot</groupId>
			<artifactId>spring-boot-starter</artifactId>
		</dependency>

		<dependency>
			<groupId>org.springframework.boot</groupId>
			<artifactId>spring-boot-starter-web</artifactId>
		</dependency>

		<dependency>
			<groupId>org.springframework.boot</groupId>
			<artifactId>spring-boot-starter-test</artifactId>
			<scope>test</scope>
		</dependency>

		<!--入参校验依赖 start-->
		<dependency>
			<groupId>org.hibernate</groupId>
			<artifactId>hibernate-validator</artifactId>
			<version>6.0.12.Final</version>
		</dependency>
		<!--入参校验依赖 end-->

		<!--mysql依赖 start-->
		<dependency>
			<groupId>mysql</groupId>
			<artifactId>mysql-connector-java</artifactId>
			<version>8.0.12</version>
		</dependency>
		<!--mysql依赖 end-->

	</dependencies>


	<build>
		<plugins>
			<plugin>
				<groupId>org.apache.maven.plugins</groupId>
				<artifactId>maven-compiler-plugin</artifactId>
				<version>3.7.0</version>
				<configuration>
					<source>${java.version}</source>
					<target>${java.version}</target>
					<showWarnings>true</showWarnings>
					<encoding>${project.build.sourceEncoding}</encoding>
				</configuration>
			</plugin>

			<plugin>
				<groupId>org.springframework.boot</groupId>
				<artifactId>spring-boot-maven-plugin</artifactId>
				<configuration>
					<classifier>exec</classifier>
				</configuration>
			</plugin>

			<plugin>
				<groupId>org.apache.maven.plugins</groupId>
				<artifactId>maven-surefire-plugin</artifactId>
				<configuration>
					<skipTests>true</skipTests>
					<testFailureIgnore>true</testFailureIgnore>
				</configuration>
			</plugin>
		</plugins>
	</build>


<!-- 使用分发管理将本项目打成jar包,直接上传到指定服务器 -->
  <distributionManagement>
    <!--正式版本-->
    <repository>
        <!-- nexus服务器中用户名:在settings.xml中<server>的id-->
        <id>releases</id>
        <!-- 这个名称自己定义 -->
        <name>Release repository</name>
        <url>http://192.168.0.125:9081/repository/maven-releases-my/</url>
    </repository>
    <!--快照-->
    <snapshotRepository>
        <!-- nexus服务器中用户名:在settings.xml中<server>的id-->
        <id>snapshots</id>
        <!-- 这个名称自己定义 -->
        <name>Snapshots repository</name>
        <url>http://192.168.0.125:9081/repository/maven-snapshots-my/</url>
    </snapshotRepository>
  </distributionManagement>

</project>
然后在pom.xml文件的同级目录中执行mvn deploy来将项目打包上传到私服。
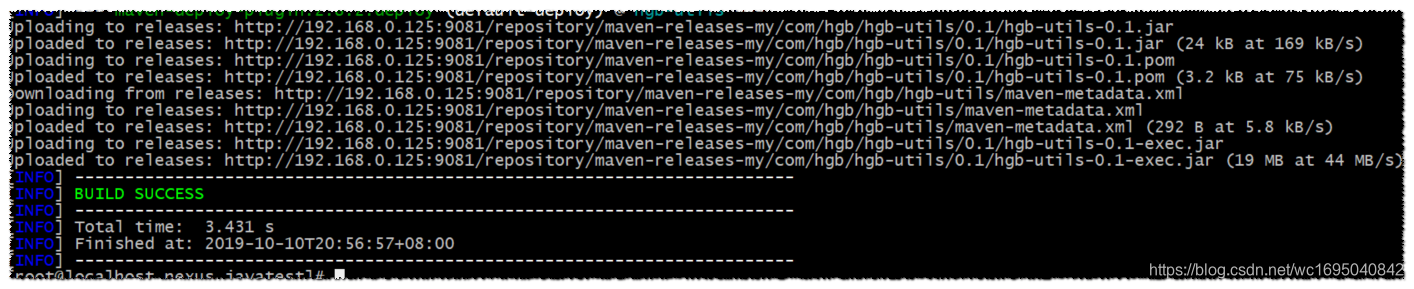
上传完成之后,去看下私服中的maven-public-my仓库。
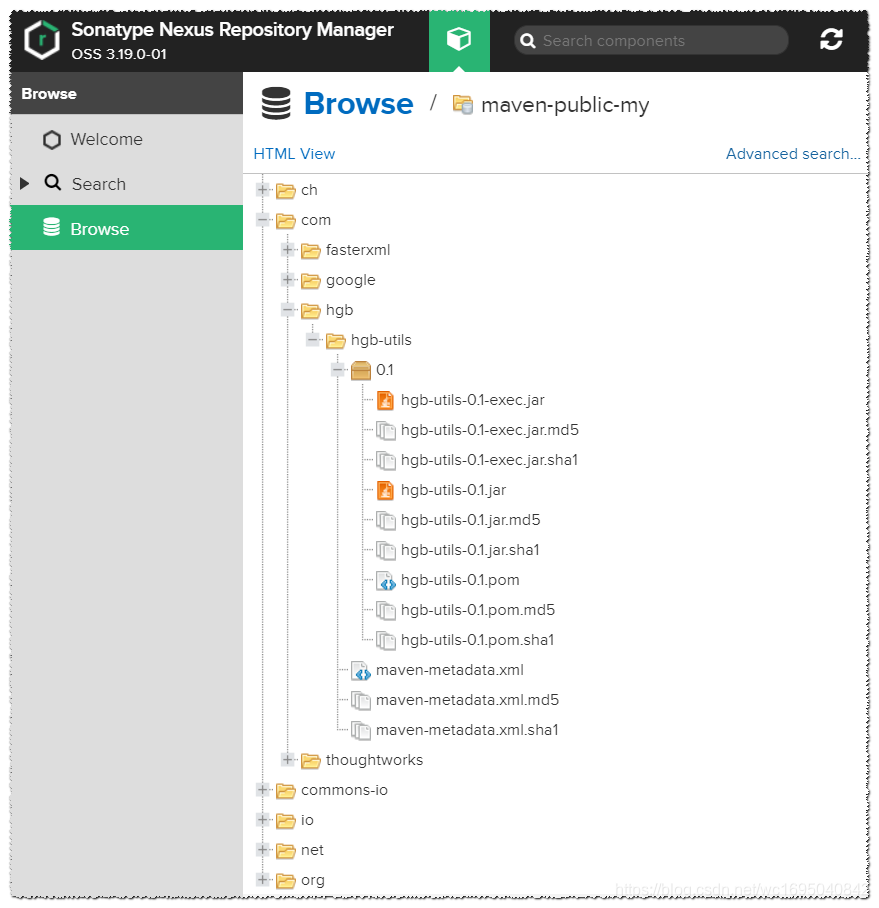
有了,完美上传。
其实准确点说应该是上传到了mavne-release-my仓库,因为maven-public-my仓库聚合了三个仓库,所以能看到。
参考文章:
https://help.sonatype.com/repomanager3/formats/maven-repositories
https://www.liyang.pro/archives/128
https://yhaing.github.io/2018/06/20/Maven私库Nexus3搭建使用/
https://www.jianshu.com/p/86f5f2374ebf
https://www.cnblogs.com/supiaopiao/p/9804733.html
http://www.eryajf.net/1851.html


 1358
1358

 被折叠的 条评论
为什么被折叠?
被折叠的 条评论
为什么被折叠?
 到【灌水乐园】发言


