


目录
1、环境准备
我只有一台CentOS 7.9.2009虚拟机,希望搭建一个完整的k8s集群用来学习测试,这里我的配置是 2C 2G 的腾讯云服务器,其实仅仅是搭建一个k8s集群并不需要多少资源。
确保系统已经更新,并且禁用 Swap(Kubernetes 不支持 Swap,必须禁用)
sudo swapoff -a
sudo sed -i '/swap/d' /etc/fstab
sudo yum update -y
2、安装依赖工具
安装 Docker 和其他必要的工具
sudo yum install -y yum-utils device-mapper-persistent-data lvm2
sudo yum-config-manager --add-repo https://download.docker.com/linux/centos/docker-ce.repo
sudo yum install -y docker-ce
sudo systemctl start docker
sudo systemctl enable docker
3、配置 Kubernetes 的国内 Yum 源
这个配置方法我们可以参考阿里镜像站的最新配置方式,因为它的地址可能会发生变化。kubernetes镜像_kubernetes下载地址_kubernetes安装教程-阿里巴巴开源镜像站
cat <<EOF | sudo tee /etc/yum.repos.d/kubernetes.repo
[kubernetes]
name=Kubernetes
baseurl=https://mirrors.aliyun.com/kubernetes-new/core/stable/v1.28/rpm/
enabled=1
gpgcheck=1
gpgkey=https://mirrors.aliyun.com/kubernetes-new/core/stable/v1.28/rpm/repodata/repomd.xml.key
EOF
4. 安装 Kubernetes 组件
安装 kubeadm、kubelet 和 kubectl
sudo yum install -y kubelet kubeadm kubectl
sudo systemctl enable kubelet
5、初始化 Kubernetes 集群
使用 kubeadm 初始化 Kubernetes 集群:
sudo kubeadm init --pod-network-cidr=192.168.0.0/16如果不出意外的话到这里k8s就基本安装成功了,但是不出意外是不可能的。
下面分享一下我遇到的意外以及对应的解决方法。
1. 容器运行时没有正常运行
[root@VM-12-2-centos yum.repos.d]# kubeadm init --pod-network-cidr=192.168.0.0/16
I0827 14:44:43.282383   30245 version.go:256] remote version is much newer: v1.31.0; falling back to: stable-1.28
[init] Using Kubernetes version: v1.28.13
[preflight] Running pre-flight checks
error execution phase preflight: [preflight] Some fatal errors occurred:
        [ERROR CRI]: container runtime is not running: output: time="2024-08-27T14:44:45+08:00" level=fatal msg="validate service connection: validate CRI v1 runtime API for endpoint \"unix:///var/run/containerd/containerd.sock\": rpc error: code = Unimplemented desc = unknown service runtime.v1.RuntimeService"
, error: exit status 1
[preflight] If you know what you are doing, you can make a check non-fatal with `--ignore-preflight-errors=...`
To see the stack trace of this error execute with --v=5 or higher
这个错误是由于 Kubernetes 初始化过程中的 CRI (Container Runtime Interface) 相关的问题导致的。错误提示的是容器运行时(container runtime)没有正常运行,导致 kubeadm 无法与之通信。
1.1. 可能的原因
- Docker 和 Containerd 之间的兼容性问题:Kubernetes 1.24 版本及以后,默认不再使用 Docker 作为容器运行时,而是使用 Containerd 或者其他兼容的容器运行时,如果系统上 Docker 和 Containerd 之间配置不当,可能会引发这个错误。
- Containerd 没有正确配置或运行:Kubernetes 依赖的容器运行时(如 Containerd)没有正确配置或启动,导致 kubeadm 无法正常初始化集群。
查看自己的k8s版本,可以在kubeadm init 时通过终端打印的日志确认版本,也可以通过下面的命令查看,但是集群没有初始化完成则无法通过kubectl version 查看。
[root@mymaster ~]# kubectl version
Client Version: v1.28.13
Kustomize Version: v5.0.4-0.20230601165947-6ce0bf390ce3
Server Version: v1.28.13
1.2. 解决办法
由于我安装的k8s版本是v1.28.13,也就是说默认不再使用 Docker 作为容器运行时,我们可以重点排查Containerd服务和k8s的连通性问题。
1.检查Containerd服务是否正常运行:
[root@mymaster ~]# systemctl status containerd.service
● containerd.service - containerd container runtime
   Loaded: loaded (/usr/lib/systemd/system/containerd.service; disabled; vendor preset: disabled)
Active: active (running) since Wed 2024-08-28 15:29:26 CST; 5 days ago2.检查 CRI 配置
确保 Kubernetes 使用的是正确的 CRI 配置文件。检查 /etc/crictl.yaml 是否存在并正确配置:
如果文件不存在,可以创建一个:
sudo cat <<EOF | sudo tee /etc/crictl.yaml
runtime-endpoint: unix:///var/run/containerd/containerd.sock
image-endpoint: unix:///var/run/containerd/containerd.sock
timeout: 10
debug: false
EOF
3.手动重启containerd
sudo systemctl restart containerd
crictl version
crictl info
如果 crictl 无法连接到 Containerd,可能是因为 CRI socket 没有正确配置。
4.检查 Containerd 配置文件
如果上述方法无法解决问题,可以进一步检查containerd配置文件,确保配置正确无误。
查看 /etc/containerd/config.toml 文件,确保配置正确。如果没有此文件,可以生成默认配置并编辑:
sudo containerd config default | sudo tee /etc/containerd/config.toml确保 systemd 是 cgroup 驱动程序。在配置文件中找到 SystemdCgroup 选项,并将其设置为 true:
[plugins."io.containerd.grpc.v1.cri".containerd.runtimes.runc]
  [plugins."io.containerd.grpc.v1.cri".containerd.runtimes.runc.options]
    SystemdCgroup = true

#如果有下面这行,请注释掉
#disabled_plugins = ["cri"]
下面是我的配置文件:
#   Copyright 2018-2022 Docker Inc.

#   Licensed under the Apache License, Version 2.0 (the "License");
#   you may not use this file except in compliance with the License.
#   You may obtain a copy of the License at

#       http://www.apache.org/licenses/LICENSE-2.0

#   Unless required by applicable law or agreed to in writing, software
#   distributed under the License is distributed on an "AS IS" BASIS,
#   WITHOUT WARRANTIES OR CONDITIONS OF ANY KIND, either express or implied.
#   See the License for the specific language governing permissions and
#   limitations under the License.

#启用cri插件
#disabled_plugins = ["cri"]

#root = "/var/lib/containerd"
#state = "/run/containerd"
#subreaper = true
#oom_score = 0

#[grpc]
#  address = "/run/containerd/containerd.sock"
#  uid = 0
#  gid = 0

#[debug]
#  address = "/run/containerd/debug.sock"
#  uid = 0
#  gid = 0
#  level = "info"

# 配置 SystemdCgroup
[plugins."io.containerd.grpc.v1.cri".containerd.runtimes.runc]
  [plugins."io.containerd.grpc.v1.cri".containerd.runtimes.runc.options]
    SystemdCgroup = true

[plugins."io.containerd.grpc.v1.cri".registry.mirrors]
  [plugins."io.containerd.grpc.v1.cri".registry.mirrors."docker.io"]
    endpoint = ["https://registry.aliyuncs.com"]
  [plugins."io.containerd.grpc.v1.cri".registry.mirrors."k8s.gcr.io"]
    endpoint = ["https://registry.aliyuncs.com/google_containers"]
  [plugins."io.containerd.grpc.v1.cri".registry.mirrors."quay.io"]
    endpoint = ["https://quay-mirror.qiniu.com"]
在编辑完配置文件后,重启 Containerd 和 Docker:
sudo systemctl restart containerd
sudo systemctl restart docker
#使用 crictl 工具验证 Kubernetes 与容器运行时的连接
sudo crictl info
这应该显示容器运行时的详细信息,如果有任何错误,则说明 CRI 和 Kubernetes 之间的通信仍然有问题。
2. 初始化拉取镜像卡住
[root@VM-12-2-centos yum.repos.d]# kubeadm init --pod-network-cidr=192.168.0.0/16
W0827 15:06:07.983250    9556 version.go:104] could not fetch a Kubernetes version from the internet: unable to get URL "https://dl.k8s.io/release/stable-1.txt": Get "https://cdn.dl.k8s.io/release/stable-1.txt": context deadline exceeded (Client.Timeout exceeded while awaiting headers)
W0827 15:06:07.983313    9556 version.go:105] falling back to the local client version: v1.28.13
[init] Using Kubernetes version: v1.28.13
[preflight] Running pre-flight checks
[preflight] Pulling images required for setting up a Kubernetes cluster
[preflight] This might take a minute or two, depending on the speed of your internet connection
[preflight] You can also perform this action in beforehand using 'kubeadm config images pull'
一般来说这一步会卡非常久,因为我们国内的网络无法访问和下载k8s官方的镜像。
2.1. 使用国内的镜像源(无法解决问题)
这个时候如果去网上搜索通常会建议在执行init操作的时候加上参数 --image-repository registry.aliyuncs.com/google_containers 来指定使用阿里镜像源。但这种方法亲测无效,因为阿里镜像源拉下来的镜像命名和k8s初始化所需要的默认镜像名不对应,无法直接使用。
[root@VM-12-2-centos yum.repos.d]# sudo kubeadm init \
>   --pod-network-cidr=192.168.0.0/16 \
>   --image-repository registry.aliyuncs.com/google_containers
I0827 15:13:14.000174   13371 version.go:256] remote version is much newer: v1.31.0; falling back to: stable-1.28
W0827 15:13:24.000473   13371 version.go:104] could not fetch a Kubernetes version from the internet: unable to get URL "https://dl.k8s.io/release/stable-1.28.txt": Get "https://cdn.dl.k8s.io/release/stable-1.28.txt": context deadline exceeded (Client.Timeout exceeded while awaiting headers)
W0827 15:13:24.000501   13371 version.go:105] falling back to the local client version: v1.28.13
[init] Using Kubernetes version: v1.28.13
[preflight] Running pre-flight checks
[preflight] Pulling images required for setting up a Kubernetes cluster
[preflight] This might take a minute or two, depending on the speed of your internet connection
[preflight] You can also perform this action in beforehand using 'kubeadm config images pull'
W0827 15:13:38.997537   13371 checks.go:835] detected that the sandbox image "registry.k8s.io/pause:3.6" of the container runtime is inconsistent with that used by kubeadm. It is recommended that using "registry.aliyuncs.com/google_containers/pause:3.9" as the CRI sandbox image.
[certs] Using certificateDir folder "/etc/kubernetes/pki"
[certs] Generating "ca" certificate and key
[certs] Generating "apiserver" certificate and key
[certs] apiserver serving cert is signed for DNS names [kubernetes kubernetes.default kubernetes.default.svc kubernetes.default.svc.cluster.local vm-12-2-centos] and IPs [10.96.0.1 10.0.12.2]
[certs] Generating "apiserver-kubelet-client" certificate and key
[certs] Generating "front-proxy-ca" certificate and key
[certs] Generating "front-proxy-client" certificate and key
[certs] Generating "etcd/ca" certificate and key
[certs] Generating "etcd/server" certificate and key
[certs] etcd/server serving cert is signed for DNS names [localhost vm-12-2-centos] and IPs [10.0.12.2 127.0.0.1 ::1]
[certs] Generating "etcd/peer" certificate and key
[certs] etcd/peer serving cert is signed for DNS names [localhost vm-12-2-centos] and IPs [10.0.12.2 127.0.0.1 ::1]
[certs] Generating "etcd/healthcheck-client" certificate and key
[certs] Generating "apiserver-etcd-client" certificate and key
[certs] Generating "sa" key and public key
[kubeconfig] Using kubeconfig folder "/etc/kubernetes"
[kubeconfig] Writing "admin.conf" kubeconfig file
[kubeconfig] Writing "kubelet.conf" kubeconfig file
[kubeconfig] Writing "controller-manager.conf" kubeconfig file
[kubeconfig] Writing "scheduler.conf" kubeconfig file
[etcd] Creating static Pod manifest for local etcd in "/etc/kubernetes/manifests"
[control-plane] Using manifest folder "/etc/kubernetes/manifests"
[control-plane] Creating static Pod manifest for "kube-apiserver"
[control-plane] Creating static Pod manifest for "kube-controller-manager"
[control-plane] Creating static Pod manifest for "kube-scheduler"
[kubelet-start] Writing kubelet environment file with flags to file "/var/lib/kubelet/kubeadm-flags.env"
[kubelet-start] Writing kubelet configuration to file "/var/lib/kubelet/config.yaml"
[kubelet-start] Starting the kubelet
[wait-control-plane] Waiting for the kubelet to boot up the control plane as static Pods from directory "/etc/kubernetes/manifests". This can take up to 4m0s
[kubelet-check] Initial timeout of 40s passed.
Unfortunately, an error has occurred:
        timed out waiting for the condition

This error is likely caused by:
        - The kubelet is not running
        - The kubelet is unhealthy due to a misconfiguration of the node in some way (required cgroups disabled)

If you are on a systemd-powered system, you can try to troubleshoot the error with the following commands:
        - 'systemctl status kubelet'
        - 'journalctl -xeu kubelet'

Additionally, a control plane component may have crashed or exited when started by the container runtime.
To troubleshoot, list all containers using your preferred container runtimes CLI.
Here is one example how you may list all running Kubernetes containers by using crictl:
        - 'crictl --runtime-endpoint unix:///var/run/containerd/containerd.sock ps -a | grep kube | grep -v pause'
        Once you have found the failing container, you can inspect its logs with:
        - 'crictl --runtime-endpoint unix:///var/run/containerd/containerd.sock logs CONTAINERID'
error execution phase wait-control-plane: couldn't initialize a Kubernetes cluster
To see the stack trace of this error execute with --v=5 or higher
上面的日志表明在 kubeadm init 过程中,Kubernetes 控制平面的组件未能成功启动,导致初始化失败。具体来说,kubelet 可能没有正常运行,或者由于某种原因无法启动控制平面的容器。
2.2. 手动拉取镜像后重命名
先确认一下初始化k8s集群所需要的镜像有哪些:
[root@mymaster ~]# kubeadm config images list
I0902 16:38:11.190130   24023 version.go:256] remote version is much newer: v1.31.0; falling back to: stable-1.28
registry.k8s.io/kube-apiserver:v1.28.13
registry.k8s.io/kube-controller-manager:v1.28.13
registry.k8s.io/kube-scheduler:v1.28.13
registry.k8s.io/kube-proxy:v1.28.13
registry.k8s.io/pause:3.9
registry.k8s.io/etcd:3.5.12-0
registry.k8s.io/coredns/coredns:v1.10.1
拉取阿里镜像源的官方镜像:
# 拉取镜像
ctr image pull registry.aliyuncs.com/google_containers/pause:3.6
ctr image pull registry.aliyuncs.com/google_containers/pause:3.9
ctr image pull registry.aliyuncs.com/google_containers/coredns:v1.10.1
ctr image pull registry.aliyuncs.com/google_containers/etcd:3.5.12-0
ctr image pull registry.aliyuncs.com/google_containers/kube-apiserver:v1.28.13
ctr image pull registry.aliyuncs.com/google_containers/kube-controller-manager:v1.28.13
ctr image pull registry.aliyuncs.com/google_containers/kube-proxy:v1.28.13
ctr image pull registry.aliyuncs.com/google_containers/kube-scheduler:v1.28.13
修改镜像标签:
sudo ctr -n k8s.io  image tag  registry.aliyuncs.com/google_containers/pause:3.6 registry.k8s.io/pause:3.6
sudo ctr -n k8s.io  image tag registry.aliyuncs.com/google_containers/pause:3.9 registry.k8s.io/pause:3.9
sudo ctr -n k8s.io  image tag registry.aliyuncs.com/google_containers/coredns:v1.10.1 registry.k8s.io/coredns/coredns:v1.10.1
sudo ctr -n k8s.io  image tag registry.aliyuncs.com/google_containers/etcd:3.5.12-0 registry.k8s.io/etcd:3.5.12-0
sudo ctr -n k8s.io  image tag  registry.aliyuncs.com/google_containers/kube-apiserver:v1.28.13 registry.k8s.io/kube-apiserver:v1.28.13
sudo ctr -n k8s.io  image tag  registry.aliyuncs.com/google_containers/kube-controller-manager:v1.28.13 registry.k8s.io/kube-controller-manager:v1.28.13
sudo ctr -n k8s.io  image tag    registry.aliyuncs.com/google_containers/kube-proxy:v1.28.13 registry.k8s.io/kube-proxy:v1.28.13
sudo ctr -n k8s.io  image tag  registry.aliyuncs.com/google_containers/kube-scheduler:v1.28.13 registry.k8s.io/kube-scheduler:v1.28.13
改完名后可以使用 crictl images 命令查看相关的镜像信息。
[root@mymaster ~]# crictl images ls |grep k8s.io
registry.k8s.io/pause                                             3.6                 6270bb605e12e       302kB
registry.k8s.io/pause                                             3.9                 e6f1816883972       322kB
registry.k8s.io/coredns/coredns                                   v1.10.1             ead0a4a53df89       16.2MB
registry.k8s.io/etcd                                              3.5.12-0            3861cfcd7c04c       57.2MB
registry.k8s.io/kube-apiserver                                    v1.28.13            5447bb21fa283       34.5MB
registry.k8s.io/kube-controller-manager                           v1.28.13            f1a0a396058d4       33.4MB
registry.k8s.io/kube-proxy                                        v1.28.13            31fde28e72a31       28.3MB
registry.k8s.io/kube-scheduler                                    v1.28.13            a60f64c0f37d0       18.6MB
这里有个特殊的地方就是虽然使用 kubeadm config images list 没有列出 registry.k8s.io/pause:3.6 的镜像,但是我在查看 containerd 日志的时候却看到了对应的报错,所以顺便也加上了这个镜像。
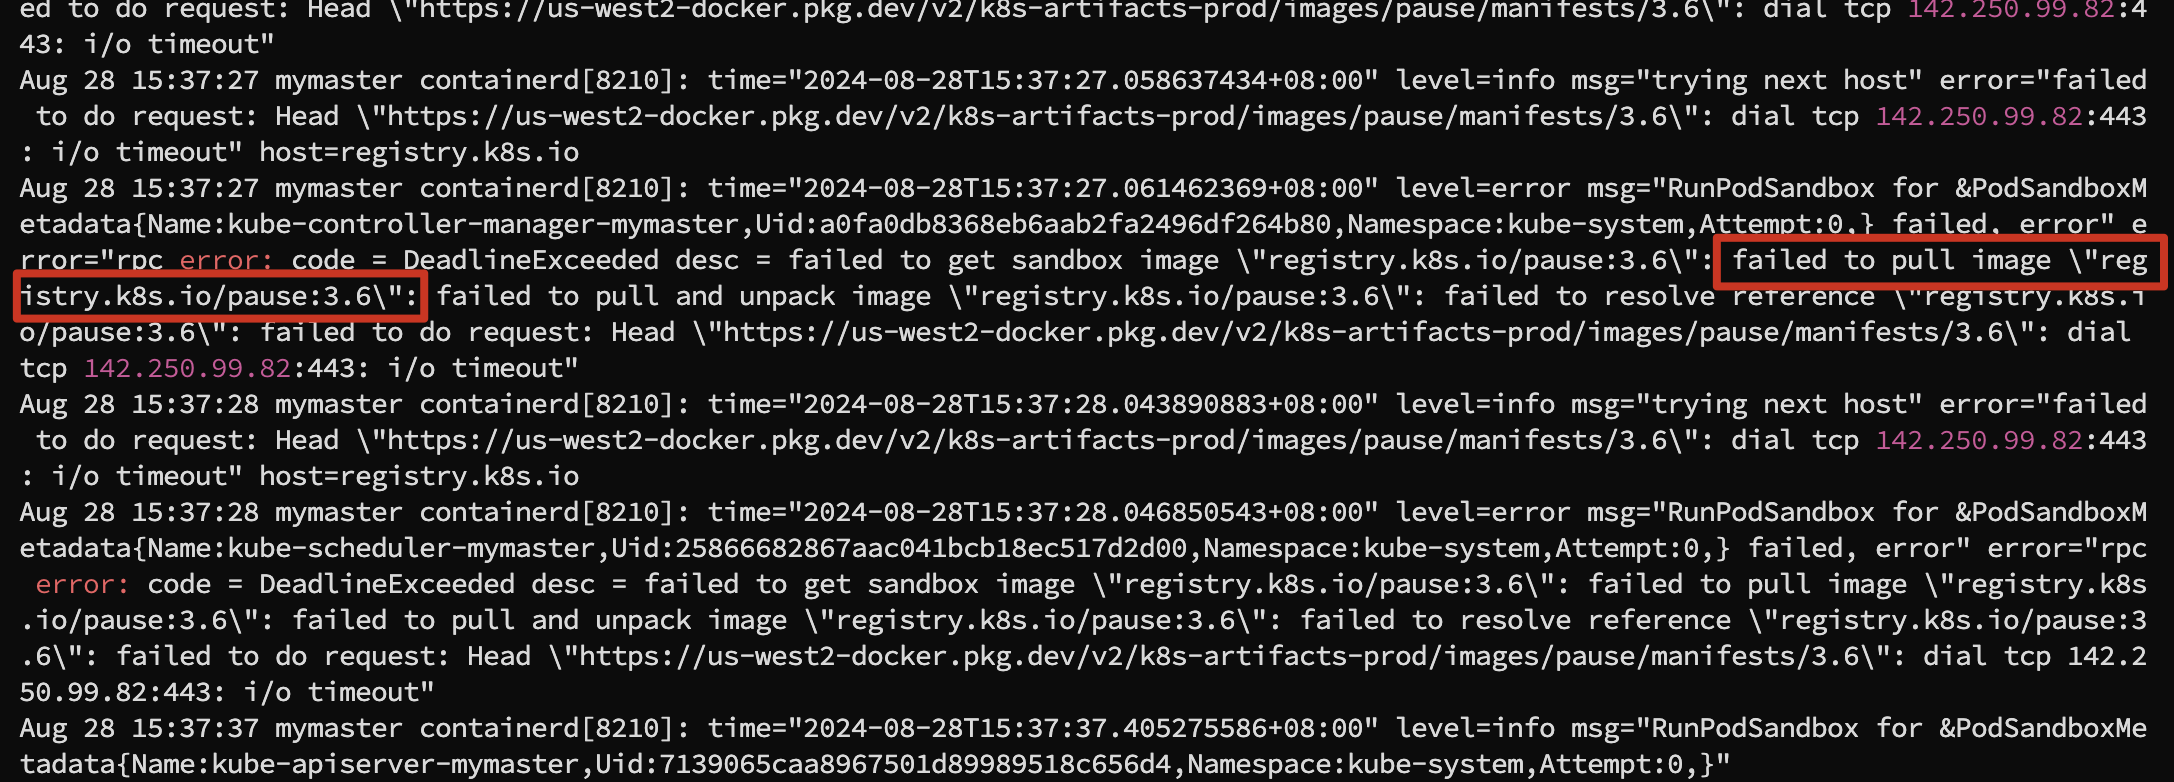
如果不清楚具体缺失的镜像,可以在执行 kubeadm init 命令时另外开两个窗口监控 containerd 和 kubelet 服务的日志信息,我就是通过这种方法把全部所需的镜像下载下来并命名的。
sudo journalctl -u containerd -f
sudo journalctl -u kubelet -f
3. 重置集群再次初始化
如果之前尝试过初始化集群,可能会留下部分配置文件,这些文件可能会干扰新的初始化过程。可以尝试重置 Kubernetes 配置:
#终端确认信息输入 y 后按回车
kubeadm reset
rm -rf /etc/kubernetes/manifests
rm -rf /var/lib/etcd
重新执行 kubeadm init
最后,重新执行 kubeadm init 命令,这里并不需要指定使用阿里镜像源,因为我前面已经手动下载和修改 tag 为 k8s 初始化所需的。
[root@VM-12-2-centos yum.repos.d]# sudo kubeadm init --pod-network-cidr=192.168.0.0/16
......
......
......
[kubelet-check] Initial timeout of 40s passed.
[apiclient] All control plane components are healthy after 185.502361 seconds
[upload-config] Storing the configuration used in ConfigMap "kubeadm-config" in the "kube-system" Namespace
[kubelet] Creating a ConfigMap "kubelet-config" in namespace kube-system with the configuration for the kubelets in the cluster
[upload-certs] Skipping phase. Please see --upload-certs
[mark-control-plane] Marking the node mymaster as control-plane by adding the labels: [node-role.kubernetes.io/control-plane node.kubernetes.io/exclude-from-external-load-balancers]
[mark-control-plane] Marking the node mymaster as control-plane by adding the taints [node-role.kubernetes.io/control-plane:NoSchedule]
[bootstrap-token] Using token: cr5apt.fk1mx89qc0r9b3e6
[bootstrap-token] Configuring bootstrap tokens, cluster-info ConfigMap, RBAC Roles
[bootstrap-token] Configured RBAC rules to allow Node Bootstrap tokens to get nodes
[bootstrap-token] Configured RBAC rules to allow Node Bootstrap tokens to post CSRs in order for nodes to get long term certificate credentials
[bootstrap-token] Configured RBAC rules to allow the csrapprover controller automatically approve CSRs from a Node Bootstrap Token
[bootstrap-token] Configured RBAC rules to allow certificate rotation for all node client certificates in the cluster
[bootstrap-token] Creating the "cluster-info" ConfigMap in the "kube-public" namespace
[kubelet-finalize] Updating "/etc/kubernetes/kubelet.conf" to point to a rotatable kubelet client certificate and key
[addons] Applied essential addon: CoreDNS
[addons] Applied essential addon: kube-proxy

Your Kubernetes control-plane has initialized successfully!

To start using your cluster, you need to run the following as a regular user:

  mkdir -p $HOME/.kube
  sudo cp -i /etc/kubernetes/admin.conf $HOME/.kube/config
  sudo chown $(id -u):$(id -g) $HOME/.kube/config

Alternatively, if you are the root user, you can run:

  export KUBECONFIG=/etc/kubernetes/admin.conf

You should now deploy a pod network to the cluster.
Run "kubectl apply -f [podnetwork].yaml" with one of the options listed at:
  https://kubernetes.io/docs/concepts/cluster-administration/addons/

Then you can join any number of worker nodes by running the following on each as root:

kubeadm join 10.0.12.2:6443 --token cr5apt.fk1mx89qc0r9b3e6 \
        --discovery-token-ca-cert-hash sha256:d1cb1bda5109cc9d6d9bdfa34e47fb33167485481b39e56b017d6edbcce3a25d
看到类似上面的输出就说明已经成功初始化了 Kubernetes ,接下来,我们可以根据提示进行后续操作,比如配置 kubectl 命令行工具并部署一个 Pod 网络,以便让集群能够正常运行 Pod。如果后续有其他节点需要加入集群,可以使用最后的 kubeadm join 命令。
6、配置kubernetes集群
1. 配置 kubectl 命令行工具
如果是普通用户,执行以下命令来配置 kubectl:
mkdir -p $HOME/.kube
sudo cp -i /etc/kubernetes/admin.conf $HOME/.kube/config
sudo chown $(id -u):$(id -g) $HOME/.kube/config
如果是 root 用户,可以直接执行以下命令:
export KUBECONFIG=/etc/kubernetes/admin.conf2. 部署 Pod 网络
为了让集群能够运行 Pod,我们需要部署一个 Pod 网络。这里我使用的是flannel插件。
kubectl apply -f https://raw.githubusercontent.com/coreos/flannel/master/Documentation/kube-flannel.yml执行上述命令时,Kubernetes 将从指定的 URL 中获取 Flannel 网络插件的配置文件,并在你的集群中应用这些配置。但是这个命令中的URL我们的本机网络不一定可以直接访问,下面是文件对应的文件内容,可以直接新建一个文件写入下面的内容。
---
kind: Namespace
apiVersion: v1
metadata:
  name: kube-flannel
  labels:
    k8s-app: flannel
    pod-security.kubernetes.io/enforce: privileged
---
kind: ClusterRole
apiVersion: rbac.authorization.k8s.io/v1
metadata:
  labels:
    k8s-app: flannel
  name: flannel
rules:
- apiGroups:
  - ""
  resources:
  - pods
  verbs:
  - get
- apiGroups:
  - ""
  resources:
  - nodes
  verbs:
  - get
  - list
  - watch
- apiGroups:
  - ""
  resources:
  - nodes/status
  verbs:
  - patch
---
kind: ClusterRoleBinding
apiVersion: rbac.authorization.k8s.io/v1
metadata:
  labels:
    k8s-app: flannel
  name: flannel
roleRef:
  apiGroup: rbac.authorization.k8s.io
  kind: ClusterRole
  name: flannel
subjects:
- kind: ServiceAccount
  name: flannel
  namespace: kube-flannel
---
apiVersion: v1
kind: ServiceAccount
metadata:
  labels:
    k8s-app: flannel
  name: flannel
  namespace: kube-flannel
---
kind: ConfigMap
apiVersion: v1
metadata:
  name: kube-flannel-cfg
  namespace: kube-flannel
  labels:
    tier: node
    k8s-app: flannel
    app: flannel
data:
  cni-conf.json: |
    {
      "name": "cbr0",
      "cniVersion": "0.3.1",
      "plugins": [
        {
          "type": "flannel",
          "delegate": {
            "hairpinMode": true,
            "isDefaultGateway": true
          }
        },
        {
          "type": "portmap",
          "capabilities": {
            "portMappings": true
          }
        }
      ]
    }
  net-conf.json: |
    {
      "Network": "10.244.0.0/16",
      "EnableNFTables": false,
      "Backend": {
        "Type": "vxlan"
      }
    }
---
apiVersion: apps/v1
kind: DaemonSet
metadata:
  name: kube-flannel-ds
  namespace: kube-flannel
  labels:
    tier: node
    app: flannel
    k8s-app: flannel
spec:
  selector:
    matchLabels:
      app: flannel
  template:
    metadata:
      labels:
        tier: node
        app: flannel
    spec:
      affinity:
        nodeAffinity:
          requiredDuringSchedulingIgnoredDuringExecution:
            nodeSelectorTerms:
            - matchExpressions:
              - key: kubernetes.io/os
                operator: In
                values:
                - linux
      hostNetwork: true
      priorityClassName: system-node-critical
      tolerations:
      - operator: Exists
        effect: NoSchedule
      serviceAccountName: flannel
      initContainers:
      - name: install-cni-plugin
        image: docker.io/flannel/flannel-cni-plugin:v1.5.1-flannel2
        command:
        - cp
        args:
        - -f
        - /flannel
        - /opt/cni/bin/flannel
        volumeMounts:
        - name: cni-plugin
          mountPath: /opt/cni/bin
      - name: install-cni
        image: docker.io/flannel/flannel:v0.25.6
        command:
        - cp
        args:
        - -f
        - /etc/kube-flannel/cni-conf.json
        - /etc/cni/net.d/10-flannel.conflist
        volumeMounts:
        - name: cni
          mountPath: /etc/cni/net.d
        - name: flannel-cfg
          mountPath: /etc/kube-flannel/
      containers:
      - name: kube-flannel
        image: docker.io/flannel/flannel:v0.25.6
        command:
        - /opt/bin/flanneld
        args:
        - --ip-masq
        - --kube-subnet-mgr
        resources:
          requests:
            cpu: "100m"
            memory: "50Mi"
        securityContext:
          privileged: false
          capabilities:
            add: ["NET_ADMIN", "NET_RAW"]
        env:
        - name: POD_NAME
          valueFrom:
            fieldRef:
              fieldPath: metadata.name
        - name: POD_NAMESPACE
          valueFrom:
            fieldRef:
              fieldPath: metadata.namespace
        - name: EVENT_QUEUE_DEPTH
          value: "5000"
        volumeMounts:
        - name: run
          mountPath: /run/flannel
        - name: flannel-cfg
          mountPath: /etc/kube-flannel/
        - name: xtables-lock
          mountPath: /run/xtables.lock
      volumes:
      - name: run
        hostPath:
          path: /run/flannel
      - name: cni-plugin
        hostPath:
          path: /opt/cni/bin
      - name: cni
        hostPath:
          path: /etc/cni/net.d
      - name: flannel-cfg
        configMap:
          name: kube-flannel-cfg
      - name: xtables-lock
        hostPath:
          path: /run/xtables.lock
          type: FileOrCreate
配置文件中有几个地方是需要特别注意的。
- kube-flannel.yml 使用到的两个 docker.io 的镜像,我们直接执行的话由于网络原因大概率会下载失败。我这里采用迂回的方法,是先用 docker pull 把镜像拉到本地,用 docker save 导出镜像 tar 包,然后使用 ctr 命令导入镜像,具体的操作步骤如下:
#拉取镜像、导出镜像为tar文件、使用ctr命令导入镜像
sudo docker pull docker.io/flannel/flannel-cni-plugin:v1.5.1-flannel2
sudo docker save -o flannel.tar flannel/flannel-cni-plugin:v1.5.1-flannel2
sudo ctr -n k8s.io images import flannel.tar
sudo crictl images
sudo docker pull docker.io/flannel/flannel:v0.25.6
sudo docker save -o flannelv0.25.6.tar docker.io/flannel/flannel:v0.25.6
sudo ctr -n k8s.io images import flannelv0.25.6.tar
sudo crictl images- 网段配置这里不能使用默认的,因为前面执行 kubeadm init 的时候加上了 --pod-network-cidr=192.168.0.0/16 参数,所以这里需要把 "Network" 修改成 192.168.0.0/16 ,否则网络会报错。
  net-conf.json: |
    {
      "Network": "10.244.0.0/16",  #这里需要根据实际情况修改
      "EnableNFTables": false,
      "Backend": {
        "Type": "vxlan"
      }
}- 最后一个就是部署 flannel 的时候可能会报错找不到 /run/flannel/subnet.env 文件,这里可以自己创建一个,内容如下:
[root@mymaster ~]# cat <<EOF | sudo tee /run/flannel/subnet.env
FLANNEL_NETWORK=192.168.0.0/16
FLANNEL_SUBNET=192.168.0.1/24
FLANNEL_MTU=1450
FLANNEL_IPMASQ=true
EOF
前面的配置工作全部完成后就可以使用命令 kubectl apply -f kube-flannel.yml 部署 flannel 了。
[root@mymaster ~]# kubectl apply -f kube-flannel.yml
[root@mymaster ~]# kubectl get pods -n kube-flannel
NAME                    READY   STATUS    RESTARTS   AGE
kube-flannel-ds-dzg9r   1/1     Running   0          1m

#查看所有命名空间的pod状态
[root@mymaster ~]# kubectl get pods --all-namespaces
NAMESPACE      NAME                               READY   STATUS              RESTARTS   AGE
kube-flannel   kube-flannel-ds-tvm8x              1/1     Running             0          28m
kube-system    coredns-5dd5756b68-6tp4l           1/1     Running             0          88m
kube-system    coredns-5dd5756b68-vgc2r           1/1     Running             0          88m
kube-system    etcd-mymaster                      1/1     Running             0          89m
kube-system    kube-apiserver-mymaster            1/1     Running             0          89m
kube-system    kube-controller-manager-mymaster   1/1     Running             0          89m
kube-system    kube-proxy-ps2d4                   1/1     Running             0          88m
kube-system    kube-scheduler-mymaster            1/1     Running             0          89m
从上面的终端输出可以看到 coredns 的 POD 也正常运行了,至此单机版的k8s集群就算搭建完成了。
7、验证k8s集群部署情况
1. 检查集群节点状态
[root@mymaster ~]# kubectl get nodes
NAME       STATUS   ROLES           AGE   VERSION
mymaster   Ready    control-plane   7d    v1.28.13
2. 检查集群网络
使用以下命令查看 Pod 和 Service 的状态:
kubectl get pods --all-namespaces
kubectl get svc --all-namespaces
确保这些资源都处于 Running 状态,并且没有异常。
3. 部署测试应用
为了确保集群的功能正常,这里我们部署一个 Nginx 应用并检查其状态:
docker pull nginx
docker save -o nginx.tar nginx
ctr -n k8s.io images import nginx.tar
#确认Nginx镜像是否导入成功
crictl images ls |grep nginx此时我们直接使用kubectl create deployment nginx --image=nginx创建一个 Nginx Pod,会发现新创建的 Pod 状态一直无法变成 Running,使用kubectl describe pod nginx-7854ff8877-xqkfv查看 Pod 的详细信息:
[root@mymaster ~]# kubectl describe pod nginx-7854ff8877-xqkfv
Name:             nginx-7854ff8877-xqkfv
Namespace:        default
Priority:         0
Service Account:  default
Node:             <none>
Labels:           app=nginx
                  pod-template-hash=7854ff8877
Annotations:      <none>
Status:           Pending
IP:
IPs:              <none>
Controlled By:    ReplicaSet/nginx-7854ff8877
Containers:
  nginx:
    Image:        nginx
    Port:         <none>
    Host Port:    <none>
    Environment:  <none>
    Mounts:
      /var/run/secrets/kubernetes.io/serviceaccount from kube-api-access-97xsr (ro)
Conditions:
  Type           Status
  PodScheduled   False
Volumes:
  kube-api-access-97xsr:
    Type:                    Projected (a volume that contains injected data from multiple sources)
    TokenExpirationSeconds:  3607
    ConfigMapName:           kube-root-ca.crt
    ConfigMapOptional:       <nil>
    DownwardAPI:             true
QoS Class:                   BestEffort
Node-Selectors:              <none>
Tolerations:                 node.kubernetes.io/not-ready:NoExecute op=Exists for 300s
                             node.kubernetes.io/unreachable:NoExecute op=Exists for 300s
Events:
  Type     Reason            Age    From               Message
  ----     ------            ----   ----               -------
  Warning  FailedScheduling  3m50s  default-scheduler  0/1 nodes are available: 1 node(s) had untolerated taint {node-role.kubernetes.io/control-plane: }. preemption: 0/1 nodes are available: 1 Preemption is not helpful for scheduling..
这个错误信息表明 Pod 无法调度到任何可用节点上,原因是节点上有一个未容忍的污点(taint),日志显示节点上的污点是:{node-role.kubernetes.io/control-plane: },这是 Kubernetes 用来标记控制平面节点的污点。默认情况下,标记为 node-role.kubernetes.io/control-plane 的节点才允许调度控制平面 Pod,不允许调度普通的工作负载 Pod。
因为我的集群是单机版部署的,所以我只有一个节点,那么解决方法有两种:
- 修改或移出这个节点的污点;
- 使用 Node Selector 或 Tolerations,为 Pod 添加适当的 tolerations,以允许它们调度到具有特定污点的节点上。
a、编辑 Deployment 配置
可以使用 kubectl edit 命令直接编辑 Deployment 的配置:
kubectl edit deployment nginx这会打开一个编辑器,在其中直接修改 Deployment 的 YAML 配置。找到 spec.template.spec 部分,并在其中添加 tolerations 配置。例如:
spec:
  template:
    spec:
      tolerations:
      - key: "node-role.kubernetes.io/control-plane"
        operator: "Exists"
        effect: "NoSchedule"
编辑完成后,保存并退出编辑器,Kubernetes 会自动更新 Deployment 配置,并重新调度 Pod。
b、使用 YAML 文件进行修改
也可以通过 YAML 文件更新 Deployment 配置。首先,使用以下命令导出现有的 Deployment 配置到 YAML 文件:
kubectl get deployment nginx -o yaml > nginx-deployment.yaml编辑 nginx-deployment.yaml 文件,找到 spec.template.spec 部分,并添加 tolerations 配置:
spec:
  template:
    spec:
      tolerations:
      - key: "node-role.kubernetes.io/control-plane"
        operator: "Exists"
        effect: "NoSchedule"
然后,使用以下命令应用修改后的 YAML 文件:
kubectl apply -f nginx-deployment.yamlc、验证修改
修改完成后,可以使用以下命令检查 Pod 是否被正确调度:
kubectl get pods -o wide通过这些步骤,我们可以将 tolerations 添加到 Nginx Deployment 中,以便让它能够调度到有特定 taint 的节点上。
4. Pod映射到宿主机端口
通过前面的操作,已经成功在 k8s 集群中运行了 Nginx Pod,但是我们现在还无法通过浏览器的方式访问到这个 Pod。
要将 Nginx Pod 的端口映射到服务器的 80 端口,我们可以创建一个 Service 资源来实现。Service 是 Kubernetes 中用于定义如何访问 Pod 的方式,它可以在集群内部提供一个稳定的 IP 地址和 DNS 名称,并将流量负载均衡到匹配的 Pods。
a、创建 Service 配置文件
创建一个 YAML 文件nginx-service.yaml 用于定义 Service。以下是一个示例配置文件,它会将 Nginx Pod 的 80 端口暴露到集群外部的 80 端口(NodePort 类型):
apiVersion: v1
kind: Service
metadata:
  name: nginx-service
  namespace: default
spec:
  type: NodePort
  ports:
    - port: 80
      targetPort: 80
      nodePort: 30000
  selector:
    app: nginx
在这个配置中:
- port: 80 是在 Service 上暴露的端口。
- targetPort: 80 是 Nginx Pod 上的端口。
- nodePort: 30000 是 Kubernetes 将服务暴露到所有节点上的端口。可以选择 30000-32767 之间的任何端口号。
b、应用及验证
使用 kubectl 命令应用这个配置文件,并且验证 Service 是否已成功创建并运行
kubectl apply -f nginx-service.yaml
kubectl get services
接下来应该能看到 nginx-service 列在输出中。确认 PORT(S) 列包含 80:30000/TCP,说明服务正在将 80 端口映射到节点的 30000 端口。
c、访问 Nginx 服务
现在我们可以通过访问集群中任何节点(这里是单节点)的 IP 地址和 nodePort(在这个例子中是 30000)来访问 Nginx 服务。
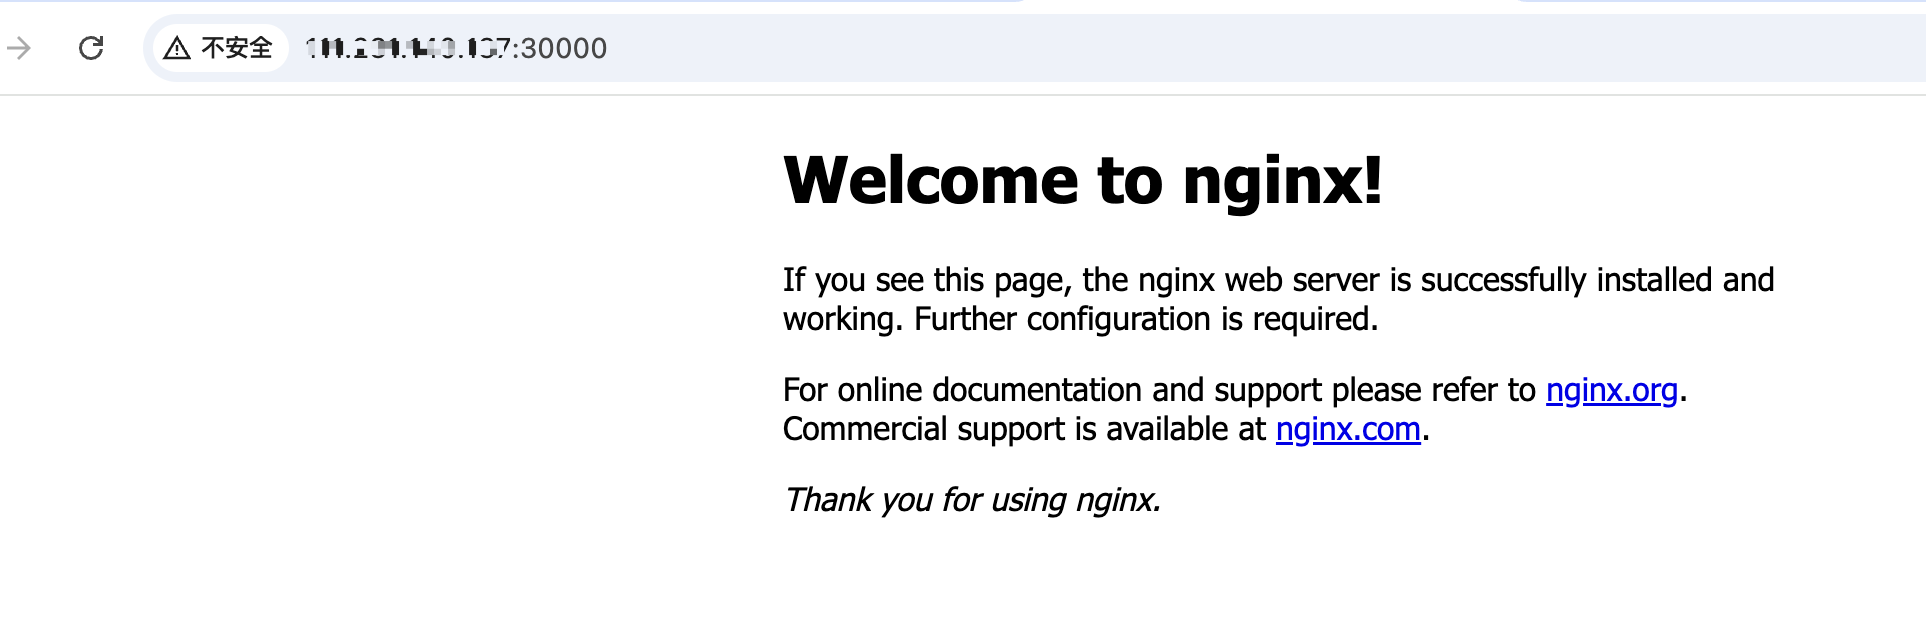
注意:如果你希望将服务直接暴露在节点的 80 端口,可以修改 Service 配置文件中的 nodePort 为 80(80 端口通常需要管理员权限),一般生产环境中不会这么做。


 1452
1452

 被折叠的 条评论
为什么被折叠?
被折叠的 条评论
为什么被折叠?
 到【灌水乐园】发言


