


在.NET微服务架构中实现服务发现与网关:Consul与Ocelot的简单集成实践
思路概述
在微服务架构中,客户端通常通过网关访问服务。为了提高系统的可用性和扩展性,网关需要实现动态路由和负载均衡。
本文将介绍如何使用Consul、Ocelot、.NET和Docker这四种技术来实现这一目标。
Cousul
Consul 是一个用于服务发现、配置和分布式一致性的工具
无ACL的Docker安装
下载Consul镜像
docker pull hashicorp/consul
运行容器
docker run --name consul1 -d -p 8500:8500 -p 8300:8300 -p 8301:8301 -p 8302:8302 -p 8600:8600 hashicorp/consul agent -server -bootstrap-expect=1 -ui -bind=0.0.0.0 -client=0.0.0.0
参数说明
- –net=host 使容器共享宿主机的网络栈,避免端口映射。
- –server Consul以服务器模式运行,参与服务发现。
- –client Consul以客户端模式运行,转发请求。
- –advertise 指定Consul服务的私有IP。
- –retry-join 重试加入指定的Consul节点。
- –bind 绑定Consul服务器的IP,用于集群内通信。
- –allow-stale 允许从任意Consul服务器节点获取信息。
- –bootstrap-expect 设置数据中心预期的服务器数,自动选举Leader。
- –data-dir 指定数据存放目录。
- –node 指定Consul节点名称。
- –config-dir 指定配置文件目录。
- –enable-script-checks 启用服务健康检查。
- –datacenter 指定数据中心名称。
- –ui 启用Consul的Web UI。
- –join 加入到指定IP的Consul集群。
端口说明:
- 8500 : http 端口,用于 http 接口和 web ui访问;
- 8300 : server rpc 端口,同一数据中心 consul server 之间通过该端口通信;
- 8301 : serf lan 端口,同一数据中心 consul client 通过该端口通信; 用于处理当前datacenter中LAN的gossip通信;
- 8302 : serf wan 端口,不同数据中心 consul server 通过该端口通信; agent Server使用,处理与其他datacenter的gossip通信;
- 8600 : dns 端口,用于已注册的服务发现;
docker 安装Consul(含acl) 推荐
方案一
思路:创建容器,进入容器,编写配置文件,启动容器,配置生效
1、进入容器
docker exec -it <id/name> /bin/sh
2、创建acl.hcl,位置在config中
acl = {
  enabled = true
  default_policy = "deny"
  enable_token_persistence = true
}
3、然后重启容器
4、在进入容器
5、创建token
consul acl bootstrap
成功显示如下结果
AccessorID:       e352f41c-3091-699b-3a9e-283fdf03753a
SecretID:         badec046-25cf-0f95-848e-47724f61dfba
Description:      Bootstrap Token (Global Management)
Local:            false
Create Time:      2024-04-24 08:03:11.404527595 +0000 UTC
Policies:
   00000000-0000-0000-0000-000000000001 - global-management
其中SecretID 就是对应Token
方案二
思路:先创建配置文件consul.json 然后把配置文件复制到镜像中去,然后创建容器
1、建立配置文件 consul.json
{
"acl": {
        "enabled": true,
        "default_policy": "deny",
        "down_policy": "extend-cache",
        "tokens":
        {
        "master": "123456"
        }
    },
"ui":true
}
上述配置中,我们启用了 ACL 功能,并设置了默认策略为 “deny”,即默认情况下拒绝所有请求。我们还指定了一个 “master” token,用于访问所有资源
2、创建consul 的docker镜像
FROM hashicorp/consul
COPY consul.json /consul/config/consul.json
EXPOSE 8500
上述 Dockerfile 中,我们从 hashicorp/consul 基础镜像开始构建,然后将 consul.json 文件复制到镜像中的 /consul/config 目录下。最后,我们将 Consul 的 Web 界面暴露在 8500 端口上
3、构建docker镜像
docker build -t my-consul .
建立consul集群
获取 consul server1 的 ip 地址
docker inspect --format '{{ .NetworkSettings.IPAddress }}' consul1
输出是:172.17.0.8
启动第二个consul服务:consul2, 并加入consul1(使用join命令)
docker run --name consul2 -d -p 8502:8500 hashicorp/consul agent -server -ui -bind=0.0.0.0 -client=0.0.0.0 -join 172.17.0.8
启动第三个consul服务:consul3, 并加入consul1(使用join命令)
docker run --name consul3 -d -p 8503:8500 hashicorp/consul agent -server -ui -bind=0.0.0.0 -client=0.0.0.0 -join 172.17.0.8
WebApi注册Consul
1、安装Consul, NuGet下载
2、注册服务
因为本次项目主要争对Docker容器使用,并方便配置,创建容器时指定ip地址与端口,然后注册consul,故把api对外的ip地址与端口设置成环境变量
步骤
- 创建JSON配置文件: 在.NET项目中,创建一个JSON配置文件,例如
appsettings.json,用来存储默认配置。
{
  "Logging": {
    "LogLevel": {
      "Default": "Information",
      "Microsoft": "Warning",
      "Microsoft.Hosting.Lifetime": "Information"
    }
  },
  "AllowedHosts": "*",
  "Server": {
    "Ip": "localhost",
    "Port": 5000
  }
}
在.NET应用程序启动时,您可以加载环境变量,并在需要时更新配置,如果手动部署每个服务,通过人工修改ip与端口,可跳过,我是为了方便,在创建容器时赋值ip与端口,那么镜像就不需要多次生成
public class Program
{
    public static void Main(string[] args)
    {
        var builder = WebApplication.CreateBuilder(args);

        // 从环境变量中读取IP和端口,并更新配置
        var ipAddress = Environment.GetEnvironmentVariable("IP_ADDRESS") ?? "0.0.0.0";
        var port = Environment.GetEnvironmentVariable("PORT") ?? "5000";

        builder.Configuration["Server:Ip"] = ipAddress;
        builder.Configuration["Server:Port"] = port;

        var app = builder.Build();

        // ... 配置和启动应用程序 ...

        app.Run();
    }
}
- 修改JSON配置文件: 在Docker容器创建时,您需要修改JSON配置文件中的IP地址和端口。这通常通过在Dockerfile中使用环境变量或者在创建容器时通过Docker命令行参数来实现。
# Dockerfile
FROM mcr.microsoft.com/dotnet/aspnet:6.0 AS base
WORKDIR /app
EXPOSE 5000
COPY . .
ENTRYPOINT ["dotnet", "MyApp.dll"]
ENV IP_ADDRESS=0.0.0.0
ENV PORT=5000
- 读取配置: 在.NET应用程序中,使用
IConfiguration接口来读取配置文件中的值。
然后在需要的地方使用Configuration来获取IP和端口:
var serverIp = Configuration["Server:Ip"];
var serverPort = Configuration["Server:Port"];
建立ConsulHelp.cs用于在项目启动时注册
public static class ConsulHelper
{

    public static void ConsulRegist(this IConfiguration configuration)
    {

        ConsulClient client = new ConsulClient(c =>
        {
            c.Address = new Uri("http://192.168.115.131:18500/"); //consul服务器地址
            c.Datacenter = "dc1";
        });

        string ip = configuration["ApiSettings:Ip"];
        int port = int.Parse(configuration["ApiSettings:port"]);//命令行参数必须传入
        //int weight = string.IsNullOrWhiteSpace(configuration["weight"]) ? 1 : int.Parse(configuration["weight"]); //权重

        client.Agent.ServiceRegister(new AgentServiceRegistration()
        {
            ID = "service" + Guid.NewGuid(),//唯一
            Name = "SjTestService",//组名称-Group
            Address = ip,//其实应该写ip地址
            Port = port,//不同实例
           // Tags = new string[] { weight.ToString() },//标签
            Check = new AgentServiceCheck()
            {
                Interval = TimeSpan.FromSeconds(12),//间隔12s一次
                HTTP = $"http://{ip}:{port}/Health/Index",
                Timeout = TimeSpan.FromSeconds(5),//检测等待时间
                DeregisterCriticalServiceAfter = TimeSpan.FromSeconds(60)//失败后多久移除
            }
        });
        //命令行参数获取
        Console.WriteLine($"{ip}:{port}");
    }
}
建立专门给consul判断的心跳服务,上面的 ” HTTP = $“http://{ip}:{port}/Health/Index” “ 就是让consul进行判断我们的服务是否还活着
[Route("[controller]")]
[ApiController]
public class HealthController : ControllerBase
{

    [HttpGet]
    [Route("Index")]
    public IActionResult Index()
    {
        return Ok();
    }

}
在服务启动中注册
//执行且只执行一次的,去注册
builder.Configuration.ConsulRegist();
![[Pasted image 20240426080203.png]]
3、创建镜像与容器
创建Dockerfile
FROM mcr.microsoft.com/dotnet/aspnet:6.0 AS base
WORKDIR /app
ENV ASPNETCORE_ENVIRONMENT Docker
EXPOSE 80

COPY . .
ENTRYPOINT ["dotnet", "WebApplication12.dll"]
ENV IP_ADDRESS=0.0.0.0
ENV PORT=5000
编译
docker build -t 镜像名称 .
创建容器
docker run --name sjtest2 -e IP_ADDRESS=192.168.115.131 -e PORT=7006 -p 7006:80 --restart=always -d sjtest:2
其中-e IP_ADDRESS=192.168.115.131 -e PORT=7006 就是对应环境变量
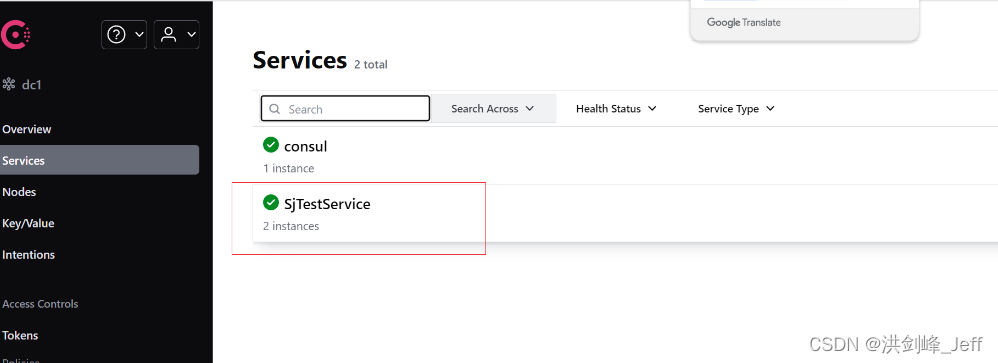
注册成功后如下
![![[Pasted image 20240425233850.png]]](https://img-blog.csdnimg.cn/direct/8a4829e8cc614ae092d7c1a54d7b035b.png)
建立网关(Ocelot)
网关可单独配置,也可与consul配合使用
单独配置:优点简单,缺点不够灵活,无法做到服务判定与在线调整
配合consul:缺点笔单独配置多了几到,优点可更加灵活判定,异常服务直接调整,并可在线编辑
步骤
1、安装 Ocelot 与 Ocelot.Provider.Consul
2、建立configuration.json 与ocelotconsul.json 配置文件
configuration.json 配置对应api地址
{
  "Routes": [
    {
      "DownstreamPathTemplate": "/{url}", //服务地址 url变量
      "DownstreamScheme": "http",
      "DownstreamHostAndPorts": [ //转发地址
        {
          "Host": "10.8.1.151",
          "Port": 8099
        },{
          "Host": "10.8.1.151",
          "Port": 8089
        }
      ],
      "UpstreamPathTemplate": "/{url}", //网关地址 url变量
      "UpstreamHttpMethod": [ "Get", "Post" ], //支持请求类型
      "ServiceName": "SjtestService", //consul服务名称
      "LoadBalancerOptions": { //负载均衡策略
        "Type": "RoundRobin" //RoundRobin 轮询 / LeastConnection 最少连接数 / NoLoadBalance 不负载均衡 / CookieStickySessions 会话粘滞
      },
      "Priority": 0 // 路由权重,通配默认0,不可修改
    }
  ]
}
ocelotconsul.json 主要配置consul地址
{
  "GlobalConfiguration": {
    "ServiceDiscoveryProvider": {
      "Host": "192.168.115.131",
      "Port": 18500,
      "ConfigurationKey": "SjTestService2"
    }
  }
}
在Program.cs中配置
using Ocelot.DependencyInjection;
using Ocelot.Middleware;
using Ocelot.Provider.Consul;

var builder = WebApplication.CreateBuilder(args);
builder.Services.AddOcelot()//添加ocelot服务组件
                .AddConsul()//添加consul服务组件
                .AddConfigStoredInConsul();// 支持consul动态配置ocelot ,可根据实际情况需求是否注册该服务
builder.Configuration.AddJsonFile("configuration.json", optional: false, reloadOnChange: true);//添加配置文件
builder.Configuration.AddJsonFile("ocelotconsul.json", optional: false, reloadOnChange: true);//添加配置文件
var app = builder.Build();

//app.MapGet("/", () => "Hello World!");
await app.UseOcelot();//替换管道模型
app.Run();
发布后,可在consul中在线编辑


 82
82

 被折叠的 条评论
为什么被折叠?
被折叠的 条评论
为什么被折叠?
 到【灌水乐园】发言


