


系列文章目录
- Android MediaCodec 简明教程(一):使用 MediaCodecList 查询 Codec 信息,并创建 MediaCodec 编解码器
- Android MediaCodec 简明教程(二):使用 MediaCodecInfo.CodecCapabilities 查询 Codec 支持的宽高,颜色空间等能力
- Android MediaCodec 简明教程(三):详解如何在同步与异步模式下,使用MediaCodec将视频解码到ByteBuffers,并在ImageView上展示
- Android MediaCodec 简明教程(四):使用 MediaCodec 将视频解码到 Surface,并使用 SurfaceView 播放视频
- Android MediaCodec 简明教程(五):使用 MediaCodec 编码 ByteBuffer 数据,并保存为 MP4 文件
- Android MediaCodec 简明教程(六):使用 EGL 和 OpenGL 绘制图像到 Surface 上,并通过 MediaCodec 编码 Surface 数据,并保存到 MP4 文件
前言
在这个系列的第七章中,我们将深入探讨一些更复杂的知识点:如何将视频帧解码到OES纹理上。在前几章中,我们已经学习了如何查询MediaCodec信息,以及如何使用MediaCodec进行解码和编码。
首先,我们需要理解为什么我们需要将视频帧解码到纹理上。Android MediaCodec 简明教程(四):使用 MediaCodec 将视频解码到 Surface,并使用 SurfaceView 播放视频,我们直接将视频帧解码到SurfaceView上进行播放,这种方法并没有对视频帧进行任何处理。但是,如果我们想要给视频添加滤镜,这种方法就无法实现。
那么,我们应该如何操作呢?有两种可能的解决方案:
- 我们可以不再将视频帧解码到 Surface 上,而是解码为ByteBuffers。然后,我们可以对ByteBuffers中的图片像素数据进行处理,最后再将这些数据显示到窗口上。
- 我们可以将视频帧解码到纹理上,然后使用OpenGL对纹理内容进行变换,并将其绘制到窗口上。
虽然第一种方法是可行的,但是其性能会非常差。因为大部分任务都是在CPU上完成的,所以处理速度会非常慢,无法满足正常视频播放的需求。因此,我们应该采用第二种方法。
为了降低每一章节的难度,将第二种方法拆为两个章节,本章将说明如何解码到 OES 纹理上,下一章则说明如何添加滤镜。本章代码你可以在 LearnMediaCodec-DecodeToTextureOESActivity 中找到。
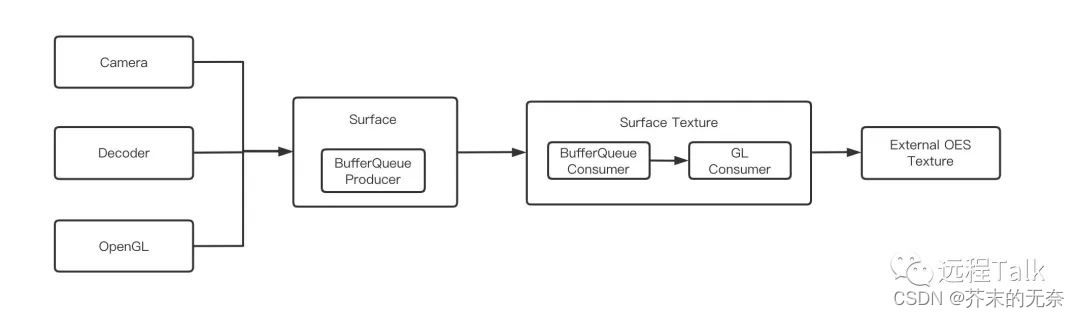
Surface、SurfaceTexture 以及 OES 纹理
MediaCodec 仅接受 Surface 作为解码的输出目标。那么问题来了,我们如何将纹理与Surface进行关联呢?幸运的是,Android为我们提供了 SurfaceTexture 和 OES 纹理这两个工具。关于OES纹理和SurfaceTexture的详细信息,你可以参考相关资料,这里就不再详细展开了。
下面的代码显示了如何更具一个 OES 纹理来创建 Surface
val numTexId = 1
val textureHandles = IntArray(numTexId)
GLES20.glGenTextures(numTexId, textureHandles, 0)
val surfaceTexture = SurfaceTexture(textureHandles[0])
val surface = Surface(surfaceTexture)
创建好 Surface 后,我们用这个 Surface 来构建 codec 即可:
codec.configure(videoFormat, surface, null, 0)
如此一来,MediaCodec 就能够将视频帧解码至 OES 纹理上了。
建立 EGL 环境
注意,我们调用了以 GLES20 开头的 OpenGL ES API,你需要保证调用 OpenGL API 前当前线程的 EGL 环境是正确的。这部分比较难理解,但目前你只需要记住就行了。
在代码中,我们构建了一个 EGLHelper 的类来帮助我们正确的建立 EGL 环境,代码如下:
class EGLHelper {
    private val TAG = "EGLHelper"

    private var mEGLDisplay = EGL14.EGL_NO_DISPLAY
    private var mEGLSurface = EGL14.EGL_NO_SURFACE
    private var mEGLContext: EGLContext? = null

    fun setupEGL(width: Int, height: Int) {
        mEGLDisplay = EGL14.eglGetDisplay(EGL14.EGL_DEFAULT_DISPLAY)
        if (mEGLDisplay === EGL14.EGL_NO_DISPLAY) {
            getError()
            throw java.lang.RuntimeException("unable to get EGL14 display")
        }

        val version = IntArray(2)
        if (!EGL14.eglInitialize(mEGLDisplay, version, 0, version, 1)) {
            mEGLDisplay = null
            throw java.lang.RuntimeException("unable to initialize EGL14")
        }

        // Configure EGL for pbuffer and OpenGL ES 2.0.  We want enough RGB bits
        // to be able to tell if the frame is reasonable.
        val attribList = intArrayOf(
            EGL14.EGL_RED_SIZE, 8,
            EGL14.EGL_GREEN_SIZE, 8,
            EGL14.EGL_BLUE_SIZE, 8,
            EGL14.EGL_RENDERABLE_TYPE, EGL14.EGL_OPENGL_ES2_BIT,
            EGLExt.EGL_RECORDABLE_ANDROID, 1,
            EGL14.EGL_NONE
        )

        val configs = arrayOfNulls<EGLConfig>(1)
        val numConfigs = IntArray(1)
        if (!EGL14.eglChooseConfig(
                mEGLDisplay,
                attribList,
                0,
                configs,
                0,
                configs.size,
                numConfigs,
                0
            )
        ) {
            throw RuntimeException("eglChooseConfig failed")
        }

        // 创建 EGLContext
        val contextAttrs = intArrayOf(
            EGL14.EGL_CONTEXT_CLIENT_VERSION, 2,
            EGL14.EGL_NONE
        )
        mEGLContext =
            EGL14.eglCreateContext(mEGLDisplay, configs[0], EGL14.EGL_NO_CONTEXT, contextAttrs, 0)
        if (mEGLContext == EGL14.EGL_NO_CONTEXT) {
            getError()
            throw RuntimeException("eglCreateContext failed")
        }

        // 创建 EGLSurface
        val surfaceAttrib = intArrayOf(
            EGL14.EGL_WIDTH, width,
            EGL14.EGL_HEIGHT, height,
            EGL14.EGL_NONE
        )
        mEGLSurface = EGL14.eglCreatePbufferSurface(mEGLDisplay, configs[0], surfaceAttrib, 0)
        if (mEGLSurface == EGL14.EGL_NO_SURFACE) {
            getError()
            throw RuntimeException("eglCreateWindowSurface failed")
        }
    }

    fun makeCurrent() {
        if (!EGL14.eglMakeCurrent(mEGLDisplay, mEGLSurface, mEGLSurface, mEGLContext)) {
            getError()
            throw RuntimeException("eglMakeCurrent failed")
        }
    }

    fun releaseEGL() {
        if (!EGL14.eglMakeCurrent(
                mEGLDisplay,
                EGL14.EGL_NO_SURFACE,
                EGL14.EGL_NO_SURFACE,
                EGL14.EGL_NO_CONTEXT
            )
        ) {
            throw java.lang.RuntimeException("eglMakeCurrent failed")
        }
    }

    fun release() {
        if (EGL14.eglGetCurrentContext() == mEGLContext) {
            // Clear the current context and surface to ensure they are discarded immediately.
            EGL14.eglMakeCurrent(
                mEGLDisplay, EGL14.EGL_NO_SURFACE, EGL14.EGL_NO_SURFACE,
                EGL14.EGL_NO_CONTEXT
            )
        }
        EGL14.eglDestroySurface(mEGLDisplay, mEGLSurface)
        EGL14.eglDestroyContext(mEGLDisplay, mEGLContext)
        EGL14.eglTerminate(mEGLDisplay)

        mEGLDisplay = null
        mEGLContext = null
        mEGLSurface = null
    }
}
上面代码看起来确实有够复杂的,但我并不想一一进行解释,关于 Android EGL 内容你可以参考 Android OpenGL 开发—EGL 的使用 。
setupEGL中调用EGL14.eglCreatePbufferSurface创建了一个 EGLSurface,width 和 height 作为属性一同作为输入。makeCurrent函数将 GL Context 切换到当前线程中,而releaseEGL解绑当前的 GL Context。再重申一遍,在调用任何 OpenGL API 前应该确保当前线程中有 GL Context。release释放 EGL 相关的资源,在退出时应该调用
Show me the code
基础知识已经铺垫完毕,接下来看具体的代码,并对代码做详细的解释
private fun decodeToSurfaceAsync() {
    val width = 720
    val height = 1280
    mEGLHelper.setupEGL(width, height)
    mEGLHelper.makeCurrent()
    count = 0
    // allocate texture id
    val numTexId = 1
    val textureHandles = IntArray(numTexId)
    GLES20.glGenTextures(numTexId, textureHandles, 0)
    checkGlError("glGenTextures")
    // bind texture id to oes and config it
    GLES20.glBindTexture(GLES11Ext.GL_TEXTURE_EXTERNAL_OES, textureHandles[0])
    // ....

    checkGlError("init oes texture")
    // create SurfaceTexture with texture id
    mSurfaceTexture = SurfaceTexture(textureHandles[0])
    thread = HandlerThread("FrameHandlerThread")
    thread!!.start()
    //mSurfaceTexture!!.setOnFrameAvailableListener(this)
    mSurfaceTexture!!.setOnFrameAvailableListener({
        synchronized(lock) {
            // New frame available before the last frame was proces
            if (frameAvailable)
                Log.d(TAG, "Frame available before the last frame w
            frameAvailable = true
            lock.notifyAll()
        }
    }, Handler(thread!!.looper))
    // create Surface With SurfaceTexture
    mOutputSurface = Surface(mSurfaceTexture)
    // create and configure media extractor
    val mediaExtractor = MediaExtractor()
    resources.openRawResourceFd(R.raw.h264_720p).use {
        mediaExtractor.setDataSource(it)
    }
    val videoTrackIndex = 0
    mediaExtractor.selectTrack(videoTrackIndex)
    val videoFormat = mediaExtractor.getTrackFormat(videoTrackIndex
    // create and configure media codec
    val codecList = MediaCodecList(MediaCodecList.REGULAR_CODECS)
    val codecName = codecList.findDecoderForFormat(videoFormat)
    val codec = MediaCodec.createByCodecName(codecName)
    val maxInputSize = videoFormat.getInteger(MediaFormat.KEY_MAX_I
    val inputBuffer = ByteBuffer.allocate(maxInputSize)
    val bufferInfo = MediaCodec.BufferInfo()
    val inputEnd = AtomicBoolean(false)
    val outputEnd = AtomicBoolean(false)
    // set codec callback in async mode
    codec.setCallback(object : MediaCodec.Callback() {
        override fun onInputBufferAvailable(codec: MediaCodec, inpu
            Log.d(TAG, "onInputBufferAvailable")
            val isExtractorReadEnd =
                getInputBufferFromExtractor(mediaExtractor, inputBu
            if (isExtractorReadEnd) {
                inputEnd.set(true)
                codec.queueInputBuffer(
                    inputBufferId, 0, 0, 0,
                    MediaCodec.BUFFER_FLAG_END_OF_STREAM
                )
            } else {
                val codecInputBuffer = codec.getInputBuffer(inputBu
                codecInputBuffer!!.put(inputBuffer)
                codec.queueInputBuffer(
                    inputBufferId,
                    0,
                    bufferInfo.size,
                    bufferInfo.presentationTimeUs,
                    bufferInfo.flags
                )
                mediaExtractor.advance()
            }
        }
        override fun onOutputBufferAvailable(
            codec: MediaCodec,
            outputBufferId: Int,
            info: MediaCodec.BufferInfo
        ) {
            if (info.flags and MediaCodec.BUFFER_FLAG_END_OF_STREAM
                outputEnd.set(true)
            }
            if (info.size > 0) {
                Log.i(TAG, "onOutputBufferAvailable")
                codec.releaseOutputBuffer(outputBufferId, true)
                waitTillFrameAvailable()
                mEGLHelper.makeCurrent()
                mSurfaceTexture!!.updateTexImage()
                saveTextureToImage(textureHandles[0], width, height
                count++
            }
        }
        override fun onError(codec: MediaCodec, e: MediaCodec.Codec
            e.printStackTrace()
        }
        override fun onOutputFormatChanged(codec: MediaCodec, forma
            Log.e(TAG, "onOutputFormatChanged")
        }
    })
    // configure with surface
    codec.configure(videoFormat, mOutputSurface, null, 0)
    // release EGL context in this thread
    mEGLHelper.releaseEGL()
    // start decoding
    codec.start()
    // wait for processing to complete
    while (!outputEnd.get() && count < 10) {
        Log.i(TAG, "count: $count")
        Thread.sleep(10)
    }
    mediaExtractor.release()
    codec.stop()
    codec.release()
}
代码大致说明:
mEGLHelper.setupEGL(width, height)建立 EGL 环境,接着使用makeCurrent方法切换当前线程的 GL Context,因为我们要开始调用 GL API 了GLES20.glGenTextures它生成一个OpenGL纹理;GLES20.glBindTexture将其绑定到OES(OpenGL ES)纹理上,然后设置纹理的各种参数。- 创建一个SurfaceTexture,它可以从图像流(如摄像头)接收图像帧,并将其转换为OpenGL ES可用的纹理。
- 创建一个HandlerThread,这是一个带有Looper的线程,可以处理消息队列中的任务。
- 设置SurfaceTexture的帧可用监听器,当有新的帧可用时,它会被调用。
- 创建一个Surface,它是一个抽象的绘图表面,可以从SurfaceTexture接收图像帧。
- 创建并配置MediaExtractor,它可以从媒体文件中提取轨道和元数据。
- 创建并配置MediaCodec,它是一个用于编解码音频和视频数据的类。
- 设置MediaCodec的回调,这些回调在输入缓冲区可用、输出缓冲区可用、发生错误和输出格式改变时被调用。
- 配置MediaCodec,使其使用Surface作为输出表面。
- 启动MediaCodec,开始解码过程。
- 在解码过程结束后,释放资源。
现在讨论几个细节的问题。首先让我们看 onOutputBufferAvailable 中的逻辑
if (info.size > 0) {
    Log.i(TAG, "onOutputBufferAvailable")
    codec.releaseOutputBuffer(outputBufferId, true)
    waitTillFrameAvailable()
    mEGLHelper.makeCurrent()
    mSurfaceTexture!!.updateTexImage()
    saveTextureToImage(textureHandles[0], width, height, count)
    count++
}
调用 releaseOutputBuffer 后,MediaCodec 将渲染好这一帧,然后通过 onFrameAvailable 回调告知使用者帧已经画好了,可以被消费了。因此我们在这里调用了 waitTillFrameAvailable 来等待回调函数被调用。
当我们等到了一帧后,makeCurrent 切换 GL Context 到当前线程,然后调用 updateTexImage 将视频帧更新到 OES 纹理上。注意,调用updateTexImage 前必须得用 makeCurrent 绑定 GL Context。接着,我们将 OES 纹理上的内容保存到了本地,以便验证效果。
第二个问题,为什么要额外创建一个 HandlerThread 用来处理 setOnFrameAvailableListener 回调事件?如果不这么进行设置,在当前这个 case 下是会卡死的,我猜测是因为 waitTillFrameAvailable 阻塞了 MediaCodec 的回调线程,而 MediaCodec 也用这个线程来执行 onFrameAvailable,所以导致卡死。
总结
本文介绍了如何使用 MediaCodec 解码视频帧到 OES 纹理上,对 OES 纹理、SurfaceTexture 等概念做了介绍和说明。本文所有代码在 LearnMediaCodec-DecodeToTextureOESActivity


 1985
1985

 被折叠的 条评论
为什么被折叠?
被折叠的 条评论
为什么被折叠?
 到【灌水乐园】发言


