


 来源:juejin.cn/post/7304265842954469413
👉 欢迎加入小哈的星球,你将获得: 专属的项目实战 / 1v1 提问 / Java 学习路线 / 学习打卡 / 每月赠书 / 社群讨论
新项目:《从零手撸:仿小红书(微服务架构)》 正在持续爆肝中,基于 Spring Cloud Alibaba + Spring Boot 3.x + JDK 17..., 点击查看项目介绍;
《从零手撸:前后端分离博客项目(全栈开发)》 2期已完结,演示链接:http://116.62.199.48/;
截止目前,累计输出 54w+ 字,讲解图 2330+ 张,还在持续爆肝中.. 后续还会上新更多项目,目标是将 Java 领域典型的项目都整一波,如秒杀系统, 在线商城, IM 即时通讯,Spring Cloud Alibaba 等等,戳我加入学习,解锁全部项目,已有2000+小伙伴加入
一、前言
最近ChatGPT非常受欢迎,尤其是在编写代码方面,我每天都在使用。随着使用时间的增长,我开始对其原理产生了一些兴趣。虽然我无法完全理解这些AI大型模型的算法和模型,但我认为可以研究一下其中的交互逻辑。特别是,我想了解它是如何实现在发送一个问题后不需要等待答案完全生成,而是通过不断追加的方式实现实时回复的。
F12打开控制台后,我发现在点击发送后,它会发送一个普通的请求。但是回复的方式却不同,它的类型是eventsource。一次请求会不断地获取数据,然后前端的聊天组件会动态地显示回复内容,回复的内容是用Markdown格式来展示的。

在了解了前面的这些东西后我就萌生了自己写一个小demo的想法。起初,我打算使用openai的接口,并写一个小型的UI组件。然而,由于openai账号申请复杂且存在网络问题,很多人估计搞不定,所以我最终选择了通义千问。通义千问有两个优点:一是它是国内的且目前调用是免费的,二是它提供了Java-SDK和API文档,开发起来容易。
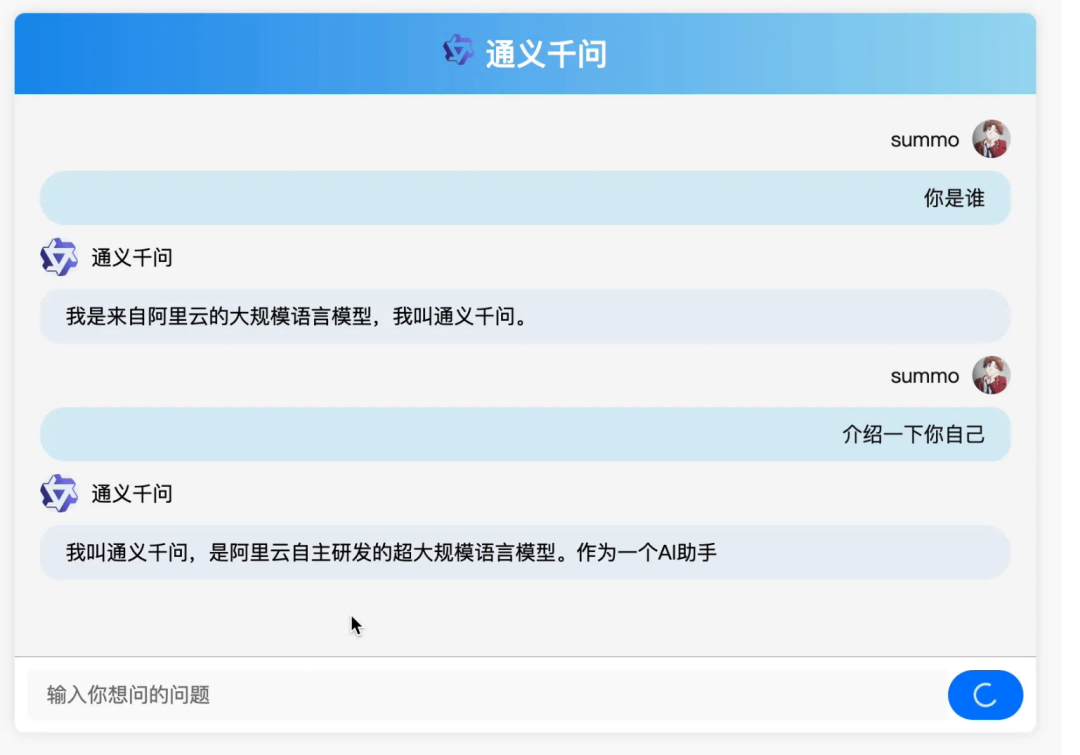
作为后端开发人员,按照API文档调用模型并不难,但真正难到我的是前端UI组件的编写。我原以为市面上会有很多支持EventStream的现成组件,但事实上并没有。不知道是因为这个功能太容易还是太难,总之,对接通义千问只花了不到一小时,而编写一个UI对话组件却花了整整两天的时间!接下来,我将分享一些我之前的经验,希望可以帮助大家少走坑。
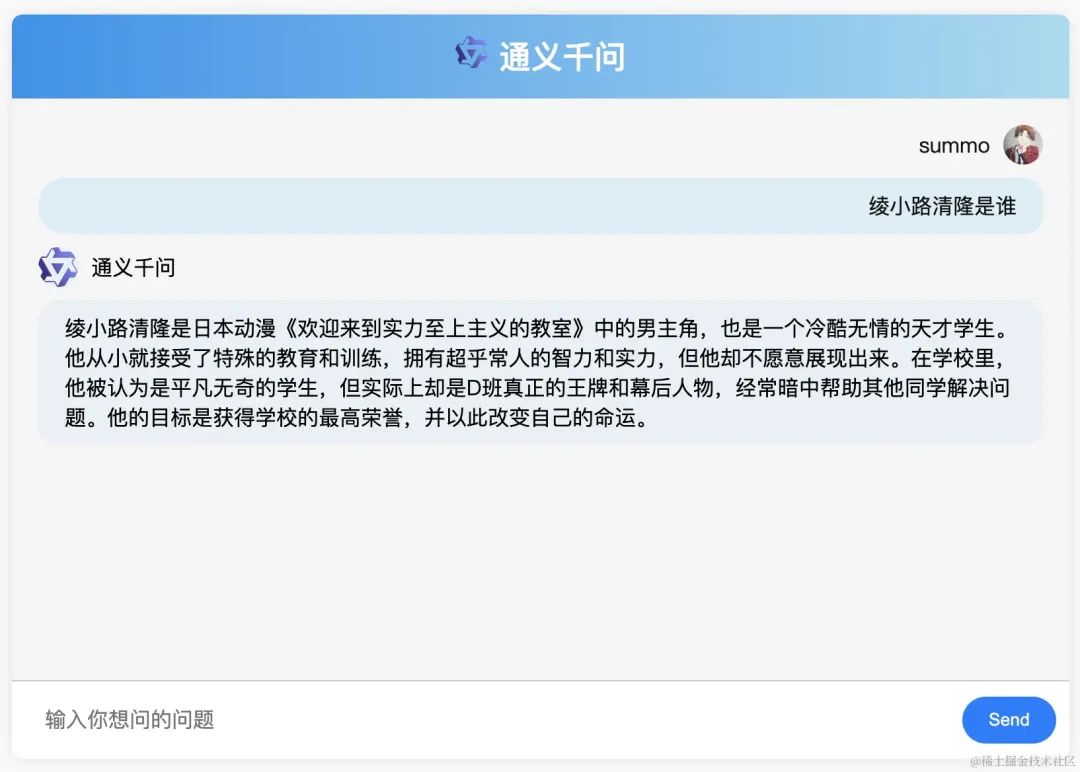
首先展示一下我的成品效果
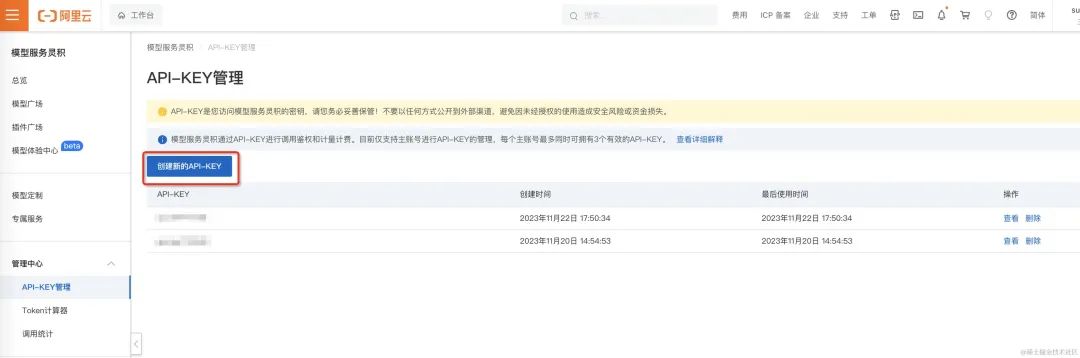
二、通义千问开发Key申请
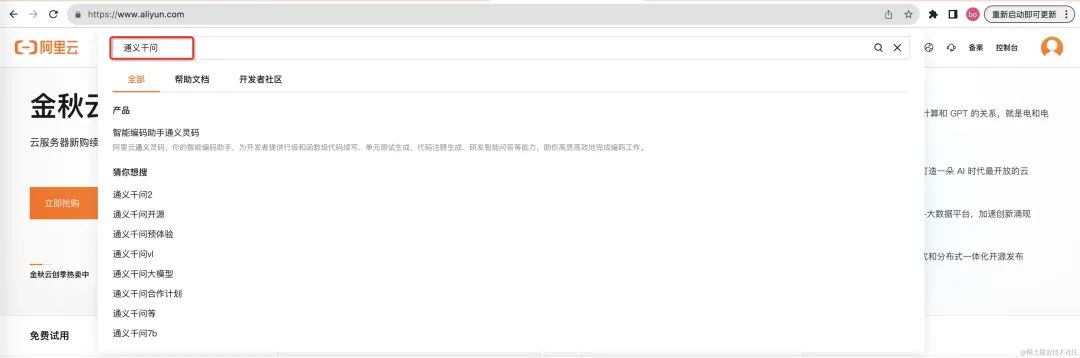
1. 登录阿里云,搜索通义千问
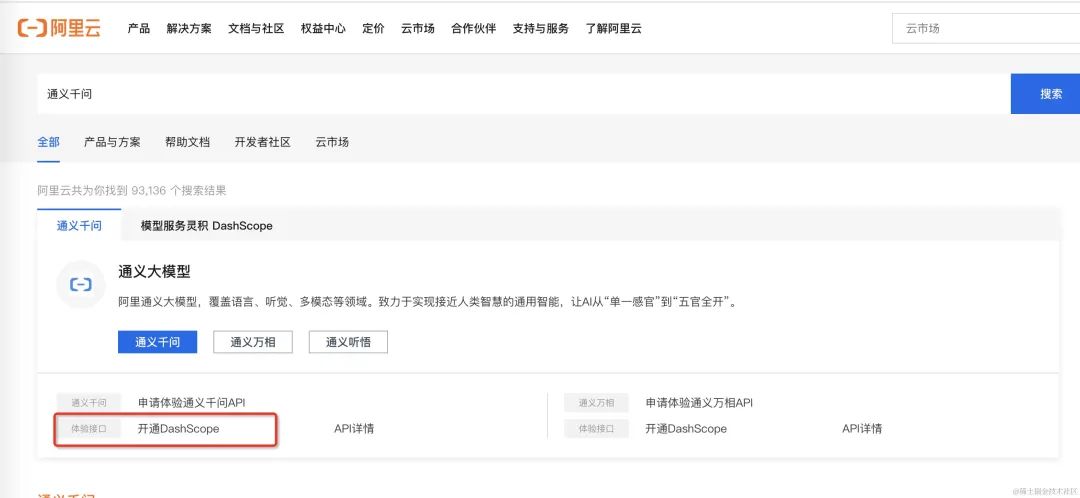
2. 点击"开通DashScope"
3. 创建一个API-KEY
4. 对接流程
1)API文档地址
https://help.aliyun.com/zh/dashscope/developer-reference/api-details
2)Java-SDK依赖
<dependency>
  <groupId>com.alibaba</groupId>
  <artifactId>dashscope-sdk-java</artifactId>
  <version>2.8.2</version>
</dependency>
三、支持EventStream格式的接口
1. 什么是EventStream
EventStream是一种流式数据格式,用于实时传输事件数据。它是基于HTTP协议的,但与传统的请求-响应模型不同,它是一个持续的、单向的数据流。它可用于推送实时数据、日志、通知等,所以EventStream很适合这种对话式的场景。在Spring Boot中,主要有以下框架和模块支持EventStream格式:
Spring WebFlux:Spring WebFlux是Spring框架的一部分,用于构建反应式Web应用程序。
Reactor:Reactor是一个基于响应式流标准的库,是Spring WebFlux的核心组件。
Spring Cloud Stream:Spring Cloud Stream是一个用于构建消息驱动的微服务应用的框架。
这次我使用的是reactor-core框架。
2. 写一个例子
maven依赖
<!-- Reactor Core -->
<dependency>
  <groupId>io.projectreactor</groupId>
  <artifactId>reactor-core</artifactId>
  <version>3.4.6</version>
</dependency>
代码如下
import org.springframework.http.MediaType;
import org.springframework.web.bind.annotation.GetMapping;
import org.springframework.web.bind.annotation.RequestMapping;
import org.springframework.web.bind.annotation.RestController;
import reactor.core.publisher.Flux;
import java.time.Duration;
import java.time.LocalTime;
@RestController
@RequestMapping("/event-stream")
public class EventStreamController {
@GetMapping(produces = MediaType.TEXT_EVENT_STREAM_VALUE)
public Flux<String> getEventStream() {
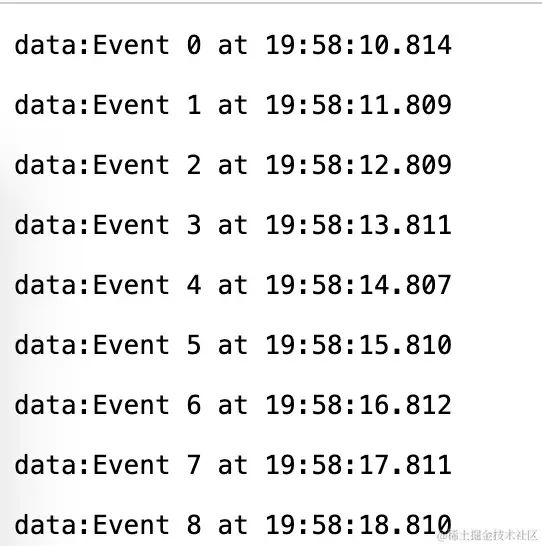
return Flux.interval(Duration.ofSeconds(1))
.map(sequence -> "Event " + sequence + " at " + LocalTime.now());
}
}调用一下接口后就可以看到浏览器上在不断地打印时间戳了
四、项目实现
这个就不BB了,直接贴代码!
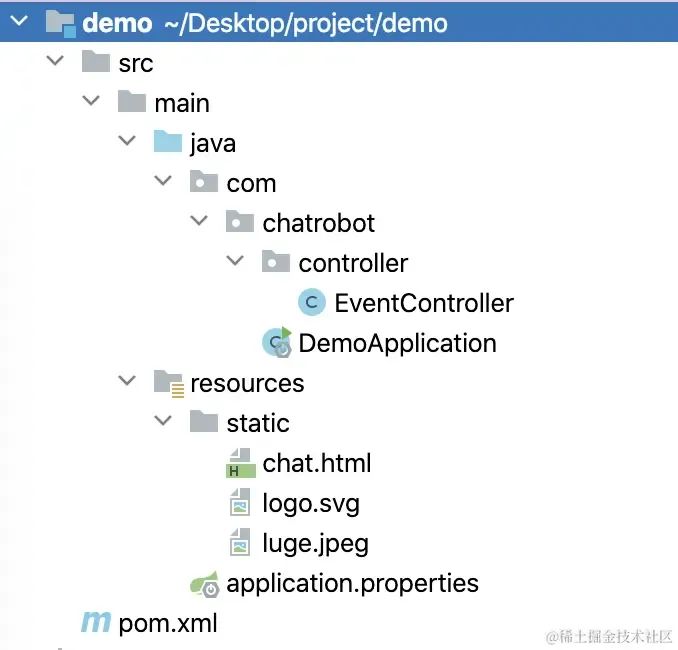
1. 项目结构
2. pom.xml
<?xml version="1.0" encoding="UTF-8"?>
<project xmlns="http://maven.apache.org/POM/4.0.0" xmlns:xsi="http://www.w3.org/2001/XMLSchema-instance"
         xsi:schemaLocation="http://maven.apache.org/POM/4.0.0 https://maven.apache.org/xsd/maven-4.0.0.xsd">
    <modelVersion>4.0.0</modelVersion>
    <parent>
        <groupId>org.springframework.boot</groupId>
        <artifactId>spring-boot-starter-parent</artifactId>
        <version>2.7.17</version>
        <relativePath/> <!-- lookup parent from repository -->
    </parent>
    <groupId>com.chatrobot</groupId>
    <artifactId>demo</artifactId>
    <version>0.0.1-SNAPSHOT</version>
    <name>demo</name>
    <description>Demo project for Spring Boot</description>
    <properties>
        <java.version>1.8</java.version>
    </properties>
    <dependencies>
        <!-- 通义千问SDK -->
        <dependency>
            <groupId>com.alibaba</groupId>
            <artifactId>dashscope-sdk-java</artifactId>
            <version>2.8.2</version>
        </dependency>

        <!-- Reactor Core -->
        <dependency>
            <groupId>io.projectreactor</groupId>
            <artifactId>reactor-core</artifactId>
            <version>3.4.6</version>
        </dependency>

        <!-- Web组件 -->
        <dependency>
            <groupId>org.springframework.boot</groupId>
            <artifactId>spring-boot-starter-web</artifactId>
            <exclusions>
                <exclusion>
                    <artifactId>logback-classic</artifactId>
                    <groupId>ch.qos.logback</groupId>
                </exclusion>
            </exclusions>
        </dependency>

    </dependencies>

</project>
3. 代码
1)后端代码
DemoApplication.java
package com.chatrobot;

import org.springframework.boot.SpringApplication;
import org.springframework.boot.autoconfigure.SpringBootApplication;

@SpringBootApplication
public class DemoApplication {

    public static void main(String[] args) {
        SpringApplication.run(DemoApplication.class, args);
    }

}
EventController.java
package com.chatrobot.controller;

import java.time.Duration;
import java.time.LocalTime;
import java.util.Arrays;

import com.alibaba.dashscope.aigc.generation.Generation;
import com.alibaba.dashscope.aigc.generation.GenerationResult;
import com.alibaba.dashscope.aigc.generation.models.QwenParam;
import com.alibaba.dashscope.common.Message;
import com.alibaba.dashscope.common.Role;
import com.alibaba.dashscope.exception.ApiException;
import com.alibaba.dashscope.exception.InputRequiredException;
import com.alibaba.dashscope.exception.NoApiKeyException;

import io.reactivex.Flowable;
import org.springframework.beans.factory.annotation.Value;
import org.springframework.http.MediaType;
import org.springframework.http.codec.ServerSentEvent;
import org.springframework.web.bind.annotation.CrossOrigin;
import org.springframework.web.bind.annotation.GetMapping;
import org.springframework.web.bind.annotation.RequestMapping;
import org.springframework.web.bind.annotation.RestController;
import reactor.core.publisher.Flux;

@RestController
@RequestMapping("/events")
@CrossOrigin
public class EventController {

    @Value("${api.key}")
    private String apiKey;

    @GetMapping(value = "/streamAsk", produces = MediaType.TEXT_EVENT_STREAM_VALUE)
    public Flux<ServerSentEvent<String>> streamAsk(String q) throws Exception {

        Generation gen = new Generation();

        // 创建用户消息对象
        Message userMsg = Message
            .builder()
            .role(Role.USER.getValue())
            .content(q)
            .build();

        // 创建QwenParam对象,设置参数
        QwenParam param = QwenParam.builder()
            .model(Generation.Models.QWEN_PLUS)
            .messages(Arrays.asList(userMsg))
            .resultFormat(QwenParam.ResultFormat.MESSAGE)
            .topP(0.8)
            .enableSearch(true)
            .apiKey(apiKey)
            // get streaming output incrementally
            .incrementalOutput(true)
            .build();

        // 调用生成接口,获取Flowable对象
        Flowable<GenerationResult> result = gen.streamCall(param);

        // 将Flowable转换成Flux<ServerSentEvent<String>>并进行处理
        return Flux.from(result)
            // add delay between each event
            .delayElements(Duration.ofMillis(1000))
            .map(message -> {
                String output = message.getOutput().getChoices().get(0).getMessage().getContent();
                System.out.println(output); // print the output
                return ServerSentEvent.<String>builder()
                    .data(output)
                    .build();
            })
            .concatWith(Flux.just(ServerSentEvent.<String>builder().comment("").build()))
            .doOnError(e -> {
                if (e instanceof NoApiKeyException) {
                    // 处理 NoApiKeyException
                } else if (e instanceof InputRequiredException) {
                    // 处理 InputRequiredException
                } else if (e instanceof ApiException) {
                    // 处理其他 ApiException
                } else {
                    // 处理其他异常
                }
            });
    }

    @GetMapping(value = "test", produces = MediaType.TEXT_EVENT_STREAM_VALUE)
    public Flux<String> testEventStream() {
        return Flux.interval(Duration.ofSeconds(1))
            .map(sequence -> "Event " + sequence + " at " + LocalTime.now());
    }
}
2)前端代码
chat.html
<!DOCTYPE html>
<html lang="en">
<head>
    <meta charset="UTF-8" />
    <meta name="viewport" content="width=device-width, initial-scale=1.0" />
    <title>ChatBot</title>
    <style>
        body {
            background: #f9f9f9;
            /* 替换为您想要的背景颜色或图片 */
        }

        .chat-bot {
            display: flex;
            flex-direction: column;
            width: 100%;
            max-width: 800px;
            margin: 50px auto;
            box-shadow: 0 0 10px rgba(0, 0, 0, 0.1);
            border-radius: 8px;
            overflow: hidden;
            font-family: "Roboto", sans-serif;
            background: #f5f5f5;
        }

        .chat-bot-header {
            background: linear-gradient(to right, #1791ee, #9fdbf1);
            color: white;
            text-align: center;
            padding: 15px;
            font-size: 24px;
            font-weight: 500;
        }

        .chat-bot-messages {
            flex: 1;
            padding: 20px;
            min-height: 400px;
            overflow-y: auto;
        }

        .userName {
            margin: 0 10px;
        }

        .message-wrapper {
            display: flex;
            align-items: flex-start;
            margin-bottom: 10px;
            border-radius: 20px;
        }

        .message-wrapper.user {
            justify-content: flex-end;
            border-radius: 20px;
        }

        .message-avatar {
            width: 30px;
            height: 30px;
            border-radius: 50%;
            background-color: #ccc;
            margin-right: 10px;
            margin-bottom: 10px;
            /* 添加这一行 */
            order: -1;
            /* 添加这一行 */
            text-align: right;
        }

        .message-avatar.user {
            background-color: transparent;
            display: flex;
            justify-content: flex-end;
            width: 100%;
            margin-right: 0;
            align-items: center;
        }

        .message-avatar.bot {
            background-color: transparent;
            display: flex;
            justify-content: flex-start;
            width: 100%;
            margin-right: 0;
            align-items: center;
        }

        .message-avatar-inner.user {
            background-image: url("./luge.jpeg");
            background-size: cover;
            background-position: center;
            width: 30px;
            height: 30px;
            border-radius: 50%;
        }

        .message-avatar-inner.bot {
            background-image: url("./logo.svg");
            background-size: cover;
            background-position: center;
            width: 30px;
            height: 30px;
            border-radius: 50%;
        }

        .message {
            padding: 10px 20px;
            border-radius: 15px;
            font-size: 16px;
            background-color: #d9edf7;
            order: 1;
            /* 添加这一行 */
        }

        .bot {
            background-color: #e9eff5;
            /* 添加这一行 */
        }

        .user {
            background-color: #d9edf7;
            color: #111111;
            order: 1;
            /* 添加这一行 */
        }

        .chat-bot-input {
            display: flex;
            align-items: center;
            border-top: 1px solid #ccc;
            padding: 10px;
            background-color: #fff;
        }

        .chat-bot-input input {
            flex: 1;
            padding: 10px 15px;
            border: none;
            font-size: 16px;
            outline: none;
        }

        .chat-bot-input button {
            padding: 10px 20px;
            background-color: #007bff;
            border: none;
            border-radius: 50px;
            color: white;
            font-weight: 500;
            cursor: pointer;
            transition: background-color 0.3s;
        }

        .chat-bot-input button:hover {
            background-color: #0056b3;
        }

        @media (max-width: 768px) {
            .chat-bot {
                margin: 20px;
            }

            .chat-bot-header {
                font-size: 20px;
            }

            .message {
                font-size: 14px;
            }
        }

        @keyframes spin {
            0% {
                transform: rotate(0deg);
            }
            100% {
                transform: rotate(360deg);
            }
        }

        .loading-spinner {
            width: 15px;
            height: 15px;
            border-radius: 50%;
            border: 2px solid #d9edf7;
            border-top-color: transparent;
            animation: spin 1s infinite linear;
        }
    </style>
</head>
<body>
<div class="chat-bot">
    <div class="chat-bot-header">
        <img src="./logo.svg" alt="Logo" class="logo" />
        通义千问
    </div>
    <div class="chat-bot-messages"></div>
    <div class="chat-bot-input">
        <input type="text" placeholder="输入你想问的问题" />
        <button id="sendButton">Send</button>
    </div>
</div>
<script
        src="https://cdnjs.cloudflare.com/ajax/libs/markdown-it/13.0.2/markdown-it.min.js"
        integrity="sha512-ohlWmsCxOu0bph1om5eDL0jm/83eH09fvqLDhiEdiqfDeJbEvz4FSbeY0gLJSVJwQAp0laRhTXbUQG+ZUuifUQ=="
        crossorigin="anonymous"
        referrerpolicy="no-referrer"
></script>
<script>
    const userName = "summo";

    document.addEventListener("DOMContentLoaded", function () {
        const input = document.querySelector(".chat-bot-input input");
        const messagesContainer = document.querySelector(".chat-bot-messages");
        const sendButton = document.getElementById("sendButton");

        function appendToMessage(messageTxt, sender, md, message) {
            let messageElement = messagesContainer.querySelector(
                `.message-wrapper.${sender}:last-child .message`
            );

            if (!messageElement) {
                if (sender === "bot") {
                    messageElement = document.createElement("div");
                    messageElement.classList.add("message-avatar", sender);
                    messageElement.innerHTML = `<div class="message-avatar-inner ${sender}"></div><div class="userName">通义千问</div>`;
                    messagesContainer.appendChild(messageElement);
                } else {
                    messageElement = document.createElement("div");
                    messageElement.classList.add("message-avatar", sender);
                    messageElement.innerHTML = `<div class="message-avatar-inner ${sender}"></div><div class="userName"">${userName}</div>`;
                    messagesContainer.appendChild(messageElement);
                }
                messageElement = document.createElement("div");
                messageElement.classList.add("message-wrapper", sender);
                messageElement.innerHTML = `<div class="message ${sender}"></div>`;
                messagesContainer.appendChild(messageElement);

                messageElement = messageElement.querySelector(".message");
            }
            // messageElement.textContent += messageTxt; // 追加文本
            // messagesContainer.scrollTop = messagesContainer.scrollHeight; // 滚动到底部
            let result = (message += messageTxt);
            const html = md.renderInline(messageTxt);
            messageElement.innerHTML += html;
            messagesContainer.scrollTop = messagesContainer.scrollHeight;
        }

        function handleSend() {
            const inputValue = input.value.trim();
            if (inputValue) {
                input.disabled = true;
                sendButton.disabled = true;
                sendButton.innerHTML = '<div class="loading-spinner"></div>';
                const md = new markdownit();
                // 修改按钮文本内容为"Loading..."
                let message = "";
                appendToMessage(inputValue, "user", md, message);
                input.value = "";
                const eventSource = new EventSource(
                    `http://localhost:8080/events/streamAsk?q=${encodeURIComponent(
                        inputValue
                    )}`
                );
                eventSource.onmessage = function (event) {
                    console.log(event.data);
                    appendToMessage(event.data, "bot", md, message);
                };
                eventSource.onerror = function () {
                    eventSource.close();
                    input.disabled = false;
                    sendButton.disabled = false;
                    sendButton.innerHTML = "Send";
                };
            }
        }

        document
            .querySelector(".chat-bot-input button")
            .addEventListener("click", handleSend);
        input.addEventListener("input", function () {
            sendButton.disabled = input.value.trim() === "";
        });

        input.addEventListener("keypress", function (event) {
            if (event.key === "Enter" && !sendButton.disabled) {
                handleSend();
            }
        });
    });
</script>
</body>
</html>
另外还有两个头像,大家可以替换成自己喜欢的,好了文章到这里也就结束了,再秀一下我的成品👉
👉 欢迎加入小哈的星球,你将获得: 专属的项目实战 / 1v1 提问 / Java 学习路线 / 学习打卡 / 每月赠书 / 社群讨论
新项目:《从零手撸:仿小红书(微服务架构)》 正在持续爆肝中,基于 Spring Cloud Alibaba + Spring Boot 3.x + JDK 17..., 点击查看项目介绍;
《从零手撸:前后端分离博客项目(全栈开发)》 2期已完结,演示链接:http://116.62.199.48/;
截止目前,累计输出 54w+ 字,讲解图 2330+ 张,还在持续爆肝中.. 后续还会上新更多项目,目标是将 Java 领域典型的项目都整一波,如秒杀系统, 在线商城, IM 即时通讯,Spring Cloud Alibaba 等等,戳我加入学习,解锁全部项目,已有1900+小伙伴加入


1. 我的私密学习小圈子~
2. 不知道哪种分页效果更好?一次性教给你四种分页方案!
3. 代码如诗,如此优雅的代码你能够写得出来吗?
4. 敢在简历上写消息队列,这几个问题必须拿下!
最近面试BAT,整理一份面试资料《Java面试BATJ通关手册》,覆盖了Java核心技术、JVM、Java并发、SSM、微服务、数据库、数据结构等等。
获取方式:点“在看”,关注公众号并回复 Java 领取,更多内容陆续奉上。PS:因公众号平台更改了推送规则,如果不想错过内容,记得读完点一下“在看”,加个“星标”,这样每次新文章推送才会第一时间出现在你的订阅列表里。
点“在看”支持小哈呀,谢谢啦


 1850
1850

 被折叠的 条评论
为什么被折叠?
被折叠的 条评论
为什么被折叠?
 到【灌水乐园】发言


