


/**
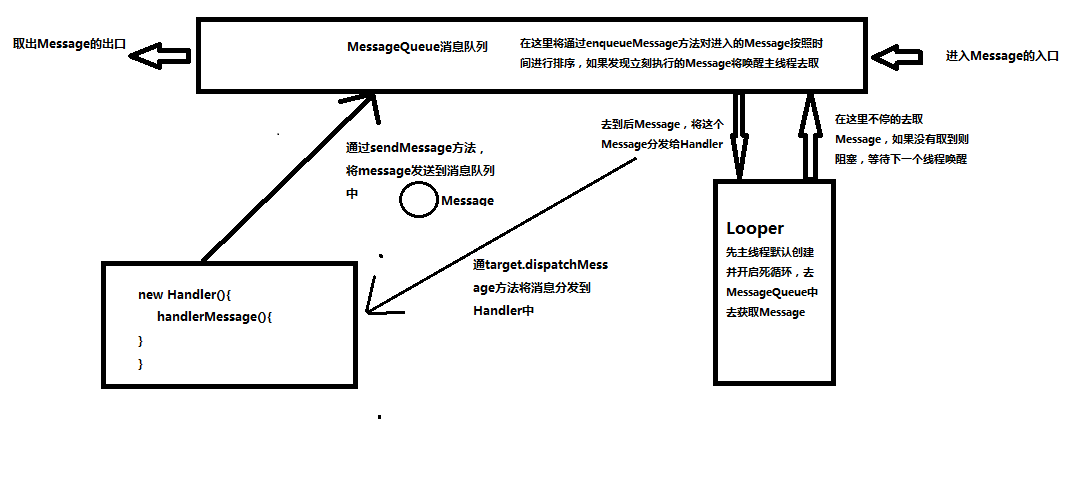
Handler、Looper、Message三者之间的关系,无外乎就是开始Looper会开始无限的循环,目的是在消息队列中进行获取Message,有则取无在等;而Handler则是在发送Message和handlerMessage方面起作用,发送的Message则是发送到消息队列中,handlerMessage则是处理Looper发过来的消息
*/
先附一张三者关系图方便理解
源码分析
首先我们来看一下Handler的构造方法
    /**
     * Default constructor associates this handler with the queue for the
     * current thread.
     *
     * If there isn't one, this handler won't be able to receive messages.
     */
    public Handler() {
        ...
        //获取Looper对象
       mLooper = Looper.myLooper();
       if (mLooper == null) {
            throw new RuntimeException(
                "Can't create handler inside thread that has not called Looper.prepare()");
        }
        mQueue = mLooper.mQueue;
        mCallback = null;
}为了验证我们来看主线程的方法ActivityThread类main方法
    public static final void main(String[] args) {
        ...
        Looper.prepareMainLooper();
        if (sMainThreadHandler == null) {
            sMainThreadHandler = new Handler();
        }

        ActivityThread thread = new ActivityThread();
        thread.attach(false);

        if (false) {
            Looper.myLooper().setMessageLogging(new
                    LogPrinter(Log.DEBUG, "ActivityThread"));
        }

        Looper.loop();
        ...
    }
}
    public static final void prepare() {
        if (sThreadLocal.get() != null) {
            throw new RuntimeException("Only one Looper may be created per thread");
        }
        sThreadLocal.set(new Looper());
    }

    public static final void prepareMainLooper() {
        prepare();
        setMainLooper(myLooper());
        if (Process.supportsProcesses()) {
            myLooper().mQueue.mQuitAllowed = false;
        }
    }
Looper.myLooper()方法
    /**
     * Return the Looper object associated with the current thread.  Returns
     * null if the calling thread is not associated with a Looper.
     */
    public static final Looper myLooper() {
        return (Looper)sThreadLocal.get();
}Loop.loop()方法
   /**
     *  Run the message queue in this thread. Be sure to call
     * {@link #quit()} to end the loop.
     */
    public static final void loop() {
        Looper me = myLooper();
        MessageQueue queue = me.mQueue;
        ...
        while (true) {
            Message msg = queue.next(); // might block
            //if (!me.mRun) {
            //    break;
            //}
            if (msg != null) {
                if (msg.target == null) {
                    // No target is a magic identifier for the quit message.
                    return;
                }
                msg.target.dispatchMessage(msg);
                ...
            }
        }
}msg.target.dispatchMessage(msg)方法
    /**
     * Handle system messages here.
     */
    public void dispatchMessage(Message msg) {
        if (msg.callback != null) {
            handleCallback(msg);
        } else {
            if (mCallback != null) {
                if (mCallback.handleMessage(msg)) {
                    return;
                }
            }
            handleMessage(msg);
        }
}对于Looper取消息和发送消息就是这些,接下来来看一下Handler的发送消息到消息队列的过程
最终调用的sendMessageAtTime()方法
    public boolean sendMessageAtTime(Message msg, long uptimeMillis)
    {
        boolean sent = false;
        MessageQueue queue = mQueue;
        if (queue != null) {
            msg.target = this;
            sent = queue.enqueueMessage(msg, uptimeMillis);
        }
        else {
            RuntimeException e = new RuntimeException(
                this + " sendMessageAtTime() called with no mQueue");
            Log.w("Looper", e.getMessage(), e);
        }
        return sent;
}MessageQueue.enqueueMessage()方法
    final boolean enqueueMessage(Message msg, long when) {
        ...
            msg.when = when;
            //Log.d("MessageQueue", "Enqueing: " + msg);
            Message p = mMessages;
            if (p == null || when == 0 || when < p.when) {
                msg.next = p;
                mMessages = msg;
                needWake = mBlocked; // new head, might need to wake up
            } else {
                Message prev = null;
                while (p != null && p.when <= when) {
                    prev = p;
                    p = p.next;
                }
                msg.next = prev.next;
                prev.next = msg;
                needWake = false; // still waiting on head, no need to wake up
            }
        }
        if (needWake) {
            nativeWake(mPtr);
        }
        return true;
    }
在第一个if语句中通过比较传入的when和队列中第一个Message的when的大小,如果传入的小则需要马上进行处理,将needWake唤醒的状态置为true
否则的话将对消息队列进行遍历将传入的Message根据when插入到里面,并且将唤醒状态置为false。
到这里三者关系就大致讲完了,如果想了解更多请看鸿洋大神的: Android 异步消息处理机制 让你深入理解 Looper、Handler、Message三者关系


 2044
2044

 被折叠的 条评论
为什么被折叠?
被折叠的 条评论
为什么被折叠?
 到【灌水乐园】发言


