


技术提示 (TECHNICAL TIPS)
介绍 (Introduction)
Apache Airflow is one of the best workflow management systems (WMS) that provides data engineers with a friendly platform to automate, monitor, and maintain their complex data pipelines. Started at Airbnb in 2014, then became an open-source project with excellent UI, Airflow has become a popular choice among developers. There are many good resources/tutorials for Airflow users at various levels. You can start learning Airflow with many good tutorials such as this step-by-step guideline, or this series on Medium in which you can also learn about workflow management system in general. For users already familiar with Airflow, this resource may help you gain a very deep understanding of many aspects of Airflow.
Apache Airflow是最好的工作流管理系统(WMS)之一,它为数据工程师提供了一个友好的平台来自动化,监视和维护其复杂的数据管道。 Airflow于2014年在Airbnb开始,后来成为具有出色UI的开源项目,已成为开发人员中的热门选择 。 各个级别的Airflow用户都有许多不错的资源/教程。 你可以开始学习气流与许多好的教程,如这一步一步的指导 ,或者这一系列的介质中,你还可以了解工作流管理系统一般 。 对于已经熟悉Airflow的用户, 此资源可以帮助您深入了解Airflow的许多方面。
In this post, I simply want to share my experience when creating a data warehouse ETL pipeline on AWS with Airflow. I hope it is helpful. And please, correct me if you found something wrong in my post.
在本文中,我只想分享在带有Airflow的AWS上创建数据仓库ETL管道时的经验。 希望对您有所帮助。 如果您发现我的帖子有问题,请改正我。
Cautions
注意事项
1. This article assumes that you already have some working knowledge of data warehouse, AWS, Amazon Redshift in particular, Apache Airflow, command line environment, and Jupyter notebook.
1.本文假设您 已经具备一些数据仓库,AWS,尤其是Amazon Redshift,Apache Airflow,命令行环境和Jupyter笔记本的工作知识。
2. This is your responsibility for monitoring usage charges on the AWS account you use. Remember to terminate the cluster and other related resources each time you finish working.
2.这是您负责监视所使用的AWS账户的使用费用的责任。 请记住,每次完成工作时都要终止集群和其他相关资源。
3. This is one of the assessing projects for the Data Engineering nanodegree on Udacity. So to respect the Udacity Honor Code, I would not include the full notebook with the workflow to explore and build the ETL pipeline for the project. Part of the Jupyter notebook version of this tutorial, together with other data science tutorials could be found on my github.
3.这是有关Udacity的数据工程纳米学位的评估项目之一。 因此,为了遵守Udacity荣誉守则,我不会在工作流程中包括完整的笔记本来探索和构建该项目的ETL管道。 本教程的Jupyter笔记本版本的一部分以及其他数据科学教程可以在我的github上找到。
项目介绍 (Project Introduction)
项目目标 (Project Goal)
Sparkify is a startup company working on a music streaming app. Through the app, Sparkify has collected information about user activity and songs, which is stored as a directory of JSON logs (log-data - user activity) and a directory of JSON metadata files (song_data - song information). These data reside in a public S3 bucket on AWS.
Sparkify是一家致力于音乐流应用程序的新兴公司。 通过该应用程序,Sparkify收集了有关用户活动和歌曲的信息,这些信息存储为JSON日志的目录( log-data -用户活动)和JSON元数据文件的目录( song_data歌曲信息)。 这些数据位于AWS上的公共S3存储桶中。
This project would be a workflow to explore and build an ETL (Extract — Transform — Load) pipeline that:
该项目将是一个工作流程,用于探索和构建ETL(提取-转换-加载)管道 ,该管道具有:
Extracts data from S3 and stages them on AWS Redshift as staging tables (user activity —
Stage_eventstable and song data —Stage_songstable).从S3提取数据,并在AWS Redshift上将它们作为登台表(用户活动—
Stage_events表和歌曲数据—Stage_songs表)进行Stage_songs。Transforms data from staging tables into a set of fact table (
songplays) and dimensional tables (includingartists, time, users, and songstables) for analytics purposes. More detail about these tables could be found in my other related project.将数据从登台表转换为事实表(
songplays)和维度表(包括artists, time, users, and songs表)的artists, time, users, and songs以进行分析。 关于这些表的更多详细信息可以在我的其他相关项目中找到 。- This high-grade ETL pipeline must be dynamic, could be monitored, and allow easy backfills if necessary. This requirement is satisfied by introducing Apache Airflow into the system. 这种高级ETL管道必须是动态的,可以进行监控,并在必要时允许轻松回填。 通过将Apache Airflow引入系统即可满足此要求。
Below is the complete Directed Acyclic Graph — DAG — with the operators used for the project. (If you don’t know what DAGs or operators are, please read a quick definition of Airflow concepts here).
以下是完整的有向无环图DAG,以及用于该项目的运算符。 (如果您不知道什么是DAG或操作员,请在此处阅读Airflow概念的快速定义)。

With this post, I will not discuss in detail how the project was done step by step. Rather, I just walk you through some crucial tips and issues that I encountered when working with Airflow. I hope it will save you so much time and effort dealing with many weird states you may have when building the workflow.
在这篇文章中,我不会详细讨论如何逐步完成该项目。 相反,我只是向您介绍在使用Airflow时遇到的一些关键技巧和问题。 我希望它可以节省您许多时间和精力来处理构建工作流时可能遇到的许多怪异状态。
提示1:从最简单的DAG开始 (Tip 1: Start with the simplest DAG)
Your DAG, the high-level outline that defines tasks in a particular order, should be as simple as possible. It is obviously the best practice in programming, but easy to be forgotten.
DAG是按特定顺序定义任务的高级大纲,应该尽可能简单。 显然,这是编程中的最佳实践,但很容易被遗忘。
Why should we start with a simple DAG?
我们为什么要从一个简单的DAG开始?
Below is the final DAG configuration requirement for my project:
以下是我的项目的最终DAG配置要求:
Basically, the DAG does not have dependencies on past runs; the start_date is on Jan 12, 2019; the pipeline would be scheduled to run every hour. On failure, the task is retried 3 times; the retries happen every 5 minutes.I was so naive trying to use that final DAG configuration for my first run, end up getting overwhelmed when triggering my DAG on the Airflow UI. There were so many runs in the queue. And many, so many more indeed, might come after these.
基本上,DAG不依赖于过去的运行; 开始日期为2019年1月12日; 该管道将按计划每小时运行。 失败时,将重试该任务3次; 重试每5分钟进行一次。 我太天真了,第一次尝试使用最终的DAG配置,最终在Airflow UI上触发我的DAG时不知所措。 队列中有很多跑步。 在这些之后可能还会有更多甚至更多。

Where all these runs in the queue come from?
队列中所有这些运行来自何处?
The arguments
start_date': datetime(2019, 1, 12),andschedule_interval = '@hourlywould produce~ 600 days x 24 hourly backfill runsfrom the start_date (Jan 12, 2019) up to now (2020).参数
start_date': datetime(2019, 1, 12),schedule_interval = '@hourlystart_date': datetime(2019, 1, 12),和schedule_interval = '@hourly~ 600 days x 24 hourly backfill runs从start_date(2019年1月12日)到现在(2020年)将产生schedule_interval = '@hourly~ 600 days x 24 hourly backfill runs。With the arguments
'retries': 3,and'retry_delay': timedelta(minutes = 5),: If the task was failed — of course, it would fail, where on earth a complex data pipeline would not be failed in the first try — it needs to retry 3 times, 5 minutes apart. And so in case of failure, in addition to the high number of runs (each scheduled run x 3 times of retries), it takes 3 x 5 minutes waiting time for each run with retries in this setting. Regarding the number of backfill runs, you will have no option but stop/kill Airflow tasks. It is quite hacky to stop/kill Airflow tasks from the UI, so better not run into this problem. In some cases, although the running DAGs were deleted, and the DAGs were modified and triggered again, they might still restart and run the previous unfinished tasks.使用参数
'retries': 3,和'retry_delay': timedelta(minutes = 5),如果任务失败- 当然,它将失败,在地球上,复杂的数据管道在第一次尝试中不会失败 -需要重试3次,相隔5分钟。 因此,在发生故障的情况下,除了运行次数很高(each scheduled run x 3 times of retries)之外,在这种设置下,每次运行都需要3 x 5分钟的等待时间。 关于回填运行的数量,您别无选择,只能停止/杀死气流任务。 从UI停止/杀死Airflow任务是很 棘手的,因此最好不要遇到此问题。 在某些情况下,尽管删除了正在运行的DAG,并再次对其进行了修改和触发,但它们仍可能重新启动并运行之前未完成的任务。
Then, what does a simple DAG look like?
那么,一个简单的DAG是什么样的?
In my debugging version, the DAG would run right away when triggered ('start_date': datetime.now()) with only 1 run at a time (max_active_runs=1,)) and run only once (schedule_interval= None) without any retry on failure (as default in DAG). This simple DAG will instantly stop when any task fails, which enable us to debug our DAG easily.
在我的调试版本中,DAG将在被触发时立即运行( 'start_date': datetime.now() ),一次仅运行1次( max_active_runs=1,) ),并且仅运行一次( schedule_interval= None ),而无需重试失败时(DAG中的默认设置)。 当任何任务失败时,此简单的DAG将立即停止,这使我们能够轻松调试DAG。
Some other notes:
其他注意事项:
What happens if I keep the start_date as
start_date': datetime(2019, 1, 12)and run the DAG only once (schedule_interval= None): There would be 2 runs: a backfill run for 2019 and one for the current manual run. Since I only need 1 run for my DAG development process, it is better to set'start_date': datetime.now().如果我将start_date保留为
start_date': datetime(2019, 1, 12)并且仅运行DAG一次(schedule_interval= None),将会发生什么情况:将有2次运行:2019年的回填运行和当前的手动运行。 由于我的DAG开发过程只需要运行1次,因此最好设置'start_date': datetime.now()。
DAG is executing multiple schedules at once, the later runs could occur simultaneously and clobber the former run. It is not good if DAG contains some heavy tasks, such as copying a huge table from S3 to Redshift. To bypass this, you may set
max_active_runsto 1.DAG一次执行多个计划,以后的运行可能会同时发生 ,而前一个运行则会变得混乱。 如果DAG包含一些繁重的任务(例如将一个巨大的表从S3复制到Redshift),那不是很好。 要绕过它,可以将
max_active_runs设置为1。
提示2:如何通过Airflow UI停止/杀死Airflow任务? (Tip 2: How to stop/kill Airflow tasks from the Airflow UI?)
As mentioned in Tip 1, it is quite tricky to stop/kill Airflow tasks. There are some approaches to stop/kill the Airflow task on the UI. The approach that works perfectly for me is as follows:
如技巧1所述,停止/终止气流任务非常棘手。 有一些方法可以在UI上停止/终止Airflow任务 。 最适合我的方法如下:
Step 1: Turn off the DAG
步骤1:关闭DAG

Step 2: Delete all the runs
第2步:删除所有运行
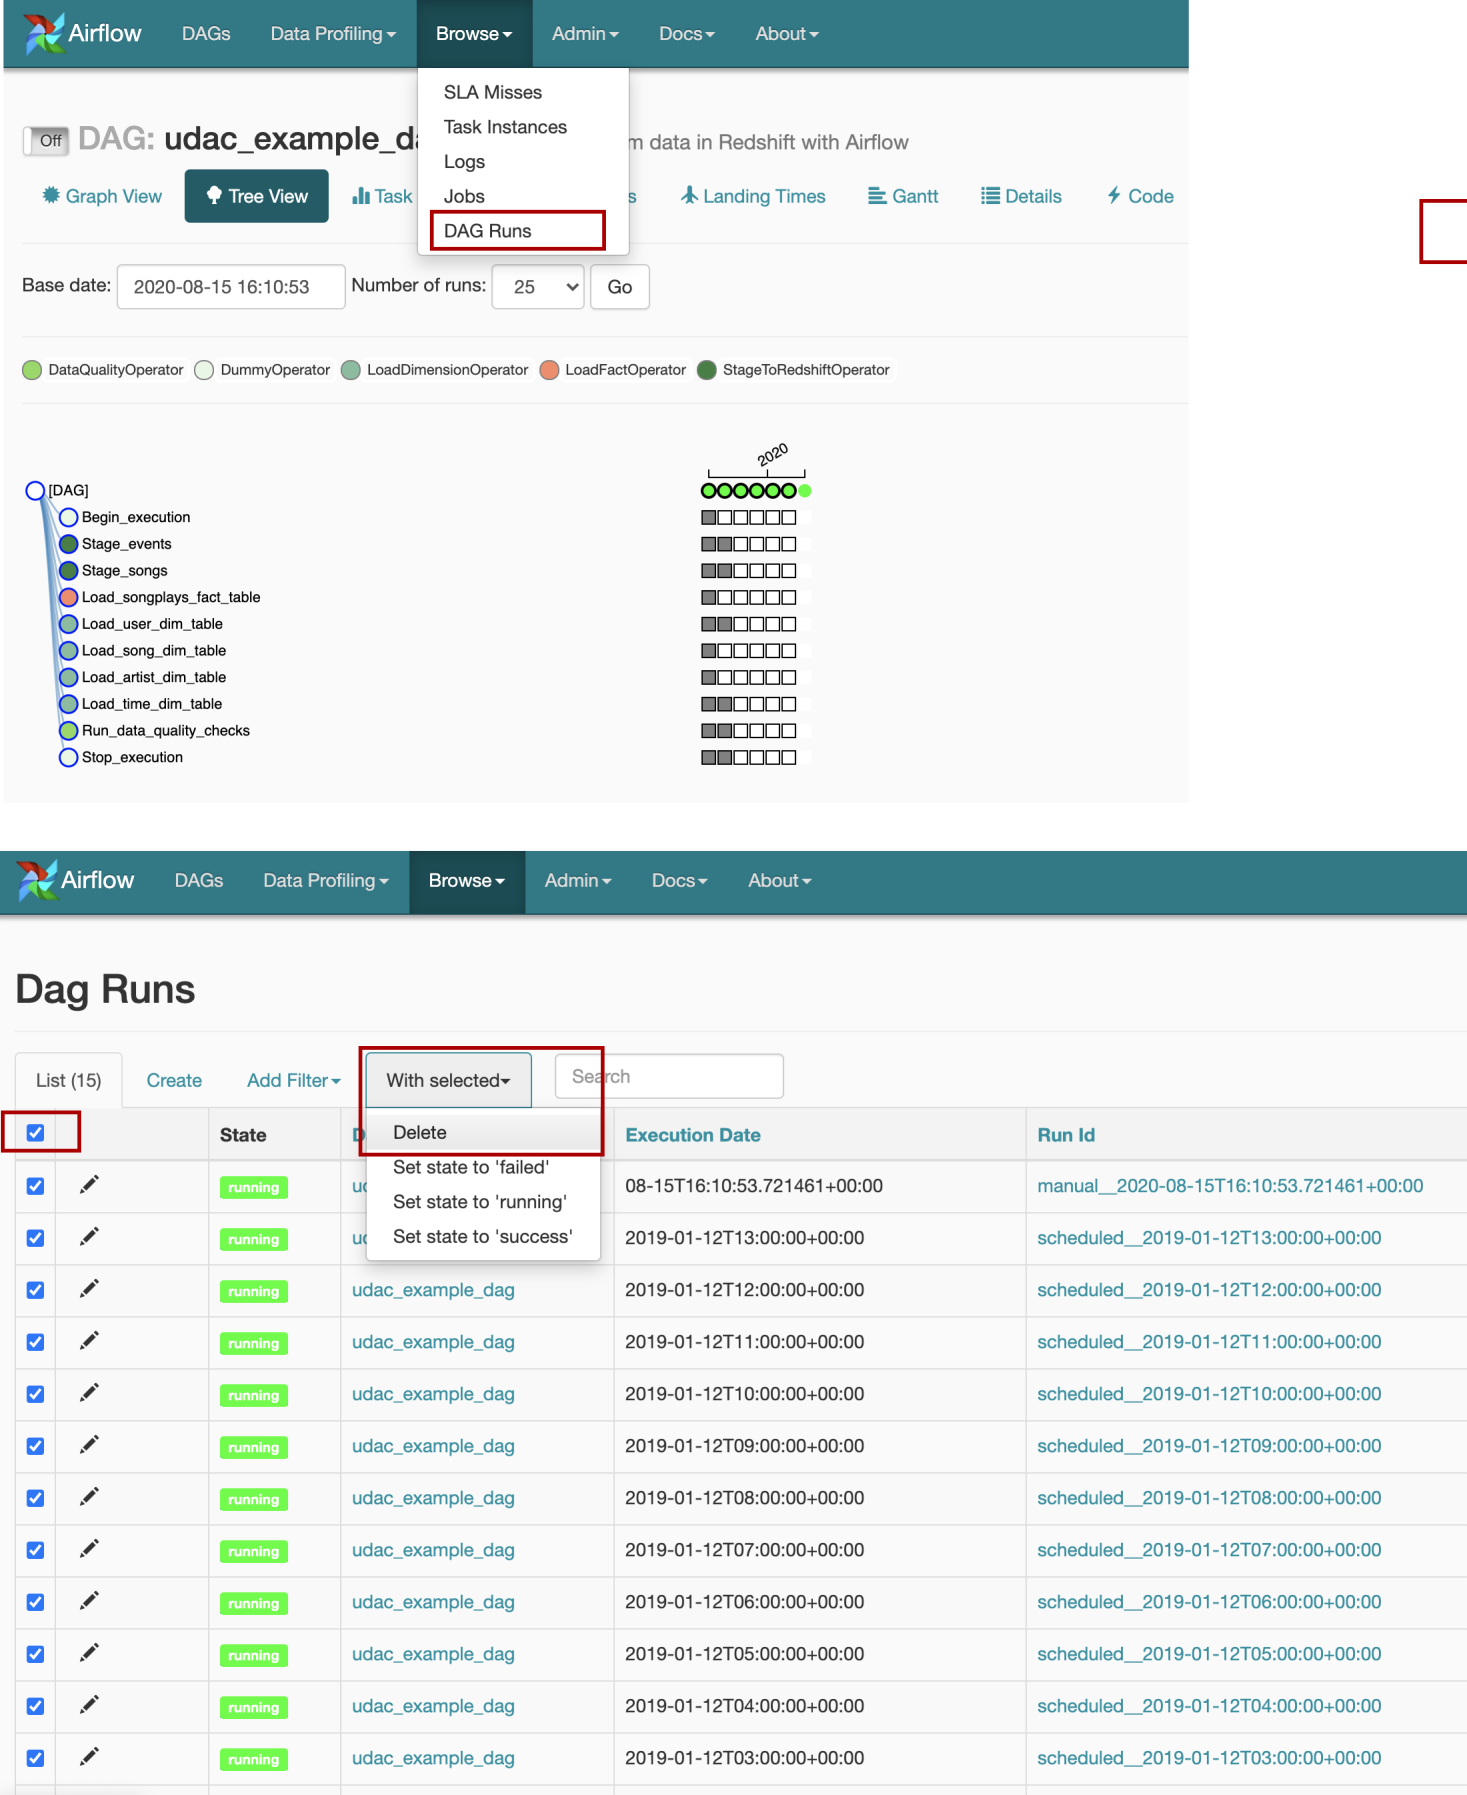
On the Airflow menu bar, choose Browse -> DAG Runs -> Checkbox to select all the runs -> With Selected -> Delete
在“气流”菜单栏上,选择“ Browse -> DAG Runs -> Checkbox to select all the runs -> With Selected -> Delete
Note that you have to turn off the DAG first, otherwise, you may see the White Walkers and the Army of the Dead in action: the executor may continue to schedule and start the new runs even though you just deleted all the DAG runs.
请注意, 您必须先关闭DAG,否则,你可能会看到 白鬼 者与死者的军队在行动 :执行器可以继续时间表并开始,即使你只是删除了所有的DAG运行新的运行。
提示3:“ DAG损坏” —可能是由于DAG解析问题引起的,而不是您的代码引起的。 (Tip 3: “Broken DAG” — It could be due to the DAG parsing issue, not your code.)
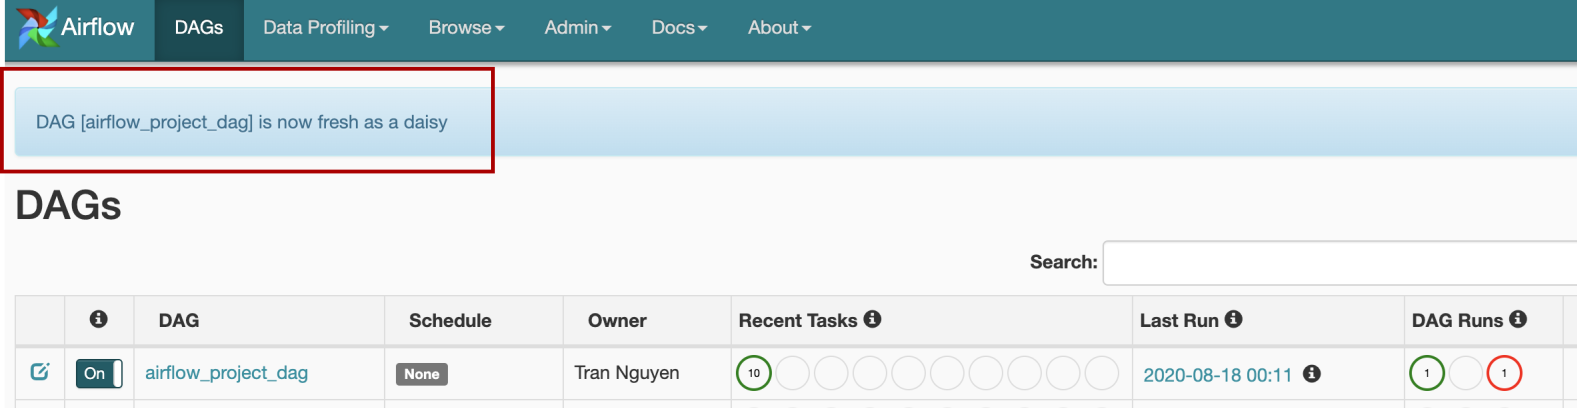
With the Airflow default settings, when you update the associated python file, DAGs should be reloaded. As someone mentioned, when the webserver is running, it refreshes DAGs every 30 seconds by default. We are good to go when seeing our DAGs “is now fresh as a daisy”:
使用Airflow默认设置,当您更新关联的python文件时,应重新加载DAG。 就像有人提到的那样 ,当Web服务器运行时,默认情况下它每30秒刷新一次DAG。 当我们看到我们的DAG“现在像雏菊一样新鲜”时,我们很高兴去:
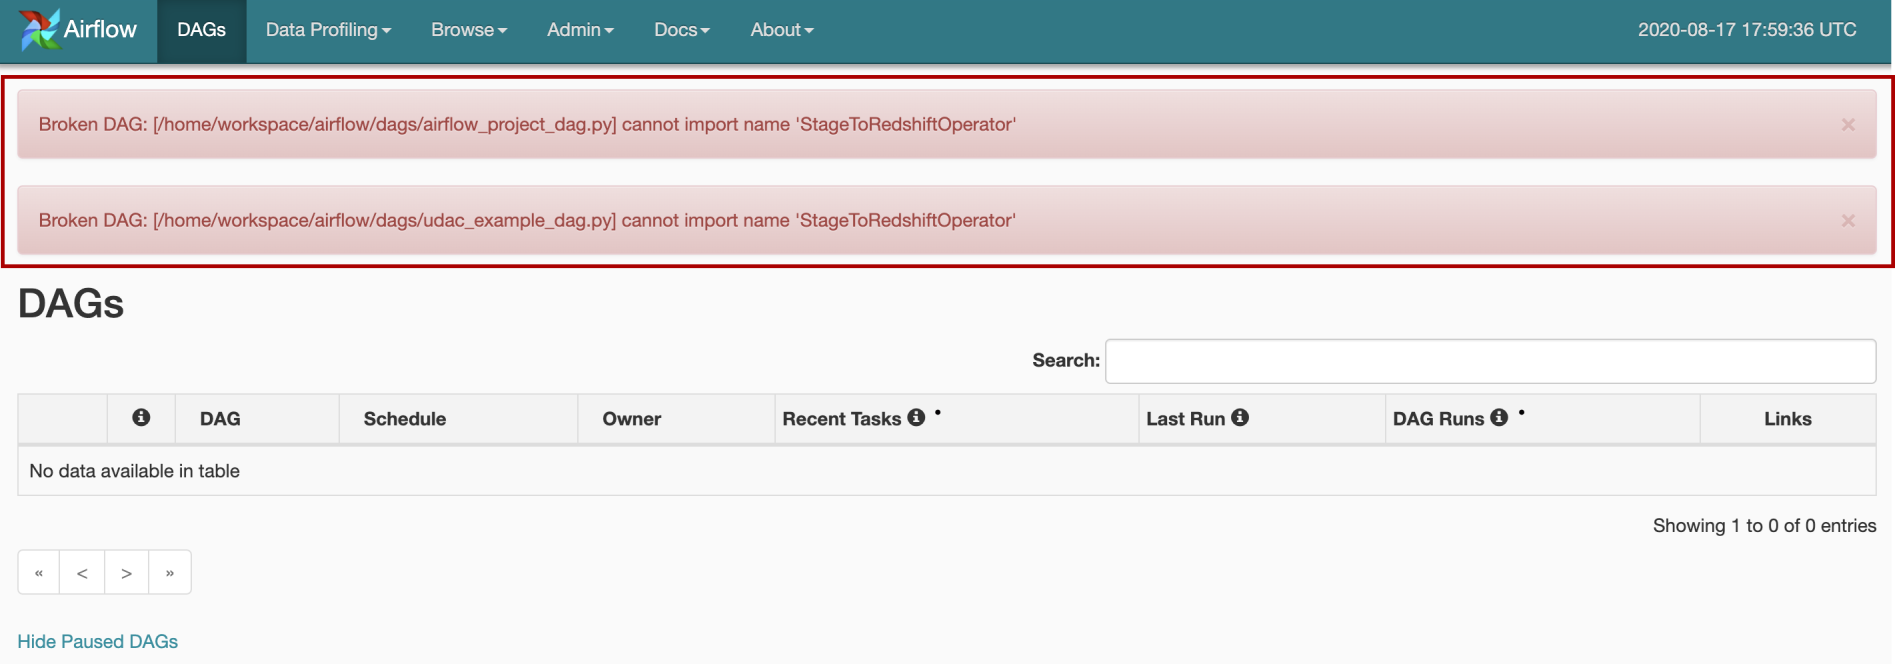
Generally, the Airflow webserver can smoothly handle DAG loading failures in most cases, but not all the time. I spent a whole day trying to figure out what was wrong with my code. I even reload a dummy — nothing-could-be-wrong DAG, but still could not fix the bug that led to the broken DAG:
通常,Airflow Web服务器可以在大多数情况下(并非始终)平稳地处理DAG加载失败。 我花了一整天的时间来弄清楚我的代码出了什么问题。 我什至重新加载了一个虚拟对象-毫无疑问的DAG,但仍然无法修复导致DAG损坏的错误:
It turned out that there was nothing wrong with my DAG, I only have to refresh the workspace to overcome the webserver issues due to DAG parsing.
事实证明,我的DAG没什么问题,我只需要刷新工作区即可克服DAG解析带来的Web服务器问题。
In summary, when there is a broken DAG issue, and you are sure that it is not because of your code, you may try:
总而言之,当DAG出现问题时,并且您确定不是由于您的代码引起的,您可以尝试:
Use the refresh button on the main DAG screen, which lets you reload the DAGs manually.
使用DAG主屏幕上的刷新按钮,可让您手动重新加载DAG。
Type
python -c "from airflow.models import DagBag; d = DagBag();"on the command line to manually refresh the DAGs.键入
python -c "from airflow.models import DagBag; d = DagBag();"在命令行上手动刷新DAG。Type
/opt/airflow/start.shon the command line to start the Airflow webserver again.在命令行上键入
/opt/airflow/start.sh以再次启动Airflow Web服务器。- For those who use the project workspace on Udacity, if nothing works, refresh the workspace with the Menu bar. 对于在Udacity上使用项目工作区的用户,如果没有任何效果,请使用菜单栏刷新工作区。

Refresh Workspace will copy all your files to a new machine, therefore, every problem related to file parsing may be solved. After finishing my Airflow project, I have to admit thatRefresh Workspace is my ultimate solution for many Broken DAG issues.
刷新工作区会将所有文件复制到新计算机上,因此,可以解决与文件解析有关的每个问题。 完成我的Airflow项目之后,我必须承认 Refresh Workspace 是解决许多 Broken DAG 问题的 最终解决方案 。
关于调试损坏的DAG的注意事项 (Note about debugging the broken DAG)
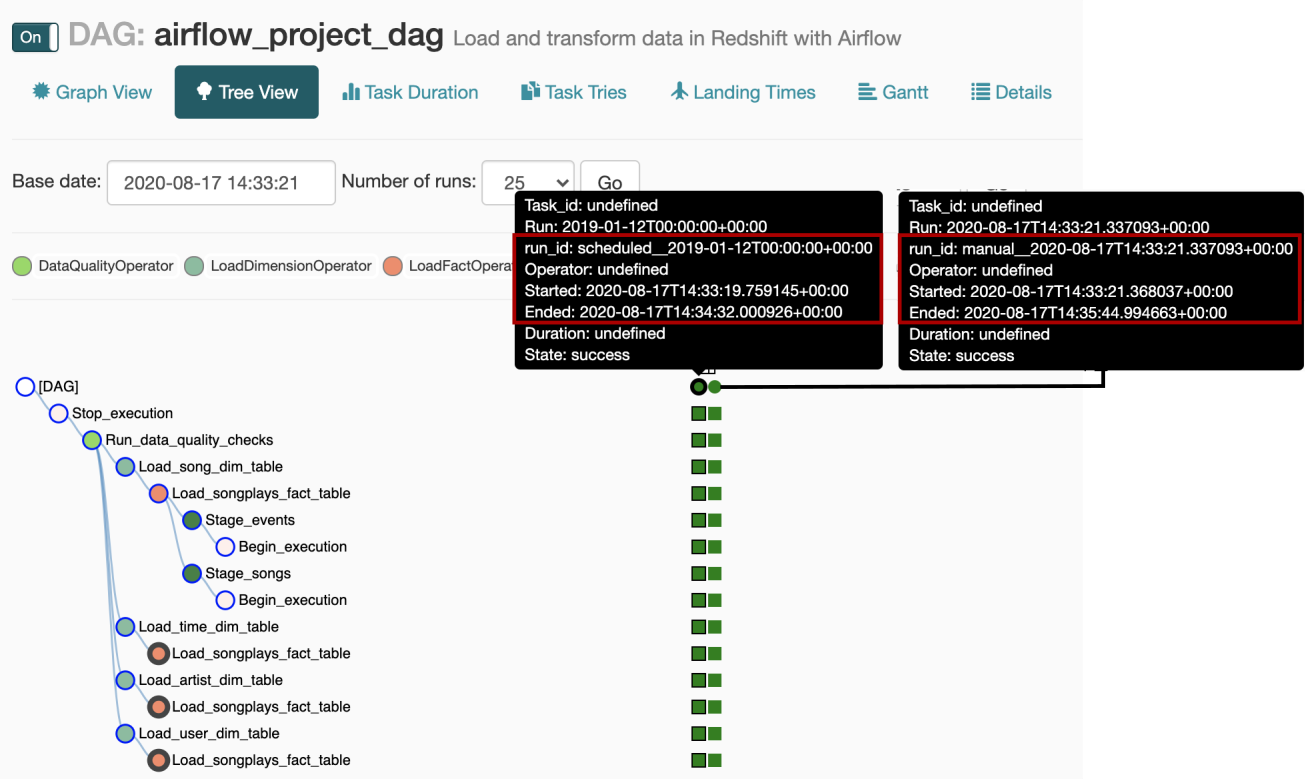
The Airflow UI may notify that you have a broken DAG, however, it will not show the problem of your DAG. The detailed issues in the broken DAG could be seen by manually reloading the DAGs using python -c "from airflow.models import DagBag; d = DagBag();" or starting the Airflow webserver again using /opt/airflow/start.sh on the command line. Below is a demonstration for this:
Airflow UI可能会通知您DAG损坏,但是,它不会显示DAG的问题。 可以通过使用python -c "from airflow.models import DagBag; d = DagBag();"手动重新加载DAG来查看损坏的DAG中的详细问题python -c "from airflow.models import DagBag; d = DagBag();" 或在命令行上使用/opt/airflow/start.sh再次启动Airflow Web服务器。 以下是对此的演示:

提示4:对于AWS的所有任务,请在Jupyter笔记本上使用IaC(基础结构代码) (Tip 4: For all the tasks with AWS, use IaC (infrastructure-as-code) on Jupyter notebook)
AWS resources could be set up and monitored through either the AWS console or through IaC (Infrastructure-as-code). I prefer the IaC approach since it helps developers automate, maintain, deploy, replicate, and share complex infrastructures easily. There are 3 options for IaC on AWS:
可以通过AWS控制台或IaC(基础架构代码)来设置和监视AWS资源。 我更喜欢IaC方法,因为它可以帮助开发人员轻松地自动化,维护,部署,复制和共享复杂的基础架构。 AWS上的IaC有3个选项:
- AWS-CLI scripts: similar to bash scripts. AWS-CLI脚本:与bash脚本相似。
- Amazon Cloud formation through JSON description for all resources, permission, and constraints. Amazon Cloud通过JSON描述形成所有资源,权限和约束。
AWS SDK: more power, could be integrated with many apps. Python users could use
boto3, a Python SDK, for programmatically accessing AWS.AWS开发工具包:功能更强大,可以与许多应用程序集成。 Python用户可以使用
boto3( Python SDK )以编程方式访问AWS。
We could use IaC to build, launch Amazon Redshift cluster and print out all the necessary configuration information for Airflow connection, such as host, schema, login_user, password, etc., without clicking and searching around on the AWS console. I found it extremely convenient and time-saving, especially when we have to terminate the cluster/clean up the resources and then create, launch, configure the cluster again another day to reduce AWS costs.
我们可以使用IaC构建,启动Amazon Redshift集群并打印出Airflow连接的所有必需配置信息,例如host , schema , login_user , password等,而无需在AWS控制台上四处搜索。 我发现它非常方便且省时,尤其是当我们不得不终止集群/清理资源,然后再创建,启动,配置集群以降低AWS成本的时候。
The whole end-to-end process for setting up and cleaning Amazon Redshift and other AWS resources, as well as a demo for creating a simple data warehouse ETL pipeline on AWS with Airflow, could be found on my Github repository.
在我的Github存储库中可以找到用于设置和清理Amazon Redshift和其他AWS资源的整个端到端过程,以及在AWS上使用Airflow创建简单数据仓库ETL管道的演示。
提示5:以编程方式设置气流连接 (Tip 5: Programmatically set up the Airflow Connection)
To run DAGs with AWS service, you may use Airflow’s UI to set up the connection, such as configuring your AWS credentials, connect to Redshift, etc.
要使用AWS服务运行DAG,您可以使用Airflow的UI设置连接,例如配置AWS凭证,连接到Redshift等。

However, these connections might be lost when the server is stopped or when you refresh your workspace. To avoid unnecessary failure, it is recommended to check if these connections are available before running your DAGs.
但是,当服务器停止或刷新工作空间时,这些连接可能会丢失。 为避免不必要的故障,建议在运行DAG之前检查这些连接是否可用。
During DAG development, manually re-setup these Airflow connections, again and again, is a troublesome and error-prone process, so I prefer to programmatically set up the Airflow Connection as a python script file. You can run the script on the command line when necessary. The simple python script for setting up Airflow connections is as followed:
在DAG开发期间,一次又一次地手动重新设置这些Airflow连接是一个麻烦且容易出错的过程,因此我更喜欢以编程方式将Airflow Connection设置为python脚本文件 。 您可以在必要时在命令行上运行脚本。 设置气流连接的简单python脚本如下:
As a good practice, instead of putting all AWS credentials and the Redshift information directly to the script, when creating the Redshift cluster (as described in Tip 4) you may export these to a .cfg file, and then use the Python packageconfigparser to get the necessary information.
作为一种好的做法,不是将所有AWS凭证和Redshift信息直接放置到脚本中,而是在创建Redshift集群时(如技巧4所述),您可以将它们导出到.cfg文件,然后使用Python包configparser进行以下操作:获得必要的信息。
Thank you so much for reading this post. Good luck with your project, and I am more than happy for any question and discussion.
非常感谢您阅读这篇文章。 祝您的项目好运,对于任何问题和讨论,我都很高兴。
The Jupyter notebook, codes, .cfg file, etc. for this post, together with other data science tutorials could be found on my Github.
这篇文章的Jupyter笔记本,代码,.cfg文件等 以及其他数据科学教程都可以在 我的Github 上找到 。


 1136
1136


 被折叠的 条评论
为什么被折叠?
被折叠的 条评论
为什么被折叠?
 到【灌水乐园】发言


