


artsy 爬虫
Like many others, I can strongly say that taking photos is not my strong suit. I learned to get better and developed a sort of half-smile like Barney from “How I met your Mother”. Recently, I wanted to try to be more photogenic, so I searched through my social media to see how others did it. Then something hit me, most of these photos had some kind of filtering on them, mainly from Snapchat. This threw me for a loop for a while, until I tried them out for myself. These filters were wacky and silly and did make me look better on camera!
像许多其他人一样,我可以坚决地说拍照不是我的强项。 我从“我如何遇见你的母亲”中学到了进步,并学会了像Barney这样的半笑脸。 最近,我想变得更加上镜,因此我在社交媒体上进行搜索,以了解其他人是如何做到的。 然后让我感到震惊的是,这些照片大部分都经过某种过滤,主要来自Snapchat。 这让我循环了一段时间,直到我自己尝试了一下。 这些滤镜古怪而愚蠢,确实使我在相机上看起来更好!
That’s when I wondered, “what if we could make our own filters”? After some research, I learned that Snapchat creates these augmented reality filters from a number of computer vision techniques. Finally, after a few hours of research, I landed on an interesting paper called “A Neural Algorithm for Artistic Style” by Leon A. Gatsy and colleagues. They used a neural network to create a “stylized image” from a photo and a piece of artwork. Then, after a sudden realization, wanted to explore if we could use this technique to create custom filters, like those on Snap chat. So here is my journey on implementing it in Python!
那时候我在想,“我们是否可以自己制造过滤器”? 经过一番研究,我了解到Snapchat通过多种计算机视觉技术创建了这些增强现实滤镜。 最终,经过几个小时的研究,我找到了Leon A. Gatsy及其同事写的一篇有趣的论文,称为“一种用于艺术风格的神经算法”。 他们使用神经网络从照片和艺术品中创建“风格化图像”。 然后,在突然意识到之后,想要探索我们是否可以使用这种技术来创建自定义过滤器,例如Snap聊天中的过滤器。 所以这是我在Python中实现它的旅程!
Side Note: This technique has been a hot topic of research for a couple of years, and there is a number of great online resources and videos that explain the concepts very well. This article is mainly to provide a high-level overview of this technique as best as I can. Alright, let's get started!
旁注:这项技术已经成为研究的热点话题,并且有很多很棒的在线资源和视频很好地解释了这些概念。 本文的主要目的是尽我所能提供有关此技术的高级概述。 好吧,让我们开始吧!
神经风格转移:算法 (Neural Style Transfer: The Algorithm)
So what is this algorithm trying to accomplish? Essentially we want to produce an image that resembles our content image (the image we want stylized), with the artistic style of our style image.
那么该算法要完成什么呢? 本质上,我们希望产生一种与我们的内容图像(我们要风格化的图像)相似的图像,并具有我们风格图像的艺术风格。

In the original paper, he first used the VGG19 model to achieve this result. VGG19 is a popular neural network for image recognition, but we’re mainly going to focus on how it extracts features from a photograph. The feature extraction is done through a number of sequential layers that can detect small patterns. The features it initially picks up are very simple but gets more complex as more feature layers are added. we can then use these features, to recreate our original image!
在原始论文中,他首先使用VGG19模型来实现此结果。 VGG19是一种流行的用于图像识别的神经网络,但我们将主要关注它如何从照片中提取特征。 特征提取是通过许多可以检测出小图案的顺序层完成的。 最初拾取的要素非常简单,但随着添加更多要素图层而变得越来越复杂。 然后,我们可以使用这些功能来重建我们的原始图像!
内容损失 (Content Loss)
In this step, we want to try to recreate, more or less the essence of our content image. To achieve this, we’ll first start off by creating an image full of random noise. We’ll then shape this image to look like our content image, using the extracted features from our network as a guide. The distance between the random image features and the content features is called our “content loss”. To get the best stylized image, we want to minimize this loss function through back-propagation. We’ll finally loop through this whole thing and optimize on each step to get a pretty good recreation of our image.
在这一步中,我们想要尝试或多或少地重新创建内容图像的本质。 为此,我们首先要创建一个充满随机噪声的图像。 然后,我们将从网络中提取的特征用作指导,以使此图像成形为看起来像我们的内容图像。 随机图像特征和内容特征之间的距离称为“内容损失”。 为了获得最佳的风格化图像,我们希望通过反向传播来最小化此损失函数。 我们最终将遍历整个过程,并在每个步骤上进行优化,以使我们的形象得到很好的再现。
for i in range(1,epochs+1):target_features = model_activations(target,model)content_loss = torch.mean((content_features['conv4_2']-target_features['conv4_2'])**2)风格损失 (Style Loss)

For this step, we’ll want to recreate the core artistic direction of our style image. Gatsy solves this in an interesting way! Instead of comparing our style features to another image, we’ll compare each feature map to itself. We’ll first transform the style features into a gram matrix, which is basically the inner product of a matrix. The “style loss” was is basically the sum of losses for all feature maps in the model network. We’ll do a similar looping process and optimize on each step.
对于这一步,我们将要重新创建样式图像的核心艺术方向。 盖茨以一种有趣的方式解决了这个问题! 与其将样式特征与其他图像进行比较,我们将每个特征图与其自身进行比较。 我们首先将样式特征转换为gram矩阵,这基本上是矩阵的内积。 “样式损失”基本上是模型网络中所有要素图的损失之和。 我们将执行类似的循环过程,并在每个步骤上进行优化。
style_loss = 0for layer in style_wt_meas:style_gram = style_grams[layer]target_gram = target_features[layer]_,d,w,h = target_gram.shapetarget_gram = gram_matrix(target_gram)style_loss += (style_wt_meas[layer]*torch.mean((target_gram-style_gram)**2))/d*w*hOur final step in this process is to calculate our final loss as the weighted sum of our content loss and style loss. we’ll also optimize this loss at each step of our training loop.
我们在此过程中的最后一步是将最终损失计算为内容损失和样式损失的加权总和。 我们还将在训练循环的每个步骤中优化这一损失。
total_loss = content_wt*content_loss + style_wt*style_loss问题与未来的工作 (Problems and Future Work)
Gatsy Method for Style Transfer was the first of its kind, but it did have some problems. The major problem is that it’s very slow. This is because Since the optimization is done every cycle in the training loop, the algorithm takes some time to produce anything. Secondly, sometimes changing the weights will greatly destabilize the photo. There is a fix by adding a total loss variation which aligns the mean and variance of the content and style images. From my research, it looks like Neural Style Transfer is still a hot topic, with applications being applied to video processing, simulations, and designs.
样式转换的盖茨方法是第一种,但是确实存在一些问题。 主要的问题是它非常慢。 这是因为由于优化是在训练循环的每个循环中完成的,所以该算法需要花费一些时间来产生任何东西。 其次,有时改变权重会大大破坏照片的稳定性。 通过添加总损耗变化来解决问题,该变化可以使内容和样式图像的均值和方差对齐。 从我的研究看来,神经样式转换仍然是一个热门话题,其应用程序已应用于视频处理,模拟和设计。
I used Ayush Chaurasia: Artistic Neural Style Transfer From Scratch on Youtube to create the code. Like I mentioned in the beginning of this article, there are plenty of great resources you can find online. If you wanted to get started with computer vision problems, I think that building neural style transfer application can be very fun and exciting! So I hoped this helped and I wish you luck if you try to pursue this!
我使用Ayush Chaurasia:Youtube上从头开始的艺术神经风格转换来创建代码。 就像我在本文开头提到的那样,您可以在网上找到很多很棒的资源。 如果您想开始解决计算机视觉问题,我认为构建神经样式转换应用程序会非常有趣和令人兴奋! 因此,我希望这对您有所帮助,并祝您好运,如果您尝试这样做!
谢谢阅读! (Thanks for Reading!)
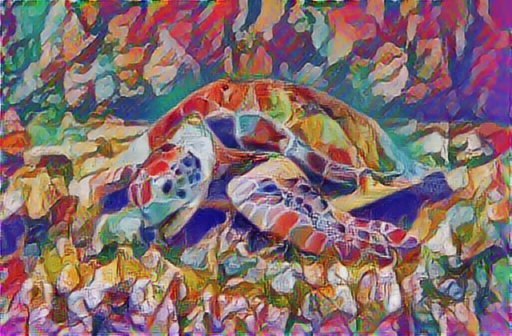
Here are some cool results that I’ve taken, I can’t wait to see what you’ll create!
这是我取得的一些不错的结果,我迫不及待想看看您将创建什么!


artsy 爬虫


 798
798

 被折叠的 条评论
为什么被折叠?
被折叠的 条评论
为什么被折叠?
 到【灌水乐园】发言


