


构建开发环境 构建demo
I should start this article with a disclaimer: It is based on iOS 13, Swift 5, and Xcode 11.x. If you’re reading this and those numbers look dated, be forewarned.
我应该以免责声明开头:它基于iOS 13,Swift 5和Xcode11.x。 如果您正在阅读本文,并且那些数字看起来过时,请提前警告。
I should also warn you that notifications — principally remote ones — involve Apple’s infrastructure, which means you’ll need an Apple Developer account to use them. Of course, you also need one to use CloudKit.
我还应该警告您,通知(主要是远程通知)涉及Apple的基础设施,这意味着您需要有Apple Developer帐户才能使用它们。 当然,您还需要使用CloudKit。
Finally, this is a series. You won’t be building your own WotsApp in 20 minutes. It has taken ten chapters. These are the last two, bringing everything I have covered together. With that said, you’ll note at the start of Chapter 10 a long to-do list. I’m finished and I’m not. If you want more of this series, please leave a comment.
最后,这是一个系列。 您将不会在20分钟内构建自己的WotsApp。 它花了十章。 这是最后两个,将我介绍的所有内容放在一起。 话虽如此,您会在第10章开始时注意到一长串待办事项。 我完成了,但我还没有。 如果您想要更多有关本系列的内容,请发表评论。
第九章 (Chapter 9)
In the last two chapters, we started to implement our conversation between messaging parties. It was a lot of different bits and pieces. So I thought it would be best if I moved the SwiftUI bit into its own chapter. Let’s make the move. Edit the ContentView.swift and create a few more variables:
在最后两章中,我们开始实现消息传递方之间的对话。 这是很多不同的点点滴滴。 因此,我认为最好将SwiftUI移到其自己的章节中。 让我们开始吧。 编辑ContentView.swift并创建更多变量:
Add this code into the Text (“WotsApp”) directive. Note that I had to make the alert here generic since SwiftUI doesn’t seem to support multiple .alerts tagged to the same element.
将此代码添加到Text (“ WotsApp”)指令中。 请注意,由于SwiftUI似乎不支持标记到同一元素的多个.alerts ,因此我必须在此处使警报通用。
We’re using a new PassthroughSubject here too. Make sure you add this to the top of your ContentView.swift file as well:
我们也在这里使用新的PassthroughSubject 。 确保也将其添加到ContentView.swift文件的顶部:
let alertPublisher = PassthroughSubject<(String, String), Never>()Now tag the enable field onto the TextField object so that we can disable requests to send messages if they have been denied or postponed.
现在,将enable字段标记到TextField对象上,这样我们就可以禁止发送已拒绝或延迟的消息的请求。
And finally, add the call to the new cloud.authRequest method we put in place in the last chapter. Tag it to the picker wheel.
最后,将调用添加到cloud.authRequest的新cloud.authRequest方法中。 将其标记到拾纸轮上。
You should be in a position to test again! Go for it. Note that to get the options on a request, you need to pull down on a notification. You should be able to accept, postpone, and deny notifications… and send each other encrypted text messages if you agree.
您应该可以再次进行测试! 去吧。 请注意,要获取请求的选项,您需要下拉通知。 您应该能够接受,推迟和拒绝通知…,如果您同意,也可以互相发送加密的短信。
OK, we’re on roll. But we haven’t quite implemented the protocol as it was envisaged. You recall we wanted the user requesting permission to add you to his private database, if and only if you knew the shared secret — a single secret you both know. To do that, we need an alert popup with a text field. This was trivial in the past but isn’t quite there yet in SwiftUI.
好,我们开始了。 但是我们还没有按预期实现协议。 您回想起,当且仅当您知道共享机密时,我们才希望用户请求权限将您添加到他的私有数据库中-你们都知道一个秘密。 为此,我们需要一个带有文本字段的警报弹出窗口。 过去这很琐碎,但在SwiftUI中还没有。
So here is a solution. I’m not suggesting it is the solution. It’s merely a solution. First, we need to store the secret so that it can be easily accessed by our appDelegate. See the new piece of code here:
所以这是一个解决方案。 我并不是说这是解决方案。 这仅仅是一个解决方案。 首先,我们需要存储秘密,以便我们的appDelegate可以轻松访问它。 在这里查看新的代码:
Obviously, we need to write the secret out in the first place when we read it in. Here is the complete tag as seen in your contentView.swift:
显然,我们在读入机密时首先需要将其写出来。这是在contentView.swift看到的完整标签:
Second, we need to change our publisher to a new one. Let’s call it the popUpPublisher. While we are there, we should add another publisher. We’ll call this one cestBonPublisher. Its purpose is to release the messaging field if the secret code given is good.
第二,我们需要将发布者更改为新发布者。 我们称其为popUpPublisher 。 当我们在那里时,我们应该添加另一个发布者。 我们将其称为cestBonPublisher 。 其目的是在给出的密码很好的情况下释放消息传递字段。
let popUpPublisher = PassthroughSubject<String, Never>()
let cestBonPublisher = PassthroughSubject<Void, Never>()
Third, we need to respond to the PopUpPublisher in our code. Tag the code below to Picker View:
第三,我们需要在代码中响应PopUpPublisher 。 将以下代码标记到Picker View :
And last but not least, we need the code for the popUp. Add this to the base of your ContentView.swift:
最后但并非最不重要的一点是,我们需要popUp的代码。 将其添加到ContentView.swift的基础中:
Oh, and before I forget, you’ll obviously need to capture the cestBonPublisher. This code will need to be tagged along with the alert you already defined. I’m showing the complete code block for good measure, including the previous alerts we put in:
哦,在我忘记之前,您显然需要捕获cestBonPublisher 。 该代码将需要与已经定义的警报一起标记。 我正在显示完整的代码块,以作很好的衡量,包括我们放入的先前警报:
You can run another test. It should challenge you, showing the code into the bargain. Type it incorrectly, it’ll warn you and you won’t be able to send a message. Type it correctly, you’ll get no warning and you can send a message.
您可以运行另一个测试。 它应该挑战您,将代码展示给您。 错误输入,它将警告您,您将无法发送消息。 正确输入,不会收到警告,并且可以发送消息。
Sure, it isn’t quite what I said, but it is very close. I’ll leave it to the reader to remove the code presented in the popup.
当然,这与我所说的不完全相同,但是非常接近。 我将其留给读者以删除弹出窗口中显示的代码。
第10章 (Chapter 10)
Our final chapter — or perhaps not. We left a few loose ends as we moved forward with the project. Here is a list of some open items (you might be able to think of even more):
我们的最后一章-也许不是。 随着项目的进行,我们留下了一些松懈的结局。 以下是一些未清项目的列表(您可能还可以想到):
- We set up the authentication handshake and it works, but it fails to save your decision, forcing an authorize message each time. 我们设置了身份验证握手并且可以使用,但是它无法保存您的决定,因此每次都强制发出授权消息。
- We have conveniently ignored what would happen if you had two users with the same name. 我们方便地忽略了如果您有两个具有相同名称的用户会发生什么。
- On that note, there is no checking on any of the fields you input, which is very poor practice. At a minimum, we need to restrict the length of user names/messages — better still the character set. 关于这一点,没有检查您输入的任何字段,这是非常差的做法。 至少,我们需要限制用户名/消息的长度-更好的是字符集。
- I shouldn’t admit it, but we used magic numbers in a few places. It isn’t good coding practice. We shouldn’t have used any. 我不应该承认,但是我们在一些地方使用了幻数。 这不是良好的编码习惯。 我们不应该使用任何东西。
- We ignored the fact that if you have approximately 100 or more users, you only get a subset initially returned on a search. You have to recursively search again and again to get them all, which is a CloudKit feature. 我们忽略了以下事实:如果您拥有大约100个或更多的用户,则只会得到最初在搜索中返回的子集。 您必须一次又一次地递归搜索以获取所有内容,这是CloudKit功能。
- On that subject, we really need a more scalable solution to selecting users to notify. Scrolling through a list of 100 is going will be a bind. Imagine 1,000. 在这个问题上,我们确实需要一个更具扩展性的解决方案来选择要通知的用户。 滚动浏览100个列表将成为一个绑定。 想象一下1,000。
- In the same domain, we really need to be able to create our own groups of users. Having a global directory simply isn’t feasible in the real world. 在同一个域中,我们确实需要能够创建我们自己的用户组。 在现实世界中,拥有全局目录根本不可行。
- Still on the subject of CloudKit, there is no means of deleting users. This is poor housekeeping. 仍然是CloudKit的主题,无法删除用户。 这是差的家政服务。
- We’re assuming the device is logged into iCloud for CloudKit to work. If not, it will fail. We need to address this with a clear message. 我们假设设备已登录iCloud以便CloudKit正常工作。 如果没有,它将失败。 我们需要用明确的信息来解决这个问题。
Indeed, we skipped error reporting almost everywhere. We need to look into this — especially for CloudKit and
RemoteNotification.实际上,我们几乎在所有地方都忽略了错误报告。 我们需要研究一下-特别是对于CloudKit和
RemoteNotification。- We set up a means of having multiple users for a single device, but we didn’t finish the capability. You’ll recall we used the CloudKit dashboard to directly edit our database. We need a real solution. 我们设置了一种方法来让一个设备拥有多个用户,但是还没有完成该功能。 您会记得我们使用CloudKit仪表板直接编辑数据库。 我们需要一个真正的解决方案。
- When you have multiple users on the same device, it still lists them as a notification target on the source device. If you then send them a message, it fails. Besides, it makes no sense. 当您在同一设备上有多个用户时,它仍将其列为源设备上的通知目标。 如果您随后向他们发送消息,则失败。 此外,这没有任何意义。
- Obviously, your device will need to be connected to the network. If not, the app will fail. We need to address this with a clear message too. 显然,您的设备将需要连接到网络。 否则,该应用程序将失败。 我们也需要用明确的信息来解决这个问题。
- Finally, I think all messaging apps offer you the ability to send photos or voice messages. We should do the same and look into this enhancement. 最后,我认为所有消息传递应用程序都可以为您提供发送照片或语音消息的功能。 我们应该做同样的事情,并研究这种增强。
As you can see, there is plenty of potential to keep coding. I didn’t arrange these in any particular order. Several of the open points might even result in your app being rejected if submitted to the Apple App Store. Food for thought.
如您所见,保持编码的潜力很大。 我没有按任何特定顺序排列这些。 如果有几个开放点提交给Apple App Store,甚至可能导致您的应用程序被拒绝。 值得深思。
Let’s finish the option we started — the multiple users per device. All we need is a simple admin interface. Fortunately for us, there already is one in the form of the Settings Bundle. We’ll also fix the nonsense issue that was mentioned second from last in the list above.
让我们完成我们开始的选项-每个设备有多个用户。 我们需要的只是一个简单的管理界面。 对我们来说幸运的是,已经有一种设置捆绑包的形式。 我们还将修复上面列表中倒数第二个废话。
Choose File, New file, and under Resource, select the Settings Bundle.
选择“文件”,“新文件”,然后在“资源”下选择“设置捆绑包”。

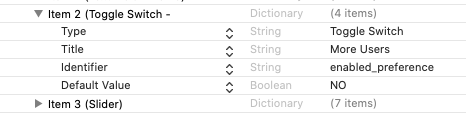
Leave all the items in there for reference now, although we’re only going to use the switch. Expand the switch item and change the title.
尽管我们仅使用开关,但现在将所有项目保留在此处以供参考。 展开开关项并更改标题。
Now add this code to the appDelegate.swift file:
现在,将此代码添加到appDelegate.swift文件中:
Of course, this does nothing more than read and set the value of our switch. What we need to do is change the behavior of the method that reads in the private cloud database. We do so with these lines in our Cloud.swift:
当然,这只不过是读取并设置开关的值而已。 我们需要做的是更改在私有云数据库中读取的方法的行为。 我们在Cloud.swift使用以下行来Cloud.swift :
OK, although a little clunky, the way it works is like this: When you want to add a second user to the same device, you need to switch the “more users” toggle to on before you start the app. It will read the fact that you want more users (on the same device) and give you the menu to add them. While we’re in the Cloud.swift file, I also want to block the appearance of the users with the same token ID. Here is the complete method with some new code added at the end. This is to stop users registered on the same device from coming up as potential targets for notifications, which is clearly nonsense.
好的,虽然有些笨拙,但是它的工作方式是这样的:如果要将第二个用户添加到同一设备,则需要在启动应用程序之前将“更多用户”开关切换为开。 它将显示您想要更多用户(在同一设备上)并为您添加菜单的事实。 当我们在Cloud.swift文件中时,我还想阻止具有相同令牌ID的用户的外观。 这是完整的方法,最后添加了一些新代码。 这是为了阻止在同一设备上注册的用户成为潜在的通知目标,这显然是胡说八道。
You can go ahead and test it again. You should be able to add multiple users to the same device using the device. Let’s look into the other piece of unfinished business to end the chapter: the saving of the authorization conversation.
您可以继续进行测试。 您应该能够使用该设备将多个用户添加到同一设备。 让我们看一看未完成的另一部分,以结束本章:授权对话的保存。
We need to save the auth value in our private database when we get permission to talk to someone. To effect the change, I need to create a few more methods in my Cloud.swift file. And of course, I need to call them at the right time in the ContentView.swift. Let’s start with Cloud.swift:
当我们获得与某人交谈的权限时,需要将auth值保存在私有数据库中。 为了实现更改,我需要在Cloud.swift文件中创建更多方法。 当然,我需要在适当的时间在ContentView.swift调用它们。 让我们从Cloud.swift开始:
This field looks up a record by name in the local private copy of the directory database and updates it if it is found. You need to call it here — here being the publisher that is fired by the popup window if you get the secret code correct.
此字段通过名称在目录数据库的本地私有副本中查找记录,并在找到记录时对其进行更新。 您需要在这里调用它-如果您正确输入了密码,这里就是弹出窗口触发的发布者。
.onReceive(cestBonPublisher, perform: { (_) in
self.disableText = false
cloud.updateRex()
})
Testing this is a tad more challenging than what we’ve done so far. A tad more because you need two real devices logged into different AppleIDs. Set them up with users in your WotsApp app and try to send notifications, grant permission, and then do the whole thing all over again. The second time you run it, assuming you agreed, it should have saved your initial agreement and you won’t have the pull-down notification pop up again.
对此进行测试比我们到目前为止所做的更具挑战性。 还有一点,因为您需要将两个真实的设备登录到不同的AppleID中。 在您的WotsApp应用程序中与用户进行设置,然后尝试发送通知,授予权限,然后再重新做一遍。 第二次运行它(假设您同意),它应该已经保存了您的初始协议,并且不会再次弹出下拉通知。
结论 (Conclusion)
This brings me to the end of this series. If you’ve been following along and want more, please drop a comment below. There is a big list of to-dos pending. What should I tackle next?
这把我带到了本系列的结尾。 如果您一直在关注并且想要更多,请在下面发表评论。 有大量待办事项。 接下来我该怎么办?
翻译自: https://medium.com/better-programming/building-your-own-wotsapp-part-5-d4747e453a00
构建开发环境 构建demo


 被折叠的 条评论
为什么被折叠?
被折叠的 条评论
为什么被折叠?
 到【灌水乐园】发言


