


Gather around, neighbors! It is time for a short pentest adventure story.In a recent engagement, we found ourselves having issues to get a command prompt under nt authority\system context, even if we had an administrator access to our target (what a shame😅).Instead of drowning in our failure and accept our lack of skills, I decided to throw away my script kiddie side and take a few hours to think about the situation.
周围聚集,邻居! 这是一次短暂pentest冒险story.In最近的接触,我们发现自己有问题下得到命令提示符, nt authority\system背景下,即使我们有我们的目标管理员访问权限(什么是shame😅)。相反由于在失败中溺水身亡并接受我们缺乏的技能,我决定抛弃我的剧本小家伙,花几个小时思考这种情况。
The first question that crossed my mind then was : Why we are failing at this ? Well the answer was clear : We did not know at the time what we were doing, we were running tools like PSExec, WMIExec left and right without really understanding how things works. And to be honest when I think about calling PSExec in order to get an nt authority\system shell, I realize how lack of understanding lead us to use a Swiss Army knife as a screwdriver (that being said using Psexec will give you a system shell … in most cases 😶).
当时我想到的第一个问题是: 为什么我们在此方面失败? 答案很明确:我们当时不知道正在做什么,我们在左右运行PSExec,WMIExec之类的工具,但并没有真正了解其工作原理。 老实说,当我考虑致电PSExec以获取nt authority\system外壳时,我意识到缺乏理解会导致我们将瑞士军刀用作螺丝起子( 也就是说使用Psexec会给您提供系统外壳) …在大多数情况下为 😶)。
本地管理员帐户VS NT AUTHORITY \ SYSTEM (Local Administrator Account VS NT AUTHORITY\SYSTEM)
As you may know, having local administrator privileges does not mean you can do what ever you want on the system. So for example using Mimikatz’s lsadump::sam or call LsaRegisterLogonProcess()at this stage was not possible for us unless we manage to have nt authority\system context. And this all made sense when I started learning about Access Tokens. After all we could have run token::elevate before lsadump::sam to get it all done, but as I said we had no idea on what we are doing and how the tools are working 👎 👎 But let’s go back to the Access Tokens thing.
如您所知,拥有本地管理员特权并不意味着您可以在系统上执行任何操作。 因此,例如,在这个阶段使用Mimikatz的lsadump::sam或调用LsaRegisterLogonProcess()对我们来说是不可能的,除非我们设法拥有nt authority\system上下文。 当我开始学习Access Tokens时,这一切都是有意义的。 毕竟我们可以先运行token::elevate lsadump::sam在lsadump::sam之前完成所有工作,但是正如我所说的,我们对我们正在做什么以及工具如何工作一无所知👎👎但是让我们回到Access Tokens事情。
According to the Windows documentation, An access token is an object that describes the security context of a process or thread. The information in a token includes the identity and privileges of the user account associated with the process or thread. When a user logs on, the system verifies the user’s password by comparing it with information stored in a security database. If the password is authenticated, the system produces an access token. Every process executed on behalf of this user has a copy of this access token.
根据Windows文档, 访问令牌是一个对象,它描述进程或线程的安全上下文 。 令牌中的信息包括与进程或线程关联的用户帐户的标识和特权。 当用户登录时,系统通过将用户密码与安全性数据库中存储的信息进行比较来验证用户密码。 如果密码已通过身份验证 ,则系统将生成访问令牌 。 代表该用户执行的每个进程都有此访问令牌的副本。
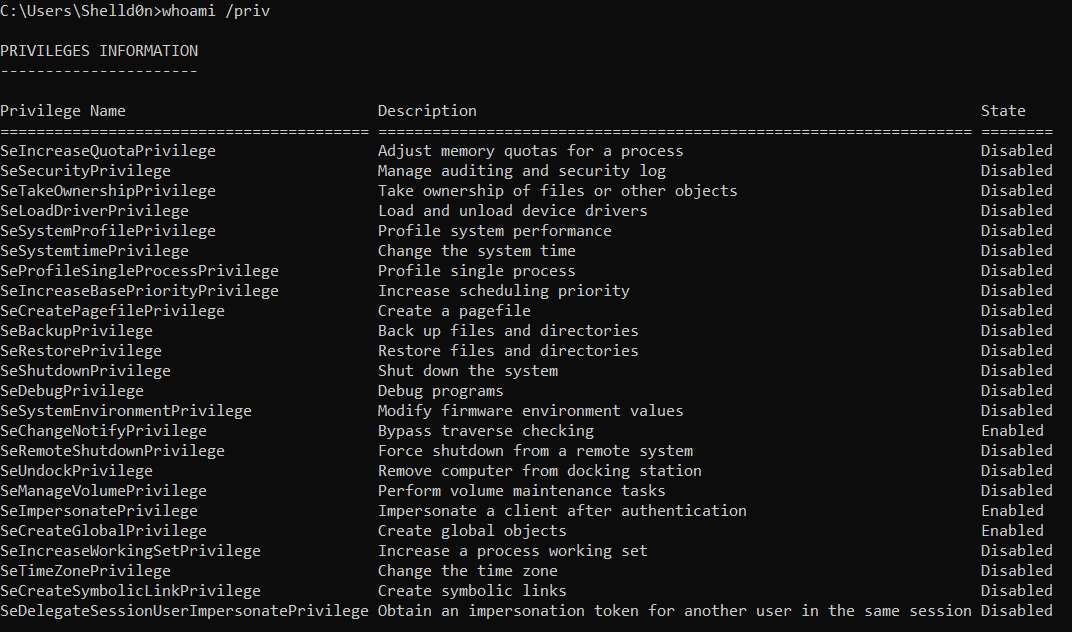
The security context we have using the Local Administrator account with UAC consent looks like this :
我们使用具有UAC同意的本地管理员帐户的安全上下文如下所示:
And in the other hand the access token under nt authority\system is more like this :
另一方面,在nt authority\system下的访问令牌更像这样:

As we can see there is some Privileges that are specific to the nt authority\system account. Which means : in order to get an access similar to ROOT in Linux we need to have a SYSTEM context. In reality this is what is happening behind the scenes when we are calling token::elevate.
如我们所见,有一些特权是特定于nt authority\system帐户的。 这意味着:为了获得类似于Linux中的ROOT的访问权限,我们需要具有SYSTEM上下文。 实际上,这就是我们调用token::elevate时在幕后发生的事情。
为什么我们自己不能做鬼事? (Why the hell can’t we do it ourselves ?)
At this stage I was quiet curious on how can we have a shell as nt authority\system , and I did not want to rely on another tool again. So I decided to dive a little deeper in the beautiful world of Windows Access Tokens .
在此阶段,我对如何拥有一个作为nt authority\system的shell感到好奇,并且我不想再次依赖其他工具 。 因此,我决定更深入地研究Windows Access Tokens的美丽世界。
By reading the Windows documentation I learned that every process has a primary token that describes the security context of the user account associated with the process. But more interesting the Windows API offers a whole set of Functions to manipulate Access Tokens, such as enable/disable the privileges in an access token, create a new primary token that duplicates an existing one, and so on … With all of these functions, it is possible for a thread to impersonate a client account and get a copy of it’s primary token, we call this process Impersonation.
通过阅读Windows文档,我了解到每个进程都有一个主要令牌 ,该令牌描述了与该进程关联的用户帐户的安全上下文。 但是更有趣的是,Windows API提供了一整套用于操作Access Tokens的功能,例如启用/禁用访问令牌中的特权,创建与现有令牌重复的新主令牌,等等……使用所有这些功能,线程可能模拟一个客户帐户并获得其主要令牌的副本,我们称此过程为模拟。
Impersonation is the ability of a thread to execute using different security information than the process that owns the thread. So basically we can use the Windows API Calls to get a copy of a process primary token and use it to start a new program that has the same exact context. And of course in this case the end goal is to target an existing process running as SYSTEM and use the copy of its token to start a new shell which will hopefully be running with nt authority\system context 🙏
模拟是线程使用与拥有该线程的进程不同的安全性信息执行的能力。 因此,基本上,我们可以使用Windows API调用来获取进程主令牌的副本,并使用它来启动具有相同确切上下文的新程序。 当然,在这种情况下,最终目标是针对以SYSTEM身份运行的现有进程,并使用其令牌的副本启动一个新的shell,该shell有望在nt authority\system上下文下运行。
Nothing new so far … but let’s do this !
到目前为止,还没有什么新东西……但是让我们这样做吧!
Of course nothing of this is new to the Offsec community but now that I had a clear idea on what to do, and how many OSTs (Long live the OSTs ❤) are abusing Impersonation, I felt confident enough to write my own implementation of the process and use it to get our nt authority\system command prompt😃. And to make the journey more fun I decided to use C# as I never wrote anything in this language, and I thought it would be such a great introduction.The first step in this process was to identify the PID of a process running as nt authority\system . This can be done with the following Powershell command:
当然,没有什么的,这是新来的Offsec社区,但现在我有什么做一个清晰的思路,多少的OST(万岁的OST❤)的滥用模仿,我觉得有足够的信心来写我自己的实现的进程并使用它来获取我们的nt authority\system命令提示符😃。 为了使旅程更有趣,我决定使用C#,因为我从来没有用这种语言写过任何东西,并且我认为这将是一个很棒的介绍。此过程的第一步是确定以nt authority\system运行的过程的PID nt authority\system 。 可以使用以下Powershell命令完成此操作:
Enabling SeDebugPrivilege with AdjustTokenPrivileges function
使用 AdjustTokenPrivileges 函数 启用SeDebugPrivilege
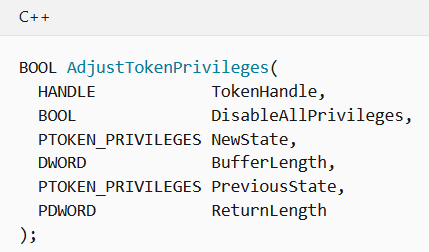
In order to obtain a handle to the primary token of the nt authority\system process we are targeting, we need to have a specific Privilege which allows use to debug programs SeDebugPrivilege . And if you remember the Access Token we got using a Local Administrator (see image above ☝️), the SeDebugPrivilege was available. But it was marked as Disabled. As we will be using this specific privilege in the process, it is mandatory to enable it before proceeding. This is where the function AdjustTokenPrivileges can be useful. Since this is a part of the unmanaged code of a Windows API we need to declare and import all the signatures/structures we need to successfully call AdjustTokenPrivileges . So the following C++ signature given in the windows documentation :
为了获得我们所针对的nt authority\system进程的主要令牌的句柄,我们需要有一个特定的Privilege,该特权可以用来调试程序SeDebugPrivilege 。 而且,如果您还记得我们使用本地管理员获得的Access Token (请参见☝️上图),则可以使用SeDebugPrivilege 。 但是它被标记为“ 禁用” 。 由于我们将在此过程中使用此特定特权,因此在继续操作之前必须启用它。 这是函数AdjustTokenPrivileges可用的地方。 由于这是Windows API非托管代码的一部分,因此我们需要声明并导入成功调用AdjustTokenPrivileges所需的所有签名/结构。 因此,Windows文档中提供了以下C ++签名:
Can be declared in C# like this : ( All credits to pinvoke.net for the amazing Wiki )
可以这样在C#中声明:(所有点数都归功于出色的Wiki的pinvoke.net )
Now that we have a function that can enable a specific privilege we can use it to enable the SeDebugPrivilege for the current process. We just need to use a few other API calls : GetCurrentProcess to get a handle for the current process, OpenProcessToken to get a handle for the Access Token of the current process, LookupPrivilegeValue to retrieve a unique identifier of the privilege we are looking for and finally the AdjustTokenPrivilege call to change the state of that privilege. After a few more definitions :
现在,我们有了一个可以启用特定特权的函数,我们可以使用它为当前进程启用SeDebugPrivilege 。 我们只需要使用其他一些API调用即可: GetCurrentProcess获取当前进程的句柄, OpenProcessToken获取当前进程的Access Token的句柄, LookupPrivilegeValue检索我们正在寻找的特权的唯一标识符,最后AdjustTokenPrivilege调用以更改该特权的状态。 经过更多的定义:
We can now use the following code to enable SeDebugPrivilege ✔️:
现在,我们可以使用以下代码来启用SeDebugPrivilege :
Get a handle for the Primary Token With OpenProcess and OpenProcessToken functions
使用 OpenProcess 和 OpenProcessToken 函数 获取主令牌的句柄
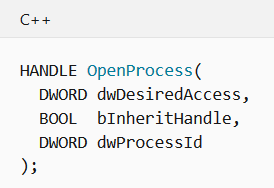
Armed with SeDebugPrivilege we can now access the primary token for a system process and get a copy of it. For this we will use OpenProcess to get a handle to the targeted process ( the PID is obtained using the command earlier ☝️). Then we call OpenProcessToken one more time to get a handle to its token. According to the windows documentation the OpenProcess C++ signature is like :
有了SeDebugPrivilege我们现在可以访问系统进程的主令牌并获取它的副本。 为此,我们将使用OpenProcess来获取目标进程的句柄(PID是使用较早的PID️命令获取的)。 然后,我们再一次调用OpenProcessToken以获取其令牌的句柄。 根据Windows文档, OpenProcess C ++签名类似于:
Which translates in C# to :
将C#转换为:
And the code block that allow us to get a handle to the primary token which we will be storing at tokenHandle variable :
以及使我们能够获取将要存储在tokenHandle变量中的主要令牌的代码块:
Duplicate the token and spawn a new process using DuplicateTokenEx and CreateProcessWithTokenW functions
复制令牌并使用 DuplicateTokenEx 和 CreateProcessWithTokenW 函数 产生一个新进程
This the part when the magics finally happens, with a handle to the token we have so far, we can duplicate it and use the duplicated token to create a new process which will use the duplicated token as a primary token. The new process we will be creating is nothing else than cmd.exe . As we will use 2 new API calls we still have some more definitions and structure to declare :
这是当魔术最终发生时的部分,具有到目前为止所拥有的令牌的句柄,我们可以对其进行复制并使用复制的令牌来创建一个新过程,该过程将复制的令牌用作主要令牌。 我们将要创建的新进程就是cmd.exe 。 由于我们将使用2个新的API调用,因此我们还有更多的定义和结构可以声明:
At this stage we should have all the prerequisites to achieve our goal. The following *ugly* C# code does the trick :
在这一阶段,我们应该具备实现我们目标的所有先决条件。 下面的* ugly * C#代码可以解决问题:
And by the end of the day, we build and run the project feeding it with the PID of a non protected SYSTEM process like Winlogon :
到最后,我们构建并运行该项目,并使用不受保护的SYSTEM进程(例如Winlogon)的PID为其提供数据:
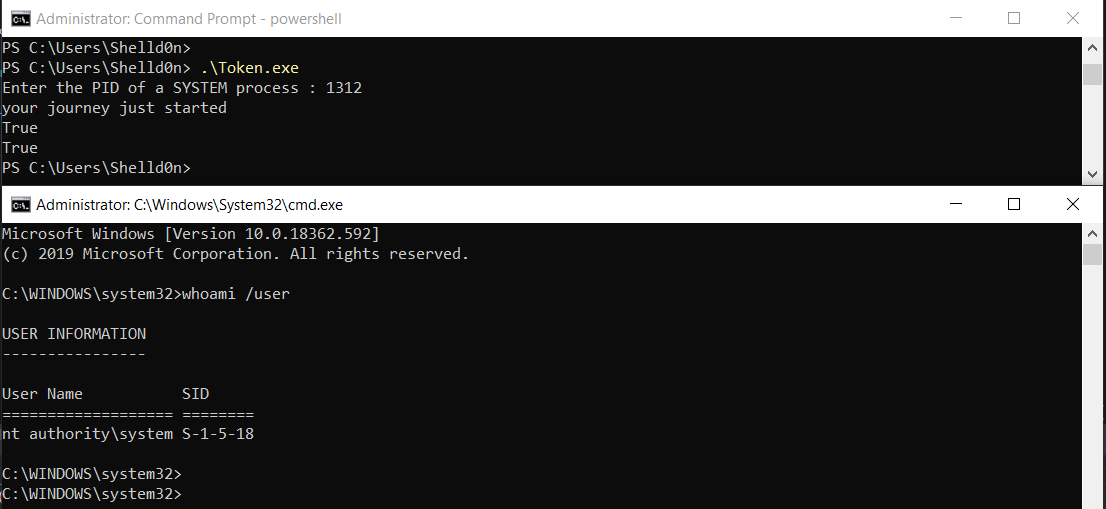
That’s it, we finally got our meterpreter’s getsystem alternative. This concludes our little adventure. As I said we did nothing revolutionary but it feels great to understand how things work.
就是这样,我们终于有了meterpreter的getsystem替代方案。 这结束了我们的小冒险。 正如我所说,我们没有做任何革命性的事情,但是了解事物的工作原理真是太好了。


 1240
1240


 被折叠的 条评论
为什么被折叠?
被折叠的 条评论
为什么被折叠?
 到【灌水乐园】发言


