


uicolor 的使用
Oh so you have been coding in Swift for a while and you feel like the Hulk with all your knowledge? You probably have experience persisting data using UserDefaults, Keychain, or flex worthy persistent storage like FileSystem. Then you start picking up CoreData, should be easy right? Then you find out you are Hulk trying to pick up Thor’s hammer.
哦,所以您已经在Swift中编码了一段时间了,您会以自己的全部知识感到像绿巨人吗? 您可能有使用UserDefaults,Keychain或有价值的持久性存储(如FileSystem)来持久化数据的经验。 然后您开始使用CoreData,应该很容易吗? 然后您发现您是绿巨人试图拿起索尔的锤子。
Enough with Marvel references, let’s get started.
有了Marvel参考资料就足够了,让我们开始吧。
入门 (Getting Started)
Start by creating a project. For full source code click here
首先创建一个项目。 有关完整的源代码,请单击此处

xcdatamodeld (xcdatamodeld)
Xcode comes with a beautiful visualization for our CoreData file called xcodeProjectName.xcdatamodeld . Now let’s add a Person entity by clicking on the + and add the Attributes exactly like below.
Xcode为我们的CoreData文件提供了一个精美的可视化文件,名为xcodeProjectName.xcdatamodeld 。 现在,让我们通过单击+添加一个Person实体,然后完全像下面一样添加Attributes。
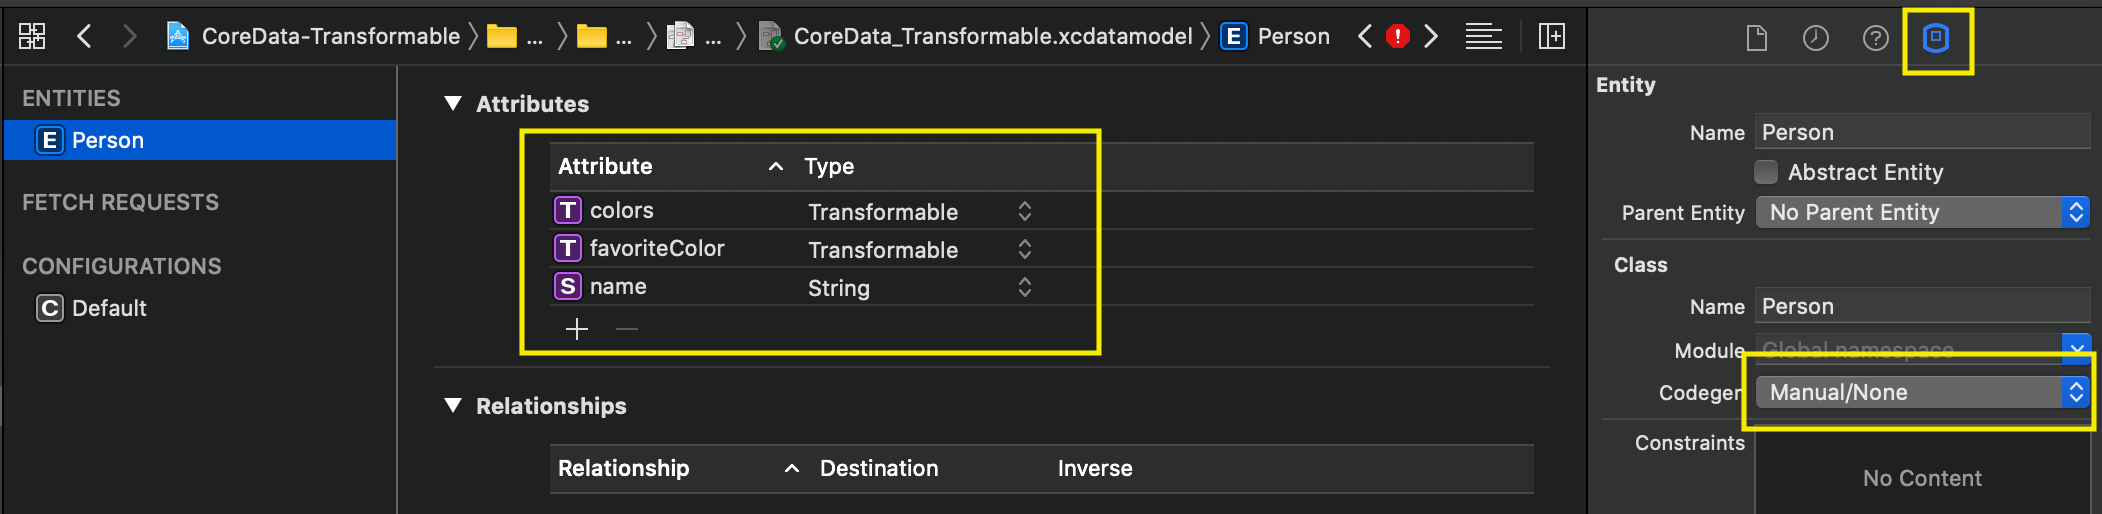
Also, click Person entity → Data Model Inspector → Codegen, and change it to Manual/None. As we will customize this ourselves which is a very common practice.
另外,单击人员实体→数据模型检查器→代码生成,并将其更改为手动/无 。 因为我们将自己定制,这是非常常见的做法。
可变形的 (Transformable)
Core Data allows us to store integers, booleans, strings, UUID, date, etc. but sometimes we want to store a specific data type like UIColor, UIImage, our own class, struct, or enum, and even arrays, but that is simply not an option in Attribute’s Type.
Core Data允许我们存储整数,布尔值,字符串,UUID,日期等。但是有时我们想存储特定的数据类型,例如UIColor,UIImage,我们自己的类,struct或enum,甚至是数组,但这只是简单的不是“属性类型”中的选项。
Say hello to Transformable property type which allows us to store custom data types as an object of the declared attribute for a record of an Entity. The only requirement is that our custom type should conform to NSCoding or we need to provide a custom value transformer.
向Transformable属性类型问好,它允许我们将自定义数据类型存储为Entity记录的声明属性的对象。 唯一的要求是我们的自定义类型应符合NSCoding或我们需要提供一个自定义值转换器 。
When you declare a property as
TransformableCore Data converts your custom data type into binaryDatawhen it is saved to the persistent store and converts it back to your custom data type when fetched from the store. It does this through a value transformer.当您将属性声明为
TransformableCore Data时,将您的自定义数据类型 保存到持久性存储中时, 会将您的自定义数据类型转换为二进制Data,并从存储中获取时将其转换回您的自定义数据类型。 它通过一个值转换器来实现。
This is a very useful feature, but we must use it carefully, especially if we use mutable types as the value of the transformable attributes. For more information read this article.
这是一个非常有用的功能,但是我们必须谨慎使用,尤其是当我们使用可变类型作为可转换属性的值时。 有关更多信息,请阅读本文 。
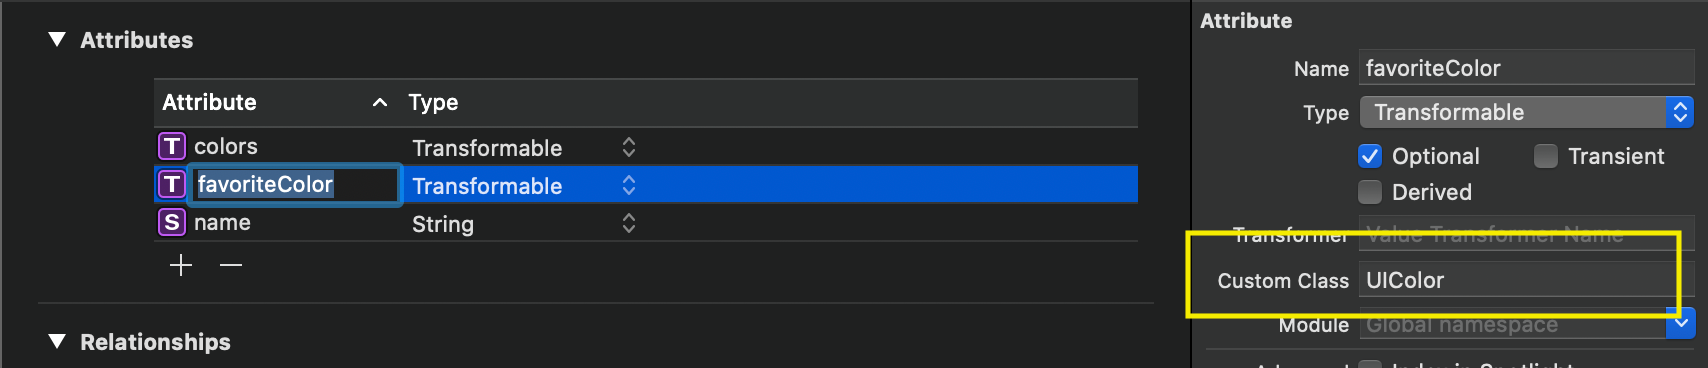
You can optionally specify your Attribute’s Custom Class here, or it will default to NSObject, which of course we can change once we create our own NSManagedObject.
您可以在此处指定属性的Custom Class ,也可以将其默认为NSObject,当然,一旦我们创建了自己的NSManagedObject,就可以对其进行更改。
创建NSManagedObject (Creating NSManagedObject)
Let’s create our NSManagedObject by clicking the tab Editor → Create NSManagedObject Subclass…
让我们通过单击选项卡编辑器→创建NSManagedObject子类来创建NSManagedObject。

Make sure our DataModel is selected and click Next, then make sure our Person entity is selected and click Next. Specify the Group directory you want to store these new files to and hit Create.
确保选择了我们的DataModel并单击下一步,然后确保选择了我们的Person实体并单击下一步。 指定要将这些新文件存储到的组目录,然后单击“创建”。

This will create two files for us Person+CoreDataClass.swift and Person+CoreDataProperties.swift . Now go to Person+CoreDataProperties.swift file and you will see that favoriteColor is of type UIColor because we specified it, but colors is of type NSObject. Make sure your Person+CoreDataProperties.swift file looks like this…
这将为我们创建两个文件Person+CoreDataClass.swift和Person+CoreDataProperties.swift 。 现在转到Person+CoreDataProperties.swift文件,您将看到favoriteColor的类型为UIColor,因为我们指定了它,但是Person+CoreDataProperties.swift的类型为NSObject。 确保您的Person+CoreDataProperties.swift文件看起来像这样…
import Foundationimport CoreDataimport UIKit.UIColor //add thisextension Person {
   @nonobjc public class func fetchRequest() -> NSFetchRequest<Person> {
      return NSFetchRequest<Person>(entityName: “Person”)
   }
   @NSManaged public var colors: [UIColor]? //update NSObject? to [UIColor]?
   @NSManaged public var favoriteColor: UIColor?
   @NSManaged public var name: String?
}
Like I previously mentioned, we can update these by changing color’s data type to [UIColor] and don’t forget to import UIKit’s UIColor.
就像我之前提到的,我们可以通过将color的数据类型更改为[UIColor]来更新它们,并且不要忘记导入UIKit的UIColor。
CoreDataStack (CoreDataStack)
Copy this simple CoreDataStack
复制此简单的CoreDataStack
import Foundationimport CoreDataclass CoreDataStack {
   private let modelName: String
   init(modelName: String) {
      self.modelName = modelName
   }   lazy var mainContext: NSManagedObjectContext = {
      return self.storeContainer.viewContext
   }()
   private lazy var storeContainer: NSPersistentContainer = {
      let container = NSPersistentContainer(name: self.modelName)
      container.loadPersistentStores { (storeDescription, error) in
         if let error = error as NSError? {
            print("Unresolved error \(error), \(error.userInfo)")
         }
      }
      return container
   }()
}// MARK: Internal
extension CoreDataStack {
   func saveContext () {
      guard mainContext.hasChanges else { return }
      do {
         try mainContext.save()
      } catch let nserror as NSError {
         fatalError("Unresolved error \(nserror), \(nserror.userInfo)")
      }
   }
}
Lastly, load and save like we normally do…
最后,像往常一样加载和保存…
func loadPerson() {
let personFetchRequest: NSFetchRequest<Person> = Person.fetchRequest() //make a Person Entity fetch request
do {
let results = try coreDataStack.mainContext.fetch(personFetchRequest)
if results.count > 0 { //found a person
person = results.first
} else { //no person found
person = Person(context: coreDataStack.mainContext)
coreDataStack.saveContext()
}
} catch let error as NSError {
print("Error: \(error) description: \(error.userInfo)")
}
}func handleSavePerson() {
guard let name = nameTextField.text, !name.isEmpty else { return }
person!.name = name
person!.colors = [.red, .orange, .yellow, .green, .blue, .purple]
person!.favoriteColor = person!.favoriteColor
//save the managed object context
do {
try coreDataStack.mainContext.save()
} catch let error as NSError {
print("Error: \(error), description: \(error.userInfo)")
}
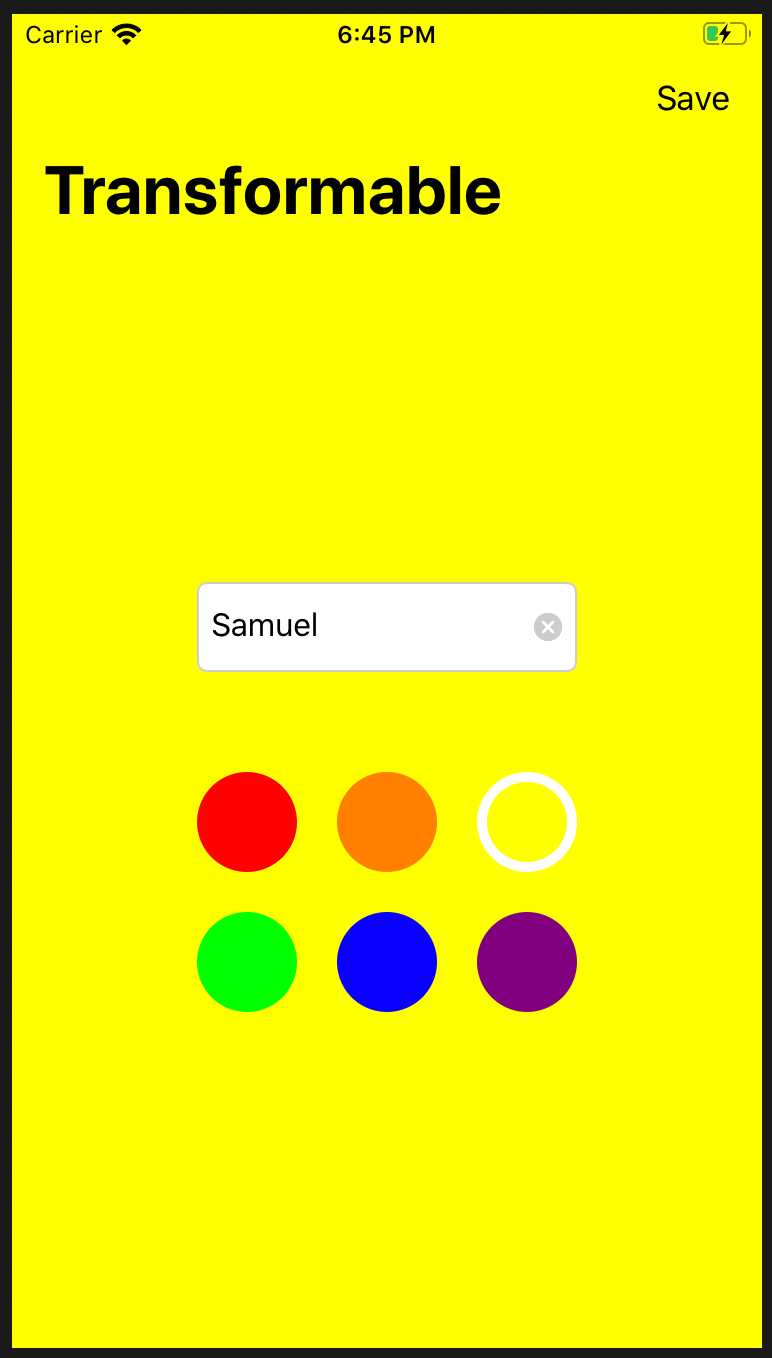
}That’s it! The background should be white at first time running the app. Additionally, putting a name, selecting a color, and clicking the Save will update the Person’s properties in our CoreData. Rerun the app and you will see your name on the textfield and the background color persisted.
而已! 首次运行该应用程序时,背景应为白色。 此外,输入名称,选择颜色并单击“保存”将更新CoreData中“人员”的属性。 重新运行该应用程序,您将在文本字段上看到您的名字,并且背景颜色保持不变。

As an extra challenge, try storing a UIImage in CoreData as Transformable of course. You can find the source code here.
当然,作为额外的挑战,请尝试将UIImage存储为CoreData可转换。 您可以在此处找到源代码。
Enjoy coding! 😁
享受编码! 😁
External Links
外部链接
uicolor 的使用


 1360
1360

 被折叠的 条评论
为什么被折叠?
被折叠的 条评论
为什么被折叠?
 到【灌水乐园】发言


