swift导航控制器
总览 (Overview)
Let’s try to build a navigation manager that will help us to navigate to any view controller where the presented view controller does not have a concrete implementation of the next step.
让我们尝试构建一个导航管理器,该导航管理器将帮助我们导航到所提供的视图控制器没有下一步具体实现的任何视图控制器。
This type of approach can be used for an onboarding flow for a new user or filling of forms, where the user has to complete a sequence of steps.
这种方法可用于新用户的入职流程或用户必须完成一系列步骤的表单填写。
Also, this approach is future-proof. If your flow changes or product requirements change, you just have to do a couple of changes to get it working.
同样,这种方法是面向未来的。 如果您的流程发生变化或产品要求发生变化,则只需进行一些更改即可使其正常运行。
先决条件 (Prerequisite)
Basics of Swift and a good understanding of protocols and enums.
Swift的基础知识以及对protocols和enums的良好理解。
开始使用 (Get Started)
Download the starter project from here.
从这里下载启动项目。
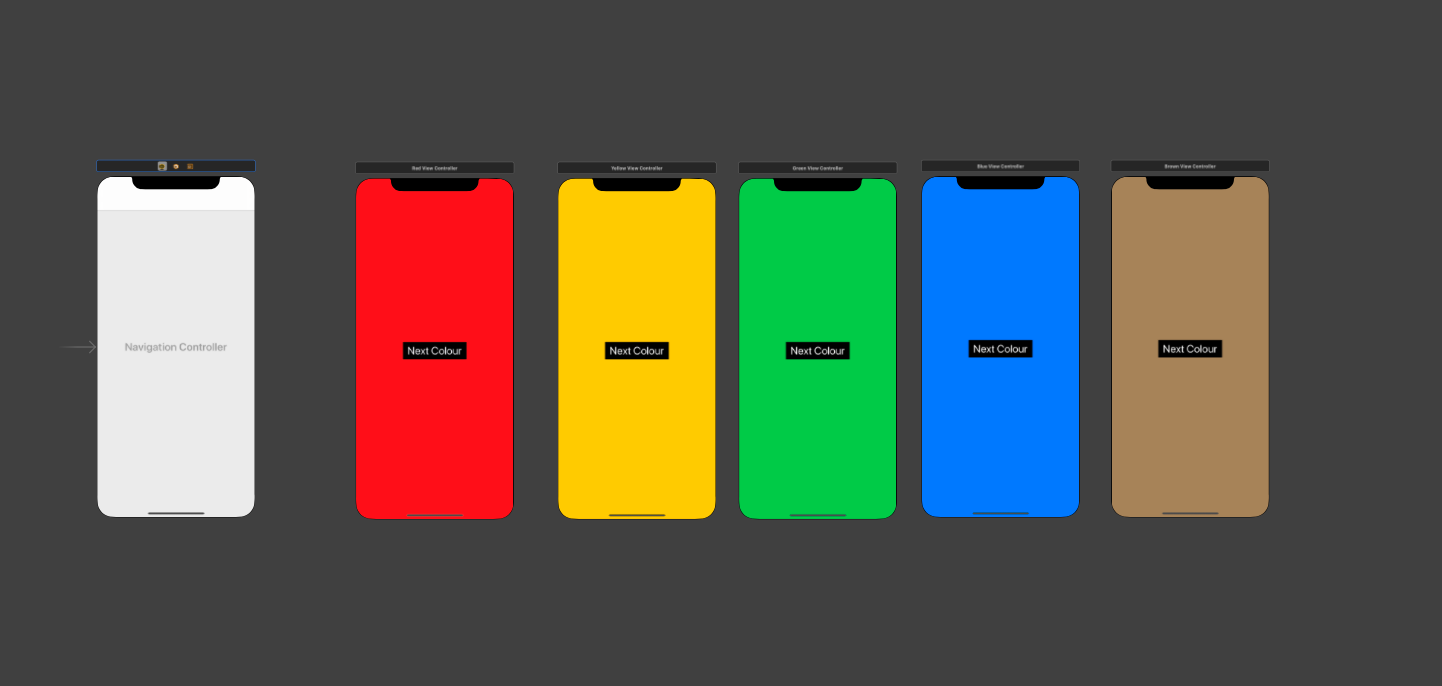
Let’s explore the starter project. Open Main.storyboard.
让我们探索入门项目。 打开Main.storyboard 。

We have five view controllers with different colours and a button with the title Next Colour. By tapping the button in a view controller, we should push a new view controller.
我们有五个具有不同颜色的视图控制器,以及一个标题为Next Colour的按钮。 通过点击视图控制器中的按钮,我们应该按下一个新的视图控制器。
The pattern is undefined, which means that the next colour in the step will be defined by a third party (just as we receive steps from the server on completing a particular flow).
模式是未定义的,这意味着该步骤中的下一个颜色将由第三方定义(就像我们从服务器收到完成特定流程的步骤一样)。
Open the AllColourViewController.swift file:
打开AllColourViewController.swift文件:

Just like RedViewController, there is a class for every other colour, with an action button in place.
就像RedViewController一样,每种其他颜色都有一个类,并带有一个操作按钮。
Let’s build a navigator that’s robust and scalable for sequential navigation.
让我们构建一个强大的导航器,以进行顺序导航。
让我们建立 (Let’s Build)
Start by adding a fileCustomNavigator.swift.
首先添加一个文件CustomNavigator.swift 。
Let’s study a few concepts which will be pillars of this implementation. Add the following code:
让我们研究一些概念,这些概念将成为此实现的基础。 添加以下代码:
struct Step {let guider: NextStepGuider
let validator: NextStepValidator}
Step
Step
Step is something that has two properties, NextStepGuider and NextStepValidator . Step has information about the current step in the process, and it validates whether to execute it or not.
Step具有两个属性, NextStepGuider和NextStepValidator 。 Step具有有关流程中当前步骤的信息,并验证是否执行该步骤。
Consider it as something like Link List, which contains the address of the next node and a data/value.
将其视为“链接列表”之类的东西,其中包含下一个节点的地址和数据/值。
Guider NextStepGuider
向导 NextStepGuider
A guider should be something which will give us our next step getNextStep(). Also, it should be able to route to a view controller for the currently selected step.
指导者应该是可以为我们提供下一步getNextStep() 。 同样,它应该能够路由到当前选定步骤的视图控制器。
protocol NextStepGuider {func routeToViewController()
func getNextStep() -> NextStepGuider?}
In our case, I am using an enum as a guider. Let’s understand the below code:
在我们的情况下,我使用枚举作为指导。 让我们了解以下代码:

//1 We can switch over to enum to guide to the particular view controller.
//1我们可以switch到枚举以引导到特定的视图控制器。
//2 This function knows the next step in the process and will return the type NextStepGuider (itself) so that the next page should be able to load the view controller by calling the routeToViewController function.
//2此函数知道过程的下一步,并将返回NextStepGuider类型(本身),以便下一页应该能够通过调用routeToViewController函数来加载视图控制器。
This is similar to Link List, where node contains the address of the next node.
这类似于“链接列表”,其中的节点包含下一个节点的地址。
Also, I’m using a helper function pustToTopMostViewController to get the UINavigationController and push the ViewController to that stack.
另外,我正在使用辅助函数pustToTopMostViewController来获取UINavigationController并将ViewController推入该堆栈。
Validator NextStepValidator
验证器 NextStepValidator
public protocol NextStepValidator {
func shouldMoveForward() -> Bool
}
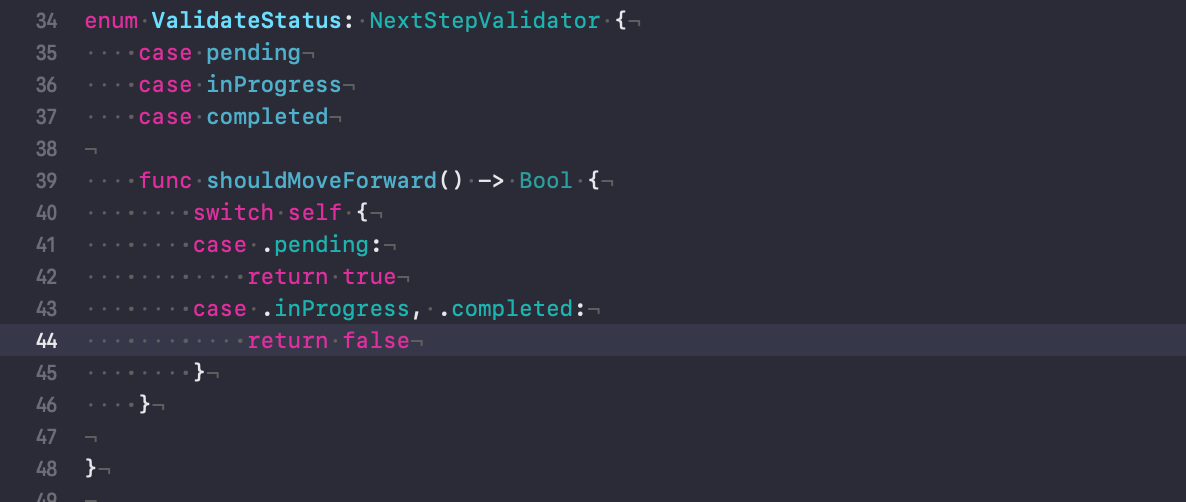
This will help us to validate whether to proceed for that step based on some validation. Consider a scenario where you will only proceed to that page if the status of that step is Pending. We should not see that page if the status is in Progress/Completed .
这将帮助我们基于一些验证来验证是否继续执行该步骤。 考虑一种情况,其中只有该步骤的状态为Pending ,您才可以进入该页面。 如果状态为in Progress / Completed ,则不应看到该页面。
Our validator will look something like this:
我们的验证器将如下所示:

Great, now we have our guider and validator. Our next stop: a manager.
太好了,现在我们有了我们的指导者和验证者。 我们的下一站:经理。
序列管理器 (SequenceManager)
protocol SequenceManager {
var sequenceOfSteps: SequenceQueue { get set }
func loadInitialViewController()
func getNextStepInOnboarding(currentStep: NextStepGuider)
}
A sequence manager should be able to control the view controller request. A sequence manager will be the one communicating with view controllers.
序列管理器应该能够控制视图控制器的请求。 序列管理器将与视图控制器进行通信。
The manager will accept all the steps for a particular flow through sequenceOfSteps. Let’s see how SequenceQueue should look.
管理者将通过sequenceOfSteps接受特定流程的所有步骤。 让我们看看SequenceQueue外观。
struct SequenceQueue {let sequenceList: [Step]func checkForNextStep() -> Step? {for step in sequenceList {
  if step.validator.shouldMoveForward() {
     return step
     }
   }return nil
  }
}
We have the function checkForNextStep which is responsible for validating and returning the step to be navigated to.
我们具有checkForNextStep函数,该函数负责验证并返回要导航到的步骤。
Let’s extend the SequenceManager and add a default behaviour.
让我们扩展SequenceManager并添加默认行为。
extension SequenceManager {func loadInitialViewController() {
  sequenceOfSteps.checkForNextStep()?.guider.routeToViewController()
 }}
In the loadInitialViewController function, we want to iterate through each step, check and validate whether to navigate to that step, and then finally route to its view controller.
在loadInitialViewController函数中,我们要遍历每个步骤,检查并验证是否导航至该步骤,然后最终路由至其视图控制器。
func getNextStepInOnboarding will be the function called by a view controller. This function will let our manager know what step we are on currently and then navigate to the next step. This function will have an explicit implementation as per different managers.
func getNextStepInOnboarding将是视图控制器调用的函数。 此功能将使我们的经理知道我们目前正在执行的步骤,然后导航到下一步。 根据不同的管理者,此功能将有一个明确的实现。
让我们创建一个流程管理类 (Let’s Create a Flow Manage Class)
Let’s create the singleton class NavigationManager.
让我们创建单例类NavigationManager 。

//1 We created a singleton by marking class as final, initialising it as private, and using a static property to access a single instance available throughout the life cycle.
//1我们通过将类标记为final ,将其初始化为private ,并使用static属性访问整个生命周期中可用的单个实例,从而创建了一个单例。
//2 Here we are iterating over the sequenceList with us and validating it with the guider provided by the view controller.
//2我们在这里遍历sequenceList ,并使用视图控制器提供的引导程序对其进行验证。
If the guider matches the one in the list, check for validation by calling shouldMoveForward, and then route to the particular view controller.
如果shouldMoveForward与列表中的shouldMoveForward匹配,请通过调用shouldMoveForward检查验证,然后路由到特定的视图控制器。
If validation fails, recursively get the next step and do the above step for the new step.
如果验证失败,则递归进行下一步,并为新步骤执行上述步骤。
Let’s connect getNextStepInOnboarding step in our ViewController.
让我们在ViewController连接getNextStepInOnboarding步骤。

We will be calling our singleton in the button action. viewController is responsible for telling the current guiding step. Similarly, other view controllers will have this implementation.
我们将在按钮动作中调用单例。 viewController负责告知当前的指导步骤。 同样,其他视图控制器将具有此实现。
Let’s create a sequence list.
让我们创建一个序列表。
Add this global function getSequenceOfSteps:
添加此全局函数getSequenceOfSteps :
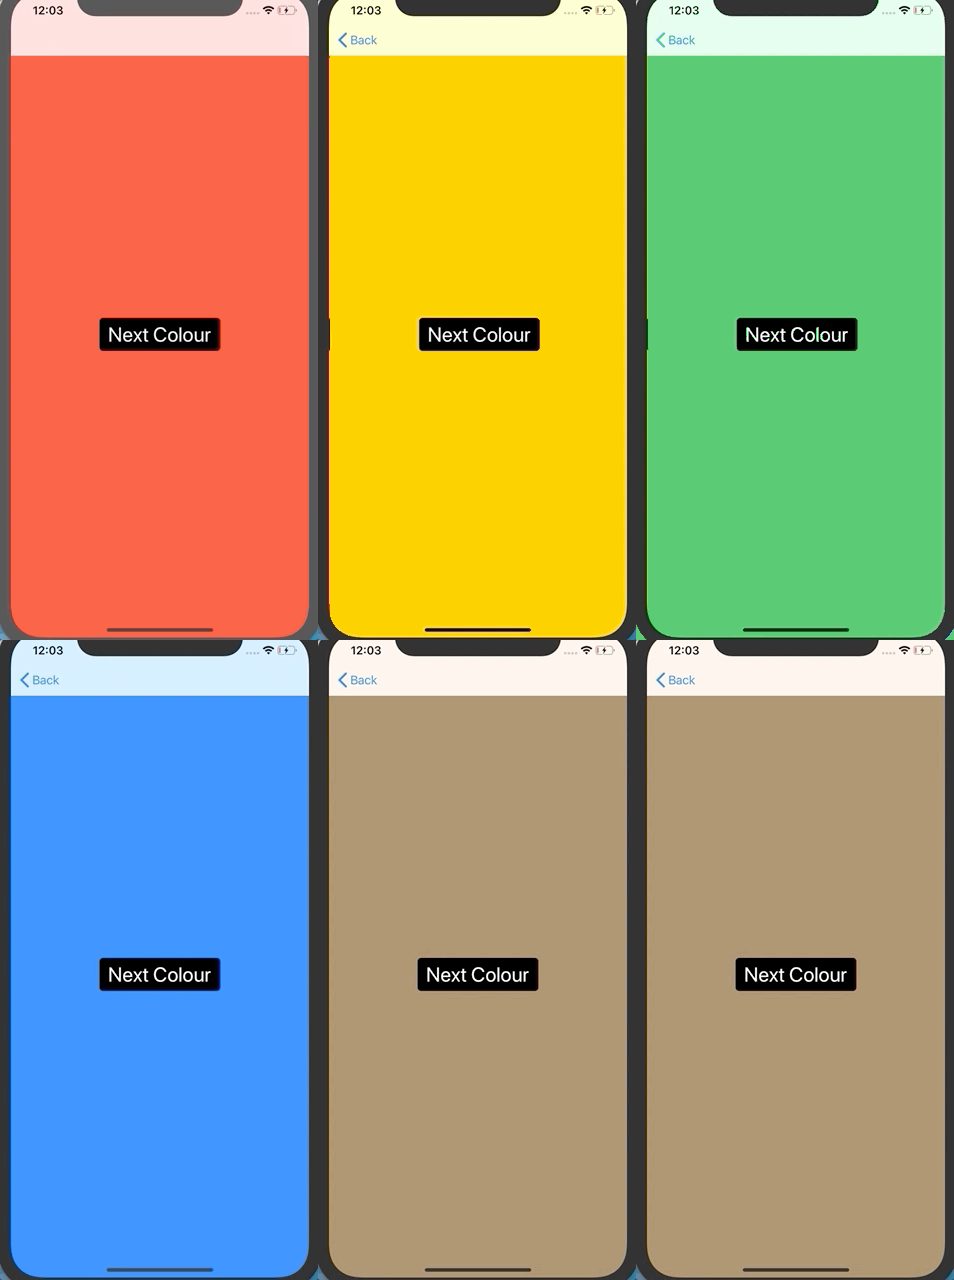
As of now, the status of all the functions is pending, so all views should be presented.
截至目前,所有功能的状态都处于待处理状态,因此应显示所有视图。
Before we Run, we have to add one more step in the sceneDelegate (iOS 13)/ AppDelegate (lower versions).
在运行之前,我们必须在sceneDelegate (iOS 13)/ AppDelegate (较低版本)中再添加一个步骤。

This will help us to get our first/initial view controller.
这将帮助我们获得第一个/初始视图控制器。
Let’s build!
让我们开始吧!

Great, let’s try modifying the step.
太好了,让我们尝试修改该步骤。

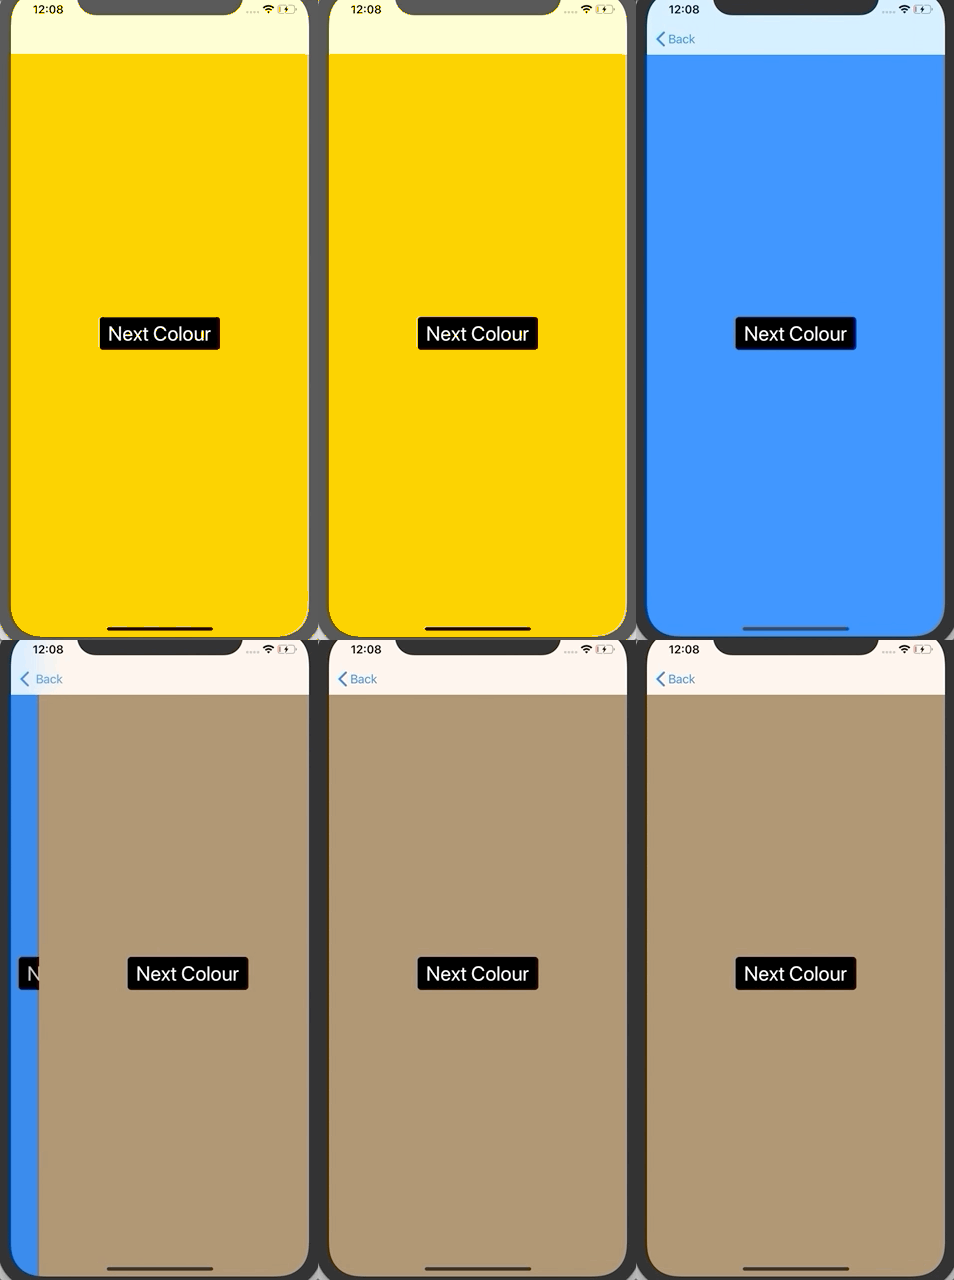
Now step 1 and step 3 are completed and in progress, respectively. We should only be navigating to step 2, 4, and 5 (i.e., yellow, blue, and brown.)
现在,步骤1和步骤3分别完成和进行中。 我们应该只导航到步骤2 , 4 ,和5 (即,黄色,蓝色,和棕色)。
Let’s test.
让我们测试一下。

Awesome! We made an any-view-controller router. The only change we have to do is in the manager if the requirement changes. Also, view controllers are loosely coupled with each other.
太棒了! 我们制作了一个任意视图控制器路由器。 如果需求发生变化,我们要做的唯一更改就是在经理中。 同样,视图控制器彼此松散耦合。
This navigator is built keeping in mind that the steps will not change. If the step flow changes, we have to change our NextStepGuider in the same way.
构建此导航器时要牢记步骤不会更改。 如果步骤流发生变化,则我们必须以相同的方式更改NextStepGuider 。
另请参阅: (Also See:)
swift导航控制器


 460
460

 被折叠的 条评论
为什么被折叠?


