


swift 引用swift
In this first part of the Unit Testing in Swift series, we will cover how to add a unit test target to your project and write your first unit test using the XCTest framework provided by Apple. If you, for whatever reason, missed the introduction to this series, you can read it here.This part of the series is for you if you want to learn how to start unit testing your own Xcode project or simply just get a better understanding of the fundamentals of unit testing with XCTest in Swift.
在Swift单元测试系列的第一部分中,我们将介绍如何向您的项目中添加单元测试目标,以及如何使用Apple提供的XCTest框架编写您的第一个单元测试。 如果您由于某种原因而错过了本系列的介绍,可以在这里阅读。本系列的这一部分适合您,如果您想学习如何开始对自己的Xcode项目进行单元测试,或者只是更好地了解Swift中使用XCTest进行单元测试的基础知识。
添加单元测试目标 (Adding a unit test target)
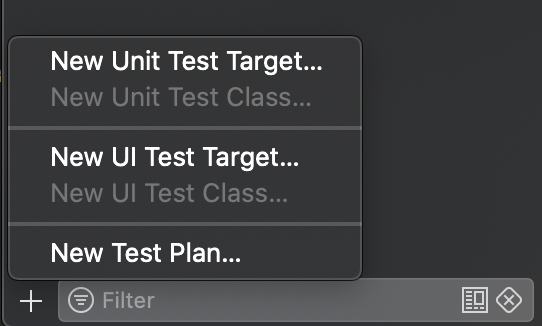
If you are starting completely from scratch, you will need to add a unit test target to your Xcode project. Don’t worry, this only takes 30 seconds. Click on the Test Navigator tab in the Xcode Navigator (the left-most window). This tab can also be reached by pressing ⌘ + 6. In the bottom left corner you can add the test target by pressing the ‘+’ button. Follow the instructions on the screen and voila: You are now ready to write your first unit test.
如果您是完全从头开始,则需要将单元测试目标添加到Xcode项目中。 不用担心,这只需要30秒。 单击Xcode Navigator(最左侧的窗口)中的Test Navigator选项卡。 也可以通过按⌘+ 6进入此选项卡。在左下角,您可以通过按“ +”按钮添加测试目标。 请按照屏幕上的说明进行操作,然后瞧:现在您可以编写第一个单元测试了。

XCTestCase (XCTestCase)
Now that we are ready to write unit tests you will find that Xcode has added a unit test class for you. This class inherits the XCTestCase class, which is the base for all unit tests that you will be adding. A test case usually contains setup and teardown functions. These functions are called before and after each of the test functions, respectively. This allows us to set up prerequisites before the tests are being run and to clean up any mess we’ve made after the completion of each unit test.
现在我们准备编写单元测试,您将发现Xcode为您添加了一个单元测试类。 此类继承XCTestCase类,该类是要添加的所有单元测试的基础。 测试用例通常包含设置和拆卸功能。 这些功能分别在每个测试功能之前和之后被调用。 这使我们能够在运行测试之前设置先决条件,并清理每个单元测试完成后产生的所有混乱情况。

Prefixing a function in an XCTestCase class with “test”, tells Xcode that the given function is a unit test. For each unit test function you will see an empty diamond shape in the gutter on the line of the function declaration. Clicking this diamond will run the specific unit test. The whole suite of unit tests can be run in various ways, but my preference is the shortcut ⌘ + U.
在XCTestCase类中以“ test”为前缀的函数会告诉Xcode,给定的函数是单元测试。 对于每个单元测试函数,您将在函数声明行的檐槽中看到一个空的菱形形状。 单击此菱形将运行特定的单元测试。 整套单元测试可以多种方式运行,但我更喜欢快捷方式⌘+U。
In terms of naming conventions for the test classes and functions, I personally prefer following Apple’s suggestions:
就测试类和功能的命名约定而言,我个人更喜欢遵循Apple的建议:
To help clarify the organization of your tests, give each test case a name that summarizes the tests within it, such as
TableValidationTests,NetworkReachabilityTests, orJSONParsingTests.为了帮助阐明测试的组织,请为每个测试用例命名一个总结其中的测试的名称,例如
TableValidationTests,NetworkReachabilityTests或JSONParsingTests。To help identify failing tests, give each test method a name that makes it clear what is tested by that method, such as
testEmptyTableRowAndColumnCount(),testUnreachableURLAccessThrowsAnError(), ortestUserJSONFeedParsing().为了帮助识别失败的测试,请为每个测试方法命名,以明确说明该方法测试了什么,例如
testEmptyTableRowAndColumnCount(),testUnreachableURLAccessThrowsAnError()或testUserJSONFeedParsing()。
If you are brand new to unit testing these naming examples may not make a lot of sense to you, but by the end of this series, they will.
如果您是单元测试的新手,那么对您来说这些命名示例可能就没有多大意义,但是到本系列结束时,它们将成为现实。
断言 (Asserting)
A unit test function is worth nothing without assertions. For that, we use the XCTAssert functions. There are many different assertion functions and I will not be covering all of them, however some of the most used are: XCTAssertTrue, XCTAssertFalse, XCTAssertNotEqual, XCTAssertEqual, XCTAssertNil and XCTAssertNotNil. I personally prefer using these Xcode providedXCTAssert functions, however there are multiple third-party alternatives available — for instance many people enjoy using Nimble.
没有断言,单元测试功能一文不值。 为此,我们使用XCTAssert函数。 有许多不同的断言函数,我将不对其全部进行介绍,但是最常用的一些XCTAssertTrue是: XCTAssertTrue , XCTAssertFalse , XCTAssertNotEqual , XCTAssertEqual , XCTAssertNil和XCTAssertNotNil 。 我个人更喜欢使用Xcode提供的XCTAssert函数,但是可以使用多种第三方替代方法,例如,许多人喜欢使用Nimble 。
例 (Example)
Let’s be honest… We won’t learn a lot from just reading about it, so it is time to add some code. For the sake of this article, we will be using a very simple example of schools with students and no complex logic.
坦白说,我们只是从阅读中不会学到很多东西,所以现在该添加一些代码了。 为了本文的目的,我们将使用一个非常简单的示例,说明学校有学生,没有复杂的逻辑。
Consider the Student struct above. It exposes a name, a list of grades and a computed property returning the GPA of the student. Since Student is a struct, we get the initialiser for free, hence there is no need to test if the properties are correctly set upon initialisation. The computed property, however, makes a perfect candidate for unit testing.So let’s start by creating a new unit test class and call it StudentTests. Since our Student file is not included in our newly created test target, we have to import our main target with @testable. This makes all code with internal access available to your test class.In order to first write our unit tests it is helpful to write a list of scenarios that the gpa computation should be able to handle:
考虑上面的Student结构。 它包含一个名称,一个成绩列表和一个返回学生的GPA的计算属性。 由于Student是结构,因此我们免费获得初始化程序,因此无需测试初始化时属性是否正确设置。 然而,计算属性非常适合用于单元测试。因此,让我们开始创建一个新的单元测试类并将其命名为StudentTests 。 由于我们的Student文件未包含在我们新创建的测试目标中,因此我们必须使用@testable导入主要目标。 这使得所有具有internal访问权限的代码都可用于您的测试类。为了首先编写我们的单元测试,编写gpa计算应能够处理的方案列表会很有帮助:
- There should be no GPA for students with no grades. 没有成绩的学生应该没有GPA。
- The calculation should work for students with only one grade 该计算仅适用于仅一年级的学生
- The calculation should work for students with many grades 该计算应适用于许多年级的学生
Additionally it would be nice to know that our GPA calculation still works in case the grading system changes to using more “extreme” numbers in the future. From these scenarios we can write our tests.
此外,很高兴得知我们的GPA计算仍然有效,以防将来评分系统更改为使用更多“极端”数字。 在这些情况下,我们可以编写测试。
Some may say that adding 4 separate unit tests for a single computed property is an overkill, but in my opinion it’s better to be safe than sorry. Notice how both the XCTAssertNil and XCTAssertEqual functions are being used. XCTAssertNotNil could also have been used for the cases that do not return nil, but the check is implicitly included in the XCTAssertEqual check. This, along with the name and documentation of each test, makes it very easy for any developer to understand what is being tested and how the GPA calculation should work.
有人可能会说,为单个计算的属性添加4个单独的单元测试是一个过大的杀伤力,但我认为安全比后悔更好。 注意如何同时使用XCTAssertNil和XCTAssertEqual函数。 XCTAssertNotNil也可以用于不返回nil ,但是该检查隐式包含在XCTAssertEqual检查中。 这以及每个测试的名称和文档,使任何开发人员都非常容易了解正在测试的内容以及GPA计算应如何进行。
测试私有功能 (Testing private functionality)
Let’s take a look at the School our students are enrolled at.
让我们来看看我们的学生就读的School 。
In the code above we see that the School exposes two properties: students and topStudents. But it also has a private function that is inaccessible from our unit tests. Inexperienced unit testers will often change the accessibility of the function in order to test it directly, however I would strongly suggest not to expose anything that shouldn’t be exposed, just for the sake of testing.There is always a way of testing the private functionality — in this case it’s quite simple as we just have to test the topStudents computed property in order to get unit test coverage of the students(withGPALimit:) -> [Student] function.So, using the same approach as before we define our scenarios that the topStudents computed property should be able to handle:
在上面的代码中,我们看到School公开了两个属性: students和topStudents 。 但是它还有一个私有功能,在我们的单元测试中是无法访问的。 经验不足的单元测试人员通常会更改功能的可访问性以直接对其进行测试,但是我强烈建议不要仅仅出于测试的目的就公开不应该公开的任何内容。功能-在这种情况下,这非常简单,因为我们只需测试topStudents计算的属性即可获得students(withGPALimit:) -> [Student]单元测试覆盖率students(withGPALimit:) -> [Student]函数。因此,使用与之前定义方法相同的方法topStudents计算属性应该能够处理的方案:
- It should retrieve an empty list of students if there are no students enrolled in the school. 如果学校没有学生注册,它应该检索一个空的学生名单。
- It should retrieve an empty list of students if none of the enrolled students have a GPA of 4.0. 如果所有注册学生的GPA均未达到4.0,它将检索一个空的学生列表。
- It should retrieve a list of all students with a GPA of 4.0 if there are one or more students enrolled. 如果有一个或多个学生入学,它将检索GPA为4.0的所有学生的列表。
These scenarios may result in the following unit tests:
这些情况可能导致以下单元测试:
For the School tests we see that a lot more assertions are being used for each unit test function. This is done to ensure that everything behaves as expected — the more assertions the merrier. If we, for instance, only tested if the topStudents property held 2 students (in the scenario with 2 top students), we can’t be sure that the list in fact contained the correct students unless we specifically assert that.
对于School测试,我们看到每个单元测试功能都使用了更多的断言。 这样做是为了确保一切都按预期进行-断言越多越好。 例如,如果我们仅测试了topStudents属性是否topStudents 2个学生(在有2个顶级学生的情况下),那么除非明确声明,否则我们无法确定列表中是否包含正确的学生。
Congratulations on writing your first unit tests in Swift.
祝贺您用Swift编写了第一个单元测试。
把它们加起来… (To sum it up…)
This was a short introduction to the fundamentals of unit testing your Xcode project. I can strongly advice working on the mindset of listing the different scenarios that your code should be able to handle, before starting to actually implement the logic. This allows you to write the unit tests before the actual implementation — a practice also known as test driven development (TDD). I won’t be covering TDD in this series, but there are plenty of interesting articles discussing this topic, here on Medium — including this one.
这是对Xcode项目进行单元测试的基础知识的简短介绍。 我强烈建议您在开始实际实现逻辑之前,列出您的代码应能够处理的不同情况的思维方式。 这使您可以在实际实施之前编写单元测试,这种做法也称为测试驱动开发(TDD)。 在本系列中,我不会涉及TDD,但是在Medium上有很多有趣的文章讨论了这一主题,包括本篇 。
For more information on unit testing in Xcode, I can recommend watching this talk from WWDC 2019. I was lucky enough to be watching that talk live at the conference!
有关Xcode单元测试的更多信息,我建议您从WWDC 2019观看此演讲 。我很幸运能够在会议上现场观看该演讲!
In the next chapter we will be going more into depth on how to test asynchronous code within your project.
在下一章中,我们将更深入地介绍如何在项目中测试异步代码。
As always, if you have any questions or comments, feel free to reach out to me by commenting on these articles. I will reply to all messages.
与往常一样,如果您有任何问题或意见,请随时评论这些文章与我联系。 我将回复所有消息。
翻译自: https://medium.com/swlh/unit-testing-in-swift-the-fundamentals-eec805766349
swift 引用swift


 511
511

 被折叠的 条评论
为什么被折叠?
被折叠的 条评论
为什么被折叠?
 到【灌水乐园】发言


