


ios json解析
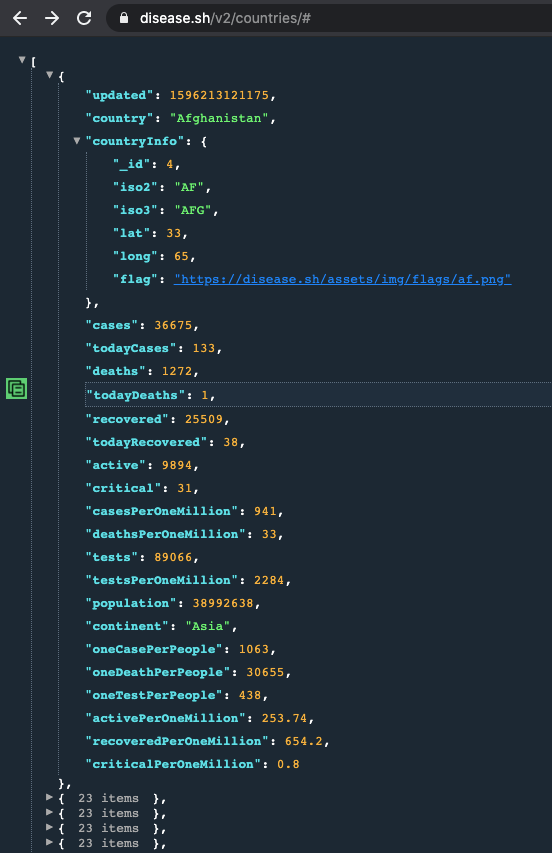
Tens of thousands of mobile applications use live data. For this COVID-19 tracker app, we will use Disease.sh API, because of its accuracy and it is for free. It includes 215 country items. Please take a look at the JSON file to see what data we are going to use.
成千上万的移动应用程序使用实时数据。 对于此COVID-19跟踪器应用程序,由于它的准确性,我们将使用Disease.sh API,它是免费的。 它包括215个国家/地区项目。 请查看JSON文件,看看我们将使用什么数据。
Let’s get the party started.
让我们开始派对吧。
I assume that you know Swift and Xcode basics. Clone the starting project and open it in your Xcode, and have a look at the project.
我假设您了解Swift和Xcode的基础知识。 克隆启动项目 ,然后在您的Xcode中打开它,然后看一下该项目。
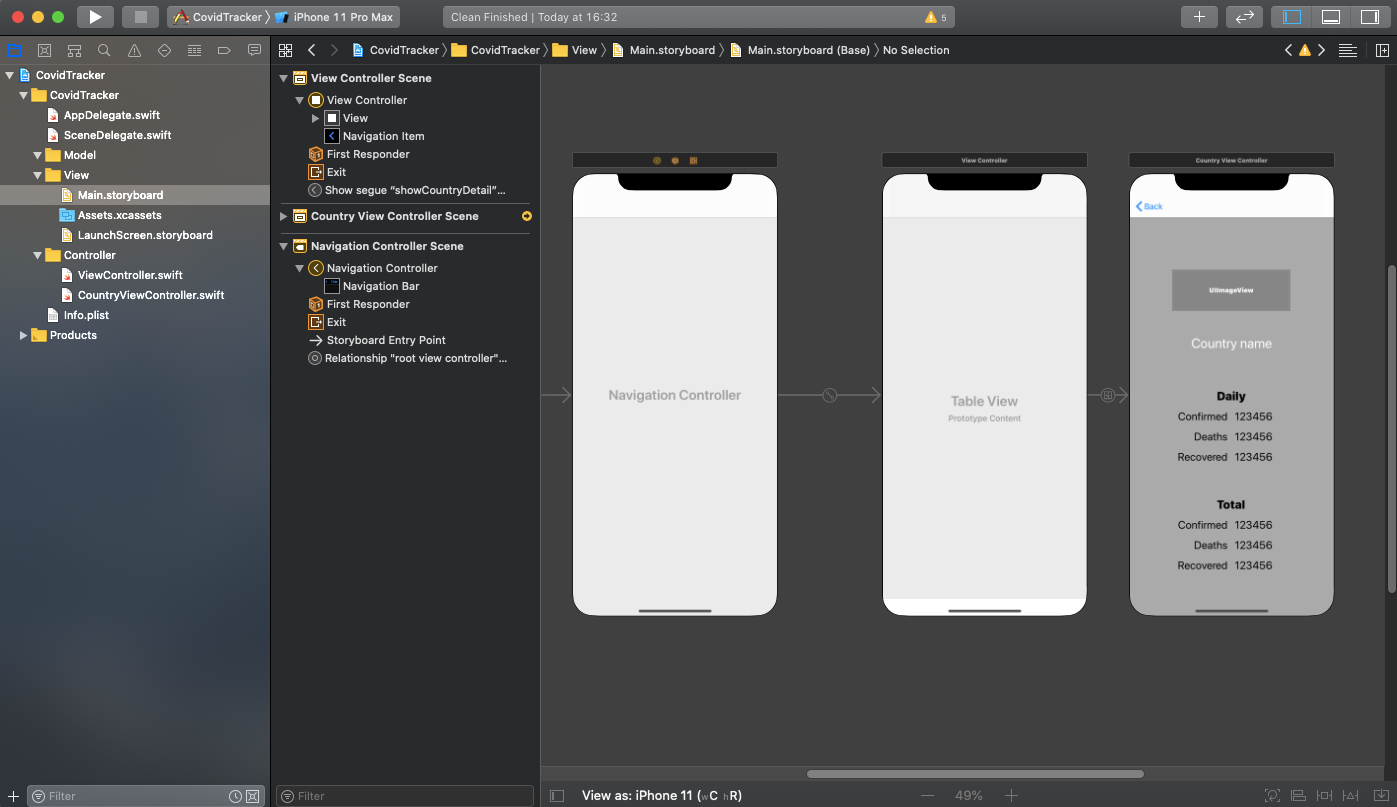
Make sure that you understand the structure of the application.
确保您了解应用程序的结构。
Create a Swift file called CovidAPI in Model group and type or copy/paste below:
在模型组中创建一个名为CovidAPI的Swift文件,然后在下面键入或复制/粘贴:
struct CovidAPI {  static let address = "https://disease.sh/v2/countries/"
}
We use “static variable” so that we don’t need to initialize the CovidAPI object for later use. We have direct access to “address” variable in any file as “CovidAPI.address”.
我们使用“静态变量”,因此我们不需要初始化CovidAPI对象以备后用。 我们可以直接访问任何文件中的“ address”变量作为“ CovidAPI.address”。
In order to list country names in our tableView, we need to parse JSON data.
为了在tableView中列出国家/地区名称,我们需要解析JSON数据。
Create a Swift file called CountryModel in Model group. This file will include the data which we are going to use to parse our JSON file. JSON parsing requires the data to include Encodable and Decodable protocols. Swift has a TypeAlias that includes both of them: “Codable”.
在模型组中创建一个名为CountryModel的Swift文件。 该文件将包含我们将用于解析JSON文件的数据。 JSON解析要求数据包含可编码和可解码协议。 Swift的TypeAlias包括了两者:“ Codable”。
Pay more attention that variable names in CountryModel file and keys in the JSON file are matching.
请更加注意,CountryModel文件中的变量名称和JSON文件中的键是匹配的。
Let’s start fetching the data and using it in our app.
让我们开始获取数据并在我们的应用程序中使用它。
In our CovidAPI file, we initialized the address variable as a string. But we can’t use the string as a link, it must have “URL” data type.
在我们的CovidAPI文件中,我们将地址变量初始化为字符串。 但是我们不能使用字符串作为链接,它必须具有“ URL”数据类型。
In our ViewController class there is viewDidLoad() function. Inside this function, let’s make the address string a URL.
在我们的ViewController类中,有viewDidLoad()函数。 在此函数内部,让我们使地址字符串成为URL。
let addressUrl = URL(string: CovidAPI.address)URL() is a predefined function in Swift. It takes a string as an argument and returns it as a URL.
URL()是Swift中的预定义函数。 它以字符串作为参数,然后将其作为URL返回。
Now that we have a new variable called “addressUrl” and its data type is URL.
现在,我们有了一个名为“ addressUrl”的新变量,其数据类型为URL。

创建URLSession (Create URLSession)
In our viewDidLoad() function let’s start parsing the JSON data.
在viewDidLoad()函数中,让我们开始解析JSON数据。
Firstly, create a URL session. All we need is to use the URL and create a “dataTask” with “completionHandler” (data, response, error) to parse the JSON data.
首先,创建一个URL会话。 我们所需要做的就是使用URL并使用“ completionHandler”(数据,响应,错误)创建一个“ dataTask”来解析JSON数据。
let task = URLSession.shared.dataTask(with: addressUrl!) { (data, response, error) in}Make sure that there is no error with the “guard” statement.
确保“ guard”语句没有错误。
guard let data = data else {
  print("Error1: \(error!)")
  return}
So it looks like:
所以看起来像:
let task = URLSession.shared.dataTask(with: addressUrl!) { (data, response, error) in  guard let data = data else {
    print("Error1: \(error!)")
    return
  }}
We use the “guard” statement to trigger the action in certain conditions. If it doesn’t pass the statement, the rest won’t be compiled and it will return.
我们使用“ 警卫”声明在某些条件下触发动作。 如果未通过该语句,则其余的将不会编译,它将返回。
In order to decode the data from CountryModel, let’s create a “JSONDecoder” object just below the guard statement.
为了解码CountryModel中的数据,让我们在guard语句下面创建一个“ JSONDecoder”对象。
let decoder = JSONDecoder()And now take a look at the below code:
现在看下面的代码:
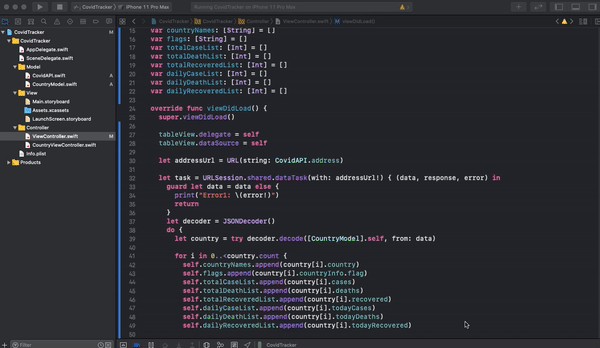
We are creating a “country” object by decoding the “CountryModel” with its attributes which are country names, flags, and daily & total statistics and we are iterating them over to append into lists by the “for” loop. For this, we need to declare those lists as global variables in ViewController class in order to have access from everywhere.
我们通过对“ CountryModel”进行解码来创建一个“ countryModel”对象,其属性包括国家名称,标志,每日和总计统计信息,并通过“ for”循环对其进行迭代以追加到列表中。 为此,我们需要在ViewController类中将这些列表声明为全局变量,以便可以从任何地方进行访问。
var countryNames: [String] = []var flags: [String] = []var totalCaseList: [Int] = []var totalDeathList: [Int] = []var totalRecoveredList: [Int] = []var dailyCaseList: [Int] = []var dailyDeathList: [Int] = []var dailyRecoveredList: [Int] = []You can place these variables just below:
您可以将这些变量放在下面:
@IBOutlet weak var listView: UITableView!For tableView, we are going to add an extension to use UITableViewDelegate and UITableViewDataSource protocols just below the ViewController class.
对于tableView,我们将在ViewController类下方添加一个扩展以使用UITableViewDelegate和UITableViewDataSource协议。
extension ViewController: UITableViewDelegate, UITableViewDataSource {
}
In this extension, we are going to make our tableView work.
在此扩展中,我们将使tableView起作用。
Firstly, the below function will tell tableView how many rows it should have.
首先,下面的函数将告诉tableView它应该有多少行。
func tableView(_ tableView: UITableView, numberOfRowsInSection           section: Int) -> Int {
  return countryNames.count
}
Naturally, we are going to have as many rows as country items.
自然,我们将与国家项目一样多的行。
The below code will push the data to be seen in tableView cells. (Names of countries)
下面的代码将把数据推送到tableView单元格中。 (国家名称)
func tableView(_ tableView: UITableView, cellForRowAt indexPath: IndexPath) -> UITableViewCell {  let cell = UITableViewCell()
  cell.textLabel?.text = countryNames[indexPath.row]
  return cell}
We have created an extension to use UITableViewDelegate and UITableViewDataSource, but we didn’t tell which tableView to assign. Include the below lines just under the super.viewDidLoad() function to complete the assignment to tableView itself.
我们创建了一个扩展以使用UITableViewDelegate和UITableViewDataSource,但是我们没有告诉您要分配哪个tableView。 在super .viewDidLoad()函数下面包括以下几行,以完成对tableView本身的分配。
tableView.delegate = selftableView.dataSource = selfThe last thing for this section is to include the below code after the closing bracket of for loop to prioritize and reload the tableView data.
本节的最后一件事是在for循环的右括号后添加以下代码,以区分优先级并重新加载tableView数据。
DispatchQueue.main.async {
  self.tableView.reloadData()
}
Your ViewController file will look like:
您的ViewController文件如下所示:
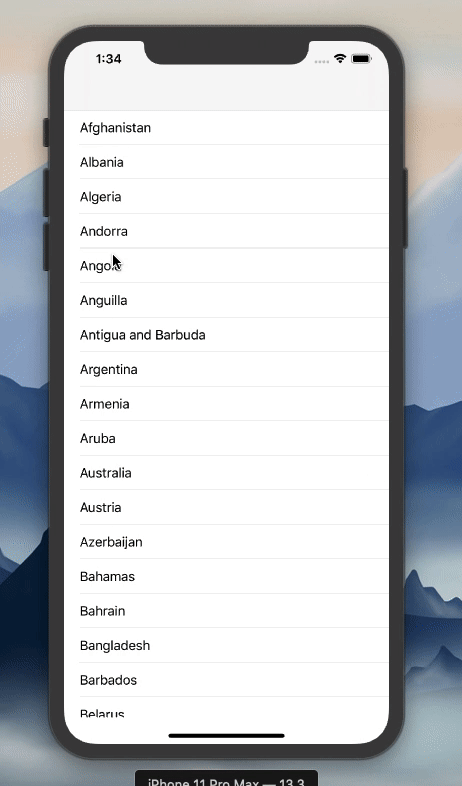
Let’s run the app.
让我们运行该应用程序。
As you can see, our application is now working and we can see the country list in our tableView. Let’s head into the next section to make tableView cells clickable and show the current statistics for the chosen country.
如您所见,我们的应用程序现在正在运行,我们可以在tableView中看到国家列表。 让我们进入下一部分,使tableView单元格可单击,并显示所选国家/地区的当前统计信息。
传递数据 (Passing the data)
Now that we have our application up and running. But we haven’t added the features yet -to choose the country and show its flag, and statistics.
现在我们已经启动了应用程序并正在运行。 但是我们尚未添加功能-选择国家/地区并显示其国旗和统计信息。
Since our idea is to pass the data from the ViewController file to CountryViewController file, we need to “prepare & perform segue” and create the global variables.
由于我们的想法是将数据从ViewController文件传递到CountryViewController文件,因此我们需要“准备并执行segue”并创建全局变量。
Add the below lines right after the global variables. (right before viewDidLoad() function)
在全局变量之后添加以下几行。 ( 在 viewDidLoad() 函数 之前 )
var chosenCountryName = ""var chosenFlagUrl = ""var chosenTotalCases = ""var chosenTotalDeathts = ""var chosenTotalRecovered = ""var chosenDailyCases = ""var chosenDailyDeaths = ""var chosenDailyRecovered = ""Include the below code at the end of the extension. This will enable the global variables to be used in different viewController files with different variable names.
在扩展名末尾包含以下代码。 这将使全局变量可以在具有不同变量名称的不同viewController文件中使用。
Let's take a look at this code.
让我们看一下这段代码。

The third box represents the global variables in the CountryViewController so that we can pass the data between the viewController files. In the second box, we are assigning the chosen values to these global variables from CountryViewController and preparing to pass the data (segue). The first box is making our tableView cells clickable and assigning the attributes of the clicked “country” data to chosen values. And redirecting us to the CountryViewController.
第三个框表示CountryViewController中的全局变量,以便我们可以在viewController文件之间传递数据。 在第二个框中,我们将选择的值分配给CountryViewController中的这些全局变量,并准备传递数据(segue)。 第一个框是使tableView单元格可单击,并将单击的“国家/地区”数据的属性分配给选定的值。 并将我们重定向到CountryViewController。
In the CountryViewController file, right below the IBOutlets, include these variables (from the 3rd box)
在IBOutlet下方的CountryViewController文件中,包括这些变量(在第3个框中)
var selectedCountryName = ""var flagUrl = ""var casesTotal = ""var deathsTotal = ""var recoveredTotal = ""var casesDaily = ""var deathsDaily = ""var recoveredDaily = ""In the same file, in the viewDidLoad() function, we are going to assign these global variables to our labels to be shown in the application.
在同一个文件的viewDidLoad()函数中,我们将这些全局变量分配给要在应用程序中显示的标签。
countryName.text = selectedCountryName
totalConfirmed.text = casesTotal
totalDeaths.text = deathsTotal
totalRecovered.text = recoveredTotal
dailyConfirmed.text = casesDaily
dailyDeaths.text = deathsDaily
dailyRecovered.text = recoveredDaily
Now that you can test the application by running and clicking the country that you choose. You will see the latest data. But there is a problem. You can’t see the flag. Let’s make it work.
现在,您可以通过运行并单击您选择的国家/地区来测试该应用程序。 您将看到最新数据。 但有一个问题。 您看不到该标志。 让我们开始吧。
With the “flagUrl” variable, we passed the flag’s link to CountryViewController as a string. Now that we need to use URL() function with flagUrl and parse this data to make that link an actual image file.
使用“ flagUrl ”变量,我们将标志的链接作为字符串传递给CountryViewController。 现在,我们需要将URL()函数与flagUrl一起使用并解析此数据,以使该链接成为实际的图像文件。
See the code below:
请参见下面的代码:
In ViewController file we used “address” from the CovidAPI file as our link. Like in the ViewController file, we parsed the JSON data here and created a UIImage which is named “downloadedImage”. But this time the link that we used is “flagUrl”.
在ViewController文件中,我们使用CovidAPI文件中的“ address ”作为链接。 就像在ViewController文件中一样,我们在此处解析JSON数据,并创建了一个名为“ downloadedImage ”的UIImage。 但是这次我们使用的链接是“ flagUrl ”。
In the end, your ViewController file will look like:
最后,您的ViewController文件将如下所示:
And CountryViewController:
和CountryViewController:
Our application is now ready to use.
我们的应用程序现在可以使用了。
You can find the final version of the app.
Thanks for reading. I hope this was helpful. If you have any questions, feel free to leave a response.
谢谢阅读。 我希望这可以帮到你。 如有任何疑问,请随时回复。
翻译自: https://medium.com/ios-os-x-development/ios-networking-apis-json-parsing-made-easy-bf1f58a00bc0
ios json解析


 被折叠的 条评论
为什么被折叠?
被折叠的 条评论
为什么被折叠?
 到【灌水乐园】发言


