


crud操作
In the last article, we got started with Vapor, checked how to create a new project, and tried to understand the project structure. In the last article, we had used the SQLite database. You can check the last article here.
在上一篇文章中,我们从Vapor开始,检查了如何创建一个新项目,并试图了解该项目的结构。 在上一篇文章中,我们使用了SQLite数据库。 您可以在此处查看最后一篇文章。
In this article, we’ll use the PostgreSQL database, We’ll also learn how to add a new table in the database and then we’ll perform CRUD operations on the table.
在本文中,我们将使用PostgreSQL数据库,还将学习如何在数据库中添加新表,然后对表执行CRUD操作。
Let’s create a new project named CRUDOperations.
让我们创建一个名为CRUDOperations的新项目。
安装PostgreSQL (Install PostgreSQL)
If PostgreSQL is not installed on your Mac, please refer to this link for installation.
如果Mac上未安装PostgreSQL,请参阅此链接进行安装。
创建项目数据库 (Create Database for Project)
After installation is finished open the terminal and hit command psql. Your terminal should look like following
安装完成后,打开终端并单击命令psql。 您的终端应如下所示

To create a new database, the command is CREATE DATABASE followed by database name and semicolon (;). I’ll name the database the same as we’ve named project that is ‘crudoperations’. So hit following command in the terminal now.
要创建新数据库,命令是CREATE DATABASE,后跟数据库名称和分号(;)。 我将为数据库命名与我们将项目命名为“ crudoperations”相同。 因此,现在在终端中按以下命令。
CREATE DATABASE crudoperations;If your terminal looks like following, your database is created
如果您的终端如下所示,则您的数据库已创建

配置项目以使用PostgreSQL (Configure project to use PostgreSQL)
1.更新Package.swift (1. Update Package.swift)
When we create a new Vapor project, by default it uses the SQLite database. To use the PostgreSQL database, we have to change the dependencies in Package.swift file.
当我们创建一个新的Vapor项目时,默认情况下它使用SQLite数据库。 要使用PostgreSQL数据库,我们必须更改Package.swift文件中的依赖项。
Package.swift
Package.swift
Check the code changed under comment 1 & 2
检查注释1和2下更改的代码
- In dependencies, we changed our fluent ORM from SQLite to PostgreSQL. 在依赖关系中,我们将流畅的ORM从SQLite更改为PostgreSQL。
- In targets for app target, we changed dependency from FluentSQLite to FluentPostgreSQL. 在应用程序目标的目标中,我们将依赖关系从FluentSQLite更改为FluentPostgreSQL。
Now on terminal run following command
现在在终端上运行以下命令
vapor xcodeThis command will install the dependencies we’ve added in the Package.swift file.
此命令将安装我们在Package.swift文件中添加的依赖项。
2.更新configure.swift (2. Update configure.swift)
We have to update code in the configure function of the configure.swift file. I’ve added numbers in the comments in code. Let’s discuss them in detail.
我们必须在configure.swift文件的configure函数中更新代码。 我在代码的注释中添加了数字。 让我们详细讨论它们。
- We’ve decided to use the PostgreSQL database so we’ve to import is ORM FluentPostgreSQL here. 我们决定使用PostgreSQL数据库,因此我们要在此处导入ORM FluentPostgreSQL。
- We have to register the FluentPostgreSQLProvider. So we are replacing FluentSqliteProvider with this one. 我们必须注册FluentPostgreSQLProvider。 因此,我们正在用这个替换FluentSqliteProvider。
- As we are not using SQLite any more, the line where I’ve added 3rd comment, I’ve commented it for reference, you can remove it. 由于我们不再使用SQLite,因此我在其中添加了3rd注释的行已对此进行了注释,以供参考,您可以将其删除。
We have to create PostgreSQLDatabaseConfig where our hostname would be localhost, the port would be 5432, the username would be your machine user name, database name would be CRUDOperation which we had created.
我们必须创建PostgreSQLDatabaseConfig,其中我们的主机名是localhost ,端口是5432 ,用户名是您的计算机用户名 ,数据库名是我们创建的CRUDOperation。
- In comment 5 line, we create an object of PostgreSQLDatabase with the help of the config. 在注释5行中,我们在配置的帮助下创建PostgreSQLDatabase的对象。
- In comment 6 we add our database object in databases. 在注释6中,我们将数据库对象添加到数据库中。
As I had mentioned in the last article, we use migrations to add or alter the tables in the database. In comment 7, I am adding a table named Pet in the database. At this moment this line with show error because we have not created a model named Pet yet. It would be resolved once we create it.
正如我在上一篇文章中提到的,我们使用迁移来添加或更改数据库中的表。 在注释7中,我在数据库中添加了一个名为Pet的表。 目前这行显示错误,因为我们尚未创建一个名为Pet的模型。 一旦创建它,它将解决。
3.删除不需要的文件 (3. Remove unwanted files)
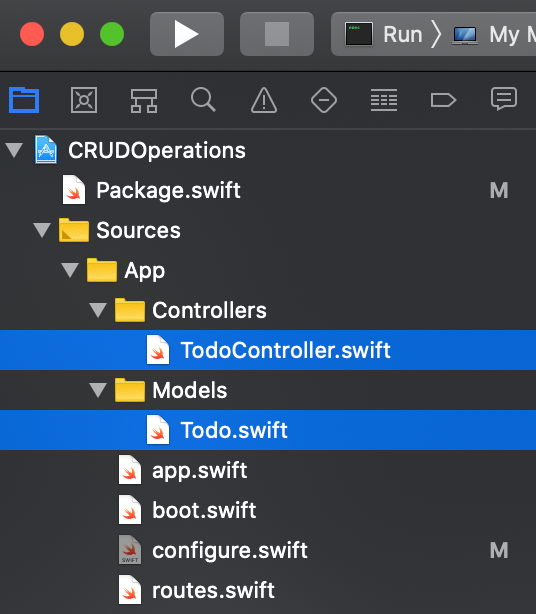
We won’t be using Todo.swift and TodoController.swift files. We will be creating our model and controller. Remove these two files from the project navigator. Refer following image
我们将不会使用Todo.swift和TodoController.swift文件。 我们将创建模型和控制器。 从项目导航器中删除这两个文件。 参考下图
Once these files are removed, go to routes.swift file and remove the code written to add routes and call functions from TodoController. You have to remove the code written under the comment
一旦删除了这些文件,请转到routes.swift文件,并删除编写的代码以从TodoController添加路由和调用函数。 您必须删除注释下编写的代码
// Example of configuring a controller
//配置控制器的示例
4.为表Pet创建一个新模型 (4. Create a new model for table Pet)
Create a new swift file named Pet.swift in the group Models. Once the file is created, write the following code into the file. Now if you run the code, it won’t show any compilation error.
在“模型”组中创建一个名为Pet.swift的新swift文件。 创建文件后,将以下代码写入文件。 现在,如果您运行代码,它将不会显示任何编译错误。
Let us understand the code in Pet class step by step
让我们逐步了解Pet类中的代码
- In the last article, we’ve already discussed that Fluent is ORM provided by Vapor. We are using the PostgreSQL database for this project. That is why we are importing the FluentPostgreSQL module here. 在上一篇文章中,我们已经讨论过Fluent是Vapor提供的ORM。 我们正在为此项目使用PostgreSQL数据库。 这就是为什么我们在这里导入FluentPostgreSQL模块的原因。
- Whatever tables we’ll need in the project, we’ll be creating those as classes in our code. For table Pet, here I’ve created class Pet. I’ve made this class ‘final’ so that it won’t be inherited. And it shouldn’t because it is representing one of the tables in our database. I’ve confirmed protocol PostgreSQLUUIDMdel, because I want our Pet must have a unique identifier and it should be of type UUID. In case you want id should be of type int, you have to confirm PostgreSQLModel protocol instead. 无论项目中需要什么表,都将在代码中将它们创建为类。 对于表Pet,在这里我创建了Pet类。 我将该类定为“最终”,以使其不会被继承。 而且不应该这样,因为它代表了我们数据库中的表之一。 我已经确认协议PostgreSQLUUIDMdel,因为我希望我们的Pet必须具有唯一的标识符,并且它应该是UUID类型。 如果您希望id为int类型,则必须确认PostgreSQLModel协议。
- Here I am declaring the properties of my class. In other words we are specifying the columns of our table. I’ve declared id as optional because id would be automatically generated whenever new entry would be added to the table. Fluent will take care of that. Then I’ve declared other properties like type, breed, and name. 在这里,我声明了类的属性。 换句话说,我们正在指定表的列。 我将id声明为可选项,因为每当将新条目添加到表中时,id都会自动生成。 流利的会照顾的。 然后,我声明了其他属性,例如类型,品种和名称。
- Here, I’ve written the constructor for our class. Constructor doesn’t accept anything for id because as I mentioned in step 3, id is optional, and Fluent will generate it automatically for us. 在这里,我为类编写了构造函数。 构造函数不接受id的任何内容,因为正如我在第3步中提到的那样,id是可选的,Fluent会自动为我们生成它。
- I’ve confirmed the Parameter protocol with our class. If you want any web service to use Pet as a dynamic parameter in the URL, this will take care of that. We’ll learn more about this in upcoming articles. 我已经在我们的课程中确认了Parameter协议。 如果您希望任何Web服务将Pet用作URL中的动态参数,则可以解决这一问题。 我们将在以后的文章中了解更多有关此的内容。
- I’ve confirmed the Content protocol with our class here. As I’ve mentioned in the last article, Content is a superset of the Codable protocol we use in iOS coding. Content helps us to convert our models to JSON when we have to return the output of our web services and vice versa. 我已经在这里与我们的班级确认了内容协议。 正如我在上一篇文章中提到的,Content是我们在iOS编码中使用的Codable协议的超集。 当我们必须返回Web服务的输出时,内容可以帮助我们将模型转换为JSON,反之亦然。
- I’ve confirmed the Migration protocol here. Migration helps us to alter the table whenever we need it. If we need to add a new column in the table or we want to delete any column from the table, we’ll be writing that code here. We’ll learn how to do this in the future. 我已经在这里确认了迁移协议。 迁移可以帮助我们在需要时更改表。 如果需要在表中添加新列或要从表中删除任何列,我们将在此处编写该代码。 我们将在以后学习如何做到这一点。
5. Postico (5. Postico)
Now run the app ins Xcode and our table is ready. If you want to check the table, you can download Postico. Postico is a PostgreSQL client for Mac. Once you download and open it, you’ll see the following window.
现在在Xcode中运行应用程序,我们的表已经准备就绪。 如果要检查表格,可以下载Postico。 Postico是Mac的PostgreSQL客户端。 下载并打开它后,您将看到以下窗口。

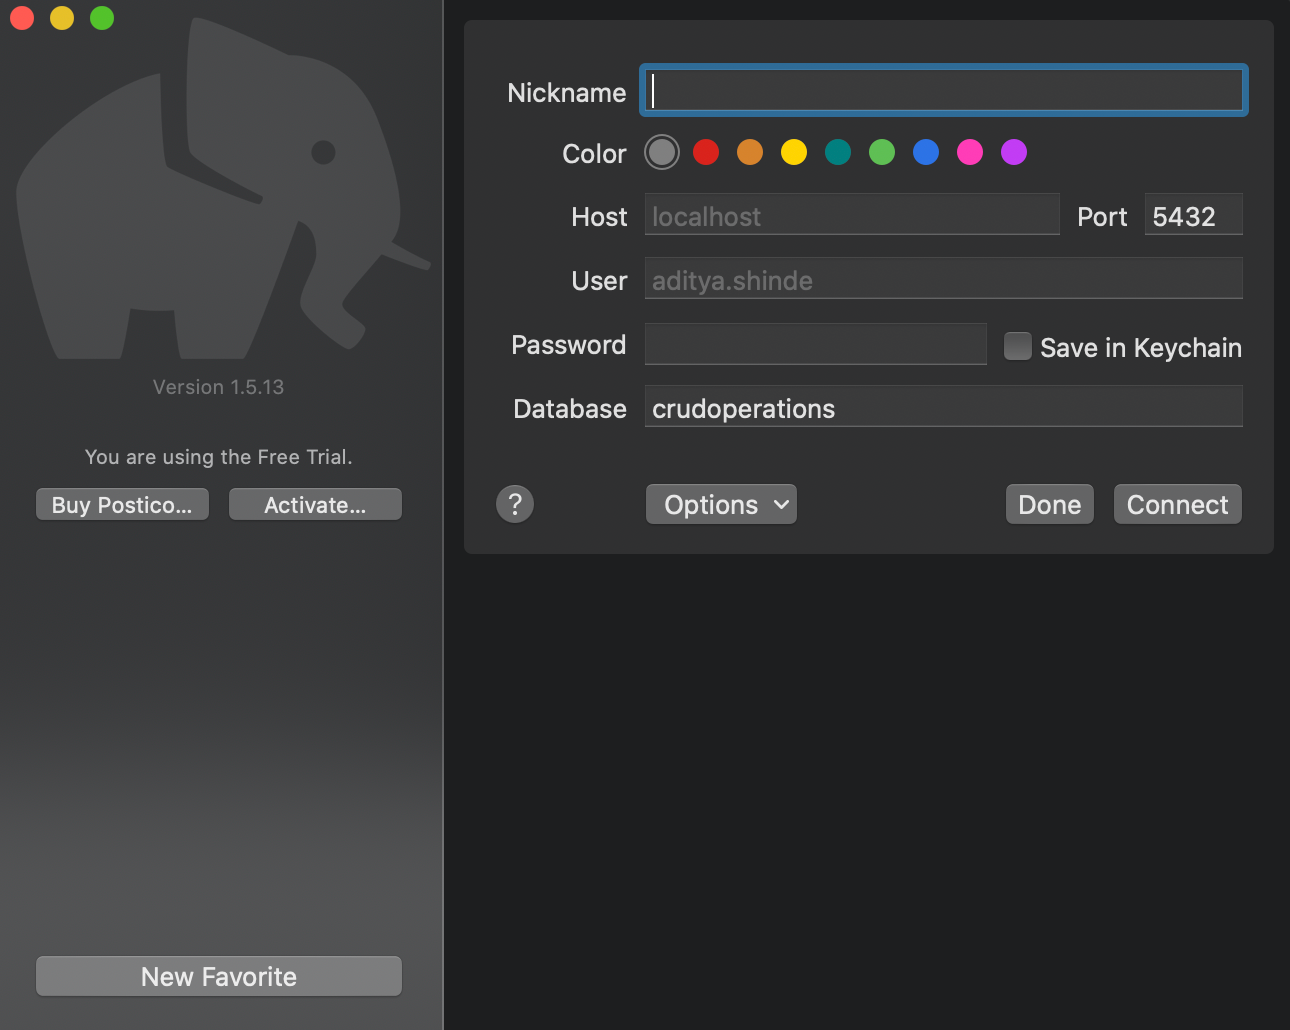
Click on the edit button. It will ask you to fill some information. It is the same information we have provided in the config.swift file while creating PostgreSQLDatabaseConfig. Check the following image.
单击编辑按钮。 它将要求您填写一些信息。 与创建PostgreSQLDatabaseConfig时在config.swift文件中提供的信息相同。 检查以下图像。
Once you provide all the information like above, click on connect. It will open the database. You’ll see two tables, Fluent and Pet.
一旦提供了上述所有信息,请单击“连接”。 它将打开数据库。 您将看到两个表Fluent和Pet。
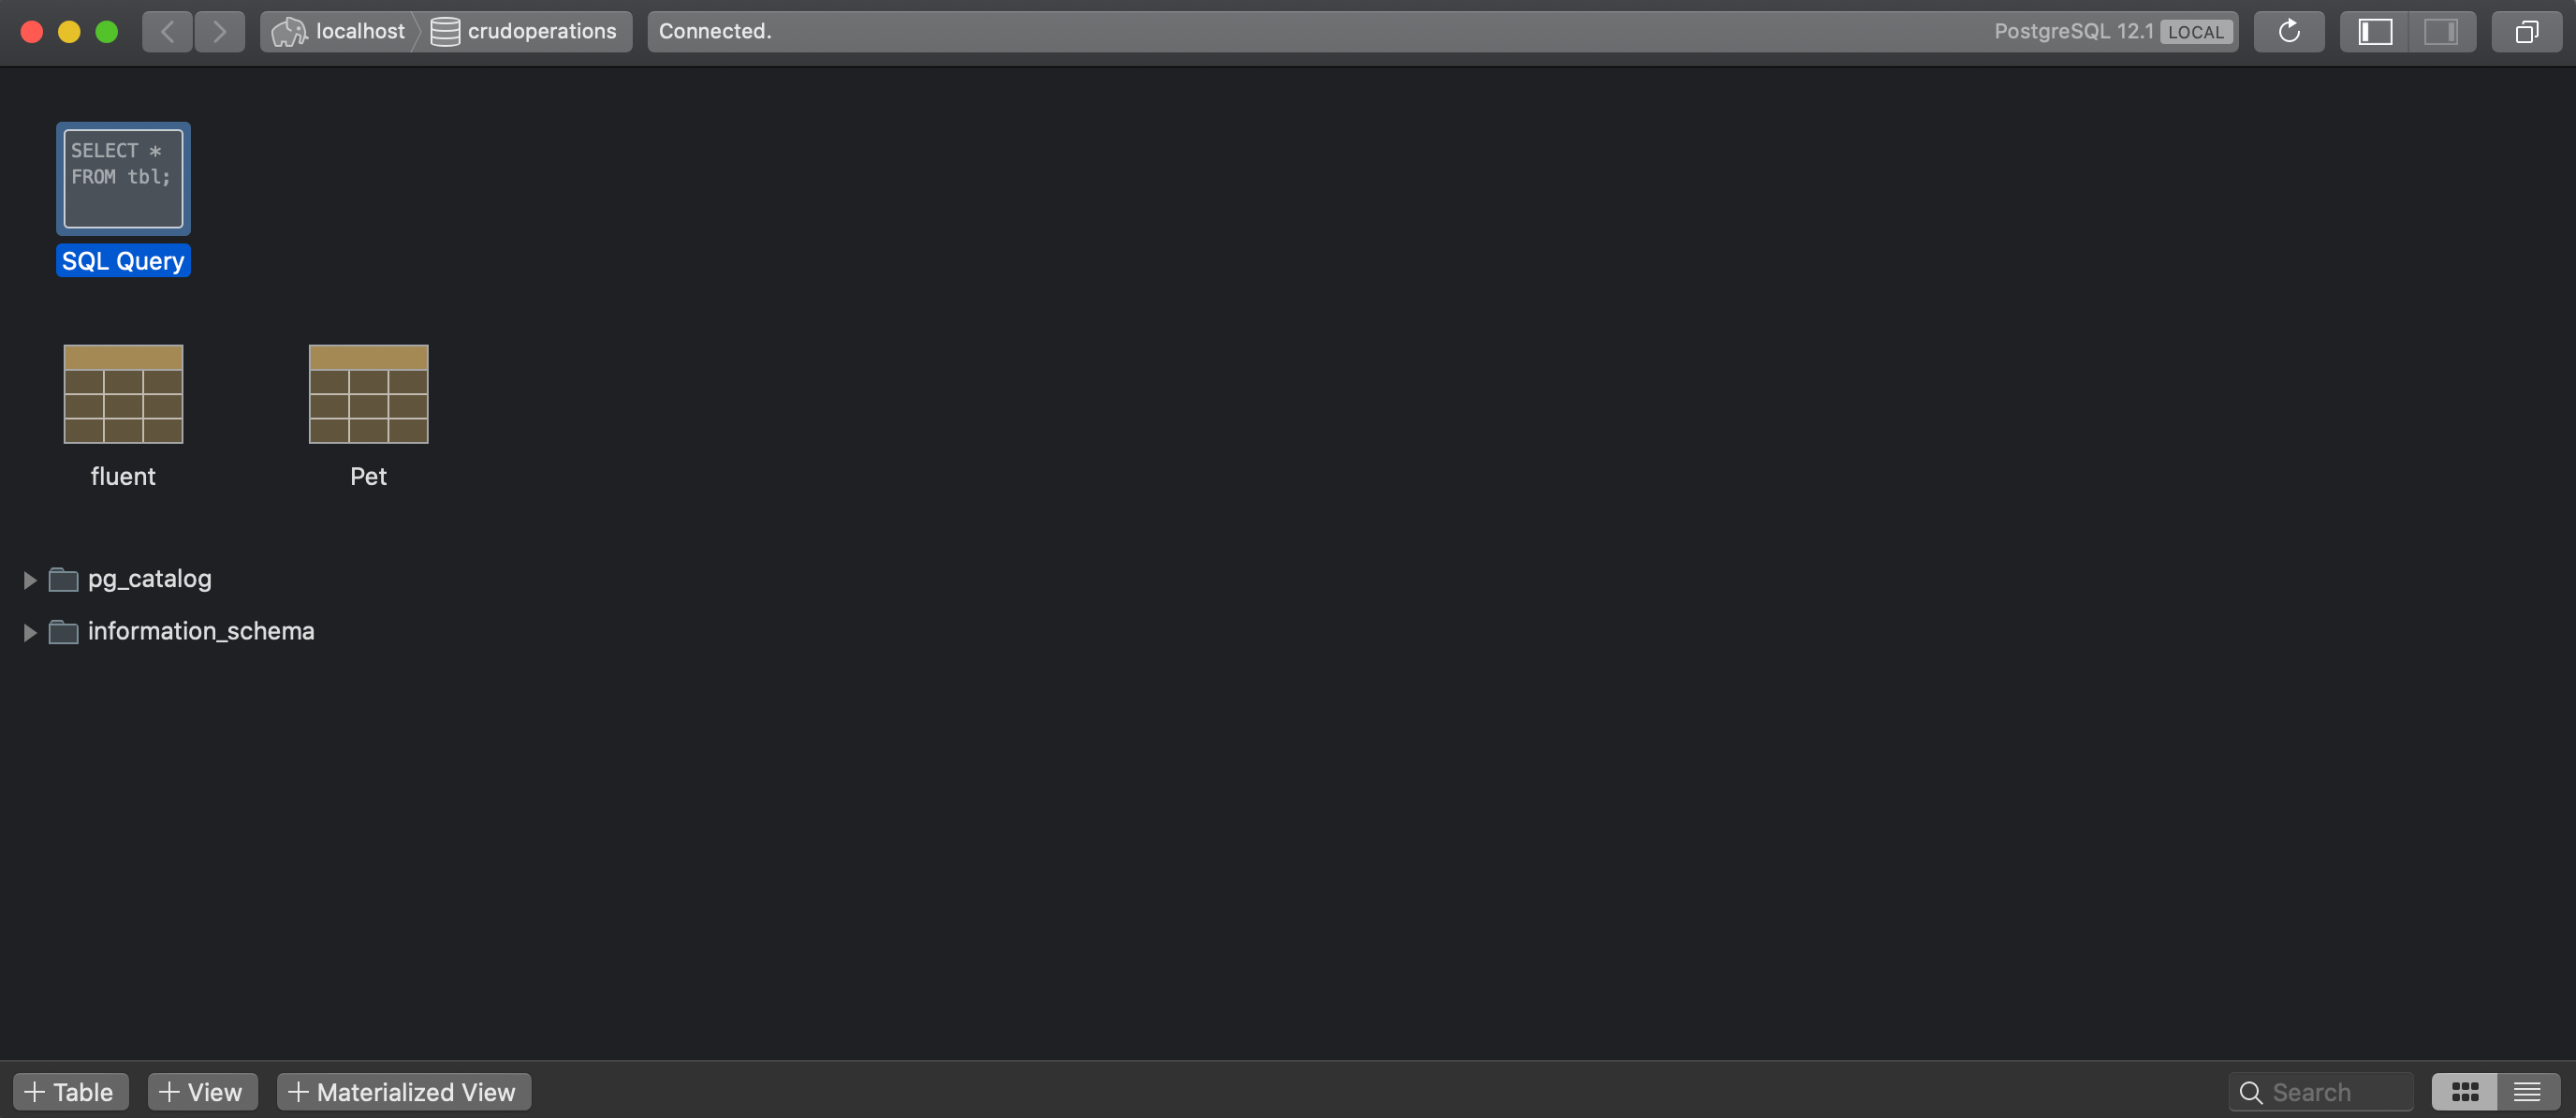
Isn’t it easy to create tables with Vapor? If you open the Pet table now, it would be empty.
用Vapor创建表难吗? 如果现在打开“宠物”表,它将为空。
6. PetController (6. PetController)
Now as our table is created, it is time for us to write web services, which will write and read data from the table. For this create a new swift file in the Controllers group and name it ‘PetController.swift’. We are going to write all the web services in this class which are related to the Pet table.
现在,在创建表之后,是时候编写Web服务了,该服务将在表中写入和读取数据。 为此,在Controllers组中创建一个新的swift文件,并将其命名为“ PetController.swift”。 我们将编写此类中与Pet表相关的所有Web服务。
Everything is set now. So let the CRUD begin.
现在一切就绪。 因此,让CRUD开始吧。
欺诈 (CRUD)
1.建立 (1. Create)
Write the following code in ‘PetController.swift’.
在“ PetController.swift”中编写以下代码。
- We have written this function to add a new Pet in our pet table. The function takes the HTTP request as a parameter and returns an object of Pet class. In other words, it returns the JSON object of Pet. We can see there something written as the Future. Just to elaborate this first we have to understand that Vapor is a completely asynchronous framework. Multiple requests received at the server, performed on a separate thread. That means the function doesn’t need to return the object of Pet immediately. The server might be busy performing some other operation. But this return type ‘Future<Pet>’ specifies that the function ‘createNewPet’ returns Pet object soon. 我们已经编写了此函数以在我们的宠物表中添加新的宠物。 该函数将HTTP请求作为参数,并返回Pet类的对象。 换句话说,它返回Pet的JSON对象。 我们可以看到这里写着“未来”。 首先,我们必须了解Vapor是一个完全异步的框架。 在服务器上接收到的多个请求是在单独的线程上执行的。 这意味着该函数不需要立即返回Pet的对象。 服务器可能正在忙于执行其他操作。 但是此返回类型'Future <Pet>'指定函数'createNewPet'很快返回Pet对象。
- We’ll be passing a JSON object which will contain pet data like type, breed, name (everything excluding id, which will be automatically generated), in POST request. In step 2 we decode the JSON to Pet object and flatMap it to get the pet object which we’ve received from the request. A small note, we can decode JSON data received in the HTTP request as Pet object because we’ve confirmed the ‘Content’ protocol with our Pet class. As it is already mentioned above, Content is a superset of the Codable protocol of swift. 我们将在POST请求中传递一个JSON对象,该对象将包含宠物数据,例如类型,品种,名称(不包括ID的所有内容,它将自动生成)。 在第2步中,我们将JSON解码为Pet对象,并对其进行FlatMap处理,以获取从请求中收到的pet对象。 提醒一下,我们可以将HTTP请求中接收的JSON数据解码为Pet对象,因为我们已经通过Pet类确认了“内容”协议。 正如上面已经提到的,Content是Swift的Codable协议的超集。
- In the flapMap closure, we get the data which we’ve received from the request in Pet model’s object and now with the function ‘save’, we are storing into Pet table as a new record. ‘save(on:_)’ returns the same model which is passed as an argument. 在flapMap闭包中,我们从Pet模型对象的请求中获得了从请求中接收到的数据,现在通过函数'save',我们将其存储为Pet表作为新记录。 'save(on:_)'返回作为参数传递的相同模型。
路线 (Route)
Now we’ve to add an HTTP method and an URL with which we can call this create pet web service. Add the following code in ‘routes’ function of the router.swift file.
现在,我们必须添加一个HTTP方法和一个URL,可以将其称为create pet web service。 在router.swift文件的“路由”功能中添加以下代码。
- We have created an object of PetController class 我们创建了一个PetController类的对象
We’ve specified that the router will use the HTTP post method, it’s path component is a pet. That is the end URL for this would be ‘http:/localhost:8080/pet’ and it has to trigger ‘createNewPet’ function of PetController.
我们已经指定路由器将使用HTTP post方法,它的路径组件是宠物。 那是它的结束URL是“ http:/ localhost:8080 / pet ”,它必须触发PetController的“ createNewPet”功能。
Now run the project in Xcode and let us test create operation with ‘Postman’.
现在,在Xcode中运行该项目,让我们使用“邮递员”测试创建操作。
In postman paste the above URL in the textbox, select the POST method and in Headers, add Content-Type, ‘application/json’. It should look like following
在邮递员中,将上述URL粘贴到文本框中,选择POST方法,然后在Headers中,添加Content-Type,“ application / json”。 它看起来应该如下

Then in Body tab add JSON data with your desired values like in the following image, I’ve added name as Tom, the breed is Lab and type is Dog.
然后在“身体”选项卡中添加具有所需值的JSON数据,如下图所示,我将名称添加为Tom,品种是Lab,类型是Dog。

Once all this is done, click on send button and in response, you should be able to see the same pet data you’ve passed along with id, like the following image
完成所有这些操作后,单击“发送”按钮,然后作为响应,您应该能够看到与id一起传递的相同宠物数据,如下图所示

You can verify this by checking if the table is having this entry. To check this, open the Pet table in Postico, you should see something like the following.
您可以通过检查表是否具有该条目来验证这一点。 为此,请在Postico中打开“宠物”表,您应该看到类似以下的内容。

Like this, you can add some more pets to the table.
这样,您可以在桌子上添加更多宠物。
2.阅读 (2. Read)
Now we have some data in our database. We’ll try to read that data now. We’ll write a web service that will fetch(read) all the pet records from the pet table.
现在我们的数据库中有一些数据。 现在,我们将尝试读取该数据。 我们将编写一个Web服务,该服务将从pet表中获取(读取)所有pet记录。
- We’ve written a function named ‘getAllPets’ which accepts HTTP request as a parameter and returns an array of Pet objects with Future. 我们编写了一个名为“ getAllPets”的函数,该函数接受HTTP请求作为参数,并返回带有Future的Pet对象数组。
- We query on the Pet table with request and call function named ‘all’ which returns an array of the model on which we are querying. 我们使用请求和调用名为“ all”的函数在Pet表上进行查询,该函数返回要查询的模型的数组。
Route
路线
Add the following lines in the ‘routes’ function of routes.swift file
在routes.swift文件的“ routes”功能中添加以下行
We’ll use the HTTP GET method. The path component would be the same as that is a pet. So the final URL won’t change. And we are using ‘getAllPets’ function of PetController.
我们将使用HTTP GET方法。 路径组件将与宠物相同。 因此,最终URL不会更改。 我们正在使用PetController的“ getAllPets”功能。
Now run the project in Xcode and test the new function in postman. You should be able to see output similar to the following.
现在,在Xcode中运行项目,并在postman中测试新功能。 您应该能够看到类似于以下内容的输出。

3.更新 (3. Update)
To perform an update, we’ll use the HTTP PUT method. We need to identify the pet which wish to update with some unique property. In our case id is that property. I’ve a dog in my pet table named ‘Tom’. I want to update its name as ‘Tomas’. For this first add following function into PetController.swift
要执行更新,我们将使用HTTP PUT方法。 我们需要识别希望通过一些独特属性进行更新的宠物。 在我们的案例中,id是该属性。 我在宠物桌中养了一条狗,名叫“汤姆”。 我想将其名称更新为“ Tomas”。 为此,首先将以下函数添加到PetController.swift中
- We’ve created a function named ‘updatePet’ that accepts HTTP request as a parameter and returns Pet object with updated data. 我们创建了一个名为“ updatePet”的函数,该函数接受HTTP请求作为参数并返回具有更新数据的Pet对象。
- In this case, we’ll be appending the ‘id’ of the pet which name we wish to update. We’ll also be passing JSON with updated pet data with the request. That is why when we flatMap in this step, first we get the pet object which id we’ve added in the URL with the help of parameter protocol. We’ll get one more pet object which we are decoding here from the pet JSON we are passing with updated pet data. That is why I’ve named them as ‘pet’ and ‘updatedPet’ in the closure parameters. 在这种情况下,我们将在宠物的“ id”后面附加我们要更新的名称。 我们还将通过请求将JSON与更新的宠物数据一起传递。 这就是为什么当我们在这一步骤中进行flatMap时,首先要获得在参数协议帮助下已在URL中添加了id的pet对象。 我们将在传递更新的宠物数据的宠物JSON中再获得一个宠物对象,该对象将在此处进行解码。 这就是为什么我在闭包参数中将它们分别命名为“ pet”和“ updatedPet”的原因。
- In step 3 we update all the data of the pet which we are getting. We are doing updations with pet object because it contains the ‘id’ of the pet against which we’ll be updating the data. 在第3步中,我们更新所获取宠物的所有数据。 我们正在对pet对象进行更新,因为它包含将要针对其更新数据的pet的“ id”。
- Here we save the pet object in the table with updated data. 在这里,我们将宠物对象与更新的数据一起保存在表中。
Route
路线
Route for this web service will be a bit different. Add following code in the route function
此Web服务的路由会有所不同。 在路由功能中添加以下代码
Here the URL will remain the same as we’ve added pet as path component but, I’ve written Pet.parameter as path component as well. As mentioned above I’ll have to append the pet id in the URL. And at the end we are using the updatePet function of the PetController. Now run the code and test it with Postman. The request and response should look like the following.
在这里,URL将保持不变,与我们将pet添加为路径组件相同,但我也将Pet.parameter编写为路径组件。 如上所述,我必须在网址中附加宠物ID。 最后,我们使用PetController的updatePet函数。 现在运行代码并使用Postman对其进行测试。 请求和响应应如下所示。

Here you can clearly see that I’ve appended the pet id in URL. And in body, I’ve updated the name as ‘Tomas’ and in output, you can see that. For more clarification, you can check the same in the table with the help of Postico.
在这里,您可以清楚地看到我在URL中附加了宠物ID。 在正文中,我将名称更新为“ Tomas”,在输出中,您可以看到。 有关更多说明,您可以在Postico的帮助下在表格中进行检查。
4.删除 (4. Delete)
To delete the user we’ll use the HTTP DELETE method and again alike update, we’ll pass the pet id in the URL. Add following function to PetController.swift
要删除用户,我们将使用HTTP DELETE方法并再次进行更新,我们将在URL中传递pet id。 将以下函数添加到PetController.swift
- We’ve created a function named ‘deletePet’ which accepts HTTP request and return HTTP status. 我们创建了一个名为“ deletePet”的函数,该函数接受HTTP请求并返回HTTP状态。
- We get the pet from the table with the help of parameter we’ve appended on URL 我们借助附加在URL上的参数从表中获得宠物
- We delete that pet with the help of delete function 我们借助删除功能删除该宠物
- Here we transform the result with HTTP status because delete function returns nothing. 在这里,我们使用HTTP状态转换结果,因为delete函数不返回任何内容。
Route
路线
Add following lines in routes function
在路由功能中添加以下行
It is almost the same as the update one, the only change is we change the method to delete instead of put.
它与更新之一几乎相同,唯一的变化是我们更改了删除方法,而不是放置方法。
Yes. That’s it. Isn’t it very simple with swift to write web services :)
是。 而已。 快速编写Web服务不是很简单:)
摘要 (Summary)
We started learning how to create a database with PostgreSQL. Then we added the required dependencies in Package.swift. We updated configurations for PostgreSQL. We created a pet table in the database and then with the help of PetController, we performed the CRUD operations.
我们开始学习如何使用PostgreSQL创建数据库。 然后,我们在Package.swift中添加了必需的依赖项。 我们更新了PostgreSQL配置。 我们在数据库中创建了一个pet表,然后在PetController的帮助下执行了CRUD操作。
You’ll be able to get the whole code here.
您将可以在此处获取整个代码。
从这往哪儿走 (Where to go from here)
In the next article, we’ll learn to provide filtered and sorted the responses. We’ll learn to add validations and also we’ll learn to encrypt and decrypt the data.
在下一篇文章中,我们将学习提供经过过滤和排序的响应。 我们将学习添加验证,还将学习加密和解密数据。
Till then
直到那时

翻译自: https://medium.com/swlh/crud-operations-with-vapor-8cddc3e622fc
crud操作


 6334
6334

 被折叠的 条评论
为什么被折叠?
被折叠的 条评论
为什么被折叠?
 到【灌水乐园】发言


