


 本文全面介绍了iOS 14中的小部件功能,包括静态和动态小部件的创建,支持不同尺寸,深层链接,智能小部件的实现以及与用户意图的互动。文章深入探讨了小部件在iOS 14中的作用,以及如何利用Xcode进行开发。
ios小部件
介绍 (Introduction)
After years and years of users demanding it, multiple jailbreaks offering this feature, and Android supporting them since the very beginning, Apple has finally jumped on the widget train. Users were relieved after the announcement at WWDC20 and developers were excited to download the Xcode 12 beta and start coding them.
在经过多年的用户要求后,多次越狱提供了此功能,并且从一开始就由Android支持它们,Apple终于跳上了窗口小部件的火车。 在WWDC20上宣布这一消息后,用户感到放心,开发人员很高兴下载Xcode 12 beta并开始对其进行编码。
This tutorial will cover:
本教程将涵盖:
- A very brief introduction to Today extensions and their role in iOS 14. 今日扩展及其在iOS 14中的作用的简短介绍。
- Static widgets: Snapshots, timelines, placeholders, and more. 静态窗口小部件:快照,时间轴,占位符等。
- Widget bundles or how to support multiple widgets in your app. 小部件捆绑包或如何在您的应用程序中支持多个小部件。
- Deep linking: Open a particular app screen from your widget. 深度链接:从小部件中打开特定的应用程序屏幕。
- Dynamic widgets: Let your users customize your widget through intents. 动态窗口小部件:让您的用户通过意图自定义您的窗口小部件。
- Smart widgets: Donations and relevance. Make your widget eligible for the Smart Stack. 智能小部件:捐赠和相关性。 使您的小部件可以使用智能堆栈。
For this article, I’ll be using TripsCalendar, a sample app I developed to test widgets. You can find the code in my repository:
对于本文,我将使用TripsCalendar,这是我开发的用于测试小部件的示例应用程序。 您可以在我的存储库中找到代码:
今日扩展及其在iOS 14中的作用 (Today Extensions and Their Role in iOS 14)
Before widgets, Apple offered what developers called “Today extensions” or “Today widgets.” Basically, very few people used them or even knew they existed. That’s how popular they were.
在提供小部件之前,Apple提供了开发人员所谓的“今日扩展”或“今日小部件”。 基本上,很少有人使用它们甚至知道它们的存在。 那就是他们的受欢迎程度。
Are they going to vanish from iOS 14? As per Xcode 12b3, your Today extension can coexist with widgets if you already added it with an older version of Xcode. This makes it possible for users stuck in iOS 13 or less to still use your “old” widget. However, be aware that Xcode 12b3 won’t let you create a new Today widget from scratch. And honestly, why would you want to?
它们会从iOS 14消失吗? 根据Xcode 12b3,如果您已经将其Today扩展名与小部件共存,并且您已经将其与旧版本的Xcode添加在一起。 这使陷入iOS 13或更低版本的用户仍然可以使用您的“旧”窗口小部件。 但是,请注意,Xcode 12b3不允许您从头开始创建新的Today小部件。 老实说,您为什么要这么做?

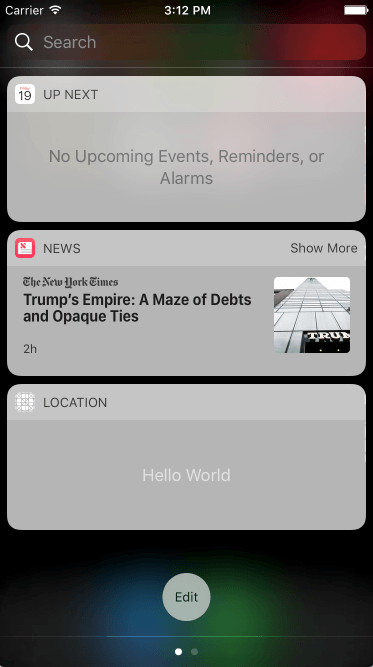
Today extensions will display under Widgets in the so-called Today view. It’s clear that Apple favors widgets and wants you to deprecate your Today extensions.
今日扩展将显示在“今日”视图中的“小组件”下。 显然,Apple偏爱小部件,并希望您弃用Today扩展。
静态小部件 (Static Widgets)
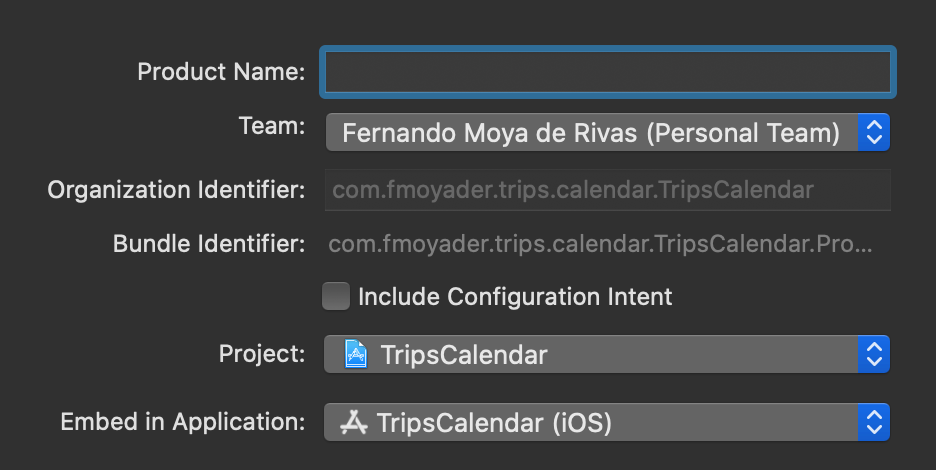
Let’s create a new widget. Go to Xcode, “New Target,” then “Widget Extension.” We’ll be creating a static widget, so leave “Include Configuration Intent” unchecked.
让我们创建一个新的小部件。 转到Xcode,“新建目标”,然后“小部件扩展”。 我们将创建一个静态小部件,因此不要选中“包括配置意图”。
This will create a bunch of boilerplate. Let’s take a look at it:
这将创建一堆样板。 让我们看一下:
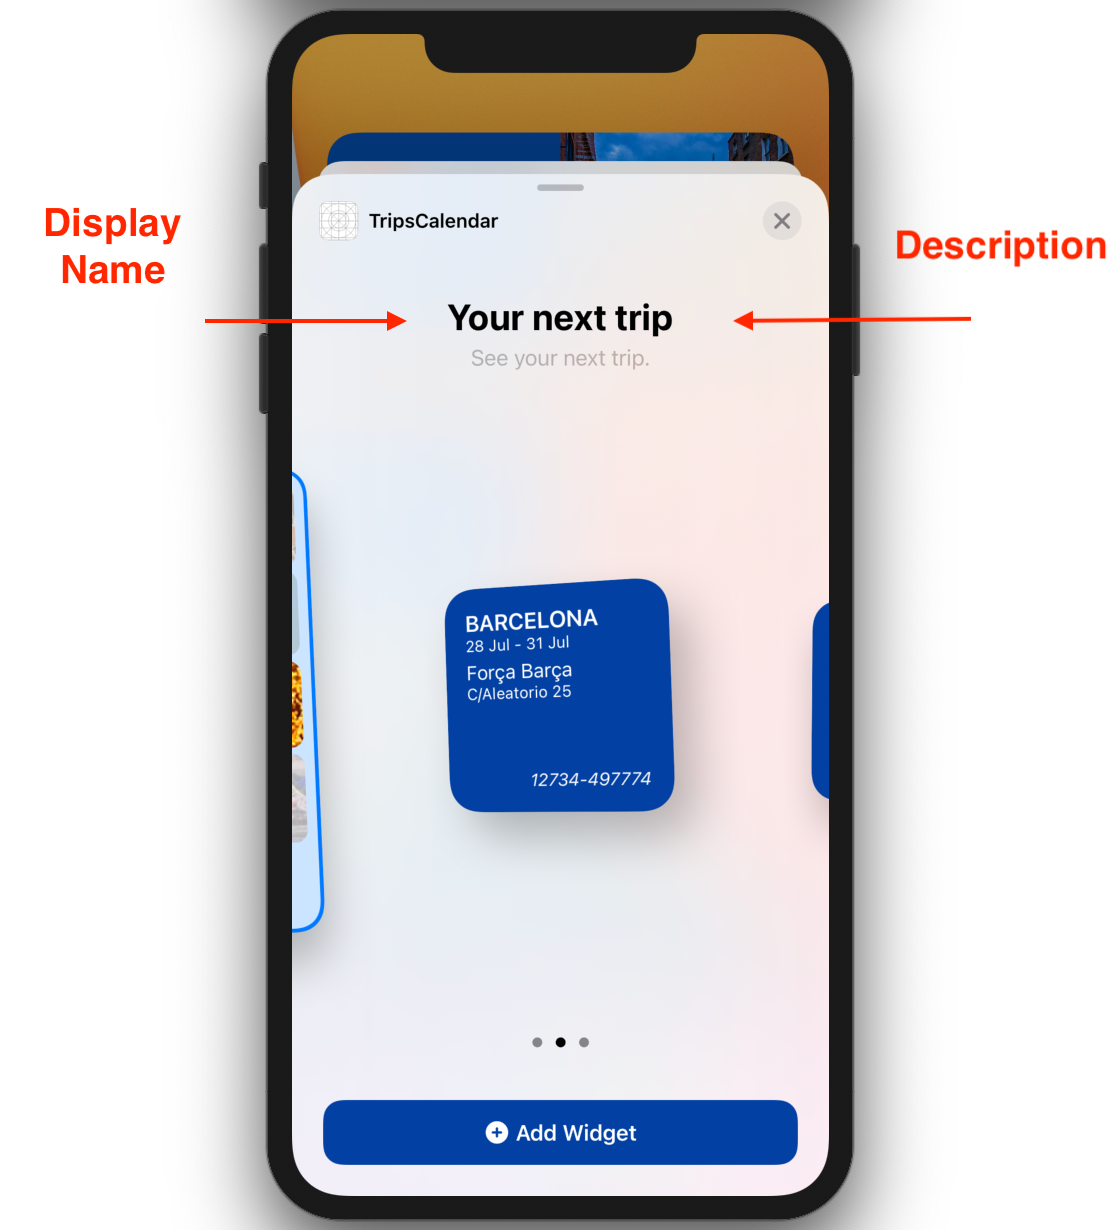
Widget — You’ll see it marked with the new
@mainwrapper to indicate that’s the starting point of the extension. Here, you can customize the display name and description of your widgets as well as specify the sizes you support by using thesupportedFamiliesmodifier.@main小部件-您将看到它带有新的@main包装器,以指示这是扩展的起点。 在这里,您可以自定义窗口小部件的显示名称和描述,以及使用supportedFamilies修饰符指定支持的大小。Entry View — The UI content of your widget. This is pure SwiftUI and we won’t be covering it, but there are nice tutorials out there.
Entry — Your Entry View’s model. It must conform to
TimelineEntry. Wrap all the data you need to successfully display your widget here. For example, TripsCalendar will be wrapping trips.条目-条目视图的模型。 它必须符合
TimelineEntry。 包装所有必要的数据以在此处成功显示小部件。 例如,TripsCalendar将包裹旅行。- Provider — The entity that will provide the system with your widget’s timeline, meaning a set of entries to display at a specific time. Be mindful and do not ask the system to display a different entry every minute. It most likely will not work. 提供者-将为系统提供小部件的时间轴的实体,意味着在特定时间显示的一组条目。 请注意,不要要求系统每分钟显示一个不同的条目。 它很可能无法正常工作。
Note that your widget uses StaticConfiguration by default. This is fine. It just means it’s not configurable or customizable by the user.
请注意,您的窗口小部件默认情况下使用StaticConfiguration 。 这可以。 这只是意味着它不能由用户配置或定制。
支持家庭 (Supporting families)
Widgets support three different sizes:
小部件支持三种不同的大小:
- Small (the space of four app icons in the home screen) 小(主屏幕中四个应用程序图标的空间)
- Medium (the space of eight app icons in the home screen, extended horizontally) 中(主屏幕中八个应用程序图标的空间,水平扩展)
- Large (the space of 16 app icons in the home screen or half the screen) 大(主屏幕或半个屏幕中16个应用程序图标的空间)
For our first widget, CalendarWidget, I want to list my next trips and I need space, so I’m choosing systemLarge as my supported family:
对于我们的第一systemLarge部件CalendarWidget ,我想列出我的下一个旅程,并且需要空间,所以我选择systemLarge作为我支持的家庭:
StaticConfiguration {
    ...
}
.supportedFamilies([.systemLarge])
快照 (Snapshot)
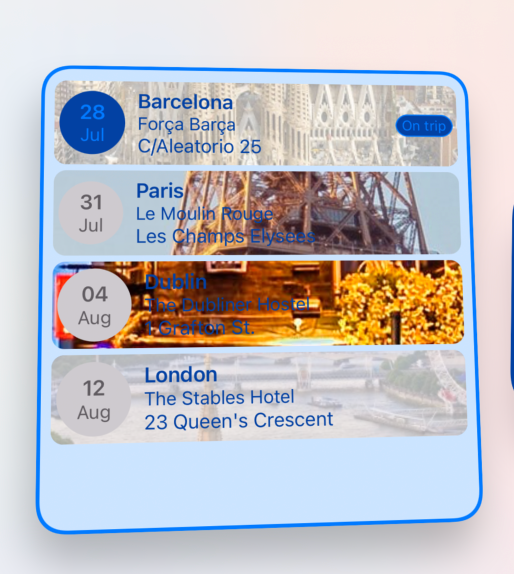
This is a single entry that will be displayed when trying to add your widget to the home screen of your device. Use your default configuration here or even some dummy data so that the user sees how beautiful your widget looks.
尝试将小部件添加到设备主屏幕时,将显示该条目。 在此处使用您的默认配置,甚至使用一些虚拟数据,以便用户看到您的小部件外观多么漂亮。
let entry = CalendarEntry(date: Date(), trips: nextTrips)This is what my snapshot looks like:
这是我的快照的样子:
时间线 (Timelines)
Similarly to Today extensions, widgets are highly limited by the system and have very few resources. The way they work is through timelines. This means we’re going to pass the system the entries/models that will populate our widget’s UI at a specific time. This is done in the provider. Notice the way the timeline is returned through a completion block. This allows us to perform async tasks (e.g. an API call or loading a file from your app sandbox).
与Today扩展类似,widget受到系统的高度限制,并且资源很少。 他们的工作方式是通过时间表。 这意味着我们将在特定时间向系统传递将填充小部件UI的条目/模型。 这是在提供程序中完成的。 注意时间轴通过完成块返回的方式。 这使我们能够执行异步任务(例如,API调用或从您的应用程序沙箱加载文件)。
Note: Don’t try to load remote images from your widget’s UI (some View body). It won’t work. I found a good tutorial on creating an AsyncImage and loading that image from a remote URL. While this works fine for a View in the app’s code, it doesn’t in the widget’s code and can actually make it crash. The only way to perform an async task from a widget is:
注意:请勿尝试从小部件的UI(某些View主体)加载远程图像。 它不会工作。 我找到了有关创建AsyncImage并从远程URL加载该图像的很好的教程 。 虽然这对于应用程序代码中的View可以正常工作,但它不在小部件的代码中,实际上会使它崩溃。 从窗口小部件执行异步任务的唯一方法是:
- In the provider when building your timeline entries. 在构建时间轴条目时在提供程序中。
- By using background tasks. However, this isn’t really an option. Background tasks aren’t executed right away but when the system decides, and you’ll most likely want to download and display that image ASAP. 通过使用后台任务。 但是,这并不是真正的选择。 后台任务不会立即执行,而是在系统决定后立即执行,您很可能希望尽快下载并显示该图像。
The last step to create your timeline is to specify a reload policy (i.e. when you want the system to request new entries). You can choose between:
创建时间轴的最后一步是指定重新加载策略(即,当您希望系统请求新条目时)。 您可以选择:
.atEnd— Once the system runs out of entries..atEnd—一旦系统用完条目。.never— The App will “manually” request an update..never应用程序将“手动”请求更新。.after(_ date: Date)— Update after a certain time..after(_ date: Date)—在一定时间后更新。
As I mentioned, CalendarWidget will display a list of trips. These won’t change unless the user removes/adds a trip, so in our case, we can just choose .never :
如前所述, CalendarWidget将显示行程列表。 除非用户删除/添加行程,否则这些更改不会更改,因此在我们这种情况下,我们可以选择.never :
let store = TripsStore()
let entry = CalendarEntry(date: Date(), trips: store.trips)
let timeline = Timeline(entries: [entry], policy: .never)
completion(timeline)
Nevertheless, I want to just show future trips. If the user doesn’t add or remove a trip for a few days, my widget could be outdated. For this reason, I’ll choose the .after policy instead:
不过,我只想显示将来的旅行。 如果用户几天没有添加或删除行程,则我的小部件可能已过时。 因此,我将改为选择.after策略:
let tomorrow = ...
let store = TripsStore()
let entry = CalendarEntry(date: Date(), trips: store.trips)
let timeline = Timeline(entries: [entry], policy: .after(tomorrow))
completion(timeline)
Finally, every time a user removes or adds a trip, I want my widget to get updated accordingly:
最后,每次用户删除或添加行程时,我都希望我的小部件得到相应的更新:
import WidgetKitfunc remove(trip: Trip) {
    ...
    WidgetCenter.shared.reloadAllTimelines()
}
Here, I’m reloading all timelines at the same time, but you can also reload timelines of a certain kind with reloadTimelines(of:) or check for a specific intent configuration of your widget with getCurrentConfigurations.
在这里,我要同时重新加载所有时间线,但是您也可以使用reloadTimelines(of:)重新加载某种类型的时间线,或者使用getCurrentConfigurations检查窗口小部件的特定意图配置。
Important note: If you’re retrieving information stored in your app sandbox or your UserDefaults, don’t forget to add App Groups to your “Widget Extension” capabilities:
重要说明:如果您要检索存储在应用程序沙箱或UserDefaults ,请不要忘记将应用程序组添加到“ UserDefaults小部件扩展”功能中:

占位符 (Placeholders)
You can specify a placeholder view while the system is loading your widget. SwiftUI provides a new modifier called .redacted(reason: .placeholder) that will replace Text and Image , among others, with faded rectangles:
您可以在系统加载窗口小部件时指定占位符视图。 SwiftUI提供了一个名为.redacted(reason: .placeholder)的新修饰符,该修饰符将用褪色的矩形替换Text和Image等:
WWDC20 videos show isPlaceholder(true) instead, but this has been deprecated in favor of redacted(reason: .placeholder). Then in your widget’s body:
WWDC20视频显示了isPlaceholder(true) ,但是已弃用了它,而推荐使用redacted(reason: .placeholder) 。 然后在小部件的主体中:
StaticConfiguration(..., placeholder: CalendarPlaceholderView()) {
    ...
}
Note that this initializer seems to be deprecated in Xcode 12b3.
请注意,该初始化程序似乎已在Xcode 12b3中弃用。
支持多个小部件 (Support Multiple Widgets)
Who said you can just have one widget? To support multiple widgets in your app, you simply need to create a WidgetBundle and list all the available widgets there.
谁说您只能拥有一个小部件? 要在您的应用程序中支持多个小部件,您只需要创建一个WidgetBundle并在其中列出所有可用的小部件。
Firstly, remove @main from the top of your widget definition. Secondly, create a widget bundle:
首先, @main部件定义的顶部删除@main 。 其次,创建一个小部件包:
Now, when you try to add a widget to your home screen, all the widgets listed in your bundle will show up to be picked:
现在,当您尝试将小部件添加到主屏幕时,捆绑软件中列出的所有小部件都会显示出来以供选择:
深层连结 (Deep Linking)
As mentioned before, widgets are very limited in resources and also in space. You can’t really design your widgets to have numerous interactions, such as buttons, gestures, etc. That would mean your widget is poorly designed, as that’s not what they’re meant for. According to Apple:
如前所述,小部件的资源和空间都非常有限。 您不能真正将小部件设计为具有多种交互功能,例如按钮,手势等。这意味着您的小部件设计不良,因为这不是它们的目的。 根据苹果的说法:
“Although people can tap a widget to see or do more in your app, a widget’s main purpose is to display a small amount of timely, personally relevant information that people can view without opening your app. Identifying a single idea for a widget and scoping the information to display are crucial first steps in the design process.”
“尽管人们可以点击小部件以在您的应用中查看或执行更多操作,但小部件的主要目的是显示少量及时的,与个人相关的信息,人们无需打开您的应用即可查看这些信息。 确定小部件的单个想法并确定信息的显示范围是设计过程中至关重要的第一步。”
What we can do is have a limited number of links (no more than four, as they recommend) to deep-link to our app. For that, they provide two options:
我们能做的是,只有有限数量的链接(不建议超过四个)来深度链接到我们的应用程序。 为此,他们提供了两种选择:
.widgetURL(_ url: URL?)will make your whole widget clickable and will deep-link to the specified URL. By default, clicking on a widget will open your app on whichever screen it was on..widgetURL(_ url: URL?)将使您的整个窗口小部件.widgetURL(_ url: URL?)单击,并将深度链接到指定的URL。 默认情况下,单击小部件将在其所在的任何屏幕上打开您的应用。Link(destination: URL)to wrap some content into a clickable deep link.Link(destination: URL),将一些内容包装到可点击的深层链接中。
For example, CalendarWidgetEntryView will link to the home screen when there’s no content to display (Empty View) and link to a particular trip when a row is tapped:
例如, CalendarWidgetEntryView将在没有要显示的内容(空视图)时链接到主屏幕,并在点击一行时链接到特定行程:
If you want to learn more about deep links in the SwiftUI app cycle, check out this article.
如果您想进一步了解SwiftUI应用周期中的深层链接,请查看本文 。
动态(意图)小部件 (Dynamic (Intent) Widgets)
The previous widget was “static” and therefore not customizable by the user. We’ll build a new widget, NextTripWidget, and learn how to make widgets configurable.
先前的窗口小部件是“静态的”,因此不能由用户自定义。 我们将构建一个新的小部件NextTripWidget ,并学习如何使小部件可配置。
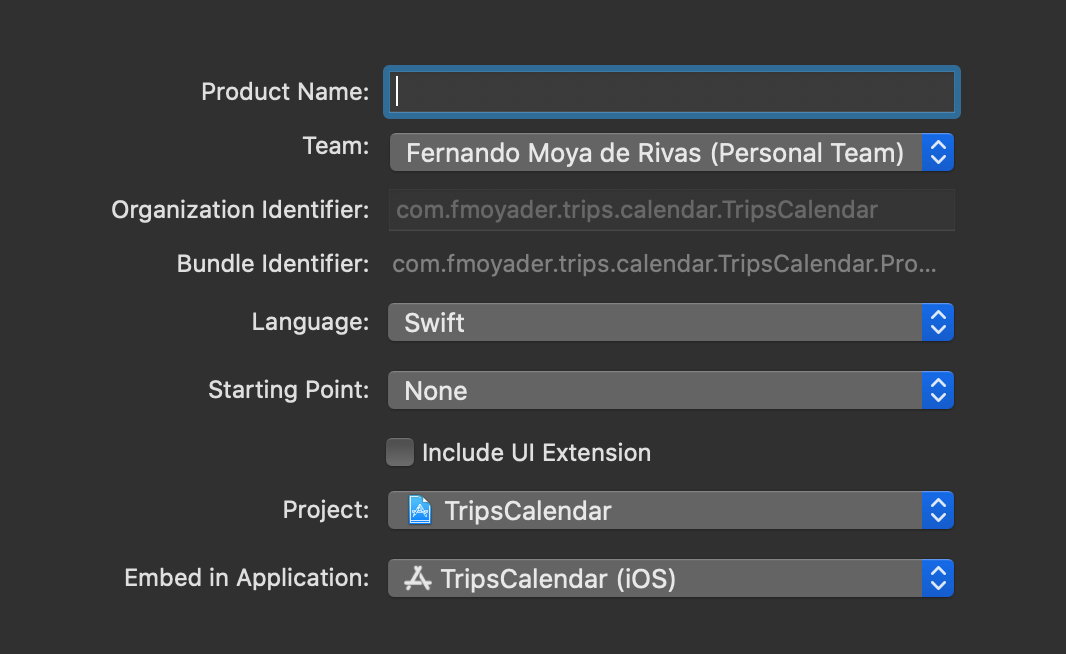
The first step is making an Intent extension (Xcode, “New Target,” “Intent Extension”). Make sure you choose “None” as the starting point and leave “Include UI Extension” unchecked.
第一步是进行Intent扩展(Xcode,“ New Target”,“ Intent Extension”)。 确保选择“无”作为起点,并且未选中“包括用户界面扩展”。
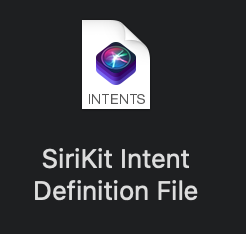
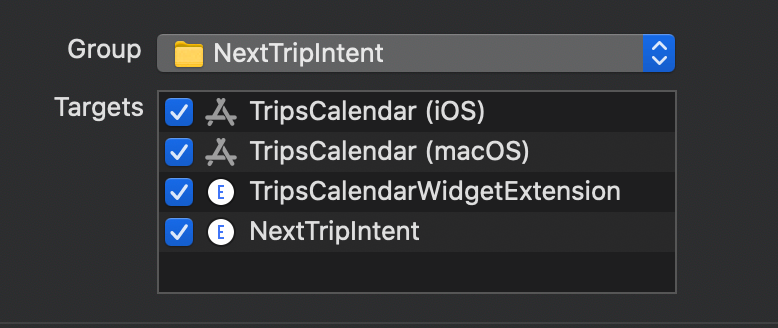
You can also use an existing Intent extension if you have one. Go to your project folder inspector, create a new file (SiriKit Intent Definition File), and make sure it’s available in all your targets:
如果有扩展名,也可以使用现有的Intent扩展名。 转到项目文件夹检查器,创建一个新文件( SiriKit Intent Definition File ),并确保该文件在所有目标中均可用:
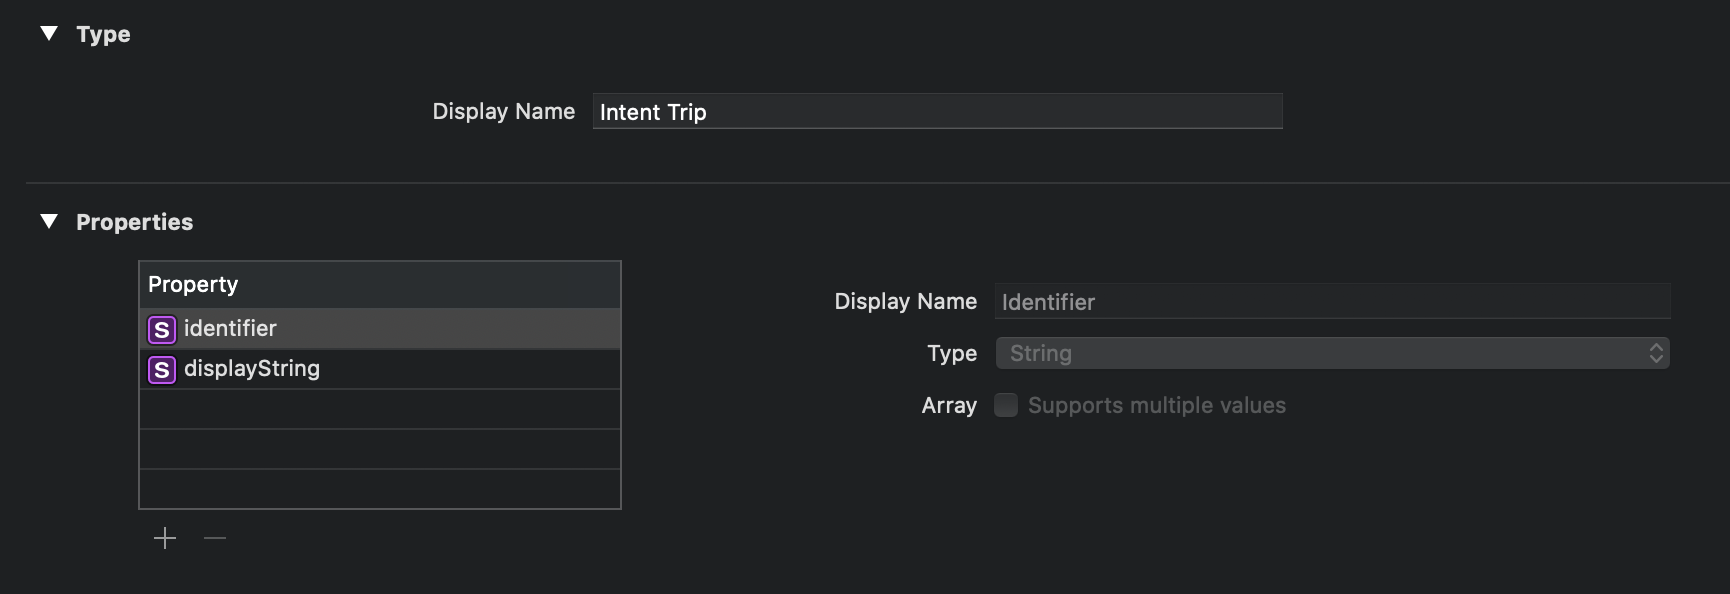
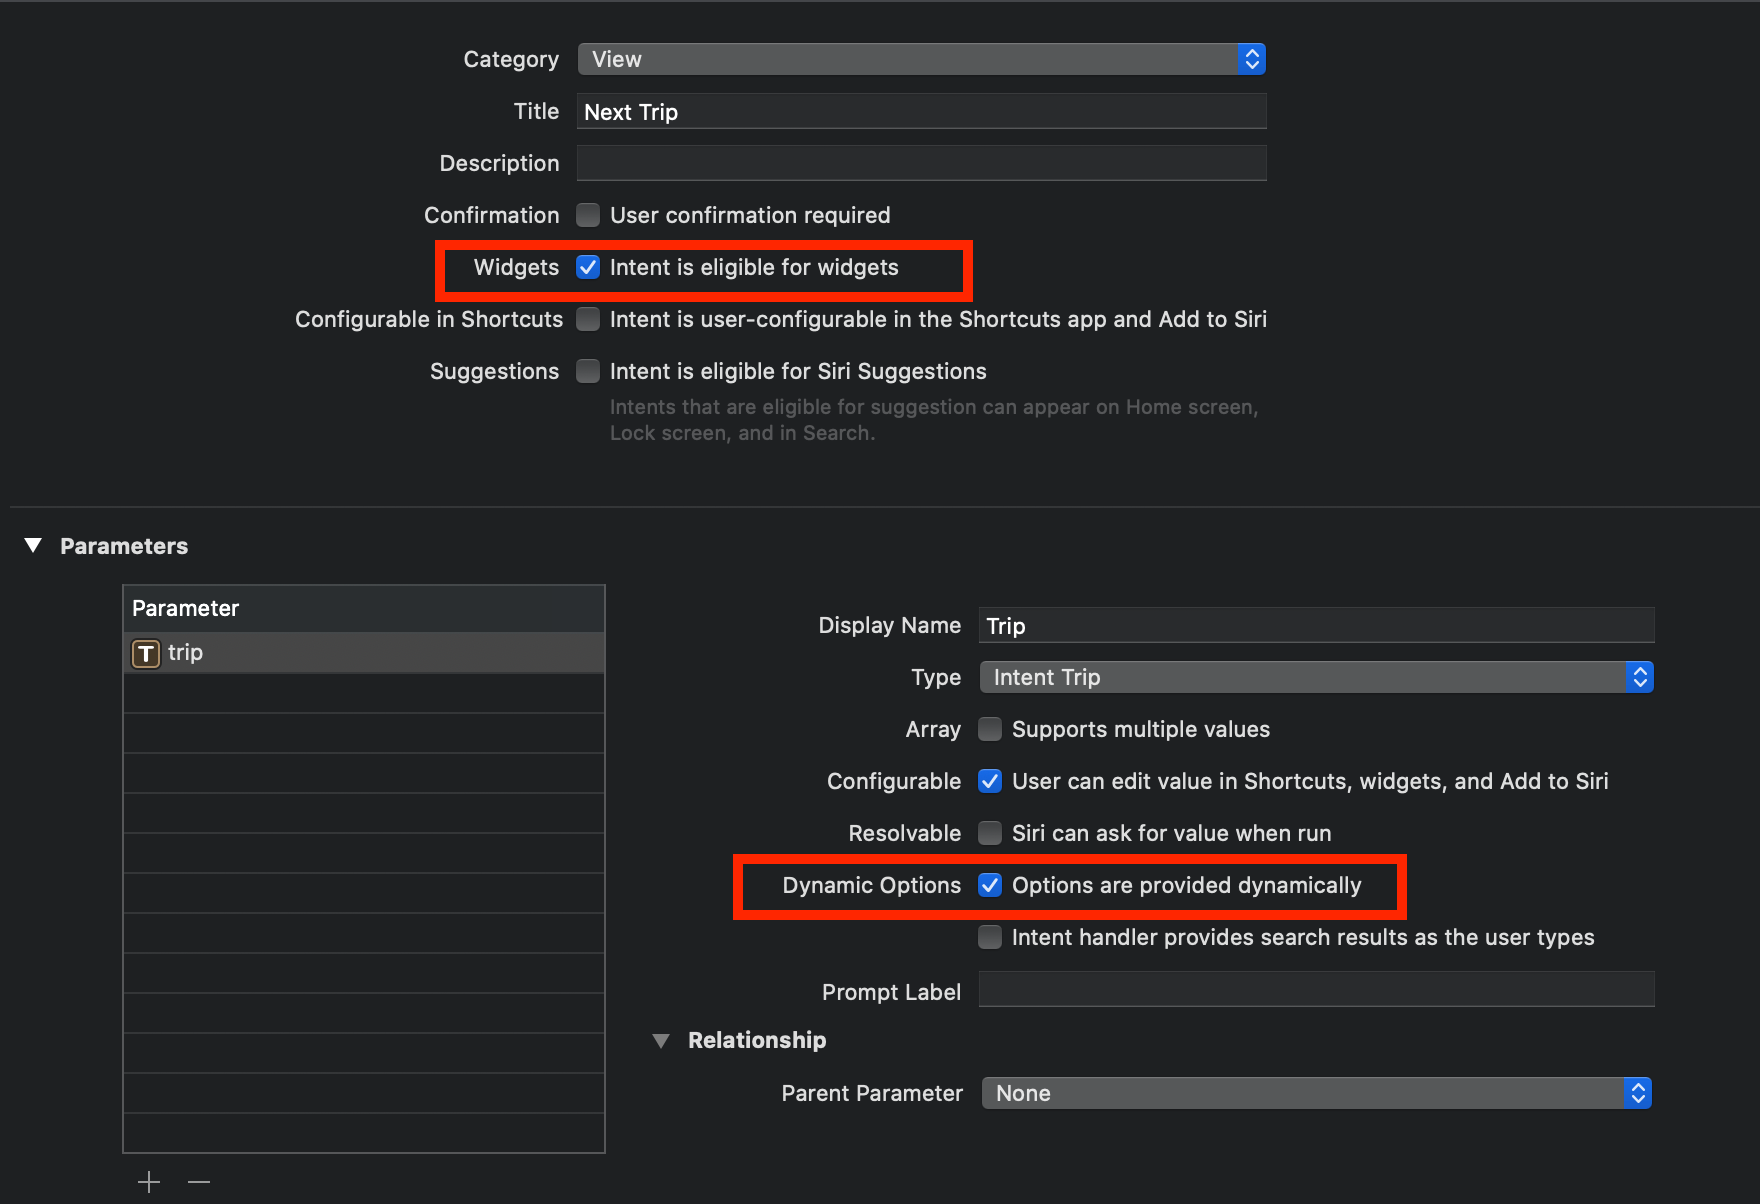
For NextTripWidget, I want to be able to choose what trip is displayed. For that, I’m going to create in my Intent definition file (a new type called IntentTrip) and I’m going to add it as a parameter to my intent. Hit + to add a new intent, pick a name, and make sure that both “Intent is eligible for widgets” and “Options are provided dynamically” are checked:
对于NextTripWidget , 我希望能够选择要显示的旅程。 为此,我将在我的Intent定义文件中创建一个名为IntentTrip的新类型,并将其作为参数添加到我的Intent中。 点击+添加一个新的意图,选择一个名称,并确保同时选中了“意图适用于窗口小部件”和“动态提供选项”:
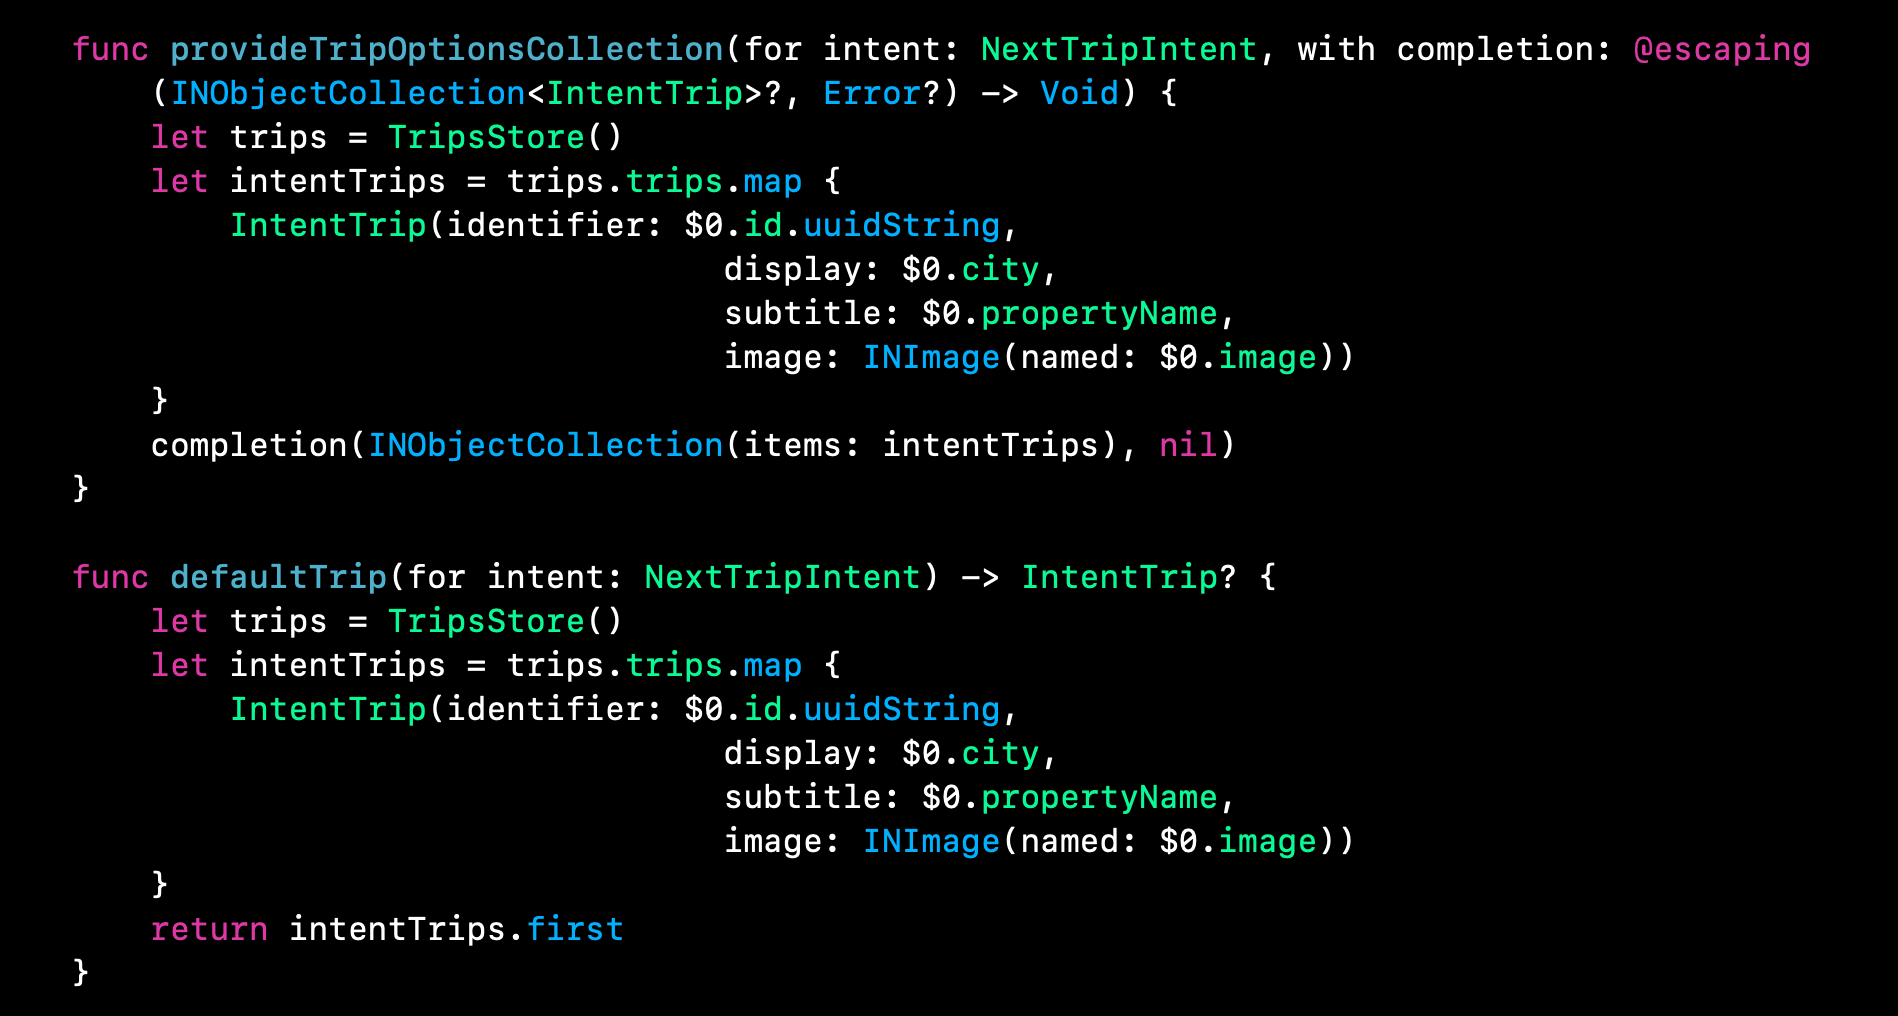
If you compile now, Xcode will generate an IntentHandling protocol as well as an Intent class with a property to hold your custom type parameter. I called my intent NextTrip in my intent definition file, so Xcode generated a NextTripIntentHandling protocol. MakeIntentHandler conform to this protocol:
如果您现在进行编译,则Xcode将生成一个IntentHandling协议以及一个Intent类,该类具有用于保存您的自定义类型参数的属性。 我在意图定义文件中调用了意图NextTrip ,因此Xcode生成了NextTripIntentHandling协议。 使IntentHandler符合以下协议:
Finally, all you have to do is make your widget use an IntentConfiguration:
最后,您要做的就是让您的小部件使用IntentConfiguration :

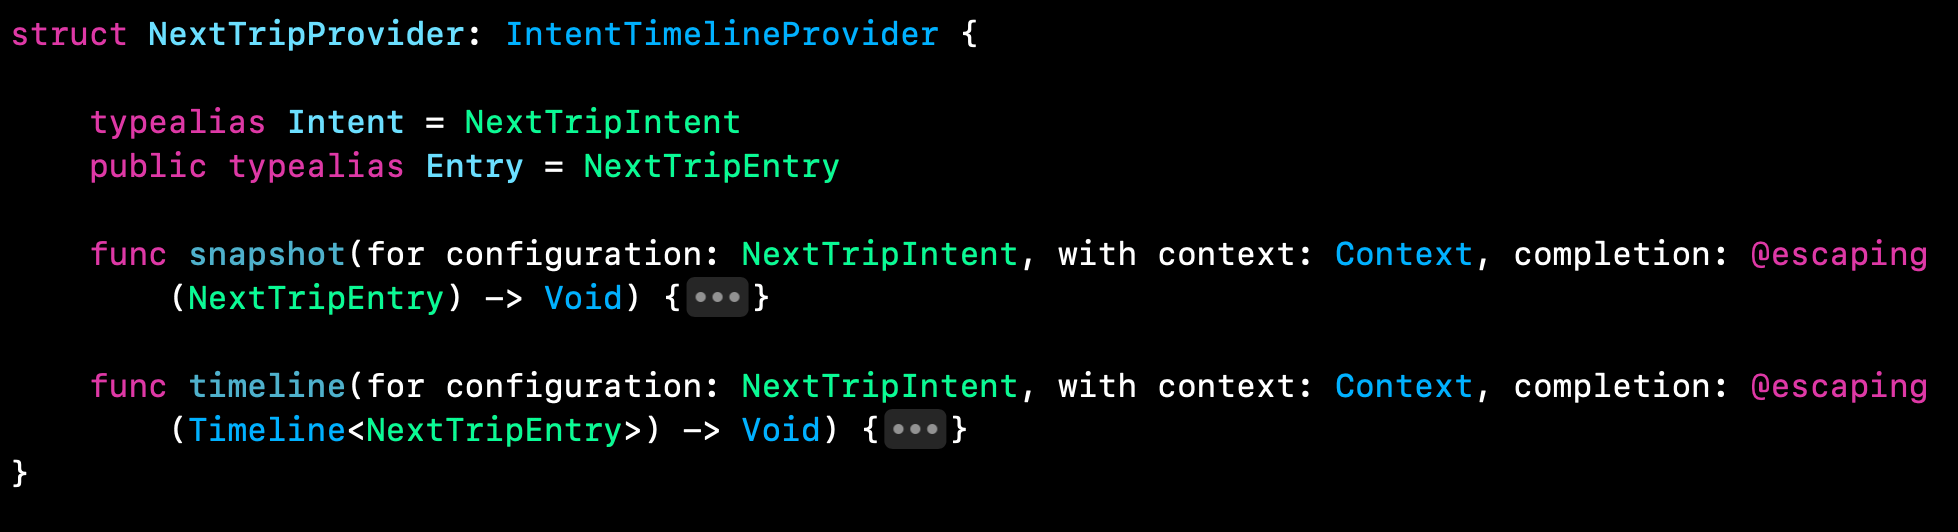
And make your provider conform to IntentTimelineProvider rather than TimelineProvider:
并使您的提供程序符合IntentTimelineProvider而不是TimelineProvider :
Now, you can retrieve the selected trip from your intent:
现在,您可以从意图中检索选定的旅程:
Note how iOS is using custom colors for the dialogs. To do this, you just have to define an AccentColor and a WidgetBackgroundColor in your Widget Extension Assets catalog. If you want to use a different name, you can change it in your widget’s target Build Settings:
注意 iOS如何将自定义颜色用于对话框。 为此,您只需要在Widget Extension Assets目录中定义AccentColor和WidgetBackgroundColor 。 如果要使用其他名称,则可以在小部件的目标构建设置中进行更改:

智能小部件:捐赠和相关性 (Smart Widgets: Donations and Relevance)
iOS 14 comes with a Smart Stack that rotates the user’s widgets according to their interests and what they will most likely be doing at any time. How can we make our widget eligible for such rotation and tell the system some timeline entry is important? There are two ways to do that.
iOS 14带有一个智能堆栈,该堆栈可根据用户的小部件的兴趣以及他们随时可能执行的操作来旋转小部件。 我们如何才能使窗口小部件有资格进行此类轮换,并告诉系统一些时间表输入很重要? 有两种方法可以做到这一点。
关联 (Relevance)
The TimelineEntry protocol comes with a variable var relevance: TimelineEntryRelevance?. By default, this value is nil, so you’ll need to declare it in your entry.
TimelineEntry协议带有可变的var relevance : TimelineEntryRelevance? 。 默认情况下,此值为nil ,因此您需要在条目中声明它。
For example, NextTripWidget shows any future trip, but one that’s ongoing feels more relevant than another that’s in two weeks. We can specify a score for ongoing trips that’s higher than for non-current trips when creating the timeline inside NextTripProvider:
例如, NextTripWidget显示将来的任何旅行,但正在进行中的旅行比两周后的旅行更有意义。 在NextTripProvider创建时间线时,我们可以为正在进行的旅程指定一个比非当前旅程更高的NextTripProvider :
let score: Float = (trip?.isOngoing ?? false) ? 1 : 0
let relevance = TimelineEntryRelevance(score: score)let entry = NextTripEntry(date: now, trip: trip, relevance: relevance)
In this case, I’m using a scale from 0 to 1. Ongoing trips will get higher relevance (1) than the rest of them (0).
在这种情况下,我使用的评分范围是0到1。与其他旅行(0)相比,进行中的旅行具有更高的相关性(1)。
意向捐赠 (Intent donation)
Siri Intents were introduced in iOS 12 and have been used for suggestions, shortcuts, etc. The same implementation can be used in this case.
Siri Intents是iOS 12中引入的,已用于建议,快捷方式等。在这种情况下,可以使用相同的实现。
For instance, when a user visits some trip details, we can let the system know by donating an intent of the type created in previous sections:
例如,当用户访问某些行程详细信息时,我们可以通过捐赠先前部分中创建的类型的意图来通知系统:
This will “donate” an interaction to the system. If the system detects that a user performs some action in their device at a certain time that turns into one of these interactions, then the Smart Stack will display a widget that matches this interaction’s identifier.
这将“捐赠”与系统的交互。 如果系统检测到用户在某个特定时间在设备中执行了某些操作,从而变成了这些交互之一,则智能堆栈将显示与该交互的标识符匹配的小部件。
结论 (Conclusion)
Apple is betting on widgets, which seem much more useful than the old Today widgets. Use a static or dynamic configuration depending on your needs and don’t overwhelm your users with too much information at once. Keep your widgets simple and with few interactions. Don’t perform any time-consuming operation. Use the app instead.
苹果公司押注小部件,这些小部件似乎比旧的“今日”小部件有用。 根据您的需求使用静态或动态配置,不要一次给您太多用户过多的信息。 使您的窗口小部件简单且很少交互。 不要执行任何耗时的操作。 请改用该应用。
翻译自: https://medium.com/better-programming/everything-you-need-to-know-about-ios-14-widgets-10856eb76d2a
ios小部件


 被折叠的 条评论
为什么被折叠?
被折叠的 条评论
为什么被折叠?
 到【灌水乐园】发言


