


This is an easy but beautiful animation for showing selected cell in collection view.
这是一个简单而漂亮的动画,用于在集合视图中显示选定的单元格。
So let’s start writing the code…
因此,让我们开始编写代码...
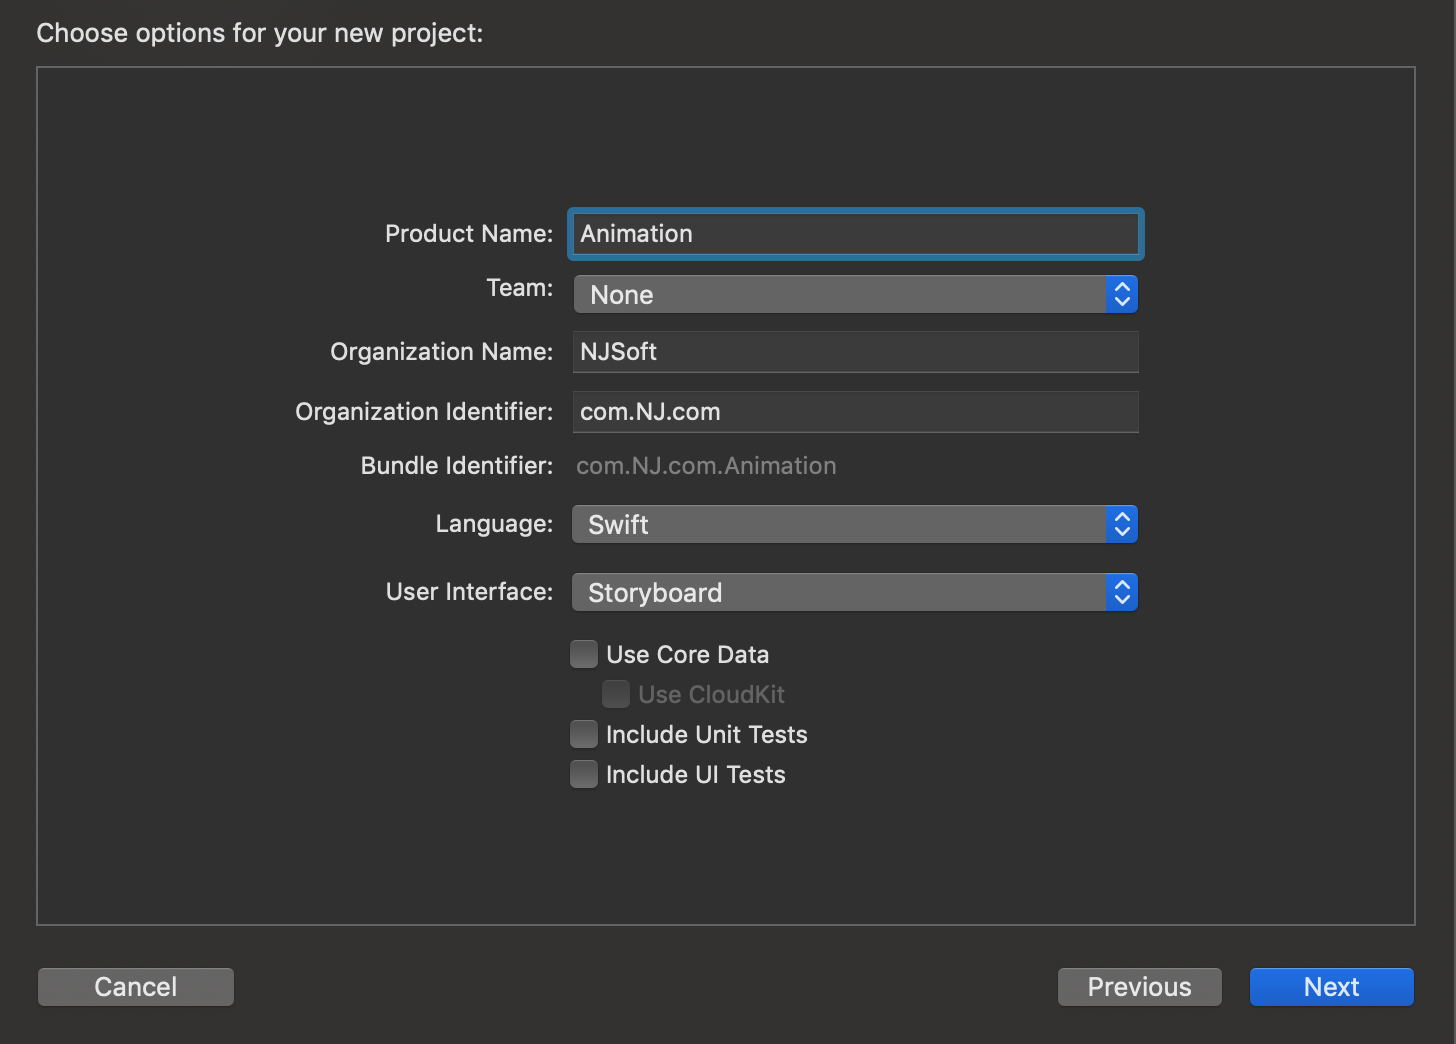
In Xcode create a Single View App, give the name Animation.
在Xcode中,创建一个单一视图应用程序,并命名为Animation。
In the Target keep the Deployment Device- ‘iPhone’ and Device Orientation- ‘Portrait’.
在目标中,保留部署设备-“ iPhone”和设备方向-“肖像”。
Now in ViewController add these:
现在在ViewController中添加以下内容:
@IBOutlet weak var photoCollectionView: UICollectionView!@IBOutlet weak var categoryCollectionView: UICollectionView!And create 2 arrays, 1 for photos and another for categories i.e top collection view.
并创建2个数组,其中1个用于照片,另一个用于类别,即顶级收藏视图。
let photoArray = ["Album4Photo0.jpg", "Album1Photo2.jpg", "Album7Photo2.jpg"]let photoCategoryArray = ["Sunshine", "Butterfly", "PinkSky"]The photoArray contains the names of images which we will use in our app. You can download these images from here. Drag that downloaded folder in your project.
photoArray包含我们将在应用程序中使用的图像的名称。 您可以从此处下载这些图像。 将下载的文件夹拖到项目中。
Open Main.storyboard, drag a collection view and connect it’s IBOutlet to photoCollectionView. Connect it’s delegate and datasource to viewcontroller. In the attribute inspector uncheck scrolling enabled. Only keep ‘paging enabled’ to checked. Last, add constraints:
打开Main.storyboard,拖动一个收藏夹视图并将其IBOutlet连接到photoCollectionView。 将它的委托和数据源连接到viewcontroller。 在属性检查器中,取消选中已启用滚动。 仅保持选中“启用分页” 。 最后,添加约束:
- Leading to safe area. 通往安全区。
- Trailing to safe area. 拖到安全区域。
- Height = 568 身高= 568
- Align centre Y to superview with constant = 30. 将中心Y对齐到超级视图,常数= 30。
Drag another collection view and connect it’s IBOutlet to categoryCollectionView. Connect it’s delegate and datasource to viewcontroller. Add constraints:
拖动另一个集合视图,并将其IBOutlet连接到categoryCollectionView。 将其委托和数据源连接到viewcontroller。 添加约束:
- Leading to safe area. 通往安全区。
- Trailing to safe area. 拖到安全区域。
- Height = 70 高度= 70
- Bottom space to photocollectionview. 底部空间到photocollectionview。
Now create 2 custom CollectionViewCell class:
现在创建2个自定义CollectionViewCell类:
class PhotoCell: UICollectionViewCell {    @IBOutlet weak var photoImage: UIImageView!
}class CategoryCell: UICollectionViewCell {    @IBOutlet weak var nameLabel: UILabel!
}
Again open Main.storyboard and do the following:
再次打开Main.storyboard并执行以下操作:
- In the cell of photoCollectionView give the identifier -‘Photo Cell’. 在photoCollectionView的单元格中提供标识符-“照片单元格”。
- Set the class of cell to ‘PhotoCell’ 将单元格的类别设置为“ PhotoCell”
- Drag an image view in this cell. Add constraints to this imageView: Leading, trailing, top and bottom space to superview with constant 0. 在此单元格中拖动图像视图。 向此imageView添加约束:常量为0的前导,尾随,顶部和底部空间以进行超级视图。
- Connect the outlet of image view to ‘photoImage’. 将图像视图的出口连接到“ photoImage”。
- Now in CategoryCollectionView, set the cell class to ‘CategoryCell’ and cell identifier -‘CategoryCell’. 现在,在CategoryCollectionView中,将单元格类设置为“ CategoryCell”,并将单元格标识符设置为“ CategoryCell”。
- Drag a label on the cell. Add constraints to this: Leading, trailing space to superview with constant 20 and top, bottom space to superview with constant 0. 在单元格上拖动标签。 为此添加约束:开头,结尾空间为常数20的超级视图,顶部,底部空间为常数0的超级视图。
- Connect the outlet of label to ‘nameLabel’. 将标签的出口连接到“ nameLabel”。
Now open the ViewController implement the delegates of collection view:
现在打开ViewController实现集合视图的委托:
extension ViewController: UICollectionViewDelegate, UICollectionViewDataSource {
     func collectionView(_ collectionView: UICollectionView,  numberOfItemsInSection section: Int) -> Int {         if collectionView == photoCollectionView {            return photoArray.count
         } else {            return photoCategoryArray.count
         }
      }func collectionView(_ collectionView: UICollectionView, cellForItemAt indexPath: IndexPath) -> UICollectionViewCell {     if collectionView == photoCollectionView {        let cell =  collectionView.dequeueReusableCell(withReuseIdentifier: "Photo Cell", for: indexPath) as! PhotoCell        cell.photoImage.image = UIImage(named: photoArray[indexPath.row])       return cell    } else {       let cell =  collectionView.dequeueReusableCell(withReuseIdentifier: "Category Cell", for: indexPath) as! CategoryCell       cell.nameLabel.text = photoCategoryArray[indexPath.row]       return cell     }
  }func collectionView(_ collectionView: UICollectionView, didSelectItemAt indexPath: IndexPath) {    if collectionView == categoryCollectionView {        if let cell = collectionView.cellForItem(at: indexPath) as?  CategoryCell {        cell.nameLabel.textColor = UIColor(white: 0, alpha: 1.0)        let labelPosition = cell.frame.origin.x + 20        photoCollectionView.selectItem(at: indexPath, animated: true, scrollPosition: .centeredHorizontally)        }
     }
   }  func collectionView(_ collectionView: UICollectionView, didDeselectItemAt indexPath: IndexPath) {     if collectionView == categoryCollectionView {     if let cell = collectionView.cellForItem(at: indexPath) as?   CategoryCell {       cell.nameLabel.textColor = UIColor(white: 0, alpha: 0.6)      }    }  }}
Add viewDidAppear function like this:
添加viewDidAppear函数,如下所示:
override func viewDidAppear(_ animated: Bool) {super.viewDidAppear(animated)//Select 1st celllet indexpath = IndexPath(item: 0, section: 0)if let cell = categoryCollectionView.cellForItem(at: indexpath) as? CategoryCell { categoryCollectionView.selectItem(at: indexpath, animated: false, scrollPosition: []) cell.nameLabel.textColor = UIColor(white: 0, alpha: 1.0) }}Run the project and see that on tapping any category from top collection view the photo is changing in photo collection view.
运行该项目,然后从顶部收藏夹视图中点击任何类别,就会看到照片在照片收藏夹视图中发生了变化。
Now let’s see the liquid bubble like animation.
现在,让我们看一下动画中的气泡。
Add this below your IBOutlet declaration:
将其添加到您的IBOutlet声明下面:
var bubble = UIView(frame: CGRect(x: 0, y: 100, width: 40, height: 40))Now in viewDidLoad, add this:
现在在viewDidLoad中,添加以下内容:
self.view.addSubview(bubble)bubble.backgroundColor = UIColor(red: 104/255, green: 134/255, blue: 1, alpha: 1.0)bubble.layer.cornerRadius = 20self.view.bringSubviewToFront(categoryCollectionView)Update your viewDidAppear with this:
使用以下命令更新viewDidAppear:
func liquidAnimate(position: CGFloat) { let midOfNewPostion = (position - self.bubble.frame.origin.x)/2 UIView.animateKeyframes(withDuration: 0.6, delay: 0, options: [.calculationModeLinear], animations: { UIView.addKeyframe(withRelativeStartTime: 0, relativeDuration: 0.5, animations: { self.bubble.frame.size.width = 80 self.bubble.frame.origin.x += midOfNewPostion self.bubble.transform = CGAffineTransform(scaleX: 0.5, y: 0.5) }) UIView.addKeyframe(withRelativeStartTime: 0.5, relativeDuration: 0.5, animations: { self.bubble.transform = CGAffineTransform(scaleX: 1, y: 1) self.bubble.frame.origin.x += midOfNewPostion self.bubble.frame.size.width = 40 }) }, completion: { _ in })}In the above function, the parameter position is the x-coordinate of the cell in which we need to show the bubble. We used animateWithKeyframes and added 2 keyframe animations in it. Let’s understand what we did in both animations…
在上面的函数中,参数位置是我们需要显示气泡的单元格的x坐标。 我们使用了animateWithKeyframes并在其中添加了2个关键帧动画。 让我们了解一下我们在两个动画中都做了什么……
The 1st keyframe animation:
第一个关键帧动画:
- Increases the width of bubble frame to 80 from 40 将气泡框的宽度从40增加到80
- Update the x position of bubble till the half of the total distance we want to shift the bubble. 更新气泡的x位置,直到我们要移动气泡的总距离的一半。
- De-scales the bubble and to half of its size. 将气泡缩放到其大小的一半。
The 2nd keyframe animation:
第二个关键帧动画:
- Again decreases the width of bubble frame to 40 from 80. 再次将气泡框的宽度从80减小到40。
- Update the x position of bubble from the remaining half of the total distance till the total distance we want to shift. 从总距离的剩余一半更新气泡的x位置,直到我们要移动的总距离。
- Re-scales the bubble and to half of its actual size. 重新缩放气泡并缩小到实际大小的一半。
Now update the didSelectItemAt indexpath function:
现在,更新didSelectItemAt的indexpath函数:
func collectionView(_ collectionView: UICollectionView, didSelectItemAt indexPath: IndexPath) {
       if collectionView == categoryCollectionView {
           if let cell = collectionView.cellForItem(at: indexPath)  as? CategoryCell {            cell.nameLabel.textColor = UIColor(white: 0, alpha: 1.0)            let labelPosition = cell.frame.origin.x + 20            liquidAnimate(position: labelPosition)            photoCollectionView.selectItem(at: indexPath, animated: true, scrollPosition: .centeredHorizontally)           }
      }
}
In the above didSelect method, we took out the x-position of cell’s nameLabel and sent that value in the parameter of func liquidAnimate.
在上面的didSelect方法中,我们取出了单元格nameLabel的x位置,并将该值发送到func liquidAnimate参数中。
So, it’s done. Thank you for reading the tutorial. Hope you enjoyed it.
这样就完成了。 感谢您阅读本教程。 希望你喜欢。
Final project can be downloaded from here:
最终项目可以从这里下载:


 5993
5993

 被折叠的 条评论
为什么被折叠?
被折叠的 条评论
为什么被折叠?
 到【灌水乐园】发言


