flutter自定义单元格_使用自定义大小的单元格制作复杂的UICollectionView布局(第1部分)

flutter自定义单元格

Recently I built a screen with a pretty complex layout containing self sizing cells. In the end it required a UICollectionView using a custom UICollectionViewLayoutUICollectionViewFlowLayout was too simple for the screen design. Parts of this proved to be a real mission to get right, so I thought I’d share my findings in the hope of saving someone else the trouble.

最近,我用复杂的布局构建了一个屏幕,其中包含自定义尺寸的单元格。 最后,它需要一个UICollectionView使用自定义UICollectionViewLayout - UICollectionViewFlowLayout是为屏幕设计过于简单。 事实证明,完成这项工作的一部分是正确的使命,所以我想与大家分享我的发现,以期避免给别人带来麻烦。

This post is split into three parts:

这篇文章分为三个部分:

Part 1 will go over the whole process in detail, starting with the general layout process, then adding self sizing cells to the mix.

第1部分将详细介绍整个过程,从总体布局过程开始,然后向混合中添加自定义大小的单元。

Part 2 will go over some workarounds to common problems and inconsistencies with layouts using self sizing views.

第2部分将使用自定义视图介绍一些解决方法,以解决常见问题和与布局不一致的情况。

Part 3 will optimise this layout with proper use of invalidation contexts and intelligent cache adjustment strategies, for silky smooth scrolling performance.

第3部分将通过正确使用无效上下文和智能缓存调整策略来优化此布局,以实现柔滑的滚动效果。

总体布局过程概述 (Overview of the General Layout Process)

Image for post

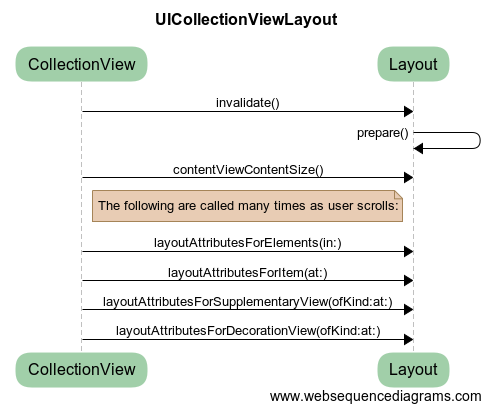
The thing that kicks the whole layout process off is a call to invalidate(). This can happen for any number of reasons: initial load, view rotation, bounds change, and even directly by you when required. After it is invalidated, we are given an opportunity to prepare new layout data in prepare() to support the later calls to the layoutAttributesFor... methods, which are called on the main thread as the user scrolls.

开始整个布局过程的是对invalidate()的调用。 发生这种情况的原因有很多:初始加载,视图旋转,边界改变,甚至在需要时直接由您自己决定。 无效后,我们有机会在prepare()准备新的布局数据,以支持以后对layoutAttributesFor...方法的调用,这些调用在用户滚动时在主线程上调用。

Preparation of new data for this purpose usually means precalculating things like frames, or even constructing whole UICollectionViewAttributes objects, for all elements. This precalculated data is held onto by the layout, to be used directly when the collection view makes calls to the layoutAttributesFor* methods. This will ensure the user has a totally smooth scrolling experience.

为此目的准备新数据通常意味着对所有元素预先计算诸如框架之类的东西,甚至构造整个UICollectionViewAttributes对象。 该预先计算的数据由布局保留,以便在集合视图调用layoutAttributesFor*方法时直接使用。 这将确保用户具有完全流畅的滚动体验。

There are plenty of tutorials around that go over this in detail for layouts with static cell sizes. It’s fairly straight forward… until we add self sizing cells to the mix.

关于静态单元格大小的布局,有很多教程对此进行了详细介绍。 这很简单……直到我们将自定义大小的单元添加到混合中。

具有自定义尺寸单元的布局过程概述 (Overview of the Layout Process with Self Sizing Cells)

Image for post

Oh boy. The self sizing layout process can be difficult to wrap your head around at first, because it involves recursion: the invalidation that causes cells to self size usually leads to further invalidations as each cell returns different sizes than expected, before the actual views are laid out. And to make matters worse, this can happen as the user is scrolling too. We’ll get into this later — there are ways we can minimise the expense of prepare() calls during scrolling.

好家伙。 自调整大小的布局过程一开始可能很难绕开头,因为它涉及到递归:导致像元达到自身大小的失效通常会导致进一步的失效,因为每个像元在实际视图布局之前返回的尺寸都比预期的要大。 。 更糟糕的是,这也可能在用户滚动时发生。 稍后我们将进行介绍-有一些方法可以最大程度地减少滚动过程中prepare()调用的开销。

So let’s unwrap the recursion and step through func by func to get a good understanding of what’s going on, and what is expected of your self sizing views and layout.

因此,让我们解开递归并逐个进行func,以更好地了解正在发生的事情以及对自定义视图和布局的期望。

自定义单元格布局— func by func (Self Sizing Cells Layout — func by func)

After the initial attributes are obtained for the elements in the initially visible rect, the self sizing process begins. The collection view asks your data source for the view at the index path of the first of these attributes. Then it asks this view for “preferred attributes fitting” these attributes.

在为初始可见区域中的元素获取初始属性后,便开始进行自调整大小过程。 集合视图在这些属性中的第一个属性的索引路径处向您的数据源询问该视图。 然后,它向该视图询问“适合这些属性的首选属性”。

UIReusableView(单元格,辅助视图或装饰视图): preferredLayoutAttributesFitting(_:) (UIReusableView (Cell, Supplementary or Decoration view): preferredLayoutAttributesFitting(_:))

This is your view’s chance to self size. Given the attributes calculated by your layout, it should calculate what these should be for it to display correctly — its preferred attributes. After all, your view knows it’s content in it’s subviews, so it knows how large it needs to be for everything to fit.

这是您查看自身大小的机会。 给定布局所计算出的属性,它应该计算出应该正确显示的属性-首选属性。 毕竟,您的视图知道子视图中的内容,因此它知道要适合所有内容的大小。

Contrary to a lot of blog posts and Stack Overflow answers, UIKit has a default implementation of this method that returns attributes with a fitting size calculated by autolayout. In a lot of cases this just works. It’s best to let it do it’s thing and only work around by overriding it when it fails. Usually this will be because you need to control which dimension is static if it is ambiguous (width with dynamic height, or height with dynamic width). For instance, if your cell just contains a UILabel, it really needs to know if it should grow vertically over multiple lines, or horizontally to fit the text.

与许多博客文章和Stack Overflow答案相反,UIKit具有此方法的默认实现,该方法返回具有通过自动布局计算的合适大小的属性。 在很多情况下,这是可行的。 最好让它做事情,并且只有在失败时才通过重写来解决。 通常这是因为如果模棱两可(宽度与动态高度相同,或者高度与动态宽度相同),则需要控制哪个尺寸是静态的。 例如,如果您的单元格仅包含一个UILabel,则它确实需要知道它应垂直增长还是多行增长,还是水平增长以适应文本。

You can use systemLayoutSizeFitting(...) to do this. It takes a priority for each dimension, so you can lock the static dimension by using the required priority for it, and give the other dimension the fitting priority.

您可以使用systemLayoutSizeFitting(...)来执行此操作。 它需要一个优先级为每个维度,因此,您可以通过使用锁定静态维度required优先考虑它,并给其他尺寸的fitting的优先级。

If things are still not working as expected, you might be running into one of the limitations that needs a workaround. I talk about these towards the end of this post. But for now let’s continue stepping through the process.

如果事情仍然没有按预期进行,则您可能遇到了需要解决方法的限制之一。 我将在本帖子结尾讨论这些内容。 但是,现在让我们继续逐步完成该过程。

UICollectionViewLayout: shouldInvalidateLayout(forPreferredLayoutAttributes:withOriginalAttributes:) (UICollectionViewLayout: shouldInvalidateLayout(forPreferredLayoutAttributes:withOriginalAttributes:))

Your collection view then takes the preferred attributes returned by your view and asks the layout if it needs to invalidate for them. The answer is almost always yes if the size in the preferred attributes is different from the size in the original attributes: a new layout will need to be calculated to account for the new size.

然后,您的集合视图将采用视图返回的首选属性,并询问布局是否需要使其无效。 如果首选属性的大小与原始属性的大小不同,答案几乎总是肯定的:将需要计算新的布局以考虑新的大小。

UICollectionViewLayout: invalidationContext(forPreferredLayoutAttributes:withOriginalAttributes:) (UICollectionViewLayout: invalidationContext(forPreferredLayoutAttributes:withOriginalAttributes:))

Now your collection view asks for an invalidation context for these preferred attributes. There are 3 things that need to happen here.

现在,您的集合视图要求这些首选属性的无效上下文。 这里需要发生三件事。

1.使索引路径无效 (1. Invalidate Index Paths)

You need to specify which individual elements need new attributes calculated and applied to account for the preferred attributes. You do this by adding element index paths to the invalidation context.

您需要指定哪些单个元素需要计算并应用新属性来说明首选属性。 您可以通过将元素索引路径添加到无效上下文中来实现。

Consider a vertically scrolling tableview like layout. If the height of an element changes, then the y position of every element underneath this one needs to be adjusted to make room. So you would need to add those index paths to the invalidation context as well.

考虑像布局这样的垂直滚动的tableview。 如果元素的高度发生变化,则需要调整该元素下方每个元素的y位置以腾出空间。 因此,您还需要将这些索引路径添加到无效上下文中。

By invalidating these index paths, the collection view knows to ask for them again using layoutAttributesFor... after the next prepare(). More on this later.

通过使这些索引路径无效,集合视图知道在下一个prepare()之后使用layoutAttributesFor...再次请求它们。 稍后再详细介绍。

2.调整内容大小 (2. Adjust Content Size)

You should also specify any adjustments to content size. You do this by setting a CGSize adjustment value. Positive values will grow the content size, negative values will shrink it. For the vertically scrolling tableview layout example, this would just be the difference between preferred and original attributes height. More complex layouts might need some more involved calculations.

您还应该指定对内容大小的任何调整。 您可以通过设置CGSize调整值来实现。 正值将增加内容大小,负值将缩小内容大小。 对于垂直滚动的tableview布局示例,这只是首选属性高度和原始属性高度之间的差异。 更复杂的布局可能需要更多涉及的计算。

3.通过首选属性存储信息 (3. Store Information from Preferred Attributes)

The preferred attributes haven’t been used to precalculate new layout attributes yet. This will of course happen during the upcoming prepare(), so you need to hold onto the information you’ve calculated for it. Commonly this is done with a dictionary of [IndexPath: PreferredData]. For the vertically scrolling tableview layout example above, PreferredData can just be CGFloat for the preferred heights. For more complex layouts, it might help to use a data struct here.

首选属性尚未用于预先计算新的布局属性。 当然,这将在即将到来的prepare()期间发生,因此您需要保留为此计算的信息。 通常,这是通过[IndexPath: PreferredData]字典来完成的。 对于上面的垂直滚动tableview布局示例, PreferredData可以是首选高度的CGFloat 。 对于更复杂的布局,在此处使用数据结构可能会有所帮助。

UICollectionViewLayout: invalidateLayout(with:) (UICollectionViewLayout: invalidateLayout(with:))

And, recursion. We are now invalidating again, which starts the process again (albeit with the more specific invalidation context that we built earlier).

并且,递归。 现在,我们再次失效,这将再次启动该过程(尽管使用了我们先前构建的更具体的失效上下文)。

Normally for preferred attributes invalidation contexts there’s nothing special to do here — just call super or don't bother overriding at all. But you will need to handle the next step differently...

通常,对于首选属性失效上下文,这里没有什么特别的事情-只需调用super或根本不用重写即可。 但是您将需要以不同的方式处理下一步...

UICollectionViewLayout: prepare() (UICollectionViewLayout: prepare())

Now when you precalculate your layout data, you must take the preferred attributes information you stored earlier into account. I suggest doing this naively first: just rebuild the whole layout using the preferred attributes. Once you have that working and tested, start optimising. Part 3 has more detail around optimisations here.

现在,当您预先计算布局数据时,必须考虑先前存储的首选属性信息。 我建议先天真地这样做:仅使用首选属性重新构建整个布局。 在进行了工作和测试之后,就开始进行优化。 第3部分在此处详细介绍了优化。

UICollectionViewLayout: layoutAttributesFor... (UICollectionViewLayout: layoutAttributesFor...)

Now the collection view asks for the new attributes. It will usually call one of the at: methods for the index path that provided preferred attributes, but it may request the whole rect again.

现在,集合视图要求新属性。 它通常会为提供首选属性的索引路径调用at:方法之一,但它可能会再次请求整个rect。

UIReuseableView: preferredLayoutAttributesFitting(_:) (UIReuseableView: preferredLayoutAttributesFitting(_:))

And finally, it asks the element view for preferred attributes again. The collection view is smart enough to finish up here for this index path if these preferred attributes are the same as the “fitting” (or “original”) attributes. This should be the case.

最后,它再次向元素视图询问首选属性。 如果这些首选属性与“拟合”(或“原始”)属性相同,则收集视图足够聪明,可以在此处完成此索引路径。 应该是这种情况。

Then it then continues into the next index path in the invalidation context, and the next and the next. It continues this process for each index path until there’s nothing invalid left. Remember that each run of this process can invalidate more paths as elements give preferred sizes, and these paths will eventually be handled too, because it’s a recursive process.

然后,它继续进入无效上下文中的下一个索引路径,以及下一个和下一个。 它将继续为每个索引路径执行此过程,直到没有无效的剩余为止。 请记住,此过程的每次运行都会使更多的路径无效,因为元素会提供首选的大小,这些路径最终也会被处理,因为这是一个递归过程。

Eventually, once there are no more invalid index paths left, the collection view knows the layout data is up to date. It then applies the layout to the actual views. Now you have your beautiful collection view with self sized cells 🎉

最终,一旦不再有无效的索引路径,收集视图就会知道布局数据是最新的。 然后,将布局应用于实际视图。 现在,您可以通过自定义大小的单元格来欣赏美丽的收藏视图🎉

第1部分结束 (End of Part 1)

Or do you? If your cells still aren’t behaving, stay tuned for part 2 where we’ll go over some of the limitations and workarounds.

还是你 如果您的手机仍然无法正常工作,请继续关注第2部分 ,我们将介绍一些限制和解决方法。

Until then! 👋

直到那时! 👋

翻译自: https://medium.com/@mfc83/making-a-complex-uicollectionview-layout-with-self-sizing-cells-part-1-ec2483a9c055

flutter自定义单元格

  • 0
    点赞
  • 0
    收藏
    觉得还不错? 一键收藏
  • 0
    评论
评论
添加红包

请填写红包祝福语或标题

红包个数最小为10个

红包金额最低5元

当前余额3.43前往充值 >
需支付:10.00
成就一亿技术人!
领取后你会自动成为博主和红包主的粉丝 规则
hope_wisdom
发出的红包
实付
使用余额支付
点击重新获取
扫码支付
钱包余额 0

抵扣说明:

1.余额是钱包充值的虚拟货币,按照1:1的比例进行支付金额的抵扣。
2.余额无法直接购买下载,可以购买VIP、付费专栏及课程。

余额充值