


建立题库
What should you do when working on a project that involves a lot of image processing?
在涉及大量图像处理的项目中应该做什么?
We had to build an iOS app that needed to work relatively fast.
我们必须构建一个需要运行相对较快的iOS应用。
As the input and output were quite large, server processing was out of the question, if we wanted to deliver a nice and friendly user experience.
由于输入和输出非常大,因此如果我们想提供良好而友好的用户体验,则服务器处理就不可能了。
What to do then?
那该怎么办?
Oh yeah, we could use OpenCV. I’ve been tinkering quite a lot with it at university and knew that it should do the trick. What should be aware of in this particular case is that OpenCV is not as straight forward as installing a cocoa pod. It needs additional tinkering before you can write your methods.
哦,是的,我们可以使用OpenCV。 我在大学里已经花了很多时间修改它,并且知道它应该可以解决问题。 在这种特殊情况下,应该注意的是OpenCV不如安装可可豆那样直接。 在编写方法之前,需要进行其他修改。
We’re going to show you how. Are you ready?
我们将向您展示如何。 你准备好了吗?
建立 (Setup)
1。 (1.)
创建一个新的Xcode项目 (Create a new Xcode project)
Select Create a new Xcode project
选择创建一个新的Xcode项目

Select “Single View Application”
选择“单视图应用程序”
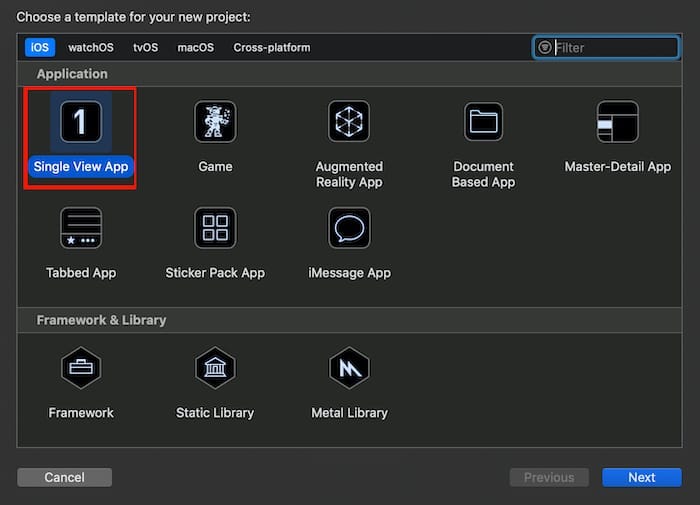
Name it however you want, I’m going with OpenCVProject
随心所欲命名,我将使用OpenCVProject
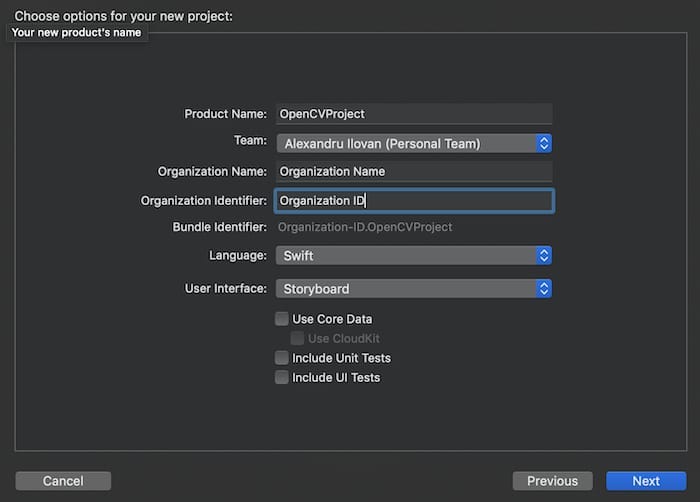
Then set up Cocoapods using “pod init”
然后使用“ pod init”设置Cocoapods
2。 (2.)
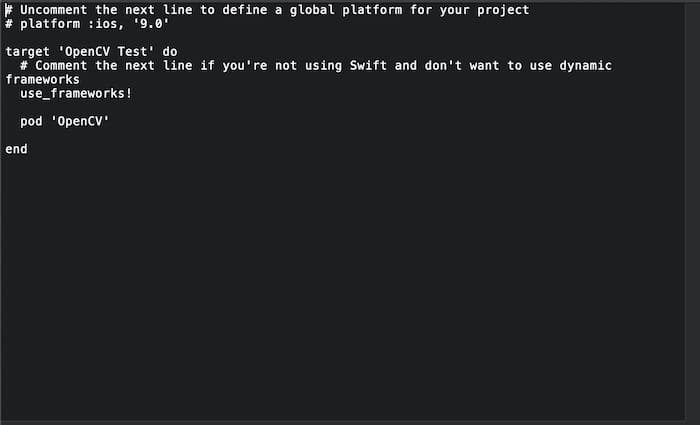
Add OpenCV to Podfile ” pod ‘OpenCV’ ” and run “pod install” in terminal.
将OpenCV添加到Podfile “ pod'OpenCV ' ”,然后在终端中运行“ pod install” 。
3。 (3.)
Click new -> file -> new file, select Cocoa Touch Class
单击新建->文件->新文件,选择Cocoa Touch Class
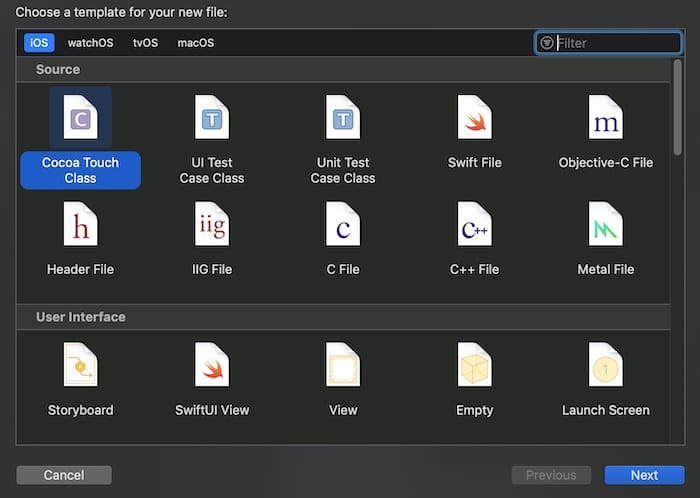
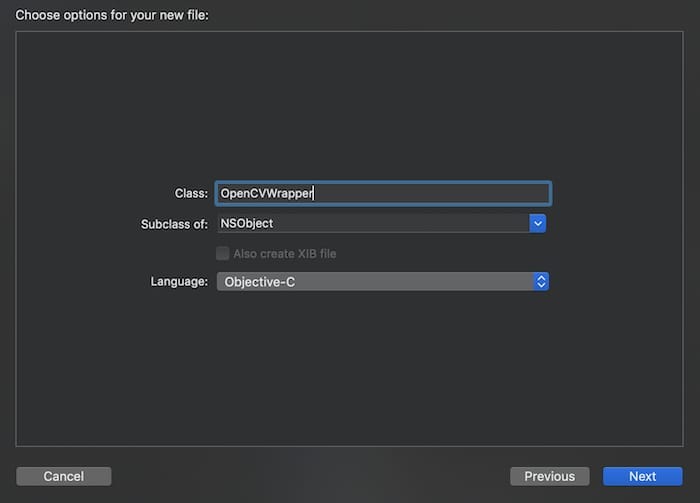
4。 (4.)
Name it “OpenCVWrapper”, a subclass of NSObject and set the language to Objective-C
将其命名为“ OpenCVWrapper”,它是NSObject的子类,并将语言设置为Objective-C
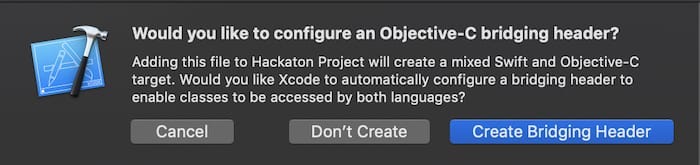
5, (5.)
When Xcode prompts you if you like to configure an Objective-C bridging header, choose to create a bridging header. This bridging header is the file where you import Objective-C classes so that they can be visible in Swift.
当Xcode提示您是否要配置Objective-C桥接标头时,选择创建一个桥接标头。 此桥接头是您在其中导入Objective-C类的文件,以便它们在Swift中可见。
6。 (6.)
Import “#import “OpenCVWrapper.h” in OpenCVWrapper.h
在OpenCVWrapper.h中导入“ #import“ OpenCVWrapper.h”
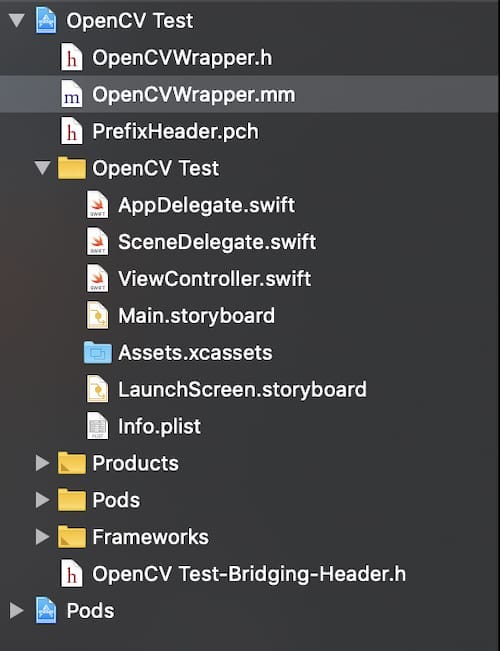
OpenCVWrapper.h// OpenCV Test Created by Alexandru Ilovan on 31/10/2019.// Copyright © 2019 S&P. All rights reserved.//#import <Foundation/Foundation.h>#import "OpenCVWrapper.h"NS_ASSUME_NONNULL_BEGIN@interface @endNS_ASSUME_NONNULL_END7 (7.)
And #import <opencv2/opencv.hpp>” in the OpenCVWrapper.m and “#import “OpenCVWrapper.h” in OpenCVWrapper.h
然后在OpenCVWrapper.m中使用#import <opencv2 / opencv.hpp> ,在OpenCVWrapper.h中使用“ #import“ OpenCVWrapper.h ”
OpenCVWrapper.mm// OpenCV Test Created by Alexandru Ilovan on 31/10/2019.// Copyright © 2019 S&P. All rights reserved.//#import "OpenCVWrapper.h"#import <opencv2/opencv.hpp>@implementation OpenCVWrapper@end 8。 (8.)
In order to use C++ inside Objective C (OpenCV is written in C++ and C++ cannot interface directly with Swift), you need to change the file extension from OpenCVWrapper.m to OpenCVWrapper.mm.
为了在目标C中使用C ++(OpenCV用C ++编写,并且C ++无法直接与Swift交互),您需要将文件扩展名从OpenCVWrapper.m更改为OpenCVWrapper.mm。
9。 (9.)
Add “#import “OpenCVWrapper.h”” to the Bridging-Header
将“ #import“ OpenCVWrapper.h” ”添加到桥接头
Use this file to import your target's public headers that you would like to expose to Swift.//#import "OpenCVWrapper.h"10。 (10.)
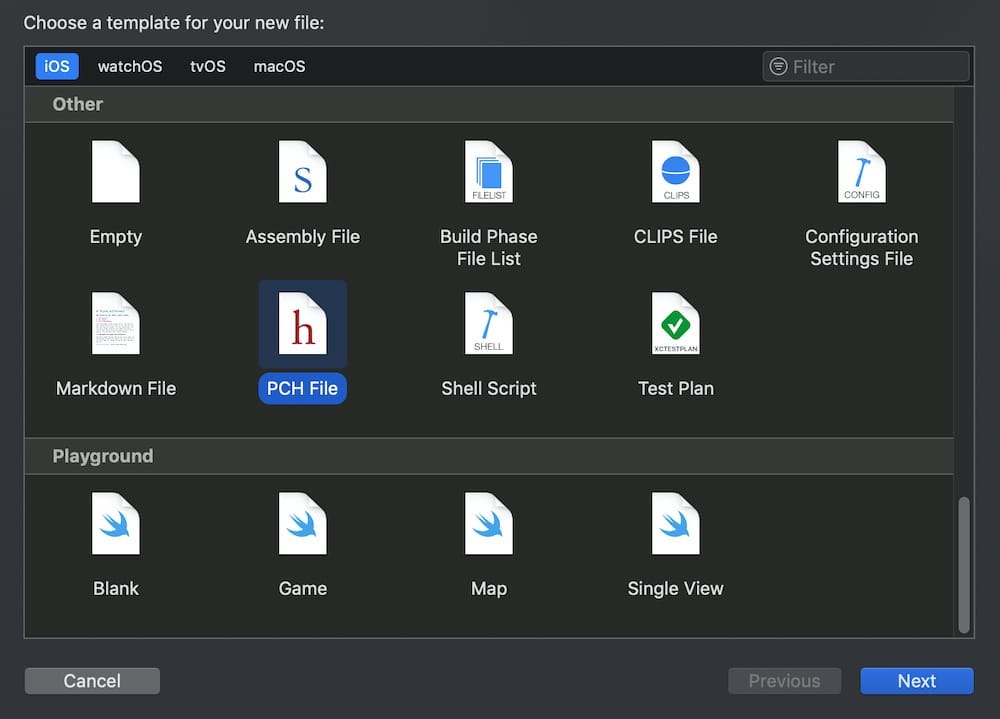
Click new-> file -> new file, select Prefix header and create one
单击新建->文件->新文件,选择前缀标头并创建一个
11。 (11.)
And add “#ifdef __cplusplus #include <opencv2/opencv.hpp> #endif” to it.
并添加“ #ifdef __cplusplus #include <opencv2 / opencv.hpp> #endif”。
PrefixHeader.pch// OpenCV Test Created by Alexandru Ilovan on 31/10/2019.// Copyright © 2019 S&P. All rights reserved.//#ifndef PrefixHeader_pch#define PrefixHeader_pch// Include any system framework and library headers here that should be included in all compilation units.// You will also need to set the Prefix Header build setting of one or more of your targets to reference this file.#ifdef __cplusplus#include <opencv2/opencv.hpp>#endif#endif /* PrefixHeader_pch */12 (12.)
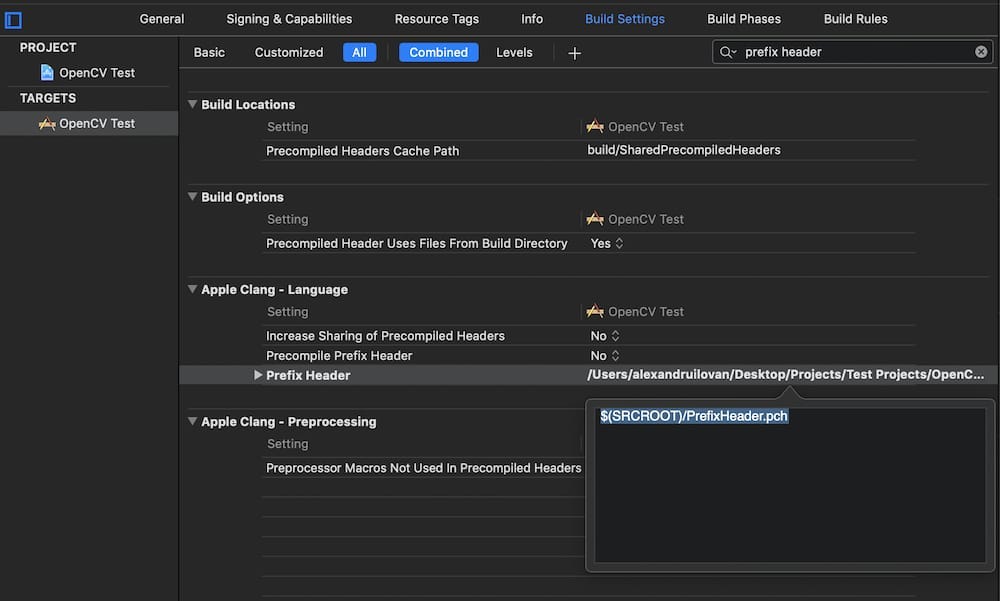
转到项目导航器。 在“生成设置”下,搜索“前缀头”,然后为.pch文件添加正确的路径。 它应该是“ $(SRCROOT)/PrefixHeader.pch”或“ $(SRCROOT)/YOUR_PROJECT/PrefixHeader.pch” (Go on to your project navigator. Under Build Settings, search Prefix Header and add the correct path for your .pch file. It should be “$(SRCROOT)/PrefixHeader.pch” or “$(SRCROOT)/YOUR_PROJECT/PrefixHeader.pch”)
13 (13.)
Now you can add methods in the OpenCVWrapper for your image processing and call them in Swift.
现在,您可以在OpenCVWrapper中添加用于图像处理的方法,并在Swift中调用它们。
To test it out, we’ll show you some code snippets for taking an image and convert it into a matrix.
为了进行测试,我们将向您展示一些用于拍摄图像并将其转换为矩阵的代码段。
In the OpenCVWrapper.mm add the matFrom and imageFrom methods that we will mark private with a #pragma mark Private
在OpenCVWrapper.mm中,添加我们将使用#pragma标记为Private的matFrom和imageFrom方法。
Don’t worry about the implementation details, they basically take an image and convert it into a matrix of pixels.
不用担心实现细节,它们基本上是拍摄图像并将其转换为像素矩阵。
OpenCVWrapper.mm// OpenCV Test Created by Alexandru Ilovan on 31/10/2019.// Copyright © 2019 S&P. All rights reserved.//#import "OpenCVWrapper.h"#import <opencv2/opencv.hpp>using namespace using namespace @implementation OpenCVWrapper+ (NSString *)openCVVersionString {return }#pragma mark Public+ (UIImage *)toGray:(UIImage *)source {cout << "OpenCV: ";return }#pragma mark Private+ (Mat)_grayFrom:(Mat)source {cout << "-> grayFrom ->";Mat result;cvtColor(source, result, COLOR_BGR2GRAY);return }+ (Mat)_matFrom:(UIImage *)source {cout << "matFrom ->";CGImageRef image = CGImageCreateCopy(source.CGImage);CGFloat cols = CGImageGetWidth(image);CGFloat rows = CGImageGetHeight(image);Mat result(rows, cols, CV_8UC4);CGBitmapInfo bitmapFlags = kCGImageAlphaNoneSkipLast | kCGBitmapByteOrderDefault;size_t bitsPerComponent = 8;size_t bytesPerRow = result.step[0];CGColorSpaceRef colorSpace = CGImageGetColorSpace(image);CGContextRef context = CGBitmapContextCreate(result.data, cols, rows, bitsPerComponent, bytesPerRow, colorSpace, bitmapFlags);CGContextDrawImage(context, CGRectMake(0.0f, 0.0f, cols, rows), image);CGContextRelease(context);return }+ (UIImage *)_imageFrom:(Mat)source {cout << "-> imageFrom\n";NSData *data = [NSData dataWithBytes:source.data length:source.elemSize() * source.total()];CGDataProviderRef provider = CGDataProviderCreateWithCFData((__bridge CFDataRef)data);CGBitmapInfo bitmapFlags = kCGImageAlphaNone | kCGBitmapByteOrderDefault;size_t bitsPerComponent = 8;size_t bytesPerRow = source.step[0];CGColorSpaceRef colorSpace = (source.elemSize() == 1 ? CGColorSpaceCreateDeviceGray() : CGColorSpaceCreateDeviceRGB());CGImageRef image = CGImageCreate(source.cols, source.rows, bitsPerComponent, bitsPerComponent * source.elemSize(), bytesPerRow, colorSpace, bitmapFlags, provider, NULL, false, kCGRenderingIntentDefault);UIImage *result = [UIImage imageWithCGImage:image];CGImageRelease(image);CGDataProviderRelease(provider);CGColorSpaceRelease(colorSpace);return }@endAnd also a method for transforming the colours associated with the matrix in grey
还有一种将与矩阵关联的颜色转换为灰色的方法
+ (UIImage *)toGray:(UIImage *)source {cout << "OpenCV: ";return }And then finally the toGray method in the #pragma mark Public
最后是#pragma mark public中的toGray方法
+ (UIImage *)toGray:(UIImage *)source {cout << "OpenCV: ";return }Also, don’t forget to add the method headers to the OpenCVWrapper.h
另外,不要忘记将方法标题添加到OpenCVWrapper.h
OpenCVWrapper.h// OpenCV Test Created by Alexandru Ilovan on 31/10/2019.// Copyright © 2019 S&P. All rights reserved.//#import <Foundation/Foundation.h>#import "OpenCVWrapper.h"#import <UIKit/UIKit.h>NS_ASSUME_NONNULL_BEGIN@interface + (UIImage *)toGray:(UIImage *)source;@endNS_ASSUME_NONNULL_ENDOk, next, go to the Main. storyboard add an imageView and a button and add a stock image to the assets and set it on the imageView.
好,接下来,进入主菜单。 情节提要添加一个imageView和一个按钮,并将一个股票图像添加到资产中,并将其设置在imageView上。
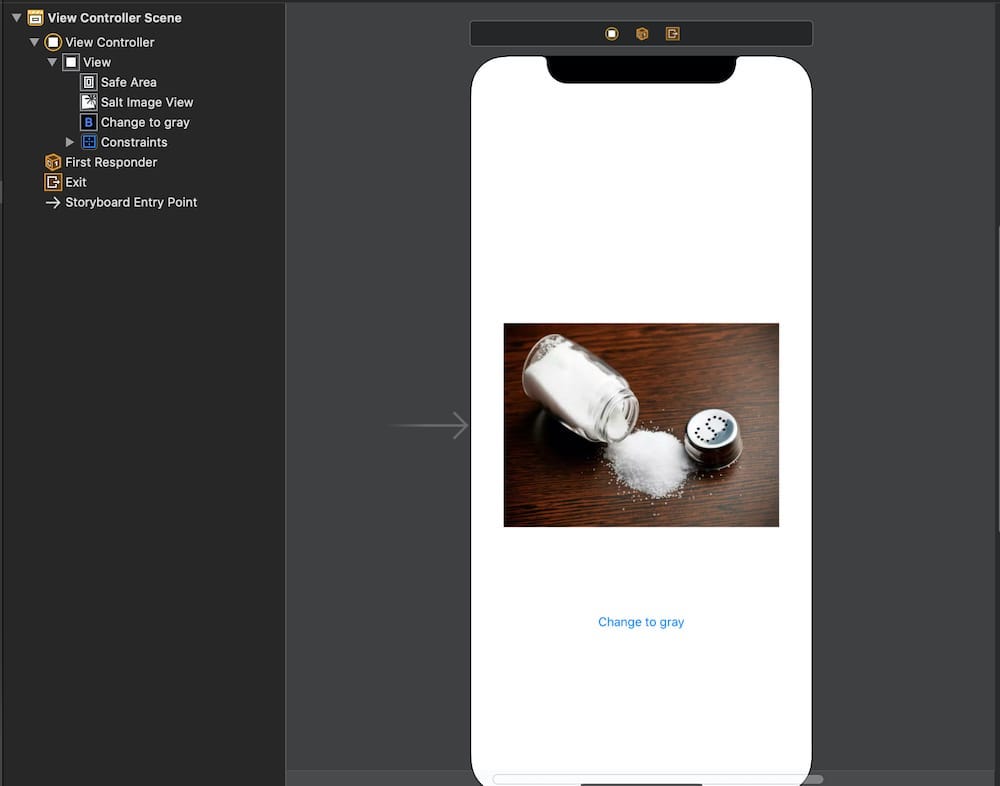
Next, connect the IBoutlets like so and call the toGray method from the OpenCVWrapper:
接下来,像这样连接IBoutlet,然后从OpenCVWrapper调用toGray方法:
ViewController.swift// OpenCV Test Created by Alexandru Ilovan on 31/10/2019.// Copyright © 2019 S&P. All rights reserved.//import UIKitclass @IBOutlet weak var override super.viewDidLoad()// Do any additional setup after loading the view.}@IBAction func didPressedButton(_ sender: Any) {let saltImageView.image = grayImage}}Finally, run the app. If you click on the button, it should greyscale the image. You’ve done it!
最后,运行该应用程序。 如果单击该按钮,它将使图像灰度化。 你完成了!
There you have it, OpenCV Swift Wrapper with one of the most basic operations that you can do in image processing.
有了OpenCV Swift Wrapper,它具有您可以在图像处理中执行的最基本的操作之一。
Have fun and keep on learning!
玩得开心,继续学习!
Originally posted on https://saltandpepper.co/2019/11/11/opencv-swift-wrapper/ by Alexandru Ilovan, Mobile Lead
最初发布于https://saltandpepper.co/2019/11/11/opencv-swift-wrapper/ ,移动主管Alexandru Ilovan
翻译自: https://medium.com/salt-pepper/opencv-swift-wrapper-6947ba236809
建立题库


 135
135

 被折叠的 条评论
为什么被折叠?
被折叠的 条评论
为什么被折叠?
 到【灌水乐园】发言


