


flutter mobx
State management in Flutter is like a labyrinth you might easily get lost between InheritedWidget, ScopedModel, Redux, BloC, Mobx, and many other libraries. Choosing one is very hard especially when you’re just starting with Flutter. This was my case and after some trial and error, I stumbled across Mobx and fell in love with it.
Flutter中的状态管理就像一个迷宫,您可能会在InheritedWidget,ScopedModel,Redux,BloC,Mobx和许多其他库之间轻易迷失。 选择一个非常困难,尤其是在您刚开始使用Flutter时。 这就是我的情况,经过一番尝试和错误,我偶然发现了Mobx,并爱上了它。
Mobx状态管理解释: (Mobx State Management Explained :)
What is Mobx ?
什么是Mobx?
Hassle free state-management for your Dart and Flutter apps
Dart和Flutter应用程序的无忧状态管理
Mobx makes it very easy to wire UI with your reactive data. If you’re interested in reading more about how Mobx works you can go to the official documentation (link). But in a nutshell, we can put it this way :
Mobx可以非常轻松地将UI与您的React数据连接起来。 如果您有兴趣阅读有关Mobx工作原理的更多信息,请访问官方文档(链接)。 简而言之,我们可以这样说:
- A UI (or an Observer) will fire an Action 用户界面(或观察者)将触发操作
- The Action will trigger a mutation in the Observable 该动作将触发可观察对象的突变
- The UI will react to the change of the Observable. UI将对Observable的更改做出React。
Mobx入门: (Getting Started With Mobx :)
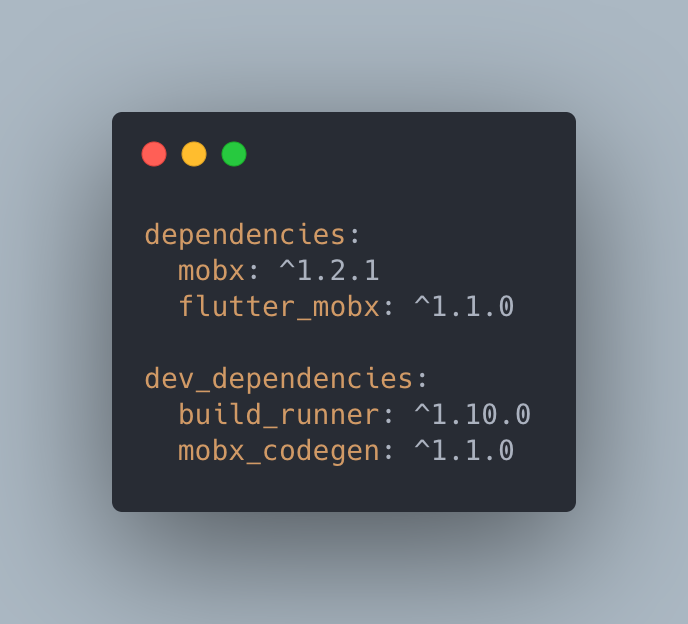
To use Mobx you need to add these dependencies to your Flutter projects :
要使用Mobx,您需要将以下依赖项添加到Flutter项目中:
We will need the Provider package. This package will allow us to inject our Mobx store in the widget tree. This approach is better than using a Singleton because the Provider will automatically dispose of our store once the widget is no longer used. This might come in handy especially in big projects.And that’s about it. Now we need to define the Store which holds out state, but first, we need to create our app and our UI.
我们将需要提供程序包。 该软件包将使我们能够将Mobx存储注入窗口小部件树中。 这种方法比使用Singleton更好,因为一旦不再使用小部件,提供者将自动处理我们的商店。 这可能会派上用场,尤其是在大型项目中。 现在,我们需要定义支持状态的Store,但是首先,我们需要创建我们的应用程序和UI。
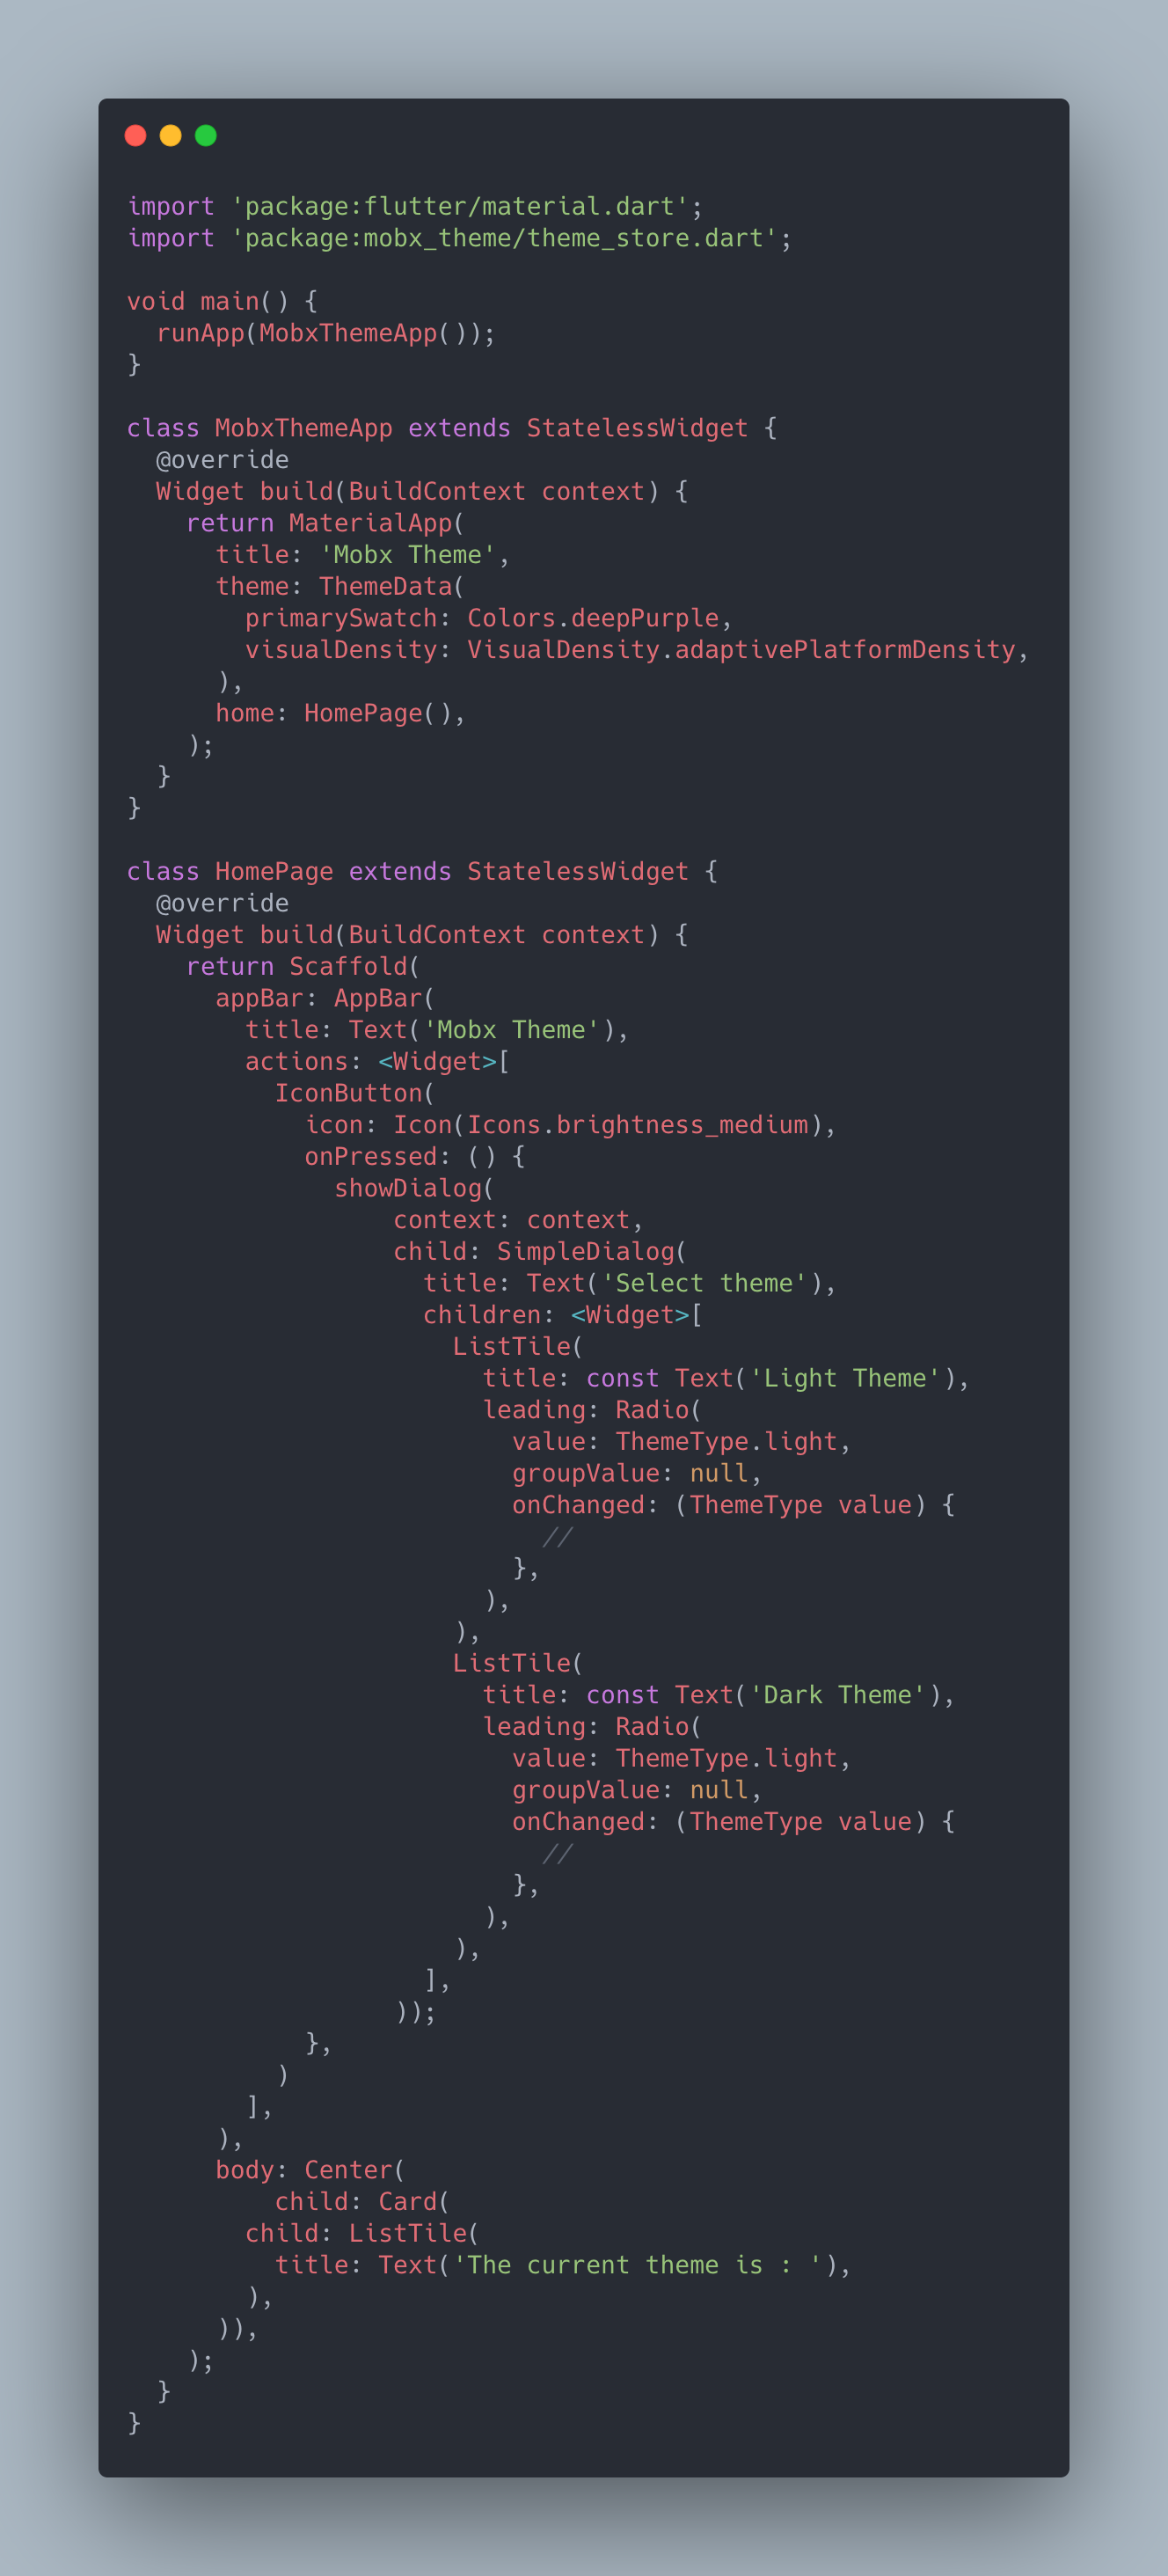
创建应用程序: (Creating the App :)
The app we’re going to create today is a very simple app with one functionality: change the global theme of the app.
我们今天要创建的应用程序是一个非常简单的应用程序,仅具有一项功能:更改应用程序的全局主题。
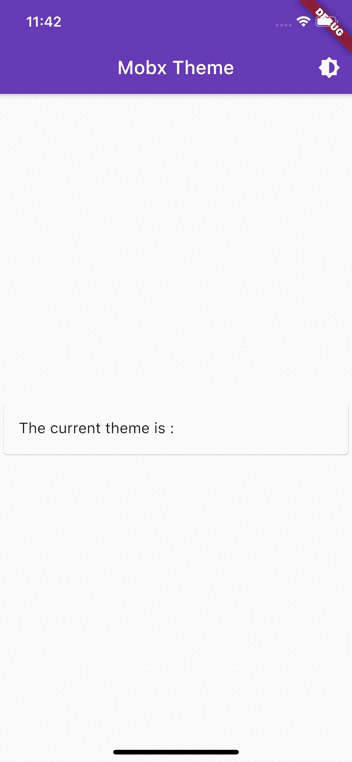
As you see from the animated image above is that nothing is happening when we press our radio buttons. What we want to do is to hook our state to our UI and make it react to the changes.
从上面的动画图像中可以看到,当我们按下单选按钮时,什么也没有发生。 我们要做的是将我们的状态挂接到我们的UI,并使它对更改做出React。
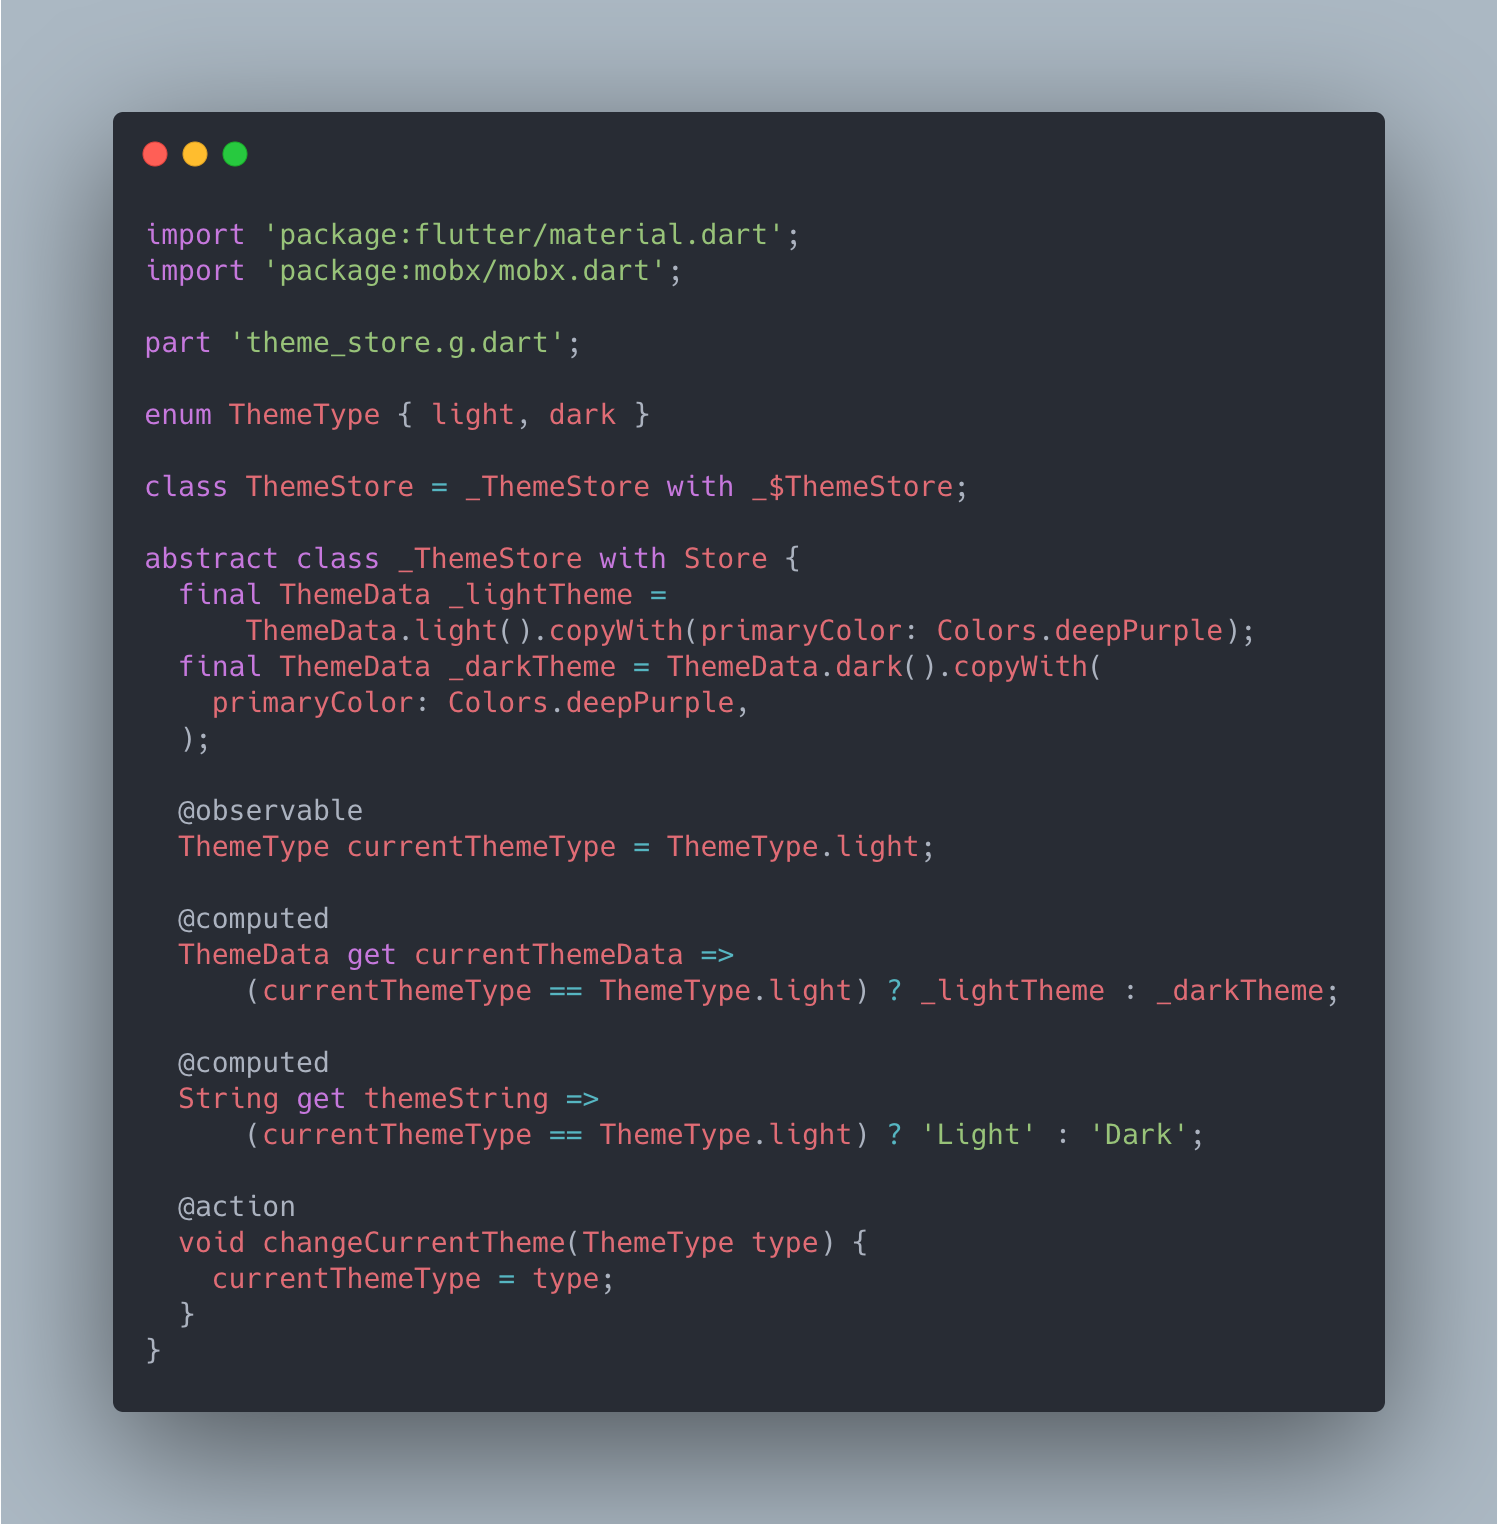
To do so we need to create the theme store. The theme store will represent the state of our app for now. Note that for larger projects you might want to separate your state into multiple stores based on the usage. A better implementation would use a principle like MVVM (Model-View-ViewModel).
为此,我们需要创建主题商店。 主题商店现在将代表我们应用程序的状态。 请注意,对于较大的项目,您可能需要根据用途将状态分为多个存储。 更好的实现将使用像MVVM(Model-View-ViewModel)这样的原理。
Mobx gives us the ability to use code generation to generate the boilerplate for our code, will we have to do is use the annotations: @action, @observable and @computed and Mobx code generator will take care of the rest.
Mobx使我们能够使用代码生成来为我们的代码生成样板,我们要做的就是使用批注: @action , @ observable和@computed,其余的由Mobx代码生成器负责。
For @computed it’s what the Mobx creators call derived state, this means that the value of a computed is not directly affected by action but rather that it’s a result of a change occurred to one or more observables.
对于@compute来说,这就是Mobx创造者所说的派生状态,这意味着计算值不会直接受到操作的影响,而是因为一个或多个可观察对象发生了更改而导致的。
The next step is to run the code generator by typing the following command :
下一步是通过键入以下命令来运行代码生成器:

After the command finishes (it'll take usually few second to finish) you'll notice that we have a new file that Mobx generated for us called theme_store.g.dart
命令完成后(通常需要花费几秒钟的时间),您会注意到我们有一个Mobx为我们生成的新文件,名为theme_store.g.dart
Now that we have our state store read and that we generated our code using Mobx code generator all that left to do is hook it all together like this :
现在,我们已经读取了状态存储,并且使用Mobx代码生成器生成了代码,剩下要做的就是将它们钩在一起,如下所示:
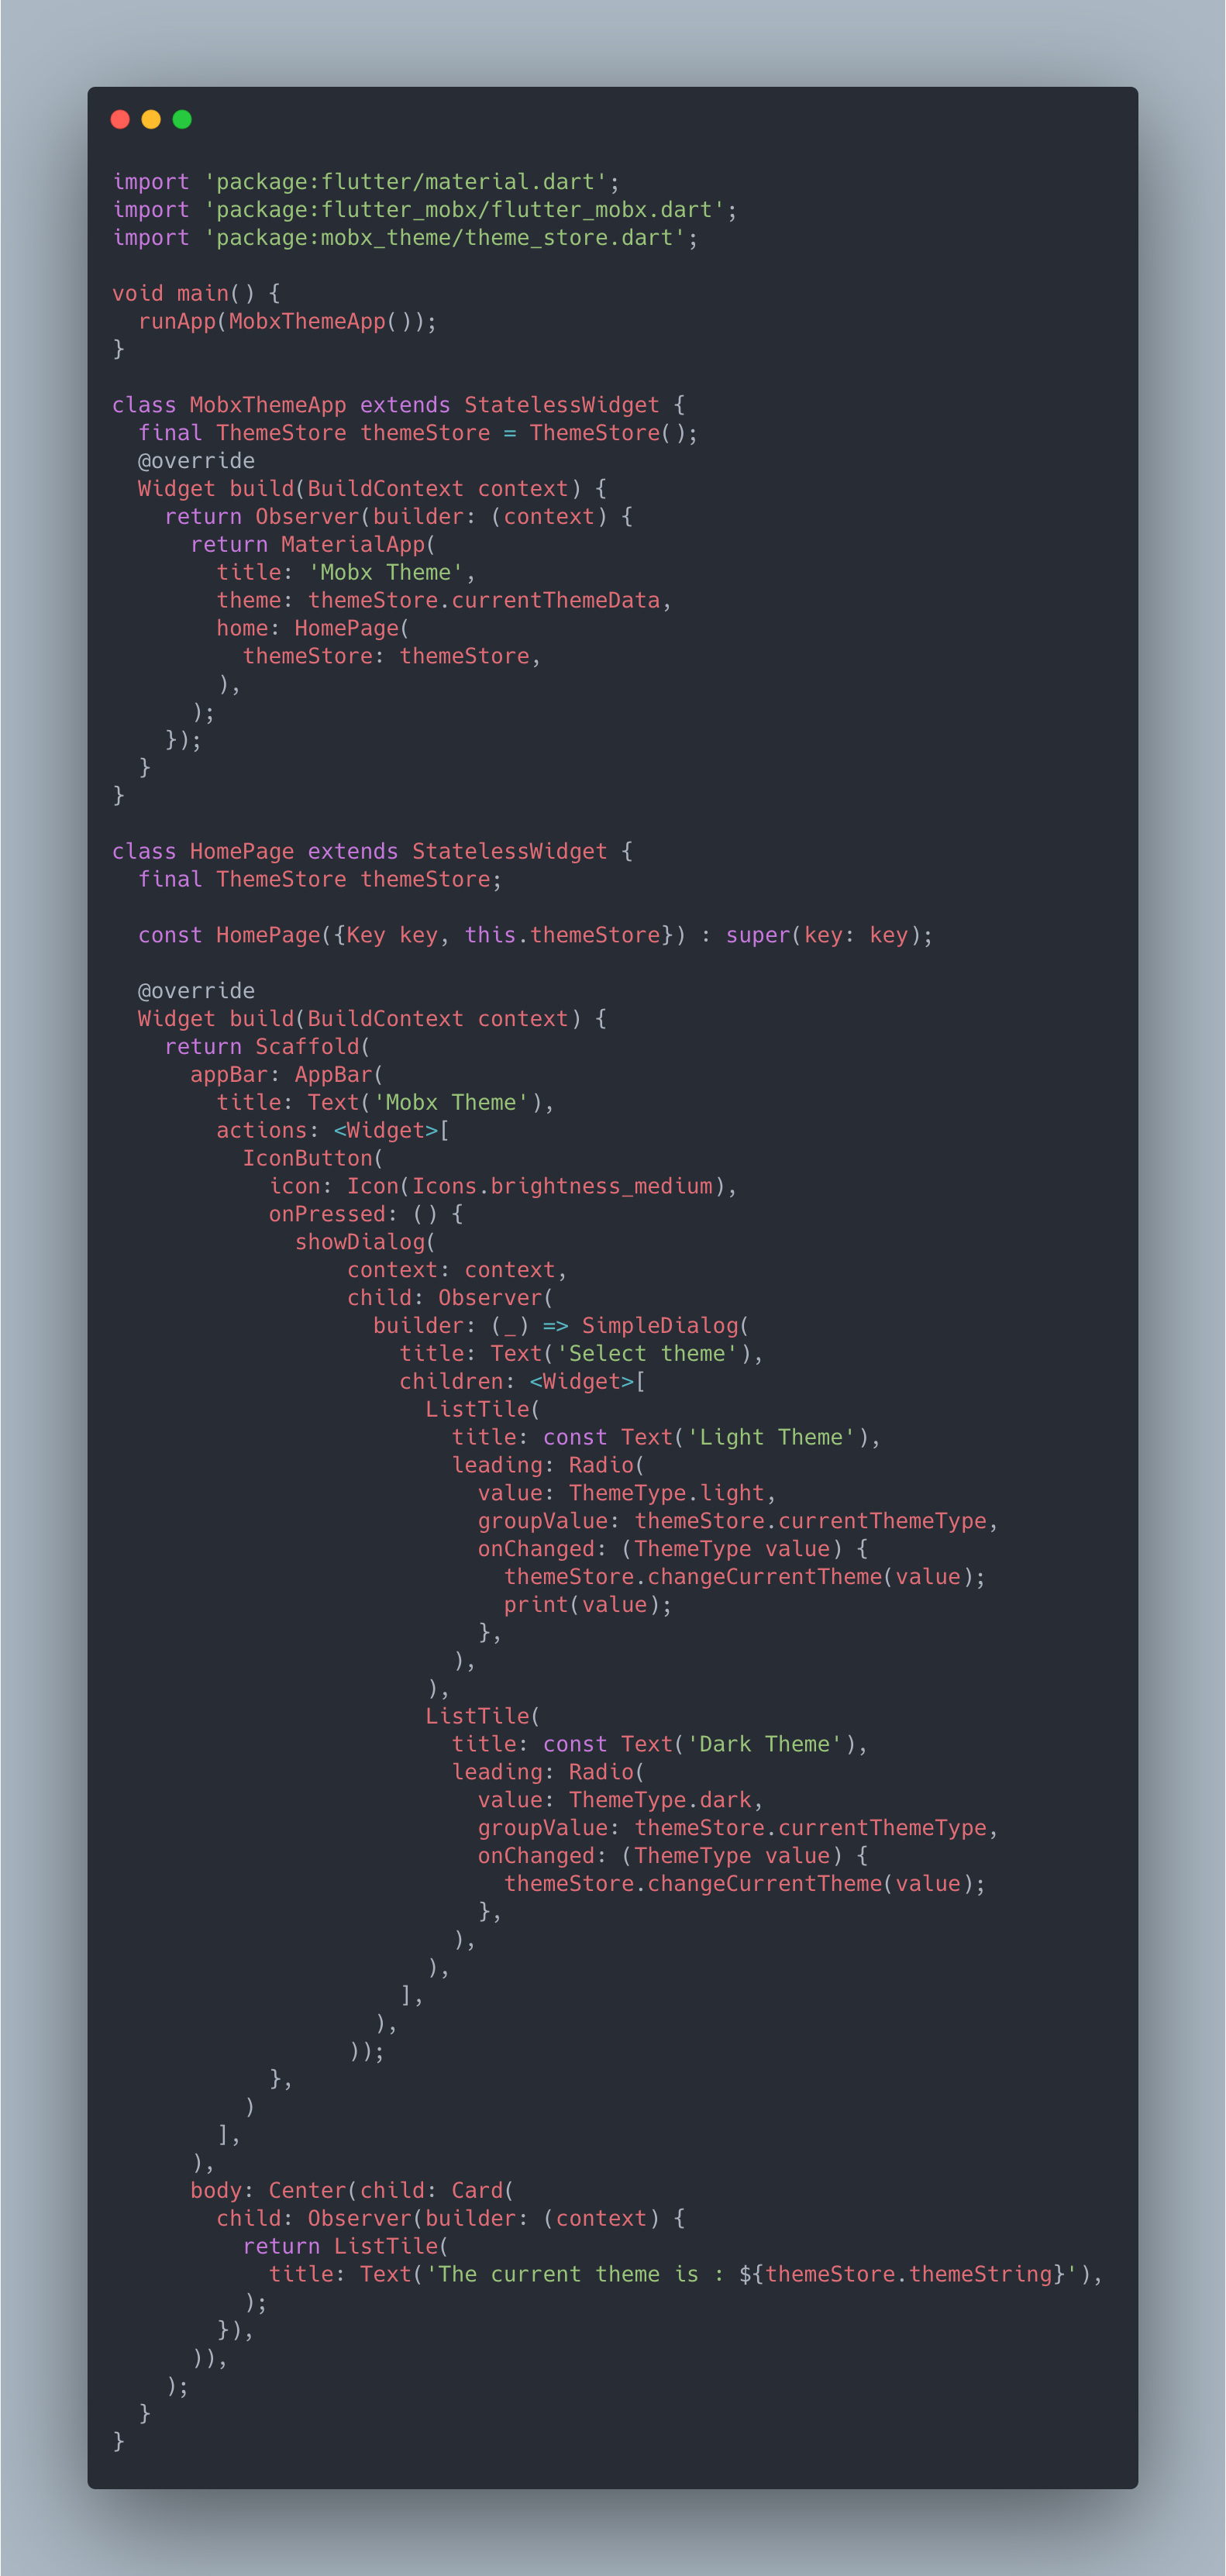
As you see from the code above we have a new Widget called Observer this widget is used by Mobx to trigger a rebuild whatever in the build method of the Observer whenever there is a change to our state (Observable/Computed).
从上面的代码中可以看到,我们有一个名为Observer的新小部件,Mobx使用此小部件在状态变化(可观察/已计算)发生变化时触发Observer的build方法中的任何内容。
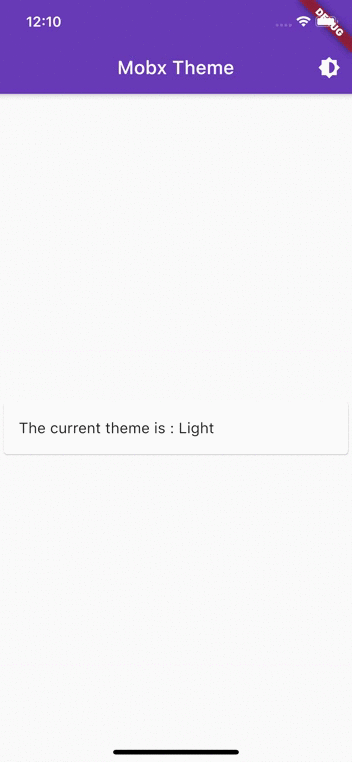
And for the final result :
对于最终结果:
从不同页面更改主题: (Changing theme from different page :)
What if we wanted to change our theme from another page? A simple solution is to inject our state store down the widget tree, but what if we have multiple state store? doing that is not very big projects might have some very serious performance issues, debugging becomes very hard and let's be honest it's not very pretty.
如果我们想从另一个页面更改主题怎么办? 一个简单的解决方案是将状态存储注入小部件树,但是如果我们有多个状态存储怎么办? 这样做不是很大,项目可能会遇到一些非常严重的性能问题,调试会变得非常困难,老实说,它不是很漂亮。
Provider to the rescue
救援人员
A more elegant solution is to Mobx + Provider, the Provider package allows us to inject our store and retrieve them anywhere from our widget tree. The code below demonstrates how we can do that.
对于Mobx + Provider,更优雅的解决方案是,Provider包允许我们注入商店并从小部件树中的任何位置检索它们。 下面的代码演示了我们如何做到这一点。
The first thing we need to do is to add the Provider package dependency into our project :
我们需要做的第一件事是将Provider包依赖项添加到我们的项目中:

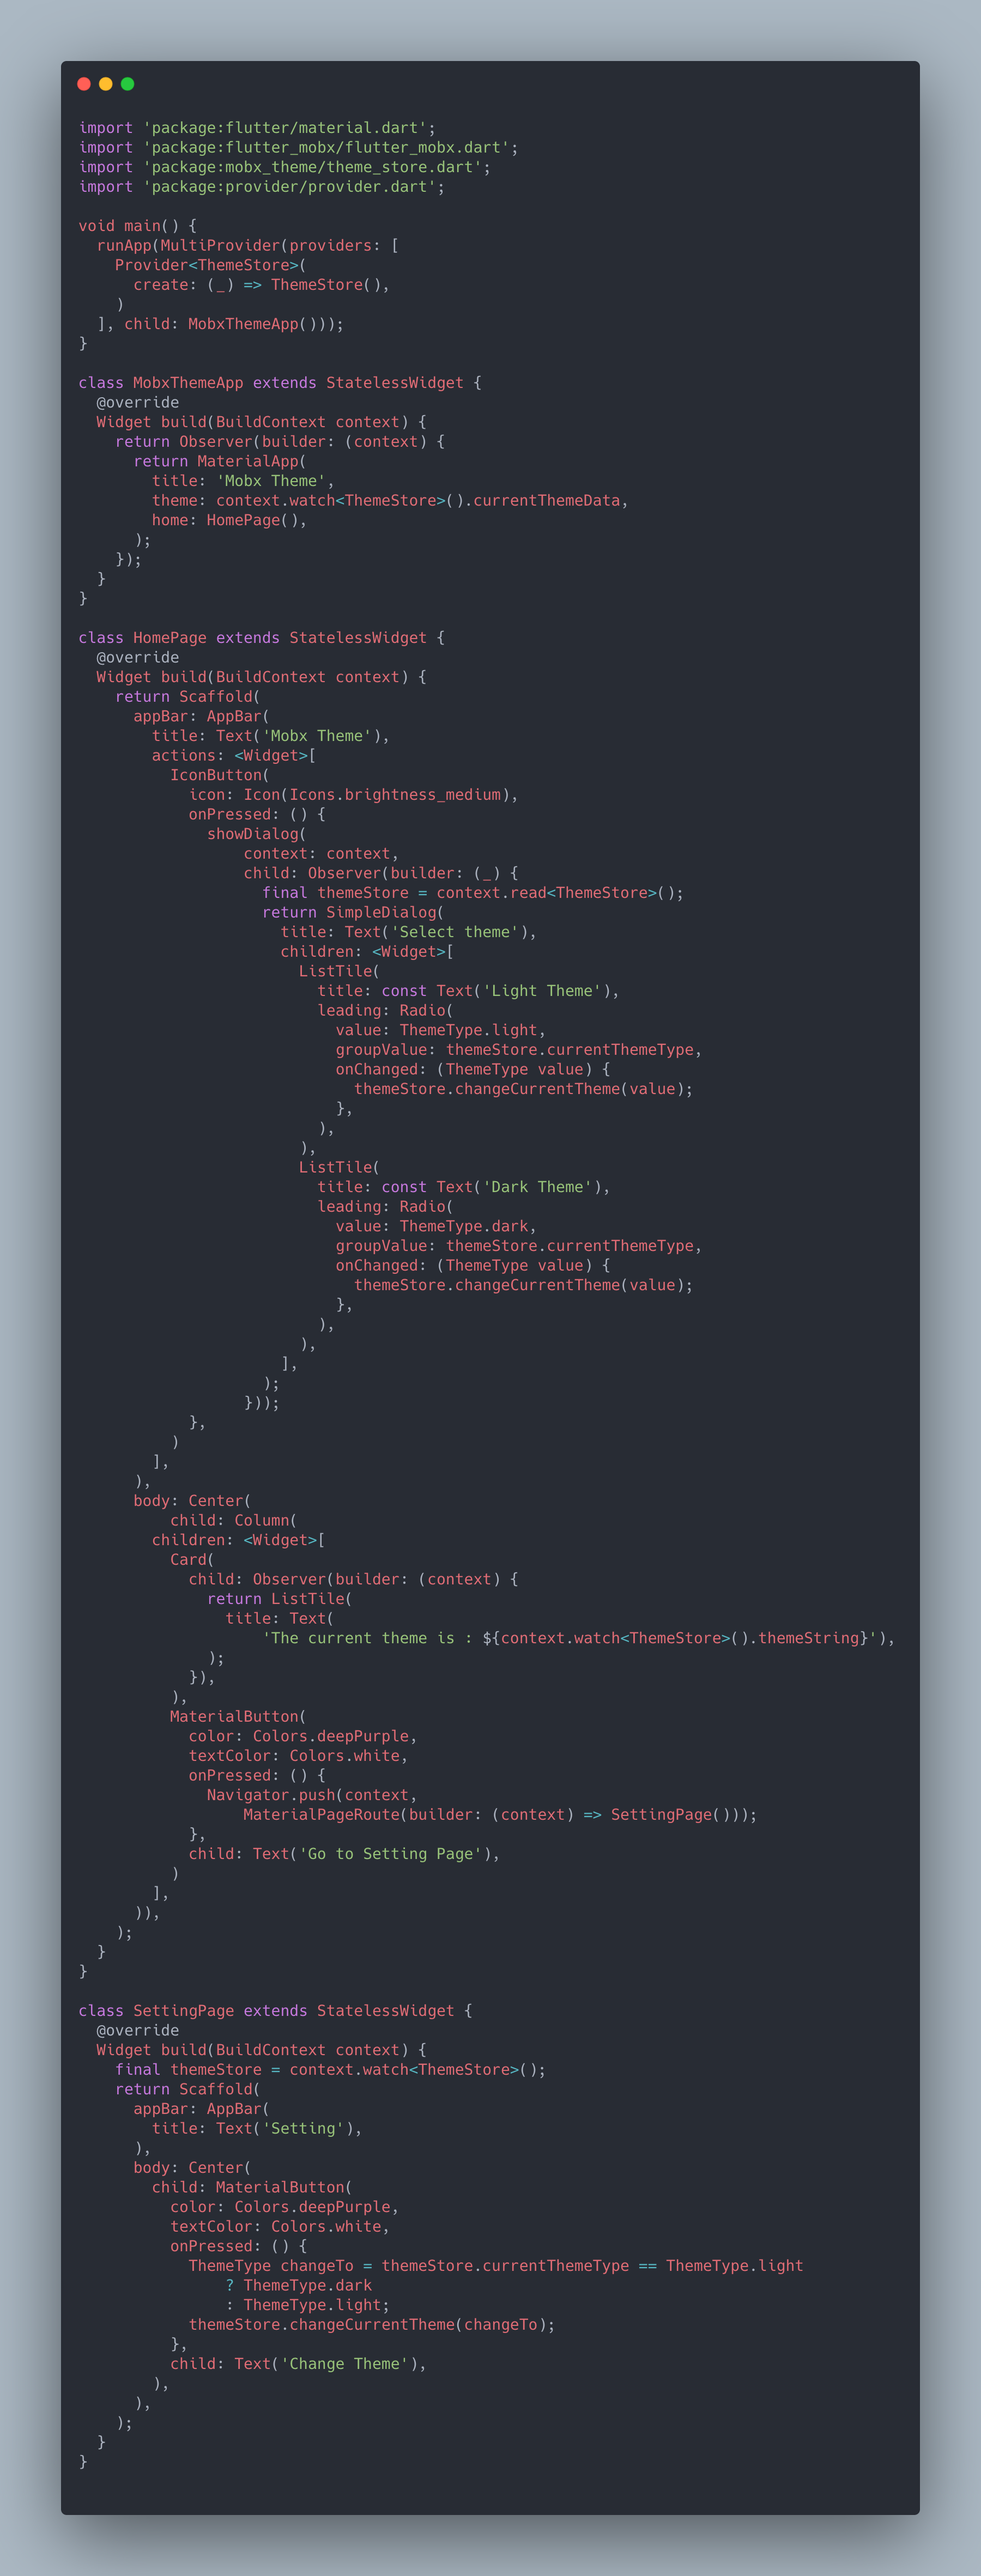
After that, we need to inject our Mobx store in our widget tree using Provider. as a habit I always use MultipleProvier and I inject all of my stores at the root of my application. To retrieve our stores down the widget tree Provider have three ways to do that :
之后,我们需要使用Provider将Mobx存储注入到我们的小部件树中。 作为一种习惯,我总是使用MultipleProvier,并将所有商店注入应用程序的根目录。 要通过小部件树提供程序检索我们的商店,可以通过以下三种方法进行:
context.watch<T>(), which makes the widget listen to changes onT
context.watch<T>(),它使小部件侦听T上的更改
context.read<T>(), which returnsTwithout listening to it
context.read<T>(),它不听即返回T
context.select<T, R>(R cb(T value)), which allows a widget to listen to only a small part ofT.
context.select<T, R>(R cb(T value)),它允许小部件仅监听T一小部分。
Our new code will look like this :
我们的新代码将如下所示:
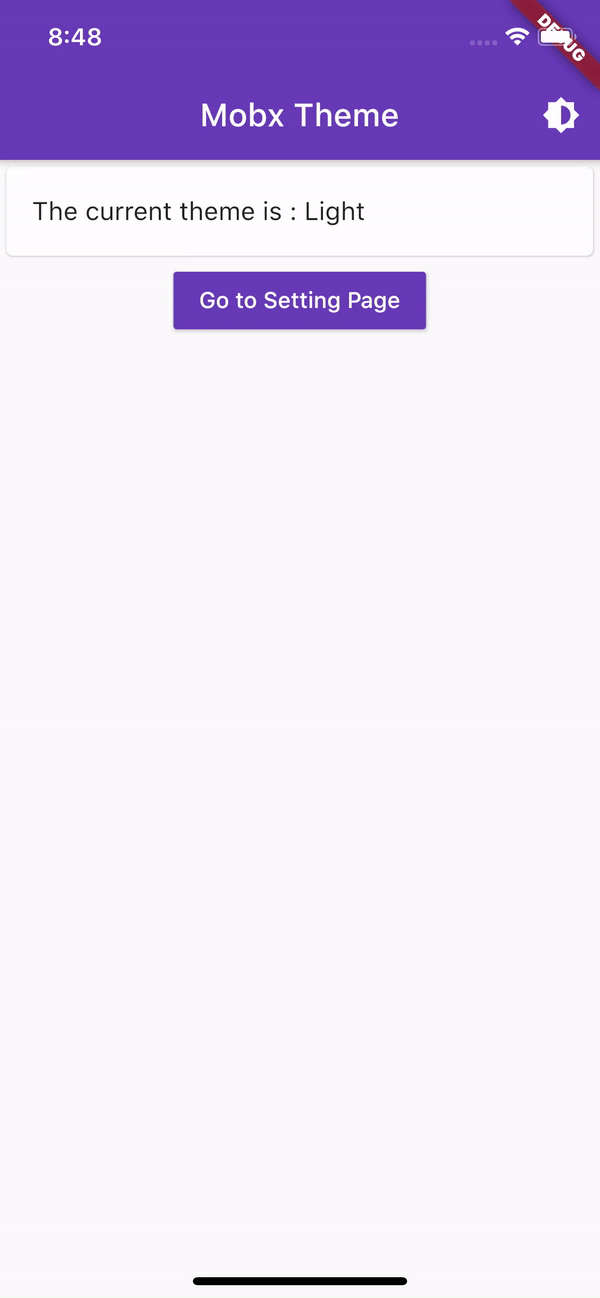
And the final result should look something like this :
最终结果应如下所示:
结论: (Conclusion :)
In a sea of the state management solution for Flutter applications, Mobx is my go-to solution for my state management needs. I find it very powerful and very easy to use, which makes Flutter development a very enjoyable experience.That’s it for now, you’ll find the complete code for this article in the Github repository down below. Thank you for reading!
在针对Flutter应用程序的状态管理解决方案中,Mobx是我满足状态管理需求的首选解决方案。 我发现它非常强大且易于使用,这使得Flutter开发成为非常令人愉快的体验。仅此而已,您可以在下面的Github存储库中找到本文的完整代码。 感谢您的阅读!
flutter mobx


 1290
1290


 被折叠的 条评论
为什么被折叠?
被折叠的 条评论
为什么被折叠?
 到【灌水乐园】发言


